John Weber, a 70-year-old from England, was given a metal mug by his grandfather in 1945. Though his grandfather had a “good eye” for antiques, John never thought the metal mug was worth much. He played with it as a child, and even used it as a target for his air rifle. The mug, assumed to be brass, has languished in a shoe box under Weber’s bed for decades.
Well, it turns out Weber’s old mug may be the world’s most expensive plinking target! The cup is actually made of solid gold, and is a rare, ancient artwork, crafted over 2300 years ago. The unusual mug, decorated with twin, opposite-facing female heads, was appraised with a value exceeding one-quarter million dollars ($250,000)!
According to news reports, Weber decided to have the old mug (thought to be brass) appraised when he moved from his house. He was shocked to learn that the mug is a Persian gold treasure, beaten out from a single sheet of gold before the time of Alexander the Great. Experts said the type of gold and the way the cup was hammered was “consistent with Achaemenid gold and gold smithing” dating back to the third or fourth century BC. The Achaemenid Empire ruled most of the Middle East and was conquered by Alexander the Great in 330 BC. Could this cup be one of Alexander’s war trophies? What stories could it tell from the past 2300 years?
Ancient Gold Cup Brings $99,000 at Auction
The rare cup was sold at auction by Duke’s Auction house in southwest England in June, 2008. Though the Cup was valued much higher by experts, it only fetched £50,000, or roughly $99,000 U.S. Dollars (at 2008 exchange rates). John Webber said he was still very pleased with that result.
Forum member Rick from Louisiana (aka RMulhern) has rigged up a fantastic target for long-range shooting. Rick, a long-time competitive Palma shooter, had a large 72″x72″ steel target fabricated with two separate center rings that are equivalent to the official paper Palma/Creedmoor target. He says he’s “shot a lot of Palma on that target, as well as lots of Black Powder Cartridge (BPCR) rounds”. The big steel target works great when Rick shoots his Sharps 45/110 BPCR at 800 to 1000 yards. The large steel background (painted white) helps Rick see and hear his hits. If you understand the high-arching trajectory of 500+ grain projectiles shot from a 45/110, you know it can take a few rounds to get Point of Impact dialed in.
Rick reports: “These are two of my favorite rifles to shoot: a M1874 Shiloh Sharps in caliber 45/110 (2 7/8) made in Big Timber, Montana by Kirk Bryan and family. The other is a 6.5×47 Lapua on a blue-printed M700 action with 1:8.5″-twist Krieger barrel and F5 McMillan Tactical stock. Many of the shooters that take up BPCR have a tendency to get away from their smokeless powder rifles in favor of the blackpowder game. Frankly I have the best of both worlds as I enjoy shooting both (smokeless and BPCR), although I must admit that I probably spend the majority of my time on the range with the Sharps rifles these days.” (Rick’s pretty good with his Sharps by the way — he recently shot a 95, 96, and 100 (clean) for 3×10 shots at 800 yards.)
Gongzilla: $1000 Worth of Steel with Three Plate Layers
Rick tells us: “Here’s the deal — everything is steel! The large plate is 72″x72″ and the black bull is 44″ diameter. The 20″-diameter central white bull is made from 1/2″-thick AR400 bull-dozer plating. That’s the same size as the regulation Palma/Creedmoor paper target. The white square and black bull are 3/8″-thick mild steel. Plates are off-set 2″ from each other. I welded a 2″ length of square tubing to the back of both plates and the bolt slides through and is attached to the large plate. I used 2 3/8″ upset tubing (oil field pipe) for the holder framing.” Rick says he invested about $1000.00 in metal for the target, but that was 15 years ago. Today the steel would be much more expensive.
Rick says the AR400 armor plate in the center bull is very strong: “You can shoot a .338 Lapua Magnum at 200 yards and it won’t damage the center bull”. The mild steel works well for the cast bullets Rick uses with his Sharps 45/110. Also, Rick says the mild steel is rugged enough for 6.5mm and .308 hollowpoint match bullets, if you’re at least 500 yards away. However, Rick told us, “If I would make [the target] again, I would make the black bull AR400 as well. [That way] you would never have to worry about big dents or beating the plate up at any distance. The AR400 is very tough steel. You can shoot a Sierra or Lapua HP bullet and they will just splatter.”
Rick told us: “I built this target with off-set clanger plates. The white clanger is AR400. Bullets just splatter!” Does he worry about hitting the bolt head? Not at all. Rick says: “When I hit the bolt head, I break my arm patting myself on the back!”.
Share the post "Gongzilla — Giant 72″x72″ Triple-Element Steel Gong"
St. Thomas Groundhog Shoot, Report by Jonathan Trivette
Nestled at the base of a mountain in south-central Pennsylvania is the St. Thomas Sportsmen’s Association. On a cool Saturday morning you’ll find some of the area’s best shooters at the monthly Groundhog Match. The match attracts shooters from Virginia, Maryland, West Virginia, and of course Pennsylvania.
It may not be the longest-yardage match in the area, but it can be the one of the toughest. The range is sloped up the mountain a little so the winds can be very tricky. Often times the three wind flags at 200, 300, and 400 yards will all be blowing in different directions.
A Class for Everyone
St. Thomas’s Groundhog match has five different classes: Heavy (Unlimited) Custom, Light Custom, Heavy Sporter, Light Factory Sporter, and an AR Class. The Heavy Custom is any gun over 17 pounds while Light Custom is any gun up to 17 pounds. The Heavy Sporter is any factory gun that has a heavy/varmint barrel on it. The Sporter class is any factory rifle that has a light profile barrel on it. And the AR class is any AR style rifle. CLICK HERE for Match Rules.
Groundhog Match Format
Signups start at around 7:00 am the day of the match. During sign-up you’ll choose a bench from the 20 available benches. The cost is $15 per gun and you can shoot as many guns as you would like. I’ve shot as many as four different guns but that makes for a busy day. For the Heavy Custom and Light Custom you will shoot 5 shots for score at 200, 300, and 400 yards. In the Heavy Sporter class you will shoot 5 shots for score at 100, 200, and 300 yards. In the Sporter and AR class you will shoot 3 shots for score at 100, 200, and 300 yards.
The Targets feature a groundhog with scoring rings on the left side and 5 practice rings on the right side. Shooters get as many practice shots as they want, subject to a time limit. The three relays run 6 minutes, 6 minutes and 9 minutes respectively.
The match is very well-organized yet has a “laid-back” feel. The first relay starts at 9:00 am and the match is usually over around 1:30 pm. There’s a covered picnic table area for socializing with fellow shooters while waiting on your relay. They have doughnuts and coffee in the morning and usually have some very good chili and hot dogs (for lunch) in the concessions area.
Groundhog Match Results April 16, 2016
On Saturday the weather was perfect and conditions were very good early on. However, by the time the last relay rolled around, mirage made it difficult to see. Ben Brubaker obviously had less trouble than most finishing 1st (143.02) and 2nd (143.02) in the Heavy Custom Class and 1st (144.04) and 3rd (142.04)in the Light Custom class using a 6mm Dasher in both classes. Bob Daron won the Heavy Sporter class with a score of 144.04 followed by Fred Kaminsky with a 142.06. Sporter class proved to be a family affair, with the Bollinger brothers, Glenn (87.01) and Bob (83.02) finishing first and second. We had one junior shooter on Saturday, 7-year-old Lydia Funk. The talented yound lady shot a 68 in Sporter class with her .223 Rem.
You may have missed the first Groundhog Shoot of the year, but there are several other chances for you to get out and test your skills against some of the best shooters in the region. St. Thomas Sportsmen’s Assn. has one shoot a month until October on the second Saturday of each month. Don’t think you have to be a professional shooter to come to these matches. Take it from me as I started shooting these matches about five years ago with a $270 Savage sitting on top of homemade sand bags. The guys here are great to shoot with and are always willing to help out a fellow shooter. They made me feel right at home and always helped me when I have any questions. I started doing this to become a better shooter for deer hunting. I continue to do it because I fell in love with the sport. So if you are looking for something to do on the second Saturday of the month come out and test your shooting skills and enjoy the fellowship of like-minded shooters.
CREDIT: We want to thank Jonathan Trivette for supplying this story and the photos. We welcome reader submissions such as this.
Share the post "Fun Shoot — The St. Thomas Pennsylvania Groundhog Match"
Each Wednesday, the U.S. Army Marksmanship Unit publishes a reloading “how-to” article on the USAMU Facebook page. On older “Handloading Hump Day” post covers removal of military primer pocket crimps. If you ever use surplus military brass, you really should this article. It contains vital information “learned the hard way”. The writer has tried many different options for removing/swaging out crimps. He weighs the pros and cons of various methods and provides some advice that will save you time and headaches. Visit the USAMU Facebook page next Wednesday for more informative articles for handloaders.
A common question, and important issue with US GI surplus 5.56 brass is “what to do with the primer crimp?” Our Handloading Shop does not prime/re-prime GI 5.56 brass, as we receive it in virgin state (primed) and don’t reload it. However, our staff has extensive private experience handloading GI brass in our own competitive shooting careers, and have several tips to offer.
Once the brass is full-length sized and decapped, the staked-in ring of displaced metal from the primer crimp remains, and hinders re-priming. Some swaging tools exist to swage out this ring, allowing free access to the primer pocket. Some are stand-alone products, and some are reloading-press mounted. Early in this writer’s High Power career, he used the common press-mounted kit several times, with less than stellar results.
Setting Up Swaging Tools
Surplus brass tends to come from mixed lots, and primer crimp varies from very mild to strong. Also, primer pocket dimensions vary. So, setting up this “one size fits most” tool involves trying to find a happy medium for a selection of different types of brass in your particular lot. Some are over-swaged, some under-swaged, and some are “Just Right.” Overall, it was a time-consuming and sub-optimal process, in this writer’s experience.
Cutting Out the Crimp Ring with a Chamfer Tool
[After trying swaging tools] this writer evolved to using the ubiquitous Wilson/RCBS/Other brands chamfer and deburring tool to cut out only the displaced crimp ring at the top of the primer pocket. One caution: DON’T OVER-DO IT! Just a little practice will let the handloader develop a “feel” for the right degree of chamfer that permits easy re-priming without removing so much metal that primer edges start to flow under pressure. For this writer, it was three half-turns of the tool in the primer pocket, with medium pressure.
Here, as with all bulk reloading operations, mechanization is our friend. A popular reloading supply house has developed an inexpensive adaptor that houses the chamfer/deburr tool (retained by an allen screw) and allows mounting in a hand drill or drill press. This speeds the operation significantly, as does use of one of the popular Case Preparation Stations that feature multiple powered operations. (Say good-bye to carpal tunnel syndrome and arthritis!)
One advantage of chamfering the primer pockets lightly to remove remnants of primer crimp, vs. swaging, is that primer pockets are not loosened in this process. US GI (usually LC) NATO 5.56 brass has a great reputation for longevity due to the superior hardness of the case head vs. some softer brands of commercial brass. This means the brass will stand up well to multiple full-pressure loads without loosening primer pockets, and the chamfering method helps support this benefit.
Powered Case Prep Centers — What to Look For
A word of advice (often learned the hard way) — think carefully before jumping on the “latest/greatest” case prep center. One with a proven, long-time track record of durability and excellent customer support has a lot going for it, vs. the flashy “new kid on the block.” Analyze the functions each case prep center can support simultaneously — i.e., can it chamfer, deburr and clean primer pockets all at the same time, without having to re-configure?
Do the tool-heads that come with it look truly functional and durable? If not, can they be easily replaced with proven or more-needed versions, such as a VLD chamfer tool, or a solid/textured primer pocket cleaner rather than a less-durable wire-brush type?
Tips for Priming with Progressive Presses
When re-priming, a couple of factors are worth noting. When re-priming using either single-stage presses, hand tools, or bench-mounted tools (such as the RCBS bench-mounted priming tool), precise alignment of the primer pocket entrance with the primer is easily achieved, and priming goes very smoothly. When using certain progressive presses, due to the tolerances involved in shell-heads, etc., one may occasionally encounter a primer that isn’t quite perfectly aligned with the primer pocket.
If resistance is felt when attempting to re-prime, DO NOT attempt to force the primer in — doing so can be dangerous! Rather, just exert SLIGHT upward pressure to keep the primer in contact with the case-head, and with the support hand, move the case back/forth a trifle. The primer will drop into alignment with the primer pocket, and then prime as usual. After priming, check each seated primer by feel. Ensure it is below flush with the case head (cleaning primer pockets helps here), and that there are no snags, burrs or deformed primers.
More Info on Primer Pocket Swaging
For more information about removing military crimps in primer pockets, we recommend you read Get the Crimp Out on the Squibloads Gun Thoughts Blog. This is a detailed, well-illustrated article that shows how to use various primer pocket reamers/cutters. It also has a very extensive discussion of swaging using CH4D, RCBS, and Dillon tools. The Squibloads author had much better luck with swaging tools than did the USAMU’s writer — so if you are considering swaging, definitely read the Squibloads article.
The illustration of primer pocket types is from the Squibloads Blog Article, Get the Crimp Out.
Share the post "How to Remove the Primer Crimp in Military Cartridge Brass"
Are you trying to decide what components to use for your next F-Class build, or are you looking to upgrade your current rig? Wonder what the “big dogs” in the sport have selected as their hardware? Here’s what United States F-Open team members are using. The most popular chambering is the .284 Winchester, followed by the 7mm Walker (a 40° .284 Winchester Improved). Kelbly and BAT actions are the most popular, and nearly all team members are using cut-rifled barrels. A wide variety of stocks are used, with PR&T holding a slight edge over second-place McMillan.
At the request of our readers, we provide select “Deals of the Week”. Every Monday morning we offer our Bargain selections. Here are some of the best deals on firearms, hardware, reloading components, and shooting accessories. Be aware that sale prices are subject to change, and once clearance inventory is sold, it’s gone for good. You snooze you lose.
1. Grafs.com — Magnetospeed Sporter $179.99
If you have been waiting to get a Magnetospeed… wait no longer. Priced at just $179.99 at Grafs.com, the Magnetospeed Sporter model costs less than half as much as Magnetospeed’s V3 models. This chronograph attaches directly to your barrel so you don’t have to go downrange to position tripods and set up skyscreens. For most people the Sporter Model contains all the features they need. Using Magnetspeed’s XFR adapter (sold separately), data can be transferred easily from the display module to your mobile device. READ Magnetospeed Sporter Review.
The Hornady Lock N Load AutoCharge Electronic Scale/Dispenser is now on sale for just $169.99 at Natchez Shooters Supply. That’s the lowest prices we’ve seen on this product in a long time, making this a real bargain. If you are looking for an affordable combination digital scale and powder dispenser, this is very attractive pricing. By comparison, the RCBS ChargeMaster now sells for $349.99 at MidwayUSA. That means you can save $180.00 by buying RED instead of GREEN.
Here’s a very cool semi-auto rimfire rifle from Russia. The modern design of the Baikal MP161K is very ergonomic, making it useful for off-hand shooting. It has an adjustable comb and adjustable LOP. We tried it for some informal silhouette shooting and the testers like it. On the bench the flat “toe” in the rear of the stock works well in the bags. At $229.99, this rifle costs less than a Ruger 10/22. Out of the box we think it’s a better rifle — with a better stock and better trigger. It also comes with a scope rail AND iron sights. A 10-round magazine is included.
4. Walmart — Plano 4-Pistol, Two-Level Hard Case, $9.99
This Plano Protector Four Pistol Case features three layers of high-density foam that allow the pistols to rest securely inside. The construction is pretty tough with durable latches. A tab allows the case to be locked with a small padlock. Overall dimensions are: 16.7″ Long 14.5″ Wide X 6″ Deep.
5. Amazon — Adventure First Aid Kit, $29.95
Everybody should have a First Aid Kit, and this unit is a very good deal for the money. It offers 82 medical supplies for just $29.95 (Marked down from $59.95 this week). The compact red bag is crafted from heavy duty, water resistant 600D Oxford Cloth. The bag has large zips for convenience, plus loop hole attachments, so you can attach it to a belt or the outside of backpacks. All medical supplies are clearly labelled. The kit included a empty square pocket for special personal medical supplies or medications.
6. Boyds Gunstocks — Savage A17 Replacement Stocks
Boyds Gunstocks now offersSavage A17 replacement gunstocks in multiple styles: Savage Classic, Featherweight Thumbhole, Heritage, Platinum, Prairie Hunter, Pro Varmint, and Varmint Thumbhole designs. Five of these styles are shown in the photos above. For field use, we like the Varmint Thumbhole because it has a comfortable grip and a longer, straight fore-end that works well with either sandbags or bipod. For target work, we favor the Pro Varmint stock ($129.00). This stock features a relatively straight toe on the buttstock that is very steady on a rear bag.
7. Amazon — Bushnell 3-9x40mm Bushnell for $112.00
No, that’s not a misprint. This 3-9x40mm Bushnell scope, optimized for .223 Rem rifles, is just $112.00 right now at Amazon.com. The price on this scope was slashed more than $140.00. Now it’s priced 56% below the regular price. Act soon as this offer won’t last long. Note: This super low $112.00 price may not come up using Amazon’s internal search. You need to click the Amazon Private Sale Link which give you a list of all pricing options.
8. Home Depot — 72″ Wood Workbench for $73.88
This patented Home Depot workbench assembles in a few minutes. Simply unfold the legs, pop in the shelf, and you are ready to start your project. Made from Premium 2×4 Hemlock fastened with glue and screws, this workbench is a great value. The bench (72″ wide x 35″ high x 22″ deep) can easily be stored when not in use. NOTE: The wood is unfinished (can be painted or stained).
Share the post "Bargain Finder 31: AccurateShooter’s Deals of the Week"
Here’s a new tactical-style rifle you should consider if you are involved in the Tactical/Practical shooting disciplines. It features a modern, adjustable Archangel stock with the smooth, made-in-Japan Howa 1500 action, outfitted with a detachable 10-round box magazine.
Legacy Sports, distributor for Howa rifles, is offering the new Howa Archangel Rifle in .223 Remington and .308 Winchester. The ambidextrous, carbon-reinforced polymer stock features a click-adjustable cheek-riser, adjustable length-of-pull, grip storage compartment, plus front/rear quick-detach flush cups. There is also a clevet, integrated, push-button bipod attachment system. The Howa actions mate precisely into the stock and ride on aluminum pillars.
In .223 Rem or .308 Win, the complete rifle, with either 20″ or 24″ barrel, starts at $915.00 MSRP, including 10-round mag. We expect the actual street price to be around $800.00. That makes this a more affordable alternative to the Ruger Precision Rifle, which is commanding $1200.00+ these days (if you can find one). Note: Archangel Mfg. offers this Howa 1500-compatible stock in Black, OD Green, and Desert Tan, but it appears that the initial Legacy Sports complete rifle will be in black only. These rifles are fitted with the very good HACT adjustable two-stage trigger and 3-position safety. The Howa Archangel rifle is also available (for about $230 more) in a scoped package with a 4-16x50mm Nikko Sterling Scope (see below). For more information call Legacy Sports at 1-800-553-4229 or visit LegacySports.com.
Note: If you already own a rifle with a Howa 1500 barreled action, you can purchase the Archangel AA1500 stock separately (MSRP $355.99) from Arizona-based Archangel Manufacturing. This company also offers similar stocks for Rem 700, Springfield M1A, and K98 Mauser barreled actions, starting at just $202.99 for the Mauser variant.
Share the post "New Howa Tactical Rifle in Archangel Adjustable Stock"
How would you like to be able to locate any rifle range in North America in a matter of seconds? That it now possible with the mobile Where To Shoot App, available FREE for both iOS (Apple) and Android devices.
The Where To Shoot App quickly locates shooting ranges near you, drawing on North America’s most comprehensive directory of shooting ranges. Users can search by current location, state, or zip code and find specifics about each range, including shooting activities offered. And once you locate a range with the App, you can call up a summary of range facilities and get driving directions to the range.
The app is modeled after NSSF’s popular WhereToShoot.org® website and is updated frequently with range information in every U.S. state and Canadian province. Once you’ve location a place to shoot, the App helps you get directions to the range. The App also includes video tips for shooters, news, and firearm-safety information.
Download the app via the links above or by visiting wheretoshoot.org on your mobile device.
The NSSF’s Where To Shoot mobile App has topped 100,000 downloads. The app, which rose to No. 4 on the Apple App Store’s list of free sports Apps, has been a hit with target shooters and gun owners nationwide. This can save you time when looking for a place to shoot.
Share the post "FREE Smart-Phone App Locates Gun Ranges in USA and Canada"
To succeed in long-range shooting matches, given the high level of competition these days, you’ll need solid wind-reading abilities. We’ve found an article by SFC Emil Praslick III, retired USAMU Service Rifle coach and U.S. Palma Team Coach, that can help you make better wind calls in competition.
Emil Praslick, now retired from the U.S. Army, is considered one of the best wind gurus in the United States, if not the world. During his service with the USAMU he authored an excellent two-part article on wind reading that is available on the CMP (Civilian Marksmanship Program) website. Both articles contain helpful illustrations, and are “must-read” resources for any long-range shooter–not just Service Rifle and Highpower competitors.
Part One covers basic principles, tactics, and strategies, with a focus on the 200-yard stages. Emil writes: “There are as many dimensions to ‘wind reading’ as there are stages to High Power competition. Your tactical mindset, or philosophy, must be different for the 200 and 300 yard rapid-fire stages than it would be for the 600 yard slow-fire. In the slow-fire stages you have the ability to adjust windage from shot to shot, utilizing the location of the previous shot as an indicator. Additionally, a change to the existing conditions can be identified and adjusted for prior to shooting the next shot.”
In Part Two, Praslick provides more detailed explanations of the key principles of wind zeros, wind reading, and the “Clock System” for determining wind values: “The Value of the wind is as important as its speed when deciding the proper windage to place on the rifle. A 10 MPH wind from ’12 o-clock’ has No Value, hence it will not effect the flight of the bullet. A 10 MPH wind from ‘3 o’clock’, however, would be classified as Full Value. Failure to correct for a Full Value wind will surely result in a less than desirable result.”
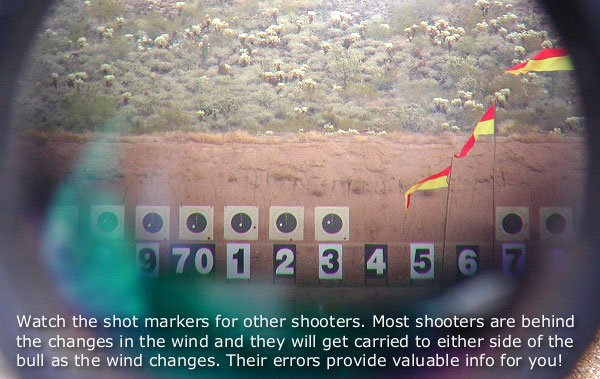
Praslick also explains how to identify and evaluate mirage:
Determine the accuracy of the mirage. Mirage is the reflection of light through layers of air that have different temperatures than the ground. These layers are blown by the wind and can be monitored to detect wind direction and speed.
Focus your scope midway between yourself and the target, this will make mirage appear more prominent. I must emphasize the importance of experience when using mirage as a wind-reading tool. The best way to become proficient in the use of mirage is to correlate its appearance to a known condition. Using this as a baseline, changes in mirage can be equated to changes in the value of the wind. Above all, you must practice this skill!
Click HERE for more excellent instructional articles by Emil Praslick and other USAMU Coaches and shooters.
Share the post "Brain Trust: Emil Praslick Offers Advice on Wind Reading"
Brownells Inc., the 77-year-old, Iowa-based catalog/estore gun parts vendor is opening its first-ever retail store. The new retail outlet will operate in Grinnell, Iowa, adjacent to the Brownells’s large distribution center. The Grinnell retail store, the company’s first brick and mortar location, will sell firearms as well as a vast inventory of gun parts, reloading equipment, and shooting accessories. A grand opening event for the retail store is planned for Saturday, June 11, 2016. To learn more about Brownells’ new retail store call 641-236-0001 or visit www.Brownells.com/retail.
The new 7,000 square-foot retail store is attached to the 245,000 square-foot Brownells Distribution Center at 3006 Brownells Parkway in Grinnell, Iowa (just off I-80 at Mile Marker 182). The new retail shop will supplement the thriving Brownells.com webstore and mail-order catalog operations.
The new retail location will showcase 1,200 new and used firearms, plus a large selection of ammunition, optics, parts and accessories. The guns and gear will be presented in an upscale retail setting with wood accents and a taxidermy collection. Notably, customers who can’t find what they’re looking for on the shelves can easily order from the warehouse next door. Brownells promises that any of the nearly 100,000 firearms-related items will be delivered from warehouse to store in minutes.
“Our company has been family-owned and Iowa-based for 77 years,” said third-generation owner and CEO, Pete Brownell. “We’ve done business nationally and internationally for decades, but we’re excited to have an Iowa focus now with our retail store. What’s most unique about this store is that it’s located in the same walls as our distribution center. This equates to a fantastic customer experience and the best of both worlds; a beautiful retail store to transact and access to a huge selection of products unrivaled anywhere in the world.”
“One thing about Brownells that sets it apart from any other organization inside or outside the firearms industry is our return policy. Here’s how it is… it’s guaranteed forever. What this means is, if you buy [a product] from Brownells… whatever it is, it’s guaranteed forever. Not just lifetime, but forever.”
Share the post "Brownells Opens First-Ever Retail Store"
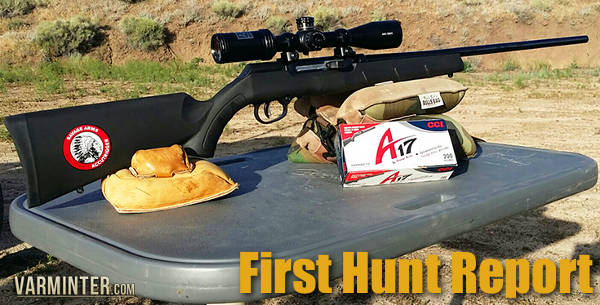
Varminter.com recently released a First Hunt Report on the new Savage A17 rifle. Savage’s new semi-auto .17 HMR has caused quite a stir. Accurate and affordable, the Savage A17 is also the first .17 HMR to feature a delayed blow-back action. We think the A17 may be the most important new rimfire rifle of 2015, so we were pleased to see that Eric Mayer, Editor of Varminter.com, put the new semi-auto Savage through its paces.
Mayer wanted to see how the new Savage would perform, accuracy-wise, and he also wanted to see how the A17 fared in the field. Mayer achieved one-MOA accuracy with the Savage A17 using the latest CCI-brand ammo, and he demonstrated the A17 is wickedly effective on ground squirrels. Below we’ve provided highlights from Varminter.com’s Savage A17 First Hunt Report.
The Giraud power trimmer indexes off the shoulder of the case. It is costly, but offers high production rates, trimming to length and chamfering in one operation.
The folks at PMA Tool, makers of arbor presses, neck-turning tools, and other case-prep tools, offer some good advice about case trimming on the PMA Tool Blog. Here we reprint a PMA blog post that explains case trimming basics and helps you choose the right case-trimming tool for your needs.
Case Trimming Basics
Trimming the cartridge case to the proper length is a crucial step in case preparation that should not be overlooked or underestimated. The cartridge case or the rifle can be damaged, or even worse you get badly injured. In most instances cases should be trimmed after firing and sizing. Trimming new brass is necessary for a lot of wildcats and can be beneficial in some instances, but by and large, trimming new brass is not necessary for most situations (unless you are neck-turning). Cases should be trimmed after you have sized the case, because the expander ball on the decapping pin can (and will) stretch the neck. Those of us who neck size should get into the habit of trimming after sizing as well. This is a good rule of thumb to go by, and hopefully it will keep you safe during the reloading and shooting process.
There are so many case trimmers out there that work, deciding which one is right for you can be confusing. Even though I have trimmed thousands of cases, using about every method possible, I can’t answer the question of what case trimmer is right for you because of all the variables that may be involved. I can, however shed some light on the subject.
The two most popular designs of trimmers either index (1) off the base or the head of the case, (2) off the shoulder or datum line of the case. There are pros and cons to each and it all depends on what you are willing to live with.
Indexing off the Base (Case Head)
Let’s talk about the first one I have listed, indexing off the base, or the head of the case. The pros to this method are that you can achieve a very accurate over all length and that is after all, what it is all about. The cons to this method are that you can get some variation doing it this way. Let me explain, the base is not always square to the body or can be damaged during firing especially if it is fired through a military style rifle with a very aggressive ejector. These cases should be discarded, but sometimes they can be overlooked. This condition can lead to an over all length that is incorrect. The case head being out of square will be corrected upon firing, however that case will wind up being shorter than the rest of your cases, possibly creating a difference in the neck tension on the bullet. The more you can do to eliminate variables in your reloads the better off you are going to be. This method can also be very slow, and if the user gets careless the result will be a inconsistent over all length.
Indexing off the Shoulder (Datum Line)
The second method I mentioned, trimming off the shoulder or the datum line of the case, has its pros as well. I have found this to be the quickest of the methods and very accurate as well. After the case has been sized through the die the dimensions (particularly the headspace) of the cases are usually very uniform and exact, this allows the case to be trimmed by indexing off the shoulder. This method can be done very quickly, by hand, or by powering either the case, or the trimmer. You also don’t have to worry about the case heads being out of square with the body using this method. Generally the trimming time is cut in half, and this leads to greater focus on the job, without becoming careless.
The PMA Micro-Adjust Case Trimmer indexes case length off of the shoulder of a properly fire-formed and full-length re-sized case. We accomplish this through the use of interchangeable Delrin™ inserts which capture the shoulder and neck of the case. This insert is contained in a spring-loaded tool head that rides on a linear bearing. When the case is captured within the tool head the tool head rotates along with the case, the spring allows for the case to self-align squarely to the cutter and allows you to control the feed rate into the cutter.
— Indexes off shoulder for easy, consistent trim length
— Fully rotating head with bearing for smooth operation keeps cuts square
— Large, ergonomic design fits the hand well
— Sharp carbide cutter for quick, smooth cuts with minimal bur
— Cases captured in Delrin™ (completely non-marring material)
— Spring loaded head allows complete control of rate of feed.
Our trimmer can be used in three ways. The first method utilizes our PMA Tool caseholder drivers and your power screwdriver, drill, case lathe, drill press or lathe. Trimming via this method the case is spun and fed into the trimmer while it is held in your hand. In the second method, the trimmer’s adjustment knob is removed (after adjusting and locking the setting) and the cutting shaft is chucked in a drill, drill press or lathe. Using this method, the case itself is held by hand and fed into the cutter. We’ve found this to be the quickest method to trim.
Summary
The choice is yours to make. I hope that this was some help to you, whether you are looking for your first trimmer or looking to replace the trimmer you have. Just remember to always put safety first and accuracy second, and you will start making little bug holes in no time.
Story Tip by EdLongrange. User Submissions are welcome.
Share the post "Helpful Advice on Case Trimming from PMA Tool"


 Forum member Rick from Louisiana (aka RMulhern) has rigged up a fantastic target for long-range shooting. Rick, a long-time competitive Palma shooter, had a large 72″x72″ steel target fabricated with two separate center rings that are equivalent to the official paper Palma/Creedmoor target. He says he’s “shot a lot of Palma on that target, as well as lots of Black Powder Cartridge (BPCR) rounds”. The big steel target works great when Rick shoots his Sharps 45/110 BPCR at 800 to 1000 yards. The large steel background (painted white) helps Rick see and hear his hits. If you understand the high-arching trajectory of 500+ grain projectiles shot from a 45/110, you know it can take a few rounds to get Point of Impact dialed in.

 St. Thomas Groundhog Shoot, Report by Jonathan Trivette
 The Targets feature a groundhog with scoring rings on the left side and 5 practice rings on the right side. Shooters get as many practice shots as they want, subject to a time limit. The three relays run 6 minutes, 6 minutes and 9 minutes respectively.


 Tips for Priming with Progressive Presses


 How would you like to be able to locate any rifle range in North America in a matter of seconds? That it now possible with the mobile Where To Shoot App, available FREE for both iOS (Apple) and Android devices.


 To succeed in long-range shooting matches, given the high level of competition these days, you’ll need solid wind-reading abilities. We’ve found an article by SFC Emil Praslick III, retired USAMU Service Rifle coach and U.S. Palma Team Coach, that can help you make better wind calls in competition.
 Part One covers basic principles, tactics, and strategies, with a focus on the 200-yard stages. Emil writes: “There are as many dimensions to ‘wind reading’ as there are stages to High Power competition. Your tactical mindset, or philosophy, must be different for the 200 and 300 yard rapid-fire stages than it would be for the 600 yard slow-fire. In the slow-fire stages you have the ability to adjust windage from shot to shot, utilizing the location of the previous shot as an indicator. Additionally, a change to the existing conditions can be identified and adjusted for prior to shooting the next shot.”