On our main AccurateShooter.com site, you’ll find a good article by GS Arizona on the Basics of Neck Turning. If you’re new to the neck-turning game, or are just looking for good tips on improving your neck-turning procedures, you should read that article. Below we offer some highlights and photos from the article, but you’ll need to read the whole story to view all the illustrations and follow all the procedures step by step.
Why Should You Consider Neck Turning?
Let’s assume that your rifle doesn’t have a tight neck chamber that requires neck turning; if you have a tight neck chamber, of course, the answer to the question is “because you have to”. For the rest of us, and that includes the vast majority of Highpower shooters, neck turning isn’t a requirement, but it can be a useful way to bring your ammunition a small but meaningful step closer to that pot of gold at the end of the rainbow: perfection. I’m not talking about a theoretical improvement, but a real one, an improvement that lies in equalizing and optimizing the neck tension of your loaded rounds. Inconsistent neck tension is a real contributor to increased muzzle velocity variance which itself is a significant factor in increased elevation dispersion at long range. So there’s our basic reason for neck turning: to equalize and optimize neck tension in order to reduce elevation dispersion.
The Tools of the Trade
Here you see everything I use and a bit more. The press, a cordless screwdriver (always plugged in, turning is tough on the old battery), a couple of K&M neck turners (one set up for 6mm, the other for .30 caliber) an expander for each size, some Imperial lube, an old toothbrush or two to keep the cutter clean, a handle with a caseholder (for those emergencies when the screwdriver dies and there’s just one more case to go!), steel wool and a tubing micrometer finish the list of tools. Hey, I left the dial calipers out of the picture! They’re always handy, keep them around, but they are useless for measuring neck thickness, so don’t try. I usually use an Optivisor magnifier while I turn necks, very handy for a clear view of what’s happening on the neck.
Expanding the Neck
Put some lube on the inside of the case neck and run it into the expander. Really, this isn’t hard. I prefer to expand each case immediately before turning it as opposed to expanding all the cases and then turning them. Brass is somewhat springy and will tend to go back toward its original size; therefore, by expanding and turning immediately, you are more likely to have all cases fit the mandrel with the same degree of tightness and to get a more consistent depth of cut.
Cutter Adjustment for Cut Depth and Length
All the tools I’ve seen have pretty good adjustment instructions. The only thing they don’t tell you is that you should have five to ten spare cases to get it right initially. Anything of the right diameter will do while you learn, for instance, just use that cheap surplus .308 brass to do initial setup and save the precious .30-06 for when you know what you’re doing. Be patient and make your adjustments slowly; you’ll need to set the cutter for thickness as well as length of cut (just into the shoulder). The depth of cut (brass thickness) takes a bit of fiddling, the length of the cut is generally easy to set.
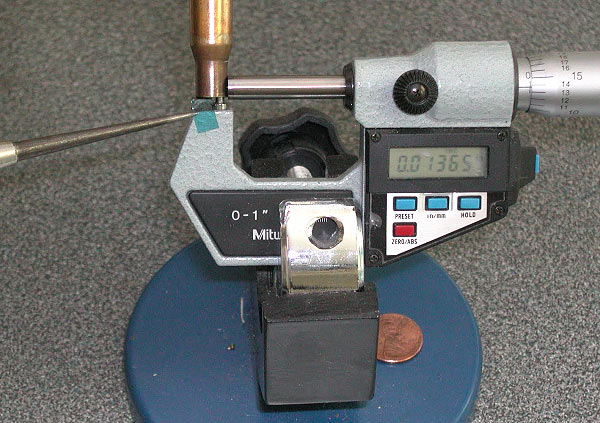
The Finished Product — A Perfectly Uniform Neck
If you read the whole article, and follow the procedures using quality tools, you should get very good results — with a little practice. To demonstrate, here’s an example of my finished, neck-turned brass. You’ll see there is a perfect, 0.0125″ thick neck. It’s very uniform around the circumference, usually I only see 1 or 2 ten-thousandths variance. Now, with the necks uniformed like this, we can select the bushing size that will give us our preferred neck tension and experiment with various levels of tension, secure in the knowledge that all of the cases will actually have the desired neck tension.
About the author — “GS Arizona” was the writing handle for German Salazar, a top-tier rifleman and gun writer. Sadly, German passed from a medical condition in 2022. German was instrumental in helping this website and our Forum get started, and we remember him as a very dear, valued friend.
German was a great individual, and a great asset to the sport. An attorney by trade, with an engineering background, German was one of the very best gun writers, who had high master shooting skills to match his writing abilities.
Share the post "Guide to Neck Turning — The Key Steps You Need to Follow"
There are many products used successfully for case lubrication for case sizing. And for neck-turning a variety of lubricants are favored. The video above explains the basics of case lubrication with die wax, and spray lubricants. Below we mention three products that have proven very effective. For cases that have a close fit to your chamber via custom FL dies, Ballistol works well and is easy to apply and remove. For neck-turning, some of our Forum members have had great success with some automotive lubricants
Three Good Lubricants You May Not Have Tried Before If you’re using a body die or a full-length sizing die, try using Ballistol (in the aerosol can) as a lube. It works GREAT without the tacky or gooey residue left by most case lubes. It will also clean off carbon residues on the neck as you lube the case. Just spray a little on a cotton patch (or your fingertips) and wipe each case before you run it up into the die. If you are using a steel neck bushing, be sure to wipe the neck as well. You can usually do a half-dozen BR-sized cases before you need to re-apply Ballistol on the patch. Ballistol is non-toxic, bio-degradeable, and will not harm your skin. It is very slippery, but can easily be removed with a rag or paper towel. Try it–you may retire your One-Shot. Ballistol can also be used to protect wood stocks.
Note, for heavy case-forming or necking up case necks, we still recommend a thicker lubricant, such as Imperial Die Wax. But for normal case sizing, after your neck has been expanded, Ballistol will do the job, and you won’t need to tumble the brass afterwards. All you need is a very thin layer of Ballistol, and this easily wipes off with a paper towel.
For Neck-Turning, Try STP Blend or Assembly Lube
For lubing the neck-turning tool mandrel while turning case necks, many folks use a blend of STP® Oil Treatment and Mobil 1 lube. Chuckw2 reports: “Try STP and Mobile 1 Synthetic oil in a 50/50 mixture. Very slick, you will need to tumble your cases after turning.” STP is a very thick lubricant, that flows and clings almost like honey. Jason reports the STP blend comes off easily in an ultra-sound bath, using a bit of detergent. At many retailers, STP is also available in a convenient 7-ounce tube, so you don’t have to buy a large bottle.
Another even cheaper option is assembly lubricant. For turning his case necks, RStreich uses assembly lube from an auto parts store. He notes: “The brand I have is reddish in color and kind of sticky like honey. It’s far better than the Imperial die wax I was using before.” There are a variety of types, both with and without moly additive, and you can select the viscosity you prefer if you sample a few brands. Be sure to clean out any lube residue from the inside of your necks when you have completed your neck-turning.
Share the post "Lubrication Products for Case Sizing and Neck Turning"
Readers who have just recently discovered the Daily Bulletin may not realize that AccurateShooter.com has hundreds of reference articles in our archives. These authoritative articles are divided into multiple categories, so you can easily view stories by topic (such as competition, tactical, rimfire, optics, shooting skills etc.). One of the most popular categories is our Technical Articles Collection. On a handy index page (with thumbnails for every story), you’ll find over 120 articles covering technical and gunsmithing topics. These articles can help you with major projects (such as stock painting), and they can also help you build more accurate ammo. Here are five popular selections from our Technical Articles archive.
Stress-Free Pillar Bedding. Richard Franklin explains how to do a top-quality bedding job, start to finish.
OnTarget Software Review. Our Editors test free software that measures shot groups with great precision. We explain how to use the program and configure advanced features.
Savage Action Tuning. Top F-TR shooter Stan Pate explains how to enhance the performance of your Savage rifle by optimizing the torque settings of the action screws.
Complete Precision Case Prep. Jake Gottfredson covers the complete case prep process, including brass weight sorting, case trimming, primer pocket uniforming, neck-sizing, and, case-neck turning.
Stock Painting Instructions. Step-by-step guide for stock painting by expert Mike Ricklefs. Mike shows both simple coverage and fancy effects.
Share the post "Access 120+ FREE Tech Articles — Pillar Bedding, Stock Painting, Case Prep, Neck Turning & More"
If you’re using a body die or a full-length sizing die, try using Ballistol (in the aerosol can) as a lube. It works GREAT without the tacky or gooey residue left by most case lubes. It will also clean off carbon residues on the neck as you lube the case. Just spray a little on a cotton patch (or your fingertips) and wipe each case before you run it up into the die. If you are using a steel neck bushing, be sure to wipe the neck as well. You can usually do a half-dozen BR-sized cases before you need to re-apply Ballistol on the patch. Ballistol is non-toxic, bio-degradeable, and will not harm your skin. It is very slippery, but can easily be removed with a rag or paper towel. Try it–you may retire your One-Shot. Ballistol can also be used to protect wood stocks.
Note, for heavy case-forming or necking up case necks, we still recommend a thicker lubricant, such as Imperial Die Wax. But for normal case sizing, after your neck has been expanded, Ballistol will do the job, and you won’t need to tumble the brass afterwards. All you need is a very thin layer of Ballistol, and this easily wipes off with a paper towel.
For Neck-Turning, Try STP Blend or Assembly Lube
For lubing the neck-turning tool mandrel while turning case necks, many folks use a blend of STP® Oil Treatment and Mobil 1 lube. Chuckw2 reports: “Try STP and Mobile 1 Synthetic oil in a 50/50 mixture. Very slick, you will need to tumble your cases after turning.” STP is a very thick lubricant, that flows and clings almost like honey. Jason reports the STP blend comes off easily in an ultra-sound bath, using a bit of detergent. STP is also now available in a convenient 7-ounce tube, so you don’t have to buy a large bottle.
Another even cheaper option is assembly lubricant. For turning his case necks, RStreich uses assembly lube from an auto parts store. He notes: “The brand I have is reddish in color and kind of sticky like honey. It’s far better than the Imperial die wax I was using before.” There are a variety of types, both with and without moly additive, and you can select the viscosity you prefer if you sample a few brands. Be sure to clean out any lube residue from the inside of your necks when you have completed your neck-turning.
Share the post "Try Ballistol Lube for Case Sizing, STP for Neck Turning"
On our main AccurateShooter.com site, you’ll find an excellent article by GS Arizona on the Basics of Neck Turning. If you’re new to the neck-turning game, or are just looking for good tips on improving your neck-turning procedures, you should read that article. Below we offer some highlights and photos from the article, but you’ll need to read the whole story to view all the illustrations and follow all the procedures step by step.
Why Should You Consider Neck Turning?
Let’s assume that your rifle doesn’t have a tight neck chamber that requires neck turning; if you have a tight neck chamber, of course, the answer to the question is “because you have to”. For the rest of us, and that includes the vast majority of Highpower shooters, neck turning isn’t a requirement, but it can be a useful way to bring your ammunition a small but meaningful step closer to that pot of gold at the end of the rainbow: perfection. I’m not talking about a theoretical improvement, but a real one, an improvement that lies in equalizing and optimizing the neck tension of your loaded rounds. Inconsistent neck tension is a real contributor to increased muzzle velocity variance which itself is a significant factor in increased elevation dispersion at long range. So there’s our basic reason for neck turning: to equalize and optimize neck tension in order to reduce elevation dispersion.
The Tools of the Trade
Here you see everything I use and a bit more. The press, a cordless screwdriver (always plugged in, turning is tough on the old battery), a couple of K&M neck turners (one set up for 6mm, the other for .30 caliber) an expander for each size, some Imperial lube, an old toothbrush or two to keep the cutter clean, a handle with a caseholder (for those emergencies when the screwdriver dies and there’s just one more case to go!), steel wool and a tubing micrometer finish the list of tools. Hey, I left the dial calipers out of the picture! They’re always handy, keep them around, but they are useless for measuring neck thickness, so don’t try. I usually use an Optivisor magnifier while I turn necks, very handy for a clear view of what’s happening on the neck.
Expanding the Neck
Put some lube on the inside of the case neck and run it into the expander. Really, this isn’t hard. I prefer to expand each case immediately before turning it as opposed to expanding all the cases and then turning them. Brass is somewhat springy and will tend to go back toward its original size; therefore, by expanding and turning immediately, you are more likely to have all cases fit the mandrel with the same degree of tightness and to get a more consistent depth of cut.
Cutter Adjustment for Cut Depth and Length
All the tools I’ve seen have pretty good adjustment instructions. The only thing they don’t tell you is that you should have five to ten spare cases to get it right initially. Anything of the right diameter will do while you learn, for instance, just use that cheap surplus .308 brass to do initial setup and save the precious .30-06 for when you know what you’re doing. Be patient and make your adjustments slowly; you’ll need to set the cutter for thickness as well as length of cut (just into the shoulder). The depth of cut (brass thickness) takes a bit of fiddling, the length of the cut is generally easy to set.
The Finished Product — A Perfectly Uniform Neck
If you read the whole article, and follow the procedures using quality tools, you should get very good results — with a little practice. To demonstrate, here’s an example of my finished, neck-turned brass. You’ll see there is a perfect, 0.0125″ thick neck. It’s very uniform around the circumference, usually I only see 1 or 2 ten-thousandths variance. Now, with the necks uniformed like this, we can select the bushing size that will give us our preferred neck tension and experiment with various levels of tension, secure in the knowledge that all of the cases will actually have the desired neck tension.
Share the post "ABCs of Neck Turning — Here is How It’s Done"
The PMA Neck Turning Tool, review by Danny Reever PMA Tool was founded by Matt Harris and Pat Reagin, two former employees of Fred Sinclair. They both worked their way through college working for and designing tools for Sinclair Int’l. They now have branched out on their own and are offering some unique tools for the reloader.
I, like many other shooters out there, would sooner take a beating than change the settings of my neck turner. Many shooters even go out and buy a separate neck turner for every caliber — just so they don’t have to adjust the settings. Most of you know what it’s like, you ruin half dozen cases (or more) getting your neck turner just right, and if you change it the chances of getting it back to where it was are practically nil. Let me be the first to tell you those days are over! Like many of you, I first saw the PMA Neck Turning Tool in an advertisement on this website’s home page. It’s hard to miss, blue anodized finish with the large PMA logo on the body.
PMA Tool Moves the Mandrel, Not the Cutter Tip From PMA’s website I learned that this turner does NOT use a coarse or fine drive screw to move the cutter towards or away from the mandrel. Nor does the PMA tool move the mandrel on an eccentric (another method of cutting depth control). The PMA tool does something very different. PMA’s Model A Neck Turning Tool simply adjusts by moving the mandrel toward or away from the stationary cutter with an 80 TPI drive screw with 60 indicating marks. Each mark moves the mandrel .0002″ (two ten-thousandths). I found, if you stop between the marks, .0001″ isn’t out of the question. It’s such a smart arrangement, I wondered “why didn’t anyone think of that before?”
Use PMA, 21st Century, or Sinclair Int’l Mandrels
My interest now piqued, I contacted Pat Reagin for one of the PMA tools. Pat suggested that I also use PMA’s stainless expander and turning mandrels since they have put a lot of effort to get them exactly right. I might mention that the 3/8 shank stainless or carbide mandrels from 21st Century or Sinclair Int’l will work also. PMA does have carbide turning mandrels in the works — a nice upgrade for those of you who turn lots of cases at one sitting. I personally didn’t encounter any unnecessary heat build-up with the stainless mandrels only turning 10-20 cases at a time. Considering that carbide mandrels run about $40.00 compared to $7.95 for stainless, it’s nice to save a couple of bucks when you can.
Cut-Depth Settings Can Be Dialed “Dead-On” (Even after Caliber Changes)
Upon receiving the PMA tool I immediately went to my reloading room to set it up for turning some culled .308 Lapua brass — to clean it up 75% for a no-turn chamber. I followed the directions included with the turner and it was a snap to set up. After turning a few of the .308s I made note of my setting and changed both mandrels to 6MM to turn some Lapua 6BR brass for my .269″-neck chamber. Again the change went smooth as silk and I was turning the 6BRs in no time for my preferred loaded neck diameter of .26730″. I then decided to take the leap of faith and change back to turning the .308s after making note of the 6BR setting. That worked, so I then again switched back again to the 6BR setting — again with success. I have gone back and forth (between calibers) numerous times in the last couple of weeks. Each time I easily returned to my caliber-specific settings and I did not ruin a single case in the process. Without sounding like I’m gushing here I must say this is the nicest neck turner that I have ever used. The adjustments are so easy and repeatable “Even a cave man can do it”!
If, like me, you absolutely hate setting up neck turners, for fear of losing your settings, you owe it to yourself to give the PMA Model A neck turner a try. I think you’ll be impressed. The PMA Neck Turning Tool costs $95.95, complete with one carbide cutter with your choice of 30° or 40° shoulder angle.
Disclosure: Danny Reever is a Forum Member. He received no “freebies” or compensation. PMA Tools advertises on AccurateShooter.com.
Share the post "Gear Review: PMA Neck Turning Tool"
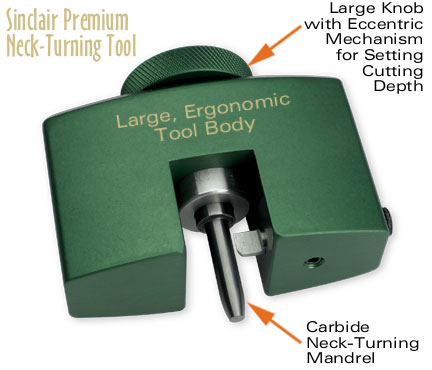
Sinclair International has just introduced a new Neck-Turning Tool. Part of a complete system with carbide mandrels, this product promises to be one of the best neck-turners on the market. The new tool has many improved features we really like:
▪ The cutter body is big, and curved to fit the hand. So, it is easier to hold than the old Sinclair tool or the K&M tool.
▪ The cutter-depth adjustment works really well. A large, knurled rotary knob on the back of the cutter body connects to an eccentric mechanism. This moves the mandrel shaft (and case) in and out relative to the cutter tip. You start by setting the cutter with feeler gauges, then fine-tune with the knob. Adjustments are very positive and precise, with laser-engraved index marks. This is a very good adjustment system, we think.
▪ The end of the tool is open so you can easily eyeball the caseneck as you’re cutting.
▪ High-grade carbide mandrels in 17 through 338 calibers will be offered with the new cutter system. At about $45 per caliber, they’re expensive, but the carbide mandrels DO work better — you’ll notice smoother case rotation and less heat build-up than with conventional (non-carbide) mandrels. If you already have mandrels, don’t worry. Sinclair says: “Our single-ended stainless mandrels will work fine with the new Neck-Turning Tool.”
Precise Adjustments Possible
With the eccentric adjustment system, you can make quick cut-depth changes with great precision. The cutter adjustment knob is click-adjustable in .0002″-.00025″ per click increments. The cut depth can be adjusted through a range of .004″-.005″ using the adjustment dial. A mandrel adjustment screw is included to make mandrel set-up and adjustment easier.
Sinclair’s new Premium Neck-Turning Tool includes three (3) feeler gauges for quickly setting cutter depth in the approximate range of the cut desired. With the cutter in range using the feeler gauge, the eccentric adjustment knob can make final adjustment for the exact neckwall thickness you desire. Sinclair claims: “Cutter adjustment is very fast and sure with none of the usual trial and error experienced with other tools.”
The $145.95 Premium Neck Turning Tool Kit (item NT-4000) includes three feeler gauges and a case-holder Turning Handle. Or you can save ten bucks and get the Tool and gauges without handle for $135.95 (item NT-4100). All popular Sinclair neck-turning tool accessories, including expander mandrels, will work with the Premium Tool. Order caliber-specific carbide turning mandrels separately for $44.75 per mandrel (items 95-0XX).
Share the post "Sinclair Releases New, Advanced Neck Turning System"
When neck-turning cases, it’s a good idea to extend the cut slightly below the neck-shoulder junction. This helps keep neck tension more uniform after repeated firings, by preventing a build-up of brass where the neck meets the shoulder. One of our Forum members, Craig from Ireland, a self-declared “neck-turning novice”, was having some problems turning brass for his 20 Tactical cases. He was correctly attempting to continue the cut slightly past the neck-shoulder junction, but he was concerned that brass was being removed too far down the shoulder.
Craig writes: “Everywhere I have read about neck turning, [it says] you need to cut slightly into the neck/shoulder junction to stop doughnutting. I completely understand this but I cant seem to get my neck-turning tool set-up to just touch the neck/shoulder junction. It either just doesn’t touch [the shoulder] or cuts nearly the whole shoulder and that just looks very messy. No matter how I adjust the mandrel to set how far down the neck it cuts, it either doesn’t touch it or it cuts far too much. I think it may relate to the bevel on the cutter in my neck-turning tool…”
Looking at Craig’s pictures, we’d agree that he didn’t need to cut so far down into the shoulder. There is a simple solution for this situation. Craig is using a neck-turning tool with a rather shallow cutter bevel angle. This 20-degree angle is set up as “universal geometry” that will work with any shoulder angle. Unfortunately, as you work the cutter down the neck, a shallow angled-cutter tip such as this will remove brass fairly far down. You only want to extend the cut about 1/32 of an inch past the neck-shoulder junction. This is enough to eliminate brass build-up at the base of the neck that can cause doughnuts to form.
The answer here is simply to use a cutter tip with a wider angle — 30 to 40 degrees. The cutter for the K&M neck-turning tool (above) has a shorter bevel that better matches a 30° shoulder. There is also a 40° tip available. PMA Tool and 21st Century Shooting also offer carbide cutters with a variety of bevel angles to exactly match your case shoulder angle*. WalkerTexasRanger reports: “I went to a 40-degree cutter head just to address this same issue, and I have been much happier with the results. The 40-degree heads are available from Sinclair Int’l for $15 or so.” Forum Member CBonner concurs: “I had the same problem with my 7WSM… The 40-degree cutter was the answer.” Below is Sinclair’s 40° Cutter for its NT-series neck-turning tools. Item NT3140, this 40° Cutter sells for $14.99. For the same price, Sinclair also sells the conventional 30° Cutter, item NT3100.
Al Nyhus has another clever solution: “The best way I’ve found to get around this problem is to get an extra shell holder and face it off .020-.025 and then run the cases into the sizing die. This will push the shoulder back .020-.025. Then you neck turn down to the ‘new’ neck/shoulder junction and simply stop there. Fireforming the cases by seating the bullets hard into the lands will blow the shoulder forward and the extra neck length you turned by having the shoulder set back will now be blended perfectly into the shoulder. The results are a case that perfectly fits the chamber and zero donuts.”
* 21st Century sells carbide cutters in: 15, 17, 20, 21.5, 23, 25, 28, 30, 35, 40, 46 and 50 degrees. PMA Tool sells carbide cutters in: 20, 23, 30, and 40 degrees, plus other angles by special order.
Share the post "Neck-Turning TIP — Use Optimal Cutter Angle for Best Results"
On our main AccurateShooter.com site, you’ll find a good article by GS Arizona on the Basics of Neck Turning. If you’re new to the neck-turning game, or are just looking for good tips on improving your neck-turning procedures, you should read that article. Below we offer some highlights and photos from the article, but you’ll need to read the whole story to view all the illustrations and follow all the procedures step by step.
Why Should You Consider Neck Turning?
Let’s assume that your rifle doesn’t have a tight neck chamber that requires neck turning; if you have a tight neck chamber, of course, the answer to the question is “because you have to”. For the rest of us, and that includes the vast majority of Highpower shooters, neck turning isn’t a requirement, but it can be a useful way to bring your ammunition a small but meaningful step closer to that pot of gold at the end of the rainbow: perfection. I’m not talking about a theoretical improvement, but a real one, an improvement that lies in equalizing and optimizing the neck tension of your loaded rounds. Inconsistent neck tension is a real contributor to increased muzzle velocity variance which itself is a significant factor in increased elevation dispersion at long range. So there’s our basic reason for neck turning: to equalize and optimize neck tension in order to reduce elevation dispersion.
The Tools of the Trade
Here you see everything I use and a bit more. The press, a cordless screwdriver (always plugged in, turning is tough on the old battery), a couple of K&M neck turners (one set up for 6mm, the other for .30 caliber) an expander for each size, some Imperial lube, an old toothbrush or two to keep the cutter clean, a handle with a caseholder (for those emergencies when the screwdriver dies and there’s just one more case to go!), steel wool and a tubing micrometer finish the list of tools. Hey, I left the dial calipers out of the picture! They’re always handy, keep them around, but they are useless for measuring neck thickness, so don’t try. I usually use an Optivisor magnifier while I turn necks, very handy for a clear view of what’s happening on the neck.
Expanding the Neck
Put some lube on the inside of the case neck and run it into the expander. Really, this isn’t hard. I prefer to expand each case immediately before turning it as opposed to expanding all the cases and then turning them. Brass is somewhat springy and will tend to go back toward its original size; therefore, by expanding and turning immediately, you are more likely to have all cases fit the mandrel with the same degree of tightness and to get a more consistent depth of cut.
Cutter Adjustment for Cut Depth and Length
All the tools I’ve seen have pretty good adjustment instructions. The only thing they don’t tell you is that you should have five to ten spare cases to get it right initially. Anything of the right diameter will do while you learn, for instance, just use that cheap surplus .308 brass to do initial setup and save the precious .30-06 for when you know what you’re doing. Be patient and make your adjustments slowly; you’ll need to set the cutter for thickness as well as length of cut (just into the shoulder). The depth of cut (brass thickness) takes a bit of fiddling, the length of the cut is generally easy to set.
The Finished Product — A Perfectly Uniform Neck
If you read the whole article, and follow the procedures using quality tools, you should get very good results — with a little practice. To demonstrate, here’s an example of my finished, neck-turned brass. You’ll see there is a perfect, 0.0125″ thick neck. It’s very uniform around the circumference, usually I only see 1 or 2 ten-thousandths variance. Now, with the necks uniformed like this, we can select the bushing size that will give us our preferred neck tension and experiment with various levels of tension, secure in the knowledge that all of the cases will actually have the desired neck tension.
Share the post "Neck-Turning 101 — Basic Steps to Follow When Turning Necks"
Here’s the super-speedy way to turn case-necks. Our friend Erik Cortina figured out how to turn his match cartridge case-necks using his milling machine. Erik told us: “While in Raton [a while back], Mid Tompkins told me that he turns his brass on milling machine. He said he could do about 500 in two hours, so I decided to try it.”
Erik fitted a Don Nielson “Pumpkin” neck-turner to the mill, and he used a modified 21st Century case holder to secure the brass. As you can see from this video, Erik was very successful with the process. The tool spins at 1500 rpm, turning Lapua 6.5-284 cases that have been necked up to 7mm.
Video Shows Eric Cortina Neck-Turning Cases with Milling Machine:
Cartridge Brass: Lapua 6.5-284 necked up to 7mm
Lubricant: Lithium grease inside and outside of neck
Neck-Turner: Nielson Pumpkin running at 1500 RPM
It’s hard to argue with Erik’s results. Here are his turned Lapua cases, which have neck-wall thickness consistent to two ten-thousandths of an inch. Think you could do better turning manually?
Some of Erik’s Facebook friends had questions about this process:
Q: Who makes the shell-holder?
Erik Cortina: I did! The shell-holder you can get from 21st Century. I Tig-welded a punch as a handle.
Q: I love the idea of working smarter not harder! Any galling issues? What are your mitigation techniques?
Erik Cortina: No issues. I use lithium grease in spray can. Makes a foam that I dip necks into.
Q: Shouldn’t either the case or the cutter be floating to allow most precise neck turning?
Erik Cortina: Up until [I tried this] I believed the same thing. I was going to build a floating case holder but decided to try rigid setup on a few cases before I built it. Results were great. Neck thickness doesn’t vary more than .0002″, which is same as when I was doing it with floating case holder on the lathe.
Q: Any problems with the Pumpkin changing the cut as it heats up?
Erik Cortina: No — there were no issues with that.
NOTE: Erik Cortina is a very skilled machinist who custom-crafted fittings used for this process. This kind of neck-turning with a milling machine may not be for the everyday hand-loader!
Nielson “Pumpkin” Neck-Turner
The circular orange cutting fixture on Erik’s Milling Machine is a Don Nielson “Pumpkin” neck-turning tool. Don designed this tool to be used by hand or with power. The Pumpkin boasts an eccentric mandrel that allows the cut to be adjusted easily in precise .0001″ increments. Benchresters like this as it allows for very precise control of cut depth and neck-wall thickness.
Nielson Neck Turner with carbide mandrel. Photo Courtesy Butch’s Reloading.
Share the post "Neck-Turning Brass with Milling Machine — High-Speed Solution"
Here’s the super-speedy way to turn case-necks. Our friend Erik Cortina figured out how to turn his match cartridge case-necks using his milling machine. Erik told us: “While in Raton, Mid Tompkins told me that he turns his brass on milling machine. He said he could do about 500 in two hours, so I decided to try it.”
Erik fitted a Don Nielson “Pumpkin” neck-turner to the mill, and he used a modified 21st Century case holder to secure the brass. As you can see from this video, Erik was very successful with the process. The tool spins at 1500 rpm, turning Lapua 6.5-284 cases that have been necked up to 7mm.
Video Shows Erik Cortina Neck-Turning Cases with Milling Machine:
Cartridge Brass: Lapua 6.5-284 necked up to 7mm
Lubricant: Lithium grease inside and outside of neck
Neck-Turner: Nielson Pumpkin running at 1500 RPM
It’s hard to argue with Erik’s results. Here are his turned Lapua cases, which have neck-wall thickness consistent to two ten-thousandths of an inch. Think you could do better turning manually?
Some of Erik’s Facebook friends had questions about this process:
Q: Who makes the shell-holder?
Erik Cortina: I did! The shell-holder you can get from 21st Century. I Tig-welded a punch as a handle.
Q: I love the idea of working smarter not harder! Any galling issues? What are your mitigation techniques?
Erik Cortina: No issues. I use lithium grease in spray can. Makes a foam that I dip necks into.
Q: Shouldn’t either the case or the cutter be floating to allow most precise neck turning?
Erik Cortina: Up until [I tried this] I believed the same thing. I was going to build a floating case holder but decided to try rigid setup on a few cases before I built it. Results were great. Neck thickness doesn’t vary more than .0002″, which is same as when I was doing it with floating case holder on the lathe.
Q: Any problems with the Pumpkin changing the cut as it heats up?
Erik Cortina: No — there were no issues with that.
NOTE: Erik Cortina is a very skilled machinist who custom-crafted fittings used for this process. This kind of neck-turning with a milling machine may not be for the everyday hand-loader!
Nielson “Pumpkin” Neck-Turner
The circular orange cutting fixture on Erik’s Milling Machine is a Don Nielson “Pumpkin” neck-turning tool. Don designed this tool to be used by hand or with power. The Pumpkin boasts an eccentric mandrel that allows the cut to be adjusted easily in precise .0001″ increments. Benchresters like this as it allows for very precise control of cut depth and neck-wall thickness.
Jason C., commenting on Erik’s YouTube video stated: “I have a couple of those too. Nothing cuts like a Pumpkin. [Don Nielson] made the best cutter tool ever.” These are still available if you ask around. The photo shows Don with a case-holder mounted to a power assembly. A talented machinist and tool-maker, Don has also been a successful short- and long-range benchrest shooter, who has won NBRSA 600-Yard Championships. CLICK HERE to read about Don’s success with the 6.5×47 Lapua.
Nielson Neck Turner with carbide mandrel. Photo Courtesy Butch’s Reloading.
Share the post "Neck-Turning Brass on Milling Machine with Erik Cortina"


 On our main AccurateShooter.com site, you’ll find a good article by GS Arizona on the Basics of Neck Turning. If you’re new to the neck-turning game, or are just looking for good tips on improving your neck-turning procedures, you should read that article. Below we offer some highlights and photos from the article, but you’ll need to read the whole story to view all the illustrations and follow all the procedures step by step.
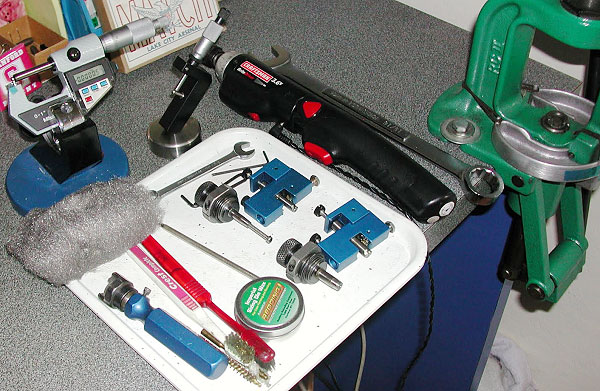

 If you’re using a body die or a full-length sizing die, try using Ballistol (in the aerosol can) as a lube. It works GREAT without the tacky or gooey residue left by most case lubes. It will also clean off carbon residues on the neck as you lube the case. Just spray a little on a cotton patch (or your fingertips) and wipe each case before you run it up into the die. If you are using a steel neck bushing, be sure to wipe the neck as well. You can usually do a half-dozen BR-sized cases before you need to re-apply Ballistol on the patch. Ballistol is non-toxic, bio-degradeable, and will not harm your skin. It is very slippery, but can easily be removed with a rag or paper towel. Try it–you may retire your One-Shot. Ballistol can also be used to protect wood stocks.
 For Neck-Turning, Try STP Blend or Assembly Lube
 Another even cheaper option is assembly lubricant. For turning his case necks, RStreich uses assembly lube from an auto parts store. He notes: “The brand I have is reddish in color and kind of sticky like honey. It’s far better than the Imperial die wax I was using before.” There are a variety of types, both with and without moly additive, and you can select the viscosity you prefer if you sample a few brands. Be sure to clean out any lube residue from the inside of your necks when you have completed your neck-turning.
 From PMA’s website I learned that this turner does NOT use a coarse or fine drive screw to move the cutter towards or away from the mandrel. Nor does the PMA tool move the mandrel on an eccentric (another method of cutting depth control). The PMA tool does something very different. PMA’s Model A Neck Turning Tool simply adjusts by moving the mandrel toward or away from the stationary cutter with an 80 TPI drive screw with 60 indicating marks. Each mark moves the mandrel .0002″ (two ten-thousandths). I found, if you stop between the marks, .0001″ isn’t out of the question. It’s such a smart arrangement, I wondered “why didn’t anyone think of that before?”


 When neck-turning cases, it’s a good idea to extend the cut slightly below the neck-shoulder junction. This helps keep neck tension more uniform after repeated firings, by preventing a build-up of brass where the neck meets the shoulder. One of our Forum members, Craig from Ireland, a self-declared “neck-turning novice”, was having some problems turning brass for his 20 Tactical cases. He was correctly attempting to continue the cut slightly past the neck-shoulder junction, but he was concerned that brass was being removed too far down the shoulder.


 The circular orange cutting fixture on Erik’s Milling Machine is a Don Nielson “Pumpkin” neck-turning tool. Don designed this tool to be used by hand or with power. The Pumpkin boasts an eccentric mandrel that allows the cut to be adjusted easily in precise .0001″ increments. Benchresters like this as it allows for very precise control of cut depth and neck-wall thickness.


