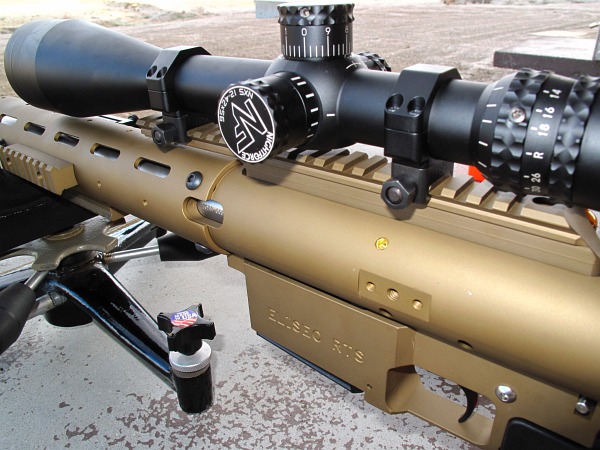
This article features an impressive .308 Winchester tubegun, crafted with an Eliseo (Competition Machine) RTS chassis, Borden action, and 30″ Krieger medium Palma Contour barrel. Owner Mark LaFevers chambered and fitted the barrel and assembled the rifle himself. What’s more, Mark even crafted his own muzzle brake, front/rear bag-riders, and his own, innovative “big-foot” bipod! Mark’s Do-It-Yourself (DIY) tubegun has proven as accurate as it is multi-faceted. Optimized to shoot the 155-grain-class match projectiles, this gun is a tack-driver. This Editor has witnessed the gun repeatedly put 3-round groups into one ragged hole at 100 yards. At 600 yards, the gun has held under 1″ of vertical in competition.
When it comes to versatility, it’s hard to beat a tubegun chambered in .308 Winchester. This rifle system can be used in High Power (Palma) competition, F-TR matches, Long Range Steel Matches, and Tactical Competitions. With the addition of a front sled, a modern tubegun can even be competitive in 600-yard benchrest matches, as demonstrated by Jerry Tierney, who, some years back, won the NBRSA 600-yard Nationals with an Eliseo (Competition Machine) tubegun.
Do-It-All Multi-Discipline .308 Win Tubegun for F-TR, Benchrest, Varmint Matches, Palma, and Tactical Competitions
by Mark LaFevers
The Concept — a ‘Do-It-All .308 Win’
This project began with a wish list developed after shooting in a precision tactical match in 2009. From that experience I knew I wanted a magazine-fed precision bolt gun sporting a high-quality, variable-power scope. I wanted a rifle that could be competitive in a broad range of gun games including tac comps and long-range prone events. If the gun could also double as a medium-range benchrest rig, that would satisfy the needs of the monthly club matches I shoot — a varmint steel silhouette match (shot from the bench), and an F-Class style prone event. I also wanted a gun that could shoot Palma matches someday (when I get around to learning to shoot with iron sights).
Because I like to build things, I’m always looking for projects that offer opportunities to customize and innovate to suit my needs. And because I’m interested in trying different shooting disciplines, I hoped to craft a rifle that could be reconfigured fairly easily to fit various needs. To maximize the gun’s potential, I chose to use only the highest-quality components for every aspect of this project. I planned on building as much of this rifle as I possibly could myself — and that would include chambering and fitting a barrel for the first time. Having much to learn, I would be relying heavily on the expert advice and goodwill of others for the gun’s success.
The Do-It-Yourself Approach — The Appeal of Building Your Own Rifle
Not everyone understands the DIY (do-it-yourself) approach to life. Why would anyone try to smith his own rifle, when he could have it done by competent professionals? There is the imagined prospect of cost savings. However, a home gunsmith may find that, at least initially, it costs more money to do it yourself when all the costs of tooling etc. are calculated. But doing it yourself is not just about saving money. There is a special satisfaction derived from building something with your own hands. For me the relationship between practiced hands, tools, materials, and knowledge of craft is important. The DIY approach surely means different things to different people. For me it’s about the quest for improvement, and an appreciation of the importance of craftmanship in history, and trying to do my part.
Whatever our craft, the fit and function of the things we care about ultimately define us. In this project I felt a responsibility to uphold certain standards. I also was motivated by the desire to give ‘homage’ to my distant relative Daniel M. LeFever, a gun-maker who left his mark on the firearms industry in the 1870s. “Uncle Dan” LeFever crafted high-grade double guns that rivaled the finest European doubles.*
Choosing Components for the .308 Win Tubegun
Looking over the range of suitable equipment, it did not take long to come across Gary Eliseo’s Competition Machine tubegun chassis kit. Initially intrigued by the beauty of the machine work in this aluminum stock, the more I looked the better this platform seemed. Gary’s RTS kit for Remington 700 and Rem clones accepts the proven AICS magazines and offers great stock adjustment flexibility. For more on that subject read German Salazar’s excellent article on Configuring the Eliseo Tubegun Stock.
When I learned that Jim Borden, BordenRifles.com, was building an action designed specifically for the Eliseo tubegun stock, the decision to go this route was made even easier. I had previously had the opportunity to admire close up the Borden action used by our top Club benchrest record holder, and I knew I couldn’t go wrong there. In selecting a trigger group, I knew I wanted a fully adjustable two-stage trigger that could be set for different pull weights for various shooting disciplines. At first glance Jewell seemed to be the obvious choices, but I asked if there were any products that might be better than the Jewell for my purposes. It was suggested that an American-made trigger by CG Jackson might do the trick, so I talked with Tom Myers of X-Treme Shooting Products. Tom’s company offered a fully-adjustable, 2-stage Mod 22 Tactical trigger that fits Remington 700 actions and their clones. It is offered with a fixed or moveable shoe, with or without a safety. I chose the fixed trigger shoe with no safety.
Choosing a Scope
Given my prior positive experiences with Nightforce products, a Nightforce scope was my first choice in optics. But I needed to select between the NXS (side-focus) and BR (front focus) models, and chose a magnification range. Because I wanted to play a variety of gun games from Tactical to Benchrest, it seemed to me that the NXS, with its faster side focus parallax adjustment, would be the more versatile choice. I went with the 12-42x56mm version so that I had plenty of magnification on tap for long-range precision work. I can still dial it back to 12 power for a wider field of view, as needed.
Mark bench-testing the gun during Load Development. The front rest is the superb SEB Neo Co-Axial.
Caliber Choice and Load Development
Choice of Caliber — .308 Win Offers Accuracy, Versatility, Long Barrel Life
Rather than agonize over the many caliber choices, I chose to step back and consider what I thought, in my experience, made winning shooters. Was it the caliber they were shooting or their training, skill and intelligence, that made them winners? While it is true that various calibers do have their specific merits, it is also true that an individual with five times as much training as you is likely to beat you with whatever caliber he or she is using. Case in point being the tactical match that got me started on this project, won by a young Marine shooting a .308 Win. While many other competitors had rifles with “faster, flatter, superior ballistics”, the Marine topped the field through his superior training, natural ability, and the keen edge of youth. With the right trigger puller, .308 Win was clearly still good enough to win this kind of match.
Among the arguments in favor of the .308 Win caliber for this project were:
I had positive previous experience with the .308 and was already set up to reload for it.
Very wide selection of performance-proven bullets.
Some popular disciplines, such as F-TR and International Fullbore, specify .308 Win (7.62×51) as one of the “permitted” chamberings.
Top shooters could provide guidance on .308 load development, and effective shooting techniques.
.308 Win offers long barrel life.
Weighing against the .308 Win were higher component costs and heavier recoil compared to many popular, smaller, mid-distance calibers, such as the 6mmBR, 6 Dasher, 6XC, and 6.5×47 Lapua.
Selecting the Optimal Barrel Configuration for my Bullet Selection
One way of narrowing the field of .308 bullet options is to choose a specific bullet that has performed well for winning shooters, and design the gun around the bullet. The weight of the bullet and its preference for a specific seating depth dictate the twist rate of the barrel and the depth of the chamber, which is also dependent upon whether you choose to single feed or magazine feed. Because I have had very positive experiences with Berger bullets, and becasue Berger Ballistician Bryan Litz was very positive about Berger’s 155.5gr Palma bullet, that was my starting bullet choice for this gun. Because Bryan had great 1000-yard success with a 1:13 twist barrel with the 155.5 bullet, but thought he might go with a 1:12 twist next time, I felt it would be interesting to try a 1:12.5″ twist. Krieger Barrels was able to privde this specific twist rate, and we hoped Krieger’s 5R rifling with a 30″ length would yield a fast barrel. Some extra velocity would help offset the velocity loss I might suffer by being limited to a mag-length COAL. (If I could load longer than mag length I could stuff in more powder and get more velocity.) The Krieger 5R proved a very good choice. From the start the barrel has cleaned up easily, it has delivered awesome accuracy, and it holds very tight elevation at long range. I’ve also been able to achieve very low ES/SD with this Krieger.
Gun Set-Up and Initial Testing
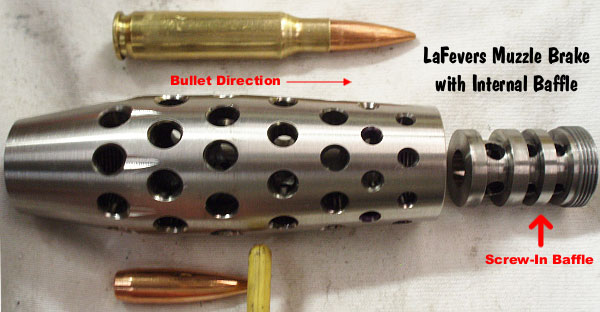
The first break-in of the rifle was done at 100 yards on home turf at the Ojai Valley Gun Club in California. Your Editor and I put 40 rounds through it using Krieger’s recommended break-in procedure. Our impression was that in less than 10 rounds the barrel was ready for competition. I shot the second 10 rounds looking at the performance of the variable muzzle brake I had built. Firing initially with only the one built-in baffle in place, a tremendous amount of gas was still blowing forward, made visually more pronounced by the frosty 29° air. Maximum recoil reduction was achieved adding the front baffle spool, so this is how the brake will be used. On disassembly after firing the forward faces of the baffle spool show descending amounts of powder residue from the gas entry to exit end, with almost no residue at the final baffle wall, showing most of the gas has exited to the side by that point. Attention to precision alignment shows the brake having no adverse effect on accuracy, as the last 20 rounds seated to various depths yielded a couple three-shot, one-hole groups at 100. At the end of the session I was pleased to find that the Krieger barrel cleaned extremely easily. Two wet patches cleared the powder residue and just a little copper showed up at the muzzle end by visual inspection.
The Jim Borden action has a really nice feel when single round loading, and good consistency feeding from the magazine with an authoritative hand. The ejector is very aggressive and will pitch the brass off the bench if it isn’t blocked from escaping. This action cycles very smoothly, and the beautiful workmanship shows even with the tubegun chassis mostly surrounding it.
Mark crafted two front sleds for the gun, one from metal, another from wood (which worked a bit better). Mark notes: “With the wood bag-rider in place the gun became quite stable, and you didn’t notice the high center of gravity so much.” Mark also made his own rear Bag-Rider.
Tubegun Wins First Fun Match
Shortly after breaking in the barrel, I took the gun down to a nearby range to compete in an informal 300- and 400-yard paper competition. I thought it would be fun to test loads while shooting in a club-level fun match. I was getting the best grouping at 44.5 grains of Varget, hotter loads were not doing so well, leading me to believe I needed to work up loads from 44.0 to 44.5 by tenths to find the sweet spot. In the 10-competitor match I squeaked out a win by 1 point. Still, a win is a win!
Load Development
I took the rifle up to the Ojai range at daybreak to run some load variations at 600 yards in still 26° air. I printed targets (sourced from AccurateShooter.com’s FREE Target Page) that had a 1″ red dot within a 5″ grid box. The dot made an excellent aim point at 600 yards. Here the capabilities of the Nightforce 12-42 NXS optic really became apparent. In the exceptionally clear, early morning conditions, I could see the dot AND the bullet holes — all at 600 yards downrange! I had set up my 72-power Meade spotting scope but didn’t use it as the Nightforce scope had more clarity and sharpness. There was no need to go downrange to check the targets, as bullet holes were clearly visible on the targets. This is great because I can make better use of the narrow window of perfect air in the morning, before the sun stirs thermals and mirage.
In this rifle, the Berger 155.5gr Fullbore bullet likes to be seated .010″ off what I’m calling “Max Jam”, using a Hornady OAL length gauge pressing the bullet softly into the lands, so the bullet just barely sticks there when the tool is removed. [Editor’s Note: At his optimal seating depth, Mark’s bullets are still in the lands, just .010″ shy of the max length he can load them without set-back.] The rounds are loaded to 2.850″ OAL to magazine feed. Even though I cut a “no-turn” chamber, I do lightly turn the outside of the case necks to uniform them. I like to look at bullet bearing surface length variations, using a Sinclair comparator body and two .30-cal inserts, one on the nose and the other on the tail of the bullet. With very uniform bullets like the Bergers this method is really only attempting to spot that random outlier bullet that varies in length enough to separate from the group. This is no knock on Berger, just a nod to the challenges of maintaining incredibly tight manufacturing tolerances.
Today’s five shot groups of Varget, jumping by tenths of a grain from 44.0 to 44.5 grains, showed the best grouping to be at 44.1 grains. The hotter loads were breaking the 2900 fps level, but the groups were not as tight as they were at the lower end. At 44.1 grains of Varget the five-shot group had a vertical dispersion of 1.9″ and a horizontal dispersion of 1.25″ at 600 yards, making that a keeper load.
Competition Load Selection and Performance
With a NBRSA 600-yard match fast approaching, I realized that with all the focus on testing I didn’t have enough Lapua brass to shoot the entire match. My solution was to fall back on once-fired Hornady Match brass, with which I have also had excellent luck. So, the day before the NBRSA match, I loaded up the best combinations of the Berger 155.5s with Hornady/Varget, Lapua/Varget, and Hornady/8208 for a final trial, and headed out to a 1000-yard range that’s a two-hour drive from home. Expecting to see the faster IMR 8208 edge out the Varget at this range, I was surprised to see the performance basically identical. With this last minute perspective I decided to shoot the six target NBRSA match using Berger/Hornady/Varget for the first three matches, then Berger/Hornady/8208 for the last three matches when the extra speed might help in a rising afternoon wind.
Match Results
Best results were in Match 1 using 44.0 grains of Varget to push the Berger 155.5 from the Hornady Match brass. Fortunately four bullets flew to a 1.44” group in the blue, unfortunately it was a five-shot match and one bullet flew high left. Excellent promise also showed in Match 6 with the IMR 8208 XBR powder yielding less than an inch of vertical at 600 yards. The lesson I learned from the event was that operator consistency was a much bigger factor than the technical limitations of the hardware or the ammunition. The gun can definitely shoot better than I can hold. I had the opportunity to shoot off a beautiful SEB NEO front rest in this competition. Although I am not a fan yet of joystick controls, this rest performed flawlessly and definitely had a positive effect on performance.
My Overall Impressions of the Project
For use as a benchrest rig, the tubegun provides an interesting challenge, because the pistol grip seems to make the gun much more sensitive to steering errors than a typical low-profile benchrest stock. You have to focus on consistency of grip. A light grip and firm cheek weld combination seems to work well at the bench, but the gun also responds well to a very firm grip and heavy shoulder pressure when fired in the prone position. Building an Eliseo tubegun is a great project and the finished product is a very versatile, fun-to-shoot gun! To encourage others with similar interests, let me just say that the products and components used in this project all get my five-star endorsement, without exception or hesitation.
The biggest challenge with this rifle lies in my own skill development — particularly for tactical matches. If you only have experience with known-distance shooting matches, you’ll need a whole new set of skills to be successful in unknown-distance (UKD) tactical competitions. These UKD matches require high levels of shooting intelligence and training. However, now that I have a rifle that instills confidence, I can work to improve my skills. Overall, I am very happy with the results of this project — the gun has certainly lived up to my expectations. It is rugged, accurate and very adept at “multi-tasking.”
DIY Machining — Chambering My First Barrel
One of my main objectives with this project was to do my own barrel chamber reaming and fit-up work. I had been studying and working from John Hinnants’s excellent book on Precision Rifle Barrel Making, building tools and working with the concepts, and felt myself to be ready to tackle the machining aspects of the project. Having local ace gunsmith Mac Tilton to talk to really helped me understand what would be needed. Greg Tannel’s excellent GreTan DVDs on how to set up a high pressure thru-the-barrel reamer flushing system and align the lathe tailstock properly for precision chamber reaming were invaluable. Greg’s off-the-shelf, hardware-store flow control layout makes the flushing system easy to regulate for other purposes as well. I built the reamer holder Greg describes in his DVD, and it too works well.
I began at everyone’s recommended starting point, which was to recheck the level of my lathe, a Jet 1340 gearhead belt-driven model. To accomplish this I used a precision 12” machinist level from Grizzly Tools. I can’t say the tool was easy to use because the leveling process is tedious as hell, but the level worked very well.
Dave Manson Shares His Reamer Knowledge
In researching which reamer maker to use to create the custom reamer for the Berger 155.5 fullbore bullet, which seems to like about .015″ jump to the lands, I was drawn by name recognition to Dave Manson’s products. In my years of thumbing through Brownells catalogs I was impressed with the thought Dave had put into the development of so many of his tools. During several phone conversations, I greatly benefited from Dave’s experience with chamber tolerances, cutting fluids and reamer modifications specific to thru-the-barrel flushing. To help spec the reamer, I sent Dave a couple dummy rounds built to magazine length so he could make a custom reamer to yield .015” jump and a no-turn neck. In no time I was using the Dave Manson reamer to practice with the flushing system on pieces cut from a take-off barrel, then checking dimensions using Cerrosafe castings. The dimensions were exactly as we had discussed, and I do mean EXACTLY! From the way Dave’s reamer worked in practice chambers, I knew this tool would produce a superior chamber.
Chambering Process with Tailstock DRO
For this project I set up a lathe tailstock digital readout from Grizzly, part # T10118, to help keep track of boring depth. Unlike relying on counting revolutions of the tailstock handwheel, with the DRO you are looking at the total travel measurement on a digital display, which is equally precise to the alternate dial indicator method. The chamber was cut in the stainless Krieger barrel at 60 RPM, using Mobilmet 744 heavy cutting oil diluted with mineral spirits, flushing chips from the reamer flutes at 100 PSI. For the last few thousandths of cut, lathe power was shut off and the cut completed by turning the reamer holder by hand while in-feeding with the lathe tailstock handwheel for precise depth and chamber dimension control.
To shorten this article up a bit and keep it on point for those interested in the rifle and not the process, let me just mention that details of some of the additional parts I made can be seen at my website: LaFeversFabricating.wordpress.com. Those parts include a muzzle brake of my design, my fast attach bipod design, a drop-leg level, wood grip, and wooden as well as metal front and rear bag riders for benchrest work.
Acknowledgements
For their participation and patience in supporting this project, and their tolerance of my myriad questions about parts and processes, I would like to thank, in alphabetical order:
Berger Bullets — Bergerbullets.com — Berger 155.5gr Fullbore Match bullets.
Jim Borden — BordenRifles.com — Stainless Rem. Clone action for Eliseo tubegun.
Gary Eliseo — CompetitionShootingStuff.com — RTS tubegun stock kit.
Grizzly Industrial — Grizzly.com
Krieger Barrels — KriegerBarrels.com — 30″ Medium Palma, 1:12.5″ twist 5R rifling, tight bore.
Dave Manson — MansonReamers.com — Custom .308 Win finish reamer for Berger 155.5 fullbore bullet.
Tom Myers — X-tremeShooting XTSP — CG Jackson Mod 22 Tactical 2-Stage Trigger.
Nightforce Optics — NightforceOptics.com — 12-42×56 NXS Scope with NP-R1 ranging reticle.
Greg Tannel — GreTanRifles.com — Lathe set-up and chambering DVDs.
*According to Chuck Hawks: “‘Uncle’ Dan Lefever was one of the greatest gun designers of his, or any, time. He founded several companies….The largest and best known of these, Lefever Arms Co., was eventually acquired by the Ithaca Gun Company around the time of the First World War. In the hey day of the classic American double there were guns galore and many different grades and price points, from plain field grade guns to masterpieces rivaling the best European guns. The Lefever Arms guns, for example, won medals at an International Arms Exhibition for ‘Best American’ and ‘World’s Best’ shotgun.”
Share the post "Sunday Gunday: Multi-Tasking .308 Tubegun in Eliseo Chassis"
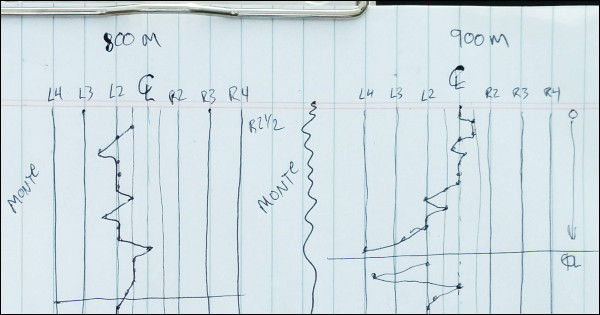
CLICK HERE to see full-screen version of Wind Plot.
Team shooting is very different than individual competition. Typically a team coach makes the wind calls for the shooters. In some cases (where the rules allow), the wind coach even dials elevation and windage changes for the active shooter. For the wind coach to do his job effectively, he must follow the changes in the wind and determine what the correct wind call should have been for each shot. (In other words — what was the “right call”)
Bryan Litz, founder of Applied Ballistics and Past USA F-TR National Champion, served as wind coach for the winning 4-man F-TR Team at the 2017 Canadian F-Class Championships, which preceded the F-Class World Championships also held in Canada. Here Bryan explains how he has used a Wind Plot to make better wind calls, helping his team-mates maximize their scores.
Wind Plot Methodology by Bryan Litz
The wind plot I use is a running history of what the correct wind call was for every shot fired. The more you shoot, the more history you have in a condition, and I find that very useful information. This kind of plot IS NOT showing where the bullet hit, and is NOT showing what you held. It’s showing what you should have held to center each shot. IMO, this is the most valuable information to have when guessing where to hold next for each shot. Here are some key points:
1. I always look for blocks of stable conditions to shoot in and wait out the rest.
2. If the wind plot shows drastic changes, either I’m not picking the right time to shoot or it’s just a really unstable wind condition.
3. When you see many shots using the same hold (e.g. Robby’s 700m and 900m strings on plot), it can indicate very fast shooting and fast pit service.
Q. What are the numbers and Markings on this Wind Plot?
Litz: The wind plot represents the rings on the target. Left 2 for example, is the 5 line on the international target, while Left 2 is the 10 line on the USA target. F-Class shooters and coaches talk about wind holds in relation to these rings. A Left 2 hold isn’t left 2 MOA or 2 MILS, it’s the second ring from center. The vertical lines on the plot represent the rings going out from center, 4 or 5 in each direction. A left or right 5 hold is edge of black on the int’l target.
Q: What Does this Specific Plot Reveal?
Litz: Looking at the plot, from left to right is 700m, 800m, and 900m that we shot progressively through the day. Top to bottom shows each shooter in sequence (shooters names are shown by their blocks). To the right I note what was on the gun for that shooter, and note when it changes. Often times we run the same wind on the gun for several shooters but if it changes, I note what the new windage is and continue on. For example if we’re settled into a condition where we’re shooting Vs with a right 3 hold, I might adjust the scope 1 MOA right because a right 3 hold is equal to 1 MOA. So we can move the scope and start shooting with a center hold.
Q. Are you Plotting Where the Bullet Hits?
Litz: Not exactly. This kind of plot IS NOT specifically showing where the bullet hit, and IS NOT showing what the shooter held. It’s showing what the shooter should have held to center each shot. IMO, this is the most valuable information to have when guessing where to hold next for each shot.
On each shot, the shooter or coach takes a guess about where to hold, and fires the shot. If the bullet hits the center, you plot the point right where you held because it was the correct hold. However, if you miss the call, you plot what hold was required to put that shot in the center. For example if you shoot a right 3 and hit where you held, the correct call would have been “center”. In this way, you’re building a history of what you should have done, which may or may not be what you actually did. This shows you the trends, and brackets which can be used to make future decisions.
Q: Is this Type of Wind Plot Something New?
Litz: I didn’t invent this method, it’s been around a long time. Vertical can be plotted the same way. In team matches, we have a plotter who is advising on elevation trends and suggesting corrections. But, as wind coach, my job is the horizontal so I only keep the wind plot. I have learned lots of strategies from my coaches Emil Praslick and Steve Hardin.
There are many ways to plot and many standard work sheets for this. They’re all tools and the key is to find something that works for you in different situations. I don’t keep a plot when I am personally behind the trigger string firing because I lose more points when I take the time to do it vs. just shooting fast. When pair firing or coaching, I can keep the wind plot without compromising the shooting.
Here Team Australia used plots and communication gear linking coaches. This helped the Aussies win the 2013 F-Open Team World Championship held at Raton, NM.
Know Your Goal — Keep It Simple
Know your goal of plotting. The simplest plot is where you write the shot number where it hit on a target face. This kind of plotting is useful for evaluating shooter performance because it shows how big the group is (in particular the vertical dispersion). However keeping a plot like this does little to help you figure out the wind. It just shows you what shots you messed up on. It does nothing to help you find the center. [Editor: That’s a whole different matter with many variables.] The wind plot I use is a running history of what the correct wind call was for every shot fired. The more you shoot, the more history you have in a condition, and I find that very useful information.
Share the post "Team Competition — How to Make and Use a Wind Plot"
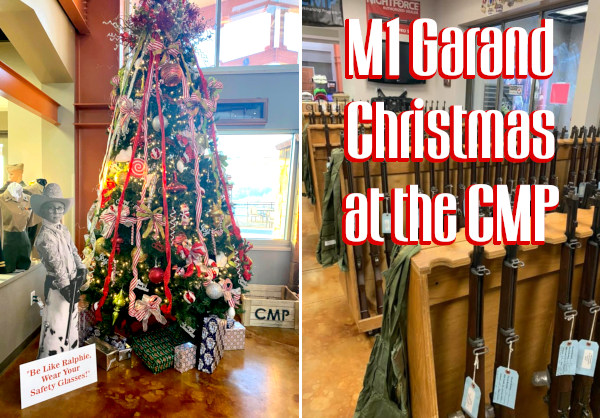
We think every serious vintage rifle collector should acquire an M1 Garand at some point. If you ordered from the CMP this fall, perhaps you may find an historic M1 Garand under your Christmas tree this year. The CMP has, in the past couple of years, received over 90,000 Garands from overseas arsenals, so there are plenty to be had currently. This article explains how to order an M1 Garand from the CMP, and how to select the right grade for your needs and budget.
How to Order an M1 Garand from the CMP
To purchase an M1 Garand through the CMP, you must be an adult U.S. Citizen, and a member of an affiliated organization who has participated in a “Marksmanship Activity”. This basically means you need to join a gun club and participate in a clinic or match. Proof of club membership and citizenship is mandatory for all ages. However, the marksmanship requirement is waived for those over 60 years of age. Garands must be ordered by mail or through official CMP Auctions. CLICK HERE to Start Order.
This handsome M1 Garand was built with a CMP barreled action fitted to an aftermarket figured Walnut stock. That’s not war-worn GI wood.”
Here are two videos that explain the procedure for ordering an M1 Garand from the CMP. Along with mail-order sales, the CMP has brick-and-mortar stores where M1 Garands can be inspected and purchased and then transferred via your FFL (in compliance with state law). The three CMP stores are located in Anniston, Alabama; Talladega, Alabama; and Port Clinton (Camp Perry), Ohio.
M1 Garand Barreled Actions and Aftermarket Barrels
Along with complete M1 Garand rifles, the CMP also offers barreled actions. This can save you money, and also makes sense if you are looking to create a rifle with high-grade wood, or you want to bed the action for improved accuracy. You can order an M1 Garand barreled action, as well as complete M1 Garand rifles, from the Civilian Marksmanship Program (CMP). The eligibility requirements and ordering process will be the same for a barreled action as for a complete rifle.
If you already have an M1 Garand, but need a new barrel, you can order a pre-chambered Criterion barrel in .30-06 Springfield. Criterion tell us: “This is a direct replacement barrel for the M1 Garand rifle, manufactured to Mil-spec print #6535448. It has the original G.I. contour and Parkerized finish. Receiver threads are timed, all milling cuts are made, and all M1 Garand barrels are hand-lapped.” NOTE: Each barrel is .010 short-chambered and should be headspaced by a qualified gunsmith. These Criterion .30-06 replacement barrels, priced at $259.95, are legal for use in Service Rifle and John C. Garand matches.
If you want to re-chamber your M1 Garand to .308 Winchester, the CMP eStore sells brand new Criterion-made barrels in .308 Win for $199.95. These authentic-profile barrels are chambered and headspaced within .010″ of finished size, with final fitting to be done by a competent gunsmith. The barrels are also externally Parkerized to match your vintage M1 Garand.
Once you have an M1 Garand in your collection, you’ll want to keep it in tip-top condition so it works flawlessly for vintage military matches and fun shooting. Below we’ve linked two good SSUSA articles on M1 Garand maintenance. Following that you’ll find two excellent videos covering M1 Garand Disassembly, Cleaning, and Lubrication. Finally there are links to recommended print manuals for the M1 Garand.
M1 Service and Maintenance Shooting Sports USA (SSUSA) published an excellent article on Service and Maintenance of M1 Garand Rifles. This offers some smart tricks, such as using smoke from burning masking tape to darken the front sight post. There is also an older SSUSA article that covers basic cleaning and servicing and also explains how to upgrade the performance of your Garands. READ Article HERE.
As a resource for Garand owners, SSUSA recommends GarandGear.com: “[At] Garand Gear you’ll find USGI spec parts, tools, gauges, clips and a few Garand accessories. They also have some interesting freebies, most notably a direct analysis of M1 gas port pressures produced by different brands of commercial .30-06 ammunition, showing which ones exceed M2 Ball pressure, as well as the pressures produced by ammo manufactured specifically for the M1 Garand, such as Hornady’s M1 Garand Match and Federal’s American Eagle M1 Garand. Here you’ll also find free, downloadable and printable PDF copies of War Department M1 Garand maintenance manuals TM9-1275 and TM9-1005.”
M1 Garand Disassembly, Cleaning, and Lubrication
Share the post "Sunday Gunday: Let Santa Bring You a CMP M1 Garand"
The fall Hunting Season is here. Do you plan to use factory ammo in your hunting rifles? Perhaps you buy bulk centerfire ammo for your AR15 or varmint rifle. Then this book can definitely benefit you.
If you ever shoot factory ammo, you should consider getting Ammo & Ballistics 6. This resource lists over 2,600 different loads for 200+ cartridge types from .17 Mach 2 up to .700 Nitro Express, including the most popular centerfire and rimfire cartridges (both rifle and handgun). In this updated-for-2020 Sixth Edition, there are over 3,000 tables covering virtually every caliber and every load for all commercially-loaded hunting ammunition sold in the USA. Tables include velocity, energy, wind drift, bullet drop, and ballistic coefficients up to 1,000 yards.
Ammo & Ballistics 6 helps you select ammo for a hunt — quickly compare the velocity and knock-down power of various commercial ammo. This book can also help you choose a caliber/chambering for your next hunting rig.
Verified Book Purchaser Reviews
“Outstanding reference guide for shooters and ballistic enthusiasts alike. Has data on velocity, energy delivered, Taylor KO index, windage and elevation on numerous loadings for hundreds of [cartridge types]. Each cartridge has all dimensions labeled (i.e rim, case length, neck, etc.), and has an informative description of the cartridges history/relevance.” — S. Step, 2017
“Great heaps of data! This volume has pages and pages of new data for .22LR like the hot Velocitor, and also on the .22 WMR from 30 grains up into the 50s. Most importantly there is lots of range data, drop, windage, kinetic energy, etc. — Terrific reference guide….” — E. Svanoe
Ammo & Ballistics 6 contains data and illustrations on virtually every sporting cartridge sold in the USA. This 2020 Edition covers 200-plus cartridge types from .17 Mach 2 up to .700 Nitro Express.
Share the post "Best Guide for Factory Ammo — .17 HM2 to .700 Nitro Express"
The 2021 NRA Long Range Target Rifle Championships, and Palma Matches, have been taking place this week at Camp Atterbury in Indiana. May of America’s top sling shooters have been competing, employing their skills on targets at 800 to 1000 yards. The Palma Team and individual matches were held August 15-16, with other matches running through Friday, August 19.
15 August — Palma Team Match
16 August — Palma Individual Match
17 August — Leech Cup/Porter/Andrus/Roumanian Team Matches
18 August — Wimbledon Cup/Farr/Doc Aiken/Herrick Team Matches
19 August — Mustin/Remington (and Shoot-offs)/Award Ceremonies*
Last day of the 2021 NRA National Long-Range Championships at Camp Atterbury:
Thomas Colyer Wins Leech Cup Shoot-Off
Forum member Corbin Shell reported: “I was fortunate to score for Thomas Colyer who shoots on the Oak Ridge Sportsmen’s Association (ORSA) long range rifle team. His Shoot-Off score was a 100-5X — not dropping a point. Michelle Gallagher was also in the Leech Shoot off and shot 99-3X.” A talented marksman, Thomas Colyer also won the Wimbledon Cup several years ago.
Phillip Crowe Wins Mustin Match
FYI, Phillip Crowe, also from Oak Ridge Sportsmen’s Association (ORSA) long range team, won the Mustin match with a Shoot-Off score of 99-3X. Here is a photo of Phillip at the beginning of the Mustin Shoot-Off.
According to the NRA High Power Rules 3.3.1 (a), a Palma rifle is “a rifle with metallic sights chambered for the .308/7.62 or .223/5.56 NATO cartridge case”.
When talking about Palma rifle competition, the traditional course of fire is at three yardages, 800, 900 and 1000 yards. The first Palma match was conducted by the NRA in 1875 at New York’s Creedmoor Range. The original Palma trophy, now lost to the ages, was commissioned by none other than Tiffanys. SEE 2018 SSUSA Camp Atterbury Long Range Gallery HERE.
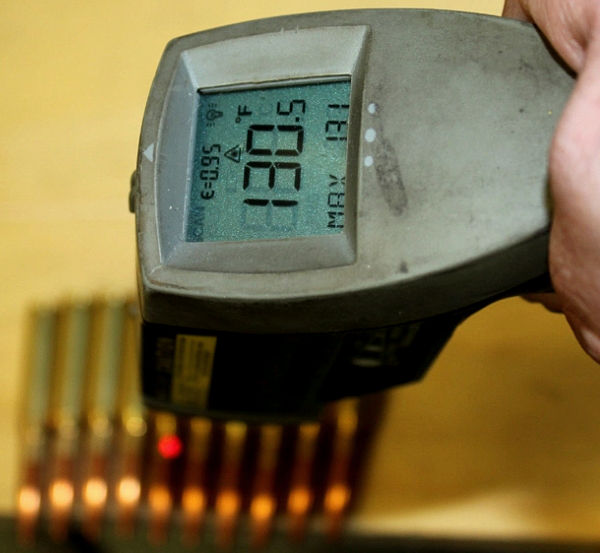
In this .308 Win test, 70° F ammo shot 96 FPS slower than ammo heated to 130.5° F. And the 130.5° ammunition was 145 fps faster than ammo taken right out of the freezer (at 25.5° F). That’s a huge difference…
Today is the first day of August. That means most parts of the country will soon be encountering peak summer heat. Some ranges in the Western states have already recorded temperatures well over 100 degrees F during matches. When dealing with extreme summer heat, you should make a serious effort to keep your ammo at reasonable temperatures. When possible, keep ammo in a cooler in the shade.
Never leave boxes of ammo out in the hot sun. Even with powders advertised as “temp stable” you can see significant velocity increases when ambient temps reach 90 degrees and above. This article explains how temperature extremes (both hot and cold) can alter bullet velocities. The velocity differences between very cold ammo and very hot ammo can be very large, as this article explains.
EDITOR’s NOTE: The Sierra tester does not reveal the brand of powder tested here. Some powders are much more temp sensitive than others. Accordingly, you cannot extrapolate test results from one propellant to another. Nonetheless, it is interesting to see the actual recorded velocity shift with ammo temperature variations in a .308 Win.
Written by Sierra Chief Ballistician Tommy Todd This story originally appeared in theSierra Bullets Blog
A few weeks ago I was attending the Missouri State F-Class Match. This was a two-day event during the summer and temperatures were hot one day and hotter the next. I shot next to a gentleman who was relatively new to the sport. He was shooting a basically factory rifle and was enjoying himself with the exception that his scores were not as good as he hoped they would be and he was experiencing pressure issues with his ammunition. I noticed that he was having to force the bolt open on a couple of rounds. During a break, I visited with him and offered a couple of suggestions which helped his situation somewhat and he was able to finish the match without major issues.
He was shooting factory ammunition, which is normally loaded to upper levels of allowable pressures. While this ammunition showed no problems during “normal” testing, it was definitely showing issues during a 20-round string of fire in the temperatures we were competing in. My first suggestion was that he keep his ammunition out of the direct sun and shade it as much as possible. My second suggestion was to not close the bolt on a cartridge until he was ready to fire. He had his ammo in the direct sunlight and was chambering a round while waiting on the target to be pulled and scored which can take from a few seconds to almost a minute sometimes.
This time frame allowed the bullet and powder to absorb chamber [heat] and build pressure/velocity above normal conditions. Making my recommended changes lowered the pressures enough for the rifle and cartridge to function normally.
Testing Effects of Ammunition Temperature on Velocity and POI
After thinking about this situation, I decided to perform a test in the Sierra Bullets underground range to see what temperature changes will do to a rifle/cartridge combination. I acquired thirty consecutive .30 caliber 175 grain MatchKing bullets #2275 right off one of our bullet assembly presses and loaded them into .308 Winchester ammunition. I utilized an unnamed powder manufacturer’s product that is appropriate for the .308 Winchester cartridge. This load is not at the maximum for this cartridge, but it gives consistent velocities and accuracy for testing.
I took ten of the cartridges and placed them in a freezer to condition.
I set ten of them on my loading bench, and since it was cool and cloudy the day I performed this test I utilized a floodlight and stand to simulate ammunition being heated in the sun.
I kept track of the temperatures of the three ammunition samples with a non-contact laser thermometer.
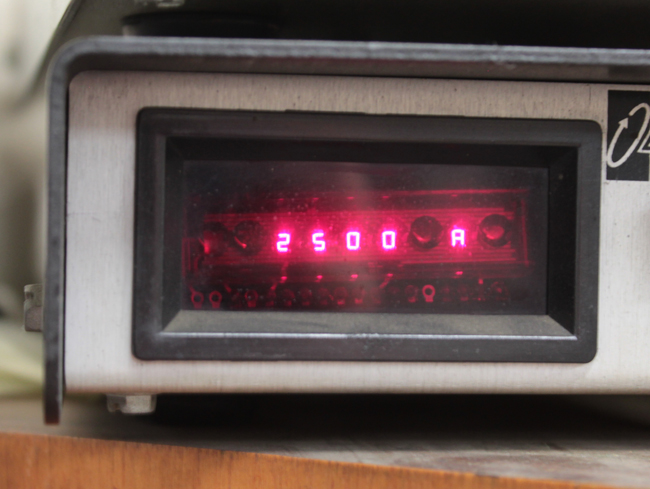
The rifle was fired at room temperature (70 degrees) with all three sets of ammunition. I fired this test at 200 yards out of a return-to-battery machine rest. The aiming point was a leveled line drawn on a sheet of paper. I fired one group with the scope aimed at the line and then moved the aiming point across the paper from left to right for the subsequent groups.
NOTE that the velocity increased as the temperature of the ammunition did.
The ammunition from the freezer shot at 2451 fps.
The room temperature ammunition shot at 2500 fps.
The heated ammunition shot at 2596 fps.
The tune window of the particular rifle is fairly wide as is shown by the accuracy of the three pressure/velocity levels and good accuracy was achieved across the board. However, notice the point of impact shift with the third group? There is enough shift at 200 yards to cause a miss if you were shooting a target or animal at longer ranges. While the pressure and velocities changed this load was far enough from maximum that perceived over pressure issues such as flattened primer, ejector marks on the case head, or sticky extraction did not appear. If you load to maximum and then subject your ammunition to this test your results will probably be magnified in comparison.
This test showed that pressures, velocities, and point-of-impact can be affected by temperatures of your ammunition at the time of firing. It’s really not a bad idea to test in the conditions that you plan on utilizing the ammo/firearm in if at all possible. It wouldn’t be a bad idea to also test to see what condition changes do to your particular gun and ammunition combination so that you can make allowances as needed. Any personal testing along these lines should be done with caution as some powder and cartridge combination could become unsafe with relatively small changes in conditions.
Share the post "How Ammo Temp Can Affect Velocity — Freezing to 130 degrees F"
Many years ago, when we decided to do a story about SAKO’s TRG series of rifles, we remembered our friend Terje Fjørtoft in Norway. Terje has owned, and hunted with, both the TRG-22 (in .308 Win), and its big brother, the TRG-42 (chambered in .338 Lapua Magnum). Unlike many TRG owners in the USA, Terje has carried his “tactical hunters” into the field, and tested their effectiveness on large game in both coastal and mountain environments, in warm weather and cold. Terje tells us the TRGs have proven to be rugged and reliable. And they are accurate. The .308 Win TRG-22 delivers about 0.45 MOA groups at 420 yards shot from bipod. The .338 LM TRG-42 shoots about 0.55 – 0.7 MOA at that distance.
A Tale of Two TRGsby Terje Fjørtoft
I live in Brattvåg, along the coast of Norway, but I hunt and shoot at the nearby island “Fjørtoft” (same as my last name) and a small island outside Fjørtoft. I grew up on Fjørtoft as a child, and we hunt seals there in the spring and fall. The large, top photo shows me with my black TRG-42 338 Lapua Mag (“LM”) during a seal hunt a couple years ago. Click on the thumbnail at right to watch a video that shows me shooting the .338 LM. Most of the photos in this story are from that hunt. Because the .338 LM was really “overkill” on the seals (and expensive to reload), I replaced that rifle with a TRG-22 in .308 Winchester.
We hunt seals primarily for wildlife control. This is because the seals carry an internal parasite, called “Kveis”, a small worm that breeds inside the seals (after eating contaminated fish). When the seals expel the Kveis into the water, the Kveis larvae are consumed by the fish and then the fish become unfit to eat. The parasite literally eats the fish from the inside out. It’s not very pretty and it has hurt our Norwegian fishing industry. So there is an important purpose for our seal hunting. We hunt mostly from islands, targeting the seals in the water, and retrieving them with a small boat.
Because the seals spend most of their time in the water, a seal-hunter needs a very accurate rifle [to take head shots at distance]. I like the TRG-22 because it is very accurate out of the box, with a very nice bipod that works well in the field. The stock is comfortable with good adjustment range. The TRG features a 10-rd magazine and the barrel is pre-threaded for a muzzle brake or suppressor.
I have also used my TRGs for hunting big game, deer and what Americans call “Elk”. You can see, further down on this page, a picture from a hunting stand taken late in the evening, in the fading light. Yes I successfully bagged a nice buck during that trip with my TRG-42. When hunting, I use a Leica 900 rangefinder, Swarovski 7×42 Habicht binoculars, and a Silva windwatch. For Optics on the TRG-22, I have a Zeiss 6-24×56 scope, in Tikka Optilock rings. To get more scope adjustment I milled 0.9 mm off the front scope base mount. The Zeiss is great for viewing small targets past 400 meters. It was very difficult to find a longer shooting place than 575 meters on this Island (Uksnøy) but I found a place where I can shoot out to 930 meters, and I’ve made an 80-cm steel gong for a target. At this range, the bullet must fly nearly all the distance over the water.
Terje Shooting the TRG-42 without suppressor. Big recoil, big flash.
Both the TRG-22 and TRG-42 are very accurate right out of the box. The only thing I did before I first shot the TRGs was to clean the barrels very thoroughly. This is because the SAKO factory test shoots the gun without cleaning the barrel. I also adjust the cheek piece upward when shooting the rifles with a big scope. However, if you raise the cheek piece too high you can’t get the bolt out without removing the whole cheek piece. The only real modification I’ve made to my TRGs was to put rubber foot pads on the feet of the SAKO factory bipod. This gives the bipod better grip on slick surfaces such as concrete, or the rocks on the offshore islands.
.338 LM vs. .308 Win — Smaller Can Be Better
A few years ago I had a black TRG-42 (338 LM), but after a year, I sold it, and ordered a TRG-22 from the SAKO factory. After a one-year wait, I got the new green TRG-22 in February this year. One main reason I changed to .308 Win was the cost of ammo. I can reload .308 Win ammo for about one-third the price that it costs to reload .338 LM. One other reason is that my usual shooting distance is about 390 meters–at that distance the .308 is more than effective enough. Also, with the .338 LM, the barrel and the suppressor heated up after only a few shots, but with my new .308, I can shoot at my own pace without this problem. After my most recent shooting trip I once again confirmed how accurate, and fun-to-shoot, the TRG-22 is. I think now the TRG-22 has become my favorite plinking gun.
Though it is fun to experience the big boom and flash of the .338 LM, I’ll admit that it is just too much rifle for most applications. The .338 LM is REAL overkill for seal hunting. Here in Norway we have a rule that the smallest caliber we can use is 6.5×55 with a 140gr (or heavier) bullet, but everyone who hunts seals knows that the seals stay mostly in the water, and therefore you must take a headshot at distance up to about 200 meters. Making the headshot with a smaller caliber is advised for two reasons. First, when a big .338 bullet hits the water, there is a danger it will skip and ricochet quite some distance. Second, if you use too powerful a load/gun/caliber and take a headshot on a swimming seal, the seal sinks like a rock.
Reloading for the TRG-22 (.308 Win) With the TRG-22, I found it was easy to get an accurate load. My groups with 155gr Scenars are consistently good with a variety of different powders. I’ve tried both light and heavy bullets, but I favor the 155gr Scenars over the 185gr Scenars because the 155s fly a lot faster and drop less.
Three loads (all with Fed 210m primers) that have worked well are: 155gr Scenar with VV N150, 885m/sec; 155gr Scenar with Norma N-11, 890m/sec, and 185gr Scenar, VV N150, 770m/sec. Norma N-11 is a low-cost powder for target shooting. N-11 is similar to Norma 203B or Norma 202 but it varies quite a bit from lot to lot.
I use a RCBS Rock Chucker press, and currently use a standard RCBS full-length die kit to reload my .308 rounds. However, I recently ordered a Redding Competition 3-die set with a .335 bushing. I look forward to trying the Reddings. I have just started to test different seating depths. The 155s just “kiss” the lands at 74.10 mm. I’ve tried 74.00 mm, 74.10 mm and 73.55 mm, but so far saw no significant differences.
Reloading for the TRG-42 (.338 LM)
For the .338 LM, I started with a 250gr Scenar and 95 grains of Vihtavuori N-170. That load was very accurate at about 850 m/sec, but it produced excessive muzzle flash. And, in the winter, the muzzle velocity was inconsistent, and there was too much unburned powder. Next I tried Norma N-15, which proved very accurate at about 880 m/sec. With that load I shot my best TRG-42 group at 380 meters. I set the 250gr Scenar to touch the rifling with 93.2 mm COAL, and I used Federal 215m primers in Lapua-brand brass. Norma MPR2 and VV N-560 (860 m/sec) also were very accurate with the 250 Scenar.
My seal hunting bullet was the 200gr Nosler BT. This bullet grouped very well with 90-94 grains Norma N-15. Velocity was about 970m/sec if I remember correctly. I also tried the 300gr Sierra MK, and got 1/2″ 3-shot groups at 100 meters with 93.5 grains of VV N-170, but this combination produced terrible groups at longer range.
Loading for the .338 LM was not difficult — about the same as loading for .308 Win, except that you use nearly twice the amount of powder. I didn’t crimp the bullets in the neck, didn’t use any special tricks or neck lube. I used RCBS .338 LM full-length die. That functioned, but it would not be my first choice today. Overall, my better loads in the .338 shot in the 0.5-0.7 MOA range. My best group was four shots in 25mm (1″) at 380 meters (416 yards).
Hunting in Norway
I’m not a competitive sport-shooter. Normally, the only time I go to a “commercial” rifle range is to take the test for my hunting license. Every year, I must re-qualify for a shooting license to hunt big game and seals.
Hunters Tested Annually
In Norway, you must pass an actual shooting test before you can hunt big game. This test requires five shots at a deer silhouette target at 100 meters. No rests are allowed–you must shoot off-hand or with a sling only. You have to place five shots inside a 30 cm circle over the front leg.
Every big game hunter that passes this test is authorized to hunt at “dusk and dawn” and in moonlight. So, we do a lot of our hunting in the twilight hours. However, no night-vision or artificial illumination (spotlights) are allowed. We usually hunt deer at dusk and dawn. In the evening, we go on post two to three hours before it is dark, and sit there waiting for the deer to show up–hopefully before it is too dark. In the morning we go to the post one hour before you see any light of the sun, and wait for the deer to show up until the daylight. But when it is full moon we sometime have enough light to hunt in the middle of the night. In the photo, you can see a deer through the scope of my TRG-42. This was very late in the evening. CLICK HERE for BIG Photo.
Sound Suppressors for Hunting Rifles
Suppressors are legal to use for hunting in Norway. I have suppressors on all my rifles, even my little CZ 452 in 17 HMR. To me, shooting a rifle without a suppressor is like driving a car without an exhaust system. The suppressor reduces both noise AND recoil significantly. With a good suppressor, there is no loss of accuracy. The only “negative” in using a suppressor is extra weight on the end of the barrel.
I crafted my own home-made suppressor. It’s similar to my commercially-made TRG-22 suppressor, but the core is made from titanium to be lighter in weight and more corrosion-resistant. I used a lathe at work to craft the inside of the new suppressor. The core of the unit is built from a 27.5 cm X 40mm round bar of titanium while the outer cylinder is made from a 42mm stainless steel tube. I wanted to use titanium for the exterior cylinder as well, but I couldn’t source the right size titanium tube.
Commercial Suppressor on TRG-42
Comparing .308 Win vs. 6mmBR I also have a 6BR hunting rifle (compensated of course). I have a lot of field time with the 6BR rifle, and feel very confident with that gun. When I got the Krieger 6mmBR barrel on the SAKO Varminter, I fell in love with that rifle from day one, and that rifle is my first choice for small game hunting.
I also like the TRG-22 gun very much and enjoy it more and more with each new field trip. That .308 is my big game rifle and my long-range target rifle.
I recently tested my TRG-22 rifle at 387 meters. This was just “fun shooting” at steel plates, and I didn’t measure groups. But I was happy with the results. Once I corrected for the 5 m/sec crosswind, I was able to put five successive shots on a 10 cm (4″) diameter steel target at 387 meters (423 yards).
My SAKO Varminter in 6mm BR and my TRG-22 are two very different rifles. The TRG-22 is much heavier. I guess the TRG-22 is about 6.5-7 kg while my SAKO 6BR is about 4.5-5 kg, both with suppressor, scope, and bipod. The 6BR with suppressor is much quieter than the TRG-22 with suppressor. The recoil of the 6BR is a lot softer than the TRG-22. So far my 6BR is more accurate. A typical three-shot group with the 6BR is 25-40 mm at 387 meter (423 yards), and that is with just 10X magnification from a Zeiss scope. With my TRG-22, my 3-shot groups run about 50-60 mm, shooting with bipod and beanbag. But I think with a better .308 Win reloading die and more practice, I can improve my groupings with the TRG-22.
SPEC SHEET
The SAKO TRG-22 and TRG-42 are built in Finland by SAKO, a subsidiary of Beretta. In America, the guns are distributed by Beretta USA. Both TRGs (22/42) are available in forest green or a matte black textured finish. A two-stage match trigger is standard.
The stock is somewhat unconventional. It is an external shell, bolted to an internal metal chassis. The action bolts directly to the chassis, without bedding. The injection-molded stock is adjustable for comb height, length of pull (with spacers), vertical butt-pad height and cast-off.
Weight TRG-22 4.7 kg (black) 4.9 kg (green)
Barrel TRG-22 660 mm (26″), hammer-forged, optional stainless or phosphate finish
Outstanding New Powder from Alliant — Reloder TS 15.5 New Product Review by DasherDude
Alliant has devloped a new temperature-stable powder for long range applications. According to Alliant, this is a “slower burning version of the popular RL 15 with TZ technology” and brings some significant advantages over RL 15 and powders in the similar burn rate range (like Varget). The powder is named “Reloder TS 15.5″ (RL TS 15.5) and is created using the same TZ technology used in Reloder 16 (RL 16) and Reloder 23 (RL 23) whereby it manipulates the response of the propellant and resists the natural tendency to generate more pressure at higher temperatures and less pressure at lower temperatures. That makes RL TS 15.5 extremely stable across the full temperature range a shooter may encounter.
When Can You Get This New Alliant RL TS 15.5 Powder?
Alliant tells us that new RL TS 15.5 should start arriving on dealer’s shelves by the end of the month. Officially: “We will be putting it into distribution probably in April 2021 sometime”. Remember you heard about this powder here first.
The burn rate of RL TS 15.5 lies between RL 15 and RL 16 making it ideal for loading heavier bullets in .308 Win, 6.5 Creedmoor, 6mm Creedmoor, .223 Rem, and 6mm wildcats such as the 6mm Dasher or 6 BRA (BR Ackley). Being a bit slower than RL 15, new TS 15.5 offers higher velocities for the same charge weight as well as ability to load heavier charges for additional velocity without generating excessive pressure.
Testing Reloder TS 15.5 in 6 Dasher and .308 Winchester
I got a chance to test a pre-production powder sample of RL TS15.5 from Alliant. In my own tests with my 6mm Dasher and .308 Win, I extensively compared it with Varget that I normally use in these cartridges. In both cases, the results were nothing short of spectacular.
Powder Characteristics and Metering
This is an extruded powder and looks and feels similar to RL 16. The kernels are about 0.03 – 0.04 grains each (with the resolution of A&D FX 120i scale). RL TS 15.5 meters very well, although I had to slightly adjust the AutoTrickler to get it to meter perfectly.
As I found, later in the testing, that the powder compresses before it can generate excessive pressure in the Dasher, a drop tube helps to fill the case more efficiently if higher charges and velocities are desired.
6mm Dasher Test Rifle and Load
For testing I used my 6mm Dasher benchrest match rifle. This has a BAT 3L action, 28″ Krieger barrel, and McMillan stock. I use Lapua brass with CCI 450 primers to propel Berger 105gr Hybrids and this combination shoots quite well.
Test Firearm: 6mm Dasher, Bat 3L, 28″ 6mm HV Krieger Barrel, McMillan Stock.
Components: Lapua fire-formed brass, CCI 450 primers, Berger 105 grain Hybrid
Powder: Alliant Reloder TS 15.5
Load Testing and Velocities
Test in 6mm Dasher — Excellent Velocity, Low ES/SD
The testing comprised of shooting groups at 100 yards with increasing powder charges (OCW method) and then selecting a node. That node was found at 33.4 grains. The accuracy was excellent with remarkably low Extreme Spread and Standard Deviation (ES/SD)
My usual load is 32.9 grains of Hodgdon Varget which runs 2925 fps with an ES of around 12 fps and SD around 5 fps. For comparison, 32.9 grains of RL TS 15.5 delivered a velocity of 3022 fps. That is 97 fps greater than Varget for the same load weight (of RL TS15.5).
When used in the 6 Dasher, RL TS 15.5 had ES of 13 for 28 Shots — Remarkable!
More Velocity Plus Consistent ES/SD With the Dasher since the new node (the sweet spot) was found at 33.4 grains, that resulted in a velocity of 3050 fps (a 125 fps velocity increase) from the same rifle setup. Not only did the velocity increase, but the SD was lowered to 3.6 with an ES of 13 (calculated over 28 shots). You read that right… 13 fps ES over 28 shots!
At 34 grains without any drop tube, the load was compressed. However, there were no pressure signs. That indicates that the 6 Dasher cartridge can be loaded with a higher charge, if a drop tube was used.
.308 Winchester Velocity Results
Similar results (velocity gains) were obtained from my .308 Win with Berger 200.20X bullets. For the same charge of 44.2 grains, I recorded about 100 fps higher velocity with RL TS 15.5, compared to Varget.
Accuracy Results at 100 and 300 Yards — Very Impressive
How does RL TS 15.5 shoot on paper? Very well indeed.
6mm Dasher Load Testing with Various RL TS 15.5 Charge Weights
The groups on paper told similar stories. For the OCW method, I shot groups of increasing charges at 100 yards and then selected 33.4 grains as the optimum charge (incidentally, it was one ragged hole).
While testing at 300 yards, the conditions were very windy but since I was testing for vertical, the point of aim was kept the same for every shot. No attempt was made to correct for wind, so the groups spread horizontally (15 mph, 3 o’clock wind) but the vertical spread of all the groups was under 0.3 MOA. That gives me great hopes for the long-range capabilities of the powder.
Thoughts and Conclusions
For the past year, Alliant powders have been a welcome surprise for this tester and they have found a home in my reloading room. I struggled to find a load for my .284 Win with H4831sc and H4350 before trying out Reloder 16 and voila, it was perfect.
I have used Hodgdon Varget powder for a long time in both my 6mm Dasher and my .308 Winchester. With the .308 Win I’ve used various bullets from 168 to 200 grains. Varget has served me well. I do always need to keep the powder charge in check and so the velocities are held back a bit. Now RL TS 15.5 looks like a very impressive competitor to Varget.
With Reloder TS 15.5, Alliant seems to have delivered a harmonious mix of great accuracy, higher velocities, and lower SDs without creating excessive pressure. All of this is delivered with a very temperature-stable package. The higher velocities may allow some shooters to hit a new, better-performing node. These qualities are highly sought after by long range shooters. Accordingly, I have no qualms in saying that Alliant has created a winner here.
Alliant Official Load Data for Reloder TS 15.5
Along with the cartridge types shown below, Alliant has also released load data for .30-06 Springfield, 7x57mm Mauser, .270 Win, .260 Rem, 6.5 Grendel, .257 Roberts, 22-250 Rem, and 224 Valkyrie. CLICK for all data (larger format).
Superb Accuracy with Criterion Pre-Fit Barrel and Creedmoor Sports Ammo
Check out that 0.188″ group. Can you believe that was shot with factory .308 Win ammo? A while back our friends at Criterion Barrels tested some .308 ammo from Creedmoor Sports. This was loaded with Lapua’s 175gr Scenar HPBT bullet in Lapua brass. The results speak for themselves. Any time factory ammo can shoot inside quarter-MOA, that’s impressive. This ammo was used in a “Rem/Age” project rifle. That term refers to a Remington action rifle that has been re-barreled with a pre-fitCriterion barrel. The new barrel is secured with a Savage-style barrel nut. Hence the term “Rem/Age” or “Rem-Age”.
Criterion posted: “I think we may have a new favorite factory match load for the nitrided Rem/Age build.” Another reader added: “[Creedmoor’s] 175 Scenar .308 ammunition is top notch.” FYI, this group was shot on our load development target, which you can download for free from our Targets Page.
Why do Criterion barrels shoot so well? One reason is that Criterion’s barrel steel is carefully stress-relieved. In the photo below, Criterion Rack 1A (aka the “Coffin”) has been loaded with barrel blanks — made ready for the stress-relieving process.
Working with Pre-Fit Barrels
While they may require the purchase of some additional tools and a bit of a learning curve to install, using Rem/Age pre-fit barrels offer advantages over gunsmith chambering and barrel-fitting. In this video, 8541 Tactical explains how to install a Criterion 6.5 Creedmoor “pre-fit” barrel. You save money and time — you don’t have to wait for a gunsmith to chamber the barrel. While Criterion recommends that a competent gunsmith oversee the pre-fit installation, if you understand the use of go/no-go gauges and you have a barrel vise and action wrench set up to remove the original barrel, putting on a pre-fit barrel CAN be a DIY project. You don’t have to pack up your rifle to ship it off to a smith.
Share the post "Criterion Barrel — Great Accuracy with Creedmoor Sports Ammo"
Brownells is a well-known retailer of guns, gun parts, tools, accessories, ammo, and pretty much everything gun related. Brownells has a very active video production department that releases new “how-to” and product information videos every week. These videos offer helpful advice on gun cleaning/maintenance, reloading, as well as selecting/assembling components for various kinds of rifles. There now over 1000 videos on the Brownells YouTube Channel, this really is a remarkable resource.
One of our favorite regular Brownells video features are the Quick Tip Cartridge Comparisons. Brownells tech staffers look at a pair of cartridge types and reveal the noteworthy differences. Here are three recent Cartridge Comparison videos from Brownells.
1. 6.5 Creedmoor vs. .260 Remington
Brownells Gun Tech Caleb Savant compares and contrasts the 6.5 Creedmoor rifle cartridge with the older .260 Remington. Both cartridges are often loaded to nearly the same overall length (OAL), but with more of the bullet inside the neck for the .260 Rem. The .260 Remington is basically a .308 Winchester necked down to 6.5mm (.264″). The 6.5 Creedmoor has a shorter case, with a more modern 30-degree shoulder angle. With the same cartridge OAL, that can make it possible to load longer-ogive, higher-BC bullets. However, with a long-freebore chamber, the .260 Rem can certainly run any high-BC 6.5mm bullet made.
The .260 Remington can, theoretically, generate a bit more velocity at the muzzle because its longer case holds a bit more powder. However, with high-quality Lapua brass, in the real world, the 6.5 Creedmoor comes pretty darn close to .260 Rem performance with any given bullet weight. Moreover, the 6.5 Creedmoor is available with small primer pocket brass from Lapua. This brass may give a higher number of reloading cycles before case-head expansion becomes a problem. For the hunter, both choices are good, but the older .260 Rem may feed a bit better from a magazine, given the .260’s case taper and longer body. Overall, we favor the 6.5 Creedmoor for its versatility and efficiency, but the .260 Rem is a good cartridge too.
2. 6.8 SPC vs. 6.5 Grendel
Brownells Gun Tech Caleb Savant compares two medium-caliber cartridges that can work in AR15-platform rifles: the 6.5 Grendel and the 6.8 SPC (aka 6.8mm Remington “Special Purpose Cartridge”). The 6.5 Grendel is typically loaded with a high-BC .264″ bullet, while the 6.8 SPC has a larger-diameter .277″ bullet. Both have the same 2.26″ OAL as the AR-15’s standard .223 Remington / 5.56 NATO round. The big difference is the 6.5 Grendel’s faster velocity and flatter trajectory. With the same bullet weight, Brownells says the 6.5 Grendel will be about 100 fps faster than the 6.8 SPC. Given a 100-yard zero, the 6.5 Grendel will drop about 8.5″ at 300 yards, while the 6.8 SPC will drop 10.5″ at the same range. The 6.5 Grendel is probably a better choice for long-range targets, at least when loaded with a higher-BC bullet. A big difference is brass. You can get superb Lapua brass for the 6.5 Grendel. Not so for the 6.8 SPC, which really has never developed into a widely popular accuracy round.
3. 7.62×51 NATO vs. .308 Winchester (Subtle differences)
Brownells Technician Caleb Savant talks about the .308 Winchester and 7.62x51mm NATO. Most shooters know that both rounds have the same external dimensions. In fact, the military 7.62×51 was developed from the civilian .308 Winchester. So… can they be used interchangeably? The 7.62×51 cartridge normally can be fired from any rifle chambered in .308 Winchester because the 7.62 is spec’d for a lower pressure than SAAMI max in the .308 Win. However, we have encountered some British and Austrian 7.62×51 NATO milsurp ammo that was VERY hot — more than a typical commercial .308 Win Load. Accordingly you should always be careful when shooting new 7.62×51 ammo in your rifles. Likewise you should be careful about shooting higher-pressure .308 Win in some 7.62 NATO rifles. The 7.62×51 NATO chamber is slightly longer, and the cartridge’s case is typically a bit thicker, so it will “flow” and expand into the extra space. NOTE: Some newer rifles with 7.62×51 NATO chambers ARE made to handle .308 Win ammo. Check the owner’s manual or contact your rifle’s manufacturer to find out for sure.
Share the post "Cartridge Comparions from Brownells Video Vault"
We are often asked “Can I get more velocity by switching primer types?” The answer is “maybe”. The important thing to know is that changing primer types can alter your load’s performance in many ways — velocity average, velocity variance (ES/SD), accuracy, and pressure. Because there are so many variables involved you can’t really predict whether one primer type is going to be better or worse than another. This will depend on your cartridge, your powder, your barrel, and even the mechanics of your firing pin system.
BE SAFE: Glen Zediker recommends decreasing your load ONE FULL GRAIN when changing to a different primer type, one that you haven’t used before.
Interestingly, however, a shooter on another forum did a test with his .308 Win semi-auto. Using Hodgdon Varget powder and Sierra 155gr Palma MatchKing (item 2156) bullets, he found that Wolf Large Rifle primers gave slightly higher velocities than did CCI-BR2s. Interestingly, the amount of extra speed (provided by the Wolfs) increased as charge weight went up, though the middle value had the largest speed variance. The shooter observed: “The Wolf primers seemed to be obviously hotter and they had about the same or possibly better ES average.” See table:
Varget .308 load
45.5 grains
46.0 grains
46.5 grains
CCI BR2 Primers
2751 fps
2761 fps
2783 fps
Wolf LR Primers
2757 fps
2780 fps
2798 fps
Speed Delta
6 fps
19 fps
15 fps
You can’t extrapolate too much from the table above. This describes just one gun, one powder, and one bullet. Your Mileage May Vary (YMMV) as they say. However, this illustration does show that by substituting one component you may see significant changes. Provided it can be repeated in multiple chrono runs, an increase of 19 fps (with the 46.0 grain powder load) is meaningful. An extra 20 fps or so may yield a more optimal accuracy node or “sweet spot” that produces better groups. (Though faster is certainly NOT always better for accuracy — you have to test to find out.)
WARNING: When switching primers, you should exercise caution. More speed may be attractive, but you have to consider that the “speedier” primer choice may also produce more pressure. Therefore, you must carefully monitor pressure signs whenever changing ANY component in a load. Glen Zediker recommends decreasing your load ONE FULL GRAIN when changing to a different primer type, one that you haven’t used before.
Share the post "Yes Both Velocity and Pressure Can Vary with Primer Choice"
Do you use factory ammo in your hunting rifles? Perhaps you buy bulk centerfire ammo for your AR15 or varmint rifle. Then this book is for you.
If you ever shoot factory ammo, you should consider getting Ammo & Ballistics 6. This resource book lists over 2,600 different loads for 200+ cartridge types from .17 Mach 2 up to .700 Nitro Express, including the most popular centerfire and rimfire cartridges (both rifle and handgun). In this updated-for-2020 Sixth Edition, there are over 3,000 tables covering virtually every caliber and every load for all commercially-loaded hunting ammunition sold in the USA. Tables include velocity, energy, wind drift, bullet drop, and ballistic coefficients up to 1,000 yards.
Ammo & Ballistics 6 helps you select ammo for a hunt — quickly compare the velocity and knock-down power of various commercial ammo. This book can help you choose a caliber/chambering for your next hunting rig.
Verified Book Purchaser Reviews
“Outstanding reference guide for shooters and ballistic enthusiasts alike. Has data on velocity, energy delivered, Taylor KO index, windage and elevation on numerous loadings for hundreds of [cartridge types]. Each cartridge has all dimensions labeled (i.e rim, case length, neck, etc.), and has an informative description of the cartridges history/relevance.” — S. Step, 2017
“Great heaps of data! This volume has pages and pages of new data for .22LR like the hot Velocitor, and also on the .22 WMR from 30 grains up into the 50s. Most importantly there is lots of range data, drop, windage, kinetic energy, etc. — Terrific reference guide….” — E. Svanoe
Ammo & Ballistics 6 contains data and illustrations on virtually every sporting cartridge sold in the USA. This 2020 Edition covers 200-plus cartridge types from .17 Mach 2 up to .700 Nitro Express.
Share the post "Ammo Reference Book Covers 200+ Cartridge Types"


 The Concept — a ‘Do-It-All .308 Win’


 Today is the first day of August. That means most parts of the country will soon be encountering peak summer heat. Some ranges in the Western states have already recorded temperatures well over 100 degrees F during matches. When dealing with extreme summer heat, you should make a serious effort to keep your ammo at reasonable temperatures. When possible, keep ammo in a cooler in the shade.


 Because the seals spend most of their time in the water, a seal-hunter needs a very accurate rifle [to take head shots at distance]. I like the TRG-22 because it is very accurate out of the box, with a very nice bipod that works well in the field. The stock is comfortable with good adjustment range. The TRG features a 10-rd magazine and the barrel is pre-threaded for a muzzle brake or suppressor.
 Both the TRG-22 and TRG-42 are very accurate right out of the box. The only thing I did before I first shot the TRGs was to clean the barrels very thoroughly. This is because the SAKO factory test shoots the gun without cleaning the barrel. I also adjust the cheek piece upward when shooting the rifles with a big scope. However, if you raise the cheek piece too high you can’t get the bolt out without removing the whole cheek piece. The only real modification I’ve made to my TRGs was to put rubber foot pads on the feet of the SAKO factory bipod. This gives the bipod better grip on slick surfaces such as concrete, or the rocks on the offshore islands.
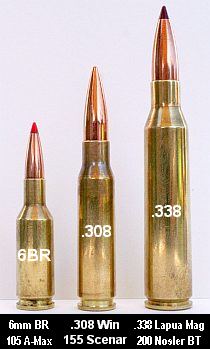 .338 LM vs. .308 Win — Smaller Can Be Better
 Reloading for the TRG-22 (.308 Win)
 Reloading for the TRG-42 (.338 LM)
 Hunting in Norway


 I also have a 6BR hunting rifle (compensated of course). I have a lot of field time with the 6BR rifle, and feel very confident with that gun. When I got the Krieger 6mmBR barrel on the SAKO Varminter, I fell in love with that rifle from day one, and that rifle is my first choice for small game hunting.


 With the Dasher since the new node (the sweet spot) was found at 33.4 grains, that resulted in a velocity of 3050 fps (a 125 fps velocity increase) from the same rifle setup. Not only did the velocity increase, but the SD was lowered to 3.6 with an ES of 13 (calculated over 28 shots). You read that right… 13 fps ES over 28 shots!


