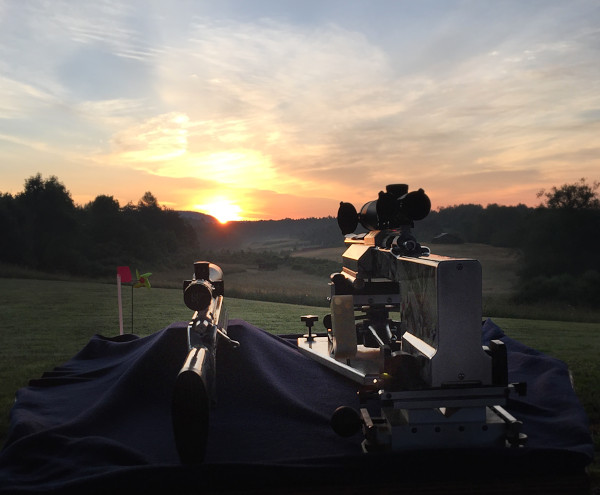
Pieter “Piet” Malan is a South African precision rifle shooter and hunter who has created an impressive YouTube Channel with over 300 videos. While Pieter’s Impact Shooting Channel focuses primarily on tactical PRS/NRL type disciplines, his channel also includes dozens of videos of interest to hunters and anyone who handloads rifle cartridges. We particularly like Pieter’s tech review videos which explain important reloading methods and showcase new products.
Here are four Peiter Malan tech videos. Topics include annealing, hydro-forming, case priming, and how to record video with spotting scopes. As a bonus for you hunters out there, we added Pieter’s latest hunting video, Kudu Hunting Paradise Part 2. After watching that, you’ll probably want to book an African Safari.
Hydro-forming Dasher Brass Using Hammer Method
Fire-forming 6mm Dasher brass can be fairly costly if you factor in barrel life along with the cost of components. If you figure a new 6mm custom barrel, chambered and fitted by a top smith, could cost $650.00 and may only be good for 1300 rounds (in competition), barrel cost per shot is $0.50 (fifty cents). Add the price of a bullet, powder, and primer, and you are approaching $1.00 per round. Given those numbers, it makes sense to hydro-form your 6mm Dasher brass. In the USA, DJ’s Brass will hydro-form and then anneal your cases for $0.60 per case. That’s not much more than the barrel cost per shot alone for fire-forming.
In this video, Pieter Malan explains the hydro-forming process for Dasher brass and shows how he does the job using the mallet method with hydro-forming dies. He shows that it takes some technique (and multiple hammer blows) to get a good result, with a case that will fit in the chamber.
Annealing Cartridge Brass with AMP Annealer
With premium cartridge brass for popular match cartridges now approaching $1.20 (or more) per case, you want that new brass to last. But after multiple firings, even the best cartridge brass will start degrading. That’s where annealing comes in. Proper, precision annealing can restore case-neck consistency, reducing ES/SD and improving accuracy. Some top shooters anneal after every firing to keep their brass in top condition. Others will anneal after every 4-6 firings.
Today with the advanced AMP microprocessor-controlled annealing machine, brass cartridge annealing is easier yet more precise than ever. The AMP Annealer provides advanced electrical induction annealing with ultra-precise temperature control set perfectly for your cartridge type and brand of brass. In this video, Pieter shows how to use the AMP Annealer to anneal 6mm Dasher cases and other cartridge types.
Primal Rights CPS — World’s Most Expensive Priming Tool
Seating primers can be a “dark art”. Many top shooters prefer to seat “by feel” using a hand tool. Others prefer lever-equipped, bench-mounted tools that offer higher work-flow rates and less strain on the hands.
There are many bench-mounted priming options — Forster has a tool, as does RCBS, and Lee. At the top of the heap is the $600 Primal Rights Competition Primer Seater (CPS). This may be the most precise bench priming tool ever created. It is certainly the most expensive at $600.00. But the CPS delivers something special — superb, repeatable depth control, along with the ability to prime up to 1000 cases per hour. For some reloaders, that precision + productivity will justify the high price. In this video Pieter reviews his Primal Rights Competition Primer Seater.
How to Record Video Through Your Spotting Scope
There are many things viewed through a spotting scope that you might want to record for posterity — a successful hunting shot on a game animal, or steel targets being hit in a PRS match. In addition, after a match, it can be useful to study the wind conditions and mirage that occurred during a match. This can help improve your wind reading skills as you watch what unfolded.
In this video, Pieter shows how to mount a smartphone to the eyepiece of a spotting scope with a plastic adapter. This allows you to record, for posterity, what the scope is “seeing”. In addition, this allows the viewer to see the scope’s magnified image conveniently without having to strain into the eyepiece and focus on a very small exit pupil.
BONUS: Kudu Hunting Paradise Part 2 (2021)
Share the post "Impact Shooting Videos — Reloading Methods + Product Reviews"
Report by Andrew Murtagh
I’ve been a long range shooter for the past 17 years. Like most shooters in this game I’ve built, bought, and sold numerous rifles during my tenure. Here’s my tale of two special rifles, a Heavy Gun and a Light Gun, both sporting Patriotic stock graphics. I shoot both of these rifles in competition at Reade Range and The Original Pennsylvania 1000-Yard Club, aka “Williamsport”, where I serve as Club Vice-President.
My two Patriots were both acquired second-hand from a fellow shooter, Mike Bonchack. As purchased, they were very different from what they are now. I first decided to rechamber them using my reamers. The Light Gun (LG) is now chambered in 6×47 Lapua with 0.267″ neck, while the Heavy Gun (HG) is a 6mm Dasher with 0.266″ neck. After re-chambering the barrels, next I decided to get both guns up to maximum weight. The LG already had an adjustable weight system so it was easy to get it to 17 pounds. For the HG, I added an additional 25 pounds of lead/epoxy fill which was milled into the barrel channel and butt stock.
The Story Behind the Patriotic Graphics
I was initially going to have the LG painted until a close friend and fellow shooter, Tom Murtiff, suggested hydrographics. I landed on the patriotic theme because I’m a right-wing leaning Constitutionalist who still believes in the principles upon which our Founding Fathers built this nation. I wanted to express my support of our country’s Constitution and its Amendments. The search for the perfect patriot print was on.
This was my first hydrographic print experience and I was overwhelmed with the sheer number and variety of prints available. I spent a few days searching when I found the Amendment print. I then contacted Rick Schuh, owner of Boyzhid Hydrographics. He then prepped, hydro-dipped, and clear-coated the LG. Late in 2017 I purchased the HG and through a lengthy process in 2018 the metal work and stock additions were completed. I was now back in search of the perfect print. This was also lengthy, and I couldn’t find anything that spoke to me except for a suggestion to have “twin” rifles. I liked the idea — a pair of “Patriots!”
Rick was again employed to dip the Heavy Gun. That became a real undertaking because the stock alone (no metal attached) now weighed 35 pounds. He had to manufacture reinforced hangers to apply the graphics without flaw. The stock came out perfect to my eye, but not to his. On the bottom, which is rarely seen on any HG, he airbrushed a small flag to cover an area that stretched the print. Rick also made a jeweled plate for the toe of the butt.
I’m including this image so everyone can see Rick’s extra effort to make the HG perfect. I often joke with him about the added work no one would see. Well now the world can view his workmanship.
1000-Yard Heavy Gun Specifications:
Kelbly Stolle F-Class Panda dual-port, right eject with Kelbly Picatinny rail
Modified Ryan Miller HG stock bedded/pillared/weighted by David Powley
Bartlein 1:8.5-8″ gain-twist 0.236″ bore barrel
— chambered in 6mm Dasher 0.266″ neck by David Powley
Ryan Miller barrel-block fitted with nylon bushing by David Powley
Harrell’s muzzle brake
Jewell trigger
Optic One: NightForce 12-42x56mm NXS in Vortex rings
Optic Two: Leupold 7-35x56mm Mark 5 HD in Leupold rings
1000-Yard Light Gun Specifications:
BAT Machine B Action RB/LP/RE
McMillan MBR stock bedded by David Powley
Bartlein 1:8″-twist 0.237″ bore 30″ barrel
— chambered in 6×47 Lapua 0.267″ neck by David Powley
Harrell’s radial muzzle brake
Jewell trigger
NightForce 15-55x52mm Competition Scope in Harrell’s rings
Stock Graphics: Both rifles share a Patriot Constitution Hydrographic print (and clear-coat) by Rick Schuh of BoyzHid Hygrogaphics.
How to Succeed in the 1K Benchrest Games — Q & A with Andrew
Q: How Do You Choose a Chambering/Cartridge for a particular Match or Relay?
Andrew: Cartridge choice depends on the wind forecast. I always have several rifles with particular cartridge/loads for each depending on the forecast. If it’s a light wind day, say 4 to 8 mph with light gusts, I’ll be shooting either a 6×47 Lapua or a 6mm Dasher. If it’s blowing around 10 to 12 mph, I’ll campaign a 6×47 on its high node to get it down range flat. But if it’s really blowing or constantly changing direction, I shoot a big .300 WSM with either 200gr or 210gr bullet.
Q: What Is Your Load Development Method?
Andrew: Initial load development is always done over the chronograph at 100 yards until I get low ES/SD for 5 shots utilizing the same 10 pieces of absolutely perfect brass. Once I’m satisfied with the raw data I move to 1000 yards with a set of match brass and shoot 5-shot strings to find the best-performing exact powder charge. I have found this is usually within 0.20 grains of what performs well over the chronograph.
Q: What Brass, Primers, Powders, and Bullets Do You Use?
Andrew: I use Lapua brass for all things 6mm and Norma brass for my big .30 Cal stuff. I never change primers and shoot CCI BR2s or BR4s. I’m a Varget and H4350 fan. I’ve tried other powders, but they never were fruitful at 1K. Currently the only bullets I shoot are Sierra Match Kings. In the 6mm Dasher and 6×47 Lapua I use the 6mm 107gr SMK. In my .300 WSM I use .308-cal 200gr and 210gr SMKs.
Q: What Advice Do You Have for Novice 1000-Yard Competitors?
Andrew: Leave your ego at home and be willing to learn each and every time you come to the range. The discipline evolves rapidly and so must the shooter. It won’t take long to get left behind and become extremely frustrated with the game if you are not willing to learn and adapt. Find a tutor who is a great shooter and who is willing to mentor you. John Hoover and Tom Murtiff helped me and are very dear friends and great 1000-yard shooters. Believe me, having a good mentor takes years off the learning curve. Lastly, enroll in the Benchrest Shooting School offered by The Original Pennsylvania 1000 Yard Benchrest Club. I’m an instructor there and I, along with all the cadre, will help new shooters rapidly advance their skills.
Q: What’s the Secret to Judging the Wind? (In this discipline there are no target markers after each shot.)
Andrew: That’s the million-dollar question. What I do is find the condition that seems to hold. Once I’m committed into the record string, I follow it to the end. At Williamsport the wind flags can change at every distance so you simply need to pick one flag and hope it’s the one that remains truthful.
Long Range Competition Advice from a Leading 1K Benchrest Competitor
FIVE Key points to remember when shooting 1000-Yard benchrest
1. Be positive and have a clear state of mind when competing.
2. Bench set-up and shooting mechanics must always be the same — every shot. Then follow the shot through your optic.
3. Shoot two (2) shots before making a scope adjustment unless you’re under a minute of the sighter period.
4. Trust yourself and your equipment. You never want to second guess anything you put on the line.
5. Once you commit to shooting your record string, DO NOT STOP.
Invitation to Join Andrew at Williamsport in Pennsylvania
I currently serve as Vice President of The Original Pennsylvania 1000 Yard Benchrest Club, PA1000yard.com. Situated near the municipality of Williamsport, Pennsylvania, it has become known as the “Williamsport Club”. We would like to invite any shooting enthusiast to come out and visit our club during a match weekend. My rifles are only a sampling of the beauty and craftsmanship that is often on display at Williamsport’s 1000-yard line. Please stop by and visit with us.
Here are UPCOMING EVENTS at our club this summer and in 2021:
Light Gun and Heavy Gun Match #5, August 22/23, 2020
Light Gun and Heavy Gun Match Match #6, September 12/13, 2020
Light Gun and Heavy Gun Match Match #7, September 26/27, 2020
Long Range Benchrest School June, 2021
Annual 1000-Yard World Open Match July, 2021
Andrew wanted to give credit to the many talented guys who have helped with his rifle builds and his reloading equipment. In alphabetical order, these are Mike Bonchack, John Hoover, Tom Murtiff, David Powley, and Rich Schuh (Boyzhid Hydrographics).
Along with these popular cartridge types, DJ’s Brass can hydro-form 6 PPC, 30 PPC, 6 BRA, 30 BR, .260 AI, .284 Shehane and other wildcats.
Do you shoot a popular wildcat (such as the 6 BRA), but hate the hassle of fire-forming all your own cartridge brass? That takes time, costs money (in bullets and powder), and consumes precious barrel life. Well there IS a better solution — you can have your new brass hydro-formed to your exact specifications for a reasonable cost.
DJ’s Brass Service now offers custom case hydro-forming to your exact specs. Darrell Jones offers this service for a variety of popular cartridges: 6 PPC, 30 PPC, 30 BR, 6 BRA (BR Ackley), 6mm Grinch, 6 BRDX, 6 BRX, .260 Ackley, .284 Shehane and of course the very popular 6mm Dasher. After hydro-forming your brass, Darrell can also neck-up or neck-down the cases to meet your needs. For example, if you shoot a 22 Dasher, Darrell can hydro-form the cases to a 6 Dasher and then neck them down to .22 caliber. He can also turn the necks to your specs (for an additional charge).
Darrell is a hydro-forming wizard who has perfected the process over the last couple of years. He has learned a few special techniques along the way to ensure uniform case-forming.
Without revealing any trade secrets, we can say the Darrell has very special dies and Darrell doesn’t use a mallet or hammer — he has a system that is much more consistent. Darrell tells us: “Many of my customers take this brass and load it ‘as is’ and go straight to a match and shoot some very nice groups.”
With Darrell’s hydro-forming service you don’t have to buy any special dies or other equipment. Darrell says: “Simply send me the brass you need or have it dropped-shipped to me along with a fired case that has not been sized. If you need formed brass for a new build (gun not yet fired), let me know and I will size the brass to fit within .001 of a PT&G GO gauge.”
Hydro-forming by Darrell costs $0.60 (sixty cents) per case with a minimum order of $60. Neck-turning is an additional $0.60 (sixty cents) per case (or $0.75 for magnums) plus actual return shipping. The turnaround is usually less than five days.
NOTE: After cases are hydro-formed by Darrell, every case is washed, cleaned and re-annealed. This cleaning and annealing process is included in the $0.60 (sixty cents) per case price — that’s all part of the Hydro-forming service.
For more information, visit DJsBrass.com, or call Darrell at (205) 461-4680. IMPORTANT: Contact Darrell for shipping instructions BEFORE sending brass for processing. In a hurry, don’t have time? Just call Darrell and he’ll make something work for you.
Hydro-Forming Customer Reports
Here are testimonials from recent customers.
“Recently had Darrell Jones of DJ’s Brass Service hydro-form 6 BRX brass for me. The turn around time was very fast and the brass was to the exact specification I ask for. I actually shot the hydro-formed brass in a match [without further fire-forming]. It shot a 3.597″ — pretty amazing. Let DJ do the work for you!” — Mike Wilson (3 Time IBS Record Holder; 2013 and 2014 1000-yard IBS Shooter of the Year.)
“Darrell Jones of DJ’s Brass Service went far beyond the call of duty, to assist me [with my first] IBS match. I have had an interest in 1000-yard competition for many years and finally got the opportunity to try it. After researching the winning competitors, rifles, and rounds I ordered a Panda action with Krieger barrel in 6mm Dasher from Kelby’s. It was one week before the match and I had a rifle and no rounds. I contacted Darrell to hydraulically form 6mm Dasher from Lapua 6mm BR brass. He formed the brass and had it in the mail the next day[.] Since I have only reloaded for hunting or magazine fed rifles I was not familiar with proper seating to allow land engagement of the bullets for 1000-yard accuracy. Darrell took the time to advised me every step of the way to allow me to shoot a 3.158″ (5) shot group to win my first round of my first competitive match ever.” — Mike Youngblood
Share the post "Save Time and Barrel Life with Professional Case Hydro-Forming"
Since its introduction in 2001, the .300 Winchester Short Magnum (.300 WSM), has proven very popular for hunting and long-range competition. The case has ample capacity to drive the heavy .30-caliber bullets, and with proper case prep and annealing, the WSM is capable of outstanding accuracy. When Nebraskan Greg Anderson decided to build his “ultimate long-range hunter”, he selected the .300 WSM for its accuracy and its ability to drop large game at long distances. Teaming up with Chris Matthews of LongShot Rifles, Greg developed an impressive long-range hunting rig, with high-tech components to reduce weight. The 26″ barrel is a carbon-wrapped composite over a Rock Creek stainless blank. The carbon technology saved about 3 pounds over an all-steel barrel of similar length/contour.
The Manners Composite stock also features carbon fiber construction for stiffness and reduced weight. Greg’s carbon/carbon rifle tips the scales at just 10.8 pounds, including scope and bipod. A conventional rig could easily weigh 15 pounds or more. Greg’s carbon hunter has proven accurate as well as innovative. With 175gr Sierra MKs, the gun shoots well under 1/2-MOA out to 600 yards and beyond.
The Ideal Spot and Stalk Rifle
by Greg Anderson
The purpose of this project was to create a hunting rifle that would be inherently accurate at long range and have an acceptable weight for hunting in rough country. I researched the question of overall weight with several gunsmiths. The smiths confirmed that while fat-contour barrels could deliver improved accuracy, there was a price to pay and a lot more weight. With a heavy barrel, the finished rifle would be most likely weigh about 15 pounds. That’s more than I wanted to haul around in the field. To reduce barrel weight, the suggested “traditional” solutions were fluting, which would reduce barrel weight by at least one-half pound, or going with a smaller diameter barrel.
The Quest for Reduced Weight without Accuracy Loss
Fluting didn’t promise enough weight savings, and a slim, sporter barrel probably wasn’t going to deliver the kind of consistent accuracy I wanted (particularly as the barrel heated up). Accordingly, I decided to “think outside the box”. My research on lightweight barrel options lead me to Advanced Barrel Systems, (ABS) a company in Lincoln, Nebraska that once produced custom carbon-wrapped barrels. ABS President Mike Degerness could wrap a barrel to virtually any shape and diameter, allowing great stiffness even with a huge reduction in barrel weight. As the “core” for his carbon-wrapped barrels, Mike recommends a cut-rifled blank made by any of the quality cut-barrel makers. [NOTE: ABS is not taking orders at this time. You cannow get excellent carbon-wrapped barrels from Proof Research].
Significant Weight Saving with Carbon
How much weight can you save with a carbon-wrapped barrel? Well a 24-inch, #7 contour ABS carbon-wrapped barrel will weigh about 2.5 pounds compared to about 5.5 pounds for a steel barrel of the same length and contour. So, this means that you can put a fat, stiff competition-contour barrel on your hunting rifle and save over half the barrel weight compared to an all-steel barrel. Saving three pounds is a blessing when you’re carrying the rifle all day long in the field. I placed an order for a 30-caliber Rock Creek barrel blank with an 1:11.25″ twist and a finished length of 26″. Mike wrapped the barrel and finished it to an M24 contour.
Carbon Can Also Improve Barrel Vibration Damping
One interesting benefit of carbon barrel-wrapping is that the carbon components have a vibration-dampening effect. According to ABS, the extreme rigidity of the finished composite barrel dampens the vibration nodes of the barrel making it shoot like a plain steel barrel of much greater mass. Carbon fiber has a high modulus of elasticity that has the effect of lowering the amplitude of the vibration of the barrel when fired. This is what makes the ABS barrels perform so well, according to Mike.
Impressive Accuracy For a Hunting Rifle
Looking at the targets below, one may ask, “Does the rifle always shoot this well?” The answer, not surprisingly, is: “it depends on the trigger-puller”. The rifle is capable of outstanding accuracy. But it took some time and effort for me to develop the skills required to shoot up to the rifle’s inherent accuracy. I nearly always practice prone from bipod. Initially, I was getting horizontal stringing until I changed my grip and learned to be more consistent from shot to shot. Shooting a heavy-recoiling .30-caliber rifle from the ground is not the same as shooting a .223 Rem from the bench.
3-Shot Group at 200 yards | 6-Shot Group at 500 Yards
Completing the Project Build
To smith the rifle, I selected Chris Matthews of LongShot Rifles, LLC because of his expertise with the WSM cartridges and long-range shooting equipment. Because cost was a factor, we decided to use a donor Remington long action that had been used on a Remington 7mm magnum. Chris trued the action and we had Dave Kiff from Pacific Tool & Gauge grind us a bolt to fit the action more perfectly. Chris chambered the Rock barrel and installed a .300 Badger recoil lug.
Carbon-reinforced Hunting Stock from Tom Manners
Being a fan of carbon fiber technology, I selected an MCS-T stock from Manners Composite Stocks. These stocks have an extremely high strength-to-weight ratio and the high comb of the MCS-T gave an almost perfect alignment with the scope. The finished rifle was topped off with a Leupold 4.5-14x40mm LR scope equipped with M1 windage and elevation turrets. A Harris bipod completed the package. All up, including scope, steel rings, and bipod, my .300 WSM rifle with 26″ barrel weighs 10.8 pounds.
Load Development for Accuracy
I developed a load using 63.0 grains of H4350, 175gr Sierra Match Kings with Federal 210M primers in Winchester-brand brass. This load gives 2960 FPS out of my rifle. The load would shoot sub-MOA from bipod from 100 yards to 600 yards and was adopted as the “go to” load. I have also tried the 208gr Hornady A-Max in this gun. The A-Maxs shot well but the Sierras work well for everything (paper punching and hunting) so the 175gr SMK is my bullet of choice.
Brass Prep and Annealing Are Very Important
The Winchester-brand brass is good, but you have to prep it thoroughly if you want good results. My brass prep consisted of turning the necks, de-burring the flash holes (inside and out), and chamfering the case necks. Using a Sinclair neck-turning tool, I turn the necks to .0135″ per side. That provides a complete clean-up of the necks, which run about .015″ neck-wall thickness out of the box.
One thing I’ve learned to do is anneal the brass every 3-4 firings. I started to do that after I noticed that the force required to seat bullets became inconsistent after just a few loading cycles. I also experienced flyers that were going out of the group for no apparent reason. Annealing the cases every 3-4 firings has eliminated most of the unexplained flyers and annealing has also made bullet seating much, much more consistent. I’ve also noticed a significant improvement in my groups at 500 and 600 yards now that I anneal regularly. Group sizes at 600 yards can be as much as 2″ smaller with annealed brass than with un-annealed, work-hardened brass.
Greg Anderson was successful with his .300 WSM on his very first hunt, dropping a nice buck at 364 yards. Chris reports: This was on some private land in Nebraska. As daylight faded… there were a couple of bucks, but one looked to be the best of the lot. The buck gave me a broadside shot ranged at 364 yards. I settled behind the scope and took one shot. It hit right where I aimed and the buck just folded.”
Share the post "Sunday GunDay: .300 WSM Hunter with Carbon-Wrapped Barrel"
by Sierra Bullets Ballistic Technician Paul Box
One thing that plays a major role in building an accuracy load is neck tension. I think a lot of reloaders pretty much take this for granted and don’t give that enough thought.
So, how much neck tension is enough?
Thru the years and shooting both a wide variety of calibers and burn rates of powder, I’ve had the best accuracy overall with .002″ of neck tension. Naturally you will run into a rifle now and then that will do its best with something different like .001″ or even .003″, but .002″ has worked very well for me. So how do we control the neck tension? Let’s take a look at that.
First of all, if you’re running a standard sizing die with an expander ball, just pull your decapping rod assembly out of your die and measure the expander ball. What I prefer is to have an expander ball that [can give] you .002″ in neck tension [meaning the inside neck diameter is about .002″ smaller than the bullet diameter after passing the expander through]. If you want to take the expander ball down in diameter, just chuck up your decapping rod assembly in a drill and turn it down with some emery cloth. When you have the diameter you need, polish it with three ought or four ought steel wool. This will give it a mirror finish and less drag coming through your case neck after sizing.
Tips for Dies With Interchangeable Neck Bushings
If you’re using a bushing die, I measure across the neck of eight or ten loaded rounds, then take an average on these and go .003″ under that measurement. There are other methods to determine bushing size, but this system has worked well for me.
Proper Annealing Can Deliver More Uniform Neck Tension
Another thing I want to mention is annealing. When brass is the correct softness, it will take a “set” coming out of the sizing die far better than brass that has become to hard. When brass has been work hardened to a point, it will be more springy when it comes out of a sizing die and neck tension will vary. Have you ever noticed how some bullets seated harder than others? That is why.
Paying closer attention to neck tension will give you both better accuracy and more consistent groups.
Share the post "Reloading Basics: Neck Tension, Expander Balls, and Bushings"
Don’t have time to neck-turn hundreds of cases? Don’t want to invest in your own annealer? Want to try a Dasher or 6 BRA but don’t like the hassle of fire-forming? Then give Darrell Jones at DJ’s Brass a call at 205-461-4680. He can handle all the difficult brass forming/brass restoration chores efficiently and affordably. And Darrell’s turn-around time is typically very fast.
Hydro-Forming News — .284 Shehane, 6 PPC, 6 BRA, 6 Dasher and More
NEW for 2019! Darrell also just got a custom hydro die for the .284 Shehane, a wildcat based on the .284 Winchester. This is a very popular option for F-Open Shooters. He is also doing a ton of fire-forming for the 100/200 benchrest crowd, hydro-forming 220 Russian into 6 PPC. And he tells us “Those guys in Montana are keeping me very busying hydro-forming the 6BR Ackley (6 BRA). NOTE: Darrell offers Free Annealing with hydro-forming services, which starts at $60 per 100 cases.
With the price of premium brass topping $1.00 per case for popular match cartridges, it makes sense to consider annealing your brass to extend its useful life. You don’t want to chuck out brass that costs a buck a case (or more)! Forum member Darrell Jones offers a full range of brass prep, brass forming, and brass restoration (annealing, ultra-sonic cleaning) at very affordable prices. Starting at just $20 per 100 cases ($25/100 for magnum cases), Darrell’s company, DJ’s Brass, will anneal your used brass using the impressive Bench-Source annealing machines. Annealing plus ultrasonic cleaning starts at $35 per 100 cases ($45 for magnum cases). For a bit more money Darrell can also uniform the primer pockets and chamfer the case necks.
Custom Neck-Turning Services
Another great service DJ’s Brass provides is precision neck-turning. Darrell can neck-turn any size case to your specified neck-wall thickness. The price starts at $60.00 per hundred for standard cases or $75.00/100 for magnum size. And if you’ve got a bucket of brass to neck-turn, that’s fine with Darrell — he recently neck-turned 1500 pieces of brass for one customer!
DJ’s Brass can process everything from .17 Fireball all the way up to the big magnum cases. And the job gets done quickly. Darrell normally offers a 10-day turn-around. For most jobs, Darrell tells us, he gets the processed brass to the Post Office within three business days. For more info, visit DJsBrass.com or call Darrell Jones at 205-461-4680. IMPORTANT: Contact Darrell for shipping instructions BEFORE sending any brass for processing. ALL BRASS MUST BE DE-PRIMED before you send it.
• Anneal Case Necks Only ($20.00/100 normal or $25.00/100 magnum)
• Ultrasonic Cleaning, Check Necks, and Annealing ($35.00/100 normal or $45.00/100 magnum)
• Full Service: Uniform primer pockets, Chamfer case mouths, Ultrasonic cleaning, Anneal case necks (Starting at $60.00/100 call for quote)
• Neck Turning or trim-to-length Custom Order Service (Starting at $60.00/100 for standard cases and $75.00/100 for magnums)
• Hydro-Form Specialty cases (such as Dasher) $0.60 (sixty cents) each minimum of 100 pieces plus actual return shipping cost
• Expand Case Necks and Anneal brass (Call for Price)
• Create False Shoulder for Fire-Forming (Call for Price)
Hydro-Forming Cartridge Brass
Hydro-forming by Darrell costs $0.60 per case with 100-ct minimum. All hydro-formed cases are annealed at no extra charge after the forming process. After hydro-forming, Darrell can also neck-turn the case for an additional charge (call for combined quote). In addition to the 6mmBR-based cases shown below, Darrell can now hydro-form 6PPC cases from .220 Russian brass, and he also offers .284 Shehane.
With Darrell’s hydro-forming service you don’t have to buy any special dies or other equipment. Darrell says: “Simply send me the brass you need or have it dropped-shipped to me along with a fired case that has not been sized. If you need formed brass for a new build (gun not yet fired), let me know and I will size the brass to fit within .001″ of a PT&G GO gauge.”
DJ’s Brass Offers Specialized Custom Services
Darrell tells us: “At DJ’s Brass, we can handle all your brass refurbishing needs. From ultrasonic cleaning to custom annealing for specific wildcat cartridges. We can expand your necks from .22 caliber to .30 caliber and anneal shoulders for consistent bump-back. We can turn your case-necks and trim the brass to your specs. For some cartridge types, I can pre-form cases to assist in fire-forming a wildcat cartridge. We also remove the carbon build-up in muzzle brakes. Don’t lose your accuracy by having carbon build up and close off the clearance required for the most accurate bullet release through a muzzle brake.” Note: Extra charges apply for neck-turning and neck expansion operations, or specialized cartridge-forming operations. Please call Darrell at 205-461-4680 for special services pricing.
Share the post "Hydro-Forming, Annealing, Neck-Turning by DJ’s Brass"
Many novice hand-loaders believe that neck bushing Inside Diameter (ID) size is the only important factor in neck tension. In fact, many different things will influence the grip on your bullet and its ability to release from the case neck. To learn more about neck tension and “case grip”, take the time to read this article carefully. We bet you’ll gain knowledge that will let you load more accurate ammo, with better ES/SD.
Neck Tension (i.e. Grip on Bullets) Is a Complex Phenomenon
While we certainly have considerable control over neck tension by using tighter or looser bushings (with smaller or bigger Inside Diameters), bushing size is only one factor at work. It’s important to understand the multiple factors that can increase or decrease the resistance to bullet release. Think in terms of overall brass-on-bullet “grip” instead of just bushing size (or the internal neck diameter in non-bushing full-length sizing dies).
Bullet grip is affected by many things, such as:
1. Neck-wall thickness.
2. Amount of bullet bearing surface (shank) in the neck.
3. Surface condition inside of neck (residual carbon can act as a lubricant; ultrasonic cleaning makes necks “grabby”).
4. Length of neck (e.g. 6mmBR neck vs. 6mm Dasher).
5. Whether or not the bullets have an anti-friction coating.
6.The springiness of the brass (which is related to degree of work-hardening; number of firings etc.)
7. The bullet jacket material.
8. The outside diameter of the bullet and whether it has a pressure ridge.
9. Time duration between bullet seating and firing (necks can stiffen with time).
10. How often the brass is annealed.
11. Amount (length) of neck sized (e.g. you can size only half the neck).
12. Interior diameter of bushing, or neck section of non-bushing die.
— and there are others…
One needs to understand that bushing size isn’t the beginning and end of neck tension questions, because, even if bushing size is held constant, the amount of bullet “grip” can change dramatically as the condition of your brass changes. Bullet “grip” can also change if you alter your seating depth, and it can even change if you ultrasonically clean your cases.
In our Shooters’ Forum a reader recently asked: “How much neck tension should I use?” This prompted a Forum discussion in which other Forum members recommended a specific number based on their experience, such as .001″, .002″, or .003″. These numbers, as commonly used, correspond to the difference between case-neck OD after sizing and the neck OD of a loaded round, with bullet in place. In other words, the numbers refer to the nominal amount of interference fit (after sizing).
While these commonly-used “tension numbers” (of .001″, .002″ etc.) can be useful as starting points, neck tension is actually a fairly complex subject. The actual amount of “grip” on the bullet is a function of many factors, of which neck-OD reduction during sizing is just one. Understanding these many factors will help you maintain consistent neck tension as your brass “evolves” over the course of multiple reloadings.
Seating Depth Changes Can Increase or Decrease Grip on Bullet
You can do this simple experiment. Seat a boat-tail bullet in your sized neck with .150″ of bearing surface (shank) in the neck. Now remove the bullet with an impact hammer. Next, take another identical bullet and seat it with .300″ of bearing surface in another sized case (same bushing size/same nominal tension). You’ll find the deeper-seated bullet is gripped much harder.
Neck-Wall Thickness is Important Too
I have also found that thinner necks, particularly the very thin necks used by many PPC shooters, require more sizing to give equivalent “grip”. Again, do your own experiment. Seat a bullet in a case turned to .008″ neckwall thickness and sized down .003″. Now compare that to a case with .014″ neckwall thickness and sized down .0015″. You may find that the bullet in the thin necks actually pulls out easier, though it supposedly has more “neck tension”, if one were to consider bushing size alone.
In practical terms, because thick necks are less elastic than very thin necks, when you turn necks you may need to run tighter bushings to maintain the same amount of actual grip on the bullets (as compared to no-turn brass). Consequently, I suspect the guys using .0015″ “tension” on no-turn brass may be a lot closer to the guys using .003″ “tension” on turned necks than either group may realize.
Toward a Better Definition of Neck Tension
As a convenient short-cut, we tend to describe neck tension by bushing size alone. When a guy says, “I run .002 neck tension”, that normally means he is using a die/bushing that sizes the necks .002″ smaller than a loaded round. Well we know something about his post-sizing neck OD, but do we really have a reliable idea about how much force is required to release his bullets? Maybe not… This use of the term “neck tension” when we are really only describing the amount of neck diameter reduction with a die/bushing is really kind of incomplete.
My point here is that it is overly simplistic to ask, “should I load with .001 tension or .003?” In reality, an .001″ reduction (after springback) on a thick neck might provide MORE “grip” on a deep-seated bullet than an .003″ reduction on a very thin-walled neck holding a bullet with minimal bearing surface in the neck. Bushing ID is something we can easily measure and verify. We use bushing size as a descriptor of neck tension because it is convenient and because the other important factors are hard to quantify. But those factors shouldn’t be ignored if you want to maintain consistent neck tension for optimal accuracy.
Consistency and accuracy — that’s really what this all about isn’t it? We want to find the best neck tension for accuracy, and then maintain that amount of grip-on-bullet over time. To do that you need to look not only at your bushing size, but also at how your brass has changed (work-hardened) with time, and whether other variables (such as the amount of carbon in the neck) have changed. Ultimately, optimal neck tension must be ascertained experimentally. You have to go out and test empirically to see what works, in YOUR rifle, with YOUR bullets and YOUR brass. And you may have to change the nominal tension setting (i.e. bushing size) as your brass work-hardens or IF YOU CHANGE SEATING DEPTHS.
Remember that bushing size alone does not tell us all we need to know about the neck’s true “holding power” on a bullet, or the energy required for bullet release. True bullet grip is a more complicated phenomenon, one that is affected by numerous factors, some of which are very hard to quantify.
Share the post "Case Grip on Bullet — There’s More to Neck Tension Than Just Bushing Size"
NOTE: If you prefer drying your brass in an oven we recommend a temp setting no higher than 200° F. Better yet, use a dedicated case dryer that cannot possibly over-cook your cases.
Tech Tip by Craig Arnzen of Area419.com
As wet-tumbling brass has become more popular in recent years, guys have tried a LOT of ways to get their brass dry — towels, hair dryers, and even food dehydrators. (See Top Ten Brass Drying Methods). Another common method — albeit with some potential issues — is putting your wet brass in the oven to dry. Provided you monitor TEMP and TIME, this method is fast, effective, and easy (as long don’t use the wife’s favorite cooking pans — that’ll get you in trouble.)
With oven-drying, however, unexpected issues can arise, as illustrated by this worrisome story: “I put my brass in for an hour at 200° F and turned it off. Next thing I know I realize my wife has the oven pre-heating to 350° F. Is my brass ruined?”
If you search the AccurateShooter.com Shooters’ Forum, you’ll find at least three threads with stories like that (i.e. higher-than-expected oven temps when drying brass), and answers on both sides of the line. I know this, because it happened to me — I had some 6XC brass drying and the wife pre-heated the oven. Concerned about my cases, I consulted a genuine annealing expert, Andrew Rixon.
Andrew is the Director of Engineering and Manufacturing at Alpha Munitions, makers of premium-grade rifle brass. I had baked a batch of Alpha’s new 6XC brass, which is exceptionally consistent and well-made.
Before Andrew would answer my question though, he gave me a little lesson on what really happens during annealing:
“Annealing is performed by heating the brass to specific temperatures. There are three phases of annealing: recovery, recrystallization, and grain growth. All of which have specific temperatures and or exposure times related to them. It is key for cartridge brass annealing processes to hit the recrystallization phase which allows for strain-free grains to grow. The growth of strain-free grains eliminate dislocations, drastically decreasing hardness and increasing ductility. For recrystallization to occur the material temperature must be within 600-1000 degrees Fahrenheit (F).”
He then got into really answering the question, and was (fortunately) definitive in his answer: “If the temps do not exceed 450 degrees F then there is nothing to worry about as it did not exceed the critical temperature for annealing to occur.” Editor: Caution — do NOT assume that the temperature marked on the oven knob is the actual temperature INSIDE the oven, particularly near the back. Some older ovens can be off as much as 75 degrees F. Be conservative!
Well, there you have it. If you’ve baked your brass, you’re probably OK. If you got it hotter than 450° F then there can start to be some changes to the metal, but we will let you learn more about that directly from Andrew, who is working on a lengthy, detailed article on the science of annealing, to be released later this summer.
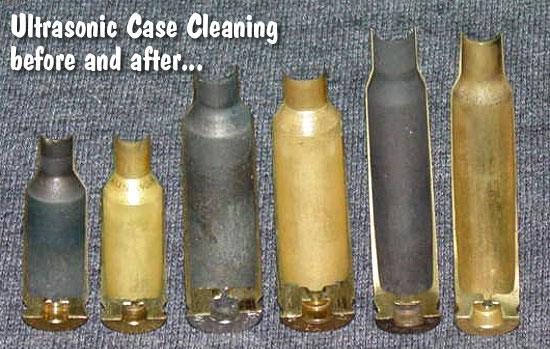
Many shooters these days clean their cartridge brass ultrasonically, or wet-tumble their cases with stainless media (above). Both methods get brass clean and shiny, inside and out. However, when those wet-cleaning processes are completed, you’re left with a pile of soaking wet brass. How do you dry your brass quickly and efficiently, without unsightly water spots? Read on for some great answers…
In our Shooters’ Forum, Forum Gold Member Terry asked: “How do you dry your brass after Ultrasonic cleaning?” In an interesting Reloading Forum Thread, many smart suggestions were posted. A dozen fellow members outlined a variety of effective case-drying procedures, which work equally well for both wet-tumbled brass and ultrasonically-cleaned cases. Here are the Top 10 brass-drying suggestions from our Forum members.
TOP TEN Ways to Dry Cartridge Brass After Wet Cleaning
1. Food Dehydrator — Shake the brass in towel to get the bulk of water off. Next leave in the food dehydrator for 45 minutes or until there are no signs of moisture inside the cases. — Lawrence97
2. Lyman 5-Level Case Dryer — Rinse off cleaning solution(s), then load brass by type into racks in Lyman Cyclone Case Dryer. This is easier to load/unload than food dehydrators and holds more cases.
3. Hot Water + Compressed Air — Rinse all your cases as a batch using scalding hot water from the kitchen sink. Hot water evaporates off of brass very very quickly. Then hit them with compressed air. Takes 10 minutes. Simple. — SG4247
4. Oven Dry in Pre-Heated Oven — After pre-heating to 200° or so, turn off oven and put brass inside on a tray. Most important! Tell your wife what you are doing so she doesn’t crank it up to 425 to heat pizza! — MClark
NOTE: Many other members suggested oven drying at 150-200°. We recommend turning OFF the oven so you don’t cook your brass if you forget to remove the cases.
5. Towel Dry then Warm with Heat Gun — Roll brass in a towel until no more water shakes out. Lay out on cardboard box top and blow off with Harbor Freight heat gun. $9.99 on coupon. Two minutes of heated air and about half hour of wait and they are good to go. This is with primers removed. — Shaggy357
6. Compressed Air, then Sun Dry Outside – I rinse the brass, then blow them out with compressed air. Then, dependent on the time of year, lay them on a towel in the sun. — HogPatrol
7. Dishwasher on Dry Cycle – In the winter, I drop my wet brass cases neck-down on the rack pegs in the dishwasher, then turn on the dry cycle. In the summer…well, I’m in Texas. They go to the porch for a bit. — Toolbreaker
8. Alcohol Rinse then Air or Oven Dry — Rinse in 90% Isopropyl alcohol and either let air dry or stick in 175° oven for half an hour. Alternatively, use a dehydrator. — Zipollini
9. Slow Air-Dry in Loading Blocks — I have a reloading block with holes drilled in it. I simply load the block up and let it air-dry in the cupboard for a couple of days. — JCS
10. Wipe with Towel Then Anneal Normally — This thread is stirring my OCD side. Seems complicated for just drying — my brass dries just fine when I anneal it. This entire process can’t take an hour per batch. When finished, the brass is cleaned, annealed, and ready to size. — CHLuke
Deprime, then tumble brass with stainless media, water, Lemishine, and dish detergent.
Shake them easily in a strainer to knock out most media then grab 4-5 pieces, shake them over the bucket for the last of the media then inside a towel.
Finally blow out the primer pockets and wipe with a towel, load in the Annealeez.
Share the post "TECH Tip: TOP TEN Ways to Dry Wet Cartridge Brass"
by Sierra Bullets Ballistic Technician Paul Box
One thing that plays a major role in building an accuracy load is neck tension. I think a lot of reloaders pretty much take this for granted and don’t give that enough thought.
So, how much neck tension is enough?
Thru the years and shooting both a wide variety of calibers and burn rates of powder, I’ve had the best accuracy overall with .002″ of neck tension. Naturally you will run into a rifle now and then that will do its best with something different like .001″ or even .003″, but .002″ has worked very well for me. So how do we control the neck tension? Let’s take a look at that.
First of all, if you’re running a standard sizing die with an expander ball, just pull your decapping rod assembly out of your die and measure the expander ball. What I prefer is to have an expander ball that is .003″ smaller than bullet diameter. So for example in a .224 caliber, run an expander ball of .221″. This allows for .001″ spring back in in your brass after sizing, and still gives you .002″ in neck tension. If you want to take the expander ball down in diameter, just chuck up your decapping rod assembly in a drill and turn it down with some emery cloth. When you have the diameter you need, polish it with three ought or four ought steel wool. This will give it a mirror finish and less drag coming through your case neck after sizing.
Tips for Dies With Interchangeable Neck Bushings
If you’re using a bushing die, I measure across the neck of eight or ten loaded rounds, then take an average on these and go .003″ under that measurement. There are other methods to determine bushing size, but this system has worked well for me.
Proper Annealing Can Deliver More Uniform Neck Tension
Another thing I want to mention is annealing. When brass is the correct softness, it will take a “set” coming out of the sizing die far better than brass that has become to hard. When brass has been work hardened to a point, it will be more springy when it comes out of a sizing die and neck tension will vary. Have you ever noticed how some bullets seated harder than others? That is why.
Paying closer attention to neck tension will give you both better accuracy and more consistent groups.
Share the post "Optimize Neck Tension with Bushings, Expanders, and Annealing"
The science behind annealing during the manufacture of new cases is well-established. What happens after that, when we repeatedly reload and anneal those same cases, has always been somewhat of a “dark art”. To help separate scientific fact from fiction, the creators of the Annealing Made Perfect (AMP) Annealer machine have conducted detailed studies of cartridge brass. The AMP Team’s studies offer some remarkable insights, while disproving a number of myths about annealing. Will annealing tighten your groups? The evidence of these studies shows it could.
The test results are fascinating. The team compared brands of brass, sectioning brass to examine both alloy composition and thickness from case mouth to case-head (bottom). They also examined how carbon build-up affects next tension. And they determined how brass changes over multiple loading cycles. They even did a series of bullet-pull tests to analyze factors affecting neck tension. Here are some of the key subjects in the reports:
Brand by Brand Analysis — How the cartridge brass alloy varies among different manufacturers. Bullet Release and Neck Tension — Tensile Bullet-Pull tests show factors affecting neck tension. Neck Tension and Carbon — How carbon build-up inside the neck affects “neck tension”. SS Tumbling and Hardness – How tumbling with stainless media affects brass hardness. Case Cleaning (Ultrasound and Tumbling) — How case cleaning affects annealing. Multiple Loadings — How brass performs when annealed every reload over 10+ cycles.
You really should read the reports — there are some fascinating revelations. The AMP team made longitudinal sections of various cases to show different case wall thicknesses and head geometry. These examples also show how the hardness of the case varies from the case mouth to the case-head. Both virgin and used, annealed cases were examined.
Bullet-Pull Tests — Using advanced tensile test equipment, AMP experimented with different combinations of dies, reloading sequences, and neck hardness to ascertain the best practice.
Carbon Inside Your Case-Necks May Be a GOOD Thing
AMP’s testers found carbon in necks can be beneficial: “Even with identical interference fit and neck hardness, as the carbon layer increased (microscopically), the force to draw the bullet decreased. It would appear the carbon acted as a lubricant. Interestingly, the [pull force] standard deviation also improved, i.e. the case to case variation in the force required to draw the bullets decreased.”*
Read the Full Test Reports
The AMP team’s objectives were to clarify some misconceptions on just what annealing does and does not do, and also to establish the best practices for consistent results. They have consulted with three independent certified metallurgy laboratories to produce some definitive information. So far, the Stage 1 and Stage 2 reports have been released. The studies include a report on the general physical properties of cartridge brass, including grain structures, hardness scales, time/temperature annealing information, and what can cause de-zincification.
The FULL REPORTS, including comprehensive appendices, are found here:
Examining Different Brands of Brass — What the Tests Revealed
Is Lapua brass harder than Norma? Is Lake City better than Remington? You’ll find answers to these and other questions in AMP’s annealing studies. One of the key findings in Stage 2 of Amp’s research is that brass from different manufacturers does vary in the distribution of material in the walls of the case.
Stage Two Conclusions:
— Different brands of the same cartridge cases can require different annealing power settings due to differing case wall thickness in the neck and shoulder region. The greater the mass of brass to be annealed, the greater the power requirement. Lot to lot variation within the same brand can occur for the same reason.
— The bushing die used in this set of tensile bullet pull tests gave significantly more consistent results than the standard neck die with expander ball.
— Cases should be annealed every reload in order to get the best repeatability.
Case Variations: Brand to Brand, and Lot to Lot
Here is a sample from AMP’s test report:
Analyzing Different Brands of Brass
In our Stage One report, we demonstrated that there is insufficient variation in alloy composition between brands to account for the variations we experience when annealing different brands of the same cartridge case. We therefore sought to confirm that it is the mass of brass to be annealed which accounts for the difference. Below are sectioned samples of four different brands of .223 Remington cases.
Both the Lapua and Norma neck walls are 314* microns (0.01236”) at the mouth. The Lapua neck wall thickens to 348 microns at the junction of the neck and shoulder, and the Norma neck thickens to 325 microns. Through the shoulder, however, the walls of both cases thicken to 370 – 380 microns. Once past the shoulder, they both taper back to 314 microns, before starting to thicken again, moving towards the case head.
The Lapua case requires AMP Program 47 to anneal correctly. It is the heaviest of the four cases tested through the shoulder region. The Norma case, which is only slightly lighter through the same region, needs Program 43.
The Remington case is very similar to the Lapua and Norma cases in the neck region, but it actually thins fractionally through the shoulder and front section of the body. The AMP program setting for Remington 223R is P32.
The Lake City case is the thinnest throughout of all four samples. It only requires Program 28.
The above samples clearly demonstrate that the mass of brass to be annealed is critical to the power requirement for correct annealing.
To see how the AMP Induction Annealing Machine works, watch this video:
* However, in Stage Two of AMP testing, the testers experimented with clean, carbon-free necks with dry lube. There was some indication of greater tensile pull consistency with dry-lube, but AMP plans to do more testing.
Share the post "The Science of Annealing — Facts Uncovered, Myths Busted"
Guys — honestly, if you do anything today on this site, watch this video. You won’t be disappointed. Guaranteed. This is a very informative (and surprisingly entertaining) video. Every serious hand-loader should watch this video to see how cartridge cases are made. Your Editor has watched the video 5 times now and I still find it fascinating. The camera work and editing are excellent — there are many close-ups revealing key processes such as annealing and head-stamping.
VERY Informative Video Show Cartridge Brass and Ammunition Production:
Norma has released a fascinating video showing how bullet, brass, and ammunition are produced at the Norma Precision AB factory which first opened in 1902. You can see how cartridges are made starting with brass disks, then formed into shape through a series of processes, including “hitting [the cup] with a 30-ton hammer”. After annealing (shown at 0:08″), samples from every batch of brass are analyzed (at multiple points along the case length) to check metal grain structure and hardness. Before packing, each case is visually inspected by a human being (3:27″ time-mark).
The video also shows how bullets are made from jackets and lead cores. Finally, you can watch the loading machines that fill cases with powder, seat the bullets, and then transport the loaded rounds to the packing system. In his enthusiasm, the reporter/narrator does sometimes confuse the term “bullets” and “rounds” (5:00″), but you can figure out what he means. We definitely recommend watching this video. It’s fascinating to see 110-year-old sorting devices on the assembly line right next to state-of-the art, digitally-controlled production machinery.
Video suggestions by Boyd Allen and EdLongrange. We welcome reader submissions.
Share the post "Norma Factory Tour Video is a “Must-Watch” for Hand-Loaders"


 Darrell is a hydro-forming wizard who has perfected the process over the last couple of years. He has learned a few special techniques along the way to ensure uniform case-forming.


 One thing I’ve learned to do is anneal the brass every 3-4 firings. I started to do that after I noticed that the force required to seat bullets became inconsistent after just a few loading cycles. I also experienced flyers that were going out of the group for no apparent reason. Annealing the cases every 3-4 firings has eliminated most of the unexplained flyers and annealing has also made bullet seating much, much more consistent. I’ve also noticed a significant improvement in my groups at 500 and 600 yards now that I anneal regularly. Group sizes at 600 yards can be as much as 2″ smaller with annealed brass than with un-annealed, work-hardened brass.


 With the price of premium brass topping $1.00 per case for popular match cartridges, it makes sense to consider annealing your brass to extend its useful life. You don’t want to chuck out brass that costs a buck a case (or more)! Forum member

 In our
  Neck-Wall Thickness is Important Too
 If you search the AccurateShooter.com


 5. Towel Dry then Warm with Heat Gun — Roll brass in a towel until no more water shakes out. Lay out on cardboard box top and blow off with Harbor Freight heat gun. $9.99 on coupon. Two minutes of heated air and about half hour of wait and they are good to go. This is with primers removed. — Shaggy357


 Norma has released a fascinating video showing how bullet, brass, and ammunition are produced at the


