Conventional brass jags work great — except for one thing. They can react to solvents, leaving a blue “false positive” on patches. In recent years, jag-makers have experimented with many different materials in an effort to cure the solvent-reaction problem. Today we have polymer jags, nickel-plated jags, and stainless steel jags. And the latest innovation is the aluminum jag from Dewey.
J. Dewey Mfg. offers a series of “Copper Eliminator” jags and brush adapters made from aircraft-grade aluminum with the same hardness as brass. Dewey claims that its aluminum jags will not become embedded with grit or particles that could harm your bore. At the same time, Dewey’s aluminum jags will not react to ammoniated bore solvents that can turn patches blue green when used with brass jags. Dewey aluminum jags are offered with either male OR female 8/32 threads. The $5.25 aluminum jags and $3.70 brush adapters are offered in a wide variety of calibers. You can order these products from Dewey Mfg. or Brownells.
Story Tip from Boyd Allen. We welcome submissions from our readers.
Share the post "Aluminum Jags Eliminate Annoying False Positives on Patches"
This article comes from the Criterion Barrels website. It provides good, conservative advice about barrel cleaning. Understand that cleaning methods may need to be adapted to fit the amount and type of fouling (and the particular barrel). In general, we do try to minimize brushing, and we follow the procedures Criterion recommends respecting the crown/muzzle. We have also had very good success using wet patches followed by Wipe-Out bore foam. Along with the practices outlined by Criterion below, you may want to try Wipe-Out foam. Just be sure to use a fitted cleaning rod bore guide, to keep foam out of the action recesses and trigger assembly.
The above video shows how to apply Wipe-Out or other bore-cleaning foam. We use a slightly different method. First, we use 3-4 wet patches to remove loose carbon fouling. Then we apply the foam as shown, but usually from the muzzle end (with bore guide in chamber). Here’s the important point — after 20-30 minutes, once the bubbles have dissipated, we apply the foam a second time, getting more of the active ingredients into the barrel. We then patch out, as shown, after 3-4 hours.
What is the Best Way to Clean a Rifle Barrel?
We are asked this question quite frequently alongside requests for recommended break-in procedures. Improper barrel cleaning methods can damage or destroy a barrel, leading to diminished accuracy or even cause a catastrophic failure. When it comes to barrel maintenance, there are a number of useful techniques that we have not listed. Some techniques may work better with different barrel types. This series of recommendations is designed to incorporate a number of methods that the Criterion Barrels staff has used successfully both in the shop and on their personal rifles. Please feel free to to list your own recommendations in the below comments section.
We recommend the use of the following components during rifle cleaning:
• Cloth patches (sized for the appropriate caliber)
• Brass jag sized properly for your bore [Aluminum and Nylon Jags also work]
• One-piece coated cleaning rod
• General bore cleaner/solvent (Example: Hoppes #9)
• Copper solvent of your choosing (Example: Sweets/KG 12)
• Fitted cleaning rod bore guide
• Plastic AP brush or toothbrush
• Q-Tips
• Plastic dental picks
• CLP or rust preventative type cleaner
There are a number of schools of thought relating to the frequency in which a barrel should be cleaned. At minimum we recommend cleaning a barrel after each shooting session to remove condensation, copper, and carbon build-up. Condensation is the greatest immediate threat, as it can cause the barrel to rust while the rifle sits in storage. Copper and carbon build-up may negatively impact future barrel performance, increasing the possibility of a failure in feed or function. Fouling should be removed whenever possible.
The below tips will help limit the wear of different parts of your barrel during routine maintenance, helping extend the life of the barrel and improving its performance.
The Lands and Grooves
This portion of the barrel may experience reduced efficiency due to copper fouling and cleaning rod damage. If copper fouling takes place during the initial break-in of the rifle, make sure to check our barrel break-in article.
For regular maintenance we suggest using a single piece coated cleaning rod rather than the traditional segmented rod or bore snake. While segmented rods and bore snakes may be convenient for field use, the corners between the segments may bow out and catch on the lands, scraping along the length of the rifling. Residual grit and particles from expended cartridges may also get caught between segments, resulting in an abrasive surface working its way down the length of the barrel. Most bore snakes will remove significant amounts of carbon fouling, but may fall short in the removal residual carbon buildup and copper fouling during deep cleaning. Good rods can be sourced from multiple manufacturers, but we have found good results using both Pro-Shot and Dewey brand products.
General cleaning requires the use of patches rather than nylon or brass bore brushes. Brass brushes may be required when aggressive cleaning is required, but can lead to unnecessary wear on the barrel if used frequently. This is not due to the nature of the soft brushes themselves, but from the abrasive particles of grit that become embedded in the material that is being run repeatedly through the bore. We recommend the use of bore guides when cleaning from both the muzzle and breech. These bore guides will help serve to protect the crown and throat from cleaning rod damage.
If significant resistance develops while running the cleaning rod through the bore, no attempt should be made to force it in further. Back the rod out and inspect the barrel to determine the cause of the resistance. The jag may be pushing between a bore obstruction and the rifling, digging a divot into the barrel before pushing the obstruction back through the muzzle. One way to minimize the risk of a stuck rod is by utilizing a slightly smaller patch during the initial push.
The process of cleaning the length of the rifling is relatively straightforward:
1. Check to make sure the rifle is safely unloaded.
2. Carry out any necessary disassembly procedures prior to cleaning.
3. Remove bolt (if possible) and insert fitted cleaning rod bore guide in action.
4. Soak a patch in bore solvent (similar to Hoppes #9).
5. Center and affix the patch on the brass jag, inserting it into the chamber end of the barrel. A misaligned patch may cause the jag to damage the lands of the rifling, so make sure the patch is centered on the jag. [Note, an aluminum or nylon jag will not show a “false positive”.]
6. Run the patch the full length of the barrel, retracting it upon reaching the end of the muzzle.
7. Let the solvent sit for a minute.
8. Continue to run patches through the bore until carbon residue is minimized.
9. Run a dry patch through the bore to ensure carbon residue has been removed.
10. Soak a patch in copper solvent (Sweet’s or KG-12).
11. Run the patch through the bore, leaving it to sit for 3-5 minutes (do not let solvent sit for more than 15 minutes.*)
12. Repeat this process until no blue residue remains on the patches.
13. Run a patch of Hoppes #9 and a dry patch through the bore to neutralize the copper solvent.
14. Inspect the barrel prior to reassembling the rifle, verifying that no bore obstructions remain.
*Please note that some ammonia-based copper solvents may prove to be corrosive if left sitting in the barrel for an extended period of time. It is essential that these solvents be removed within 15 minutes to avoid ruining the bore.
The Crown
The crown is the portion of the barrel where the bullet loses contact with the lands and grooves and proceeds to exit the firearm. The area most critical to accuracy potential is the angle where the bullet last touches the bore of the barrel.
Avoid damage to this area by using a plastic toothbrush and CLP type cleaner to scrub the crown from the exterior of the barrel. Even the most minimal variation in wear to the crown will negatively impact barrel performance, so be careful to avoid nicking or wearing away this part of the barrel.
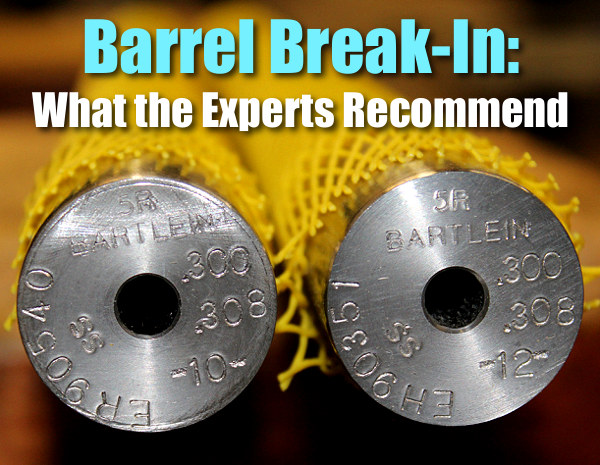
The question of barrel break-in is controversial. Some folks advocate an elaborate, lengthy cycle of shooting and brushing, repeated many times — one shot and clean, two shots and clean and so on. This, it is argued, helps barrels foul less and shoot more accurately. Others say minimal break-in, with patching and brushing after 10-15 rounds, is all you need. Still others contend that break-in procedures are a total waste of time and ammo — you should just load and shoot, and clean as you would normally.
We doubt if there will ever be real agreement among shooters concerning barrel break-in procedures. And one must remember that the appropriate break-in procedure might be quite different for a factory barrel vs. a custom hand-lapped barrel. This Editor has found that his very best custom barrels shot great right from the start, with no special break-in, other than wet patches at 5, 10, and 15 rounds. That said, I’ve seen some factory barrels that seemed to benefit from more elaborate break-in rituals.
What’s the best barrel break-in procedure? Eric Mayer of Varminter.com decided to ask the experts. Eric interviewed representatives of three leading barrel manufacturers: Krieger, Lothar-Walther, and Shilen. He recorded their responses on this video. In order of appearance, the three experts are:
Shilen, Krieger, and Walther Experts Talk about Barrel Break-in
Do I Need to Break-In a New Rifle Barrel?
Eric Mayer of Varminter.com says: “That is a simple question, [but it] does not necessarily have a simple answer. Instead of me repeating my own beliefs, and practices, on breaking-in a new rifle barrel, I decided to answer this one a bit differently. While we were at the 2016 SHOT Show, we tracked down three of the biggest, and most popular, custom barrel makers in the world, and asked them what they recommend to anyone buying their barrels, and why they recommend those procedures. We asked the question, and let the camera run!” Launch the video above to hear the answers — some of which may surprise you.
Barrel Break-in — Initial Inspection and Cleaning
This video explains that you should always inspect and clean the bore of your barrel before sending rounds through it. There may be remnants of the production process, such as lapping residues, that you’ll want to get out of the bore. We’ve even seen a few tiny metal pieces in some factory barrels. And it’s always wise to borescope a new barrel to see if there are visible defects in the rifling such as lands that have flawed edges — we’ve seen that on some cheaper barrels.
Barrel Break-In — Ian Klemm’s Surprising Observations
Here’s a 10-minute Vortex Nation interview with Ian Klemm. Ian, a 4-Time F-TR National Champion is one of America’s best long-range shooters. In this video, Ian explains his approach to barrel break-in, which may surprise you. Does barrel break-in even matter? Conventional wisdom says “Yes” and perhaps there’s some truth to that, but Ian argues that break-in is NOT nearly as important as the internet wants you to believe. Ian believes that you don’t need to waste a ton of time/ammo to get your barrel ready to shoot extremely accurately. This may be particularly true with premium hand-lapped custom barrels.
Barrel Break-In Procedures with Keith Glasscock
Keith Glasscock is also one of America’s greatest F-Class shooters who has finished second at the Nationals multiple times. Keith is also a highly-respected wind coach who has a popular YouTube video channel, Winning in the Wind. In this video, Keith explains his procedure for breaking-in his match barrels. He starts by bore-scoping the barrel and cleaning it. If he finds some burrs he may use some JB Bore Paste, a patch, and a worn brush and “give that throat a little scrub” (See 1:30 time-mark). He used different stroke lengths to avoid putting a “step” in the throat. When he’s satisfied he goes to the range. He fires the first five rounds, then cleans. He then fires quite a few rounds before cleaning the barrel again and beginning load development (See 8:25 time-mark).
General Barrel Break-in Procedures Recommended by Brownells
Brownells Gun Techs Steve Ostrem and Caleb Savant tackle a thorny topic: breaking in a new barrel. What IS breaking-in a barrel? And WHY do it? The rifling of a freshly machined barrel has microscopic burrs and sharp edges. “Breaking-in” is the process of putting bullets down the bore to smooth out those rough spots. The goal is to round down the sharp edges so they’re not stripping copper off a bullet as it travels the bore, which leads to fouling that leads to reduced accuracy and inconsistent groups. In a very minor way, you’re actually lapping the barrel. The breaking-in process works best on cut-rifled and button-rifled barrels. Cold hammer-forged, chrome-lined, or nitrided barrels — such as commonly found on AR-15s — may not benefit much from the process. Pistol barrels really don’t need to be broken in because larger-diameter bullets are not so much affected by tiny variations in the bore. Likewise, break-in is more helpful for a .17, .20, or .22 caliber rifle than a .45 caliber rifle.
George Gardner of G.A. Precision Talks About Barrel Break-In
G.A. Precision’s George Gardner is a leading figure in the PRS/NRL world. In this video, George makes the valid point that not all barrels require the same amount of break-in. George says some barrels require very little break-in, while others benefit from a more elaborate break-in process that helps reduce future copper and powder fouling. He calls this “seasoning” the barrel so it fouls less. For a typical barrel, George’s recommended process (4:25 time-mark) starts with one shot, then clean for three one-round cycles. This is followed by three shots then clean, with repeat 3-shot cycles if need. For cleaning George prefers nylon brushes (5:50 time-mark). NOTE: George also makes a very important point — you MUST swab the chamber and get it dry between cleaning cycles (5:30 time-mark).
Share the post "Saturday Movies: Barrel Break-In, Various Methods Reviewed"
The question of barrel break-in is controversial. Some folks advocate an elaborate, lengthy cycle of shooting and brushing, repeated many times — one shot and clean, two shots and clean and so on. This, it is argued, helps barrels foul less and shoot more accurately. Others say minimal break-in, with patching and brushing after 10-15 rounds, is all you need. Still others contend that break-in procedures are a total waste of time and ammo — you should just load and shoot, and clean as you would normally.
We doubt if there will ever be real agreement among shooters concerning barrel break-in procedures. And one must remember that the appropriate break-in procedure might be quite different for a factory barrel vs. a custom hand-lapped barrel. This Editor has found that his very best custom barrels shot great right from the start, with no special break-in, other than wet patches at 5, 10, and 15 rounds. That said, I’ve seen some factory barrels that seemed to benefit from more elaborate break-in rituals.
What’s the best barrel break-in procedure? Well our friend Eric Mayer of Varminter.com decided to ask the experts. A while back Eric interviewed representatives of three leading barrel manufacturers: Krieger, Lothar-Walther, and Shilen. He recorded their responses on video. In order of appearance in the video, the three experts are:
Do I Need to Break-In a New Rifle Barrel?
Eric Mayer of Varminter.com says: “That is a simple question, [but it] does not necessarily have a simple answer. Instead of me repeating my own beliefs, and practices, on breaking-in a new rifle barrel, I decided to answer this one a bit differently. While we were at the 2016 SHOT Show, we tracked down three of the biggest, and most popular, custom barrel makers in the world, and asked them what they recommend to anyone buying their barrels, and why they recommend those procedures. We asked the question, and let the camera run!” Launch the video above to hear the answers — some of which may surprise you.
Long-Term Barrel Care — More Experts Offer Opinions
Apart from the debate about barrel break-in, there is the bigger question of how should you clean and maintain a barrel during its useful life. Some folks like aggressive brushing, other shooters have had success with less invasive methods, using bore foam and wet patches for the most part. Different strokes for different folks, as they say. In reality, there may not be one solution for every barrel. Different fouling problems demand different solutions. For example, solvents that work well for copper may not be the best for hard carbon (and vice-versa).
“Why worry about a little barrel fouling when the throat is subjected to a brutal 5,600° F volcano at 55,000 PSI? To investigate these and other questions about taking care of a match barrel, we spoke with a dozen experts and share their knowledge in this first of a series of articles.
After listening to folks who shoot, build barrels or manufacture cleaning solvents for a living, we concluded that even the experts each have their own unique recommendations on how to care for a match barrel. But they all agree on one thing — the gun will tell you what it likes best. Because the life expectancy of a match barrel is about 1,500 to 2,500 rounds, the objectives of cleaning one should include: preserve accuracy, slow the erosion, and remove fouling — all without damaging the gun. This article doesn’t claim that one cleaning method is better than the next. Rather, we set out to interject a little science into the discussion and to share some lessons learned from experts in the field.” — Chip Lohman
Share the post "Barrel Break-In Methods — What Do the Experts Recommend?"
This article comes from the Criterion Barrels website. It provides good, conservative advice about barrel cleaning. Understand that cleaning methods may need to be adapted to fit the amount and type of fouling (and the particular barrel). In general, we do try to minimize brushing, and we follow the procedures Criterion recommends respecting the crown/muzzle. We have also had very good success using wet patches followed by Wipe-Out bore foam. Along with the practices outlined by Criterion below, you may want to try Wipe-Out foam. Just be sure to use a fitted cleaning rod bore guide, to keep foam out of the action recesses and trigger assembly.
The above video shows how to apply Wipe-Out or other bore-cleaning foam. We use a slightly different method. First, we use 3-4 wet patches to remove loose carbon fouling. Then we apply the foam as shown, but usually from the muzzle end (with bore guide in chamber). Here’s the important point — after 20-30 minutes, once the bubbles have dissipated, we apply the foam a second time, getting more of the active ingredients into the barrel. We then patch out, as shown, after 3-4 hours.
What is the Best Way to Clean a Rifle Barrel?
We are asked this question quite frequently alongside requests for recommended break-in procedures. Improper barrel cleaning methods can damage or destroy a barrel, leading to diminished accuracy or even cause a catastrophic failure. When it comes to barrel maintenance, there are a number of useful techniques that we have not listed. Some techniques may work better with different barrel types. This series of recommendations is designed to incorporate a number of methods that the Criterion Barrels staff has used successfully both in the shop and on their personal rifles. Please feel free to to list your own recommendations in the below comments section.
We recommend the use of the following components during rifle cleaning:
• Cloth patches (sized for the appropriate caliber)
• Brass jag sized properly for your bore
• One-piece coated cleaning rod
• General bore cleaner/solvent (Example: Hoppes #9)
• Copper solvent of your choosing (Example: Sweets/KG 12)
• Fitted cleaning rod bore guide
• Plastic AP brush or toothbrush
• Q-Tips
• Plastic dental picks
• CLP or rust preventative type cleaner
There are a number of schools of thought relating to the frequency in which a barrel should be cleaned. At minimum we recommend cleaning a barrel after each shooting session to remove condensation, copper, and carbon build-up. Condensation is the greatest immediate threat, as it can cause the barrel to rust while the rifle sits in storage. Copper and carbon build-up may negatively impact future barrel performance, increasing the possibility of a failure in feed or function. Fouling should be removed whenever possible.
The below tips will help limit the wear of different parts of your barrel during routine maintenance, helping extend the life of the barrel and improving its performance.
The Lands and Grooves
This portion of the barrel may experience reduced efficiency due to copper fouling and cleaning rod damage. If copper fouling takes place during the initial break-in of the rifle, make sure to check our barrel break-in article.
For regular maintenance we suggest using a single piece coated cleaning rod rather than the traditional segmented rod or bore snake. While segmented rods and bore snakes may be convenient for field use, the corners between the segments may bow out and catch on the lands, scraping along the length of the rifling. Residual grit and particles from expended cartridges may also get caught between segments, resulting in an abrasive surface working its way down the length of the barrel. Most bore snakes will remove significant amounts of carbon fouling, but may fall short in the removal residual carbon buildup and copper fouling during deep cleaning. Good rods can be sourced from multiple manufacturers, but we have found good results using both Pro-Shot and Dewey brand products.
General cleaning requires the use of patches rather than nylon or brass bore brushes. Brass brushes may be required when aggressive cleaning is required, but can lead to unnecessary wear on the barrel if used frequently. This is not due to the nature of the soft brushes themselves, but from the abrasive particles of grit that become embedded in the material that is being run repeatedly through the bore. We recommend the use of bore guides when cleaning from both the muzzle and breech. These bore guides will help serve to protect the crown and throat from cleaning rod damage.
If significant resistance develops while running the cleaning rod through the bore, no attempt should be made to force it in further. Back the rod out and inspect the barrel to determine the cause of the resistance. The jag may be pushing between a bore obstruction and the rifling, digging a divot into the barrel before pushing the obstruction back through the muzzle. One way to minimize the risk of a stuck rod is by utilizing a slightly smaller patch during the initial push.
The process of cleaning the length of the rifling is relatively straightforward:
1. Check to make sure the rifle is safely unloaded.
2. Carry out any necessary disassembly procedures prior to cleaning.
3. Remove bolt (if possible) and insert fitted cleaning rod bore guide in action.
4. Soak a patch in bore solvent (similar to Hoppes #9).
5. Center and affix the patch on the brass jag, inserting it into the chamber end of the barrel. A misaligned patch may cause the jag to damage the lands of the rifling, so make sure the patch is centered on the jag.
6. Run the patch the full length of the barrel, retracting it upon reaching the end of the muzzle.
7. Let the solvent sit for a minute.
8. Continue to run patches through the bore until carbon residue is minimized.
9. Run a dry patch through the bore to ensure carbon residue has been removed.
10. Soak a patch in copper solvent (Sweet’s or KG-12).
11. Run the patch through the bore, leaving it to sit for 3-5 minutes (do not let solvent sit for more than 15 minutes.*)
12. Repeat this process until no blue residue remains on the patches.
13. Run a patch of Hoppes #9 and a dry patch through the bore to neutralize the copper solvent.
14. Inspect the barrel prior to reassembling the rifle, verifying that no bore obstructions remain.
*Please note that some ammonia-based copper solvents may prove to be corrosive if left sitting in the barrel for an extended period of time. It is essential that these solvents be removed within 15 minutes to avoid ruining the bore.
The Crown
The crown is the portion of the barrel where the bullet loses contact with the lands and grooves and proceeds to exit the firearm. The area most critical to accuracy potential is the angle where the bullet last touches the bore of the barrel.
Avoid damage to this area by using a plastic toothbrush and CLP type cleaner to scrub the crown from the exterior of the barrel. Even the most minimal variation in wear to the crown will negatively impact barrel performance, so be careful to avoid nicking or wearing away this part of the barrel.
Conventional brass jags work great — except for one thing. They can react to solvents, leaving a blue “false positive” on patches. In recent years, jag-makers have experimented with many different materials in an effort to cure the solvent-reaction problem. Today we have polymer jags, nickel-plated jags, and stainless steel jags. And the latest innovation is the aluminum jag from Dewey.
J. Dewey Mfg. offers a series of “Copper Eliminator” jags and brush adapters made from aircraft-grade aluminum with the same hardness as brass. Dewey claims that its aluminum jags will not become embedded with grit or particles that could harm your bore. At the same time, Dewey’s aluminum jags will not react to ammoniated bore solvents that can turn patches blue green when used with brass jags. Dewey aluminum jags are offered with either male OR female 8/32 threads. The $5.25 aluminum jags and $3.70 brush adapters are offered in a wide variety of calibers. You can order these products from Dewey Mfg. or Brownells.
Story Tip from Boyd Allen. We welcome submissions from our readers.
Share the post "Aluminum Jags — Eliminate “False Positives” on Patches"
Performs as Promised — Prevents Mess at Home or at Range
When cleaning rifles, wet and dirty patches can make a real mess. And solvent spray from the muzzle is another issue. Here’s a solution — the MTM Gun Cleaning Patch Catcher. Simply slip it over your barrel to contain all the patches pushed out the muzzle. No more mess and stains on your bench/table. When cleaning tasks are done, simply remove the Patch Catcher and dump the contents into the trash.
We’ve tried this product and it definitely helps keep your work surfaces and floors clean. No more messes on the bench or spray from solvents. Purchasers really like this product — it has 80% five-star reviews on Amazon (current Price $9.03). Watch the video to see how the MTM Patch Catcher works.
Here are product reviews from actual MTM Patch Catcher purchasers:
“This box straps over the muzzle end of a barrel and keeps the mess completely contained. Excess cleaning solvents collect in the bottom. Patches fall off the jag and are captured as well when the cleaning rod is withdrawn. It also completely contains the splatter burst when a bore brush exits the muzzle of whatever firearm is being cleaned.” — D.J. Bradley
“This little device is more than a patch catcher. It also contains that dirty, smelly spray when a bore bristle exits the barrel. With the top open, it will also catch spray cleaners and lubes when used on small parts. It takes a little work to mount it on a railed over/under, but it gets the job done there too.” — TwoBoxer
“This does exactly what it claims. It keeps the table or floor clean while you are cleaning barrels. It is easy to use and easy to clean. If you are cleaning guns outside on a range, then you probably don’t need this. If you cleaning them in your garage, then buy this. Your garage and workbench will love you.” — DDDnotes
Q: Does this fit securely if you have a standard muzzle break?
Answer: Yes, I regularly use this product on all of my rifles including my Savage 111 Long Range Hunter with a factory brake. It really keeps the smell down with the top closed. Also stops the splatter of a stiff brush exiting the muzzle. Great Product! — Iklwa
Q: Has anyone used this with an AR15?
Answer: It works quite well — goes on and off easily. Slide it on the barrel until you can tighten the strap behind the flash suppressor.” — Cactus
Share the post "MTM Gun Cleaning Patch Catcher — Effective and Easy to Use"
Conventional brass jags work great — except for one thing. They can react to solvents, leaving a blue “false positive” on patches. In recent years, jag-makers have experimented with many different materials in an effort to cure the solvent-reaction problem. Today we have polymer jags, nickel-plated jags, and stainless steel jags. And the latest innovation is the aluminum jag from Dewey.
J. Dewey Mfg. offers a series of “Copper Eliminator” jags and brush adapters made from aircraft-grade aluminum with the same hardness as brass. Dewey claims that its aluminum jags will not become embedded with grit or particles that could harm your bore. At the same time, Dewey’s aluminum jags will not react to ammoniated bore solvents that can turn patches blue green when used with brass jags. Dewey aluminum jags are offered with either male OR female 8/32 threads. The $5.25 aluminum jags and $3.70 brush adapters are offered in a wide variety of calibers. You can order these products from Dewey Mfg. or Brownells.
Story Tip from Boyd Allen. We welcome submissions from our readers.
Share the post "Eliminate Copper “False Positives” with Aluminum Jags"
This article comes from the Criterion Barrels website. It provides good, conservative advice about barrel cleaning. Understand that cleaning methods may need to be adapted to fit the amount and type of fouling (and the particular barrel). In general, we do try to minimize brushing, and we follow the procedures Criterion recommends respecting the crown/muzzle. We have also had very good success using wet patches followed by Wipe-Out bore foam. Along with the practices outlined by Criterion below, you may want to try Wipe-Out foam. Just be sure to use a fitted cleaning rod bore guide, to keep foam out of the action recesses and trigger assembly.
The above video shows how to apply Wipe-Out or other bore-cleaning foam. We use a slightly different method. First, we use 3-4 wet patches to remove loose carbon fouling. Then we apply the foam as shown, but usually from the muzzle end (with bore guide in chamber). Here’s the important point — after 20-30 minutes, once the bubbles have dissipated, we apply the foam a second time, getting more of the active ingredients into the barrel. We then patch out, as shown, after 3-4 hours.
What is the Best Way to Clean a Rifle Barrel?
We are asked this question quite frequently alongside requests for recommended break-in procedures. Improper barrel cleaning methods can damage or destroy a barrel, leading to diminished accuracy or even cause a catastrophic failure. When it comes to barrel maintenance, there are a number of useful techniques that we have not listed. Some techniques may work better with different barrel types. This series of recommendations is designed to incorporate a number of methods that the Criterion Barrels staff has used successfully both in the shop and on their personal rifles. Please feel free to to list your own recommendations in the below comments section.
We recommend the use of the following components during rifle cleaning:
• Cloth patches (sized for the appropriate caliber)
• Brass jag sized properly for your bore
• One-piece coated cleaning rod
• General bore cleaner/solvent (Example: Hoppes #9)
• Copper solvent of your choosing (Example: Sweets/KG 12)
• Fitted cleaning rod bore guide
• Plastic AP brush or toothbrush
• Q-Tips
• Plastic dental picks
• CLP or rust preventative type cleaner
There are a number of schools of thought relating to the frequency in which a barrel should be cleaned. At minimum we recommend cleaning a barrel after each shooting session to remove condensation, copper, and carbon build-up. Condensation is the greatest immediate threat, as it can cause the barrel to rust while the rifle sits in storage. Copper and carbon build-up may negatively impact future barrel performance, increasing the possibility of a failure in feed or function. Fouling should be removed whenever possible.
The below tips will help limit the wear of different parts of your barrel during routine maintenance, helping extend the life of the barrel and improving its performance.
The Crown
The crown is the portion of the barrel where the bullet loses contact with the lands and grooves and proceeds to exit the firearm. The area most critical to accuracy potential is the angle where the bullet last touches the bore of the barrel.
Avoid damage to this area by using a plastic toothbrush and CLP type cleaner to scrub the crown from the exterior of the barrel. Even the most minimal variation in wear to the crown will negatively impact barrel performance, so be careful to avoid nicking or wearing away this part of the barrel.
Reducing Cleaning Rod Wear to the Crown
When running a patch through the barrel, place the muzzle about a ¼” from a hard surface that runs flat at a perpendicular angle to the cleaning rod’s direction of travel, like a wall or the edge of a work bench (pictured). When the jag impacts the hard surface, retract the cleaning rod and remove the patch.
By withdrawing the jag prior to its exit from the barrel, you are limiting the possibility of the brass dragging upon the crown if the rod is at all bent or misaligned. The soft cloth patch will continue to serve as the point of contact between the jag and the barrel, minimizing potential wear.
If possible, insert the rod through the chamber, pushing it forward toward the muzzle. Some rifles, such as the M1 Garand or M14, will require you to insert the cleaning rod through the muzzle. In these situations the use of a cleaning rod guide is recommended to limit the friction placed upon the crown.
Avoid using cleaning rod segments for scraping carbon from the recessed muzzle of an AR-15 barrel. We used this trick in the Marine Corps to impress the armorers and NCO’s with the cleanliness of our muzzles, but it likely played a significant role in reducing the service life of the rifle barrel in question.
Use a Q-Tip soaked in solvent to remove any copper or carbon residue from the recessed muzzle of an AR-15 barrel. A little bit of remaining carbon on the face of the muzzle will not negatively affect bullet travel so long as the crown edge remains consistent around the circumference of the bore.
The Lands and Grooves
This portion of the barrel may experience reduced efficiency due to copper fouling and cleaning rod damage. If copper fouling takes place during the initial break-in of the rifle, make sure to check our barrel break-in article.
The question of barrel break-in is controversial. Some folks advocate an elaborate, lengthy cycle of shooting and brushing, repeated many times — one shot and clean, two shots and clean and so on. This, it is argued, helps barrels foul less and shoot more accurately. Others say minimal break-in, with patching and brushing after 10-15 rounds, is all you need. Still others contend that break-in procedures are a total waste of time and ammo — you should just load and shoot, and clean as you would normally.
We doubt if there will ever be real agreement among shooters concerning barrel break-in procedures. And one must remember that the appropriate break-in procedure might be quite different for a factory barrel vs. a custom hand-lapped barrel. This Editor has found that his very best custom barrels shot great right from the start, with no special break-in, other than wet patches at 5, 10, and 15 rounds. That said, I’ve seen some factory barrels that seemed to benefit from more elaborate break-in rituals.
What’s the best barrel break-in procedure? Well our friend Eric Mayer of Varminter.com decided to ask the experts. A while back Eric interviewed representatives of three leading barrel manufacturers: Krieger, Lothar-Walther, and Shilen. He recorded their responses on video. In order of appearance in the video, the three experts are:
Do I Need to Break-In a New Rifle Barrel?
Eric Mayer of Varminter.com says: “That is a simple question, [but it] does not necessarily have a simple answer. Instead of me repeating my own beliefs, and practices, on breaking-in a new rifle barrel, I decided to answer this one a bit differently. While we were at the 2016 SHOT Show, we tracked down three of the biggest, and most popular, custom barrel makers in the world, and asked them what they recommend to anyone buying their barrels, and why they recommend those procedures. We asked the question, and let the camera run!” Launch the video above to hear the answers — some of which may surprise you.
Long-Term Barrel Care — More Experts Offer Opinions
Apart from the debate about barrel break-in, there is the bigger question of how should you clean and maintain a barrel during its useful life. Some folks like aggressive brushing, other shooters have had success with less invasive methods, using bore foam and wet patches for the most part. Different strokes for different folks, as they say. In reality, there may not be one solution for every barrel. Different fouling problems demand different solutions. For example, solvents that work well for copper may not be the best for hard carbon (and vice-versa).
“Why worry about a little barrel fouling when the throat is subjected to a brutal 5,600° F volcano at 55,000 PSI? To investigate these and other questions about taking care of a match barrel, we spoke with a dozen experts and share their knowledge in this first of a series of articles.
After listening to folks who shoot, build barrels or manufacture cleaning solvents for a living, we concluded that even the experts each have their own unique recommendations on how to care for a match barrel. But they all agree on one thing — the gun will tell you what it likes best. Because the life expectancy of a match barrel is about 1,500 to 2,500 rounds, the objectives of cleaning one should include: preserve accuracy, slow the erosion, and remove fouling — all without damaging the gun. This article doesn’t claim that one cleaning method is better than the next. Rather, we set out to interject a little science into the discussion and to share some lessons learned from experts in the field.” — Chip Lohman
Share the post "Barrel Break-In — Essential Procedure or Total Waste of Time?"
Otis will introduce a number of new products at SHOT Show 2018. We were impressed by two new products, one that cleans bores, and a second that promises to protect the inside of your barrel from corrosion. As to the latter, we’re always looking for better ways to prevent the formation of rust in barrels during long term storage. You can certainly coat the bore using patches soaked with Eezox, Corrosion-X, or other good anti-corrosion product. But is there something that could work even better?
New Otis Metal Defense Bore Stick
Otis came up with a new idea that may hold promise. The new Otis Metal Defense Bore Stick™ is placed inside your barrel during storage. Perhaps better named the “Bore Cord”, this product has a long orange “tail” that runs down inside the barrel. The cord’s fibers release VCI, a very effective corrosion inhibitor. The top end has an orange rubber handle with a conical plug. That plug goes in the muzzle to block moisture and retain the rust-fighting VCI vapors. Available for rifles, shotguns, and pistols, Otis says this product “protects firearms from rust and corrosion for up to two years. It is inserted in the barrel of the gun, features a plug to cap the muzzle, and creates a protective barrier on the metal surface.” Single packs cost $4.99 and two-packs are $6.99.
New Foaming Bore Cleaner from Otis
Count us as Foam Fans. We have used Wipe-Out Foam Bore Cleaner on our own match rifles for years. Over that time, Wipe-Out has worked very well, greatly reducing the amount of brushing required. Chemist Terry Paul, inventor of Wipe-Out, created a great product that really works. Our procedure with Wipe-Out is to first patch out the barrel with 3-4 wet patches soaked with Carb-Out or other solvent. Then we apply Wipe-Out once to the bore (with an O-ring boreguide sealing off the chamber). We wait 20-30 minutes, then apply Wipe-out foam a second time. After 3-4 hours we patch out the bore, and normally the rifle is good to go. For long-term storage we may run an oil patch down the bore as a final step.
Otis now has its own proprietary Foaming Bore Cleaner. The expanding foam is formulated to clean the bore of any rifle, pistol, or shotgun. Available in a 3 ounce aerosol can, it retails for $9.99. The can ships with a handy tube for application, with a push-button control on top. We look forward to trying the Otis foam cleaner to see how it stacks up to Wipe-Out.
The above video shows how to apply Wipe-Out or other bore-cleaning foam. We use a slightly different method. First, we use 3-4 wet patches to remove loose carbon fouling. Then we apply the foam as shown, but usually from the muzzle end (with bore guide in chamber). Here’s the important point — after 20-30 minutes, once the bubbles have dissipated, we apply the foam a second time, getting more of the active ingredients into the barrel. We then patch out, as shown, after 3-4 hours.
Share the post "New Anti-Corrosion and Bore-Cleaning Products from Otis"
Ask 10 shooters about barrel cleaning and you’ll get 10 different opinions. This reflects that fact that different fouling problems demand different solutions. For example, solvents that work well for copper may not be the best for hard carbon (and vice-versa). To come up with the right solution, first you must understand the nature of the fouling in your barrel.
John Krieger Interview with AccurateShooter at SHOT Show:
The debate about the proper care of a match barrel is a hot one, spiked with folklore and old wives’ tales, Lohman said. He and his staff set out to set the record straight: “We tried to interject some science into the discussion of cleaning a match barrel,” he explained. In his article, Lohman writes:
Why worry about a little barrel fouling when the throat is subjected to a brutal 5,600° F volcano at 55,000 PSI? To investigate these and other questions about taking care of a match barrel, we spoke with a dozen experts and share their knowledge in this first of a series of articles.
After listening to folks who shoot, build barrels or manufacture cleaning solvents for a living, we concluded that even the experts each have their own unique recommendations on how to care for a match barrel. But they all agree on one thing — the gun will tell you what it likes best. Because the life expectancy of a match barrel is about 1,500 to 2,500 rounds, the objectives of cleaning one should include: preserve accuracy, slow the erosion, and remove fouling — all without damaging the gun. This article doesn’t claim that one cleaning method is better than the next. Rather, we set out to interject a little science into the discussion and to share some lessons learned from experts in the field.
For more Shooting Sports USA articles, visit www.ssusa.org.
Share the post "Bore Cleaning The Right Way — Top Barrel-Makers Give Advice"


 J. Dewey Mfg. offers a series of “Copper Eliminator” jags and brush adapters made from aircraft-grade aluminum with the same hardness as brass. Dewey claims that its aluminum jags will not become embedded with grit or particles that could harm your bore. At the same time, Dewey’s aluminum jags will not react to ammoniated bore solvents that can turn patches blue green when used with brass jags. Dewey aluminum jags are offered with either male OR female 8/32 threads. The $5.25 aluminum jags and $3.70 brush adapters are offered in a wide variety of calibers. You can order these products from Dewey Mfg. or Brownells.
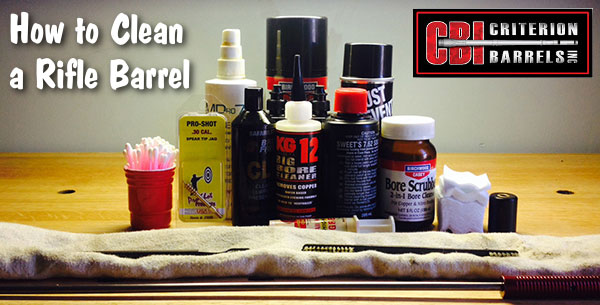
 We doubt if there will ever be real agreement among shooters concerning barrel break-in procedures. And one must remember that the appropriate break-in procedure might be quite different for a factory barrel vs. a custom hand-lapped barrel. This Editor has found that his very best custom barrels shot great right from the start, with no special break-in, other than wet patches at 5, 10, and 15 rounds. That said, I’ve seen some factory barrels that seemed to benefit from more elaborate break-in rituals.


 New Foaming Bore Cleaner from Otis


