When a rifle isn’t shooting up to it’s potential, we need to ask: “Is it the gun or the shooter?” Having multiple shooters test the same rifle in the same conditions with the same load can be very revealing…
When developing a load for a new rifle, one can easily get consumed by all the potential variables — charge weight, seating depth, neck tension, primer options, neck lube, and so on. When you’re fully focused on loading variables, and the results on the target are disappointing, you may quickly assume you need to change your load. But we learned that sometimes the load is just fine — the problem is the trigger puller, or the set-up on the bench.
Here’s an example. A while back we tested two new Savage F-Class rifles, both chambered in 6mmBR. Initial results were promising, but not great — one gun’s owner was getting round groups with shots distributed at 10 o’clock, 2 o’clock, 5 o’clock, 8 o’clock, and none were touching. We could have concluded that the load was no good. But then another shooter sat down behind the rifle and put the next two shots, identical load, through the same hole. Shooter #2 eventually produced a 6-shot group that was a vertical line, with 2 shots in each hole but at three different points of impact. OK, now we can conclude the load needs to be tuned to get rid of the vertical. Right? Wrong. Shooter #3 sat down behind the gun and produced a group that strung horizontally but had almost no vertical.
Hmmm… what gives?
>
Shooting Styles Created Vertical or Horizontal Dispersion
What was the problem? Well, each of the three shooters had a different way of holding the gun and adjusting the rear bag. Shooter #1, the gun’s owner, used a wrap-around hold with hand and cheek pressure, and he was squeezing the bag. All that contact was moving the shot up, down, left and right. The wrap-around hold produced erratic results.
Shooter #2 was using no cheek pressure, and very slight thumb pressure behind the tang, but he was experimenting with different amounts of bag “squeeze”. His hold eliminated the side push, but variances in squeeze technique and down pressure caused the vertical string. When he kept things constant, the gun put successive shots through the same hole.
Shooter #3 was using heavy cheek pressure. This settled the gun down vertically, but it also side-loaded the rifle. The result was almost no vertical, but this shooting style produced too much horizontal.
A “Second Opinion” Is Always Useful
Conclusion? Before you spend all day fiddling with a load, you might want to adjust your shooting style and see if that affects the group size and shape on the target. Additionally, it is nearly always useful to have another experienced shooter try your rifle. In our test session, each time we changed “drivers”, the way the shots grouped on the target changed significantly. We went from a big round group, to vertical string, to horizontal string.
Interestingly, all three shooters were able to diagnose problems in their shooting styles, and then refine their gun-handling. As a result, in a second session, we all shot that gun better, and the average group size dropped from 0.5-0.6 inches into the threes — with NO changes to the load.
That’s right, we cut group size in half, and we didn’t alter the load one bit. Switching shooters demonstrated that the load was good and the gun was good. The skill of the trigger-puller(s) proved to be the limiting factor in terms of group size.
Share the post "Rule Out “Driver Error” — Test Accuracy with Multiple Shooters"
A while back our Aussie friend Stuart Elliot of BRT Shooters Supply recently filmed some interesting videos at the QTS range in Brisbane, Australia. Stuart told us: “I was shooting in an Air Gun Benchrest match here in Brisbane, Australia. I finished my target early and was awaiting the cease fire and took a short, slow-motion video of windflag behavior.” You may be surprised by the velocity changes and angle swings that occur, even over a relatively short distance (just 25 meters from bench to target).
Here are windflags in slow motion:
The flags show in the videos are “Aussie Wind Flags”, developed by Stuart Elliot. These are sold in the USA by Butch Lambert, through Shadetree Engineering.
Here is a video in real time:
Stuart says this video may surprise some shooters who don’t use windflags: “Many people say the wind doesn’t matter. Well it sure does — whether for an airgun at 25 meters or a long range centerfire at 1,000.” This video illustrates how much the wind can change direction and velocity even in a small area.
Share the post "Dance of the Aussie Windflags — Slow-Motion Windflag Videos"
Want to shoot better scores at your next match? Here’s a smart, inexpensive do-it-yourself project from the good folks at Criterion Barrels. For less than a dollar or two in materials, in just a few minutes you can create a handy, effective mirage shield, custom-fitted to your favorite rifle.
All precision shooters should be familiar with mirage, a form of optical distortion caused primarily by variations in air temperature. Savvy shooters will use mirage as a valuable tool when gauging wind speed and direction. Natural mirage is unavoidable, but there are many techniques designed to limit its influence in long-range marksmanship.
A form of mirage can be produced by the barrel itself. Heat rising from the barrel may distort sight picture through your optics, leading to erratic results. Mirage caused by barrel heat can be reduced dramatically by a simple, light-weight mirage shield.
How to Make a Mirage Shield
A mirage shield is an extremely cost-effective way to eliminate a commonly-encountered problem. Making your own mirage shield is easy. Using old venetian blind strips and common household materials and tools, you can construct your own mirage shield for under one dollar.
Materials Required:
1. Vertical PVC Venetian blind panel
2. Three 1”x1” pieces adhesive-backed Velcro
3. Ruler or tape measure
4. Scissors or box cutter
5. Pencil or marker
1. Measure the distance from the end of the receiver or rail to the crown of the barrel.
2. Using a pencil and ruler, measure the same distance and mark an even line across the blind.
3. Cut across the line using scissors or a box cutter, shortening the blind to the required length. (Remember, measure twice, cut once!)
4. Expose the adhesive backing on the loop side of the Velcro. Center and apply the Velcro strips on the barrel at regular intervals.
5. Expose the adhesive backing of the fuzzy side of the Velcro.
6. Place the blind on the upper side of the barrel. Apply downward pressure. Once the Velcro has secured itself to the barrel, separate the two sides. Proceed to mold both sides of the Velcro to fit the contour of their respective surfaces.
7. Reaffix the blind. Barrel related mirage is now a thing of the past!
NOTE: You can attach the Velcro on the opposite side of the blind if you want the blind to curve upwards. Some folks thinks that aids barrel cooling — it’s worth a try.
How to Remove and Re-Attach the Mirage Shield
Removal of your mirage shield is accomplished by simply removing the blind. You can un-install the Velcro by pulling off the strips and then gently removing any adhesive residue left behind using an appropriate solvent. (Simple cooking oil may do the job.) Caution: With fine, high-polish blued barrels, test any solvent on a non-visible section of the barrel. Before storing the gun, re-oil the barrel to remove active solvents and residual fingerprints.
Share the post "Make Your Own Mirage Shield from Low-Cost Venetian Blind"
Available for under $230.00 including front bag, the Caldwell Fire Control front rest is a very good value. It makes the co-axial, joystick design more affordable than ever. We used the Fire Control front rest when testing our Ultimate Varminter 20 Practical AR. Once we removed some sand from the tri-lobe front bag, the rest worked quite well.
Get a Fire Control Rest for $220.99
Right now you can get the Caldwell Fire Control Front Rest for just $220.99, an 18% savings off the regular price. The $220.99 Amazon price is a great deal for guys on a tight budget who want a modern joystick-style front rest (this same Caldwell rest sells for up to $269.99 elsewhere).
With the conversion described in this article, you can put together a system that works pretty darn well, and is more than adequate for many applications, including prairie-dog hunting (from a bench). Put the money saved into a nice custom, hand-lapped barrel or some bullets for your varminter.
Upgrading Fire Control Front Rest with Sinclair Top
While most Fire Control owners are happy with the product, many have wanted to replace the tri-lobe front bag with a more conventional front bag from Protektor or Edgewood. This isn’t as easy as it looks because the width of the Fire Control top is too narrow for most standard 3″-wide front bags. On a “special order” basis, Protektor has crafted some narrower leather front bags that fit pretty well, but some shooters have decided to “upgrade” the entire front assembly.
Forum member Doug M. (aka DrJeckyl), has come up with an elegant solution that allows a Sinclair Int’l Benchrest Rest Top to be fitted to the Fire Control Rest. Doug notes: “The Caldwell Fire Control is a nice rest for the money, but it comes up short in the rest top department. The Sinclair RT-3 [or its replacement, the Gen II B/R top] fits perfect with minor modifications.” Shown below are the main components:
To adapt the Sinclair RT-3 or Gen II B/R top, Doug merely had to drill a couple holes in the RT-3 baseplate, and adapt a spacer to get the height correct: “The Caldwell factory top has a raised mounting portion so a 1/8″ piece of stock will be needed as a spacer to the flat-bottom RT-3. The spacer needs to be cut to the same length as the movable portion on the rest. And you should plan the mounting accordingly so the left thumbscrew clears the vertical height column at full left position (there is a cutaway in the rest under the thumbscrew that allows for easy access to the screw).” We labeled the photo with dimensions, but Doug cautions you should measure your own original plate to insure the drill locations are correct for your unit.
The completed installation, with the RT-3 installed on the Fire Control rest, is shown at the top of this article. Doug says it works very well. To learn more about this conversion, with Doug’s measurements for the hole-spacing and his specs on the fasteners, go to the original thread in our Shooter’s Forum. NOTE: Sinclair no longer sells the RT-3 top, but Sinclair’s $89.99 Gen II B/R top can be converted just as easily. LINK to Fire Control Rest Top Conversion Forum Thread.
Share the post "Budget Co-Axial Rest — The $220.99 Caldwell (Plus Upgrade)"
Every Saturday we present interesting, informative videos for our Daily Bulletin readers. Here we feature five YouTube videos that offer a ton of useful information for serious shooters. We start with a great video about setting up rifle, rest, and bag on the bench. Then Hall-of-Fame benchrest shooter Speedy Gonzalez shows smart methods for cleaning barrels. Next F-Class Ace Keith Glasscock explains how to optimize your rifle after travel. In the fourth video, AutoTrickler inventor Adam MacDonald shows how to optimize the AutoTrickler V4. Next the truly outstanding 21st Century Power Neck-Turning lathe is showcased.
How to Set Up Your Rifle, Rest, and Bag on the Bench
To get the best results in benchrest shooting, you need to set up all the gear on your bench properly. That includes front rest placement, rear bag position, spotting scope set-up, and placement of cartridge holder/caddy, and possibly an elbow/forearm rest. When setting up the hardware, you need to align the front rest and rear bag properly to get optimal tracking. In addition you want to make sure the rear bag doesn’t slide or rotate a bit from shot to shot. And you also want to set your seat height/location so the shooter’s position is optimal and comfortable. This helpful video shows how to set up your rifle and gear for a benchrest match or load development/practice at the range. Credit to Boyd Allen for finding video.
Cleaning Barrels with Speedy — Smart Techniques
There are many effective methods to clean barrels. But some are more efficient that others and can help you do the job more quickly, with less effort. Here respected gunsmith and Hall-of-Fame benchrest shooter Speedy Gonzalez shows his procedures for cleaning competition barrels. He uses Sharpshoot-R Liquid Patch-Out and Wipe-Out Accelerator as primary solvents. Watch carefully — Speedy has some clever techniques for starting a patch in the rifling, and he is also careful about exiting the muzzle when brushing. Speedy also explains the importance of keeping your rods clean. And he prefers nylon brushes because, as the barrel starts to get wear in the throat, “the bronze bristles will actually start eating into that and you’ll see little grooves if you have a good borescope.” (See video 00:38-01:35)
Getting Rifle Ready After Traveling — Keith Glasscock
Keith Glasscock is one of America’s top F-Class shooters, having finished Second at the National Championships multiple times. Keith, who has an engineering background, runs the popular Winning in the Wind YouTube channel. There you’ll find great advice on wind reading, load tuning, precision reloading and many other topics. In this video, Keith offers very smart advice on how to re-assemble your rifle after you have traveled to a match or practice destination. Keith explains how to check the fasteners on the gun and set up the scope properly if you removed it while traveling.
Adjusting AutoTrickler V4 with its Inventor, Adam MacDonald
Adam MacDonald is the brilliant Canadian engineer who created the AutoTrickler series of automated powder dispensing systems. These work with advanced scales to dispense powder rapidly, but with a precise final trickle accurate to a single kernel. In this video, Adam explains how best to adjust and calibrate the AutoTrickler V4 when using powders that flow at different rates.
21st Century Power Neck-Turning Lathe — Great Tool
Turning case-necks can be tedious and tough on older hands if you’re using hand-held tools. Quite a few years ago 21st Century released a great compact, neck-turning lathe that delivers superb, consistent results. This Editor uses that original lathe with hand crank and I can affirm that it works great. It is easy to use, fast, and the turned necks come out smooth with consistent rim thickness. But you still had to turn a crank. Well, in 2018, 21st Century created an upgraded Power Neck-Turning Lathe with an electric motor and lever to advance the cases to the cutter. The power head glides on stainless steel guide rails. Power is controlled with a red button in the feed handle.
This advanced, powered mini-lathe is absolutely superb. It works brilliantly and makes the task of turning case-necks fast and VERY easy. And there is even a 3-Way trimmer upgrade that will trim cases to length at the same time as the necks are turned.
BONUS — How to Spot Fake Online Sellers of Components
With the shortage of premium reloading components, particularly powder and primers, many handloaders are desperate to find components when even big companies such as Midsouth and MidwayUSA are completely sold out. Enter the scammers. There are criminals, many based overseas, who have created entire websites designed to steal your money. You might find such a site when searching for “Varget powder in stock” or “CCI BR4 primers”. These sites look like regular business webstores, with product photos and modern shopping cart systems. But it’s all a scam.
Key giveaways are: 1) The site does NOT take Visa, Mastercard, or Discover but requires payment with Zelle, Venmo, Bitcoin, or AppleCash only; and 2) The site has hard-to-find powders, such as Varget and H4350, that nobody else has, and you can put thousands of pounds in the shopping cart.
Bottom line here — if the site allows you to order vast amounts of powder and/or primers, and does not take ANY major Credit Card types, it is almost surely a scam. If you see links to pay with Crypto-Currency (such as Bitcoin) run away!
Share the post "Saturday at the Movies: Five Great Videos for Accurate Shooters"
How to Fill Shooting Sandbags Most Effectively
For both front and rear Edgewood bags, start by looking for the black nylon/cordura flap. This flap will have white stiches running along both sides. Note that the flap is actually two pieces of nylon/cordura which are sewn together. These two pieces must be separated at the end where there are no stitches in order to insert a funnel or other filling device.
Hold the bag so that the flap is pointed straight up and fill half way. Using a blunted rod and alternating between filling and packing, begin packing the sand firmly into the bag until the shape is uniform and you are satisfied with the firmness. Slam the base of the bag firmly on the bench several times to compact and evenly seat the sand. Then, check to see if more sand needs to be added. Repeat this process for the ears if you are filling a rear bag. Note that as the sand continues to condense during use, the bag may occasionally require additional sand until it reaches maximum capacity. NOTE: This tip is from Creedmoor Sports, which carries Edgewood Shooting Bags.
Edgewood offers an innovative rear Twisted Gater bag with an unusual asymmetrical footprint. This provides arm/hand support for the shooter while still providing superb rear support for your bench rifles.
SANDBAG Fill Options — Yes Weight Matters
For most shooting applications, “heavy is good” when it comes to sandbags. The more your sandbag weighs, the better it will resist movement or mis-alignment that can throw off a shot. In order to increase the weight of their rear bags, serious shooters have turned to exotic sand formulations that offer greater density (hence higher weight by volume) than plain silica sand (aka “play sand”).
In this article, Jason Baney reviews three popular alternatives to play sand for rear sandbags. He tested each variety to determine its density, i.e. how much volume it would displace per pound. Then he calculated how much each type of sand would weigh in various sizes of rear sandbags: standard, large, and ultra-large (Bigfoot). Check our Rapid Reference Chart to see how much weight you can add to your sandbag by switching to heavy sand.
Is heavy sand worth the added expense? For serious shooters, the answer is yes. More mass equals more stability, and a more stable bag will help you shoot tighter groups. By switching from conventional sand to Zircon or Chromite, you can DOUBLE the weight of sand in your rear bag.
Shown above are the latest SEB Bigfoot Bags. Note that the bags sit perfectly flat — there is no bulge on the bottom even though the bags are “packed to the brim with sand”.
Heavy Sand — Weighing the Benefits by Jason Baney
Many serious Benchrest shooters fill their sand bags with “heavy sand”. This practice may seem “overkill” to most shooters, but its benefits are realized quickly when shooting from a bench. Heavy sand is more dense than normal silica “play sand” and therefore makes the sandbag heavier and more stable. How much heavier is the heaviest sand? Check the chart below and you’ll see that Zircon sand weighs essentially TWICE as much as ordinary play sand. More weight equals more inertia opposing bag movement, plus more gravity-induced “stiction” on the bottom of the bag. In other words, using heavy sand helps your rear bag stay planted on the bench during a string of fire. When you shoot a hard-recoiling gun, the difference between a bag filled with play sand vs. Zircon is very noticeable. The Zircon-filled bag stays put. The play sand-filled bag may not.
Rapid Reference Chart
Comparative Sand Weights by Sandbag Size
SandBag Type
Play Sand
Riverbed Sand
Chromite
Zircon
Standard 5″x6″
5.1 lbs.
7.9 lbs.
9.9 lbs.
10.1 lbs.
Large 6″x8″
6.8 lbs.
10.5 lbs.
13.2 lbs.
13.4 lbs.
BigFoot 6″x13″
10.2 lbs.
15.8 lbs.
19.7 lbs.
20.1 lbs.
Weight Increase Compared to Play Sand
Zincon +98%
Chromite +94%
Riverbed Sand +55%
The Benefits of Heavier Sand
Heavy Sand helps your sandbag resist the tendency to shift or change alignment (relative to the stock) during recoil. This ability to maintain sandbag alignment is vital when shooting competitive Benchrest, either short-range or long-range. Having to fight a “migrating” rear bag during a group at 1000 yards will not do anything to help your accuracy. In non-competitive use, heavy sand can still benefit shooters. Friction from the stock on the rear bag, or bumping the bag on recoil with either a body part or pistol grip can move a lighter bag out of place and necessitate realigning the bag to get on target.
Of course there are some shooting situations where you don’t need (or don’t want) maximum sandbag weight. During a “walk-around” varmint session you may prefer a lighter bag. Beanbags that I carry around the groundhog fields stay filled with plastic beads, making the bag handier to tote. But, any rear bag used on a bench will be as heavy as I can make it while still using “sand” as filler.
Heavy Sand, Lead Shot, and Competition Rules
Some will say, “Well if you want a heavier sandbag, why not just add lead shot?” That is a great idea, but as far as I know, it is also illegal in every form of Benchrest competition. The material in sandbags must actually be “sand”, and only sand. It’s tempting to filter in a mix of shot and sand to increase weight, but that would also violate the rules.
Heavy Sand — Available Types and Properties
Heavy sand comes in several different varieties. In this article we tested three types: Zircon, Chromite, and commercial Riverbed sand (Exo-Terra brand “Reptile Sand”). All these are heavier alternatives to normal silica “play sand.” There are other types of Heavy Sand not tested here, such as Garnet Sand, which is between Chromite and Zircon in weight.
Sources: Sinclair Int’l sells black “Heavy Sand”, basically chromite. Large quantities of Zircon and Chromite are available from IFS Industries, and other industrial suppliers.
Exo-Terra Riverbed sand (amber). Available at pet stores.
Silica “Play Sand” (tan or light gray). Available at Home/Garden stores.
Zircon — Heavy-Weight Champion
To my knowledge, “Dupont Zircon M” is the heaviest “sand” that a normal human can acquire. It is also the most expensive. Zircon is a very light tan/brown color and is very similar in appearance to normal sandbox “play sand”. Zircon is normally rated as having the greatest density among heavy sands and it has the smallest particle size, though some Chromite sand density values overlap the Zircon numbers.
1.00 pound of Zircon displaces 149cc vs. 295cc for Play Sand. So, that means Zircon is 98% heavier than an equal volume of Play Sand.
CONSUMER TIP: Real ZIRCON sand is TAN in color, not black or dark gray. Some “heavy sand” vendors promise Zircon but deliver a dark gray sand that is something else entirely!
Chromite — Almost as Heavy as Zircon, and 30% Cheaper
Chromite sand is nearly the same density as Zircon but it costs quite a bit less. Chromite typically sells for about 25-30% less than Zircon (comparing bulk prices of both types of sand). Chromite sand is black in color. So when you buy “heavy sand,” make sure you are getting what you pay for.
1.00 pound of Chromite displaces 152cc vs. 295cc for Play Sand. So, that means Chromite is 94% heavier than an equal volume of Play Sand.
Riverbed Sand — Weighs Less but Costs More than Chromite
Riverbed sand, is about 30% less dense than Zircon or Chromite, but is about 150% more dense than silica sand. Depending upon where you buy this sand, and the quantity, you will most likely pay more for this sand than you would Zircon or Chromite. Riverbed sand is a conglomerate of several different sizes and colors and appears red and black. Unless you are unable to get Zircon or Chromite, I would not bother with the riverbed sand.
1.00 pound of Riverbed Sand displaces 190cc vs. 295cc for Play Sand. So, that means Riverbed Sand is 55% heavier than an equal volume of Play Sand.
Density/Volume Testing and Weight Comparisons
All four sand varieties mentioned above were tested for volumetric density by weight. Each type of sand was weighed out to 1.00 lbs. on a commercial postal scale. Each 1.00 lb sample of sand was then poured loosely into a 600ml beaker and shaken minimally to level the top surface. This served to determine the volume that the sand occupied.
1.00 pound of sand displaced the following volumes:
Zircon: 149 cc
Chromite: 152 cc
Riverbed sand: 190 cc
Play Sand: 295 cc
How do the density-volume numbers translate to the real world? Here is an estimate of how much each sand would weigh in various sizes of rear bag:
Standard Bunny Ear Bag
5″ by 6″ footprint or about 1500cc
Zircon: 10.1 lbs.
Chromite: 9.9 lbs.
Riverbed Sand: 7.9 lbs.
Play Sand: 5.1 lbs.
Protektor Doctor Bag
6″ by 8″ footprint or about 2000cc
Zircon: 13.4 lbs.
Chromite: 13.2 lbs.
Riverbed Sand: 10.5 lbs.
Play Sand: 6.8 lbs.
Seb BigFoot Rear Loaf Bag
6″ by 13″ footprint or about 3000cc
Zircon: 20.1 lbs.
Chromite: 19.7 lbs.
Riverbed Sand: 15.8 lbs.
Play Sand: 10.2 lbs.
Conclusions and Recommendations
What’s the best choice? For most users, we recommend Chromite. Chromite delivers nearly the same bag weight as Zircon but is more economical to buy. But for those who demand the maximum weight in their sandbag (without consideration of cost), Zircon is the top choice because it is sold at a finer grade (higher density) than Chromite. However, Chromite will save you money, and deliver very nearly the same amount of weight by volume. When purchased in bulk, Chromite is typically 25-30% LESS expensive than Zircon.
I would not suggest using the Riverbed sand unless you really need to fill a sandbag immediately and can’t wait to locate a source for either Zircon or Chromite. Keep in mind that Sinclair Int’l and other major mail-order vendors do sell heavy sand (though Zircon and Chromite may be much less expensive when purchased in larger quantities from local industrial sources.) The price of the Riverbed sand will vary quite a bit depending on the pet store and quantity bought. The Riverbed sand I tested, Exo-Terra Reptile sand (photo right), was fairly expensive as purchased at a pet store.
Bottom Line: When it comes time to fill your new rear bag, you may want to save a few dollars and go with cheaper Chromite sand, but if you want to gain every bit of weight possible, step up to the heavier Zircon.
Lenzi Rear bags work very well and are popular with top competitors. This are sold through PMA Tool.
Credit our buddy Joe Friedrich for this simple yet effective accessory for your benchrest rifle. Joe shoots a .22 LR benchrest rig with a barrel tuner. When he added weights to his tuner, he found his rifle no longer balanced well. He wanted to add some weight in the rear without drilling holes in the stock. He also wanted the weight to be removable, and easily placed on another rifle in his stable. He wanted a weight that could be moved from gun to gun as needed.
At a local sporting goods shop Joe found a 1.5-lb ankle weight that comes in a padded, tubular elastic cover. It’s like a 1.5-lb sausage in a soft, stretchy nylon cover. (Imagine a really fat, heavy bungee cord). Joe simply attached a plastic zip tie at the end to make a loop that fits perfectly over his buttstock. CLICK HERE for full-screen photo.
To “tune” the rifle’s balance, Joe just slides the ankle weight fore and aft on the stock. We have tried this moveable ankle weight on a variety of different BR stocks (including a McMillan Edge) and it worked perfectly. This is a great invention, and would work with sporter rifles and ARs just as well.
NOTE: Obviously, this ring will increase the measured weight of your rifle. So, if you are competing in a registered match with weight restrictions, you have to ensure that your rifle still makes class weight limits with the ankle weight ring in place.
Share the post "Ankle Weight on Stock Optimizes Balance of Benchrest Rifle"
They say that a man can never have too much money or too much time. Darrell Jones would add that a man can never have too many BR-based rifles. Darrell had a fleet of BRs, in 22BR, 6mm BR, 6.5 BR, 7 BR, and 30 BR. But he was intrigued by the potential of a rifle in the .257 caliber. Could it shoot as well as a 6mm BR? Could it challenge the more popular calibers in the highly competitive 600-yard benchrest game? Through careful research and component selection, Darrell created a 25 BR rifle that proves the viability of the 25 BR as a competition round. Pushing 115gr high-BC Berger bullets at 2837 fps, Darrell’s 25 BR “Peppermint” won first place in its very first match.
The Barely Bigger BR — Exploring the .25 Caliber Option
Rifle Report by Darrell Jones
I decided to build a 25 BR after several weeks of deliberation and ruling out a .257 Ackley Improved. Part of my dilemma was that I wanted to shoot F-Class competition at 600 yards, and I was unsure about the accuracy potential of the 25 BR. However, I currently have several BRs chambered in 22 BR, 6BR, 6.5 BR, 7 BR, and 30 BR and they all shoot exceptionally well at 600 yards. This lead me to believe a 25 BR should deliver fine accuracy, just like its other BR siblings. Why wouldn’t a 25 BR shoot accurately provided that I built it with the right components? The feasibility saga began. I began searching diligently for custom 25-caliber bullets. Unfortunately, there are not many 25-caliber custom bullet makers. I actually found only two custom bulletsmiths who produce the 25s. I did look at Fowlers and then looked at Bergers. Both Jeff Fowler and Berger made 110-grain flat-base bullets when I was looking. [Editor — this 110gr bullet is no longer listed by Berger]. The Berger 110gr FB bullets (.414 ballistic coefficient) shot very well out of my 12-twist 25-06 Ackley. However, I wanted to shoot a heavier bullet if possible. Berger makes a 25-caliber 115gr VLD boat-tail with a high ballistic coefficient. This needs a 10-twist barrel.
Panda Action, McMillan Stock, Weaver T-36
As you can see, I went with a Panda polished action and a weighted McMillan BR stock painted metallic silver with red candy cane stripes thus the name “Peppermint”. This gun actually does double duty now as a 25 BR and 6 PPC switch barrel. When I want to run the gun as a 6 PPC for short range, I simply screw on the PPC barrel, then swap in a bolt (fitting the PPC bolt face) from another Panda action I own. That’s one advantage of owning custom Kelbly actions! Don’t even think about exchanging bolts between factory guns. Kelbly rings and a Weaver T-36 fixed-power scope handle the optical duties while a Jewell trigger set at one ounce takes care of the firing mechanism.
Chambering for the .25 Caliber BR Wildcat
I wanted a chamber that would let me shoot both the 110s and the 115s. I took some time surfing the net looking for rental reamers that had suitable throat dimensions. I found that Elk Ridge Reamer Rentals had a 25 BR pilot reamer available. I called and Elk Ridge faxed me a reamer diagram that indicated it was designed to tight SAMMI specs. I asked how often was the reamer used and was told “not very often”.
I did want a minimum no-turn neck optimized for Lapua brass. The drawing indicated that the reamer would cut a .281″ neck and a throat of 1.0315″. This was very close to ideal, though I did have to turn two thousandths off the necks of Lapua 6BR brass after I necked it up. I resized using a .277″ bushing and the loaded rounds came out to be .279″. Realizing that this was in the ball park, I decided to go with the Elk Ridge Reamer and build a 25 BR that could shoot 110gr or 115gr bullets. Now the question was where to get a match-grade 25-caliber barrel. I called quite a few of the custom barrel-makers, including BlackStar Barrels in Texas (no longer operating). I have had wonderful success with the BlackStar barrel on my 6BR “Chantilly” — it delivered great accuracy and impressive velocities. Since the 25 BR was so similar, I went with another BlackStar. I ordered a 10-twist, 6-groove, 1.250″-diameter straight-contour tube.
After chambering, the barrel finished at 1.245″ diameter and 27.5″ inches with an 11° crown. I actually had the throat lengthened to accept both Berger 110gr and 115gr bullets. The bases of the FB 110-grainers sit flush with the neck-shoulder junction, when they are seated .010″ into the lands. With the longer 115gr VLDs, the bottom of the bearing surface (i.e. start of boat-tail) is just about even with the neck-shoulder junction.
Accurate Load Development
The barrel broke in easily with just 10 shots, using a “shoot one and clean” process. The load I started with was 31.5 grains of Varget with CCI 450 primers. The Berger 110s and Berger 115s had the same Point of Impact (POI) at 100 yards. However, the 115s impacted two inches higher at 600 yards with the same load. That shows the benefits of a higher BC. Pushed by the CCI 450s and 31.5 grains of Varget, the 115-grainers were running about 2837 FPS. I boosted the load up to 32.0 grains but I noticed primer cratering, so I backed off, settling on 31.5 grains for the 115gr Berger VLD.
Peppermint Wins at 600 Yards
For her debut in competition, I took “Peppermint” to our local 600 yard F-class match. Shooting the Berger 115s with 31.5 grains Varget, she won with a perfect score of 200 with 14 Xs. At my club, we use a SR3 target. The X-Ring measures 3″ in diameter and the 10-Ring measures 7″. At the match there were some very good shooters with top-flight custom rifles in accurate calibers such as 6.5-284 and 22 Dasher. I was very fortunate to come out on top, but I give the credit to Peppermint’s good bench manners and outstanding accuracy.
As you can see from the target, “Peppermint” is a very accurate rifle that has proven herself in competition. It takes a good gun to finish “on top” in her very first match. So far, I’m very happy with the project, and more than satisfied with the accuracy of the 25 BR. This is definitely a worthy cartridge for Egg Shoots, 500m varmint matches, and the 600-yard F-Class game.
BR-Based Cartridge Comparison
CALIBER
22 BR
6mm BR
25 BR
6.5 BR
7 BR
30 BR
Bullet
80gr SMK
107gr SMK
115gr Berger
107gr SMK
130gr SMK
118gr BIB
BC
.420
.527
.522
.420
.391
na
Load Grains
31.0 H4350
30.0 Varget
31.5 Varget
32.0 Varget
34.0 AA2460
34.0 H4198
Barrel Length
27″
27″
27.5″
27.5″
28″
24″
Velocity
3100 fps
2880 fps
2837 fps
2851 fps
2719 fps
2970 fps
Comparing the BR-Based Variants
Now that I have several calibers in the BR cartridge family, (22 BR, 6mm BR, 6.5 BR, 7 BR, and a 30 BR), it is my humble opinion that they each have their own place. A varmint hunter’s dream, the 22 BR can push a bullet faster and more accurately than the 22-250. With an 8-Twist barrel, the 22 BR can send an 80gr SMK to 600 yards with extreme accuracy.
The 6 BR can do it all. The 6mm caliber offers a wide variety of quality bullets suitable for any shooting situation. All the major custom barrel makers produce outstanding 6mm barrels in a full range of twists. Moreover, since the 6 BR cartridge is so popular, there is a great store of knowledge about reloading for the 6 BR. It is easy to find a load that will shoot superbly in any bullet weight.
The 25 BR has proved to be easily tuneable, proficient and not fickle. You can obtain extreme accuracy without great effort in load development. The 115gr Berger offers a good high-BC projectile for this caliber, making the 25 BR a viable alternative to the 6 BR. As I’ve shown, it is competitive with a 6 BR in head to head competition.
Compared to the 25 BR, the 6.5 BR has a small edge in ballistics. However, there are not many light bullet choices available, especially from custom makers. The 123gr Lapua Scenar is an excellent bullet with a .547 stated BC, but it may be a bit heavy for the case capacity.
The 7 BR was designed for silhouette shooting, and it excels at that task. The 7 BR can push a 130 grain bullet fast enough to knock over the steel silhouettes at 500 meters with real consistency.
The 30 BR is nothing less than outstanding. The 30 BR is now the dominant cartridge on the benchrest Score-shooting circuit. It is also highly accurate for group shooting at 200 yards and very capable of winning a 600-yard F-Class match. Barrel life of over 6,000 rounds is realistic.
I like all the “flavors” of BR derived from the 6mm BR Norma case. However, if I could only have one BR in my safe, give me my 8-Twist, 6 BR “Chantilly” and I will be a happy camper. The final point I would make is if a cartridge is stamped BR on the case, it will shoot extremely accurately if you can.
Share the post "Sunday Gunday: 25 BR Peppermint — “Tweener” Caliber Works"
Look and be amazed! In competition, a rifle drilled FIVE perfectly-overlapped bullet holes — the last virtually indistinguishable from the first — at a target a football field (100 yards) away.
Today we feature a benchrest rifle that earned its place in history by setting a small-group record in 2013 that may never be broken. This .30-caliber benchrest rig shot a 0.0077″ five-shot group at 100 yards. That’s the smallest 100-yard group ever shot in competition by ANY gun at 100 yards in history. And we may never see anything smaller in our lifetimes.
In setting that .0077″ (seventy-seven ten-thousandths of an inch) record, the shooter, Mike Stinnett, broke a record that stood for four decades — the 0.009″ five-shot group credited to Mac McMillan. The previous NBRSA Light Varmint Record of .009″ for five shots (at 100 yards) was set on 9/23/1973, 49 years ago. Experts considered that record “untouchable”, “unassailable” — in other words “unbreakable.” But Mike broke Mac’s record 40 years after it was set.
The Record-Setting Rifle and Cartridge
The gun that produced the historic .0077″ group was a Light Varmint-class Benchrest rifle chambered as a .30-caliber wildcat, the 30 Stewart. That cartridge is based on the 6.5 Grendel case necked up. The load had Hodgdon H4198 powder behind BIB 114gr, 10-ogive bullets. Notably, the record-setting ammo was pre-loaded before the match.
The Smallest 100-yard Group in History
All target shooters strive for perfect shot placement. Well one man has come closer to perfection than any other shooter who ever lived. You are looking at Michael Stinnett’s .0077″ NBRSA world-record group, the smallest 100-yard 5-shot group ever shot in the history of rifle competition. The group was certified at .0077″ (though labeled .008″ on the range-signed target below). A moving backer verified that this was FIVE shots — no question about that. You may be surprised but this was NOT shot by a 6 PPC, but rather a .30-caliber wildcat, based on the 6.5 Grendel.
Group Is Smaller than ANY 100-yard Group Shot in ANY Class
Mike’s amazing group stands as a NBRSA Light Varmint Class record. But it is also smaller than the current NBRSA 5-shot, 100-yard records for ALL other classes, even Unlimited (Rail Gun). Likewise Stinnett’s .0077″ group is smaller than the IBS records for ALL classes:
Better than any Rail Gun too — Mike Stinnett’s .0077″ group was smaller that ANY group shot in ANY class — event Unlimited Rail Guns, as shown below:
Below is a larger-than-life-size view. Using this photo we measured the group with target-calculating software, and it came out .006″ (the software only goes to three digits). We recognize that it would be much better to work from the real target rather than a photo, so we are not challenging the official measurement in the least. But this does confirm that this is a phenomenally small five-shot group.
Stinnett Sets .0077″ Record with a .30-Caliber Modified Grendel Cartridge, Pre-Loaded
Many folks have asked about the gun and ammo that produced the .0077″ group. The rifle was chambered as a .30-caliber wildcat, the 30 Stewart, which is based on the 6.5 Grendel case necked up. Mike was using Hodgdon H4198 powder behind BIB 114gr, 10-ogive bullets. Notably, the record-setting ammo was pre-loaded before the match. Unfortunately, we don’t have a photo of the target yet — it is still in the hands of the official NBRSA certification committee. However, Mike has been kind enough to tell us about his rifle and his load.
Mike Stinnett .0077″ Record Group Equipment Report
Mike reports: “Several guys have asked so here is my equipment listing. The hardware build actually started in 2008 with the goal of building two identical Benchrest rifles which could be used for both group and score. The idea was to shoot 6PPC and a .30 Cal without a base rifle change.”
Record-Setting Rifle Equipment and Components
Action: Kelbly Panda “Speedy Shorty” with solid bolt and PPC-diameter bolt face. Kelbly was asked to build several actions which were identical with the intent to eliminate any variance in head space between the two new rifles. This helped me use a single set-up on sizing dies for both rifles and ammo is interchangeable. Both actions were sent to Thomas ‘Speedy’ Gonzalez to be blue-printed and have Jewell triggers installed.
Reamer: 30 STEWART (I just call it a 30 PPC as that is what everyone expects, but it is in fact a custom design and Ralph deserves about 99% of the credit).
Barrels: Krieger was selected for the barrels. After discussions with Randy Robinett of BIB Bullets, a 1:17″ twist was identified as the correct, safe solution. Ralph Stewart has cut all my chambers using a custom-designed reamer. [Our goal] was consistent headspace and Ralph has been able to keep my barrels within .0002 variance. The barrel tuner also comes from Ralph Stewart.
Stock: Larson (including action bedding)
Scope: Leupold 45X Competition in Kelby Single Screw Tall Rings
Brass: Lapua (Base case is 6.5 Grendel)
Bullets: Randy Robinett (BIB) 30 Cal. 114gr, 10 Ogive (secondary bullet; primary is 112gr BIB)
Powder: H4198 – Stout Load with 2980 FPS Velocity
Front Rest: Farley Coaxial
Bags: Micro Fiber
Flags: Graham Wind Flags (large)
About the Cartridge — 30 Stewart (Based on Lapua 6.5 Grendel Parent Brass)
Mike explains: “Our goal was to shoot H4198 as the optimal powder for stability. There were several versions of the reamer before we settled on the current configuration. I am optimized for the 10 Ogive BIB bullet, powder to the base of the bullet. I found in testing the small 30-cal case did not like compression at all. The bullet is seated only 0.12″ into the case with zero freebore.
Cases were initially created with the .220 Russian (like a PPC) but I later decided it was better to build from the 6.5 Grendel. I size the brass and bump the shoulder back until it will fit into the chamber, fill to shoulder with International Clays, cotton wad packed on top. I have a fire-forming barrel. (I would not recommend this Clays and cotton wad method in a good barrel.) After initial fire-forming, I then mandrel the neck up the rest of the way to .30 caliber, turn the necks and trim.
It takes at least 8 firings to fully form a case! If you fire only three loads I find the brass does not have a sharp shoulder or any pressure on the bolt so any die selection is incorrect. Brass continues to harden well past 25 firings. I have match brass with well over 500 rounds fired, and I have never blown a case or neck yet (using my forming method).
For loading I use a Hornady Custom Shop Sizing Die and a Ralph Stewart Custom Seating Die. For those who are curious, yes the small group was fired with pre-loaded rounds. I do this now and then with local matches or may load 50 in a batch for one match.”
Mike wanted to thank his smiths, Randy Robinett, and all the folks involved in running the matches: “A big THANKS — as these are the guys that make our matches possible and without question maintain the integrity of the targets and record system. I was very fortunate to have all the right people in the right places for this match and my record. As for measurement – I only saw the target for about 10 seconds up close and can say I’m very happy I did not have to measure that group! Thanks again to everyone!” — Mike Stinnett
Share the post "Sunday Gunday: The Smallest 100-yard 5-Shot Group in History"
Forest of Windflags at World Benchrest Championships in France in 2011
There’s a simple, inexpensive “miracle device” that can cut your groups in half. If you’re not using this device, you’re giving away accuracy. The “miracle device” to which we refer is a simple wind indicator aka “windflag”. Using windflags may actually improve your accuracy on target much more than weighing charges to the kernel, or spending your life savings on the “latest and greatest” hardware.
Remarkably, many shooters who spend $3000.00 or more on a precision rifle never bother to set up windflags, or even simple wood stakes with some ribbon to show the wind. Whether you’re a competitive shooter, a varminter, or someone who just likes to punch small groups, you should always take a set of windflags (or some kind of wind indicators) when you head to the range or the prairie dog fields. And yes, if you pay attention to your windflags, you can easily cut your group sizes in half. Here’s proof…
Miss a 5 mph Shift and You Could DOUBLE Your Group Size
The table below records the effect of a 5 mph crosswind at 100, 200, and 300 yards. You may be thinking, “well, I’d never miss a 5 mph let-off.” Consider this — if a gentle 2.5 mph breeze switches from 3 o’clock (R to L) to 9 o’clock (L to R), you’ve just missed a 5 mph net change. What will that do to your group? Look at the table to find out.
Values from Point Blank Ballistics software for 500′ elevation and 70° temperature.
Imagine you have a 6mm rifle that shoots half-MOA consistently in no-wind conditions. What happens if you miss a 5 mph shift (the equivalent of a full reversal of a 2.5 mph crosswind)? Well, if you’re shooting a 68gr flatbase bullet, your shot is going to move about 0.49″ at 100 yards, nearly doubling your group size. With a 105gr VLD, the bullet moves 0.28″ … not as much to be sure, but still enough to ruin a nice small group. What about an AR15, shooting 55-grainers at 3300 fps? Well, if you miss that same 5 mph shift, your low-BC bullet moves 0.68″. That pushes a half-inch group well past an inch. If you had a half-MOA capable AR, now it’s shooting worse than 1 MOA. And, as you might expect, the wind effects at 200 and 300 yards are even more dramatic. If you miss a 5 mph, full-value wind change, your 300-yard group could easily expand by 2.5″ or more.
If you’ve already invested in an accurate rifle with a good barrel, you are “throwing away” accuracy if you shoot without wind flags. You can spend a ton of money on fancy shooting accessories (such as expensive front rests and spotting scopes) but, dollar for dollar, nothing will potentially improve your shooting as much as a good set of windflags, used religiously.
Windflags Sources and Options
Which Windflag to buy? There are many vendors selling windflags of various types, some with daisy wheels others without. You may want to go to a match and see what types works best for you. CLICK HERE for the Benchrest Central Classifieds with multiple windflag types and accessories for sale. Here is a sample:
Look carefully at the photo above. That stylish black rear bag doesn’t look anything like an Edgewood or Protektor — it’s a Lenzi bag from Italy. The front Bag-holder on the SEB Neo Rest is also a Lenzi product.
Lenzi Rear Sand Bag
Pat Reagin of PMA Tool offers a really superb rear bag that comes from Italy. Pat tells us: “We are now carrying rear bags made by Italian benchrester Alberto Lenzi. Made in Italy, these Lenzi bags are AWESOME! They are available for short range and one that is slightly taller for long range.” The Lenzi rear bags feature a big, 8″x6″ footprint with a thick, slightly concave base that sits very flat on the bench top. The Long Range Model is 1/2″ shorter with slightly taller ears. For both bag versions, chose Nylon ear fabric or 3M Slick covering.
Lenzi bags are very stable with a reassuring “dead” feel on the bench. Guys who have tried this bag really like it. Pat says: “I can’t explain it, but the bag seems to absorb energy/recoil better than other bags — the gun tracks a little better and I get back on target really well.” CLICK HERE for more information: Lenzi Long Range Rear Bag | Lenzi Standard Rear Bag.
– Black leather with Cordura at stock contact points with blue stitching.
– 1/2″ flat between medium ears.
– Heavy 8″x6″ base with built-in “donut”.
– Weight about 15.5 lbs filled with heavy sand in bottom & white sand in ears.
– Bags offered with Nylon Ear Covering OR 3M Slick Ear Fabric.
Lenzi Replacement Top for SEB NEO Front Rest
Some SEB NEO rest owners prefer a conventional front bag instead of the SEB standard three-piece front bag. This rest top made by Alberto Lenzi addresses the issue by replacing the entire rest top. The rest top features a more conventional design and includes a traditional style front bag that conforms to IBS and NBRSA rules.
For today’s Sunday GunDay story we showcase seven interesting metal-chassis rifles. While we love the look and feel of wood and fiberglass, metal does have its advantages. It can be crafted very straight and true, and the designs can achieve a very low center-of-gravity without sacrificing rigidity. In addition, a precisioned machined metal chassis tends to track extremely well.
Massive IBS Heavy Gun Milled from Solid Aluminum Billet
This remarkable 70-lb IBS Heavy Gun, was machined from solid aluminum billet, by Bruce Baer. It rests on a G&G Alvey rest split in the middle to comply with rules. This “heavy metal” CNC-machined wonder is a work of art designed for the 1000-yard game in the Heavy Gun class. Wood stocks, and to a lesser extent fiberglass stocks, are more forgiving, offering greater damping and recoil absorption. However, metal stocks offer superior rigidity, and the CNC machining allows tracking surfaces to be perfectly parallel.
Williamsport limits Heavy Guns to 100 pounds. Under IBS and NBRSA rules weight is unlimited. You will see a few massive 200-lb behemoths at IBS matches, but most competitors find that something in the 60-90 pound range works best. Bruce Baer explains, “You can’t stop a gun from recoiling. If it doesn’t recoil it will jump. If it jumps you might as well go home because you won’t shoot a good group. So it is pointless to try to build a gun so heavy as to eliminate all recoil. The more you restrict the rifle’s recoil the more temperamental that rifle will be. The 200-pounders just don’t out-perform something in the 60- to 80-pound range, and I think the optimal weight is 60-70 pounds.”
Bruce Baer likes the 70-lb overall weight for a heavy gun: “Extreme mass is not necessarily an advantage. Watch a locomotive starting up from zero–it will vibrate from one end to another. If the gun is too heavy I think it will vibrate at the start of recoil and that will kill accuracy. I want the gun to start from recoil with very little effort so it will be smooth from start to stop.”
Water-Cooled World Record-Setting Wondergun
We like “outside of the box” thinking. And in the world of competitive shooting, it can’t get more unconventional than this. But this radical liquid-cooled benchrest rig wasn’t just a crazy experiment — it actually delivered the goods. This IBS Heavy Gun, built by Joel Pendergraft, produced a superb 10-shot, 3.044″ group that stood as an International Benchrest Shooters (IBS) 1000-Yard Heavy Gun record for seven years, not being broken until 2016.
Using this water-cooled wondergun, Joel shot the record-breaking group in April 2009 at Hawks Ridge, NC. This monster features a .30-Caliber 12-twist, 4-groove Krieger barrel inside a water-filled sleeve (like on a liquid-cooled machine gun). Joel shot BIB 187gr flat-based bullets in Norma brass, pushed by a “generous amount” of Alliant Reloder 25 and Federal 210M primers. The cartridge was a big custom wildcat Joel listed as “.300 Ackley Improved”.
Pendergraft’s 3.044″ 10-shot group was a great feat, breaking one of the longest-standing, 1000-yard IBS World Records. And Joel’s 3.044″ record stood for 7 years!
Richard King’s Radical .223 Rem F-TR Skeleton Rifle
Here’s something exotic from our Gun of the Week archives. We like this rig because it is so radical (we doubt that you have ever seen anything quite like it). Gun-builder Richard King calls this his “Texas-T”, noting that “this is my personal gun, built the way I wanted it. I know it’s radical and some may not care for it. But it works.” The rig was designed to shoot F-TR, but it can also be converted easily to shoot F-Open with a front rest.
Richard reports: “This is pretty much an all-aluminum rifle. The action is a Kelbly F-Class with a Shilen stainless steel competition trigger. The scope is a 1″-tube Leupold 36X with a Tucker Conversion set in Jewell spherical bearing rings. The .223 barrel is 30″ Pac-Nor 3-groove, 1:6.5″-twist mounted in a V-type barrel block. The bipod has vertical adjustment only via a dovetail slide activated by a stick handle. It works like a joy-stick, but for vertical only. I adjust for windage by moving the rear sandbag.”
Richard likes how the barrel block works: “With the barrel block forward, the vibrations should be at a low frequency. Instead of one long rod whipping, I now have two short rods (barrel halves) being dampened. This is my fourth barrel block gun. They work, but so does a good pillar-bedded action. [This rifle] is designed for my style of shooting. It is not meant to be a universal ‘fit all’ for the general public. However, I will say the design is adaptable. I can easily convert the system to run in F-Open Class. I would drop a big-bore barreled action into the V-block, slide on a heavier pre-zeroed scope and rings, add plates on the sides up front to bring the width to 3″, and maybe a recoil pad.”
F1 F-Open Chassis from Competition Machine
Along with his famed tube-guns, Gary Eliseo of Competition Machine has designed a modern, low-profile chassis system for F-Open competition. Assembled with Cerakoted aluminum beams, these F1 F-Open chassis systems offer great tracking with an ultra-low center of gravity.
Here is the F1 Chassis with “Marine Corps Red” powder coat finish. Read Full Report.
This F1 aluminum alloy chassis stock features a super-low center of gravity, plus adjustable length of pull, cheek rest, and drop. The stock is available in a wide choice of Cerakote finishes. The current Model F1 chassis features a action block mounting system to fit most actions. There was also an earlier version that had a free-floated action with the barrel in a barrel block, secured with epoxy. Both F1 versions (action block and barrel block) shot great, with excellent performances in competition.
Gen 1 F1 F-Open Chassis System with Barrel Block
State Championship Win with Home-Built Aluminum Stock
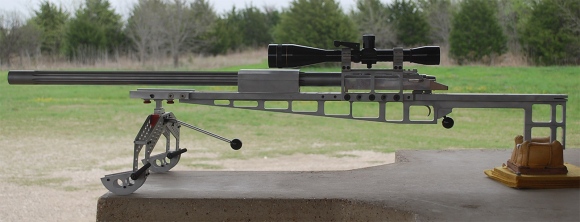
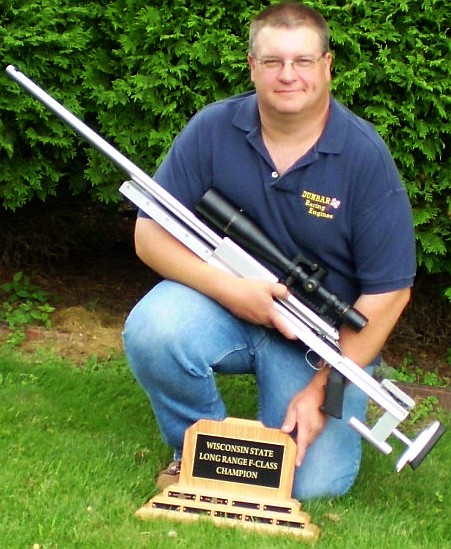
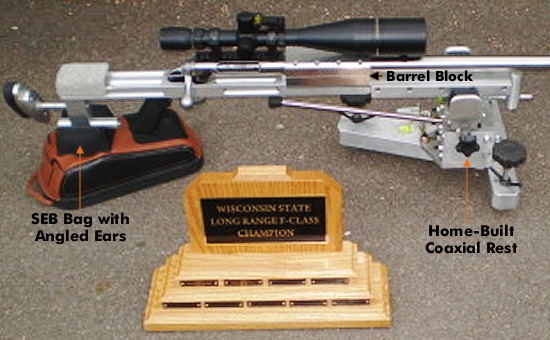
While most of the stocks featured above were crafted by professionals, the properties of aluminum allow it to be used by persons with some basic mechanical skills and metal-working tools. Here’s proof. Back in 2009, Forum Member John Dunbar (aka JD12) crafted his own aluminum F-Open stock. And he used that impressive metal stock to win the Wisconsin State F-Class championship. READ Full Story.
The stock for John’s “home-built” .284 Winchester was mated with a Savage target action. John designed and fabricated the aluminum stock himself. It features a central barrel block clamping a 32″ Brux barrel. Get this — John completed the rifle only 5 days before the match: “I finished machining/assembly on Monday night, did load workup Wednesday and Thursday nights, loaded rounds Friday night, and headed to Lodi at 4:30 on Saturday morning.” John even made his own co-axial front rest (see below)
When Fiberglass Fails, Aluminum Stock Saves the Day
Australian Mark Fairbairn performed a “Quick Fix” during the 2018 Berger SW Nationals. Mark’s F-Open rifle, in a conventional fiberglass stock, was giving him random vertical during one yardage: “I had a bit of a problem with elevation — the stock was hitting somewhere [causing vertical]. I was X-X-X then a shot popped up in the 9 ring with no good reason. So I figured I better put a new stock on it. I got my old aluminium stock I brought from Australia and quickly adjusted it to fit on the Stolle.”
Right on the firing line berm Mark swapped his barreled action into the metal stock of his own design. The clock was ticking… but the story had a happy ending. For the next yardage Mark shot a brilliant 150-7X, not dropping a point. So the “Quick Fix” did the trick. As they say Down Under — “Good on Ya, Mate!”
Home-Built Aluminum Chassis with Innovative A-Arm Bipod
Here is another home-built rig featuring an aluminum chassis mated to a Savage barreled action via a forward-mounted barrel block. This rig was crafted by Forum member Patrick Lundy, who followed the maxim: “If you can’t buy it, then build it.”
Patrick Lundy was so impressed with a fellow shooter’s barrel-block rifle, that he build a similar match gun himself, complete with barrel block and aluminum chassis. Patrick was inspired by a metal stock belonging to Peter Gagne. But he added his own custom touches, including an innovative “A-Arm”-design bipod for shooting in F-TR class. The gun has been very successful in competition. READ FULL Report
Pat told us: “This new stock was a milestone in my shooting career — it was my very first attempt to build a stock. I wasn’t much of a wood worker but I did have a talent for building with metal. The stock was fabricated from 6061 T6 aluminum. With this gun I was able to shoot from a rest or a bipod.”
Pat crafted the bipod from aluminum tubing: “The bipod was a very rigid A-frame design with welded aluminum tubing. I added slippery feet under the pod skis to facilitate smoother recoil. I realized that a wide-stance bipod had to recoil the same on both sides or the group would string horizontally.” Here is the innovative “A-Arm” bipod that Pat Lundy built for his rifle.
Share the post "Sunday GunDay: Flashy Chassis Showcase — Aluminum Wonders"


 >
>


 How to Fill Shooting Sandbags Most Effectively
 For most shooting applications, “heavy is good” when it comes to sandbags. The more your sandbag weighs, the better it will resist movement or mis-alignment that can throw off a shot. In order to increase the weight of their rear bags, serious shooters have turned to exotic sand formulations that offer greater density (hence higher weight by volume) than plain silica sand (aka “play sand”).
 Many serious Benchrest shooters fill their sand bags with “heavy sand”. This practice may seem “overkill” to most shooters, but its benefits are realized quickly when shooting from a bench. Heavy sand is more dense than normal silica “play sand” and therefore makes the sandbag heavier and more stable. How much heavier is the heaviest sand? Check the chart below and you’ll see that Zircon sand weighs essentially TWICE as much as ordinary play sand. More weight equals more inertia opposing bag movement, plus more gravity-induced “stiction” on the bottom of the bag. In other words, using heavy sand helps your rear bag stay planted on the bench during a string of fire. When you shoot a hard-recoiling gun, the difference between a bag filled with play sand vs. Zircon is very noticeable. The Zircon-filled bag stays put. The play sand-filled bag may not.
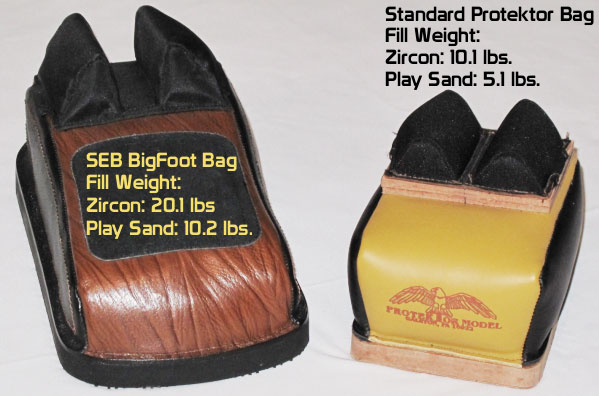
 Dupont Zircon M (pale tan): 165-175 lb/cu.ft; avg. particle size 0.01″.

 Zircon — Heavy-Weight Champion
 Chromite — Almost as Heavy as Zircon, and 30% Cheaper
 Riverbed Sand — Weighs Less but Costs More than Chromite


 I would not suggest using the Riverbed sand unless you really need to fill a sandbag immediately and can’t wait to locate a source for either Zircon or Chromite. Keep in mind that

 Credit our buddy Joe Friedrich for this simple yet effective accessory for your benchrest rifle. Joe shoots a .22 LR benchrest rig with a barrel tuner. When he added weights to his tuner, he found his rifle no longer balanced well. He wanted to add some weight in the rear without drilling holes in the stock. He also wanted the weight to be removable, and easily placed on another rifle in his stable. He wanted a weight that could be moved from gun to gun as needed.


 I did want a minimum no-turn neck optimized for Lapua brass. The drawing indicated that the reamer would cut a .281″ neck and a throat of 1.0315″. This was very close to ideal, though I did have to turn two thousandths off the necks of Lapua 6BR brass after I necked it up. I resized using a .277″ bushing and the loaded rounds came out to be .279″. Realizing that this was in the ball park, I decided to go with the Elk Ridge Reamer and build a 25 BR that could shoot 110gr or 115gr bullets. Now the question was where to get a match-grade 25-caliber barrel. I called quite a few of the custom barrel-makers, including BlackStar Barrels in Texas (no longer operating). I have had wonderful success with the BlackStar barrel on my 6BR “Chantilly” — it delivered great accuracy and impressive velocities. Since the 25 BR was so similar, I went with another BlackStar. I ordered a 10-twist, 6-groove, 1.250″-diameter straight-contour tube.
 After chambering, the barrel finished at 1.245″ diameter and 27.5″ inches with an 11° crown. I actually had the throat lengthened to accept both Berger 110gr and 115gr bullets. The bases of the FB 110-grainers sit flush with the neck-shoulder junction, when they are seated .010″ into the lands. With the longer 115gr VLDs, the bottom of the bearing surface (i.e. start of boat-tail) is just about even with the neck-shoulder junction.
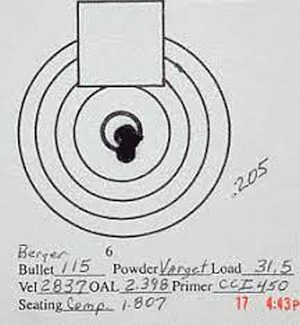 For her debut in competition, I took “Peppermint” to our local 600 yard F-class match. Shooting the Berger 115s with 31.5 grains Varget, she won with a perfect score of 200 with 14 Xs. At my club, we use a SR3 target. The X-Ring measures 3″ in diameter and the 10-Ring measures 7″. At the match there were some very good shooters with top-flight custom rifles in accurate calibers such as 6.5-284 and 22 Dasher. I was very fortunate to come out on top, but I give the credit to Peppermint’s good bench manners and outstanding accuracy.
 Now that I have several calibers in the BR cartridge family, (22 BR, 6mm BR, 6.5 BR, 7 BR, and a 30 BR), it is my humble opinion that they each have their own place. A varmint hunter’s dream, the 22 BR can push a bullet faster and more accurately than the 22-250. With an 8-Twist barrel, the 22 BR can send an 80gr SMK to 600 yards with extreme accuracy.


 There’s a simple, inexpensive “miracle device” that can cut your groups in half. If you’re not using this device, you’re giving away accuracy. The “miracle device” to which we refer is a simple wind indicator aka “windflag”. Using windflags may actually improve your accuracy on target much more than weighing charges to the kernel, or spending your life savings on the “latest and greatest” hardware.