This article comes from the Criterion Barrels website. It provides good, conservative advice about barrel cleaning. Understand that cleaning methods may need to be adapted to fit the amount and type of fouling (and the particular barrel). In general, we do try to minimize brushing, and we follow the procedures Criterion recommends respecting the crown/muzzle. We have also had very good success using wet patches followed by Wipe-Out bore foam. Along with the practices outlined by Criterion below, you may want to try Wipe-Out foam. Just be sure to use a fitted cleaning rod bore guide, to keep foam out of the action recesses and trigger assembly.
The above video shows how to apply Wipe-Out or other bore-cleaning foam. We use a slightly different method. First, we use 3-4 wet patches to remove loose carbon fouling. Then we apply the foam as shown, but usually from the muzzle end (with bore guide in chamber). Here’s the important point — after 20-30 minutes, once the bubbles have dissipated, we apply the foam a second time, getting more of the active ingredients into the barrel. We then patch out, as shown, after 3-4 hours.
What is the Best Way to Clean a Rifle Barrel?
We are asked this question quite frequently alongside requests for recommended break-in procedures. Improper barrel cleaning methods can damage or destroy a barrel, leading to diminished accuracy or even cause a catastrophic failure. When it comes to barrel maintenance, there are a number of useful techniques that we have not listed. Some techniques may work better with different barrel types. This series of recommendations is designed to incorporate a number of methods that the Criterion Barrels staff has used successfully both in the shop and on their personal rifles. Please feel free to to list your own recommendations in the below comments section.
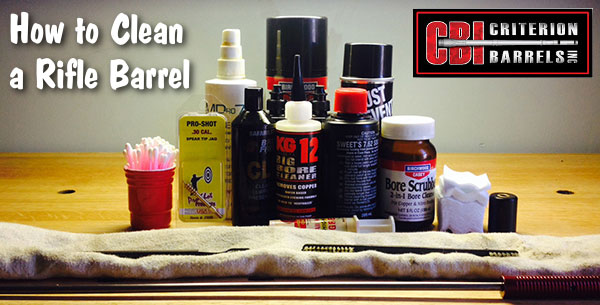
We recommend the use of the following components during rifle cleaning:
• Cloth patches (sized for the appropriate caliber)
• Brass jag sized properly for your bore [Aluminum and Nylon Jags also work]
• One-piece coated cleaning rod
• General bore cleaner/solvent (Example: Hoppes #9)
• Copper solvent of your choosing (Example: Sweets/KG 12)
• Fitted cleaning rod bore guide
• Plastic AP brush or toothbrush
• Q-Tips
• Plastic dental picks
• CLP or rust preventative type cleaner
There are a number of schools of thought relating to the frequency in which a barrel should be cleaned. At minimum we recommend cleaning a barrel after each shooting session to remove condensation, copper, and carbon build-up. Condensation is the greatest immediate threat, as it can cause the barrel to rust while the rifle sits in storage. Copper and carbon build-up may negatively impact future barrel performance, increasing the possibility of a failure in feed or function. Fouling should be removed whenever possible.
The below tips will help limit the wear of different parts of your barrel during routine maintenance, helping extend the life of the barrel and improving its performance.
The Lands and Grooves
This portion of the barrel may experience reduced efficiency due to copper fouling and cleaning rod damage. If copper fouling takes place during the initial break-in of the rifle, make sure to check our barrel break-in article.
For regular maintenance we suggest using a single piece coated cleaning rod rather than the traditional segmented rod or bore snake. While segmented rods and bore snakes may be convenient for field use, the corners between the segments may bow out and catch on the lands, scraping along the length of the rifling. Residual grit and particles from expended cartridges may also get caught between segments, resulting in an abrasive surface working its way down the length of the barrel. Most bore snakes will remove significant amounts of carbon fouling, but may fall short in the removal residual carbon buildup and copper fouling during deep cleaning. Good rods can be sourced from multiple manufacturers, but we have found good results using both Pro-Shot and Dewey brand products.
General cleaning requires the use of patches rather than nylon or brass bore brushes. Brass brushes may be required when aggressive cleaning is required, but can lead to unnecessary wear on the barrel if used frequently. This is not due to the nature of the soft brushes themselves, but from the abrasive particles of grit that become embedded in the material that is being run repeatedly through the bore. We recommend the use of bore guides when cleaning from both the muzzle and breech. These bore guides will help serve to protect the crown and throat from cleaning rod damage.
If significant resistance develops while running the cleaning rod through the bore, no attempt should be made to force it in further. Back the rod out and inspect the barrel to determine the cause of the resistance. The jag may be pushing between a bore obstruction and the rifling, digging a divot into the barrel before pushing the obstruction back through the muzzle. One way to minimize the risk of a stuck rod is by utilizing a slightly smaller patch during the initial push.
The process of cleaning the length of the rifling is relatively straightforward:
1. Check to make sure the rifle is safely unloaded.
2. Carry out any necessary disassembly procedures prior to cleaning.
3. Remove bolt (if possible) and insert fitted cleaning rod bore guide in action.
4. Soak a patch in bore solvent (similar to Hoppes #9).
5. Center and affix the patch on the brass jag, inserting it into the chamber end of the barrel. A misaligned patch may cause the jag to damage the lands of the rifling, so make sure the patch is centered on the jag. [Note, an aluminum or nylon jag will not show a “false positive”.]
6. Run the patch the full length of the barrel, retracting it upon reaching the end of the muzzle.
7. Let the solvent sit for a minute.
8. Continue to run patches through the bore until carbon residue is minimized.
9. Run a dry patch through the bore to ensure carbon residue has been removed.
10. Soak a patch in copper solvent (Sweet’s or KG-12).
11. Run the patch through the bore, leaving it to sit for 3-5 minutes (do not let solvent sit for more than 15 minutes.*)
12. Repeat this process until no blue residue remains on the patches.
13. Run a patch of Hoppes #9 and a dry patch through the bore to neutralize the copper solvent.
14. Inspect the barrel prior to reassembling the rifle, verifying that no bore obstructions remain.
*Please note that some ammonia-based copper solvents may prove to be corrosive if left sitting in the barrel for an extended period of time. It is essential that these solvents be removed within 15 minutes to avoid ruining the bore.
The Crown
The crown is the portion of the barrel where the bullet loses contact with the lands and grooves and proceeds to exit the firearm. The area most critical to accuracy potential is the angle where the bullet last touches the bore of the barrel.
Avoid damage to this area by using a plastic toothbrush and CLP type cleaner to scrub the crown from the exterior of the barrel. Even the most minimal variation in wear to the crown will negatively impact barrel performance, so be careful to avoid nicking or wearing away this part of the barrel.
This article comes from the Criterion Barrels website. It provides good, conservative advice about barrel cleaning. Understand that cleaning methods may need to be adapted to fit the amount and type of fouling (and the particular barrel). In general, we do try to minimize brushing, and we follow the procedures Criterion recommends respecting the crown/muzzle. We have also had very good success using wet patches followed by Wipe-Out bore foam. Along with the practices outlined by Criterion below, you may want to try Wipe-Out foam. Just be sure to use a fitted cleaning rod bore guide, to keep foam out of the action recesses and trigger assembly.
The above video shows how to apply Wipe-Out or other bore-cleaning foam. We use a slightly different method. First, we use 3-4 wet patches to remove loose carbon fouling. Then we apply the foam as shown, but usually from the muzzle end (with bore guide in chamber). Here’s the important point — after 20-30 minutes, once the bubbles have dissipated, we apply the foam a second time, getting more of the active ingredients into the barrel. We then patch out, as shown, after 3-4 hours.
What is the Best Way to Clean a Rifle Barrel?
We are asked this question quite frequently alongside requests for recommended break-in procedures. Improper barrel cleaning methods can damage or destroy a barrel, leading to diminished accuracy or even cause a catastrophic failure. When it comes to barrel maintenance, there are a number of useful techniques that we have not listed. Some techniques may work better with different barrel types. This series of recommendations is designed to incorporate a number of methods that the Criterion Barrels staff has used successfully both in the shop and on their personal rifles. Please feel free to to list your own recommendations in the below comments section.
We recommend the use of the following components during rifle cleaning:
• Cloth patches (sized for the appropriate caliber)
• Brass jag sized properly for your bore
• One-piece coated cleaning rod
• General bore cleaner/solvent (Example: Hoppes #9)
• Copper solvent of your choosing (Example: Sweets/KG 12)
• Fitted cleaning rod bore guide
• Plastic AP brush or toothbrush
• Q-Tips
• Plastic dental picks
• CLP or rust preventative type cleaner
There are a number of schools of thought relating to the frequency in which a barrel should be cleaned. At minimum we recommend cleaning a barrel after each shooting session to remove condensation, copper, and carbon build-up. Condensation is the greatest immediate threat, as it can cause the barrel to rust while the rifle sits in storage. Copper and carbon build-up may negatively impact future barrel performance, increasing the possibility of a failure in feed or function. Fouling should be removed whenever possible.
The below tips will help limit the wear of different parts of your barrel during routine maintenance, helping extend the life of the barrel and improving its performance.
The Crown
The crown is the portion of the barrel where the bullet loses contact with the lands and grooves and proceeds to exit the firearm. The area most critical to accuracy potential is the angle where the bullet last touches the bore of the barrel.
Avoid damage to this area by using a plastic toothbrush and CLP type cleaner to scrub the crown from the exterior of the barrel. Even the most minimal variation in wear to the crown will negatively impact barrel performance, so be careful to avoid nicking or wearing away this part of the barrel.
Reducing Cleaning Rod Wear to the Crown
When running a patch through the barrel, place the muzzle about a ¼” from a hard surface that runs flat at a perpendicular angle to the cleaning rod’s direction of travel, like a wall or the edge of a work bench (pictured). When the jag impacts the hard surface, retract the cleaning rod and remove the patch.
By withdrawing the jag prior to its exit from the barrel, you are limiting the possibility of the brass dragging upon the crown if the rod is at all bent or misaligned. The soft cloth patch will continue to serve as the point of contact between the jag and the barrel, minimizing potential wear.
If possible, insert the rod through the chamber, pushing it forward toward the muzzle. Some rifles, such as the M1 Garand or M14, will require you to insert the cleaning rod through the muzzle. In these situations the use of a cleaning rod guide is recommended to limit the friction placed upon the crown.
Avoid using cleaning rod segments for scraping carbon from the recessed muzzle of an AR-15 barrel. We used this trick in the Marine Corps to impress the armorers and NCO’s with the cleanliness of our muzzles, but it likely played a significant role in reducing the service life of the rifle barrel in question.
Use a Q-Tip soaked in solvent to remove any copper or carbon residue from the recessed muzzle of an AR-15 barrel. A little bit of remaining carbon on the face of the muzzle will not negatively affect bullet travel so long as the crown edge remains consistent around the circumference of the bore.
The Lands and Grooves
This portion of the barrel may experience reduced efficiency due to copper fouling and cleaning rod damage. If copper fouling takes place during the initial break-in of the rifle, make sure to check our barrel break-in article.
The Bertalotto 17 HMR Cleaning Rod Bore Guide is actually made from aluminum arrow shafts.
When Hornady (and CCI) developed the 17 HMR cartridge, they really hit a home-run. And the rifle manufacturers quickly marketed some nice rifles to chamber this 17-cal rimfire round. But unlike .22 LR rifles which, typically, require very little cleaning, 17 HMRs demand frequent bore cleaning to maintain good accuracy. That’s because 17 HMRs shoot copper-jacketed bullets at 2550 fps velocities.
17-Cal Bore Guides — The Challenge
The problem is, it’s hard to find a well-designed, quality bore guide for 17-caliber rimfire rifles. With many 17 HMR (and 17 Mach 2) rifles, you encounter mechanical interference when you try to use a standard bore guide to protect the delicate chamber edge and the bottle neck area of the chamber. A fixed ejector is in the way. On many 17 HMR rifles, this little “shark fin” ejector is right in line with the chamber and is fixed — it doesn’t retract. Therefore the kind of bore guide you might use for centerfire rifles won’t work in 17 HMRs — it will hang up on the ejector.
Polymer bore guides exist for this type of action, but they are typically open-bottom designs that do not enter and seal the chamber. These open-bottom designs don’t protect the delicate chamber edge or the bottleneck area of the chamber, and they also allow some seepage of solvents out of the chamber. That’s why Roy Bertalotto created his RVB Precision Bore Guide for 17 HMR rifles. The 7075 aluminum tube on his Bore Guide is thin enough to pass by the ejector, yet it is extremely rigid. (Photos below.)
Roy explains: “My bore guide is made of 7075 anodized aluminum tubing, which is totally unaffected by any type of cleaning solution. One end is swagged down to fit completely into the chamber of a 17 HMR rifle. This guides your cleaning rod perfectly to the bore without touching the chamber walls or front edge of the chamber. The tight fit of the bore guide in the chamber also stops cleaning solvents from getting into the action, magazine, and trigger housing.” (Editor: Solvent seepage can do damage. We had a 17 Mach 2 rifle that rusted internally because solvents leaked past an open-bottom bore guide.)
Using the RVB 17 HMR Guide – Once the bore guide is in place, slide the supplied aluminum bushing over the tube, and gently push the bushing into the rear of the action. This centers the guide rod in the action to keep the guide rod tube aligned. Once the guide rod and bushing are in place, you can use a 17-caliber cleaning rod* with patches and/or brushes to clean the barrel. Use the rod normally, but make sure your patches are quite small and don’t apply too much pressure as these small-diameter rods can kink if you try to force over-size patches down the bore.
The RVB Precision 17 HMR Bore Guide costs $19.95 plus $5.00 shipping. To order, email Roy Bertalotto via rvb100 [at] comcast.net. Roy will then send you shipping/payment details.
Roy tells us: “Yes, I make the bore guides out of 1616 aluminum arrow shafts. The only material on earth that fits EXACTLY what is needed. I buy the shaft material as simple tubing from Easton. It is hard anodized, the perfect wall thickness and doesn’t look too bad either.”
* NOTE: You really do need a dedicated .17-cal cleaning rod for this job. Most other rods are too fat to pass through the barrel. Dewey Mfg. makes a decent 17-caliber cleaning rod that is reasonably stiff and doesn’t kink too readily. It is available in 7″, 11″, 18″, 26″, and 36″ lengths, either bare stainless steel or with a nylon coating. For use with the Bertalotto Bore Guide, we prefer the nylon-coated version, in either 26″ or 36″ lengths, depending on barrel length.
If you have a high comb on your rifle, you may need extra length to avoid interference with the rod handle. Use this formula to determine correct rod length: Length of barrel + action or breech rod guide length + 2-3″ clearance + high comb if applicable = total rod length needed.
There are other quality 17-cal cleaning rods, but we’ve used the Dewey and it functioned well. The nylon coating cleaned easily and was gentle on the throat and crown. You should clean the coating before and after each use to ensure it does not embed grit or other contaminants.
Share the post "Cleaning Rod Bore Guide for 17 HMR Rifles"
Here’s a new product we like — Creedmoor’s extra-long, fitted Cleaning Rod Guides (aka Bore Guides) that offer a port for adding solvent. We like the distinctive bright orange color. That helps you quickly identify your rifle on crowded cleaning bench.
Why a Rod Guide Is Needed for Proper Bore Cleaning
A good Cleaning Rod Guide ensures that your brushes and jags are centered in your bore, so you don’t get uneven wear in your throat. Moreover the guides protect the action raceways, blocking liquids and debris from entering the trigger group. The port helps you add solvent without making a mess or spilling on a fine stock finish.
The orange Creedmoor Cleaning Rod Guides have some nice features. They are long enough so that you can avoid removing larger optics and include a port to apply solvent. The O-ring at the front provides an additional seal for the chamber. These Rod Guides are designed for specific action types and chamberings for proper alignment. Creedmoor’s Bore guides cost $24.95. That’s quite a bit less than some other vendors’ fitted cleaning rod guides. Current offering are:
TIP: When using any cleaning rod guide, you should cover the rear of the stock with a towel to prevent any solvent from touching the stock. Solvents can harm find wood, painted, and hydro-dipped finishes.
Share the post "New Hi-Viz Orange Cleaning Rod Guides from Creedmoor Sports"
Product innovation is all about “building a better mousetrap”, or in this case, building a better bore-cleaning patch. A real smart guy, Shane Smith, has invented a triangular patch that earned a patent. The U.S. Patent Office has awarded a utility patent for BoreSmith’s triangular Pyramid Patch™. This unique cleaning patch was designed by Shane Smith, a mathematician/physicist who employed his scientific and firearms knowledge to create innovative bore-cleaning products.
BoreSmith’s clever Triangle Patch™ (aka Pyramid Patch) presents more cleaning surface area to the bore wall than does a conventional square or round patch (of equivalent size). At the same time, the unique geometry makes Triangle Patches much less likely to jam in the barrel. This is because the notches in the sides of the triangle allow the patch to sit more uniformly on the jag (without bunching up). In addition, the Pyramid patch is must less likely to jam due to pleating. One reason conventional patches get stuck is unwanted 5-layer pleating. The special notches in the Pyramid patch remove all or most 5-layer pleating. As a result the patch does not bunch up and this also reduces rod bowing.
Triangle Patch Function and Geometry Explained (See 1:18 time-mark):
NOTE: Despite what you may see in this video, you should ALWAYS insert brushes and patches from the chamber end first, using a fitted cleaning rod bore guide. With bolt-action rifles, NEVER insert a cleaning rod (with brush or jag) in through the muzzle. This may damage the delicate crown of your barrel.
Share the post "The Patented Triangular Pyramid Patch — Tried One Yet?"
Editor: This article appears on the Criterion Barrels website. It provides good, conservative advice about barrel cleaning. Understand that cleaning methods may need to be adapted to fit the amount and type of fouling (and the particular barrel). In general, we do try to minimize brushing, and we follow the procedures Criterion recommends respecting the crown/muzzle. We have also had very good success using wet patches followed by Wipe-Out bore foam. Along with the practices outlined by Criterion below, you may want to try Wipe-Out foam. Just be sure to use a fitted cleaning rod bore guide, to keep foam out of the action recesses and trigger assembly.
What is the Best Way to Clean a Rifle Barrel?
We are asked this question quite frequently alongside requests for recommended break-in procedures. Improper barrel cleaning methods can damage or destroy a barrel, leading to diminished accuracy or even cause a catastrophic failure. When it comes to barrel maintenance, there are a number of useful techniques that we have not listed. Some techniques may work better with different barrel types. This series of recommendations is designed to incorporate a number of methods that the Criterion Barrels staff has used successfully both in the shop and on their personal rifles. Please feel free to to list your own recommendations in the below comments section.
We recommend the use of the following components during rifle cleaning:
• Cloth patches (sized for the appropriate caliber)
• Brass jag sized properly for your bore
• One-piece coated cleaning rod
• General bore cleaner/solvent (Example: Hoppes #9)
• Copper solvent of your choosing (Example: Sweets/KG 12)
• Fitted cleaning rod bore guide
• Plastic AP brush or toothbrush
• Q-Tips
• Plastic dental picks
• CLP or rust preventative type cleaner
There are a number of schools of thought relating to the frequency in which a barrel should be cleaned. At minimum we recommend cleaning a barrel after each shooting session to remove condensation, copper, and carbon build-up. Condensation is the greatest immediate threat, as it can cause the barrel to rust while the rifle sits in storage. Copper and carbon build-up may negatively impact future barrel performance, increasing the possibility of a failure in feed or function. Fouling should be removed whenever possible.
The below tips will help limit the wear of different parts of your barrel during routine maintenance, helping extend the life of the barrel and improving its performance.
The Crown
The crown is the portion of the barrel where the bullet loses contact with the lands and grooves and proceeds to exit the firearm. The area most critical to accuracy potential is the angle where the bullet last touches the bore of the barrel.
Avoid damage to this area by using a plastic toothbrush and CLP type cleaner to scrub the crown from the exterior of the barrel. Even the most minimal variation in wear to the crown will negatively impact barrel performance, so be careful to avoid nicking or wearing away this part of the barrel.
Reducing Cleaning Rod Wear to the Crown
When running a patch through the barrel, place the muzzle about a ¼” from a hard surface that runs flat at a perpendicular angle to the cleaning rod’s direction of travel, like a wall or the edge of a work bench (pictured). When the jag impacts the hard surface, retract the cleaning rod and remove the patch.
By withdrawing the jag prior to its exit from the barrel, you are limiting the possibility of the brass dragging upon the crown if the rod is at all bent or misaligned. The soft cloth patch will continue to serve as the point of contact between the jag and the barrel, minimizing potential wear.
If possible, insert the rod through the chamber, pushing it forward toward the muzzle. Some rifles, such as the M1 Garand or M14, will require you to insert the cleaning rod through the muzzle. In these situations the use of a cleaning rod guide is recommended to limit the friction placed upon the crown.
Avoid using cleaning rod segments for scraping carbon from the recessed muzzle of an AR-15 barrel. We used this trick in the Marine Corps to impress the armorers and NCO’s with the cleanliness of our muzzles, but it likely played a significant role in reducing the service life of the rifle barrel in question.
Use a Q-Tip soaked in solvent to remove any copper or carbon residue from the recessed muzzle of an AR-15 barrel. A little bit of remaining carbon on the face of the muzzle will not negatively affect bullet travel so long as the crown edge remains consistent around the circumference of the bore.
The Lands and Grooves
This portion of the barrel may experience reduced efficiency due to copper fouling and cleaning rod damage. If copper fouling takes place during the initial break-in of the rifle, make sure to check our barrel break-in article.
For regular maintenance we suggest using a single piece coated cleaning rod rather than the traditional segmented rod or bore snake. While segmented rods and bore snakes may be convenient for field use, the corners between the segments may bow out and catch on the lands, scraping along the length of the rifling. Residual grit and particles from expended cartridges may also get caught between segments, resulting in an abrasive surface working its way down the length of the barrel. Most bore snakes will remove significant amounts of carbon fouling, but may fall short in the removal residual carbon buildup and copper fouling during deep cleaning. Good rods can be sourced from multiple manufacturers, but we have found good results using both Pro-Shot and Dewey brand products.
General cleaning requires the use of patches rather than nylon or brass bore brushes. Brass brushes may be required when aggressive cleaning is required, but can lead to unnecessary wear on the barrel if used frequently. This is not due to the nature of the soft brushes themselves, but from the abrasive particles of grit that become embedded in the material that is being run repeatedly through the bore. We recommend the use of bore guides when cleaning from both the muzzle and breech. These bore guides will help serve to protect the crown and throat from cleaning rod damage.
If significant resistance develops while running the cleaning rod through the bore, no attempt should be made to force it in further. Back the rod out and inspect the barrel to determine the cause of the resistance. The jag may be pushing between a bore obstruction and the rifling, digging a divot into the barrel before pushing the obstruction back through the muzzle. One way to minimize the risk of a stuck rod is by utilizing a slightly smaller patch during the initial push.
The process of cleaning the length of the rifling is relatively straightforward:
1. Check to make sure the rifle is safely unloaded.
2. Carry out any necessary disassembly procedures prior to cleaning.
3. Remove bolt (if possible) and insert fitted cleaning rod bore guide in action.
4. Soak a patch in bore solvent (similar to Hoppes #9).
5. Center and affix the patch on the brass jag, inserting it into the chamber end of the barrel. A misaligned patch may cause the jag to damage the lands of the rifling, so make sure the patch is centered on the jag.
6. Run the patch the full length of the barrel, retracting it upon reaching the end of the muzzle.
7. Let the solvent sit for a minute.
8. Continue to run patches through the bore until carbon residue is minimized.
9. Run a dry patch through the bore to ensure carbon residue has been removed.
10. Soak a patch in copper solvent (Sweet’s or KG-12).
11. Run the patch through the bore, leaving it to sit for 3-5 minutes (do not let solvent sit for more than 15 minutes.*)
12. Repeat this process until no blue residue remains on the patches.
13. Run a patch of Hoppes #9 and a dry patch through the bore to neutralize the copper solvent.
14. Inspect the barrel prior to reassembling the rifle, verifying that no bore obstructions remain.
*Please note that some ammonia-based copper solvents may prove to be corrosive if left sitting in the barrel for an extended period of time. It is essential that these solvents be removed within 15 minutes to avoid ruining the bore.
The Chamber
Proper cleaning of the chamber is a critical component of a general cleaning procedure. Carbon rings can build up near the neck and throat of the chamber wall, leading to feeding malfunctions and pressure spikes inside the chamber.
The chamber can be the trickiest part of the barrel to effectively clean, due to its fluctuation in size and the awkward ergonomics often required to remove carbon residue. Numerous chamber specific devices have been created to address this problem, and while some should be avoided (steel chamber brushes), others can be used to great effect (cleaning stars and plastic dental picks). The simplest approach to cleaning a chamber is to apply solvent to a couple patches, and use the cleaning rod to spin the wadded up patches inside the confines of the chamber. This should aid in removing any excess carbon. A Q-Tip can be used to reach portions of the chamber unreached by patches.
The Barrel Exterior
While the condition of the crown, rifling, and chamber are essential to firearm performance, the finish of the exterior should also be cleaned after handling. Condensation, humidity, direct water contact, and salt residue from skin contact can cause rust or corrosion. An application of anti-corrosion products is recommended when placing a firearm into deep storage for an extended period of time. [Editor: AccurateShooter.com recommends Corrosion-X or Eezox, but other products work well too.]
Finding Cleaning Components
While most cleaning components can be found at your local gun shop, some specialty items may need to be sourced through online retailers such as Brownell’s. Criterion utilizes both Dewey and Pro-Shot brand cleaning components during our day-to-day operations.
Do you have any rifle cleaning tips or tricks not mentioned in the above article? We’d love to hear about them. You can post your comments below.
Share the post "Rifle Barrel Cleaning 101 — The Criterion Way"
When Hornady (and CCI) developed the 17 HMR cartridge, they really hit a homerun. And the rifle manufacturers quickly marketed some nice rifles to chamber this 17-cal rimfire round. But unlike .22 LR rifles which, typically, require very little cleaning, 17 HMRs demand frequent bore cleaning to maintain good accuracy. That’s because 17 HMRs shoot copper-jacketed bullets at 2550 fps velocities.
17-Cal Bore Guides — The Challenge
The problem is, it’s hard to find a well-designed, quality bore guide for 17-caliber rimfire rifles. With many 17 HMR (and 17 Mach 2) rifles, you encounter mechanical interference when you try to use a standard bore guide to protect the delicate chamber edge and the bottle neck area of the chamber. A fixed ejector is in the way. On many 17 HMR rifles, this little “shark fin” ejector is right in line with the chamber and is fixed — it doesn’t retract. Therefore the kind of bore guide you might use for centerfire rifles won’t work in 17 HMRs — it will hang up on the ejector.
Polymer bore guides exist for this type of action, but they are typically open-bottom designs that do not enter and seal the chamber. These open-bottom designs don’t protect the delicate chamber edge or the bottleneck area of the chamber, and they also allow some seepage of solvents out of the chamber. That’s why Roy Bertalotto created his RVB Precision Bore Guide for 17 HMR rifles. The 7075 aluminum tube on his Bore Guide is thin enough to pass by the ejector, yet it is extremely rigid. (Photos below.)
Roy explains: “My bore guide is made of 7075 anodized aluminum tubing, which is totally unaffected by any type of cleaning solution. One end is swagged down to fit completely into the chamber of a 17 HMR rifle. This guides your cleaning rod perfectly to the bore without touching the chamber walls or front edge of the chamber. The tight fit of the bore guide in the chamber also stops cleaning solvents from getting into the action, magazine, and trigger housing.” (Editor: Solvent seepage can do damage. We had a 17 Mach 2 rifle that rusted internally because solvents leaked past an open-bottom bore guide.)
Using the RVB 17 HMR Guide – Once the bore guide is in place, slide the supplied aluminum bushing over the tube, and gently push the bushing into the rear of the action. This centers the guide rod in the action to keep the guide rod tube aligned. Once the guide rod and bushing are in place, you can use a 17-caliber cleaning rod* with patches and/or brushes to clean the barrel. Use the rod normally, but make sure your patches are quite small and don’t apply too much pressure as these small-diameter rods can kink if you try to force over-size patches down the bore.
The RVB Precision 17 HMR Bore Guide costs $19.95 plus $5.00 shipping. To order, email Roy Bertalotto via rvb100 [at] comcast.net. Roy will then send you shipping/payment details.
* NOTE: You really do need a dedicated .17-cal cleaning rod for this job. Most other rods are too fat to pass through the barrel. Dewey Mfg. makes a decent 17-caliber cleaning rod that is reasonably stiff and doesn’t kink too readily. It is available sizes from 7″ to 36″, either bare stainless or with a nylon coating. We prefer the nylon-coated version, in either 26″ or 36″ lengths, depending on barrel length.
If you have a high comb on your rifle, you may need extra length to avoid interference with the rod handle. Use this formula to determine correct rod length: Length of barrel + action or breech rod guide length + 2-3″ clearance + high comb if applicable = total rod length needed.
There are other quality 17-cal cleaning rods, but we’ve used the Dewey and it functioned well. The nylon coating cleaned easily and was gentle on the throat and crown. You should clean the coating before and after each use to ensure it does not embed grit or other contaminants.
Share the post "RVB Precision Cleaning Rod Bore Guide for 17 HMR Rifles"
Smart shooters know the importance of using a quality cleaning rod bore guide when cleaning barrels. The rod guide helps center the rod in the bore, preventing uneven wear on the rifling. Good bore guides also seal off the chamber to prevent solvents and gunk from flowing back into the bolt raceway and trigger housing. While most bore guides are “better than nothing”, the best designs are custom-sized to the chamber and also have a very tight clearance around the rod shaft. This prevents the rod from bowing and from dragging on the critical throat area of your rifle. We use Lucas Rod Guides for many of our rifles. The Lucas two-part design, with a caliber-specific insert, provides a tight fit for the rod.
T.K. Nollan’s Barrel Saver System
While many readers may have seen or used Lucas Rod Guides, T.K. Nollan makes another very high-quality cleaning rod guide that is favored by top benchrest shooters such as Tony Boyer, Dwight Scott, and Dick Wright. If, like many short-range Benchresters, you do a lot of barrel brushing, it may be worth investing in the $135.00 Barrel Saver.
T.K. Nollan’s patent-pending Barrel Saver is a precision-machined system designed to provide maximum protection during barrel cleaning. The Barrel Saver features a double O-ring “fail-safe” seal, and a stainless steel outer tube with straightness held to within .001″. To help ensure optimal alignment, a bushing, custom-sized for your action, precisely centers the outer tube in your action. Models are offered for Hall, Stolle, Grizzly, Farley, Remington, RFD, Nesika Bay, Borden, BAT, Viper and similar 2-lug actions.
Each Nollan Barrel Saver comes with two (2) metal guide tubes, one for brushes and the other for jags. As you can see in the slide show below, these brush/jag tubes run INSIDE the larger diameter guide which slides into the action and chamber. This “tube-within-tube” design, combined with the 0-ring for the chamber, ensures that the cleaning rod stays precisely centered, even if you brush fairly aggressively. While we strongly advocate bore-brushing only in the outward direction, we know some shooters prefer to brush back and forth. If you are a “back and forth” cleaner, you NEED a product like the T.K. Nollan Barrel Saver.
T.K. Nollan Barrel Savers start at $135.00 plus $9.00 shipping for PPC-type chamberings. Custom sizes cost $150.00 plus $9.00 shipping. Each Barrel Saver kit comes complete with two Rod Guide Tubes and spare O-rings. For more info, visit the Barrel Saver website, or contact T.K. Nollan at this address:
TK Tool Co. – Precision Benchrest Tools
tknemail [at] gmail.com
401 South Cimarron St.
Catoosa, OK 74015
(918) 633-2966 (Call before 9:00 PM CST)
Share the post "T.K. Nollan’s Barrel Saver Cleaning Rod Guide"


 17-Cal Bore Guides — The Challenge
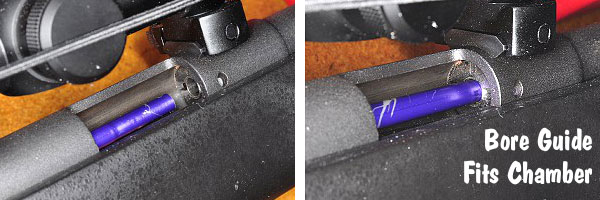

 Using the RVB 17 HMR Guide – Once the bore guide is in place, slide the supplied aluminum bushing over the tube, and gently push the bushing into the rear of the action. This centers the guide rod in the action to keep the guide rod tube aligned. Once the guide rod and bushing are in place, you can use a 17-caliber cleaning rod* with patches and/or brushes to clean the barrel. Use the rod normally, but make sure your patches are quite small and don’t apply too much pressure as these small-diameter rods can kink if you try to force over-size patches down the bore.


