If you hand-load pistol ammunition, you should definitely have a case gauge (aka “gage”) for each cartridge type you reload. Caliber-specific, precision-machined cylindrical gauges perform many important functions. They will instantly reveal if your rounds are too long or have excessive headspace. They will also show if your case is bulged or otherwise too fat to chamber easily. You can use the gauge with sized brass as well as loaded rounds.
Case gauges are a “must-have” for anyone loading handgun ammunition, particularly if you crank out large quantities of pistol ammo with a progressive press. An oversize round can cause a misfeed, jam, or other problem. That can ruin your day if you are in the middle of a shooting match. If you are relying on your handgun for self-defense, the last thing you want is a malfunction of any kind. This Editor personally runs every pistol round through a gauge before it goes into the ammo box.
UltimateReloader.com Video Shows How to Use Pistol Case Gauges:
Our friend Gavin Gear of UltimateReloader.com has prepared an excellent video that explains the benefits of pistol case gauges and shows how to use them. Gavin uses the quality gages produced by L.E. Wilson. These are available for the most popular handgun cartridges, both autoloader cartridges, and rimmed revolver cartridges. Gavin demonstrates gage use with .40 SW and .44 magnum cases.
Gavin states: “Using a case gage is very simple, and I would recommend that you add one of these gages to your reloader’s tool chest for each of the pistol cartridge types you reload. It may just save you a lot of time and hassle. Peace of mind is hard to put a price on!”
Here’a useful article by Sierra Bullets Media Relations Manager Carroll Pilant. This story, which originally appeared in the Sierra Bullets Blog, covers some of the more common ammo problems that afflict hand-loaders. Some of those issues are: excessive OAL, high primers, and improperly-sized cases. Here Mr. Pilant explains how to avoid these common problems that lead to “headaches at the range.
I had some gentlemen at my house last fall getting rifle zeros for an upcoming elk hunt. One was using one of the .300 short mags and every 3rd or 4th round would not chamber. Examination of the case showed a bulge right at the body/shoulder junction. These were new cases he had loaded for this trip. The seating die had been screwed down until it just touched the shoulder and then backed up just slightly. Some of the cases were apparently slightly longer from the base to the datum line and the shoulder was hitting inside the seating die and putting the bulge on the shoulder. I got to thinking about all the gun malfunctions that I see each week at matches and the biggest percentage stem from improper handloading techniques.
One: Check Your Cases with a Chamber Gage
Since I shoot a lot of 3-gun matches, I see a lot of AR problems which result in the shooter banging the butt stock on the ground or nearest solid object while pulling on the charging handle at the same time. I like my rifles too well to treat them that way (I cringe every time I see someone doing that). When I ask them if they ran the ammo through a chamber gage, I usually get the answer, “No, but I need to get one” or “I didn’t have time to do it” or other excuses. The few minutes it takes to check your ammo can mean the difference between a nightmare and a smooth running firearm.
A Chamber Gauge Quickly Reveals Long or Short Cases
Size Your Cases Properly
Another problem is caused sizing the case itself. If you will lube the inside of the neck, the expander ball will come out a lot easier. If you hear a squeak as the expander ball comes out of a case neck, that expander ball is trying to pull the case neck/shoulder up (sometimes several thousandths). That is enough that if you don’t put a bulge on the shoulder when seating the bullet … it can still jam into the chamber like a big cork. If the rifle is set up correctly, the gun will not go into battery and won’t fire but the round is jammed into the chamber where it won’t extract and they are back to banging it on the ground again (with a loaded round stuck in the chamber). A chamber gage would have caught this also.
Oversizing cases also causes problems because the firing pin doesn’t have the length to reach the primer solid enough to ignite it 100% of the time. When you have one that is oversized, you usually have a bunch, since you usually do several cases at a time on that die setting. If the die isn’t readjusted, the problem will continue on the next batch of cases also. They will either not fire at all or you will have a lot of misfires. In a bolt action, a lot of time the extractor will hold the case against the face of the breech enough that it will fire. The case gets driven forward and the thinner part of the brass expands, holding to the chamber wall and the thicker part of the case doesn’t expand as much and stretches back to the bolt face. If it doesn’t separate that time, it will the next time. When it does separate, it leaves the front portion of the case in the chamber and pulls the case head off. Then when it tries to chamber the next round, you have a nasty jam. Quite often range brass is the culprit of this because you never know how many times it has been fired/sized and in what firearm. Back to beating it on the ground again till you figure out that you have to get the forward part of the case out.
Just a quick tip — To extract the partial case, an oversized brush on a cleaning rod [inserted] and then pulled backward will often remove the case. The bristles when pushed forward and then pulled back act like barbs inside the case. If you have a bunch of oversized case that have been fired, I would dispose of them to keep from having future problems. There are a few tricks you can use to salvage them if they haven’t been fired though. Once again, a case gage would have helped.
Two: Double Check Your Primers
Another thing I see fairly often is a high primer, backwards primer, or no primer at all. The high primers are bad because you can have either a slam fire or a misfire from the firing pin seating the primer but using up its energy doing so. So, as a precaution to make sure my rifle ammo will work 100% of the time, I check it in a case gage, then put it in an ammo box with the primer up and when the box is full, I run my finger across all the primers to make sure they are all seated to the correct depth and you can visually check to make sure none are in backwards or missing.
Three: Check Your Overall Cartridge Length
Trying to load the ammo as long as possible can cause problems also. Be sure to leave yourself enough clearance between the tip of the bullet and the front of the magazine where the rounds will feed up 100%. Several times over the years, I have heard of hunters getting their rifle ready for a hunt. When they would go to the range to sight in, they loaded each round single shot without putting any ammo in the magazine. On getting to elk or deer camp, they find out the ammo is to long to fit in the magazine. At least they have a single shot, it could be worse. I have had hunters that their buddies loaded the ammo for them and then met them in hunting camp only to find out the ammo wouldn’t chamber from either the bullet seated to long or the case sized improperly, then they just have a club.
Four: Confirm All Cases Contain Powder
No powder in the case doesn’t seem to happen as much in rifle cartridges as in handgun cartridges. This is probably due to more handgun ammo being loaded on progressive presses and usually in larger quantities. There are probably more rifle cartridges that don’t have powder in them than you realize though. Since the pistol case is so much smaller internal capacity, when you try to fire it without powder, it usually dislodges the bullet just enough to stick in the barrel. On a rifle, you have more internal capacity and usually a better grip on the bullet, since it is smaller diameter and longer bearing surface. Like on a .223, often a case without powder won’t dislodge the bullet out of the case and just gets ejected from the rifle, thinking it was a bad primer or some little quirk.
For rifle cases loaded on a single stage press, I put them in a reloading block and always dump my powder in a certain order. Then I do a visual inspection and any case that the powder doesn’t look the same level as the rest, I pull it and the one I charged before and the one I charged after it. I inspect the one case to see if there is anything visual inside. Then I recharge all 3 cases. That way if a case had powder hang up and dump in the next case, you have corrected the problem.
On progressive presses, I try to use a powder that fills the case up to about the base of the bullet. That way you can usually see the powder as the shell rotates and if you might have dumped a partial or double charge, you will notice as you start to seat the bullet if not before. On a progressive, if I don’t load a cartridge in one smooth stroke (say a bullet tipped over sideways and I raised the ram slightly to reset it) Some presses actually back the charge back adding more powder if it has already dumped some so you have a full charge plus a partial charge. When I don’t complete the procedure with one stroke, I pull the case that just had powder dumped into it and check the powder charge or just dump the powder back into the measure and run the case through later.
Share the post "Four Vital Ammo Checks You Should Always Do Before Shooting"
L.E. Wilson Case Gage Depth Micrometer Tool Hands-On Tool Review by F-Class John
Are you looking for a better way to measure shoulder bump when sizing brass? When it comes to measuring your shoulder bump there has traditionally been just one way to do it and that’s with a set of calipers and some type of tool attached to a calipers jaw which contacts the case shoulder. While this method has worked well for decades there’s always been some inherent lack of consistency and repeatability. While a minor issue, the inability to get the exact number in completely dependent on the user’s pressure applied and the angle at which the jaws push on the brass.
Enter the L.E. Wilson Case Gage Depth Micrometer with its simple but effective use of Wilson case gauges to ensure a perfect measure of shoulder bump every time. The unit comes with the micrometer top as well as a check gauge which allows you to easily calibrate the micrometer whenever needed. On top of the micrometer unit, you’ll also need to purchase the appropriate case gauges for each of your cartridge types and then you’re ready to go. No other measuring instruments are needed (yep, no calipers are required).
Using the Wilson Depth Micrometer (perhaps a better name is Shoulder Bump Micrometer) is a straightforward process. Simply take your fired brass and insert it into the case gauge and place the micrometer top onto the primer side of the gauge. While holding the micrometer top firmly against the case gauge in one hand, slowly turn the micrometer until you feel it stop. You can back off and turn it again to verify the stop point and once you have it, look at the measurement on the micrometer. Now insert a sized piece of brass and repeat the procedure. Take note of the new number and subtract it from the fired brass number and you now have an exact amount of shoulder bump. Continue to adjust your sizing die until you have the correct amount of shoulder bump and you’re ready to size all your brass.
Watch Video to See how Shoulder-Bump Measuring Micrometer Tool Works
Guys, in this case a VIDEO is worth more than a thousand words. It may not be obvious from the photos how this system works. In fact, it is fast and easy. Drop brass into cartridge-specific case gauge, then put the Micrometer unit on top, and dial to touch. The video shows how this works.
SUMMARY — Tool is Fast, Precise, Repeatable, and Easy to Use — We Like It
The beauty of this tool is the simplicity with which it works. It uses a very accurate micrometer to simply measure how much further your brass is sitting forward inside the case gauge. After a couple uses, you’ll find that this tool is fast, accurate and incredibly repeatable. That gives you confidence that your brass is being sized properly. Ultimately, I found that using the micrometer top really became a joy as I set up a new set of dies and as I sized my brass, I could easily check the consistency as brass came off my press. If you’re looking to improve your sizing game, give the L.E. Wilson Case Gage Depth Micrometer a try. MSRP is $130.00.
Share the post "L.E. Wilson Case Gage Depth Micrometer Review"
Here’a useful article by Sierra Bullets Media Relations Manager Carroll Pilant. This story, which originally appeared in the Sierra Bullets Blog, covers some of the more common ammo problems that afflict hand-loaders. Some of those issues are: excessive OAL, high primers, and improperly-sized cases. Here Mr. Pilant explains how to avoid these common problems that lead to “headaches at the range.
I had some gentlemen at my house last fall getting rifle zeros for an upcoming elk hunt. One was using one of the .300 short mags and every 3rd or 4th round would not chamber. Examination of the case showed a bulge right at the body/shoulder junction. These were new cases he had loaded for this trip. The seating die had been screwed down until it just touched the shoulder and then backed up just slightly. Some of the cases were apparently slightly longer from the base to the datum line and the shoulder was hitting inside the seating die and putting the bulge on the shoulder. I got to thinking about all the gun malfunctions that I see each week at matches and the biggest percentage stem from improper handloading techniques.
One: Check Your Cases with a Chamber Gage
Since I shoot a lot of 3-gun matches, I see a lot of AR problems which result in the shooter banging the butt stock on the ground or nearest solid object while pulling on the charging handle at the same time. I like my rifles too well to treat them that way (I cringe every time I see someone doing that). When I ask them if they ran the ammo through a chamber gage, I usually get the answer, “No, but I need to get one” or “I didn’t have time to do it” or other excuses. The few minutes it takes to check your ammo can mean the difference between a nightmare and a smooth running firearm.
A Chamber Gauge Quickly Reveals Long or Short Cases
Size Your Cases Properly
Another problem is caused sizing the case itself. If you will lube the inside of the neck, the expander ball will come out a lot easier. If you hear a squeak as the expander ball comes out of a case neck, that expander ball is trying to pull the case neck/shoulder up (sometimes several thousandths). That is enough that if you don’t put a bulge on the shoulder when seating the bullet … it can still jam into the chamber like a big cork. If the rifle is set up correctly, the gun will not go into battery and won’t fire but the round is jammed into the chamber where it won’t extract and they are back to banging it on the ground again (with a loaded round stuck in the chamber). A chamber gage would have caught this also.
Oversizing cases also causes problems because the firing pin doesn’t have the length to reach the primer solid enough to ignite it 100% of the time. When you have one that is oversized, you usually have a bunch, since you usually do several cases at a time on that die setting. If the die isn’t readjusted, the problem will continue on the next batch of cases also. They will either not fire at all or you will have a lot of misfires. In a bolt action, a lot of time the extractor will hold the case against the face of the breech enough that it will fire. The case gets driven forward and the thinner part of the brass expands, holding to the chamber wall and the thicker part of the case doesn’t expand as much and stretches back to the bolt face. If it doesn’t separate that time, it will the next time. When it does separate, it leaves the front portion of the case in the chamber and pulls the case head off. Then when it tries to chamber the next round, you have a nasty jam. Quite often range brass is the culprit of this because you never know how many times it has been fired/sized and in what firearm.’Back to beating it on the ground again till you figure out that you have to get the forward part of the case out.
Just a quick tip — To extract the partial case, an oversized brush on a cleaning rod [inserted] and then pulled backward will often remove the case. The bristles when pushed forward and then pulled back act like barbs inside the case. If you have a bunch of oversized case that have been fired, I would dispose of them to keep from having future problems. There are a few tricks you can use to salvage them if they haven’t been fired though. Once again, a case gage would have helped.
Two: Double Check Your Primers
Another thing I see fairly often is a high primer, backwards primer, or no primer at all. The high primers are bad because you can have either a slam fire or a misfire from the firing pin seating the primer but using up its energy doing so. So, as a precaution to make sure my rifle ammo will work 100% of the time, I check it in a case gage, then put it in an ammo box with the primer up and when the box is full, I run my finger across all the primers to make sure they are all seated to the correct depth and you can visually check to make sure none are in backwards or missing.
Three: Check Your Overall Cartridge Length
Trying to load the ammo as long as possible can cause problems also. Be sure to leave yourself enough clearance between the tip of the bullet and the front of the magazine where the rounds will feed up 100%. Several times over the years, I have heard of hunters getting their rifle ready for a hunt. When they would go to the range to sight in, they loaded each round single shot without putting any ammo in the magazine. On getting to elk or deer camp, they find out the ammo is to long to fit in the magazine. At least they have a single shot, it could be worse. I have had hunters that their buddies loaded the ammo for them and then met them in hunting camp only to find out the ammo wouldn’t chamber from either the bullet seated to long or the case sized improperly, then they just have a club.
Four: Confirm All Cases Contain Powder
No powder in the case doesn’t seem to happen as much in rifle cartridges as in handgun cartridges. This is probably due to more handgun ammo being loaded on progressive presses and usually in larger quantities. There are probably more rifle cartridges that don’t have powder in them than you realize though. Since the pistol case is so much smaller internal capacity, when you try to fire it without powder, it usually dislodges the bullet just enough to stick in the barrel. On a rifle, you have more internal capacity and usually a better grip on the bullet, since it is smaller diameter and longer bearing surface. Like on a .223, often a case without powder won’t dislodge the bullet out of the case and just gets ejected from the rifle, thinking it was a bad primer or some little quirk.
For rifle cases loaded on a single stage press, I put them in a reloading block and always dump my powder in a certain order. Then I do a visual inspection and any case that the powder doesn’t look the same level as the rest, I pull it and the one I charged before and the one I charged after it. I inspect the one case to see if there is anything visual inside. Then I recharge all 3 cases. That way if a case had powder hang up and dump in the next case, you have corrected the problem.
On progressive presses, I try to use a powder that fills the case up to about the base of the bullet. That way you can usually see the powder as the shell rotates and if you might have dumped a partial or double charge, you will notice as you start to seat the bullet if not before. On a progressive, if I don’t load a cartridge in one smooth stroke (say a bullet tipped over sideways and I raised the ram slightly to reset it) Some presses actually back the charge back adding more powder if it has already dumped some so you have a full charge plus a partial charge. When I don’t complete the procedure with one stroke, I pull the case that just had powder dumped into it and check the powder charge or just dump the powder back into the measure and run the case through later.
Share the post "Four Ammo Safety Checks to Do Every Time BEFORE You Shoot"
If you load pistol ammo you should have a case gauge (aka “gage”) for each cartridge type you reload. Caliber-specific, precision-machined cylindrical gauges perform many important functions. They will instantly reveal if your rounds are too long or have excessive headspace. They will also show if your case is bulged or otherwise too fat to chamber easily. You can use the gauge with sized brass as well as loaded rounds.
Case gauges are a “must-have” for anyone loading handgun ammunition, particularly if you crank out large quantities of pistol ammo with a progressive press. An oversize round can cause a misfeed, jam, or other problem. That can ruin your day if you are in the middle of a shooting match. If you are relying on your handgun for self-defense, the last thing you want is a malfunction of any kind. This Editor personally runs every pistol round through a gauge before it goes into the ammo box.
UltimateReloader.com Video Shows How to Use Pistol Case Gauges:
Our friend Gavin Gear of UltimateReloader.com has prepared an excellent video that explains the benefits of pistol case gauges and shows how to use them. Gavin uses the quality gages produced by L.E. Wilson. These are available for the most popular handgun cartridges, both autoloader cartridges, and rimmed revolver cartridges. Gavin demonstrates gage use with .40 SW and .44 magnum cases.
Gavin states: “Using a case gage is very simple, and I would recommend that you add one of these gages to your reloader’s tool chest for each of the pistol cartridge types you reload. It may just save you a lot of time and hassle. Peace of mind is hard to put a price on!”
Here’a useful article by Sierra Bullets Media Relations Manager Carroll Pilant. This story, which originally appeared in the Sierra Blog, covers some of the more common ammo problems that afflict hand-loaders. Some of those issues are: excessive OAL, high primers, and improperly sized cases. Here Mr. Pilant explains how to avoid these common problems that lead to “headaches at the range.
I had some gentlemen at my house last fall getting rifle zeros for an upcoming elk hunt. One was using one of the .300 short mags and every 3rd or 4th round would not chamber. Examination of the case showed a bulge right at the body/shoulder junction. These were new cases he had loaded for this trip. The seating die had been screwed down until it just touched the shoulder and then backed up just slightly. Some of the cases were apparently slightly longer from the base to the datum line and the shoulder was hitting inside the seating die and putting the bulge on the shoulder. I got to thinking about all the gun malfunctions that I see each week at matches and the biggest percentage stem from improper handloading techniques.
One: Utilize a Chamber Gage
Since I shoot a lot of 3-gun matches, I see a lot of AR problems which result in the shooter banging the butt stock on the ground or nearest solid object while pulling on the charging handle at the same time. I like my rifles too well to treat them that way (I cringe every time I see someone doing that). When I ask them if they ran the ammo through a chamber gage, I usually get the answer, “No, but I need to get one” or “I didn’t have time to do it” or other excuses. The few minutes it takes to check your ammo can mean the difference between a nightmare and a smooth running firearm.
A Chamber Gauge Quickly Reveals Long or Short Cases
Size Your Cases Properly
Another problem is caused sizing the case itself. If you will lube the inside of the neck, the expander ball will come out a lot easier. If you hear a squeak as the expander ball comes out of a case neck, that expander ball is trying to pull the case neck/shoulder up (sometimes several thousandths). That is enough that if you don’t put a bulge on the shoulder when seating the bullet, like we talked about above, it can still jam into the chamber like a big cork. If the rifle is set up correctly, the gun will not go into battery and won’t fire but the round is jammed into the chamber where it won’t extract and they are back to banging it on the ground again (with a loaded round stuck in the chamber). A chamber gage would have caught this also.
Oversizing cases also causes problems because the firing pin doesn’t have the length to reach the primer solid enough to ignite it 100% of the time. When you have one that is oversized, you usually have a bunch, since you usually do several cases at a time on that die setting. If the die isn’t readjusted, the problem will continue on the next batch of cases also. They will either not fire at all or you will have a lot of misfires. In a bolt action, a lot of time the extractor will hold the case against the face of the breech enough that it will fire. The case gets driven forward and the thinner part of the brass expands, holding to the chamber wall and the thicker part of the case doesn’t expand as much and stretches back to the bolt face. If it doesn’t separate that time, it will the next time. When it does separate, it leaves the front portion of the case in the chamber and pulls the case head off. Then when it tries to chamber the next round, you have a nasty jam. Quite often range brass is the culprit of this because you never know how many times it has been fired/sized and in what firearm.’Back to beating it on the ground again till you figure out that you have to get the forward part of the case out.
Just a quick tip — To extract the partial case, an oversized brush on a cleaning rod [inserted] and then pulled backward will often remove the case. The bristles when pushed forward and then pulled back act like barbs inside the case. If you have a bunch of oversized case that have been fired, I would dispose of them to keep from having future problems. There are a few tricks you can use to salvage them if they haven’t been fired though. Once again, a case gage would have helped.
Two: Double Check Your Primers
Another thing I see fairly often is a high primer, backwards primer, or no primer at all. The high primers are bad because you can have either a slam fire or a misfire from the firing pin seating the primer but using up its energy doing so. So, as a precaution to make sure my rifle ammo will work 100% of the time, I check it in a case gage, then put it in an ammo box with the primer up and when the box is full, I run my finger across all the primers to make sure they are all seated to the correct depth and you can visually check to make sure none are in backwards or missing.
Three: Check Your Overall Cartridge Length
Trying to load the ammo as long as possible can cause problems also. Be sure to leave yourself enough clearance between the tip of the bullet and the front of the magazine where the rounds will feed up 100%. Several times over the years, I have heard of hunters getting their rifle ready for a hunt. When they would go to the range to sight in, they loaded each round single shot without putting any ammo in the magazine. On getting to elk or deer camp, they find out the ammo is to long to fit in the magazine. At least they have a single shot, it could be worse. I have had hunters that their buddies loaded the ammo for them and then met them in hunting camp only to find out the ammo wouldn’t chamber from either the bullet seated to long or the case sized improperly, then they just have a club.
Four: Confirm All Cases Contain Powder
No powder in the case doesn’t seem to happen as much in rifle cartridges as in handgun cartridges. This is probably due to more handgun ammo being loaded on progressive presses and usually in larger quantities. There are probably more rifle cartridges that don’t have powder in them than you realize though. Since the pistol case is so much smaller internal capacity, when you try to fire it without powder, it usually dislodges the bullet just enough to stick in the barrel. On a rifle, you have more internal capacity and usually a better grip on the bullet, since it is smaller diameter and longer bearing surface. Like on a .223, often a case without powder won’t dislodge the bullet out of the case and just gets ejected from the rifle, thinking it was a bad primer or some little quirk. For rifle cases loaded on a single stage press, I put them in a reloading block and always dump my powder in a certain order. Then I do a visual inspection and any case that the powder doesn’t look the same level as the rest, I pull it and the one I charged before and the one I charged after it. I inspect the one case to see if there is anything visual inside. Then I recharge all 3 cases. That way if a case had powder hang up and dump in the next case, you have corrected the problem.
On progressive presses, I try to use a powder that fills the case up to about the base of the bullet. That way you can usually see the powder as the shell rotates and if you might have dumped a partial or double charge, you will notice as you start to seat the bullet if not before. On a progressive, if I don’t load a cartridge in one smooth stroke (say a bullet tipped over sideways and I raised the ram slightly to reset it) Some presses actually back the charge back adding more powder if it has already dumped some so you have a full charge plus a partial charge. When I don’t complete the procedure with one stroke, I pull the case that just had powder dumped into it and check the powder charge or just dump the powder back into the measure and run the case thru later.
I could go on and on but hopefully this will help some of you that are having these problems cure them. A case gage really can do wonders. Stay tuned for Easy Easy Ways to Save Yourself Headaches at the Range Part 2!
Share the post "Smart Advice: How to Avoid Headaches at the Range"
Here is an interesting new measuring device from L.E. Wilson, makers of precision hand dies, case trimmers, and other precision tools. This new Case Gage Depth Micrometer measures shoulder “bump”, so you can determine your headspace both before and after Full-Length sizing. With this Depth Micrometer, you can ascertain exactly how much your FL-sizing die is pushing back the shoulder during the sizing process. While you can measure shoulder setback with comparators on calipers, this Wilson Depth Mic is much more handy. Just place your sized round in the base gage and then slip the micrometer over the top. Take a measurement before FL sizing and then, after sizing, click the micrometer top to verify the amount of shoulder set-back. The measurement is quick and repeatable — very slick.
This is one more nice product from the folks at L.E. Wilson. The $110.00 tool comes with a Gage Block and micrometer top with .001 gradations. The Depth Mic top is compatible with all other Wilson case L.E. Wilson Gages (one size works for all).
Product Tip from EdLongrange. We welcome reader submissions.
Share the post "New Case Gage Depth Micrometer from L.E. Wilson"
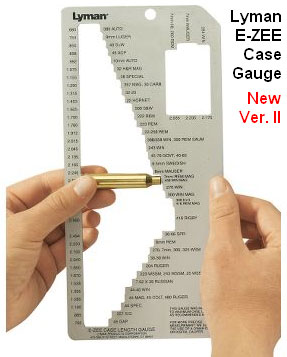
Lyman’s popular E-Zee Case Length Gauge is now bigger and better. The new version II of Lyman’s Case Gauge is much larger than the original version. The Case Gauge II now measures more than 70 cartridge types — way more than before. This tool is a metal template with SAAMI-max-length slots for various cartridge types, including relatively new cartridges such as the .204 Ruger and Winchester Short Magnums. This tool allows you to quickly sort brass or check the dimensions. If you have a bucketful of mixed pistol brass this can save you hours of tedious work with calipers. You can also quickly check case lengths to see if it’s time to trim your fired brass.
If you load a wide variety of calibers, or do a lot of pistol shooting, we think you should pick up one of these Lyman Case Gauge templates. They are available for under twenty bucks at Sinclair Int’l and Amazon.com. The folks at Sinclair say the E-Zee Case Gauge II has a been a hot seller.
Case Gauge Should Last a Lifetime
Easily measure the case length of over 70 popular rifle and pistol cases with Lyman’s new E-Zee Case Length Gauge II.
This rugged, precisely-made metal gauge makes sorting or identifying cases fast and accurate. The template is machined with SAAMI max recommended case lengths. Made from metal, with no moving parts, the E-Zee Case Gauge II should last a lifetime.
Share the post "Lyman E-Zee Case Length Gauge II Measures 70+ Cartridge Types"


 Oversizing cases also causes problems because the firing pin doesn’t have the length to reach the primer solid enough to ignite it 100% of the time. When you have one that is oversized, you usually have a bunch, since you usually do several cases at a time on that die setting. If the die isn’t readjusted, the problem will continue on the next batch of cases also. They will either not fire at all or you will have a lot of misfires. In a bolt action, a lot of time the extractor will hold the case against the face of the breech enough that it will fire. The case gets driven forward and the thinner part of the brass expands, holding to the chamber wall and the thicker part of the case doesn’t expand as much and stretches back to the bolt face. If it doesn’t separate that time, it will the next time. When it does separate, it leaves the front portion of the case in the chamber and pulls the case head off. Then when it tries to chamber the next round, you have a nasty jam. Quite often range brass is the culprit of this because you never know how many times it has been fired/sized and in what firearm. Back to beating it on the ground again till you figure out that you have to get the forward part of the case out.


 Lyman’s popular E-Zee Case Length Gauge is now bigger and better. The new version II of Lyman’s Case Gauge is much larger than the original version. The Case Gauge II now measures more than 70 cartridge types — way more than before. This tool is a metal template with SAAMI-max-length slots for various cartridge types, including relatively new cartridges such as the .204 Ruger and Winchester Short Magnums. This tool allows you to quickly sort brass or check the dimensions. If you have a bucketful of mixed pistol brass this can save you hours of tedious work with calipers. You can also quickly check case lengths to see if it’s time to trim your fired brass.