Sinclair Internationalhas released an interesting article about Case Concentricity* and bullet “run-out”. This instructional article by Bob Kohl explains the reasons brass can exhibit poor concentricity, and why high bullet run-out can be detrimental to accuracy.
Concentricity, Bullet Alignment, and Accuracyby Bob Kohl
The purpose of loading your own ammo is to minimize all the variables that can affect accuracy and can be controlled with proper and conscientious handloading. Concentricity and bullet run-out are important when you’re loading for accuracy. Ideally, it’s important to strive to make each round the same as the one before it and the one after it. It’s a simple issue of uniformity.
The reason shooters work with tools and gauges to measure and control concentricity is simple: to make sure the bullet starts down the bore consistently in line with the bore. If the case isn’t properly concentric and the bullet isn’t properly aligned down the center of the bore, the bullet will enter the rifling inconsistently. While the bore might force the bullet to align itself with the bore (but normally it doesn’t), the bullet may be damaged or overstressed in the process – if it even it corrects itself in transit. These are issues we strive to remedy by handloading, to maintain the best standard possible for accurate ammunition.
The term “concentricity” is derived from “concentric circle”. In simple terms it’s the issue of having the outside of the cartridge in a concentric circle around the center. That goes from case head and center of the flash hole, to the tip of the bullet.
Factors Affecting Concentricity
The point of using this term is to identify a series of issues that affect accurate ammunition. Ideally this would work best with a straight-walled case; but since most rifle cartridge cases are tapered, it equates to the smallest cross section that can be measured point by point to verify the concentric circle around the center. For the examples below, I’m working with .308 Winchester ammo.
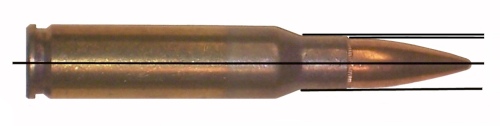
Figure 1: The cartridge.
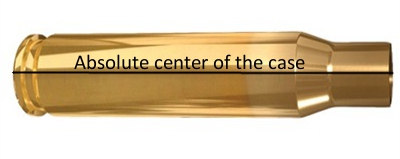
Figure 2: Centerline axis of the case, extending from flash hole to case mouth.
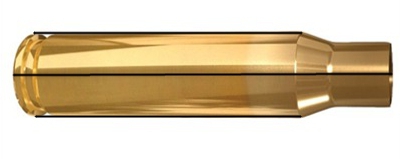
The case walls have to be in perfect alignment with the center, or axis, of that case, even if it’s measured at a thousandth of an inch per segment (in a tapered case).
Figure 3: Case body in alignment with its axis, or centerline, even in a tapered case.
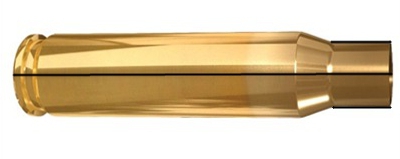
The case neck must also be in alignment with its axis. By not doing so you can have erratic bullet entry into the bore. The case neck wall itself should be as uniform as possible in alignment and in thickness (see the M80 7.62x51mm NATO cartridge in Figure 5) and brass can change its alignment and shape. It’s why we expand the case neck or while some folks ream the inside of the neck and then turn the outside for consistent thickness, which affects the tension on the bullet when seated.
Figure 4: Neck in alignment with center of the case axis.
Figure 5: Variations in case neck wall thickness, especially on some military brass, can cause an offset of the bullet in its alignment. This is an M80 ball round. Note the distinct difference of the neck walls.
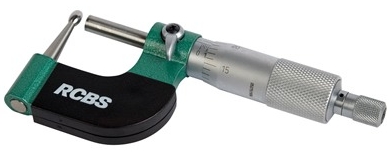
Having a ball micrometer on hand helps, especially with military brass like 7.62x51mm in a semi-auto rifle, where there are limits as to how thin you want the neck walls to be. In the case of 7.62 ball brass you want to keep the wall to .0145″.
Figure 6: A ball micrometer like this RCBS tool (#100-010-268) can measure case neck thickness.
Turning the outside of the neck wall is important with .308 military cases regardless of whether you expand or ream the neck walls. There are several outside neck turning tools from Forster, Hornady, Sinclair, and others. I’ve been using classic Forster case trimming (#100-203-301) and neck turning (#749-012-890) tools for 40 years.
Bullet Run-Out
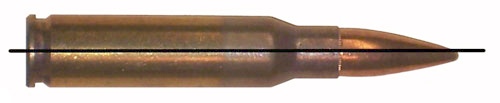
The cartridge, after being loaded, still needs to be in alignment with the center of the case axis. Figure 7 shows a bad example of this, a round of M80 ball. A tilted bullet is measured for what’s known as bullet “run-out”.
Figure 7: An M80 round with the bullet tilted and not aligned with the axis. This will be a flyer!
Run-out can be affected by several things: (1) improperly indexing your case while sizing, which includes not using the proper shell holder, especially while using a normal expander ball on the sizing die (it also can stretch the brass). (2) The head of a turret press can flex; and (3) improper or sloppy bullet seating. This is also relevant when it comes to using a progressive press when trying to load accuracy ammo.
Mid Tompkins came up with a simple solution for better bullet seating years ago. Seat your bullet half way into the case, back off the seater die and rotate the case 180 degrees before you finish seating the bullet. It cuts down on run-out problems, especially with military brass. You also want to gently ream the inside of the neck mouth to keep from having any brass mar the surface of the bullet jacket and make proper seating easier. A tilted bullet often means a flyer.
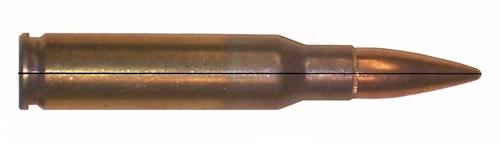
Figure 8: Proper alignment from the center of the case head to the tip of the bullet.
(NOTE: This links to a Web Archive version of the original Sinclair Int’l article.)
*Actually some folks would say that if we are talking about things being off-center or out-of-round, we are actually talking about “eccentricity”. But the tools we use are called “Concentricity Gauges” and Concentricity is the term most commonly used when discussing this subject.
Share the post "Bullet Concentricity and Alignment — What You Need to Know"
Sinclair International has created a series of helpful articles on rifle cartridge reloading. Today’s feature lists ten basic steps for precision hand-loading, with links to longer, detailed Sinclair Int’l technical articles providing more complete information. There’s a lot of helpful info here guys, if you click all the links to access the ten “long form” articles.
Tying It All Together: 10 Steps To Precision Handloads
Feature based on article by Roy Hill, Brownells/Sinclair Copywriter
Sinclair Int’l offers a series of detailed articles on hand-loading precision rifle ammunition. The articles are included in Sinclair’s GunTech Articles Archive, but sorting through the index to find each article takes time. To help you access all these articles quickly, here’s a handy summary of ten key topics, with links to longer articles covering each subject in detail.
Part 1: The first step in making high-quality handloads is to carefully choose the best brass for your application. You need to know how to identify the different types of brass and how to choose the best kind for the ammo you want to load. CLICK HERE for Part 1.
Part 2: Even high-quality brass can have burrs around the flash hole that can interfere with the primer flame and cause inconsistent ignition – which can lead to shot groups opening up. Flash hole deburring is a critical step in making sure primers ignite powder consistently. CLICK HERE for Part 2.
Part 3: The next step is to make sure the primer pockets are square and uniform. Like flash hole deburring, primer pocket uniforming may reduce variations in primer ignition by ensuring more consistent primer seating. CLICK HERE for Part 3.
Part 4: Making sure all your cases are precisely the same length is crucial, especially when you use cases that have been fired before. Case trimming is the way to get there. CLICK HERE for Part 4.
Part 5: After trimming, cases still have to be resized. In order for them to work through the resizing die, they have to be lubricated. The case lube method you choose is crucial to making precision handloads. CLICK HERE for Part 5.
Part 6: Now it’s time to choose the dies that will resize your cases. There are several important options to consider in selecting the right sizing dies. CLICK HERE for Part 6.
Part 7: Wait! You’re not quite ready to start sizing yet. There’s yet more to consider before you start cranking cases through the press. Learn more about setting up and adjusting your sizing dies. CLICK HERE for Part 7.
Part 8: Once the cases are completely prepped, it’s time to start putting fresh components back into them. We start off by seating primers. CLICK HERE for Part 8.
Part 9: After the primers are seated, it’s time to drop in the powder. There are several tools that will help you handle powder for precision handloads. CLICK HERE for Part 9.
Part 10: The final step in the process is carefully seating the bullet to just the right depth. And then… you’re ready to try your loads at the range. CLICK HERE for Part 10.
Share the post "Basics of Precision Reloading — 10 Steps Start to Finish"
RCBS makes some of the most rugged and durable reloading products you can buy. The RCBS Rock Chucker press is legendary — for good reason. The Editor uses one that has been in my family over twenty years. I also own an RCBS 2000 progressive press that has loaded many thousands of rounds, and features the excellent APS strip priming system. RCBS is serious about reloading, so this company has created a very complete series of instructional videos showing reloading precedures and equipment. You’ll find over 60 videos on the RCBS Video Resources Page and RCBS YouTube Channel.
We encourage readers to check out the RCBS Videos. They can help you master the basics of handloading — case prep, priming, sizing, and bullet seating. In addition, these videos can help you select the right equipment for your loading bench. Videos show presses, case tumblers, ultrasonic cleaning machines, powered case prep centers, and more.
Here are three of our favorite RCBS Reloading videos, along with links to a dozen more:
Basic Safety Precautions for Reloading
Every novice hand-loader should watch this video. It covers the key safety principles you should follow, such as “Don’t use components of unknown origin”. We would add — always double check the labels on your powder bottles, and if you don’t know 100% what powder is in your powder measure — dump it out. Some of the most serious injuries have occurred when reloaders put pistol powder in rifle cases.
Setting Up the Sizing Die Correctly
This video address the common complaint some novices have when their hand-loadeed cartridges won’t chamber properly. Kent Sakamoto explains how to set up the sizing die properly to size the case body and bump the shoulder.
Choosing a Case Cleaning System
Here Kent Sakamoto looks at the three main types of brass cleaning systems: Vibratory Tumbler, Wet Tumbler (with media), and Ultrasonic Cleaning Machine. Kent reviews the pros and cons of each system.
More RCBS Reloading Videos
Here are twelve more helpful videos from RCBS. These cover both reloading techniques and reloading equipment. There are currently over 60 videos on the RCBS YouTube Channel.
Sinclair International has created a series of helpful articles on rifle cartridge reloading. Today’s feature lists ten basic steps for precision hand-loading, with links to longer, detailed Sinclair Int’l technical articles providing more complete information. There’s a lot of helpful info here guys, if you click all the links to access the ten “long form” articles.
Tying It All Together: 10 Steps To Precision Handloads
Feature based on article by Roy Hill, Brownells/Sinclair Copywriter
Sinclair International offers a series of detailed articles on hand-loading precision rifle ammunition. The articles are included in Sinclair’s GunTech Articles Archive, but sorting through the index to find each article takes time. To help you access all these articles quickly, here’s a handy summary of ten key topics, with links to longer articles covering each subject in detail.
Part 1: The first step in making high-quality handloads is to carefully choose the best brass for your application. You need to know how to identify the different types of brass and how to choose the best kind for the ammo you want to load. CLICK HERE for Part 1.
Part 2: Even high-quality brass can have burrs around the flash hole that can interfere with the primer flame and cause inconsistent ignition – which can lead to shot groups opening up. Flash hole deburring is a critical step in making sure primers ignite powder consistently. CLICK HERE for Part 2.
Part 3: The next step is to make sure the primer pockets are square and uniform. Like flash hole deburring, primer pocket uniforming may reduce variations in primer ignition by ensuring more consistent primer seating. CLICK HERE for Part 3.
Part 4: Making sure all your cases are precisely the same length is crucial, especially when you use cases that have been fired before. Case trimming is the way to get there. CLICK HERE for Part 4.
Part 5: After trimming, cases still have to be resized. In order for them to work through the resizing die, they have to be lubricated. The case lube method you choose is crucial to making precision handloads. CLICK HERE for Part 5.
Part 6: Now it’s time to choose the dies that will resize your cases. There are several important options to consider in selecting the right sizing dies. CLICK HERE for Part 6.
Part 7: Wait! You’re not quite ready to start sizing yet. There’s yet more to consider before you start cranking cases through the press. Learn more about setting up and adjusting your sizing dies. CLICK HERE for Part 7.
Part 8: Once the cases are completely prepped, it’s time to start putting fresh components back into them. We start off by seating primers. CLICK HERE for Part 8.
Part 9: After the primers are seated, it’s time to drop in the powder. There are several tools that will help you handle powder for precision handloads. CLICK HERE for Part 9.
Part 10: The final step in the process is carefully seating the bullet to just the right depth. And then… you’re ready to try your loads at the range. CLICK HERE for Part 10.
Share the post "Precision Handloading — TEN Important Steps — Start to Finish"
Sinclair Internationalhas released an interesting article about Case Concentricity* and bullet “run-out”. This instructional article by Bob Kohl explains the reasons brass can exhibit poor concentricity, and why high bullet run-out can be detrimental to accuracy.
Concentricity, Bullet Alignment, and Accuracyby Bob Kohl
The purpose of loading your own ammo is to minimize all the variables that can affect accuracy and can be controlled with proper and conscientious handloading. Concentricity and bullet run-out are important when you’re loading for accuracy. Ideally, it’s important to strive to make each round the same as the one before it and the one after it. It’s a simple issue of uniformity.
The reason shooters work with tools and gauges to measure and control concentricity is simple: to make sure the bullet starts down the bore consistently in line with the bore. If the case isn’t properly concentric and the bullet isn’t properly aligned down the center of the bore, the bullet will enter the rifling inconsistently. While the bore might force the bullet to align itself with the bore (but normally it doesn’t), the bullet may be damaged or overstressed in the process – if it even it corrects itself in transit. These are issues we strive to remedy by handloading, to maintain the best standard possible for accurate ammunition.
The term “concentricity” is derived from “concentric circle”. In simple terms it’s the issue of having the outside of the cartridge in a concentric circle around the center. That goes from case head and center of the flash hole, to the tip of the bullet.
Factors Affecting Concentricity
The point of using this term is to identify a series of issues that affect accurate ammunition. Ideally this would work best with a straight-walled case; but since most rifle cartridge cases are tapered, it equates to the smallest cross section that can be measured point by point to verify the concentric circle around the center. For the examples below, I’m working with .308 Winchester ammo.
Figure 1: The cartridge.
Figure 2: Centerline axis of the case, extending from flash hole to case mouth.
The case walls have to be in perfect alignment with the center, or axis, of that case, even if it’s measured at a thousandth of an inch per segment (in a tapered case).
Figure 3: Case body in alignment with its axis, or centerline, even in a tapered case.
The case neck must also be in alignment with its axis. By not doing so you can have erratic bullet entry into the bore. The case neck wall itself should be as uniform as possible in alignment and in thickness (see the M80 7.62x51mm NATO cartridge in Figure 5) and brass can change its alignment and shape. It’s why we expand the case neck or while some folks ream the inside of the neck and then turn the outside for consistent thickness, which affects the tension on the bullet when seated.
Figure 4: Neck in alignment with center of the case axis.
Figure 5: Variations in case neck wall thickness, especially on some military brass, can cause an offset of the bullet in its alignment. This is an M80 ball round. Note the distinct difference of the neck walls.
Having a ball micrometer on hand helps, especially with military brass like 7.62x51mm in a semi-auto rifle, where there are limits as to how thin you want the neck walls to be. In the case of 7.62 ball brass you want to keep the wall to .0145″.
Figure 6: A ball micrometer like this RCBS tool (#100-010-268) can measure case neck thickness.
Turning the outside of the neck wall is important with .308 military cases regardless of whether you expand or ream the neck walls. There are several outside neck turning tools from Forster, Hornady, Sinclair, and others. I’ve been using classic Forster case trimming (#100-203-301) and neck turning (#749-012-890) tools for 40 years.
Bullet Run-Out
The cartridge, after being loaded, still needs to be in alignment with the center of the case axis. Figure 7 shows a bad example of this, a round of M80 ball. A tilted bullet is measured for what’s known as bullet “run-out”.
Figure 7: An M80 round with the bullet tilted and not aligned with the axis. This will be a flyer!
Run-out can be affected by several things: (1) improperly indexing your case while sizing, which includes not using the proper shell holder, especially while using a normal expander ball on the sizing die (it also can stretch the brass). (2) The head of a turret press can flex; and (3) improper or sloppy bullet seating. This is also relevant when it comes to using a progressive press when trying to load accuracy ammo.
Mid Tompkins came up with a simple solution for better bullet seating years ago. Seat your bullet half way into the case, back off the seater die and rotate the case 180 degrees before you finish seating the bullet. It cuts down on run-out problems, especially with military brass. You also want to gently ream the inside of the neck mouth to keep from having any brass mar the surface of the bullet jacket and make proper seating easier. A tilted bullet often means a flyer.
Figure 8: Proper alignment from the center of the case head to the tip of the bullet.
(NOTE: This links to a Web Archive version of older Sinclair Int’l article.)
*Actually some folks would say that if we are talking about things being off-center or out-of-round, we are actually talking about “eccentricity”. But the tools we use are called “Concentricity Gauges” and Concentricity is the term most commonly used when discussing this subject.
Story Tip from EdLongrange. We welcome reader submissions.
Share the post "Bullet Concentricity Basics — What You Need to Know"
Our friend Erik Cortina is at Raton, NM this week at the F-Class Nationals. When he’s not shooting (or working) Erik produces YouTube videos. One of his most popular videos explained why you should full-length size cartridge brass. In no uncertain terms Erik says: “Quit Neck Sizing!!!” Watch the Video:
Why It’s Smart to Full-Length Size Your Brass
Commentary by Erik Cortina
Should You Full-Length Size Your Cartridge Brass?
Absolutely. Let Me Explain Why…
I have seen it time and time again, shooters on the line wrestling with their rifle trying to get the bolt closed while the wind is switching. They were too focused trying to get their bolt to close and getting their rifle settled back on the bags that they missed the wind switch. Bang… Eight! The straw that broke the camel’s back for me was at the 2017 Canadian Nationals. I was paired up with a young girl and she would try really hard to close the bolt on her rifle. The majority of the time she would get it to close, but often times she could not even get the round to chamber. She was focused on her rifle the entire time rather than on the conditions. When we completed our strings, she had five rounds that did not chamber our of 15! That is way too many!. I told her she needed to think about Full-length sizing with 0.002″ shoulder bump, or Controlled Full-length Sizing like I call it. I told her not to worry about losing accuracy. I told her that I full-length size all my rounds and asked if she noticed how smooth my bolt was and noticed my score. She said yes, they were both great!
Controlled Full-length Sizing Does NOT Harm Accuracy
I have found that Controlled Full-length Sizing does NOT hurt accuracy or shorten brass life. I find that I can focus much more on the conditions when I don’t have to think about chambering a round nor extracting it. It has become second nature. After firing, I keep my head welded to the stock, I open the bolt by placing my thumb on top of stock and rotating hand upwards. I reach in and retrieve spent case, place it back in ammo box, and pick up another loaded round and put in chamber. I verify conditions and when ready, I push the bolt in and close it with my index and middle finger.
With Controlled Full-length Sizing you “bump” the shoulder around .002″ for bolt guns.* Image courtesy Sinclair International which carries a variety of Full-length dies.
Whidden Full-Length Sizing Dies by AccurateShooter.com Editor
For proper Full-length sizing, you want a quality die that’s a very good match to your chamber. For our project rifles we usually turn to Whidden Gunworks which offers both bushing and non-bushing FL dies. And if you want the hot new option, check out Whidden’s patent-pending, click-adjustable FL-sizing die. This gives instant, precise control over shoulder bump. It works great.
*With gas guns, such as the AR10, you may want to increase shoulder bump to .003″ or more. With some benchrest cartridges, .0015″ bump may prove optimal. But .002″ is a good starting point.
Share the post "‘Quit Neck Sizing’ — Cortina Explains Full-Length Sizing is Better"
Harrell’s Precision sells “semi-custom” full-length bushing dies for the PPC and 6BR chamberings. While the Harrell brothers do not cut the die to spec, they carry a large selection of dies made with slightly different internal dimensions. When you send in your fired brass, the Harrells choose a die from inventory with just the right amount of sizing (diameter reduction) at the top and bottom of the case. Given the quality, and precise fit, Harrell’s full-length dies are a good value at $75.00 plus shipping.
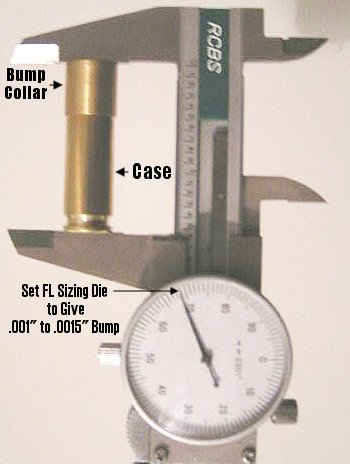
Bump Measuring Collar
The Harrell brothers provide a nice bonus item with each full-length die — a neat, little shoulder bump measuring device as shown in the photo at right. Hornady/Stoney Point sells a stand-alone tool that does the same job, but the Harrell’s bump collar is simpler and faster. To measure your shoulder bump, simply place the Harrell’s bump collar over the front of your deprimed case (before sizing) and measure the OAL with your calipers. Then size the case in your full-length die, replace the collar and repeat the measurement. You want to set your die so the shoulder moves back about .001″ to .0015″ for most applications. (With semi-auto guns you may want more bump.)
Share the post "Measure Shoulder Bump Precisely with Harrell’s Bump Collar"
Wouldn’t it be great if you could quickly and easily adjust shoulder bump during the full-length sizing process, without struggling to move die lock-rings by trial and error (or fiddle with shims). Well you can. The PMA Micro Die Adjuster is a brilliant little device that replaces the lock ring on your FL sizing die. It allows you to move the die up and down in precise, tiny increments. The tool has .001″ index marks, but you can easily set your die between the marks to achieve .0005″ (half-thousandth) adjustments.
To see how the PMA Micro-Die Adjuster works, watch this video by our friend Boyd Allen:
Many of our Forum members now use the PMA Micro Die Adjuster, and they give this specialty tool high praise. Here are actual reviews by Forum members and other verified tool buyers. Read more comments in this AccurateShooter Forum Thread.
PMA Micro Die Adjuster User Reviews
“No more ‘close enough’ for headspace[.] With this tool set-up it’s easy to put headspace exactly where you want it, then repeat it exactly for subsequent batches for the same cartridge.” — JohnF
“I have four of these Micro Adjuster rings and all I can say is that it works and it is repeatable. I bump my brass .0005″-.001″ and this die lock ring will do it without issue.” — TrapperT
“I size brass for four different 6.5×47 rifles (chambered with three different reamers) using a single die, set in the PMA Adjuster. I have to say… I should have bought one sooner. Adjusting it is very quick and repeatable to well under .001.” — /VH
“Great product. Shims used to drive me crazy, put a .002 in and get .0035 of change. With this if you want .0015 set it and that’s what you get.” — John B
“I’ve been using PMA’s lock ring for some time now and find it to be very easy to adjust to within .0005″ on a single piece of brass. Very quick to do as well. One thing I have found is that if you still need that half-thou adjustment I will run the brass once more at the same setting before I make that .0005″ adjustment and 50 percent of the time that does the trick. The marked increments are in .001″ scale so if you go half way in between there’s your half-thousandth.
PMA Micro-Adjuster vs. Shims: With respect to using shims, that requires you to completely remove the die. That gets old rather quickly after having used the PMA adjustable lock ring.” — Patch 700
“I like mine — adjustments are easy and it will adjust very fine. I used to use .001″ shims. Now can adjust my bump as fine as I want.” — Joe139
“The PMA adjuster works just like they say it does and is very simple to use and adjust. I use JLC inserts as well … as nice as they are you’re still hobbled by a click. However with the PMA you can go between what would be clicks. And you can use them … with any die.” — Dusty Stevens
Product Description from PMA Tool
The PMA Tool Micro Die Adjuster (MDA) replaces your existing lock ring and can be used with nearly any 7/8-14 full length sizing die. We successfully used this tool with sizing dies from Redding, RCBS, Hornady, Lee, Harrells Precision and those made from Newlon Precision die blanks. It allows you to easily make adjustments to your “shoulder bump” as fine as .0005″. The engraved marks on the MDA are equal to approximately .001 inches (true adjustment .000992″) of adjustment to the shoulder bump. Splitting the engraved marks is therefore approximately equal to .0005″. The design of the MDA does not allow it to work with the Forster Co-Ax press. Some custom dies for very short cartridges may require the use of an extended shellholder. Micro Die Adjuster shown in use installed on Custom Newlon/Scott 6mm PPC Die and Harrells Precision Compact Press.
Share the post "PMA Micro Die Adjuster — User Reports"
We recommend Ballistol as a near-ideal case lube for basic full-length sizing. It’s extremely slick, and goes on very thin when applied with the aerosol version. Ballistol is this Editor’s favorite case lube for regular resizing, and I’ve tried all the popular brands including RCBS, Hornady One-shot, and Lee lube. Unlike many other case lubes, with Ballistol you won’t need to use a solvent or tumble the brass afterwards to remove the lube. All you need is a very thin layer of Ballistol, and this easily wipes off with a paper towel. The Ballistol will also remove the carbon on the outside of fired case-necks, so you can clean and lube your cases at the same time. (For case-forming and neck expansion, we recommend a thicker lube such as Imperial Die Wax or Mobil 1.)
Unfortunately, many folks have told us that they can’t find Ballistol at local shops, or they want to combine it with a reloading supply order to cut down on shipping costs. Here are sources for Ballistol, including Brownell’s and MidwayUSA. For convenience, we recommend the aerosol version, but the liquid version can be diluted and used also.
MidwayUSA
6.0 oz. Aerosol $7.49 831231
16 oz. Liquid $7.49 164428
BULK ORDER SOURCES:
Ballistol USA
PACKAGE 1: BALLISTOL-LUBE
Four – 6 oz. Aerosol Cans
$ 24.00 + 10.00 s&h = $ 34.00
FireHawktech.com
Combo Pack
Two – 6 oz. Aerosol Cans
One – 16 oz. Liquid Can
Total $24.95
Aerosol Full Case (12 cans)
Twelve – 6 oz. Aerosol Cans
Total $81.00 (just $6.75/can)
Ballistol Frequently Asked Questions
Q: Is the “Ballistol Lube” with the white label the same as the Ballistol “Sportsman’s Oil” with the green label.
A: Yes. Same product, just different labels. But remember there are both aerosol and liquid versions. The aerosol comes out very thin — like water. The liquid is thick — like motor oil.
Q: The liquid version is more economical by weight, but can I dilute it down?
A: Yes, Ballistol liquid can be diluted with water, up to a 10:1 ratio and it will remain slick. We recommend about a 6:1 ratio for use as a general case cleaner and lubricant — but you should experiment yourself.
Q: If Ballistol oil can be diluted with water, does that mean it will promote corrosion?
A: No. Ballistol emulsifies in water. The resulting product will displace H20 like WD40, and then leaves a thin, protective oil. Ballistol is also mildly alkaline (pH between 8.5 and 9.5), so it neutralizes mild acidic residues such as hand sweat or residues from black powder (which are acidic).
Q: What’s Ballistol made from — it smells funny?
A: Ballistol is made from medical grade mineral oil, alkaline salts of oleic acid, several alcohols, Benzyl Acetate and oil from vegetable seeds. The smell comes from medicinal Anethole oil, which is derived from the Anise plant. Ballistol is biodegradable and non-toxic. CLICK HERE for the Material Data Safety Sheet
For more information on Ballistol, contact Ballistol USA, (800) 253 2460, (252) 261 0408 (fax).
Share the post "Non-Toxic Ballistol Lube Works Great for Case Sizing"


 Sinclair International has released an interesting article about Case Concentricity* and bullet “run-out”. This instructional article by Bob Kohl explains the reasons brass can exhibit poor concentricity, and why high bullet run-out can be detrimental to accuracy.
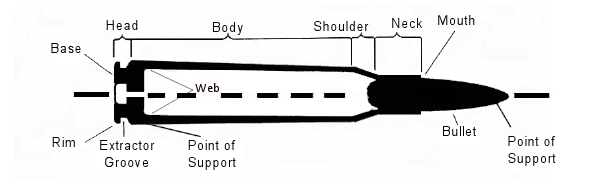


 Bump Measuring Collar


