Whether you should from the bench, or from prone, it’s great to have your cartridges in a convenient, easy-to-reach position. This article explains how you can build your own height-adjustable ammo caddy for under ten bucks. Credit Martin Tardif for this great Do-It-Yourself (DIY) project. Martin’s flex-arm caddy design works great for F-Open competitors as well as anyone who shoots with a pedestal front rest, either on the ground or from a bench. The ammo caddy attaches, via a flexible arm, to your front rest. The flexy arm allows you to position your ammunition close to your rifle’s feeding port. That makes it easy to grab cartridges and load them into the chamber without shifting your shooting position.
Kudos to Martin Tardif for his clever use of inexpensive materials. The total cost of the whole project, according to Martin, was just $8.00! (With Bidenflation, materials could run a bit more these days, but the project would still be very inexpensive.)
Martin Explains How to Build the Ammo Caddy
Here are some pics of my DIY P.L.A.B. (Port Level Ammo Block). I cannibalized the goose neck from a Craftsman bendy-style utility light and bought a 3.5″x 1″ Acetal disk on eBay. I then drilled out the disk to accept twenty .284 Winchester rounds and screwed the disk to the bendy arm. The arm, by itself, wasn’t sturdy enough to support my fully loaded ammo block, so I inserted a 1/8″-diameter steel rod cut to length into the arm before I screwed it to the disk. On this Bald Eagle rest, I wasn’t using the windage adjustment cable. That allowed me to secure the bottom end of the arm to the unused 5/16″ x 18 bolt hole for the cable. [Editor’s Note: For other pedestal rest types/brands you may need to drill a hole for the base of the flexy arm.]
Share the post "Do-It-Yourself Ammo Caddy — Under Ten Bucks"
Assembly Diagram: Here are all the components of the target frame. The overall maximum assembled dimensions are roughly 26″ wide, 41″ deep, and 66″ tall (the cardboard is 2 x 3 feet).
One of the easiest ways to build a portable target stand is to use PVC pipe and connectors. Utah .308 Shooter “Cheese” has created a simple yet sturdy target frame, and he’s shared his design so you can build a similar frame easily and at low cost. The components are wood furring strips, 2″-diameter PVC pipes (and connections), and a 2’x3′ sheet of cardboard. The PVC base can be glued together, or, for easier transport and storage, you can leave some or all of the connections free. “Cheese” tells us: “I didn’t glue any of it together so I could disassemble it, shove it in a bag and take it anywhere.”
“All the parts are just pushed together and not glued. That way I can break it down and carry it all in a bag. Also, if a buddy (not me!) happens to shoot the stand, I can easily replace just the damaged piece. The last 6 inches of the furring strips are wittled-down a bit so they can be pushed into the upright pipes with a little friction. The cardboard is 2 x 3 feet, and I use a staple gun to attach it to the furring strips. Then I just staple the target onto the cardboard and go at it.
Of course you can modify the dimensions as desired. I chose the black ABS pipe over white PVC simply for cost — black ABS is a little cheaper. You can also glue some or all of the parts together, it’ll just be larger for transporting. In windy conditions, the thing likes to come apart. Duct tape might work well.
For weight, I thought about filling the two end pipes with sand and gluing test caps on each of their ends. The test caps still allow the pipes to slip into the elbows.”
Add Anchors or Internal Weight for Stability
On a very windy day, a PVC stand can shake or even topple over. There are a couple solutions to this. Some people fill the PVC pipe sections with sand to add weight, or you can put short sections of Re-BAR inside the long legs. One GlockTalk forum member noted: “I built [a frame] almost identical to this. I also take four pieces of wire coathanger bent into an inverted “U” shape to anchor the frame to the ground. It is so light that wind will knock the stand over [without anchors].”
You can find photos of a similar home-made PVC target stand (with a slightly different rear section) on the Box of Truth website. This also employs a PVC tubing base with wood uprights. We’ve also seen all-PVC target stands, but we’ve found that it is easier to attach the cardboard to wood strips than to PVC pipe. Also, if the upper section is wood, you can fit different height targets, while using the same base.
Share the post "Craft Your Own Target Stand with Low-Cost PVC or ABS Pipe"
Brownells’ Do-It-Yourself (DIY) video series provides logical, step-by-step installation help for triggers, stocks, and springs. Nine separate videos cover Brownells various DIY Kits. Not sure if you’re up to the project? Just watch each video to see what’s involved. The nine DIY kits are:
This video shows Remington 700 after-market trigger installation:
In the Do-It-Yourself videos, Brownells’ Gun Techs proceed step-by-step, showing you exactly how to install the parts on your gun. Each kit also comes with complete, illustrated instructions you can take to the bench. To learn more, click the links above, or CLICK HERE to visit Brownells’ DIY Kit online page.
Share the post "Brownells Do-It-Yourself Videos Show How to Upgrade Your Guns"
Assembly Diagram: Here are all the components of the target frame. The overall maximum assembled dimensions are roughly 26″ wide, 41″ deep, and 66″ tall (the cardboard is 2 x 3 feet).
One of the easiest ways to build a portable target stand is to use PVC pipe and connectors. Utah .308 Shooter “Cheese” has created a simple yet sturdy target frame, and he’s shared his design so you can build a similar frame easily and at low cost. The components are wood furring strips, 2″-diameter PVC pipes (and connections), and a 2’x3′ sheet of cardboard. The PVC base can be glued together, or, for easier transport and storage, you can leave some or all of the connections free. “Cheese” tells us: “I didn’t glue any of it together so I could disassemble it, shove it in a bag and take it anywhere.”
“All the parts are just pushed together and not glued. That way I can break it down and carry it all in a bag. Also, if a buddy (not me!) happens to shoot the stand, I can easily replace just the damaged piece. The last 6 inches of the furring strips are wittled-down a bit so they can be pushed into the upright pipes with a little friction. The cardboard is 2 x 3 feet, and I use a staple gun to attach it to the furring strips. Then I just staple the target onto the cardboard and go at it.
Of course you can modify the dimensions as desired. I chose the black ABS pipe over white PVC simply for cost — black ABS is a little cheaper. You can also glue some or all of the parts together, it’ll just be larger for transporting. In windy conditions, the thing likes to come apart. Duct tape might work well.
For weight, I thought about filling the two end pipes with sand and gluing test caps on each of their ends. The test caps still allow the pipes to slip into the elbows.”
Add Anchors or Internal Weight for Stability
On a very windy day, a PVC stand can shake or even topple over. There are a couple solutions to this. Some people fill the PVC pipe sections with sand to add weight, or you can put short sections of Re-BAR inside the long legs. One GlockTalk forum member noted: “I built [a frame] almost identical to this. I also take four pieces of wire coathanger bent into an inverted “U” shape to anchor the frame to the ground. It is so light that wind will knock the stand over [without anchors].”
You can find photos of a similar home-made PVC target stand (with a slightly different rear section) on the Box of Truth website. This also employs a PVC tubing base with wood uprights. We’ve also seen all-PVC target stands, but we’ve found that it is easier to attach the cardboard to wood strips than to PVC pipe. Also, if the upper section is wood, you can fit different height targets, while using the same base.
Share the post "Do-It-Yourself Target Stand — Make it with PVC or ABS Pipe"
Whether you should from the bench, or from prone, it’s great to have your cartridges in a convenient, easy-to-reach position. This article explains how you can build your own height-adjustable ammo caddy for under ten bucks. Credit Martin Tardif for this great Do-It-Yourself (DIY) project. Martin’s flex-arm caddy design works great for F-Open competitors as well as anyone who shoots with a pedestal front rest, either on the ground or from a bench. The ammo caddy attaches, via a flexible arm, to your front rest. The flexy arm allows you to position your ammunition close to your rifle’s feeding port. That makes it easy to grab cartridges and load them into the chamber without shifting your shooting position.
Kudos to Martin Tardif for his clever use of inexpensive materials. The total cost of the whole project, according to Martin, was just $8.00!
Martin Explains How to Build the Ammo Caddy
Here are some pics of my DIY P.L.A.B. (Port Level Ammo Block). I cannibalized the goose neck from a Craftsman bendy-style utility light and bought a 3.5″x 1″ Acetal disk on eBay. I then drilled out the disk to accept twenty .284 Winchester rounds and screwed the disk to the bendy arm. The arm, by itself, wasn’t sturdy enough to support my fully loaded ammo block, so I inserted a 1/8″-diameter steel rod cut to length into the arm before I screwed it to the disk. On this Bald Eagle rest, I wasn’t using the windage adjustment cable. That allowed me to secure the bottom end of the arm to the unused 5/16″ x 18 bolt hole for the cable. [Editor’s Note: For other pedestal rest types/brands you may need to drill a hole for the base of the flexy arm.]
Share the post "Make Your Own Ammo Caddy for Under Ten Bucks"
Right now, Brownells is running a big sale on Howa Barreled Actions, in a wide variety of chamberings. You may want to pick up one of these barreled actions, which start at $259.99. We like Howa actions — they are smooth, and they feature an excellent two-stage trigger. Howa also offers a unique Mini Action, which is great for a small-caliber varmint rig.
Howa Barreled Action Basics
The above video shows the basics of the Howa barreled actions, which are offered in Mini, Standard, and Long Action versions, with dozens of chamberings, from .204 Ruger all the way up to .300 Winchester Magnum. If you’re not familiar with Howa barreled actions you should be. Each barreled action comes with Howa’s Lifetime Warranty and is guaranteed to deliver sub-MOA performance at 100-yards when using premium factory ammo. The Howa 1500 barreled action also features a crisp two-stage trigger, three-position safety, 70° bolt throw, M16-style extractor, two-lug bolt design and a flat bottom receiver with an integral recoil lug.
Howa Barreled Action Project Videos
Brownells has created a series of helpful videos showing how to put together an accurate rifle using a Howa barreled action. We think this is a sensible, cost-effective option for a varmint rifle, or entry-level tactical rig. Not counting optics, you should be able to assemble a good shooting, general-purpose rifle for under $700.00.
1. Long-Range Precision Rifle Build
Here the Brownells team puts together a nice tactical rifle in an MDT modular aluminum chassis made specifically for the Howa 1500 action. Attached, AR-style, to the back end of the chassis, is a Luth-AR adjustable buttstock also sold by Brownells. An EGW Picatinny rail is fitted to the action for mounting a Nightforce optic. As you can see in the video, the entire build takes less than 10 minutes. Using this Howa 1500 heavy-barreled action, you can save hundreds over the cost of a factory tactical rifle, and we bet the accuracy will be better than you’ll get with some popular brands. We’ve seen heavy-barreled Howas shoot well under 1 MOA.
2. Hunting Rifle Build
In this video, Brownells puts together a general-purpose hunting rifle using the Howa 1500 barreled action. This was attached to a Hogue Overmolded stock with internal aluminum bedding block. Fitted to the top of the action is an EGW Picatinny Rail with a Sig Sauer scope in Leupold rings. As with the Precision Rifle build above, the entire assembly process took less than ten minutes. This was done with a standard-length Howa action, but the same procedure could be used with the Howa Mini Action, or a Long Action. NOTE: No separate bedding compound was used here. That’s an option that would extend build time significantly.
Check out the Prices for Howa Barreled Actions
Here are some of the Howa Barreled Actions currently in stock at Brownells. NOTE: This is just a partial sample — there are many other varieties:
.223 Rem, 20″ Heavy Barrel, $399.99
6.5 Grendel, Mini Heavy Barrel, $389.99
6.5 Creedmoor, 24″ Heavy Barrel, $399.99
6.5 Creedmoor, 26″ Heavy Barrel, $429.99
7mm-08, Std Cerakote, $579.99
7.62×39, Mini Light Barrel, $259.99
.308 Win, 20″ Heavy Barrel, $289.99
.308 Win, 24″ Heavy Barrel, $299.99
.30-06 Sprg, 22″ Sporter Barrel, Cerakote, $349.99
.300 Win Mag, 24″ Heavy Barrel, $279.99
Share the post "Build Your Own Rifle with Affordable Howa Barreled Actions"
We like well-executed DIY (Do-It-Yourself) projects. You can save money with DIY projects, and often create something unique and special that can’t be purchased from any vendor. That’s the case with this very cool double shooting bench built by Jacob D., a pilot and 6.5 Creedmoor shooter.
Jacob, who flys for Arizona’s Mesa Airlines, built his own side-by-side benchrest shooting bench. He then posted photos of this on the 6.5 Creedmoor Group Facebook Page. We like this — very nice work Jacob!
Jacob writes: “Sighting in my new Ruger Precision Rifle with Leupold VX3i LRP 6.5-20x50mm and Burris tactical rings, using my benchrest table I built. Very happy with the combo!”
There is plenty of room for two shooters and two rifles on Jacob’s big and sturdy DIY shooting bench.
Share the post "AZ Pilot Builds Great Two-Station Shooting Bench"
We like Do-It-Yourself (DIY) projects. It takes initiative, creativity, and dedication to make your own hardware, and that’s worth acknowledging. For you dedicated DIY guys, here’s a great project that should inspire. Here is an owner designed and crafted F-Open rig, complete with home-built, belt-drive front rest.
Some of our mechanically-skilled readers chamber their own barrels or bed their own stocks. But these are relatively simple tasks compared to the jobs of constructing an entire rifle plus building an advanced front rest from scratch. Well that’s exactly what Forum member Steve B. (aka Essexboy) did a couple seasons back. He built his own rifle and an impressive twin-belt-drive pedestal rest. (Click photo below for large version). And get this, Steve’s home-made rifle was victorious in its first-ever match. Steve reports: “I shot my first Comp with the rifle … and managed to win with a score of 239-21!” (The match was shot at 300/500/600/1000/1100 with English scoring of 5 points for center bullseye).
Do-It-Yourself F-Open Rig from England
Steve, who hails from Essex in the UK, constructed virtually every component of his skeleton-style rifle except the 28″ HV Bartlein barrel (chambered as a 6mm Dasher) and the Tikka 590 donor action. Steve also did all the design and fabrication work on his one-of-a-kind front rest. Steve tells us: “Over the last year or so, I made this rifle stock and rest. I managed to make it all on a little Myford Lathe, as you can tell I’m no machinist but it saved me a load of money — so far I’ve got about $200 invested plus the barrelled action. The stock is aluminum except for the stainless steel bag runner. The rifle came in at one ounce under weight limit for F-Class Open division.” Steve did get help with the chambering and barrel-fitting, but he hopes to do all the barrel work himself on his next project.
The gun is very accurate. Steve notes: “I have shot the rifle to 1100 yards and it shoots well. Last time out the rifle dropped just one point at 1000 yards and 5 points at 1100 yards [English scoring system]. I know it’s not pretty, but it got me shooting long range F-Class for peanuts.” Message to Steve: Don’t worry how it looks. As another Forum member observed: “Any rifle that shoots well at 1100 yards is beautiful….”
Steve started with a Tikka 590 action: “The whole stock was made on a small (6.5×13) lathe and a vertical slide. This caused a few head scratching moments, figuring out how to hold the T6/HE30 alloy for the milling/turning operations, but it did teach me a few things. The hardest parts were clamping the longer sections (such as the fore-end) and keeping it all square. Due to the short cross-slide travel I had to keep re-setting the parts. I managed to keep all measurements to 0.001″ (one thousandth). I’m most proud of the trigger guard (photo below). This took a full day but came out really well, even if I say so myself.”
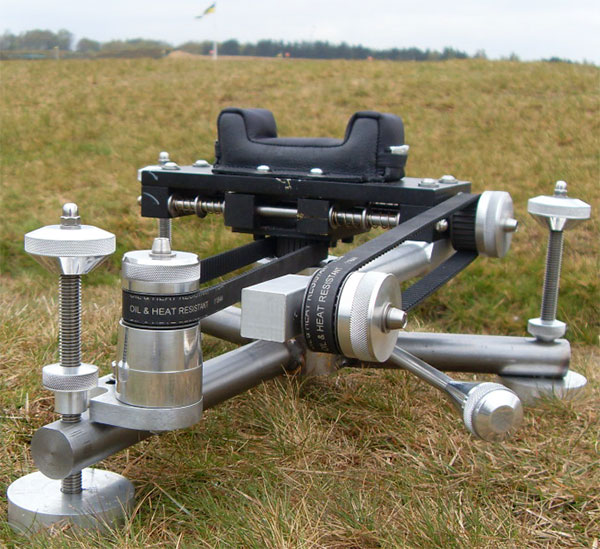
Belt-Driven Front Rest
We’re impressed with Steve’s ingenious front rest. Steve explains: “The rest is belt-driven and still in the experimental stage — hence no powder coating or polishing yet. I may have gone over the top as the key moving parts (the pulleys) run on three (3) types of bearings: radial; reamed bush; and a ball race. The main post runs on a radial bearing and the feet even have bearings in them, so when I raise the main body up (for rough height adjustment) the foot stays static.”
Will Steve build another rifle? Steve says he will, and he’s upgraded his tools: “Since building the rifle I have acquired a bigger lathe (Harrison m250) and a milling machine. For the next project I hope to be able to do the barrel work (threading, chambering, crowning) as well.” The next gun might be another Dasher. Steve explains: “After extensive reading on AccurateShooter.com, I chose the 6mm Dasher chambering, as I have a shoulder problem and can’t shoot a rifle with a lot of recoil.”
Share the post "Home-Built F-Open Rifle and Dual-Belt-Drive Front Rest"
Need a new barrel for your Rem-actioned hunting or tactical rifle? Here’s a great DIY option for riflemen. McRee’s Precision offers complete, no-gunsmithing re-barreling kits for Remington and Rem-clone actions. These feature a high-quality, pre-chambered “PRE-FIT” stainless barrel from Criterion, a Savage-style barrel nut, a recoil lug, and a special barrel-nut wrench. With this system you can easily re-barrel your favorite Remington rifle yourself in less than an hour. You don’t need to pay gunsmithing fees, or wait weeks (or months) for a busy smith to do the job. And the price is under $500.00. McRee’s Precision even offers a Half-MOA Accuracy Guarantee with its pre-fitted barrel kits. NOTE: Check MrReesPrecision.net on Thanksgiving for a Holiday Special Price (probably 10% Off).
McRee’s Precision Remington DIY Barrel Kit includes Criterion Pre-Fit Stainless Barrel, Barrel Nut, Recoil Lug, Thread Protector, and Barrel Nut Wrench: The stainless steel Barrel Nut is set up for 1 1/16 x 16 barrel threads, while the stainless steel recoil lug has a 1/8 inch removable locator pin and is set up for 1.0625 dia barrel threads.Barrel Kit Specifications.
McRee’s Precision sells Rem-action Pre-Fit barrel packages (complete with barrel nut, recoil lug, and wrench) starting at $499.52 (get a Holiday Discount on that price commencing 11/24/2016). Choose from five chamberings: .243 Win, 6.5 Creedmoor, .260 Rem, .308 Win, and .300 Win Mag. These Pre-Fit barrel kits are “100% complete and ready-to-install”. All you need to do is remove your current barrel, place the recoil lug, spin on the new tube, follow the instructions for setting head-space, then torque the barrel nut against the lug. NOTE: You may require a barrel vise and action wrench to remove the original barrel. Minor inletting changes may be needed forward of the action.
The folks at McRee’s Precision say their Pre-Fit system offers many advantages: “Remington Pre-Fitted Barrel Kits have become popular over the years. If Savage can do it, why not for our Remingtons? Our [Criterion-supplied] barrels are spec’d to the McRee standard of performance. There are several places to get the tools required to remove your factory barrel correctly. Once you have your barrel removed all you have to do is follow the normal Savage procedure to install your new barrel. We recommend that you contact your local gunsmith for the install. Feel free to call us with any questions.”
Product Tip from Ed LongRange. We welcome readers’ submissions.
Share the post "Pre-Fit DIY Barrel System for Remington-Type Actions"
Forum member Mike T. (aka “Watercam”), has cleverly adapted a tubegun cheek piece to conventional fiberglass and wood stocks. The cheek piece hardware comes from Competition Machine and is the same as used on Gary Eliseo’s tubegun stocks. Here is Watercam’s Project Report:
Installing Tubegun Cheek Piece on Conventional Gun Stock
All of my match rifles are equipped with thumb-wheel adjustable cheek pieces for the best of reasons — adjustments can be made while in position, on target. I’ve learned that variations in position, terrain, and vertical angle all demand adjustability to achieve optimal cheek weld.
I wanted a cheek piece for my hunting and tactical type stocks that gave the same adjustability without having to cut a chunk off of my butt stocks. It needed to be affordable and easy to install. I also wanted a unit that would not push my head laterally away from the centerline of the scope or iron sights. Turns out I already had what I needed on my Gary Eliseo B-1 tubegun. I ran the idea past Gary, who said: “If you’ll be the guinea pig I’ll send the hardware”.
Using Gary’s hardware, I mounted Eliseo alloy thumb-wheel adjustable cheek pieces on a Bell & Carlson Medalist hunting stock and a Boyd’s laminate tactical stock. Read Forum Discussion.
Building Version One on Bell & Calson Stock
I had a Bell & Carlson Medalist stock for a Mauser 98 chambered in 9.3×62. This test rifle was enough of a thumper to reveal if the metal cheek piece could handle strong recoil.
I started by drilling three 1/2″ holes into the top of the comb to match the two pillars and one threaded shaft on the cheek piece. I used aluminum tubing to make guides for each and epoxied them in place. Inletting the oval hole for the thumb wheel was reasonably straight forward and the fiber reinforced foam in the buttstock offered enough support. A large flat washer epoxied underneath where the thumbwheel lay gave a smooth bearing surface. Total adjustment (with 2.25″ pillars and shafts) is just about an inch. I chose to trim the bottom of the skirt of Gary’s cheek plate so as to allow better position behind the scope for me and allow maximum adjustment even with the cheek piece of the stock. Set screws could be used instead of the thumb-wheel or in conjunction with it. In the end it was exactly what I envisioned and works great! The only thing left to do is paint the metal to match the stock.
Version Two — Installed on Boyds Laminated Tactical Stock
Watercam’s second metal cheek piece installation was on a laminated tactical stock. This Boyds stock did have a movable comb, but the original adjustable cheek section was too awkward to adjust from position. So I adapted the Eliseo cheek piece to to the Boyds stock, as you can see:
Cheek piece installation for both stocks was straight-forward, and the new cheek pieces work every bit as well the systems on my match rifles. Aluminum tubes epoxied in place guide the rods and threaded shank. A matching-diameter flat washer epoxied under the wheel provides smooth bearing surface. The glass-filled filler of the butt stock is plenty strong enough to support the unit. A set screw and knob can be added to lock in changes if so desired.
Share the post "New Adjustable Cheek Piece using Eliseo Tubegun Parts"
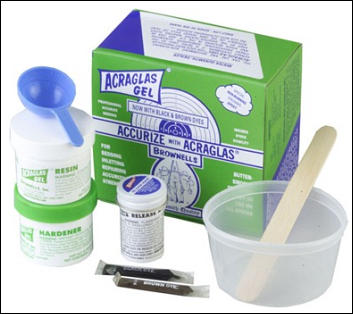
The NRA’s American Rifleman showcased an interesting project this week — an upgraded Ruger American Rifle Predator in 6.5 Creedmoor. The video below shows how a laminated wood stock from Boyd’s Gunstocks was adapted for the Ruger. A Boyds Prairie Hunter model in gray laminate was selected. This was custom-bedded to the Ruger’s action using Brownell’s Acraglas.
All Ruger American Rifle models employ dual aluminum V-Blocks to support the action. These fit slots in the underside of the action. Boyds makes its own version of these V-Blocks which were installed in the Boyds stock to secure the action.
Project leader Joe Kurtenbach says the size, shape, and geometry of the Boyds V-Blocks is very accurate, so they fit the Ruger action well. To further support the action, Acraglas bedding compound was applied to the inside of the stock, after release compound was applied to the barreled action. With this DIY bedding job, the Boyds laminated stock is definitely an improvement over this original “Tupperware” factory stock.
DIY Bargain Hunter Upgrade
American Rifleman states: “The Ruger American has some great features—hammer-forged barrel, reliable action, crisp trigger — but many would not consider the molded, polymer stock to be among them. Luckily, there are aftermarket options to enhance the rifle’s utility and aesthetics. A durable, attractive stock from Boyds Gunstocks and some DIY action bedding, using Brownells Acraglas, is the next step in the precision-driven hunting rifle build.”
Choice of Gun and 6.5 Creedmoor Chambering
For this project, American Rifleman’s Joe Kurtenbach selected one of his favorite cartridges, the 6.5 Creedmoor. Introduced in 2007 by Hornady, the accurate, flat-shooting 6.5 Creedmoor has proven very popular with both hunters and tactical/PRS shooters. The Ruger American Rifle Predator was chosen for its affordable price, reliable action, and Ruger Marksman adjustable trigger.
In this video, Kurtenback explains how and why the 6.5 Creedmoor chambering and Ruger American Rifle were chosen for the Precision Hunter rifle build project.
Share the post "DIY Hunting Rifle Upgrade — 6.5 Creedmoor Ruger American Rifle"
A while back, we featured a portable reloading bench built on a Black & Decker Workmate. That proved a VERY popular do-it-yourself project so we’re showing it again, in case you missed it the first time.
Texan Robert Lewis made himself a great portable reloading bench from plywood mounted to a Black & Decker Workmate. The bench, roughly 22″ x 19″ on top, folds up to fit easily in your car’s trunk or behind the seats in a pick-up truck cab. Four recessed bolts hold the wood top section to the collapsible B&D Workmate.The sides and back of the unit are attached to the base with small nails. There is a small shelf (also nailed in place) which can be used to clamp a powder measure or hold a scale. Shown in the photo is a Harrell’s Benchrest measure and Harrell’s single-stage “C” press.
The whole unit can be built for about $65.00 with pine, or $80.00 with oak (as shown). Robert explained: “The Workmate was $40. If someone bought a 2’x4′ sheet of 3/4″ oak plywood, I think it is around $30. Using pine plywood would be about half that. Fasteners were $3. Spar Urethane would be $5.”
Robert told us: “I used a couple ideas I found on the web. The Larry Willis website gave me the idea to use the Black and Decker Workmate as a base. I found the Workmate on sale for $40 and the top is made from oak plywood I had in my shop. I sealed the wood with three coats of Spar Urethane. The whole thing folds into a nice package for transportation to and from the range.”
Editor’s NOTE: In the time that’s transpired since we first ran this story, the price of a Black & Decker workmate has gone up. However you can still pick a WM225 Workmate for under $65.00. Target is currently selling WM225 Workmates for $64.99.


 One of the easiest ways to build a portable target stand is to use PVC pipe and connectors. Utah .308 Shooter “Cheese” has created a simple yet sturdy target frame, and he’s shared his design so you can build a similar frame easily and at low cost. The components are wood furring strips, 2″-diameter PVC pipes (and connections), and a 2’x3′ sheet of cardboard. The PVC base can be glued together, or, for easier transport and storage, you can leave some or all of the connections free. “Cheese” tells us: “I didn’t glue any of it together so I could disassemble it, shove it in a bag and take it anywhere.”


 The gun is very accurate. Steve notes: “I have shot the rifle to 1100 yards and it shoots well. Last time out the rifle dropped just one point at 1000 yards and 5 points at 1100 yards [English scoring system]. I know it’s not pretty, but it got me shooting long range F-Class for peanuts.” Message to Steve: Don’t worry how it looks. As another Forum member observed: “Any rifle that shoots well at 1100 yards is beautiful….”
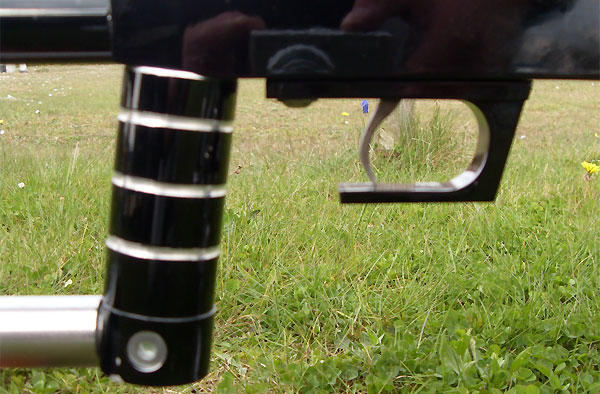


 All Ruger American Rifle models employ dual aluminum V-Blocks to support the action. These fit slots in the underside of the action. Boyds makes its own version of these V-Blocks which were installed in the Boyds stock to secure the action.
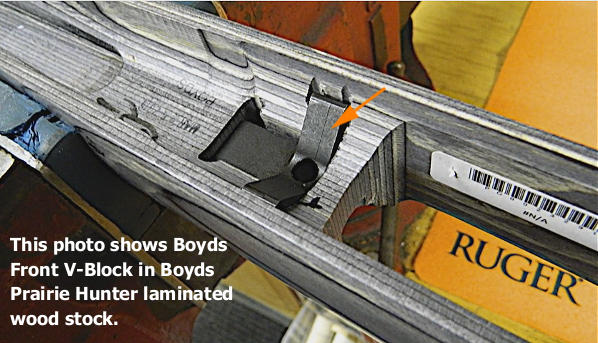
 A while back, we featured a portable reloading bench built on a Black & Decker Workmate. That proved a VERY popular do-it-yourself project so we’re showing it again, in case you missed it the first time.


