Brownells’ Do-It-Yourself (DIY) video series provides logical, step-by-step installation help for triggers, stocks, and springs. Nine separate videos cover Brownells various DIY Kits. Not sure if you’re up to the project? Just watch each video to see what’s involved. The nine DIY kits are:
This video shows Remington 700 after-market trigger installation:
In the Do-It-Yourself videos, Brownells’ Gun Techs proceed step-by-step, showing you exactly how to install the parts on your gun. Each kit also comes with complete, illustrated instructions you can take to the bench. To learn more, click the links above, or CLICK HERE to visit Brownells’ DIY Kit online page.
Share the post "Brownells Do-It-Yourself Videos Show How to Upgrade Firearms"
Brownells’ Do-It-Yourself (DIY) video series provides logical, step-by-step installation help for triggers, stocks, and springs. Nine separate videos cover Brownells various DIY Kits. Not sure if you’re up to the project? Just watch each video to see what’s involved. The nine DIY kits are:
This video shows Remington 700 after-market trigger installation:
In the Do-It-Yourself videos, Brownells’ Gun Techs proceed step-by-step, showing you exactly how to install the parts on your gun. Each kit also comes with complete, illustrated instructions you can take to the bench. To learn more, click the links above, or CLICK HERE to visit Brownells’ DIY Kit online page.
Share the post "Upgrade Your Firearms with Brownells Do-It-Yourself Videos"
Assembly Diagram: Here are all the components of the target frame. The overall maximum assembled dimensions are roughly 26″ wide, 41″ deep, and 66″ tall (the cardboard is 2 x 3 feet).
One of the easiest ways to build a portable target stand is to use PVC pipe and connectors. Utah .308 Shooter “Cheese” has created a simple yet sturdy target frame, and he’s shared his design so you can build a similar frame easily and at low cost. The components are wood furring strips, 2″-diameter PVC pipes (and connections), and a 2’x3′ sheet of cardboard. The PVC base can be glued together, or, for easier transport and storage, you can leave some or all of the connections free. “Cheese” tells us: “I didn’t glue any of it together so I could disassemble it, shove it in a bag and take it anywhere.”
“All the parts are just pushed together and not glued. That way I can break it down and carry it all in a bag. Also, if a buddy (not me!) happens to shoot the stand, I can easily replace just the damaged piece. The last 6 inches of the furring strips are wittled-down a bit so they can be pushed into the upright pipes with a little friction. The cardboard is 2 x 3 feet, and I use a staple gun to attach it to the furring strips. Then I just staple the target onto the cardboard and go at it.
Of course you can modify the dimensions as desired. I chose the black ABS pipe over white PVC simply for cost — black ABS is a little cheaper. You can also glue some or all of the parts together, it’ll just be larger for transporting. In windy conditions, the thing likes to come apart. Duct tape might work well.
For weight, I thought about filling the two end pipes with sand and gluing test caps on each of their ends. The test caps still allow the pipes to slip into the elbows.”
Add Anchors or Internal Weight for Stability
On a very windy day, a PVC stand can shake or even topple over. There are a couple solutions to this. Some people fill the PVC pipe sections with sand to add weight, or you can put short sections of Re-BAR inside the long legs. One GlockTalk forum member noted: “I built [a frame] almost identical to this. I also take four pieces of wire coathanger bent into an inverted “U” shape to anchor the frame to the ground. It is so light that wind will knock the stand over [without anchors].”
You can find photos of a similar home-made PVC target stand (with a slightly different rear section) on the Box of Truth website. This also employs a PVC tubing base with wood uprights. We’ve also seen all-PVC target stands, but we’ve found that it is easier to attach the cardboard to wood strips than to PVC pipe. Also, if the upper section is wood, you can fit different height targets, while using the same base.
Share the post "Build Your Own Target Stand with Inexpensive PVC or ABS Pipe"
Brownells’ Do-It-Yourself (DIY) video series provides logical, step-by-step installation help for triggers, stocks, and springs. Nine separate videos cover Brownells various DIY Kits. Not sure if you’re up to the project? Just watch each video to see what’s involved. The nine DIY kits are:
Birchwood-Casey brand Shoot-N-C targets are great for fun shooting. When your bullet passes through the target, a large yellow splash of color surrounds the bullet hole. This is ideal for plinking at short range without optics. Even when using a powerful scope, the color splash on the high-contrast background helps you see your hits at long range. We’ve been able to see Shoot-N-See bullet hits at 800 yards with a 42-power scope.
The only problem with official Shoot-N-See targets is the price. A 30-sheet pack of 8″ Bullseye Shoot-N-C targets costs about $22.00 plus shipping.
Well folks, put your money back in your wallet. In the YouTube Video below, SebalHP shows how to make your own color-splash targets for pennies per target. All you need are sheets of neon (day-glow) poster paper, cheap bulk packing tape, and a can of spray paint. (You can even speed up the process if you can find full size laminating sheets at an office supply store — these replace the tape.)
Making the targets is easy. Simply place the plastic tape over the neon paper. Then spray with matte black paint. Of course do your painting outdoors, in a well-ventilated area! When the paint is dry, cut target to desired size. Watch the video and see how simple it is.
Share the post "Make Your Own Shoot-N-C Type Targets for Pennies"
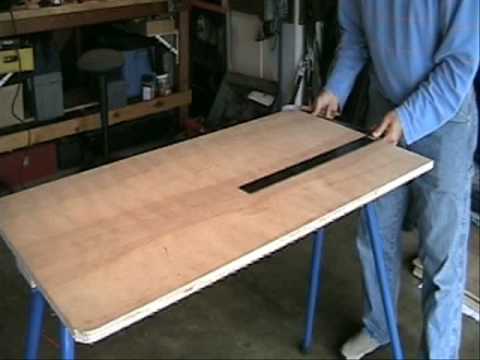
Are you looking for a stable and affordable shooting bench for your next varmint safari? Well, why not build your own? Clemdog, a talented wood-worker and avid varmint-hunter, has designed a sturdy, portable bench you can build for $75.00 in materials. The bench is made from plywood attached to Rugged Buddy sawhorse legs which fold open and engage securely with patented snap-locks. These tubular steel legs cost about $60.00 per set. Clemdog’s bench can also be built with banquet table legs. These are cheaper, but heavier (and some extra assembly work is required).
Clemdog Shows How to Build Your Own Bench
Clemdog has created a nice video that shows, step-by-step, how to build his portable shooting bench. Clemdog writes: “I am amazed at the number of shooting tables on the market today. I’ve seen them in catalogs at prices ranging from $75 to almost $500. While I’m sure it’s a pleasure to shoot from one of the high-end benches, I wouldn’t want to drop the cash on one, nor would I want to assemble and disassemble one each time I repositioned. The vast majority of the lower-end tables or benches are so rickety that it would be difficult to shoot accurately from them. If you have a saw and a drill, or can borrow one, here’s how you can make your own portable shooting and reloading bench for [about $75.00].” Just watch the video below:
Instructions for Table Fabrication
Clemdog says: “Start with a 3/4″ plywood panel, available at Home Depot or other lumber yards for about $15. Pay a few bucks more for a birch or other nice veneer, it will look fantastic if you varnish the table. The panels come 48″ x 24″. You will also need some wood glue, and about 15 #10 wood screws, about 1-1/4″ long. Check out my video on how to build the bench using a set of folding Rugged Buddy 34″ sawhorse legs. If you opt for standard banquet table legs, you will need about 20″ of scrap 2×4 and four to six 3″ lag bolts with washers and nuts to bolt the 2x4s to the table top.”
At the end of his video, Clemdog offers some sound advice: “Don’t buy a crappy bench, or spend hundreds of dollars on a bench. Build your own. It will be a fun project and it will last you for years.” For more info, visit Clemdog’s personal webpage, which also hosts a series of reloading videos.
Share the post "Build Your Own Portable Shooting Bench — Step-By-Step Video"


 One of the easiest ways to build a portable target stand is to use PVC pipe and connectors. Utah .308 Shooter “Cheese” has created a simple yet sturdy target frame, and he’s shared his design so you can build a similar frame easily and at low cost. The components are wood furring strips, 2″-diameter PVC pipes (and connections), and a 2’x3′ sheet of cardboard. The PVC base can be glued together, or, for easier transport and storage, you can leave some or all of the connections free. “Cheese” tells us: “I didn’t glue any of it together so I could disassemble it, shove it in a bag and take it anywhere.”
 Birchwood-Casey brand Shoot-N-C targets are great for fun shooting. When your bullet passes through the target, a large yellow splash of color surrounds the bullet hole. This is ideal for plinking at short range without optics. Even when using a powerful scope, the color splash on the high-contrast background helps you see your hits at long range. We’ve been able to see Shoot-N-See bullet hits at 800 yards with a 42-power scope.