When your cases become hard to extract, or you feel a stiff bolt lift when removing a cartridge, it’s probably time to full-length size your cases, and “bump” the shoulder back. We generally recommend bumping shoulders each time you reload, after the initial fire-forming. Benchrest and F-Class benchrest shooters, running relatively high pressures, typically full-length size every load cycle, bumping the shoulder .001-.003″. High Power shooters with gas guns generally full-length size every time, and may need to bump the shoulders .003″ or more to ensure reliable feeding and extraction.
Use Shims for Precise Control of Shoulder Bump
Some shooters like to set the “default” position for their full-length die to have an “ample” .003″ or .004″ shoulder bump. When they need less bump, a simple way to reduce the amount of shoulder movement is to use precision shims in .001″ (one-thousandth) increments.
Here are reports from Forum members who use the shims:
“Great product. I have my die lock ring(s) adjusted for the shortest headspace length on my multiple chambers 6BRs and 6PPCs. When needing a longer headspace, I just refer to my notes and add the appropriate shim under the lock ring. Keep it simple.” — F.D. Shuster
Mats Johansson writes: “I’ve been using [shims] since Skip Otto (of BR fame) came out with them. I set up my dies with the .006″ shim, giving me the option of bumping the shoulder a bit more when the brass gets old and hardens while still having room to adjust up for zero headspace, should I have missed the original setup by a thou or two. Hunting rounds can easily be bumped an extra .002-.003″ for positive, no-crush feeding. Being a safety-oriented cheapskate, I couldn’t live without them — they let me reload my cases a gazillion times without dangerous web-stretching. Shims are a must-have, as simple as that.” — Mats Johansson
Sinclair Die Shim Kit — Seven Shims for $14.99
Sinclair Int’l (through Brownells) offers a seven-piece set of Sizing Die Shims that let you adjust the height of your die (and thereby the amount of bump and sizing) in precise .001″ increments. Sinclair explains: “Some handloaders will set their die up to achieve maximum sizing and then progressively use Sinclair Die Shims between the lock ring and the press head to move the die away from the shellholder. Doing this allows you to leave the lock ring in the same position. These shims are available in increments of .001″ and work very well.”
Seven Shims from .003″ to .010″
Sinclair’s $14.99 Die Shim Kit (item 22400) includes seven shims in thicknesses of .003, .004, .005, .006, .007, .008, and .010. For ease of use, shim thickness is indicated by the number of notches cut in the outer edge of each shim. Even without looking you can “count” the notches by feel.
Share the post "Die Shims for FL Sizing Dies Give Precise Control of Bump"
I have seen it time and time again, shooters on the line wrestling with their rifle trying to get the bolt closed while the wind is switching. They were too focused trying to get their bolt to close and getting their rifle settled back on the bags that they missed the wind switch. Bang… Eight! The straw that broke the camel’s back for me was at the 2017 Canadian Nationals. I was paired up with a young girl and she would try really hard to close the bolt on her rifle. The majority of the time she would get it to close, but often times she could not even get the round to chamber. She was focused on her rifle the entire time rather than on the conditions. When we completed our strings, she had five rounds that did not chamber our of 15! That is way too many!. I told her she needed to think about Full-length sizing with 0.002″ shoulder bump, or Controlled Full-length Sizing like I call it. I told her not to worry about losing accuracy. I told her that I full-length size all my rounds and asked if she noticed how smooth my bolt was and noticed my score. She said yes, they were both great!
Controlled Full-length Sizing Does NOT Harm Accuracy
I have found that Controlled Full-length Sizing does NOT hurt accuracy or shorten brass life. I find that I can focus much more on the conditions when I don’t have to think about chambering a round nor extracting it. It has become second nature. After firing, I keep my head welded to the stock, I open the bolt by placing my thumb on top of stock and rotating hand upwards. I reach in and retrieve spent case, place it back in ammo box, and pick up another loaded round and put in chamber. I verify conditions and when ready, I push the bolt in and close it with my index and middle finger.
With Controlled Full-length Sizing you “bump” the shoulder around .002″ for bolt guns.* Image courtesy Sinclair International which carries a variety of Full-length dies.
Whidden Full-Length Sizing Dies by AccurateShooter.com Editor
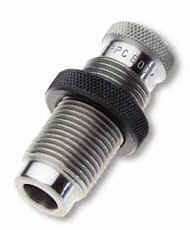
For proper full-length sizing, you want a quality die that’s a very good match to your chamber. For our project rifles we usually turn to Whidden Gunworks which offers both bushing and non-bushing FL dies. And if you want the hot new option, check out Whidden’s patent-pending, click-adjustable FL-sizing die. This gives instant, precise control over shoulder bump. It works great.
*With gas guns, such as the AR10, you may want to increase shoulder bump to .003″ or more. With some benchrest cartridges, .0015″ bump may prove optimal. But .002″ is a good starting point.
Share the post "Quit Neck-Sizing — Why You Should Full-Length Size Your Cases"
I have seen it time and time again, shooters on the line wrestling with their rifle trying to get the bolt closed while the wind is switching. They were too focused trying to get their bolt to close and getting their rifle settled back on the bags that they missed the wind switch. Bang… Eight! The straw that broke the camel’s back for me was at the 2017 Canadian Nationals. I was paired up with a young girl and she would try really hard to close the bolt on her rifle. The majority of the time she would get it to close, but often times she could not even get the round to chamber. She was focused on her rifle the entire time rather than on the conditions. When we completed our strings, she had five rounds that did not chamber our of 15! That is way too many!. I told her she needed to think about Full-length sizing with 0.002″ shoulder bump, or Controlled Full-length Sizing like I call it. I told her not to worry about losing accuracy. I told her that I full-length size all my rounds and asked if she noticed how smooth my bolt was and noticed my score. She said yes, they were both great!
Controlled Full-length Sizing Does NOT Harm Accuracy
I have found that Controlled Full-length Sizing does NOT hurt accuracy or shorten brass life. I find that I can focus much more on the conditions when I don’t have to think about chambering a round nor extracting it. It has become second nature. After firing, I keep my head welded to the stock, I open the bolt by placing my thumb on top of stock and rotating hand upwards. I reach in and retrieve spent case, place it back in ammo box, and pick up another loaded round and put in chamber. I verify conditions and when ready, I push the bolt in and close it with my index and middle finger.
With Controlled Full-length Sizing you “bump” the shoulder around .002″ for bolt guns.* Image courtesy Sinclair International which carries a variety of Full-length dies.
Whidden Full-Length Sizing Dies by AccurateShooter.com Editor
For proper Full-length sizing, you want a quality die that’s a very good match to your chamber. For our project rifles we usually turn to Whidden Gunworks which offers both bushing and non-bushing FL dies. And if you want the hot new option, check out Whidden’s patent-pending, click-adjustable FL-sizing die. This gives instant, precise control over shoulder bump. It works great.
*With gas guns, such as the AR10, you may want to increase shoulder bump to .003″ or more. With some benchrest cartridges, .0015″ bump may prove optimal. But .002″ is a good starting point.
Share the post "Quit Neck-Sizing — Why It’s Better to Full-Length Size Your Cases"
When your cases become hard to extract, or you feel a stiff bolt lift when removing a cartridge, it’s probably time to full-length size your cases, and “bump” the shoulder back. Short-range benchrest shooters, running high pressures, typically full-length size every load cycle, bumping the shoulder .001-.002″. The vast majority of mid-range and long-range F-Class shooters also full-length size every time. High Power shooters with gas guns should definitely full-length size every time, and may need to bump the shoulders .003″ or more to ensure reliable feeding and extraction.
Use Shims for Precise Control of Shoulder Bump
Some shooters like to set the “default” position for their full-length die to have an “ample” .003″ or .004″ shoulder bump. When they need less bump, a simple way to reduce the amount of shoulder movement is to use precision shims in .001″ (one-thousandth) increments. Sinclair Int’l offers a set of seven (7) shims for your standard 7/8-14 FL sizing dies for $14.99.
Sinclair explains: “Each shim is notched for easy size identification. Just set your die using one of the middle thickness shims. Adjustments can be made easily by changing shims to increase or decrease die depth without changing the stem setting. This is a great upgrade for non-micrometer adjustable dies.”
Here are reports from Forum members who use the shims:
“Great product. I have my die lock ring(s) adjusted for the shortest headspace length on my multiple chambers 6BRs and 6PPCs. When needing a longer headspace, I just refer to my notes and add the appropriate shim under the lock ring. Keep it simple.” — F.D. Shuster
Mats Johansson writes: “I’ve been using [shims] since Skip Otto (of BR fame) came out with them. I set up my dies with the .006″ shim, giving me the option of bumping the shoulder a bit more when the brass gets old and hardens while still having room to adjust up for zero headspace, should I have missed the original setup by a thou or two. Hunting rounds can easily be bumped an extra .002-.003″ for positive, no-crush feeding. Being a safety-oriented cheapskate, I couldn’t live without them — they let me reload my cases a gazillion times without dangerous web-stretching. Shims are a must-have, as simple as that.” — Mats Johansson
Brownells offers the seven-piece set of Sizing Die Shims that let you adjust the height of your die (and thereby the amount of bump and sizing) in precise .001″ increments. Sinclair explains: “Some handloaders will set their die up to achieve maximum sizing and then progressively use Sinclair Die Shims between the lock ring and the press head to move the die away from the shellholder. Doing this allows you to leave the lock ring in the same position. These shims are usually available in increments of .001″ and work very well.”
Seven Shims from .003″ to .010″
For use with 7/8-14 threaded dies, Sinclair’s $14.99 Die Shim Kit (Sinclair item 22400 or Brownells Code 749-001-325WB) includes seven shims in thicknesses of .003, .004, .005, .006, .007, .008, and .010. For ease of use, shim thickness is indicated by the number of notches cut in the outer edge of each shim. Even without looking you can “count” the notches by feel.
NOTE: These shim sets can also be use to adjust bullet seating depth for dies that lack micrometer adjustment. Use the same 7/8-14 shims with your non-micrometer seating dies.
Shims for Arbor Dies
Do you seat with an Arbor Press? No problem…
Brownells offers a $14.99 10-shim Arbor Die set for use with L.E. Wilson seating dies employed with arbor presses. Frankly we prefer micrometer-top Wilson dies, but if you have the standard Arbor dies, these shims come in handy. Order either Brownells Code 749-001-370WB (.22 to .243 caliber) or Brownells Code 749-001-326WB (.25 to .30 caliber).
Share the post "Die Shims For Full-Length Sizing Dies — EZ Die Adjusting"
Harrell’s Precision sells “semi-custom” full-length bushing dies for the PPC and 6BR chamberings. While the Harrell brothers do not cut the die to spec, they carry a large selection of dies made with slightly different internal dimensions. When you send in your fired brass, the Harrells choose a die from inventory with just the right amount of sizing (diameter reduction) at the top and bottom of the case. Given the quality, and precise fit, Harrell’s full-length dies cost $115.00 plus shipping. These are currently available for PPC family, 6mmBR, 6mm Dasher, and 6.5×47 Lapua. The folks at Harrells recommend checking if you have questions about die sizing: “Unless you know exactly which die you need, do not order online. We have 8 different sizes of each caliber. Please call (540)380-2683.”
Bump Measuring Collar
The Harrell brothers provide a nice bonus item with each full-length die — a neat, little shoulder bump measuring device as shown in the photo at right. Hornady sells a stand-alone tool that does the same job, but the Harrell’s bump collar is simpler and faster. To measure your shoulder bump, simply place the Harrell’s bump collar over the front of your deprimed case (before sizing) and measure the OAL with your calipers. Then size the case in your full-length die, replace the collar and repeat the measurement. You want to set your die so the shoulder moves back about .001″ to .0015″ for most applications. (With semi-auto guns you may want more shoulder bump, perhaps .003″.)
Share the post "Tech Tip: Measuring Shoulder “Bump” with Harrell’s Bump Collar"
L.E. Wilson Case Gage Depth Micrometer Tool Hands-On Tool Review by F-Class John
Are you looking for a better way to measure shoulder bump when sizing brass? When it comes to measuring your shoulder bump there has traditionally been just one way to do it and that’s with a set of calipers and some type of tool attached to a calipers jaw which contacts the case shoulder. While this method has worked well for decades there’s always been some inherent lack of consistency and repeatability. While a minor issue, the inability to get the exact number in completely dependent on the user’s pressure applied and the angle at which the jaws push on the brass.
Enter the L.E. Wilson Case Gage Depth Micrometer with its simple but effective use of Wilson case gauges to ensure a perfect measure of shoulder bump every time. The unit comes with the micrometer top as well as a check gauge which allows you to easily calibrate the micrometer whenever needed. On top of the micrometer unit, you’ll also need to purchase the appropriate case gauges for each of your cartridge types and then you’re ready to go. No other measuring instruments are needed (yep, no calipers are required).
Using the Wilson Depth Micrometer (perhaps a better name is Shoulder Bump Micrometer) is a straightforward process. Simply take your fired brass and insert it into the case gauge and place the micrometer top onto the primer side of the gauge. While holding the micrometer top firmly against the case gauge in one hand, slowly turn the micrometer until you feel it stop. You can back off and turn it again to verify the stop point and once you have it, look at the measurement on the micrometer. Now insert a sized piece of brass and repeat the procedure. Take note of the new number and subtract it from the fired brass number and you now have an exact amount of shoulder bump. Continue to adjust your sizing die until you have the correct amount of shoulder bump and you’re ready to size all your brass.
Watch Video to See how Shoulder-Bump Measuring Micrometer Tool Works
Guys, in this case a VIDEO is worth more than a thousand words. In may not be obvious from the photos how this system works. In fact, it is fast and easy. Drop brass into cartridge-specific case gauge, then put the Micrometer unit on top, and dial to touch. The video shows how this works.
SUMMARY — Tool is Fast, Precise, Repeatable, and Easy to Use — We Like It
The beauty of this tool is the simplicity with which it works. It uses a very accurate micrometer to simply measure how much further your brass is sitting forward inside the case gauge. After a couple uses, you’ll find that this tool is fast, accurate and incredibly repeatable. That gives you confidence that your brass is being sized properly. Ultimately, I found that using the micrometer top really became a joy as I set up a new set of dies and as I sized my brass, I could easily check the consistency as brass came off my press. If you’re looking to improve your sizing game, give the L.E. Wilson Case Gage Depth Micrometer a try. MSRP is $110.00.
Share the post "L.E. Wilson Case Gage Depth Micrometer Product Review"
When your cases become hard to extract, or you feel a stiff bolt lift when removing a cartridge, it’s probably time to full-length size your cases, and “bump” the shoulder back. Short-range benchrest shooters, running high pressures, typically full-length size every load cycle, bumping the shoulder .001-.002″. The vast majority of mid-range and long-range F-Class shooters also full-length size every time. High Power shooters with gas guns should definitely full-length size every time, and may need to bump the shoulders .003″ or more to ensure reliable feeding and extraction.
Use Shims for Precise Control of Shoulder Bump
Some shooters like to set the “default” position for their full-length die to have an “ample” .003″ or .004″ shoulder bump. When they need less bump, a simple way to reduce the amount of shoulder movement is to use precision shims in .001″ (one-thousandth) increments. Sinclair Int’l offers a set of seven (7) shims for your standard 7/8-14 FL sizing dies for $14.99.
Sinclair explains: “Each shim is notched for easy size identification. Just set your die using one of the middle thickness shims. Adjustments can be made easily by changing shims to increase or decrease die depth without changing the stem setting. This is a great upgrade for non-micrometer adjustable dies.”
Here are reports from Forum members who use the shims:
“Great product. I have my die lock ring(s) adjusted for the shortest headspace length on my multiple chambers 6BRs and 6PPCs. When needing a longer headspace, I just refer to my notes and add the appropriate shim under the lock ring. Keep it simple.” — F.D. Shuster
Mats Johansson writes: “I’ve been using [shims] since Skip Otto (of BR fame) came out with them. I set up my dies with the .006″ shim, giving me the option of bumping the shoulder a bit more when the brass gets old and hardens while still having room to adjust up for zero headspace, should I have missed the original setup by a thou or two. Hunting rounds can easily be bumped an extra .002-.003″ for positive, no-crush feeding. Being a safety-oriented cheapskate, I couldn’t live without them — they let me reload my cases a gazillion times without dangerous web-stretching. Shims are a must-have, as simple as that.” — Mats Johansson
Brownells offers the seven-piece set of Sizing Die Shims that let you adjust the height of your die (and thereby the amount of bump and sizing) in precise .001″ increments. Sinclair explains: “Some handloaders will set their die up to achieve maximum sizing and then progressively use Sinclair Die Shims between the lock ring and the press head to move the die away from the shellholder. Doing this allows you to leave the lock ring in the same position. These shims are usually available in increments of .001″ and work very well.”
Seven Shims from .003″ to .010″
For use with 7/8-14 threaded dies, Sinclair’s $14.99 Die Shim Kit (Sinclair item 22400 or Brownells Code 749-001-325WB) includes seven shims in thicknesses of .003, .004, .005, .006, .007, .008, and .010. For ease of use, shim thickness is indicated by the number of notches cut in the outer edge of each shim. Even without looking you can “count” the notches by feel.
NOTE: These shim sets can also be use to adjust bullet seating depth for dies that lack micrometer adjustment. Use the same 7/8-14 shims with your non-micrometer seating dies.
Shims for Arbor Dies
Do you seat with an Arbor Press? No problem…
Brownells offers a $14.99 10-shim Arbor Die set for use with L.E. Wilson seating dies employed with arbor presses. Frankly we prefer micrometer-top Wilson dies, but if you have the standard Arbor dies, these shims come in handy. Order either Brownells Code 749-001-370WB (.22 to .243 caliber) or Brownells Code 749-001-326WB (.25 to .30 caliber).
Share the post "Smart Reloader — Die Shims For Full-Length Sizing Dies"
Some of our readers have questioned how to set up their body dies or full-length sizing dies. Specifically, AFTER sizing, they wonder how much resistance they should feel when closing their bolt.
Forum member Preacher explains:
“A little resistance is a good, when it’s time for a big hammer it’s bad…. Keep your full-length die set up to just bump the shoulder back when they get a little too tight going into the chamber, and you’ll be good to go.”
To quantify what Preacher says, for starters, we suggest setting your body die, or full-length sizing die, to have .0015″ of “bump”. NOTE: This assumes that your die is a good match to your chamber. If your sizing or body die is too big at the base you could push the shoulder back .003″ and still have “sticky case” syndrome. Also, the .0015″ spec is for bolt guns. For AR15s you need to bump the shoulder of your cases .003″ – .005″, for enhanced reliability. For those who have never worked with a body die, bump die, or Full-length sizing die, to increase bump, you loosen lock-ring and screw the die in further (move die down relative to shell-holder). A small amount (just a few degrees) of die rotation can make a difference. To reduce bump you screw the die out (move die up). Re-set lock-ring to match changes in die up/down position.
That .0015″ is a good starting point, but some shooters prefer to refine this by feel. Forum member Chuckhunter notes: “To get a better feel, remove the firing pin from your bolt. This will give you the actual feel of the case without the resistance of the firing pin spring. I always do this when setting up my FL dies by feel. I lock the die in when there is just the very slightest resistance on the bolt and I mean very slight.” Chino69 concurs: “Remove the firing pin to get the proper feel. With no brass in the chamber, the bolt handle should drop down into its recess from the full-open position. Now insert a piece of fire-formed brass with the primer removed. The bolt handle should go to the mid-closed position, requiring an assist to cam home. Do this several times to familiarize yourself with the feel. This is how you want your dies to size your brass, to achieve minimal headspace and a nearly glove-like fit in your chamber.”
We caution that, no matter how well you have developed a “feel” for bolt-closing resistance, once you’ve worked out your die setting, you should always measure the actual amount of shoulder bump to ensure that you are not pushing the shoulder too far back. This is an important safety check. You can measure this using a comparator that attaches to your caliper jaws, or alternatively, use a sized pistol case with the primer removed. See Poor Man’s Headspace Gauge.
Share the post "TECH Tip: How to Adjust FL Dies for Correct Shoulder Bump"
Sinclair International has created a series of helpful articles on rifle cartridge reloading. Today’s feature lists ten basic steps for precision hand-loading, with links to longer, detailed Sinclair Int’l technical articles providing more complete information. There’s a lot of helpful info here guys, if you click all the links to access the ten “long form” articles.
Tying It All Together: 10 Steps To Precision Handloads
Feature based on article by Roy Hill, Brownells/Sinclair Copywriter
Sinclair International offers a series of detailed articles on hand-loading precision rifle ammunition. The articles are included in Sinclair’s GunTech Articles Archive, but sorting through the index to find each article takes time. To help you access all these articles quickly, here’s a handy summary of ten key topics, with links to longer articles covering each subject in detail.
Part 1: The first step in making high-quality handloads is to carefully choose the best brass for your application. You need to know how to identify the different types of brass and how to choose the best kind for the ammo you want to load. CLICK HERE for Part 1.
Part 2: Even high-quality brass can have burrs around the flash hole that can interfere with the primer flame and cause inconsistent ignition – which can lead to shot groups opening up. Flash hole deburring is a critical step in making sure primers ignite powder consistently. CLICK HERE for Part 2.
Part 3: The next step is to make sure the primer pockets are square and uniform. Like flash hole deburring, primer pocket uniforming may reduce variations in primer ignition by ensuring more consistent primer seating. CLICK HERE for Part 3.
Part 4: Making sure all your cases are precisely the same length is crucial, especially when you use cases that have been fired before. Case trimming is the way to get there. CLICK HERE for Part 4.
Part 5: After trimming, cases still have to be resized. In order for them to work through the resizing die, they have to be lubricated. The case lube method you choose is crucial to making precision handloads. CLICK HERE for Part 5.
Part 6: Now it’s time to choose the dies that will resize your cases. There are several important options to consider in selecting the right sizing dies. CLICK HERE for Part 6.
Part 7: Wait! You’re not quite ready to start sizing yet. There’s yet more to consider before you start cranking cases through the press. Learn more about setting up and adjusting your sizing dies. CLICK HERE for Part 7.
Part 8: Once the cases are completely prepped, it’s time to start putting fresh components back into them. We start off by seating primers. CLICK HERE for Part 8.
Part 9: After the primers are seated, it’s time to drop in the powder. There are several tools that will help you handle powder for precision handloads. CLICK HERE for Part 9.
Part 10: The final step in the process is carefully seating the bullet to just the right depth. And then… you’re ready to try your loads at the range. CLICK HERE for Part 10.
Share the post "Precision Handloading — TEN Important Steps — Start to Finish"
by Sierra Bullets Ballistic Technician Paul Box
One thing that plays a major role in building an accuracy load is neck tension. I think a lot of reloaders pretty much take this for granted and don’t give that enough thought.
So, how much neck tension is enough?
Thru the years and shooting both a wide variety of calibers and burn rates of powder, I’ve had the best accuracy overall with .002″ of neck tension. Naturally you will run into a rifle now and then that will do its best with something different like .001″ or even .003″, but .002″ has worked very well for me. So how do we control the neck tension? Let’s take a look at that.
First of all, if you’re running a standard sizing die with an expander ball, just pull your decapping rod assembly out of your die and measure the expander ball. What I prefer is to have an expander ball that [can give] you .002″ in neck tension [meaning the inside neck diameter is about .002″ smaller than the bullet diameter after passing the expander through]. If you want to take the expander ball down in diameter, just chuck up your decapping rod assembly in a drill and turn it down with some emery cloth. When you have the diameter you need, polish it with three ought or four ought steel wool. This will give it a mirror finish and less drag coming through your case neck after sizing.
Tips for Dies With Interchangeable Neck Bushings
If you’re using a bushing die, I measure across the neck of eight or ten loaded rounds, then take an average on these and go .003″ under that measurement. There are other methods to determine bushing size, but this system has worked well for me.
Proper Annealing Can Deliver More Uniform Neck Tension
Another thing I want to mention is annealing. When brass is the correct softness, it will take a “set” coming out of the sizing die far better than brass that has become to hard. When brass has been work hardened to a point, it will be more springy when it comes out of a sizing die and neck tension will vary. Have you ever noticed how some bullets seated harder than others? That is why.
Paying closer attention to neck tension will give you both better accuracy and more consistent groups.
Share the post "Reloading Basics: Neck Tension, Expander Balls, and Bushings"
Each Wednesday, the U.S. Army Marksmanship Unit publishes a reloading “how-to” article on the USAMU Facebook page. A while back, the USAMU’s reloading gurus looked at the subject of case lubrication. Tasked with producing thousands of rounds of ammo for team members, the USAMU’s reloading staff has developed very efficient procedures for lubricating large quantities of cases. This article reveals the USAMU’s clever “big-batch” lube methods. For other helpful hand-loading tips, visit the USAMU Facebook page on upcoming Wednesdays.
Rapid, High-Volume Case Lubrication
Today’s topic covers methods for quickly applying spray lube to cartridge cases prior to sizing. A typical order for this shop may be 25,000 rounds, so [speeding up] the lubrication process can be a real time-saver. While your ammunition lots probably aren’t this large, the efficient methods discussed here may help save a considerable amount of time over your handloading career. Our case lubrication rates range from 1500-1600 cases per hour, to 2400-2500 cases per hour, depending on caliber.
This shop uses virgin brass, whereas most home handloaders use fired brass, which necessitates some small changes at times. These will be discussed as they arise. Begin with fired brass that has been tumbled clean.
Ensure as much tumbling media as possible is removed from the brass, as when it gets into a size die, it can dent cases significantly. This is a good time to round out dents in the case mouths using a tapered tool to prevent damage from the decapping stem.
First, dump the clean cases into a large box or reloading bin. Shake the bin back and forth so that many cases are oriented with the mouths up. Next, pick up as many cases as is convenient with the mouths “up”, from natural clusters of correctly-oriented cases. With 7.62mm-size cases, this is usually 3-4, and with 5.56mm cases, this can be up to 8-10. Place the cases into the rack slots, mouth-up. Doing this in groups rather than singly saves considerable time. Once these clusters have been depleted, it will be time to re-shake the bin to orient more cases “up.”.
This photo shows a case lubrication rack made by a USAMU staffer.
Naturally, adjust the spacing to best fit the calibers you reload. We have found this size … convenient for handling through the various phases of case lubrication/transfer to progressive case feeders for processing. Note that the 1/2-inch angle does not cover much of the critical case area at the base, just forward of the extractor groove, where most re-sizing force will be exerted. As the USAMU uses virgin brass, less lubrication is required for our brass than would be needed for Full Length (FL) sizing of previously-fired brass.
NOTE: The amount applied using our rack is easily enough for our purpose. If using fired brass, be sure to adequately lube this base area to avoid having cases stick in the full-length sizing die.
Using a spray lube, coat the cases adequately, but not excessively, from all sides. Be sure to get some lube into the case mouths/necks, in order to reduce expander ball drag and case stretching/headspace changes. The spray lube this shop uses does not harm primers or powder, and does not require tumbling to remove after lubing.*
Take a close look at the photo above. The USAMU shop uses a common kitchen turntable, which allows the rack to be rotated easily. We place this in a custom-made box which prevents over-spray on to floors and walls.
Angled Box Method for Smaller Cases to be Neck-Sized
A refinement of the above method which especially speeds processing of 5.56x45mm cases is as follows. A small cardboard box which holds about 100 cases is fitted with an angled “floor” secured by tape. With the smaller 5.56mm cases, usually about 8-10 cases per handful can be picked up, already correctly-oriented, and placed into the box together. This prevents having to place them into the rack slots, saving time.
HOWEVER, note that this does not allow nearly as much lube access to the case bodies as does the rack. For our purposes — neck-sizing and setting neck tension on new brass, this works well. If using this procedure with fired brass, take steps to ensure adequate lube to prevent stuck cases.
As always, we hope this will help our fellow handloaders. Good luck, and good shooting!
*A two-part test performed here involved spraying primed cases heavily, while getting more lube into the case mouth/body than even a careless handloader would likely apply. The second part of the test involved literally spraying considerable quantities of the lube directly into the cases, drenching the primers. After a several-day wait to allow the lube to penetrate the primers, they were then fired in a test barrel. All fired normally; no unusual reports were noted. This bolstered confidence that normal amounts of the lube would not adversely affect our ammunition, and we have been pleased with the results over several years.
Share the post "Slick Tricks: Techniques and Tools for Big-Batch Case Lubrication"
In this video, gunsmith Alex Wheeler explains how to ensure that your full-length sizing dies fit your brass properly. With many cartridge types, it’s not unusual for factory dies to be slightly large in the bottom section. When the diameter of a FL-sizing die is too large near the base, this can leave the bottom section of fired cases “unsized”, with the result that you can have extraction issues and stiff bolt lift, or what Alex calls “clickers”. At the same time, it’s not unusual for dies to over-size fired cases at the shoulder (i.e. reduce the shoulder diameter by .004″ or more).
We strongly recommend that all hand-loaders watch this video, particularly if you load cases 6+ times with relatively high-pressure loads.
Alex explains that a key dimension is the diameter of a fired case 0.200″ above the case head. If your die does not size your fired cases at this point, you should get a FL die that does. This could be a custom die ground to fit your chamber, or it could be a “small-base” die specifically designed to “hit” the bottom section of the case. Alex also notes that some FL dies have an inside chamfer at the mouth of the die, right at the very bottom. (See video at 3:55). This can leave the section of the case right above the extractor groove unsized, which can also lead to “clickers” and stiff bolt lift.
Paint Your Brass to Find Problem Areas
If you are having stiff bolt lift or extraction issues, Alex explains that you can “paint” your brass with magic marker (or dye-chem), and then place the case in your chamber. On the “hot spots” where the case contacts the chamber wall, the marking will rub off, allowing the brass metal to shine through in the problem area(s). This will illustrate where you need better sizing from your die.
“You can ink up the case with some magic marker or dye-chem. If you are getting clickers, go ahead and mark up the case and chamber it and see where it’s wearing. This will help you diagnose [whether the problem] is coming from the base, is it coming maybe from a score in the chamber… it can even happen at the shoulder although that’s pretty rare. Usually the dies size enough at that point.”
Did you find this video helpful? View more informative Tech Tip Videos on WheelerAccuracy.com.
Video Tip from Boyd Allen. We welcome reader submissions.
Share the post "Full-Length Sizing Die Fit — Diagnosing Stiff Bolt Lift Problems"


 Shims for Arbor Dies
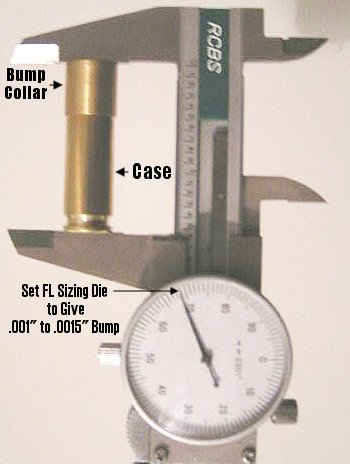

 Bump Measuring Collar


 To quantify what Preacher says, for starters, we suggest setting your body die, or full-length sizing die, to have .0015″ of “bump”. NOTE: This assumes that your die is a good match to your chamber. If your sizing or body die is too big at the base you could push the shoulder back .003″ and still have “sticky case” syndrome. Also, the .0015″ spec is for bolt guns. For AR15s you need to bump the shoulder of your cases .003″ – .005″, for enhanced reliability. For those who have never worked with a body die, bump die, or Full-length sizing die, to increase bump, you loosen lock-ring and screw the die in further (move die down relative to shell-holder). A small amount (just a few degrees) of die rotation can make a difference. To reduce bump you screw the die out (move die up). Re-set lock-ring to match changes in die up/down position.


