Do you occasionally get completely unexplained flyers, or have a shot land straight down at 6 O’Clock, right below your point of aim? That could be caused by poor or inconsistent trigger technique. How you pull the trigger can and does affect your accuracy.
Many gun enthusiasts start with pistols. When they later start shooting rifles they may carry over some not-so-good practices acquired from shooting handguns with heavy 4 to 6-pound trigger pulls. You may want to “re-learn” your trigger techniques to get better rifle results.
Shooting Sports USA has a good article on trigger technique that offers many useful tips. That article also has many helpful illustrations, including the one shown above. Another illustration shows different types of trigger shoes (straight vs. curved) and explains how each makes a difference: “With a lightly curved trigger, the shooter’s finger can contact the trigger either high or low according to preference. Higher contact will increase the resistance.” READ ARTICLE HERE.
The article analyzes common errors, such as pulling the trigger with the very tip of the finger rather than the pad of the index finger: “Using the tip of the finger can lead to lateral pressure on the trigger, which throws off the shot.”
The article also explains that you should check your trigger regularly to make sure it is functioning properly and is not out of adjustment: “Just like any other moving part, the trigger can suffer from wear. In such a precise mechanism, tiny amounts of wear can cause major problems.”
The ergonomics of the Eliseo Tubegun allow a nice, straight trigger pull.
Trigger Tips
Six Suggestions for Making your Trigger Control More Consistent.
1. If your triggers are adjustable, set the pull weight appropriate to the discipline. For a hunting rifle, you don’t want an ultra-light trigger pull. For High Power, you may want a two-stage pull, while on a Benchrest rifle you may prefer a very light trigger.
2. If you have a two-stage trigger, experiment with different combinations of First Stage and Second Stage.
3. Have a friend watch you as you pull the trigger, and maybe even take a close-up video as you pull the trigger. This can reveal a variety of flaws.
4. Practice dry-firing to see if flaws in trigger technique are causing gun movement.
5. As an experiment, try pulling the trigger with your middle finger. Ergonomically, the middle finger has a more straight alignment with the tendons in your hand. This exercise can help you identify alignment issues with your index finger.
6. For stocks with adjustable Length of Pull you may want to set the LOP differently for bench shooting vs. prone or F-Class shooting.
When Only the Best Will Do…
German-made Bix’N Andy triggers, available from BulletCentral.com, are among the very best you can buy. Available in both single-stage and two-stage, Bix’N Andy triggers are extremely precise, repeatable and smooth. The unique internal, friction-reducing roller ball system allows for extremely low reset force, yielding an ultra-crisp let-off. Bix’N Andy triggers can be fitted with a variety of trigger shoes according to shooter preference.
Share the post "Improve Trigger Technique for Better Accuracy & Higher Scores"
Jewell triggers are still the most-used triggers on competition benchrest and F-Class rifles and they are also popular for hunting, varmint, and tactical rifles (with or without safeties). While a Jewell trigger can work for years with minimal maintenance, if the trigger becomes gunked up, it may be necessary to disassemble the trigger for a thorough cleaning. Our friends Ed and Steve, aka the 6.5 Guys, have produced a helpful video that shows how to disassemble and then reassemble a Jewell trigger.
Why You May Need to Disassemble Your Jewell Trigger — the 6.5 Guys
Jewell triggers are a popular choice in the sport of long range precision shooting, and like everything else require regular cleaning and maintenance. In most cases they can be cleaned with charcoal lighter fluid or dropped into an ultrasonic cleaner. Should the situation require, they can be completely disassembled according to the Jewell Trigger Manual.
We ran into a situation where we had to dissemble a trigger due to the entrapment of some sticky dirt that couldn’t be removed with an ultrasonic cleaner. Our first step was to find some step-by-step instructions but we couldn’t find anything.
Recognizing that other shooters might be in the same situation we produced a step-by-step guide and video, published in full on 65Guys.com. These instructions will work with a left- or right-handed trigger. In our case we worked with a left-handed BR model trigger with safety and bolt release.
Step-by-Step Instructions are provided on 65Guys.com website. We recommend you read all the instructions carefully before you even think about disassembling your trigger. This video explains the process so you can get a sense of what is involved.
Share the post "Jewell Trigger Tips — Take-Down, Cleaning, and Re-Assembly"
Do you occasionally get completely unexplained flyers, or have a shot land straight down at 6 O’Clock, right below your point of aim? That could be caused by poor or inconsistent trigger technique. How you pull the trigger can and does affect your accuracy.
Many gun enthusiasts start with pistols. When they later start shooting rifles they may carry over some not-so-good practices acquired from shooting handguns with heavy 4 to 6-pound trigger pulls. You may want to “re-learn” your trigger techniques to get better rifle results.
Shooting Sports USA has a good article on trigger technique that offers many useful tips. That article also has many helpful illustrations, including the one shown above. Another illustration shows different types of trigger shoes (straight vs. curved) and explains how each makes a difference: “With a lightly curved trigger, the shooter’s finger can contact the trigger either high or low according to preference. Higher contact will increase the resistance.” READ ARTICLE HERE.
The article analyzes common errors, such as pulling the trigger with the very tip of the finger rather than the pad of the index finger: “Using the tip of the finger can lead to lateral pressure on the trigger, which throws off the shot.”
The article also explains that you should check your trigger regularly to make sure it is functioning properly and is not out of adjustment: “Just like any other moving part, the trigger can suffer from wear. In such a precise mechanism, tiny amounts of wear can cause major problems.”
The ergonomics of the Eliseo Tubegun allow a nice, straight trigger pull.
Trigger Tips
Six Suggestions for Making your Trigger Control More Consistent.
1. If your triggers are adjustable, set the pull weight appropriate to the discipline. For a hunting rifle, you don’t want an ultra-light trigger pull. For High Power, you may want a two-stage pull, while on a Benchrest rifle you may prefer a very light trigger.
2. If you have a two-stage trigger, experiment with different combinations of First Stage and Second Stage.
3. Have a friend watch you as you pull the trigger, and maybe even take a close-up video as you pull the trigger. This can reveal a variety of flaws.
4. Practice dry-firing to see if flaws in trigger technique are causing gun movement.
5. As an experiment, try pulling the trigger with your middle finger. Ergonomically, the middle finger has a more straight alignment with the tendons in your hand. This exercise can help you identify alignment issues with your index finger.
6. For stocks with adjustable Length of Pull you may want to set the LOP differently for bench shooting vs. prone or F-Class shooting.
When Only the Best Will Do…
German-made Bix’N Andy triggers, available from BulletCentral.com, are among the very best you can buy. Available in both single-stage and two-stage, Bix’N Andy triggers are extremely precise, repeatable and smooth. The unique internal, friction-reducing roller ball system allows for extremely low reset force, yielding an ultra-crisp let-off. Bix’N Andy triggers can be fitted with a variety of trigger shoes according to shooter preference.
Share the post "Trigger Technique — Become a Better Trigger-Puller"
Do you occasionally get completely unexplained flyers, or have a shot land straight down at 6 O’Clock, right below your point of aim? That could be caused by poor or inconsistent trigger technique. How you pull the trigger can and does affect your accuracy.
Many gun enthusiasts start with pistols. When they later start shooting rifles they may carry over some not-so-good practices acquired from shooting handguns with heavy 4 to 6-pound trigger pulls. You may want to “re-learn” your trigger techniques to get better rifle results.
Shooting Sports USA has a good article on trigger technique that offers many useful tips. That article also has many helpful illustrations, including the one shown above. Another illustration shows different types of trigger shoes (straight vs. curved) and explains how each makes a difference: “With a lightly curved trigger, the shooter’s finger can contact the trigger either high or low according to preference. Higher contact will increase the resistance.” READ ARTICLE HERE.
The article analyzes common errors, such as pulling the trigger with the very tip of the finger rather than the pad of the index finger: “Using the tip of the finger can lead to lateral pressure on the trigger, which throws off the shot.”
The article also explains that you should check your trigger regularly to make sure it is functioning properly and is not out of adjustment: “Just like any other moving part, the trigger can suffer from wear. In such a precise mechanism, tiny amounts of wear can cause major problems.”
The ergonomics of the Eliseo Tubegun allow a nice, straight trigger pull.
Trigger Tips
Six Suggestions for Making your Trigger Control More Consistent.
1. If your triggers are adjustable, set the pull weight appropriate to the discipline. For a hunting rifle, you don’t want an ultra-light trigger pull. For High Power, you may want a two-stage pull, while on a Benchrest rifle you may prefer a very light trigger.
2. If you have a two-stage trigger, experiment with different combinations of First Stage and Second Stage.
3. Have a friend watch you as you pull the trigger, and maybe even take a close-up video as you pull the trigger. This can reveal a variety of flaws.
4. Practice dry-firing to see if flaws in trigger technique are causing gun movement.
5. As an experiment, try pulling the trigger with your middle finger. Ergonomically, the middle finger has a more straight alignment with the tendons in your hand. This exercise can help you identify alignment issues with your index finger.
6. For stocks with adjustable Length of Pull you may want to set the LOP differently for bench shooting vs. prone or F-Class shooting.
When Only the Best Will Do…
German-made Bix’N Andy triggers, available from BulletCentral.com, are among the very best you can buy. Available in both single-stage and two-stage, Bix’N Andy triggers are extremely precise, repeatable and smooth. The unique internal, friction-reducing roller ball system allows for extremely low reset force, yielding an ultra-crisp let-off. Bix’N Andy triggers can be fitted with a variety of trigger shoes according to shooter preference.
Share the post "Improve Your Trigger Technique for Better Scores and Accuracy"
.243 Ackley Improved for Long-Range Varminting and Benchrest Competition
Whenever Matt Bianchini brings his bright yellow .243 Ackley to the firing line, heads turn. This is one truly handsome rig–as good-looking as it is accurate. Built to smoke varmints at long-range as well as compete in 1000-yard benchrest matches, this rifle is proof that competition improves the breed. Fitted with a Farley action, Jewell trigger, Leupold LRT scope, and Lilja or Krieger barrel, the Yellow Ackley is a “no compromise” match rifle that can run with the big dogs in 1K Benchrest competition. And with the Ackley’s ability to toss 106gr Clinch Rivers at 3350 fps, this is one flat-shooting, hard-hitting varmint rifle.
Ultra-Fast, Ultra-Smooth Farley Action…and One Wicked Paint Job
The heart of Matt’s rifle is a Farley action. Farleys have found favor with Benchrest competitors, because the bolt can be worked so fast. And the Farley is as smooth as it is speedy. The difference is quite noticeable if you compare it to a blue-printed Rem 700, or even a recent Stolle Panda. Farleys were true customs, built one at a time by the Farley family in Oklahoma. Unlike a BAT action which is machined from billet steel, a Farley starts with a stainless investment casting, much like Ruger pistol frames. It uses a cone bolt for smooth, yet solid lock-up.
One of the unique features of the Farley is the ejector–it can be switched on or off, depending on the shooter’s preference. So, if you’re load testing some hot rounds, you can turn the ejector off. In a match you can turn the ejector “on” to function normally. Matt is now a confirmed Farley fanatic. He tells us: “I’ve got quite a few other very nice actions, including Nesikas. But none of them are as slick as that Farley. When you work the bolt it feels like it’s on ball-bearings.”
Matt’s Screamin’ Yellow Ackley–The Need for Speed
.243 Ackley Improved Speed Demon
In a long-range varmint rifle, speed kills. Ultra-high velocities will deliver flatter trajectories and more explosive hits on critters. That’s where the .243 Ackley Improved really shines.
Matt has explored the upper limits of .243 Ackley Improved (AI) performance with his yellow long-range rig, fitted with a 29″ Lilja 3-groove, 1:8″-twist barrel. Using a stout load of Alliant Reloder 25, Matt’s “Screamin’ Yellow Ackley” has topped 3340 fps with Clinch River 106s. That’s serious speed for heavy 6mm bullets. This shows a well-built .243 AI leaves Dashers and 6XCs in the dust when it comes to pure velocity.
Ultimate Evolution of the .243 Winchester
Matt’s show-stopping rifle is a .243 Ackley Improved (40-degree shoulder, .271″ neck), chambered with a Manson reamer. On top of the stainless Farley “S” action, in Farley 30mm rings, sits a Leupold LRT (1/16 MOA dot) boosted to 18X-40X by Premier Reticles. Matt has SIX barrels for the gun, three Lilja 3-grooves, a couple Kriegers, and a Shilen.
Matt’s gun currently sports an 8-twist 29″ Lilja 3-groove HV taper that Matt says cleans up like a dream. The stock is a Shehane ST-1000 Tracker made in fiberglass by McMillan, with a BAT trigger guard and Shehane polished billet aluminum buttplate. Prior to final finishing, Matt worked over the flats and some of the angles. That’s why the facets are so well-defined on this rifle compared to some ‘glass Trackers you may have seen. The gun was chambered by Dave Bruno of Cheswick, PA.
Matt bedded the stock and applied the stunning Sikken “Viper” yellow paint job himself. That flawless, smooth-as-glass Screamin’ Yellow finish is no ordinary paint-job, but then Matt Bianchini is no ordinary do-it-yourself painter. His family runs an automotive body-shop, so he had access to premium paints and a quarter-million-dollar spray booth with all the latest technology. Still, Matt spent many hours on this stock to get everything right, trying a couple colors before he settled on a Sikken automotive “Viper Race Yellow” formulated for the Dodge Viper sports car. After careful prep work, Matt sprayed two coats of Viper Yellow, and then added three coats of high-grade automotive clear, which was then baked-on in a heat chamber. Matt also painted the Sinclair front rest to match the stock, and even polished the surfaces of the Hoehn windage top. A lot of effort, Matt told us, was required to achieve the results you see here.
3300 fps for 1000 Yards
Though Matt’s Ackley has harvested its share of varmints, the gun was built with 1000-yard benchrest competition in mind. At left is the firing line at Thunder Valley, Ohio. Yep those targets (upper right) are 1000 yards away. Now you know why Matt has a 40-power scope.
The Yellow Ackley weighs just under 17 pounds to meet IBS and NBRSA “Light Gun” weight limits. While Matt says his bullets don’t “go to sleep” for a couple hundred yards, this gun can still shoot 1/4″ groups at 100 yards and hold that accuracy much, much farther. Matt reports, “my best-ever group was five shots in .397″ at 400 yards. Yep, I got lucky with the conditions, but this is a very accurate rifle.”
.243 Ackley Improved–More Velocity, Less Case Stretch
by Bob Blaine, Sinclair International
Parker Ackley reluctantly developed the .243 Ackley Improved (“AI”). Ackley finally gave in to his customers’ requests to develop the .243 AI. He had always felt that the .243 Winchester was already an improved configuration, but he did say that the best thing to be gained by improving the .243 Winchester was to substantially reduce the case-stretching problems. The .243 Winchester parent case has always stretched brass, almost as bad as the Swift. Even though you get more velocity with the improved .243, I’ve also found that the improved version gives a bit more throat life than the parent case does.
The .243 AI delivers more velocity by virtue of enhanced case capacity–roughly five grains more H20 capacity than a standard .243 Winchester. The .243 AI has a water capacity of approximately 57 to 58 grains, compared to 52-53 grains for the standard .243 Winchester.
Loading for Long-Range
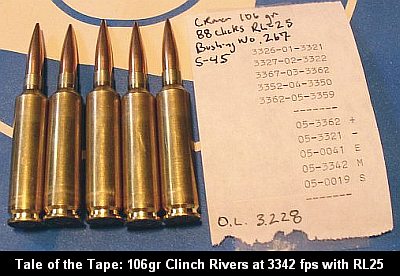
For long-range shooting, Matt loads 106gr Clinch Rivers with 47.5gr of Alliant Reloder 25 for his Krieger barrels, a little more powder with the Lilja 3-grooves. The Lilja load runs 3342 fps, with a 3.228″ OAL. Cases are neck-turned Lapua .243 Winchester. He uses Wilson inline seater and Wilson eck-sizer dies (.267″ bushing), and a custom, reamer-cut FL sizing die.
Not Just for BR, This Gun Can Hunt
While Matt has a big stable of varmint rifles, the Yellow Ackley has seen plenty of duty in the ‘Hog fields. Matt is from a farming family and he can shoot practically right out his back door (see top photo at the farm). He has nailed some big ground-hogs at 800 yards and beyond. The .243 AI does kick a bit compared to other varmint cartridges, but even with 105-106gr bullets, it’s not bad. He has considered adding a muzzle brake at some point to one of the barrels, just so he can see impacts better.
Screamin’ Yellow Dasher?
Matt originally thought of building the gun up as a 6BR or a 6BR Improved. He has a Manson reamer similar to a 6mm Dasher, with a 40-degree shoulder and .008″ body taper. He actually chambered a couple barrels with that 6BR Improved reamer, but he hasn’t shot them yet. He was so pleased with how the gun performed in .243 AI, that he saw no reason to change. And it may be a while before he slaps a Dasher-chambered barrel on the rig: “I really like the way it shoots as a .243 AI. I’m so impressed with it that I don’t want to mess with anything. And I don’t think I’ll be running out of Ackley barrels anytime soon.”
Since the .243 Win is such a popular cartridge, all the major die-makers offer reloading dies. It’s hard to go wrong with a Redding Type ‘S’ Full-length bushing die–item 77114 for the standard .243 Win and item 77420 for .243 AI. Whidden Gunworks also makes great .243 Win sizing dies (and custom .243 Win AI dies on request). These will both resize the case (and bump the shoulder) as necessary, and allow you to adjust neck tension with bushings. Alternatively, you can go with a body die, and a separate neck bushing die.
If you load primarily one brand of bullets, another slick set-up is to buy a Forster or Whidden full-length, non-bushing .243 Win sizing die, and then have Forster or Whidden hone the neck for your desired amount of tension. This elegant one-pass sizing solution produces very straight rounds with low run-out.
For bullet seating, both the Redding Competition Seater (item 55114) and the Forster Ultra-Seater (item U00034) work great for the standard .243 Win case. If you shoot a .243 Ackley, Redding’s .243 AI Comp Seater (item 55420) costs quite a bit more than the standard version Forster doesn’t list a .243 AI seater in their catalog. However, you can just run your chambering reamer into the inner sleeve of either seating die to fit the .243 Ackley Improved case.
If you want the “Cadillac” of production seater dies for the .243 Win, order the Wilson Stainless Micrometer seater (item 50-1114S) from Sinclair International. Costing only a few dollars more than a Redding Comp seater, this die is a joy to use, providing very positive control over bullet seating depth. When used with a quality arbor press, the Wilson offers unrivaled “feel” for bullet-seating force. This can help you monitor neck tension, one of the most critical factors in maintaining low ES and SD for long-range accuracy.
Share the post "Sunday GunDay: Matt’s Screamin’ Yellow .243 Ackley Improved"
Jewell triggers are still the most-used triggers on competition benchrest and F-Class rifles and they are also popular for hunting, varmint, and tactical rifles (with or without safeties). While a Jewell trigger can work for years with minimal maintenance, if the trigger becomes gunked up, it may be necessary to disassemble the trigger for a thorough cleaning. Our friends Ed and Steve, aka the 6.5 Guys, have produced a helpful video that shows how to disassemble and then reassemble a Jewell trigger.
Why You May Need to Disassemble Your Jewell Trigger — the 6.5 Guys
Jewell triggers are a popular choice in the sport of long range precision shooting, and like everything else require regular cleaning and maintenance. In most cases they can be cleaned with charcoal lighter fluid or dropped into an ultrasonic cleaner. Should the situation require, they can be completely disassembled according to the Jewell Trigger Manual.
We ran into a situation where we had to dissemble a trigger due to the entrapment of some sticky dirt that couldn’t be removed with an ultrasonic cleaner. Our first step was to find some step-by-step instructions but we couldn’t find anything.
Recognizing that other shooters might be in the same situation we produced a step-by-step guide and video, published in full on 65Guys.com. These instructions will work with a left- or right-handed trigger. In our case we worked with a left-handed BR model trigger with safety and bolt release.
Step-by-Step Instructions are provided on 65Guys.com website. We recommend you read all the instructions carefully before you even think about disassembling your trigger. This video explains the process so you can get a sense of what is involved.
Share the post "How to Disassemble, Clean, and Re-Assemble Jewell Triggers"
In the video below, Forum member (and F-Class ace) Erik Cortina shows how to install a Jewell Benchrest trigger into a Kelbly F-Class Panda action. You could follow the same simple procedure to install a Jewell in a standard Panda action. Kelbly’s sells both standard and long versions of the F-Class Panda action. Both versions feature integral recoil lugs in the front.
To see more detail in this “how-to” video, you can zoom it to full-screen size. Simply click the full-screen icon (4-cornered frame) just to the right of the YouTube logo in the lower right.
Share the post "How-To Feature: Jewell Trigger Installed in Kelbly Panda Action"
Spring varmint season is just around the corner. So here’s a very accurate Half-Mile ‘Hog rifle, that can drill a groundhog at long range. While just about any cartridge from a 22 magnum on up will do the job on a groundhog at close range, when you want to “reach out and touch” your prey at very long distance, it takes a case capable of tossing a heavier, wind-bucking projectile at ultra-high speeds. This week we feature a 6mm Remington Ackley Improved (6mm AI) belonging to our friend John Seibel, who ran the Varmints for Forum website for many years. John’s handsome BAT-actioned rifle sends the 87gr V-Max at a blistering 3675 fps. With its 1/4-MOA accuracy and flat-shooting ballistics, this gun is a varmint’s worst nightmare, a rig that regularly nails groundhogs at a half-mile (880 yards) and beyond.
Quarter-MOA Accuracy For Long-Distance Varminting
GunDay Report by John Seibel
John reports: “So far this gun has been an awesome long-distance varmint rig, with enough velocity to smack those critters hard at 800 yards and beyond. I have some more testing to do, but it seems that the 87gr V-Max (molyed) pushed by 52 grains of N160 or 51.5 grains of RL-19 shoots very well indeed. Velocity runs around 3675 fps. I shot consistent 1″ groups at 500 yards with both of these loads. Warning: These are max loads that work in my rifle, so start at least 10% lower and work up.
My fire-forming procedure is just jam and shoot. I start with a powder (such as H414) that works for the parent case, fire a few cases as I work up the load to where I get a well-formed case, then shoot them at varmints. Then I work my load up with the newly-formed cases over a chrono. If a load looks good at 100 yards, I will go straight for 200 yards. I’ve seen that some loads which grouped well at 100 won’t shoot well at 200. If it is consistent at 200, then I’ll shoot it a steel plate at 500 yards. Then the truth will be told.
Man I love that BAT action! I have tried some Berger 88gr Lo-Drag bullets as well. They have the same BC as the V-Maxs but offer excellent accuracy. The action is BAT’s Model B round action configured Right Bolt, Left Port, with a fluted .308-faced bolt. The port is 3.0 inches wide — perfect for the 6mm Rem Improved cartridge’s OAL. I use a NightForce 8-32x56mm NXS scope mounted to BAT’s 20-MOA aluminum Weaver-style base. I use Burris Signature Zee rings because they are self-aligning and easy on scope tubes, plus you have the option of adding more MOA if needed.
Krieger with Harrell Brake
The barrel is a stainless Krieger 1:12″ twist Heavy Varmint contour, finished at 26″. I installed a Harrell’s muzzle brake because I hate recoil and I like to be able to spot my hits when target shooting and hunting–especially hunting.
When hunting I am usually by myself so when I eyeball a varmint I want to see my shot flatten him … and I hardly ever miss (heh-heh). Make sure you have your earplugs in though — that muzzle brake is loud!
Easy-Steering Thumbhole Varminter
The stock is Richard’s Custom Rifles Model 005 Thumbhole Varminter. This is a big stock that rides the sand bags very well. Took me a while to get used to this stock as I had never shot a thumbhole before. It is very comfortable and easy to control when you are shooting a moving target. In fact, my first kill with this rifle was a coyote at a little over 200 yards, she was moving along at a slow clip and I had to give her the ole’ Texas heart shot before she disappeared over a hill! (It’s pretty rare for me to shoot moving varmints though — at long-range, I want my cross-hairs steady on the target.)
Regarding the stock selection, I like Richard Franklin’s stocks because they are well-suited to my kind of shooting. I prefer a stock that is flat most of the way back towards the action because when I’m shooting out of my truck window it has to balance around mid-point. Also his stocks seem to track very well on the bench. I guess the stocks I like the most are his Model 001 and Model 008 F-Class. [Editor’s note: John often shoots from the driver’s seat of his truck because he is partially paralyzed. He also has a hoist in his truck bed for his wheelchair. Even with his mobility challenges, John tags more varmints in a season than most of us ever will.]
Choice of Caliber — A 6mm with More Punch for Long Distance
I picked the 6mm Rem Improved mainly because it has that long neck for holding long bullets and it doesn’t burn the throats out as fast as a .243 AI would. I don’t use Remington brass; it splits when fire-forming and seems to work-harden fast. Another reason I picked the 6mm Improved was what I saw in the field–it seemed to be a perfect long-range groundhog getter. I saw my stocker, Richard Franklin, flat smack groundhogs out to 900+ yards with regularity. The OAL of a 6mm Improved does make it hard to remove a loaded round from a standard Remington 700 action. That’s why I went with the BAT Model B, with its longer 3.0″ port. For a standard action, a .243 AI might function better.
As for the 6 Dasher, from what I have read, I think it is a fine round. I’m a hunter though and a lot of case-forming isn’t worth it to me. Forming the Ackleyized cases is bad enough. The 6-250 is a real screamer and very accurate but it doesn’t have the capacity to drive the heavier bullets as well as the 6mm Improved. I have tried a .243 WSSM, also with a Richard’s stock (#008) and a BAT action. It may not shoot as well as the 6mm Rem Improved, but I like those short fat cases.
John’s Views on the Great Moly Debate
Editor: John started with moly-coated bullets for this 6mm Rem AI rifle, but he has moved away from that. He does have considerable experience with coated bullets, and now, at least with custom, hand-lapped barrels, he normally uses uncoated bullets. He now favors coated bullets only for the small .17 caliber.
Moly or no moly… hmm? I have used moly and Danzac for several years, mainly Danzac. In my experience, both moly and Danzac can work well for somebody who shoots a lot of rounds before cleaning. A barrel has to be broken-in correctly whether you use moly or not. I have done break-in with naked bullets, using the conventional method of shooting and cleaning till the copper stops sticking. I have also gone through the break-in process using molyed bullets from the start. It seems to me the barrels broke-in more readily with moly bullets than with naked bullets. I think if there are any rough or sharp places in the barrel the slick molyed bullet doesn’t grab it as badly and the moly will “iron” the flaw out without leaving copper behind.
The main mistake I think most people make with moly is improper cleaning. By that I mean they don’t get the bore clean from the beginning. Some people will scoff at me for this but I use JB bore paste for most all my cleaning, hardly ever use a brush. Just JB and Montana Extreme or Butch’s Bore Shine. It works for me! Now shooting molyed bullets works fine to say 500 yards, but any further and you really need a lot of tension on the bullet. If not you will get bad flyers.
Personally, I use coated bullets only with .17 cal rounds now. I did use them initially in my 6mm Rem AI but I am starting to move away from that. With proper break-in, the fine custom barrels we have now will not copper if you clean correctly and don’t push those bullets too fast! And remember that powder-fouling build-up is an accuracy-killer too. That is another reason I use a lot of JB paste.
John lives and works on a farm in Virginia. Getting rid of intrusive varmints is part of the job of running the farm. Here is one of John’s bolt-action pistols, which is very handy when shooting from a vehicle.
The Guru of Varmints For Fun
For many years John Seibel ran the popular Varmints For Fun website (now offline). This site offered excellent advice for hunters and reloaders. John covered a wide variety of varmint chamberings, from big 6mm wildcats, to the popular 6BR, 22BR and .22-250 caliber varmint rounds, and even the micro-caliber wildcats such as the 20 Vartarg and 20 PPC. Shown below is one of his favorite rifles, a 20 PPC with a special short version of Richard Franklin’s Model 008 stock.
John tells us: “I guess one reason I started my web site is that I was getting a lot of inquiries about hunting groundhogs, custom rifles and reloading. Plus I thought it was a fine way to get young people interested in the shooting sports. Lord knows hunting and firearms aren’t taught any more. I get a lot of young hunters and shooters asking what’s the best caliber for hunting varmints, and they’ll ask for reloading help too. It’s a shame, but many of them have no one to teach them. I do my best to help.
Showing others that a person can still shoot, even with a disability, is another reason I started my web site. I am a C 6-7 Quadraplegic, which means I have no grip in my hands. Imagine shooting those 1.5 oz Jewels that way! I had a therapist tell me I wouldn’t be able to shoot or reload once I got out of the hospital…shows you how much he knows! First time I got home from the hospital it was deer season and I had Pops park me at the edge of some woods. Well I had a 7-point buck on the ground in thirty minutes! Being raised on a farm didn’t hurt none either–it helped me figger ways to jury-rig stuff. Of course I couldn’t have done much if it wasn’t for my family and my lovely wife Cathy[.]”
John’s Favorite 20 PPC Varmint Rifle
Cartridge History Lesson — the Original .244 Remington
Here’s bit of cartridge history. The 6mm Remington, parent of John’s 6mm AI, actually started its life with a different name, the “.244 Remington”. What we now know as the “6mm Remington” was originally called the .244 Remington. The cartridge was renamed because it was not a commercial success initially, being eclipsed by the .243 Winchester. The .244 Remington and the 6mm Remington are identical — only the name was changed.
Share the post "Sunday GunDay: Half-Mile ‘Hog Rifle, John’s 6mm Rem AI"
At the request of our readers, we provide select “Deals of the Week”. Every Sunday afternoon or Monday morning we offer our Best Bargain selections. Here are some of the best deals on firearms, hardware, reloading components, optics, and shooting accessories. Be aware that sale prices are subject to change, and once clearance inventory is sold, it’s gone for good. You snooze you lose.
1. Academy Sports — Cannon 64-Gun Safe, $599.99 (Save $400)
⏺ BIG gun safe, good interior, amazing 40% OFF Savings
This is a jumbo-sized, 40″-wide fire-rated safe that holds up to 64 long guns. This big Cannon Valley Forge Gunsafe normally sells for $999.99, but this week you can get it for just $599.99 at Academy Sports. Yep, that’s a whopping $400 off normal retail, a 40% savings! If you need a big safe, don’t hesitate — this deal is good from November 22-28, 2020 only.
⏺ Bargain Price AND get 500 free bullets from Hornady
Need tools to start reloading? Check out the Lock-N-Load Classic Reloading Kit. This Hornady Reloading Kit includes everything you need except brass, powder, and bullets to get started. Don’t forget to use Brownells coupon code VTJ for $20 off, lowering your net price to $299.99. Also, this Lock-N-Load Classic Reloading Kit appears to qualify for 500 FREE bullets through the Hornady Get Loaded Rebate. That Rebate can net you bullets worth 50% of your Kit purchase price, making this a very attractive deal
3. Amazon — Vortex Diamondback HD Spotting Scope, $399.00
⏺ Great Spotting Scope Deal — hard to beat at twice the price
Whether hunting or target shooting, spotting scopes get you on target faster and easier than bare eyes or riflescope. If you need a good HD-grade spotter, check out the Vortex Diamondback HD 16-48x65mm angled spotting scope for $399.00. It offers great clarity and rock-solid lifetime guarantee. Relatively compact and weighing 49.8 ounces, this is a good choice for a hunter. There’s also a straight version for $399.00, with same 16-48X power and 65mm objective. If you need more magnification and low-light performance, Vortex offers the 20-60x80mm Diamondback HD spotter for $499.00.
4. Amazon — All-Weather Case with Anti-Rust Interior, $93.99
⏺ Protect your firearm investment with corrosion-fighting rifle case
Transporting your firearms isn’t just about protecting them from damage, it’s also about keeping them clean and RUST FREE. If you keep long guns in hard cases for significant periods of time, condensation can create rust faster than you realize. A great choice to combat this is the Plano All Weather Gun Case with Rustrictor. This waterproof rifle case fights rust with Vapor Corrosion Inhibitor (VCI) chemicals infused into resin and foam emitters. With its built-in rust-fighter, this case resists corrosion 5x longer than competing products (per lab testing). The 42″ model is $93.99, while the smaller 36″ rustrictor case is just $74.99. There is also a large 52″ wheeled case for $171.90.
⏺ Truly some of the highest-quality soft rifle cases you can buy
Tired of poorly-made soft cases that wear out after one season? If you want to get a top-quality case that will last for years, check out the Creedmoor Blue Deluxe 55″ or 60″ Rifle Case. These are hand-made cases that provide an incredible level of protection with quality fabrics and padding. Smart design, high-grade zippers, and top-quality sewing make a noticeable difference. And right now you can get either the 55″ or 60″ model for $124.45 — a $25 savings off the regular $149.95 price. You will see many of the nation’s top Palma and F-Class shooters using these cases.
6. Bullet Central — Jewell Benchrest Trigger, $169.50
⏺ Jewell triggers hold world records in multiple disciplines
Jewell triggers have set records and dominated firing lines across the country for good reason. They’re about half the price of other top triggers, can be easily tuned and adjusted and they just work without question. If you need a new competition trigger consider the Jewell Remington 700 BR Trigger (No Safety) model from Bullet Central. Upgrade your rifle for a reasonable price.
7. Natchez — RCBS ChargeMaster Lite, $229.99
⏺ Best Deal on popular, speedy Scale/Dispenser
Do you need an electronic powder scale/dispenser? Most vendors charge $290-$300 for the popular RCBS ChargeMaster Lite. But now you can get it for just $229.99 at Natchez. You save $70.00, about 24%! The ChargeMaster Lite features an easy-to-use LCD touchscreen and claimed precision of plus/minus 0.1 grains. The unit comes with twin check weights and a convenient plastic cover for the powder pan. If Natchez sells out, you can get the ChargeMaster Lite for $239.99 at Sportsman’s Warehouse.
8. Amazon — Frankford Arsenal Hand Deprimer Tool, $44.49
⏺ Deprime fired cartridge brass anywhere — no press needed
Decapping brass can be a tedious and messy chore. Not only does the priming cup come out but so does the anvil and other little bits. Keep it clean and easy but grabbing the Frankford Arsenal Platinum Series Hand Deprimer Tool and deprime in style. This self-contained unit allows you to decap anywhere and keep all the mess in the capture container. It’s easy on the hands too. With this handy tool you can deprime your bases while watching TV.
9. Amazon — TWO Sets of NRR 28dB Earmuffs, $21.24
⏺ Amazing Deal for TWO pairs of NRR 28 muffs
How about a gift for a friend that’s also a gift for you? Pick up this 2-Pack of Mpow Professional Ear Defenders muffs for just $21.24. You can give one set to a buddy and keep one set for yourself. With a 28dB Noise Reduction Rating (NRR), these muffs have good buyer reviews, with positive comments about comfort and noise reduction. You can’t beat this price for TWO sets of muffs with carry bags included.
Share the post "Bargain Finder 270: AccurateShooter’s Deals of the Week"
Editor’s NOTE: Shelley Davidson passed away in 2008 after a courageous battle with cancer. He was one of the great innovators in benchrest rifle design. This article, written before Shelley died, showcases Shelley’s creative talents at their best. His “Tinker Toy” design will always be a tribute to Shelley’s fabricating skills and imagination.
Shelley Davidson — a brilliant innovator. R.I.P. Shelley — you will not be forgotten.
Shelley Davidson’s peers called his radical rifle the “Tinker Toy” gun. We call it revolutionary. Even now, 14 years after its creation, there’s nothing quite like it. This innovative, skeleton design threw conventional wisdom to the winds. Shelley readily concedes he “broke the rules” of benchrest rifle building. But this was inspired rule-breaking, because Davidson’s rifle shot like a house on fire. The Tinker Toy gun won its first matches, both for Score AND for Group. And this rifle also delivered many “zero groups” in Gene Begg’s Texas Tunnel. Hats off to Shelley for conceiving and building a truly radical rifle that was also wicked accurate and successful in competition.
Tinker Toy 30 BR — Radical As It Gets
Report by Shelley Davidson
Although I’m not big on naming rifles, my shooting buddies have christened the gun “Tinker Toy.” I can live with that as it does kind of look as if it was made with a Tinker Toy set.
Origins of the Project
This project began with some wild ideas I had in the fall of 2006 about using magnets to tune a barrel. My idea was to use one magnet on the barrel and another on the stock so they pushed against each other to counter gravity-induced barrel sag (and possibly) tame barrel vibration in a beneficial manner. The only way to test these ideas was to build the device and mount it on a gun. That meant I had to build a new rifle because there was no place to mount a magnet on the stock of a conventional benchrest rig. I had a Kelbly-stocked heavy varmint stock with a Michael Kavanaugh paint job on it. I didn’t think Kav would ever forgive me if I started drilling holes in one of his works of art. My light varmint was in a carbon fiber Scoville stock that costs about a grand. Drilling into the Scoville for an experiment just smacked of bad judgment. So, the magnet thing was my first motivation for designing a new stock. As long as I was building from scratch I decided to offset the barrel and action 0.75″ to the right to counteract the spin/torque from the bullet.
Although there’s nothing new here, my second motivation was to build a 30BR that could shoot in the 10.5 lb light varmint class in NBRSA. The magnetic tuner will automatically make this gun illegal in the IBS. The IBS has declared all barrel attachments un-safe and have outlawed them. I personally feel that the IBS really outlawed all barrel attachments to prevent experimentation and innovation. But at least we have NBRSA matches.
Designing the New Gun — Thinking “Outside the Box”
Once I’d decided to build a lightweight stock that could support experimental devices out near the muzzle, I started drawing up some rough plans. I also took a trip to Jerry Stiller’s shop in Wylie, Texas for a brainstorming session with Jerry, the maker of Viper and other Benchrest actions. Jerry is a school-trained mechanical engineer and thinks differently than I do. I came away from Stiller’s shop with my design roughed out and sketched on paper. The design violated several covenants of conventional wisdom for building competition BR rifles. For instance, two-piece stocks stress the action. Stress reduction is why most BR rifles are glued into the stock. Another myth is that metal stocks vibrate too much so wood or foam-filled fiberglass or carbon fiber are used.
Tinker Toy Rifle DESIGN FEATURES
Shelly Davidson’s Rifle was so innovative, that almost every feature, except the bare action, is very different than you’ll find on most Benchrest rigs. Accordingly we felt it would be useful to isolate and describe the key design features, from stem to stern. Click thumbnails to view FULL-SIZE PHOTOS.
Front Bracket with Magnetic Tuner
The tuner consists of one rare earth magnet attached to the stock and another attached to a barrel sleeve with the magnets oriented so as to make the magnetic force repel each other. The purpose is to counter “barrel droop” and, hopefully, dampen barrel vibration. The lower magnet is carried on a threaded shaft (with lock ring), allowing the magnet to be raised up and down to adjust the “up push” on the barrel.
Tubular Fore-Arm Supported by Brackets
Three brackets support two tubes, one on either side of the barrel. The rear-most bracket is sandwiched between the barrel and the action. Four inches forward (max distance allowed for barrel blocks) a second bracket grips the barrel. Near the muzzle a third bracket secures the ends of the tubes and holds the magnetic tuner. To allow barrel offset, the left tube is 1″ diameter tube while the right tube is 5/8″ diameter.
Offset Barrel The rifle rests on a 3″ wide plate attached to the underside of the two fore-end tubes. With the plate centered in the front sandbag, the barreled action is actually offset 0.75″ to the right (looking forward from the breech). The purpose of this offset is to keep more weight on the right side to counter the tendency of the rifle to torque counter-clockwise. Two different diameter tubes allow for the built-in offset.
Floating Action without Sub-Support or Bedding
On the Tinker Toy gun, the action serves as a load-bearing assembly, holding the barrel in the front, and the skeleton buttstock (or “keel”) in the rear. Shelley was told that accuracy would suffer if you stressed a benchrest action in this manner but that proved untrue. It is a very simple solution to building a rifle, and it eliminates the need to bed the action. The forearm attaches to the action via a bracket installed like a recoil lug.
Skeleton Rear “Keel” Affixed Directly to Action
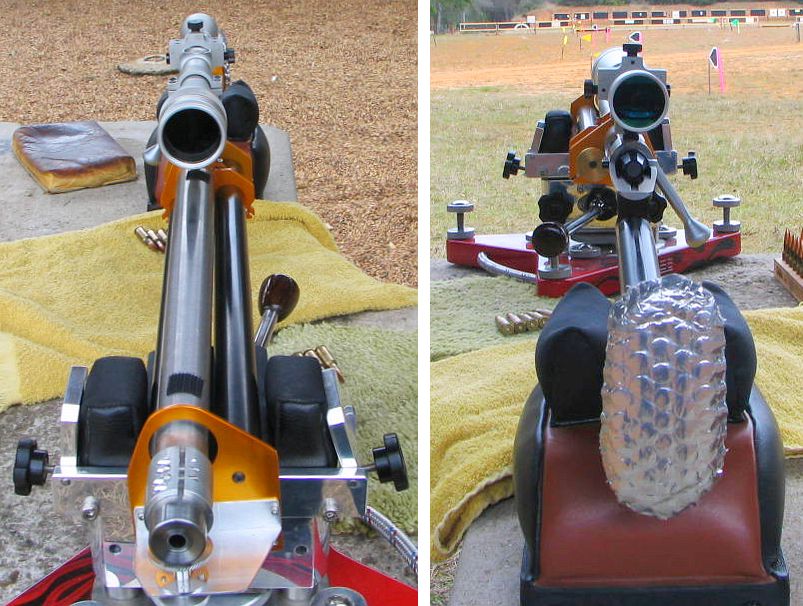
Davidson’s Tinker Toy does not have a conventional rear buttstock. Instead there is low-profile, v-shaped metal “keel”, as Davidson calls it, that rides the rear bag. The keel is supported by a tubular backbone that attaches at the rear of the Diamondback action. At the butt end is an aluminum plate covered with bubble wrap that serves as a butt pad. The skeletonized rear section helps the rifle maintain a very low center of gravity.
Locked Scope with External Windage and Elevation Adjustment
Shelley ran an older Leupold 36X Benchrest Scope with front-adjusting objective. To eliminate slop or loose tolerances in the erector mechanism that could cause changes in point of impact, the internals have been locked up by Jackie Schmidt. To move the cross-hairs relative to the bore axis, Shelley has a special Jewell/Foster rear ring that allows a limited amount of lateral and vertical movement of the entire scope body.
TINKER TOY SPECIFICATIONS
Action: Stiller SS Diamondback Drop-Port (1/2″ short), with .308 Bolt Face.
Barrel: Shilen .308 caliber, 17-twist, HV.
Chambering: 30BR, .330″ neck, Pacific Tool & Gauge Robinett Reamer.
Stock: Davidson Custom Tubular Stock with 0.75″ Offset Barreled Action.
Tube Construction: 6061 Aluminum, 1″ diameter (left), 5/8″ diameter (right).
Load: H4198 powder and 118gr Ronnie Cheek bullets. Loaded to 2980 fps.
Trigger: Jewell, 2 ounce BR.
Tuner: Custom, Adjustable with Opposing Magnets.
Optics: Leupold 36X (locked by J. Schmidt).
Rings: Jewell Foster External Adjusting Rings.
Stiller Diamondback Action and Shilen 17-Twist Barrel
I had wanted to use an aluminum Stiller Cobra drop port with a 6mmBR bolt face but Jerry had none in stock and he estimated it would be a year before one was available. Although I’ve waited for up to a year for an action in the past, I wanted to build this rifle during the fall of 2006 while the weather was pleasant enough to work in my unheated and un-air-conditioned garage shop. Jerry did have a 1/2″ short stainless steel Diamondback in stock so I purchased it even though it would add 3 ounces to the gun compared to the aluminum Cobra. Three ounces is a lot of weight when you’re working with a 10.5-lb limit. I had a heavy varmint contour Shilen 17-twist barrel that would work nicely and I had a Jewell trigger on a rifle that I wasn’t using at the time. I also decided to use my Leupold 36X (locked-up by Jackie Schmidt) with the Jewell/Foster adjustable rings.
Building the Tube Fore-Arm and Brackets
I took a wild guess as to tubing thickness and settled on .035″ for the 1″ left fore-arm tube and .058″ for the 5/8″ right fore-arm tube. All of the flat stock and tubes are 6061 Aluminum. I did the lathe work and the mill work and every evening I’d put the parts together and think about the proper way to proceed.
When the parts were mostly made, I started thinking that this was a truly ugly rifle. I thought about painting it but that wasn’t a good option as many of the parts are designed to slide over others and glue together. Anodizing was the best answer so while looking on the Internet for local anodizing shops I Googled “Home Anodizing”. Sure enough there were a few sites that told about how to anodize at home. I picked up some battery acid from NAPA Auto Supply, some Rit Clothes Dye from Wal-Mart, and a bunch of distilled water from the grocery store. Using an old battery charger as my dc power supply I started anodizing and dying the eighteen parts that went into the stock. Although I had to strip and re-anodize some of the parts, the work turned out acceptable.
Putting it All Together–Lug-Mounting the Fore-Arm and Lots of Epoxy
The barrel contour had to be modified to work with the stock which attaches by way of a rear plate which mounts like a recoil lug and a plate that ties the barrel and the stock tubes together 4″ forward of the bolt face. The four-inch maximum distance is a NBRSA rule concerning barrel blocks.
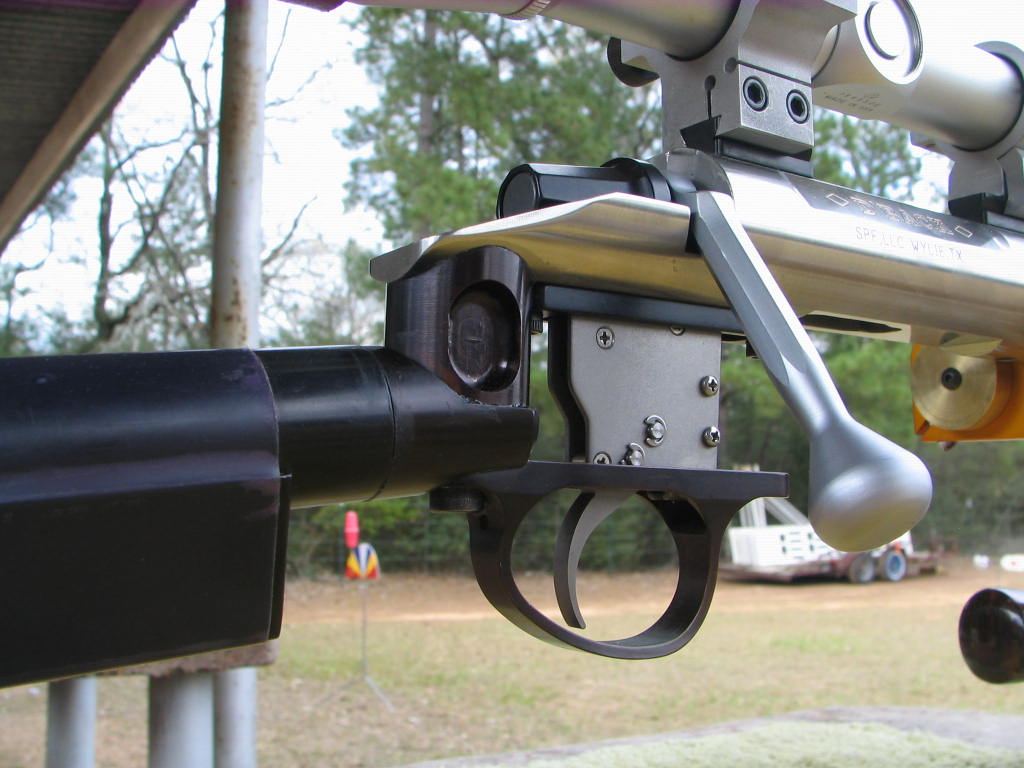
The recoil lug-style stock mount is probably the only truly innovative thing I did other than the opposing-magnet tuner. Basically, the rear bracket is sandwiched between the receiver face and the barrel shoulder–positioned where a conventional recoil lug would go. I also added a brass ring (visible in photo) between the anodized bracket and the barrel. This was done to distribute loads over a wider surface area. (I was concerned that the bracket material was fairly soft and I didn’t want to crush it as I torqued the barrel in place.) After fitting the barrel and plates I glued the entire gun together using epoxy and various LocTite adhesives. The rest of the parts were assembled but I did not Loctite the scope bases since I thought I’d be disassembling the rifle for re-work after the first trials. That came back to bite me during later testing when the gun started shooting erratically and I went down a couple of blind alleys before finding the loose bases.
Range Testing–Results Are Very Positive
The first range session was a real shocker. Even though the wind was up to 10mph and twitchy, the rifle showed promise from the very first shot. I really didn’t expect that kind of performance without, at least, some rework. After sighting in, I shot five, 5-shot groups that, when averaged together, measured .223″. That’s good enough to win some benchrest group matches. But I wasn’t finished with the gun yet–I still wanted to try out my magnetic tuner concept.
The Magnetic Tuner
Next, I built the magnetic tuner. The tuner consists of one rare earth magnet attached to the stock and another attached to a barrel sleeve with the magnets oriented so the magnetic forces repel each other. In order to test the magnets and to determine if the rifle really shot as well as it seemed to, I took it to Gene Beggs’s shooting tunnel in Odessa, Texas. I spent two days at the tunnel testing loads and then installed the magnetic tuner. The gun shoots well with the magnets and shoots well without them. I suppose I can’t make any claims as to how much, if any, improvement the magnets make. Gene said that my gun was the most accurate rifle to be tested at his one-year-old shooting facility: “Shelley Davidson brought one of the most unusual rifles I had ever seen; he called it his ‘Tube Gun.’ And boy, did it ever shoot! It still holds the record in the tunnel as the rifle that shot more zeros than any other to date.” I definitely recommend Gene’s facility for testing and refining shooting techniques and loads.
Competition — Tinker Toy Won Both Score and Group Matches
Finally the big day arrived when I’d shoot the first match with my new gun. The North Texas Shooters Association was holding its first club match of the 2007 season. At the Denton, Texas matches we shoot a Score Match in the morning and a Group Match in the afternoon. The March event was at 100 yards and the April match will be at 200 yards and so on alternating throughout the benchrest season.
Match One–Tinker Toy Wins Score with a 250 – 17X
Since the gun is chambered in 30BR and that chambering is almost immune to tuning woes, I preloaded 130 rounds with H4198 powder and 118gr Cheek bullets. I used my SEB front rest and rear bag which are made by Sebastian Lambang in Indonesia. Everything came together, and Tinker Toy demonstrated that the accuracy it showed in the tunnel was no fluke. The gun shot great and I won the morning match with a 250, 17X. The day was quite windy and the next best shooter scored a 250, 15X. So I’d chalked up my first win.
Match Two–Tinker Toy Wins Group with a .2282″ Agg Tinker Toy won the afternoon group match I entered with a five-group Aggregate of .2282″. (The second place score was .2568″.) My groups were .149″, .197″, .243″, .302″ (oops), and .250″. You know how some folks say a 30BR can’t be competitive with a PPC? Well that .2282″ Agg won’t break any records, but it is good enough to win some regional registered BR matches. So this rifle has demonstrated an ability to win in both Score and Group matches. Obviously I have a very good Shilen barrel, great Cheek bullets and the rest of the components are doing their jobs as well. But, the stock is also working well.
Score Shooting vs. Group Shooting–The Rules
In a score match, the shooter shoots one bullet at each of five record targets, which are clustered on one target sheet. The Aggregate score of five of these targets determines the winner. If the shooter touches the 10 ring on all of his 25 targets he can score a “clean” 250 score. Usually there will be more than one shooter who scores a 250 so the winner is determined by the X-count. The 1/2″ 10-point ring has a 1/16″ dot in its center. Touching the X dot adds to the shooters X count. In short-range group matches, the shooter must try to put five bullets through the same hole. At each distance (100 or 200), five, 5-shot matches are scored, the group sizes are added together (MOA equivalent at 200) and the total is divided by five to arrive at an Aggregate score.
Share the post "Sunday GunDay: Shelley Davidson’s Amazing “Tinker Toy” 30 BR"
Jewell triggers are still the most-used triggers on competition benchrest and F-Class rifles and they are also popular for hunting, varmint, and tactical rifles (with or without safeties). While a Jewell trigger can work for years with minimal maintenance, if the trigger becomes gunked up, it may be necessary to disassemble the trigger for a thorough cleaning. Our friends Ed and Steve, aka the 6.5 Guys, have produced a helpful video that shows how to disassemble and then reassemble a Jewell trigger.
Why You May Need to Disassemble Your Jewell Trigger — the 6.5 Guys
Jewell triggers are a popular choice in the sport of long range precision shooting, and like everything else require regular cleaning and maintenance. In most cases they can be cleaned with charcoal lighter fluid or dropped into an ultrasonic cleaner. Should the situation require, they can be completely disassembled according to the Jewell Trigger Manual.
We ran into a situation where we had to dissemble a trigger due to the entrapment of some sticky dirt that couldn’t be removed with an ultrasonic cleaner. Our first step was to find some step-by-step instructions but we couldn’t find anything.
Recognizing that other shooters might be in the same situation we produced a step-by-step guide and video, published in full on 65Guys.com. These instructions will work with a left- or right-handed trigger. In our case we worked with a left-handed BR model trigger with safety and bolt release.
Step-by-Step Instructions are provided on 65Guys.com website. We recommend you read all the instructions carefully before you even think about disassembling your trigger. This video explains the process so you can get a sense of what is involved.
Share the post "Jewell Trigger Tips — Take-Down and Re-Assembly Procedures"
In the video below, Forum member (and F-Class ace) Erik Cortina shows how to install a Jewell Benchrest trigger into a Kelbly F-Class Panda action. You could follow the same simple procedure to install a Jewell in a standard Panda action. Kelbly’s sell both standard and long versions of the F-Class Panda action. Both versions feature integral recoil lugs in the front.
To see more detail in this “how-to” video, you can zoom it to full-screen size. Simply click the full-screen icon (4-cornered frame) just to the right of the YouTube logo in the lower right.
Share the post "DIY Project — Install Jewell Trigger in F-Class Panda Action"


 Ultimate Evolution of the .243 Winchester


 If you load primarily one brand of bullets, another slick set-up is to buy a Forster or Whidden full-length, non-bushing .243 Win sizing die, and then have Forster or Whidden hone the neck for your desired amount of tension. This elegant one-pass sizing solution produces very straight rounds with low run-out.


 My fire-forming procedure is just jam and shoot. I start with a powder (such as H414) that works for the parent case, fire a few cases as I work up the load to where I get a well-formed case, then shoot them at varmints. Then I work my load up with the newly-formed cases over a chrono. If a load looks good at 100 yards, I will go straight for 200 yards. I’ve seen that some loads which grouped well at 100 won’t shoot well at 200. If it is consistent at 200, then I’ll shoot it a steel plate at 500 yards. Then the truth will be told.

 Choice of Caliber — A 6mm with More Punch for Long Distance

 The Guru of Varmints For Fun


 The recoil lug-style stock mount is probably the only truly innovative thing I did other than the opposing-magnet tuner. Basically, the rear bracket is sandwiched between the receiver face and the barrel shoulder–positioned where a conventional recoil lug would go. I also added a brass ring (visible in photo) between the anodized bracket and the barrel. This was done to distribute loads over a wider surface area. (I was concerned that the bracket material was fairly soft and I didn’t want to crush it as I torqued the barrel in place.) After fitting the barrel and plates I glued the entire gun together using epoxy and various LocTite adhesives. The rest of the parts were assembled but I did not Loctite the scope bases since I thought I’d be disassembling the rifle for re-work after the first trials. That came back to bite me during later testing when the gun started shooting erratically and I went down a couple of blind alleys before finding the loose bases.

 Match One–Tinker Toy Wins Score with a 250 – 17X


