|
|
February 19th, 2024

Useful reloading gear does not have to be costly. Here are ten handy (and very inexpensive) items that belong on your loading bench or in your range kit.
|
 • Magnifying Glass – We use a flat, 2″x2″ pocket 4x-8x magnifier. This folds up on itself. Very handy, we use it to inspect bullets and brass. Use this to check your flash holes for burrs, and check the meplats of your bullets before loading. • Magnifying Glass – We use a flat, 2″x2″ pocket 4x-8x magnifier. This folds up on itself. Very handy, we use it to inspect bullets and brass. Use this to check your flash holes for burrs, and check the meplats of your bullets before loading.
• Clear 35mm Film Cannister – Use this to transfer the thrown powder charge to the little measuring cup that sits on your scale. That way you don’t get any kernel splash. Also if the charge weight is obviously off, it’s easy to dump back in the measure. A film canister works pretty well as a trickler too.
• Compressed Air in a Can -- Get these at office supply stores. Use the can (with tube attached) to blow crud out of cases after cleaning the neck with a brush, and blast loose debris out of primer pockets.
• Pin Vise – A simple pin vise with a #53 bit is perfect for deburring small PPC and BR flash holes without reaming the flash-holes any larger. The Lapua PPC/BR flash-hole diameter is 1.5 mm, or 0.059″. Amazon.com sells a handy $8.29 pin vise kit with 10 bits, including the ideal 1.5mm bit. Other vendors offer a #53 pin vise bit that measures .0595″ or .060″ (depending or source). You can find pin vises and bits at hobby stores — here’s an example below with ten bits including 1.5mm. Pin vise sets can be found from $7 to $15.

• Bounce Dryer Sheets – The common dryer sheets eliminate “static cling” on your plastic reloading parts such as powder measure cylinders, powder funnels, and reloading press plastic bins. Thanks to Doc76251 for this tip.
 • Ballistol Aerosol – Try using this versatile lubricant/solvent for full-length sizing. Spray some on a patch and you can wipe the carbon off your case necks. Then, continue to apply a very small amount of Ballistol on the case bodies — just thin sheen is all you need. Ballistol is super slippery, and easy to remove. For general full-length sizing (on small cases) it works great and doesn’t leave a gooey, waxy, or chalky residue. For heavier case-forming jobs, we recommend Imperial Die Wax. • Ballistol Aerosol – Try using this versatile lubricant/solvent for full-length sizing. Spray some on a patch and you can wipe the carbon off your case necks. Then, continue to apply a very small amount of Ballistol on the case bodies — just thin sheen is all you need. Ballistol is super slippery, and easy to remove. For general full-length sizing (on small cases) it works great and doesn’t leave a gooey, waxy, or chalky residue. For heavier case-forming jobs, we recommend Imperial Die Wax.
• Shotgun Mop – Stick this in the chamber when using Wipe-Out foaming bore cleaner. This will seal off the chamber so the foam doesn’t flow into your action. For long chambers screw on one section of cleaning rod to aid extraction.
• Colored Sharpie Marking Pens – Mark your bullets ahead of the bearing surface, and the color transfers to the target. This way you can shoot multiple loads at the same point of aim and discern which load shoots the tightest. (Recommended for 300 yards and beyond). With colored bullet tips you can test multiple loads “round robin” to equalize wind effects. When testing seating depths for example, you can mark the longer-seated set of bullets red and the shorter-seated set green and shoot them during the same sequence. Just look at the colored marks on the target to see which grouped better.

• Thin Latex Gloves – You should keep a box of inexpensive, disposable latex gloves (the kind doctors use) in your loading room. These will prevent contamination of primers or powder kernels that you handle directly. Also, use the gloves when handling fine blued tools or firearms to prevent transfering body oils and salts that promote rust.
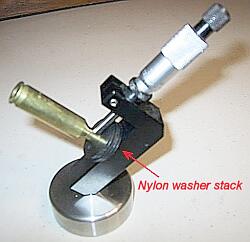
• Plastic Washers for Neck Mic – If you use a Sinclair Neck-wall Micrometer Gauge with integral stand, you can use thin plastic washers to adjust the height of the case on the mandrel. This makes it much easier to measure the same point on the case neck every time. Thanks to MikeCR for this tip (and photo).

|
Share the post "Cheap Tricks — Ten Great Budget Items for Folks Who Reload"
January 6th, 2024

Even with high-quality brass from Lapua, Peterson, Norma, Alpha and RWS, occasionally you may find one or two cases per box which have a small flake or obstruction in the flash-hole. This will appear like a thin crescent on one side of the flash hole (see photo). You should inspect ALL new brass before loading to identify any pieces with a partially-obstructed flash hole. It’s a good idea to remove any flake or thin crescent left as an artifact of the flash-hole forming process. Because the flash-hole itself is normally centered and of the correct diameter, it is not necessary to ream the flash-hole to a larger diameter. All you really need to do is remove the small obstruction(s). This can be done quickly with inexpensive tools.
Use a Small Pin Vise to Remove Flash-Hole Obstructions
Folks have asked if there is a tool that can remove obstructions from a Lapua small, BR-sized flash hole without opening the hole size. The Lapua PPC/BR flash hole is spec’d at 1.5mm, which works out to 0.059055″. Most of the PPC/BR flash-hole uniforming tools on the market use a 1/16″ bit which is nominally 0.0625″, but these often run oversize — up to 0.066″.
If you want to just clear out any obstructions in the flash hole, without increasing the flash hole diameter, you can use an inexpensive “pin vise” with an appropriate drill bit. For $0.99 ($0.50 on sale), eHobbyTools.com sells a 1.5mm drill bit, item 79186, that matches the Lapua flash hole exactly. Other vendors offer a #53 pin vise drill bit that measures .0595″ or .060″ (depending or source). An 0.0595″ bit is close enough. You can find pin vises and these small-diameter drill bits at hobby stores.

For quite some time, Sinclair Int’l has sold a similar device for small (PPC and BR-size) flash holes. Like the 07-3081 unit for large flash holes, the 073000 Reamer for small flash holes works from the outside, so it can index off the primer pocket. It reams to .0625″, and also costs $29.99. The standard dimension for Lapua 220 Russian and 6mmBR flash holes is 1.5mm or .0590″. This tool will permit standard-size decapping rods with .0625″ tips to work without binding. However, note that both Forster and Redding normally supply .057″ decapping pins with their PPC and BR dies. So, it is NOT necessary to ream your Lapua BR/PPC flashholes, unless you prefer to do so for uniformity. It IS, however, a good idea to check BR/PPC flash holes for burrs before loading the first time.
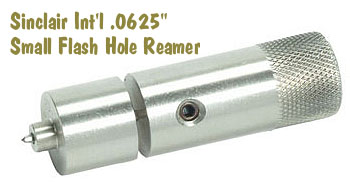
NOTE: If you purchase either the 073081 or 073000 Sinclair Flash Hole Reamer tools, we recommend you mic the cutter tip before you process a bunch of cases. Sometimes a tip comes through that is oversize. This will ream the flash holes larger than you may intend.
Share the post "Flash-Hole Fix — Remove Case Flash-Hole Obstructions"
August 22nd, 2023
Even with high-quality brass from Lapua, Peterson, Norma, Alpha and RWS, occasionally you may find one or two cases per box which have a small flake or obstruction in the flash-hole. This will appear like a thin crescent on one side of the flash hole (see photo). You should inspect ALL new brass before loading to identify any pieces with a partially-obstructed flash hole. It’s a good idea to remove any flake or thin crescent left as an artifact of the flash-hole forming process. Because the flash-hole itself is normally centered and of the correct diameter, it is not necessary to ream the flash-hole to a larger diameter. All you really need to do is remove the small obstruction(s). This can be done quickly with inexpensive tools.
Use a Small Pin Vise to Remove Flash-Hole Obstructions
Folks have asked if there is a tool that can remove obstructions from a Lapua small, BR-sized flash hole without opening the hole size. The Lapua PPC/BR flash hole is spec’d at 1.5mm, which works out to 0.059055″. Most of the PPC/BR flash-hole uniforming tools on the market use a 1/16″ bit which is nominally 0.0625″, but these often run oversize — up to 0.066″.
If you want to just clear out any obstructions in the flash hole, without increasing the flash hole diameter, you can use an inexpensive “pin vise” with an appropriate drill bit. For $0.99 ($0.50 on sale), eHobbyTools.com sells a 1.5mm drill bit, item 79186, that matches the Lapua flash hole exactly. Other vendors offer a #53 pin vise drill bit that measures .0595″ or .060″ (depending or source). An 0.0595″ bit is close enough. You can find pin vises and these small-diameter drill bits at hobby stores.
For quite some time, Sinclair Int’l has sold a similar device for small (PPC and BR-size) flash holes. Like the 07-3081 unit for large flash holes, the 073000 Reamer for small flash holes works from the outside, so it can index off the primer pocket. It reams to .0625″, and also costs $29.99. The standard dimension for Lapua 220 Russian and 6mmBR flash holes is 1.5mm or .0590″. This tool will permit standard-size decapping rods with .0625″ tips to work without binding. However, note that both Forster and Redding normally supply .057″ decapping pins with their PPC and BR dies. So, it is NOT necessary to ream your Lapua BR/PPC flashholes, unless you prefer to do so for uniformity. It IS, however, a good idea to check BR/PPC flash holes for burrs before loading the first time.
NOTE: If you purchase either the 073081 or 073000 Sinclair Flash Hole Reamer tools, we recommend you mic the cutter tip before you process a bunch of cases. Sometimes a tip comes through that is oversize. This will ream the flash holes larger than you may intend.
Share the post "Flash-Hole Fixing — How to Clear Flash-Hole Obstructions"
January 5th, 2023

Useful reloading gear does not have to be costly. Here are ten handy (and very inexpensive) items that belong on your loading bench or in your range kit.
|
 • Magnifying Glass – We use a flat, 2″x2″ pocket 4x-8x magnifier. This folds up on itself. Very handy, we use it to inspect bullets and brass. Use this to check your flash holes for burrs, and check the meplats of your bullets before loading. • Magnifying Glass – We use a flat, 2″x2″ pocket 4x-8x magnifier. This folds up on itself. Very handy, we use it to inspect bullets and brass. Use this to check your flash holes for burrs, and check the meplats of your bullets before loading.
• Clear 35mm Film Cannister – Use this to transfer the thrown powder charge to the little measuring cup that sits on your scale. That way you don’t get any kernel splash. Also if the charge weight is obviously off, it’s easy to dump back in the measure. A film canister works pretty well as a trickler too.
• Compressed Air in a Can -- Get these at office supply stores. Use the can (with tube attached) to blow crud out of cases after cleaning the neck with a brush, and blast loose debris out of primer pockets.
• Pin Vise – A simple pin vise with a #53 bit is perfect for deburring Lapua PPC and BR flash holes without reaming the flash-holes any larger. The Lapua PPC/BR flash-hole diameter is 1.5 mm, or 0.059″. Amazon.com sells a handy $8.29 pin vise kit with 10 bits, including the ideal 1.5mm bit. Other vendors offer a #53 pin vise bit that measures .0595″ or .060″ (depending or source). You can find pin vises and bits at hobby stores — here’s an example below with ten bits including 1.5mm. Pin vise sets can be found from $7 to $15.
• Bounce Dryer Sheets – The common dryer sheets eliminate “static cling” on your plastic reloading parts such as powder measure cylinders, powder funnels, and reloading press plastic bins. Thanks to Doc76251 for this tip.
 • Ballistol Aerosol – Try using this versatile lubricant/solvent for full-length sizing. Spray some on a patch and you can wipe the carbon off your case necks. Then, continue to apply a very small amount of Ballistol on the case bodies — just thin sheen is all you need. Ballistol is super slippery, and easy to remove. For general full-length sizing (on small cases) it works great and doesn’t leave a gooey, waxy, or chalky residue. For heavier case-forming jobs, we recommend Imperial Die Wax. • Ballistol Aerosol – Try using this versatile lubricant/solvent for full-length sizing. Spray some on a patch and you can wipe the carbon off your case necks. Then, continue to apply a very small amount of Ballistol on the case bodies — just thin sheen is all you need. Ballistol is super slippery, and easy to remove. For general full-length sizing (on small cases) it works great and doesn’t leave a gooey, waxy, or chalky residue. For heavier case-forming jobs, we recommend Imperial Die Wax.
• Shotgun Mop – Stick this in the chamber when using Wipe-Out foaming bore cleaner. This will seal off the chamber so the foam doesn’t flow into your action. For long chambers screw on one section of cleaning rod to aid extraction.
• Colored Sharpie Marking Pens – Mark your bullets ahead of the bearing surface, and the color transfers to the target. This way you can shoot multiple loads at the same point of aim and discern which load shoots the tightest. (Recommended for 300 yards and beyond). With colored bullet tips you can test multiple loads “round robin” to equalize wind effects. When testing seating depths for example, you can mark the longer-seated set of bullets red and the shorter-seated set green and shoot them during the same sequence. Just look at the colored marks on the target to see which grouped better.

• Thin Latex Gloves – You should keep a box of inexpensive, disposable latex gloves (the kind doctors use) in your loading room. These will prevent contamination of primers or powder kernels that you handle directly. Also, use the gloves when handling fine blued tools or firearms to prevent transfering body oils and salts that promote rust.
• Plastic Washers for Neck Mic – If you use a Sinclair Neck-wall Micrometer Gauge with integral stand, you can use thin plastic washers to adjust the height of the case on the mandrel. This makes it much easier to measure the same point on the case neck every time. Thanks to MikeCR for this tip (and photo).
|
Share the post "Ten Great Budget-Priced Tools and Accessories for Shooters"
July 17th, 2022
Even with high-quality brass from Lapua, Peterson, Norma, Alpha and RWS, occasionally you may find one or two cases per box which have a small flake or obstruction in the flash-hole. This will appear like a thin crescent on one side of the flash hole (see photo). You should inspect ALL new brass before loading to identify any pieces with a partially-obstructed flash hole. It’s a good idea to remove any flake or thin crescent left as an artifact of the flash-hole forming process. Because the flash-hole itself is normally centered and of the correct diameter, it is not necessary to ream the flash-hole to a larger diameter. All you really need to do is remove the small obstruction(s). This can be done quickly with inexpensive tools.
Use a Small Pin Vise to Remove Flash-Hole Obstructions
Folks have asked if there is a tool that can remove obstructions from a Lapua small, BR-sized flash hole without opening the hole size. The Lapua PPC/BR flash hole is spec’d at 1.5mm, which works out to 0.059055″. Most of the PPC/BR flash-hole uniforming tools on the market use a 1/16″ bit which is nominally 0.0625″, but these often run oversize — up to 0.066″.
If you want to just clear out any obstructions in the flash hole, without increasing the flash hole diameter, you can use an inexpensive “pin vise” with an appropriate drill bit. For $0.99, eHobbyTools.com sells a 1.5mm drill bit, item 79186, that matches the Lapua flash hole exactly. Other vendors offer a #53 pin vise drill bit that measures .0595″ or .060″ (depending or source). An 0.0595″ bit is close enough. You can find pin vises and these small-diameter drill bits at hobby stores.
For quite some time, Sinclair Int’l has sold a similar device for small (PPC and BR-size) flash holes. Like the 07-3081 unit for large flash holes, the 073000 Reamer for small flash holes works from the outside, so it can index off the primer pocket. It reams to .0625″, and also costs $29.99. The standard dimension for Lapua 220 Russian and 6mmBR flash holes is 1.5mm or .0590″. This tool will permit standard-size decapping rods with .0625″ tips to work without binding. However, note that both Forster and Redding normally supply .057″ decapping pins with their PPC and BR dies. So, it is NOT necessary to ream your Lapua BR/PPC flashholes, unless you prefer to do so for uniformity. It IS, however, a good idea to check BR/PPC flash holes for burrs before loading the first time.
NOTE: If you purchase either the 073081 or 073000 Sinclair Flash Hole Reamer tools, we recommend you mic the cutter tip before you process a bunch of cases. Sometimes a tip comes through that is oversize. This will ream the flash holes larger than you may intend.
Share the post "Flash-Hole Fixer — How to Clear Flash-Hole Obstructions"
April 15th, 2021
Useful reloading gear does not have to be costly. Here are ten handy (and very inexpensive) items that belong on your loading bench or in your range kit.
|
• Magnifying Glass – We use a flat, 2″x2″ pocket 4x-8x magnifier. This folds up on itself. Very handy, we use it to inspect bullets and brass. Use this to check your flash holes for burrs, and check the meplats of your bullets before loading.
• Clear 35mm Film Cannister – Use this to transfer the thrown powder charge to the little measuring cup that sits on your scale. That way you don’t get any kernel splash. Also if the charge weight is obviously off, it’s easy to dump back in the measure. A film canister works pretty well as a trickler too.
• Compressed Air in a Can -- Get these at office supply stores. Use the can (with tube attached) to blow crud out of cases after cleaning the neck with a brush, and blast loose debris out of primer pockets.
• Pin Vise – A simple pin vise with a #53 bit is perfect for deburring Lapua PPC and BR flash holes without reaming the flash-holes any larger. The Lapua PPC/BR flash-hole diameter is 1.5 mm, or 0.059″. Amazon.com sells a handy $8.99 pin vise kit with 10 bits, including the ideal 1.5mm bit. Other vendors offer a #53 pin vise bit that measures .0595″ or .060″ (depending or source). You can find pin vises and bits at hobby stores — here’s an example below with ten bits including 1.5mm. Pin vise sets can be found from $7 to $15.
• Bounce Dryer Sheets – The common dryer sheets eliminate “static cling” on your plastic reloading parts such as powder measure cylinders, powder funnels, and reloading press plastic bins. Thanks to Doc76251 for this tip.
• Ballistol Aerosol – Try using this versatile lubricant/solvent for full-length sizing. Spray some on a patch and you can wipe the carbon off your case necks. Then, continue to apply a very small amount of Ballistol on the case bodies — just thin sheen is all you need. Ballistol is super slippery, and easy to remove. For general full-length sizing (on small cases) it works great and doesn’t leave a gooey, waxy, or chalky residue. For heavier case-forming jobs, we recommend Imperial Die Wax.
• Shotgun Mop – Stick this in the chamber when using Wipe-Out foaming bore cleaner. This will seal off the chamber so the foam doesn’t flow into your action. For long chambers screw on one section of cleaning rod to aid extraction.
• Colored Sharpie Marking Pens – Mark your bullets ahead of the bearing surface, and the color transfers to the target. This way you can shoot multiple loads at the same point of aim and discern which load shoots the tightest. (Recommended for 300 yards and beyond). With colored bullet tips you can test multiple loads “round robin” to equalize wind effects. When testing seating depths for example, you can mark the longer-seated set of bullets red and the shorter-seated set green and shoot them during the same sequence. Just look at the colored marks on the target to see which grouped better.
• Thin Latex Gloves – You should keep a box of inexpensive, disposable latex gloves (the kind doctors use) in your loading room. These will prevent contamination of primers or powder kernels that you handle directly. Also, use the gloves when handling fine blued tools or firearms to prevent transfering body oils and salts that promote rust.
• Plastic Washers for Neck Mic – If you use a Sinclair Neck-wall Micrometer Gauge with integral stand, you can use thin plastic washers to adjust the height of the case on the mandrel. This makes it much easier to measure the same point on the case neck every time. Thanks to MikeCR for this tip (and photo).
|
Share the post "10 Budget Items That Will Make Reloading and Shooting Better"
January 22nd, 2021
Even with high-quality brass from Lapua, Peterson, Norma, Alpha and RWS, occasionally you may find one or two cases per box which have a small flake or obstruction in the flash-hole. This will appear like a thin crescent on one side of the flash hole (see photo). You should inspect ALL new brass before loading to identify any pieces with a partially-obstructed flash hole. It’s a good idea to remove any flake or thin crescent left as an artifact of the flash-hole forming process. Because the flash-hole itself is normally centered and of the correct diameter, it is not necessary to ream the flash-hole to a larger diameter. All you really need to do is remove the small obstruction(s). This can be done quickly with inexpensive tools.
Use a Small Pin Vise to Remove Flash-Hole Obstructions
Folks have asked if there is a tool that can remove obstructions from a Lapua small, BR-sized flash hole without opening the hole size. The Lapua PPC/BR flash hole is spec’d at 1.5mm, which works out to 0.059055″. Most of the PPC/BR flash-hole uniforming tools on the market use a 1/16″ bit which is nominally 0.0625″, but these often run oversize — up to 0.066″.
If you want to just clear out any obstructions in the flash hole, without increasing the flash hole diameter, you can use an inexpensive “pin vise” with an appropriate drill bit. For $0.99, eHobbyTools.com sells a 1.5mm drill bit, item 79186, that matches the Lapua flash hole exactly. Other vendors offer a #53 pin vise drill bit that measures .0595″ or .060″ (depending or source). An 0.0595″ bit is close enough. You can find pin vises and these small-diameter drill bits at hobby stores.
For quite some time, Sinclair Int’l has sold a similar device for small (PPC and BR-size) flash holes. Like the 07-3081 unit for large flash holes, the 073000 Reamer for small flash holes works from the outside, so it can index off the primer pocket. It reams to .0625″, and also costs $29.99. The standard dimension for Lapua 220 Russian and 6mmBR flash holes is 1.5mm or .0590″. This tool will permit standard-size decapping rods with .0625″ tips to work without binding. However, note that both Forster and Redding normally supply .057″ decapping pins with their PPC and BR dies. So, it is NOT necessary to ream your Lapua BR/PPC flashholes, unless you prefer to do so for uniformity. It IS, however, a good idea to check BR/PPC flash holes for burrs before loading the first time.
NOTE: If you purchase either the 073081 or 073000 Sinclair Flash Hole Reamer tools, we recommend you mic the cutter tip before you process a bunch of cases. Sometimes a tip comes through that is oversize. This will ream the flash holes larger than you may intend.
Share the post "Flash-Hole First Aid — Clearing Obstructions in Flash-Holes"
June 6th, 2019
Folks have asked if there is a tool that can remove obstructions from a Lapua small, BR-sized flash hole without opening the hole size. The Lapua PPC/BR flash hole is spec’d at 1.5mm, which works out to 0.059055″. Most of the PPC/BR flash-hole uniforming tools on the market use a 1/16″ bit which is nominally 0.0625″, but these often run oversize — up to 0.066″.
If you want to just clear out any obstructions in the flash hole, without increasing the flash hole diameter, you can use an inexpensive, five-dollar “pin vise” with an appropriate drill bit. For $1.00, eHobbyTools.com sells a 1.5mm pin vise bit, item 79186, that matches the Lapua flash hole exactly. Other vendors offer a #53 pin vise bit that measures .0595″ or .060″ (depending or source). An 0.0595″ bit is close enough. You can find pin vises and bits at hobby stores, and eHobbyTools sells pin vises for $4.99 to $7.99.
Share the post "Use Pin Vise for Lapua 1.5mm Small Flash Holes"
August 1st, 2017
Even with high-quality brass from Lapua, Norma, and RWS, occasionally you may find one or two cases per box which have a small flake or obstruction in the flash-hole. This will appear like a thin crescent on one side of the flash hole (see photo). You should inspect ALL new brass before loading to identify any pieces with a partially-obstructed flash hole. It’s a good idea to remove any flake or thin crescent left as an artifact of the flash-hole forming process. Because the flash-hole itself is normally centered and of the correct diameter, it is not necessary to ream the flash-hole to a larger diameter. All you really need to do is remove the small obstruction(s). This can be done quickly with inexpensive tools.
Use a Small Pin Vise to Remove Flash-Hole Obstructions
Folks have asked if there is a tool that can remove obstructions from a Lapua small, BR-sized flash hole without opening the hole size. The Lapua PPC/BR flash hole is spec’d at 1.5mm, which works out to 0.059055″. Most of the PPC/BR flash-hole uniforming tools on the market use a 1/16″ bit which is nominally 0.0625″, but these often run oversize — up to 0.066″.
If you want to just clear out any obstructions in the flash hole, without increasing the flash hole diameter, you can use an inexpensive “pin vise” with an appropriate drill bit. For $0.99, eHobbyTools.com sells a 1.5mm drill bit, item 79186, that matches the Lapua flash hole exactly. Other vendors offer a #53 pin vise drill bit that measures .0595″ or .060″ (depending or source). An 0.0595″ bit is close enough. You can find pin vises and these small-diameter drill bits at hobby stores.
For quite some time, Sinclair Int’l has sold a similar device for small (PPC and BR-size) flash holes. Like the 07-3081 unit for large flash holes, the 073000 Reamer for small flash holes works from the outside, so it can index off the primer pocket. It reams to .0625″, and also costs $39.99. The standard dimension for Lapua 220 Russian and 6mmBR flash holes is 1.5mm or .0590″. This tool will permit standard-size decapping rods with .0625″ tips to work without binding. However, note that both Forster and Redding normally supply .057″ decapping pins with their PPC and BR dies. So, it is NOT necessary to ream your Lapua BR/PPC flashholes, unless you prefer to do so for uniformity. It IS, however, a good idea to check BR/PPC flash holes for burrs before loading the first time.
NOTE: If you purchase either the 073081 or 073000 Sinclair Flash Hole Reamer tools, we recommend you mic the cutter tip before you process a bunch of cases. Sometimes a tip comes through that is oversize. This will ream the flash holes larger than you may intend.
Share the post "Flash-Hole Fix — Clearing Flash-Hole Obstructions in Your Brass"
April 16th, 2017
Folks have asked if there is a tool that can remove obstructions from a Lapua small, BR-sized flash hole without opening the hole size. The Lapua PPC/BR flash hole is spec’d at 1.5mm, which works out to 0.059055″. Most of the PPC/BR flash-hole uniforming tools on the market use a 1/16″ bit which is nominally 0.0625″, but these often run oversize — up to 0.066″.
If you want to just clear out any obstructions in the flash hole, without increasing the flash hole diameter, you can use an inexpensive “pin vise” with an appropriate drill bit. For $1.00, eHobbyTools.com sells a 1.5mm pin vise bit, item 79186, that matches the Lapua flash hole exactly. Other vendors offer a #53 pin vise bit that measures .0595″ or .060″ (depending or source). An 0.0595″ bit is close enough. You can find pin vises and bits at hobby stores.
Share the post "Pin Vise with 1.5mm Bit Fits Lapua BR/PPC Flash Holes"
December 2nd, 2014
Useful reloading gear does not have to be costly. Here are ten handy (and very inexpensive) items that belong on your loading bench or in your range kit.
|
• Magnifying Glass – We use a flat, 2″x2″ pocket 4x-8x magnifier. This folds up on itself. Very handy, we use it to inspect bullets and brass. Use this to check your flash holes for burrs, and check the meplats of your bullets before loading.
• Clear 35mm Film Cannister – Use this to transfer the thrown powder charge to the little measuring cup that sits on your scale. That way you don’t get any kernel splash. Also if the charge weight is obviously off, it’s easy to dump back in the measure. A film canister works pretty well as a trickler too.
• Compressed Air in a Can -- Get these at office supply stores. Use the can (with tube attached) to blow crud out of cases after cleaning the neck with a brush, and blast loose debris out of primer pockets.
• Pin Vise – A simple $7.00 pin vise with a #53 bit is perfect for deburring Lapua PPC and BR flash holes without reaming the flash-holes any larger. The Lapua PPC/BR flash-hole diameter is 1.5 mm, or 0.059″. eHobbyTools.com sells a 1.5mm pin vise bit. Other vendors offer a #53 pin vise bit that measures .0595″ or .060″ (depending or source). You can find pin vises and bits at hobby stores.

• Bounce Dryer Sheets – The common dryer sheets will eliminates “static cling” on your plastic reloading parts such as powder measure cylinders, powder funnels, and reloading press plastic bins. Thanks to Doc76251 for this tip.
• Ballistol Aerosol – Try using this versatile lubricant/solvent for full-length sizing. Spray some on a patch and you can wipe the carbon of your case necks. Then, continue to apply a very small amount of Ballistol on the case bodies — just thin sheen is all you need. Ballistol is super slippery, and easy to remove. For general full-length sizing (on small cases) it works great and doesn’t leave a gooey, waxy, or chalky residue. For heavier case-forming jobs, we recommend Imperial Die Wax.
• Shotgun Mop – Stick this in the chamber when using Wipe-Out foaming bore cleaner. This will seal off the chamber so the foam doesn’t flow into your action. For long chambers screw on one section of cleaning rod to aid extraction.
• Colored Sharpie Marking Pens – Mark your bullets ahead of the bearing surface, and the color transfers to the target. This way you can shoot multiple loads at the same point of aim and discern which load shoots the tightest. (Recommended for 300 yards and beyond). With colored bullet tips you can test multiple loads “round robin” to equalize wind effects. When testing seating depths for example, you can mark the longer-seated set of bullets red and the shorter-seated set green and shoot them during the same sequence. Just look at the colored marks on the target to see which grouped better.
• Thin Latex Gloves – You should keep a box of inexpensive, disposable latex gloves (the kind doctors use) in your loading room. These will prevent contamination of primers or powder kernels that you handle directly. Also, use the gloves when handling fine blued tools or firearms to prevent transfering body oils and salts that promote rust.
• Plastic Washers for Neck Mic – If you use a Sinclair Neck-wall Micrometer Gauge with integral stand, you can use thin plastic washers to adjust the height of the case on the mandrel. This makes it much easier to measure the same point on the case neck every time. Thanks to MikeCR for this tip (and photo).
|
Share the post "Cheap Tricks — Ten Low-Cost Items for Reloaders"
December 6th, 2012
Even with high-quality brass from Lapua, Norma, and RWS, occasionally you may find one or two cases per box which have a small flake or obstruction in the flash-hole. This will appear like a thin crescent on one side of the flash hole (see photo). You should inspect ALL new brass before loading to identify any pieces with a partially-obstructed flash hole. It’s a good idea to remove any flake or thin crescent left as an artifact of the flash-hole forming process. Because the flash-hole itself is normally centered and of the correct diameter, it is not necessary to ream the flash-hole to a larger diameter. All you really need to do is remove the small obstruction(s). This can be done quickly with inexpensive tools.
Use a Small Pin Vise to Remove Flash-Hole Obstructions
Folks have asked if there is a tool that can remove obstructions from a Lapua small, BR-sized flash hole without opening the hole size. The Lapua PPC/BR flash hole is spec’d at 1.5mm, which works out to 0.059055″. Most of the PPC/BR flash-hole uniforming tools on the market use a 1/16″ bit which is nominally 0.0625″, but these often run oversize — up to 0.066″.
If you want to just clear out any obstructions in the flash hole, without increasing the flash hole diameter, you can use an inexpensive “pin vise” with an appropriate drill bit. For $1.00, eHobbyTools.com sells a 1.5mm drill bit, item 79186, that matches the Lapua flash hole exactly. Other vendors offer a #53 pin vise drill bit that measures .0595″ or .060″ (depending or source). An 0.0595″ bit is close enough. You can find pin vises and these small-diameter drill bits at hobby stores.
For quite some time, Sinclair Int’l has sold a similar device for small (PPC and BR-size) flash holes. Like the new 07-3081 unit for large flash holes, the 07-3000 Reamer for small flash holes works from the outside, so it can index off the primer pocket. It reams to .0625″, and also costs $45.99. The standard dimension for Lapua 220 Russian and 6mmBR flash holes is 1.5mm or .0590″. This tool will permit standard-size decapping rods with .0625″ tips to work without binding. However, note that both Forster and Redding normally supply .057″ decapping pins with their PPC and BR dies. So, it is NOT necessary to ream your Lapua BR/PPC flashholes, unless you prefer to do so for uniformity. It IS, however, a good idea to check BR/PPC flash holes for burrs before loading the first time.
NOTE: If you purchase either the 07-3081 or 07-3000 Sinclair Flash Hole Reamer tools, we recommend you mic the cutter tip before you process a bunch of cases. Sometimes a tip comes through that is oversize. This will ream the flash holes larger than you may intend.
Share the post "Flash-Hole First Aid — Removing Flash Hole Obstructions"
|


