Pac-Nor Production Manager Casey Dichter says the Sunnen hone produces a consistency in bore diameter that is much superior to hand-lapping. The Sunnen machine has all but eliminated the standard pre-rifling lap. “You can really tell the difference between a bore that was honed before rifling and one that was [only] lapped”, notes Dichter.
Gun Barrel Honing System Hits Target for Pac-Nor Barreling
Manufacturing precision rifle barrels has always been something of an art that involves hand lapping of the bore surface twice, before and after the rifling profile is cut or swaged in by a rifling button. In fact, a bright, hand-lapped bore is considered one of the hallmarks of a precision rifle barrel, despite the inherent variations from manual work done by people who get bored and tired from the monotonous chore. Pac-Nor Barreling, Inc. set its sights on this issue more than a year ago and hit the X-ring with the newly developed Sunnen HTE honing machine. The machine has all but eliminated Pac-Nor’s pre-rifling lap, which is the more difficult and time-consuming of the two laps. Pac-Nor is also producing as many custom barrels as ever, but with a slightly smaller staff. “Our objectives with the hone were to build a better product with less labor, and the honing machine has exceeded my expectations,” said Pac-Nor Production Manager Casey Dichter. “The hone produces a consistency in bore diameter that is head and shoulders above lapping, within two to three millionths of an inch end-to-end when it’s really dialed in,” he said. “This, in turn, improves the consistency of the rifling process by minimizing variation in the depth of the grooves. We still finish lap after rifling, but it’s easier because we just polish off the fine crosshatch finish that may be left after honing and rifling.”
The Sunnen hone secures the barrel blank in a 3-jaw chuck, with honing oil pumped into one end while the tool works from the opposite end. Sunnen’s specialized Long Bore Tool uses metal-bond diamond or CBN superabrasives to quickly remove reamer marks, waviness, tight spots and other imperfections left by upstream processes.
Honing is an ideal replacement for hand lapping barrel blanks before rifling. It quickly removes reamer scratches and surface waviness without labor-intensive hand lapping. A typical 600-grit abrasive can produce a 6-10 microinch Ra (0.15 to 0.25 µm) finish in a reamed barrel blank. By producing a consistent bore diameter (±0.0001″ or less), parallelism, roundness and surface finish end to end, honing yields more consistent performance from rifling buttons and cutters, resulting in a constant groove depth. The ideal bore geometry reduces distortion of the bullet shape.
Pac-Nor’s barrel-making process starts with cutting and facing premium bar stock, followed by gun drilling, done by four Pratt & Whitney twin-spindle machines and an Eldorado CNC twin spindle. After reaming, the barrels are gauged for size. Depending on the condition of the reamer, 0.0004″ to 0.0007″ of material is left in the bore. This must be manually lapped out or honed out to final size for rifling. “Everyone who works here has done hand-lapping,” said Dichter. “It’s an unpleasant job, particularly if the reamer is starting to get dull. Lapping may take 10 to 45 minutes, depending on the caliber of the barrel. We tried to shorten this, but when chatter marks get ‘ironed’ into the surface by the rifling button, the finish lap is even longer and more difficult, so there is no advantage. With lapping, too, there is potential for variation, simply because it’s a manual process. Lapping can also be a production limiter and in our region we have a very small labor force to draw on when we want to grow.”
Pac-Nor cuts and faces premium bar stock, then gun drills on one of five twin-spindle machines, followed by reaming of the blanks. This rack of barrel blanks awaits completion.
The company had explored honing in the nineties, but re-visited the idea when Sunnen introduced its HTE honing machine in 2014. The HTE is a horizontal machine that can hone small-bore rifle barrels, with a diameter range of 0.150″ to 0.790” (4-20 mm), and lengths up to 60″ (1,524 mm). Designed specifically for long small bores, the machine features an extremely sensitive drive and tool feed system that provide maximum protection against tool overload/breakage. Tool specific force limits and run settings are stored in the touch-screen PC control, allowing the system to sense tight sections in the bore and correct them automatically.
Sunnen also developed a new Long-Bore Tool (LBT) designed to take on industry’s most difficult honing challenges in small bores of .17 caliber rifle barrels. The tool quickly remove reamer marks, waviness, tight spots and other imperfections left by upstream processes. The LBT utilizes metal-bond diamond or CBN super-abrasives for high productivity, long life and fast cycle times. Precision-machined of through-hardened tool steel, the LBT can produce bore accuracies of 0.000027″ (0.0006 mm) for diameter, roundness, and taper – from first part to last.
“We are currently honing about 80 percent of what we make and will do more as we acquire the tools in different calibers,” said Dichter. “Although there is a trade-off in cycle time and abrasive cost for additional honing, we are still able to run our reamers two to three times longer than when we lapped alone. With a hand lap, the time and effort increase when the reamer is getting dull.”
After honing, each barrel is inspected again before rifling with a pull-button. Pac-Nor makes its own Accu-Twist carbide rifling buttons and can provide different rifling styles, including polygonal, per the customer’s choice. A button is attached to a rod and the rod is pulled through the barrel. The company’s hydraulic rifling machine utilizes a CNC-machined twist bar with a helix angle that matches the twist rate requested by the customer. The final twist rate is confirmed afterward using a Barrel-Scan electro-optical twist measurement system.
The barrel is then stress-relieved in a tempering furnace, followed by contouring of the outer shape and final, finish lapping of the bore. “During the finish lap, you can really tell the difference between a bore that was honed before rifling and one that was lapped,” said Dichter. “You can easily sense any remaining tight or loose spots in the bore. The diameter uniformity and roundness of the honed bore are superb. The lap also feels different in a honed bore.”
In competitive shooting where winning scores may be separated by thousandths of an inch, a few millionths of an inch improvement in the uniformity of a Pac-Nor barrel may make a big difference for a skilled shooter. For more information, visit www.sunnen.com or contact:
Sunnen Products Company
Mr. Bob Davis
Global Communications Mgr.
Sunnen Products Company
Tel: 314-781-2100
bdavis [at] sunnen.com
About Pac-Nor Barreling Inc.
Pac-Nor Barreling is a true custom manufacturer catering to bolt-action rifle shooters. The company’s principle markets are law enforcement, military, competitive shooters and hunters. Started in 1984 by avid shooter and company President Chris Dichter, Pac-Nor is now in its second generation under his son, Casey. In addition to barrel manufacturing, the shop will install the barrel on a customer’s action, or add features such as muzzle brakes or fluting on bolts and barrels etc.
The shop runs two shifts per day. A day shift of ten people produces 30-40 custom barrels of different calibers in 416R stainless or chrome-moly steel. A night shift of three people produces one type of barrel — about 50 AR-15 barrels per day for a rifle OEM.
Share the post "Sunnen Barrel Honing System Used by Pac-Nor Barreling"
Next time you have a barrel fitted, consider having your gunsmith create a “stub gauge” from a left-over piece of barrel steel (ideally taken from your new barrel blank). The outside diameter isn’t important — the key thing is that the stub gauge is created with the same reamer used to chamber your current barrel, and the stub must have the same bore diameter, with the same land/groove configuration, as the barrel on your rifle. When properly made, a stub gauge gives you an accurate three-dimensional model of the upper section of your chamber and throat. This comes in handy when you need to bump your case shoulders. Just slide a fired case (with spent primer removed) in the stub gauge and measure from base of case to the end of the gauge. Then, after bumping, re-measure to confirm how much you’ve moved the shoulder.
In addition, the stub gauge lets you measure the original length to lands and freebore when your barrel was new. This gives you a baseline to accurately assess how far your throat erodes with use. Of course, as the throat wears, to get true length-to-lands dimension, you need take your measurement using your actual barrel. The barrel stub gauge helps you set the initial bullet seating depth. Seating depth is then adjusted accordingly, based on observed throat erosion, or your preferred seating depth.
Forum member RussT explains: “My gunsmith [makes a stub gauge] for me on every barrel now. I order a barrel an inch longer and that gives him enough material when he cuts off the end to give me a nice case gauge. Though I don’t have him cut that nice-looking window in the side (as shown in photos). That’s a neat option. You can tell how much throat erosion you are getting from when it was new as well. For measuring initial seating depths, this is the most useful item on my loading bench next to calipers. Everyone should have a case gauge made by there smith if you have a new barrel put on.”
Forum member Lawrence H. has stub gauges made with his chamber reamers for each new barrel. He has his smith cut a port in the stub steel so Lawrence can actually see how the bullet engages the rifling in a newly-cut chamber. With this “view port”, one can also see how the case-neck fits in the chamber. Lawrence tells us: “My stub gauges are made from my barrels and cut with my chamber reamers. With them I can measure where my bullets are ‘touching the lands’ and shoulder bump dimensions. This is a very simple tool that provides accurate information.” To learn more about stub gauges, read this Forum Thread. The photos above and below show Lawrence’s stub gauges:
Share the post "Got Stub? Barrel Stub Gauges Serve Many Functions"
Many shooters, particular those who shoot vintage military rifle matches, reload once-fired military cartridge brass. This brass may be high-quality and stout, but you may encounter a primer crimp* that interferes with the seating of a new primer. There are a variety of dedicated, military-crimp tools on the market, such as Dillon’s excellent Super Swage 600 tool that “rolls the crimp away”. But the Dillon tool costs $100.95 and takes quite a bit of room on your reloading bench. If you don’t want to drop a C-note and give up valuable bench space — here’s another (much cheaper) solution.
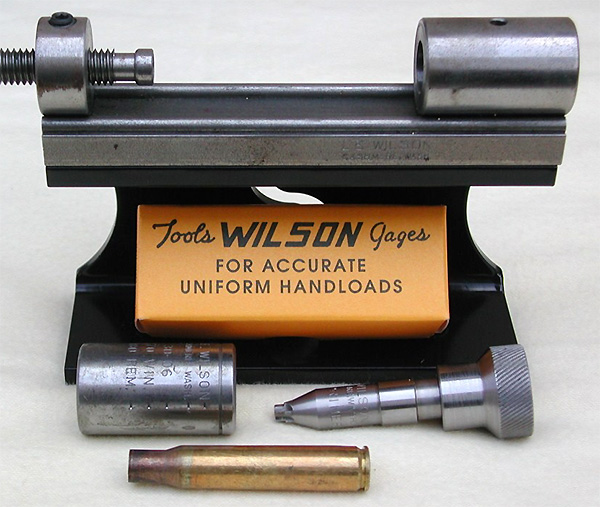
If you already have a Wilson case trimmer set-up, you can ream away those military crimps using an affordable Wilson accessory — the Primer Pocket Reamer (large #PPR-210, small #PPR-175). This $32.99 accessory is used in conjunction with a Wilson case trimmer and case-holder as shown below.
In the older Riflemans Journal website, the Editor, “GS Arizona”, shows how to use the Wilson primer pocket reamer to remove military crimps on Lake City .30-06 cartridge brass. He explains: “The case goes into the Wilson case-holder, the same one used for case trimming, and the reamer replaces the trimmer head in the tool base. The threaded rod on the left side, which is normally used to regulate trim length has no use for this operation and it is simply backed out. Hold the case-holder as you turn the reamer into the primer pocket, it cuts easily and quickly. The reamer will stop cutting when the proper depth is reached.”
Do you really need to do this operation with military-crimped brass? Yes, and here’s why: “any attempt to prime the case without removing the crimp will simply result in a mangled primer that cannot be expected to fire and certainly won’t fire reliably.”
*Why does military brass has a primer crimp? GS Arizona answers: “The crimp is nothing more than an intentional deformation of the case around the primer pocket, the purpose of which is to retain the primer in the case despite high pressure situations in machine guns and other automatic weapons where a loose primer may cause a malfunction. As reloaders, our task is to get rid of the remnants of the crimp in order to allow re-priming the case.”
Share the post "Remove Military Primer Crimp with Wilson Primer Pocket Reamer"
Next time you have a barrel fitted, consider having your gunsmith create a “stub gauge” from a left-over piece of barrel steel (ideally taken from your new barrel blank). The outside diameter isn’t important — the key thing is that the stub gauge is created with the same reamer used to chamber your current barrel, and the stub must have the same bore diameter, with the same land/groove configuration, as the barrel on your rifle. When properly made, a stub gauge gives you an accurate three-dimensional model of the upper section of your chamber and throat. This comes in handy when you need to bump your case shoulders. Just slide a fired case (with spent primer removed) in the stub gauge and measure from base of case to the end of the gauge. Then, after bumping, re-measure to confirm how much you’ve moved the shoulder.
In addition, the stub gauge lets you measure the original length to lands and freebore when your barrel was new. This gives you a baseline to accurately assess how far your throat erodes with use. Of course, as the throat wears, to get true length-to-lands dimension, you need take your measurement using your actual barrel. The barrel stub gauge helps you set the initial bullet seating depth. Seating depth is then adjusted accordingly, based on observed throat erosion, or your preferred seating depth.
Forum member RussT explains: “My gunsmith [makes a stub gauge] for me on every barrel now. I order a barrel an inch longer and that gives him enough material when he cuts off the end to give me a nice case gauge. Though I don’t have him cut that nice-looking window in the side (as shown in photos). That’s a neat option. You can tell how much throat erosion you are getting from when it was new as well. For measuring initial seating depths, this is the most useful item on my loading bench next to calipers. Everyone should have a case gauge made by there smith if you have a new barrel put on.”
Forum member Lawrence H. has stub gauges made with his chamber reamers for each new barrel. He has his smith cut a port in the stub steel so Lawrence can actually see how the bullet engages the rifling in a newly-cut chamber. With this “view port”, one can also see how the case-neck fits in the chamber. Lawrence tells us: “My stub gauges are made from my barrels and cut with my chamber reamers. With them I can measure where my bullets are ‘touching the lands’ and shoulder bump dimensions. This is a very simple tool that provides accurate information.” To learn more about stub gauges, read this Forum Thread. The photos above and below show Lawrence’s stub gauges:
Share the post "Barrel Stub Gauges — Handy for Many Reloading Tasks"
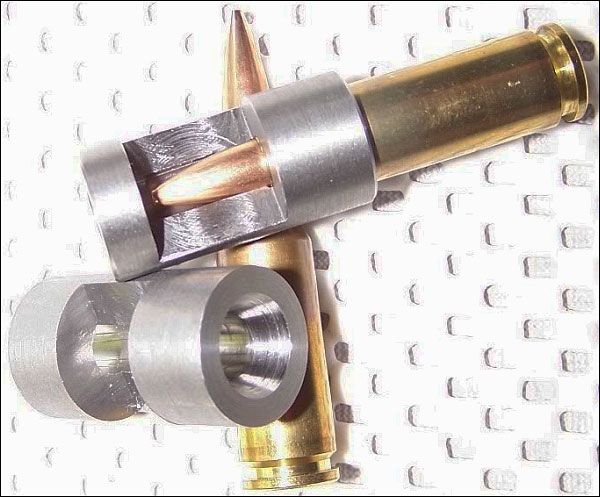
Even with high-quality brass from Lapua, Norma, and RWS, occasionally you may find one or two cases per box which have a small flake or obstruction in the flash-hole. This will appear like a thin crescent on one side of the flash hole (see photo). You should inspect ALL new brass before loading to identify any pieces with a partially-obstructed flash hole. It’s a good idea to remove any flake or thin crescent left as an artifact of the flash-hole forming process. Because the flash-hole itself is normally centered and of the correct diameter, it is not necessary to ream the flash-hole to a larger diameter. All you really need to do is remove the small obstruction(s). This can be done quickly with inexpensive tools.
Use a Small Pin Vise to Remove Flash-Hole Obstructions
Folks have asked if there is a tool that can remove obstructions from a Lapua small, BR-sized flash hole without opening the hole size. The Lapua PPC/BR flash hole is spec’d at 1.5mm, which works out to 0.059055″. Most of the PPC/BR flash-hole uniforming tools on the market use a 1/16″ bit which is nominally 0.0625″, but these often run oversize — up to 0.066″.
If you want to just clear out any obstructions in the flash hole, without increasing the flash hole diameter, you can use an inexpensive “pin vise” with an appropriate drill bit. For $1.00, eHobbyTools.com sells a 1.5mm drill bit, item 79186, that matches the Lapua flash hole exactly. Other vendors offer a #53 pin vise drill bit that measures .0595″ or .060″ (depending or source). An 0.0595″ bit is close enough. You can find pin vises and these small-diameter drill bits at hobby stores.
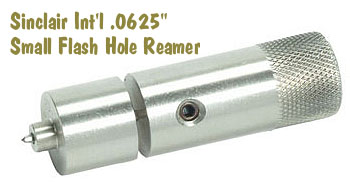
For quite some time, Sinclair Int’l has sold a similar device for small (PPC and BR-size) flash holes. Like the new 07-3081 unit for large flash holes, the 07-3000 Reamer for small flash holes works from the outside, so it can index off the primer pocket. It reams to .0625″, and also costs $45.99. The standard dimension for Lapua 220 Russian and 6mmBR flash holes is 1.5mm or .0590″. This tool will permit standard-size decapping rods with .0625″ tips to work without binding. However, note that both Forster and Redding normally supply .057″ decapping pins with their PPC and BR dies. So, it is NOT necessary to ream your Lapua BR/PPC flashholes, unless you prefer to do so for uniformity. It IS, however, a good idea to check BR/PPC flash holes for burrs before loading the first time.
NOTE: If you purchase either the 07-3081 or 07-3000 Sinclair Flash Hole Reamer tools, we recommend you mic the cutter tip before you process a bunch of cases. Sometimes a tip comes through that is oversize. This will ream the flash holes larger than you may intend.
Share the post "Flash-Hole First Aid — Removing Flash Hole Obstructions"
Robert Whitley of AR-X Enterprises visited the JGS booth to review the Oregon-based tool-maker’s offerings for 2012. In the video below, Cary Pugh of JGS Precision Mfg., spotlights some popular JGS products including chamber reamers, headspace gauges, core drills, counter-bores, and more….
Share the post "SHOT Show: JGS Precision Mfg. — Reamers and More…"
Dave Kiff of Pacific Tool & Gauge showed off some trick products and specialty tools at SHOT Show 2012. First he showed his new Remington bottom metal. Designed originally for a Remington M5 installation, there is also a BDL version that requires minimal stock modification to put in place. This allows you to convert a BDL to accept the reliable AICS detachable box magazines (DBM). Call PT&G at 541-826-5808 and ask about the SHOT Show Special price for AccurateShooter.com readers. (Limited Time Only, subject to availability.)
Micro-Adjustable Reamer Depth Stop
Dave also showed us the handy micrometer-adjustable reamer depth-stop jointly developed by PT&G and gunsmith Nat Lambeth, one of our long-term Forum members. This clever little device give you ultra-precise control over cutting depth. It can save any gunsmith considerable time when cutting chambers, as it assures positive depth control with no guesswork — so you can spend less time measuring incrementally. At right is Nat Lambeth holding the Lambeth-Kiff Adjustable Reamer Stop.
Spiral-Fluted Throat Reamer
Some gunsmiths prefer to start chambers with zero freebore, and then cut the throat in a second step with a throating reamer. You can also use a throating reamer to extend the freebore as needed to shoot a longer type of bullet. PT&G offers an excellent throating reamer with spiral-cut flutes. We have received very positive feedback on this product from respected gunsmiths. One smith raved about the spiral-fluted reamer, saying it “cuts smoothly, with zero chatter, leaving a very fine throat finish”.
Share the post "SHOT Show: Cool Tools from Pacific Tool & Gauge"
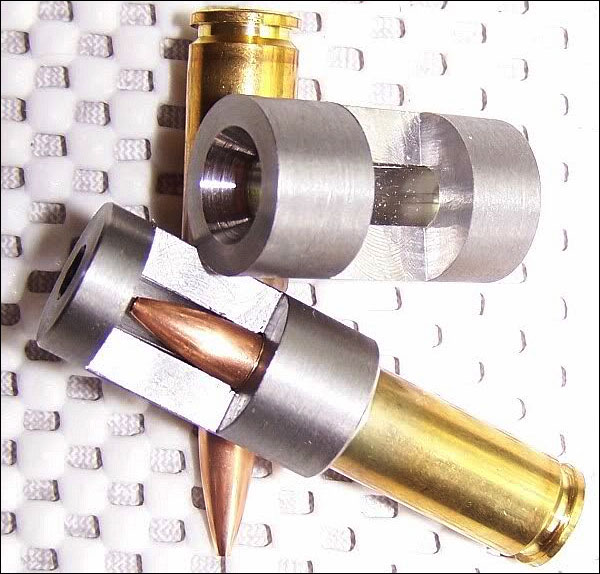
For years, Sinclair Int’l has offered a reamer for small, BR-sized flash-holes, product #07-3000. This popular tool features an 0.0625″ cutting tip to uniform the .059″ flash-holes on Lapua 220 Russian, 6mmBR, 6.5 Grendel, and 6.5×47 brass. Sinclair’s tool works from the outside, indexing off the primer pocket. For those people who believe in the utility of reaming small flash-holes (an open question), the Sinclair “outside-in” design may be the best. But until now, there has been no equivalent “outside-in” reamer for cases with large flash-holes.
Sinclair recently introduced its NEW .081″ large flash-hole reamer, item #07-3081. This $37.50 tool is designed to ream standard flash holes (.080″) to exactly .081 inch, both for small primer pockets and large primer pockets. This tool will remove most burrs left in manufacturing and will uniform the flash-hole diameter of all your brass to ensure consistent ignition.
Double-Ended Design Works with Both Small and Large Primer Pockets
Sinclair’s all-stainless three-piece tool features a double-ended reamer guide for both large and small primer pockets, a knurled handle for easy turning and a straight fluted .081″ reamer. It is designed for all cartridges (with either small OR large primer pockets) with standard .080″ flash holes.
As one Sinclair customer noted: “This is a tool that has been needed for a long time.” As a result, the .081″ flash-hole reamers have been back-ordered through 12/1/2009. But if you order now you should have yours within 5-6 weeks.
IMPORTANT: We recommend, if you order this tool, that you mic the actual diameter of the cutter tip. We have found that some flash-hole reamers, of ALL brands, arrive with slightly oversized cutter tips. Indeed we’ve seen tip diameters of other brands (not Sinclair) vary by as much as .006″ (six-thousandths). You want to make sure you don’t have an oversize cutter before you ream hundreds of cases.
Share the post "New "Outside-In" Flash Hole Reamer for Large Flash Holes"
We recently talked with Dave Kiff of Pacific Tool & Gauge (PT&G). Dave told us he has a number of new time-saving tools for gunsmiths, plus new bottom metal and bolt components for owners of Remington rifles..
Specialized Gunsmithing Tools in Stock
At the show, dave noted that PT&G currently has a variety of specialized cutting tools in inventory. Dave says the big new is is “Gen 2 Reamer”. This unique $287.00 tool will true the receiver face AND the internal lug recesses simultaneously. That will save a gunsmith time and effort. Dave offers other specialized cutters including:
– Threaded Receiver Mandrel for external engraving, outside truing etc. — $189.00
– Oversize Thread Reamer — $189.00
– Diamond-coated tap for Rem 700 – $189.00
New Rem 700 Upgrades
Dave Kiff has collaborated with parts designer Kevin Wyatt to introduce some exciting new hardware for precision tactical, match, and hunting rifles. The new PT&G/Wyatt products will include custom bottom metal for the Rem 700, and a Win m70 claw-extractor modification for the Remington 700.
Initially, the Rem 700 bottom metal will be crafted from aluminum (steel versions will be offered soon). The bottom metal will use Wyatt’s detachable box magazines. The bottom metal fits a standard Remington footprint (though minor modifications may have to be made to the receiver). Both aluminum and solid steel versions should be available by late spring for $205.00 with one magazine, and extra mags are $54.00.
The Claw Extractor mod for the Rem 700 is a robust design that avoids some of the problems associated with a SAKO-style extractor in a Rem bolt. The Claw Extractor allows a “normal” ejection angle so you won’t bounce your brass off the windage knob of the scope. No receiver alterations are required, and Wyatt is working to provide controlled feeding in the final production version. The new Claw Extractor product, according to Dave Kiff, should be available by the end of 2009. Installation will require a gunsmith — this is not a do-it-yourself mod.
Share the post "New Gunsmithing Tools and Rem Bottom Metal from PT&G"


 In the older


 Dave Kiff of
  Micro-Adjustable Reamer Depth Stop
 Sinclair recently introduced its NEW
 New Rem 700 Upgrades


