|
|
June 24th, 2018

The Bertalotto 17 HMR Cleaning Rod Bore Guide is actually made from aluminum arrow shafts.
When Hornady (and CCI) developed the 17 HMR cartridge, they really hit a home-run. And the rifle manufacturers quickly marketed some nice rifles to chamber this 17-cal rimfire round. But unlike .22 LR rifles which, typically, require very little cleaning, 17 HMRs demand frequent bore cleaning to maintain good accuracy. That’s because 17 HMRs shoot copper-jacketed bullets at 2550 fps velocities.
 17-Cal Bore Guides — The Challenge 17-Cal Bore Guides — The Challenge
The problem is, it’s hard to find a well-designed, quality bore guide for 17-caliber rimfire rifles. With many 17 HMR (and 17 Mach 2) rifles, you encounter mechanical interference when you try to use a standard bore guide to protect the delicate chamber edge and the bottle neck area of the chamber. A fixed ejector is in the way. On many 17 HMR rifles, this little “shark fin” ejector is right in line with the chamber and is fixed — it doesn’t retract. Therefore the kind of bore guide you might use for centerfire rifles won’t work in 17 HMRs — it will hang up on the ejector.
Polymer bore guides exist for this type of action, but they are typically open-bottom designs that do not enter and seal the chamber. These open-bottom designs don’t protect the delicate chamber edge or the bottleneck area of the chamber, and they also allow some seepage of solvents out of the chamber. That’s why Roy Bertalotto created his RVB Precision Bore Guide for 17 HMR rifles. The 7075 aluminum tube on his Bore Guide is thin enough to pass by the ejector, yet it is extremely rigid. (Photos below.)
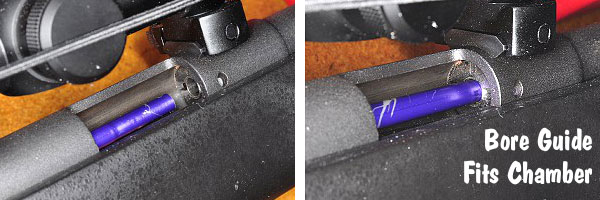
Roy explains: “My bore guide is made of 7075 anodized aluminum tubing, which is totally unaffected by any type of cleaning solution. One end is swagged down to fit completely into the chamber of a 17 HMR rifle. This guides your cleaning rod perfectly to the bore without touching the chamber walls or front edge of the chamber. The tight fit of the bore guide in the chamber also stops cleaning solvents from getting into the action, magazine, and trigger housing.” (Editor: Solvent seepage can do damage. We had a 17 Mach 2 rifle that rusted internally because solvents leaked past an open-bottom bore guide.)

 Using the RVB 17 HMR Guide – Once the bore guide is in place, slide the supplied aluminum bushing over the tube, and gently push the bushing into the rear of the action. This centers the guide rod in the action to keep the guide rod tube aligned. Once the guide rod and bushing are in place, you can use a 17-caliber cleaning rod* with patches and/or brushes to clean the barrel. Use the rod normally, but make sure your patches are quite small and don’t apply too much pressure as these small-diameter rods can kink if you try to force over-size patches down the bore. Using the RVB 17 HMR Guide – Once the bore guide is in place, slide the supplied aluminum bushing over the tube, and gently push the bushing into the rear of the action. This centers the guide rod in the action to keep the guide rod tube aligned. Once the guide rod and bushing are in place, you can use a 17-caliber cleaning rod* with patches and/or brushes to clean the barrel. Use the rod normally, but make sure your patches are quite small and don’t apply too much pressure as these small-diameter rods can kink if you try to force over-size patches down the bore.
The RVB Precision 17 HMR Bore Guide costs $19.95 plus $5.00 shipping. To order, email Roy Bertalotto via rvb100 [at] comcast.net. Roy will then send you shipping/payment details.
Roy tells us: “Yes, I make the bore guides out of 1616 aluminum arrow shafts. The only material on earth that fits EXACTLY what is needed. I buy the shaft material as simple tubing from Easton. It is hard anodized, the perfect wall thickness and doesn’t look too bad either.”
* NOTE: You really do need a dedicated .17-cal cleaning rod for this job. Most other rods are too fat to pass through the barrel. Dewey Mfg. makes a decent 17-caliber cleaning rod that is reasonably stiff and doesn’t kink too readily. It is available in 7″, 11″, 18″, 26″, and 36″ lengths, either bare stainless steel or with a nylon coating. For use with the Bertalotto Bore Guide, we prefer the nylon-coated version, in either 26″ or 36″ lengths, depending on barrel length.

If you have a high comb on your rifle, you may need extra length to avoid interference with the rod handle. Use this formula to determine correct rod length: Length of barrel + action or breech rod guide length + 2-3″ clearance + high comb if applicable = total rod length needed.
There are other quality 17-cal cleaning rods, but we’ve used the Dewey and it functioned well. The nylon coating cleaned easily and was gentle on the throat and crown. You should clean the coating before and after each use to ensure it does not embed grit or other contaminants.
Share the post "Cleaning Rod Bore Guide for 17 HMR Rifles"
August 13th, 2016

Muzzle brakes are controversial. Some people swear by them, while others swear at them. Still, there’s no question that a good brake can reduce felt recoil up to 45%. And likewise, the best brakes, when installed properly, seem to have no negative effect on accuracy.
Roy Bertalotto has done considerable experimentation with muzzle brakes, testing dozens of brake designs on his own rifles over the past few years. Roy’s article, Adventures with Muzzle Brakes, discusses various aspects of muzzle brake design and performance. Roy doesn’t claim that his testing is definitive, but his article is definitely worth a read. Here are some of Roy’s interesting findings:
Exit Hole Diameter
“Best accuracy and effectiveness of the brake was obtained with a hole .020″ over bullet diameter. If the exit hole is too small, such as +.005″ over bullet diameter, accuracy suffers. If the depth of the exit hole is too shallow, the metal around the hole will erode very quickly.”
Hole Placement
“The most effective braking was with a brake 1″ in diameter with a 3/4″ exit hole on each side, just in front of the muzzle. The bullet passes through a cone of 35 degrees before it exits the brake. (Like the tank example), Incredible reduction of recoil. But loud and ugly. Very easy to make since you don’t need a spin fixture or a dividing head.”
Bottom Gas Venting Helps Accuracy
“In my tests, not having holes all around the brake effects accuracy a bit. I believe it does something to the bullet by the air pushed ahead of the bullet creating unequal turbulence in the bullet path. I’ve tried a few brakes where I drilled only holes on the top, test fired, and then completed holes on the bottom and in every case, accuracy improved.” Below are spiral-ported brakes crafted by Clay Spencer.
 
Brakes Work Best with High-Pressure Cartridges
“The higher the pressure of the particular round, the more effective the brake. I have over 20 rifles with brakes. The 220 Swift is the king of reduction. Followed very closely by the 25-06, 6mm Remington, any Weatherby small bore. With a proper brake and a hot handload under a 40 gr bullet, the Swift will move 1/2″ to the rear and 0 muzzle rise! Big boomers with low pressure like 45-70s and shot guns benefit the least.” [Editor’s Note: Roy is judging effectiveness by the percentage of recoil reduction rather than absolute levels of recoil. Obviously if you start with a heavier-recoiling round, the absolute amount of recoil energy reduction is greater. Roy is really talking about efficiency–brakes are most efficient when used with high-pressure cartridges.]
Installation is Key to Accuracy
Roy’s findings are fascinating and suggest that further study of muzzle brakes is warranted. But we can all agree that precision installation of the brake is essential for accuracy. A poorly-installed, mis-aligned brake will degrade accuracy, that is well-known.
Harrell’s Precision has made thousands of muzzle brakes, in many styles and port arrangements. The Harrell brothers offer some good advice for gunsmiths installing brakes: “Muzzle brakes aren’t magic, they reduce recoil by redirecting exiting gas. What’s important is that they are straight and the threads are perpendicular with the base. The only way to get the base and threads perpendicular is to thread, not tap, them on a lathe.”
Share the post "TECH TIP: Optimizing Muzzle Brake Accuracy and Effectiveness"
November 23rd, 2013
Roy Bertalotto is an author, precision shooter, varmint hunter and part-time gunsmith. On his website, RVBPrecision.com, you’ll find many interesting feature stories, including “how-to” articles. One project that caught our eye was Roy’s clever rotating-top shooting bench. Simple to build from low-cost components, Roy’s bench design features a raised center section that traverses on rollers. This allows you to move your rifle through a wide arc without having to move your front rest or rear sand bag. Roy’s bench can be built for a fraction of the cost of the big, heavy carousel-style varmint benches. This would make a nice, winter project for anyone handy with simple tools. For a set of plans and list of materials, send email to Robert: RVB100 [at] comcast.net.
This picture shows a conventional front pedestal rest used with a benchrest type rifle. As you can see, the top swivels, allowing a tremendous sweep of the varmint fields.

CLICK HERE to see MORE PHOTOS (16 total.)
The swiveling top moves on metal rollers. These roller devices are available from Trend Lines, or Woodworkers warehouse. Two are required at the front of the movable top.

Below is a close-up of the pivot point.

A conventional folding table leg (from Woodworkers Warehouse) is used in the front. In the rear, Roy’s table uses a single leg fabricated from tubing and aluminum angle iron. This creates a tripod. The three-legged design provides more room for the shooter, and is easier to set up on uneven ground.

Photos courtesy Roy Bertalotto.
Share the post "Build a Swivel-Top Shooting Bench"
February 3rd, 2013
Forum member Roy Bertalotto has found a great print resource for cast bullet shooters. Roy, who runs the RVB Precision website, has started casting his own bullets. Roy tells us: “I recently joined the Cast Bullet Association (CBA) as I’ve discovered the great hobby of casting my own bullets for long range ‘Buffalo Shoots’ and Cowboy Action Shooting.” Roy says he found the information he needed in the CBA’s own guide to bullet casting: “The CBA offers a fantastic 496-page book, mostly prepared by members, on absolutely everything you’d ever want to know and more about bullet casting.”

Cast Bullets For Beginner and Expert (Second Edition) is a collection of articles from serious cast bullet shooters, covering every subject imaginable. Compiled by Joe Brennan, this new edition has updated information. This Second Edition is now available for $29.95 with free shipping in the USA.
You can order this book online, or send a $29.95 check to:
Eunice Birmley, CBA Director of Services, 47 Pinon, Cimarron, NM 87714

Share the post "Recommended Bullet Casting Book from Cast Bullet Association"
September 29th, 2012
Last year, our friend Roy Bertalotto acquired a budget-priced Kimber 82G rimfire target rifle from the CMP. The Kimber comes with an oiled-wood stock that works fine for three-position training, but Roy wanted to shoot the gun for the bench. The original Kimber stock, with its narrow, radiused forearm, was not ideal for this purpose. Roy wanted a wide, flat fore-end, which is much more stable in the bags. Rather that spend hundreds on a new benchrest stock, Roy modified his Kimber’s original stock by slicing a section off the bottom of the stock and then replacing this with a 3/4″ X 2 3/4″ X 15″ piece of walnut. The finished product is in the second photo below.

Roy explains: “The modification I did on my Kimber 82G stock was done using a milling machine, hand planes, files, die grinder and sand paper. It can also be done with simple hand tools — it will just take longer. The first step is removing the wood on the bottom of the fore-end. This was accomplished in the milling machine. A scrap piece of 2X8 was mounted to the milling machine’s table and the surface milled to be perfectly flat. The Kimber stock was screwed to this 2X8 with two large screws and the bottom of the stock was milled flat. Once this was done, a piece of 3/4″ X 2 3/4″ X 15″ walnut was glued using West System epoxy to the cut out area. I use West System epoxy in boat building, but any good wood glue will work.” WATCH project stages in Slide-Show below:
After gluing the new bottom piece in place, Roy milled the sides to provide side flats with a radius to transition from the wider lower section to the narrower upper part of the fore-end. As a added enhancement, Roy contoured the rear of the fore-end to blend with the rear of the stock, adding what he calls “1965 Ford Mustang side scoops”. Roy then used a Die Grinder with a 1.5″ sanding wheel to modify the wrist area to provide more thumb relief.

Following the cutting, milling, gluing, and shaping, Roy sanded with 150 grit and 300 grit sandpaper before applying multiple coats of Tung Oil. Once the main stock was completed, Roy completed the project by crafting an extended buttplate from a couple pieces of 1/8″ aluminum and two 1.5″ aluminum tubes, “all polished to a slightly less than mirror finish”. NOTE: This metal buttplate assembly was made from scratch (other than the pad). This is not an aftermarket extension kit.

Overall the gun turned out very nicely. Log on to Roy’s RVB Precision webpage to learn more about this Kimber stock modification project, and view more photos of the building process.
Share the post "CMP Kimber Benchrest Conversion by Roy Bertalotto"
|


