To optimize your loads and to generate precise ballistics tables, you need a quality chronograph. Having precise readings of bullet muzzle velocities lets you calculate ES and SD to determine the most repeatable load with least vertical dispersion. Very accurate velocity data is also essential to created a precise drop table for long range and to predict the effect of winds. There are many good chronographs on the market, ranging in price from around $100 to $1000, not counting tripods.
Today’s Saturday Movie showcase features a variety of modern chronographs. We include comparison tests, as well as video reviews of the new, small-format Bulletseeker Mach 4 and AndiScan Micro A2 Doppler Radar chronographs. If you are in the market for a new chronograph and have the resources, you should definitely consider one of these new small chronos, which are easy to set-up and can be mounted directly to your rifle. For those with a limited budget, MagnetoSpeeds still offer great performance for the price. However, you may have to conduct load tuning separately with the MagnetoSpeed removed.
Triple Chronograph Comparison Test
LabRadar, MagnetoSpeed, and Shooting Chrony Alpha Master
This video has an interesting comparison test with three chronograph devices operating at the same time. A Shooting Chrony Alpha Master unit was set up downrange, while a modern LabRadar was placed to the right side of the rifle. On the barrel of the rifle a MagnetoSpeed chrono was attached. This allowed the tester to compare shot velocity values from all three chrono systems at the same time. The video creator explained: “I was curious to see if my old [Shooting Chrony] chronograph could still give me useful velocity information compared to using the newer MagnetoSpeed and LabRadar.”
Chronograph Functions and Features — Vortex Nation Podcast
In this 78-minute video, experts from Vortex explaining how modern chronographs work. The discussion covers the technical features of various chronographs. Multi-time F-Class National Champion Ian Klemm and former sniper Tony Palzkill examine different chronograph types, explaining how they operate. Ian discusses the pros and cons of different chronograph designs, and provides many good tips for chronograph owners. This 78-minute discussion covers multiple chronograph designs, including LabRadar, MagnetoSpeed, and Caldwell Ballistic Precision. There is also extensive discussion of ballistics in the first 20 minutes.
MagnetoSpeed vs. Caldwell Ballistic Precision Chronograph
In this video the host compares a MagnetoSpeed with an older, first generation Caldwell Ballistic Precision Chronograph, mounted a few yards downrange on a tripod. The tester favored the Magnetospeed saying it was “incredibly accurate” while being much easier to set up and transport. He also says the MagnetoSpeed App was very “user-friendly”.
NOTE: Skip Forward to 5:40 to see the Bulletseeker field-tested as mounted on rifle and on tripods.
The Bulletseeker Mach 4 is a new radar chronograph that mounts directly to your rifle. The advanced Bulletseeker features 120 Ghz radar with a beam-forming lens. Developed in Europe, with made-in-Germany core components, this unit is sold in the USA for $999.00 by Longshot, trusted maker of long-range target cameras. We think this is a game-changer. You get advanced radar ON YOUR GUN, with no need to haul around a bulky LabRadar.
Comparison test with the Bulletseeker Mach 4 and LabRadar
Another Bulletseeker tester was very impressed: “Based on my experiences with the device it seems like a good product that does everything it advertises. All the benefits of a LabRadar without the drawbacks.” (SEE Product review HERE.)
In this video, our friend F-Class John tests the innovative, ultra-compact AndiScan Micro A2 Doppler radar chronograph. This unit is small enough that it can be fitted to your rifle, or attached to a front rest or mini tripod. John tested an early pre-production model. The production model is now available for 800 Euros on the SQI-AndiX eShop. The manufacturer notes: “The next large 2023 production series is expected to be ready by the end of February.”
Product Description: “The AndiScan Micro A2 is an advanced ballistic velocity Doppler radar for measuring muzzle velocity of projectiles. It operates in 24GHz frequency band. It is a highly integrated and extremely small form-factor device that is intended to be directly mounted on the rifle. This frees the user from a complicated setup alignment and it also allows to perform measurements under dynamic conditions. It is the first device [with] this form-factor on the public market.”
JKL Inertial Trigger for LabRadar
The JKL Inertial Trigger for the LabRadar is an easy-to-use, inertial-driven trigger that activates simply from the recoil of your gun. Rather than activate by sound or Doppler reading, the JKL Trigger works from the rifle’s instantaneous recoil pulse when a shot is fired. The unit consists of a small rectangular pad attached to a long audio cable. All you do is plug in the audio cable, attach the pad to your gun with the provided hook and loop (Velcro) material. Then (important), you must change the LabRadar trigger settings from “Doppler” to “Trigger”. The unit works great and is easy to set up.
The text in this article is Copyright 2023 AccurateShooter.com. No site shall reproduce this article without express authorization.
Share the post "Saturday at the Movies: Chronograph Tests and Comparisons"
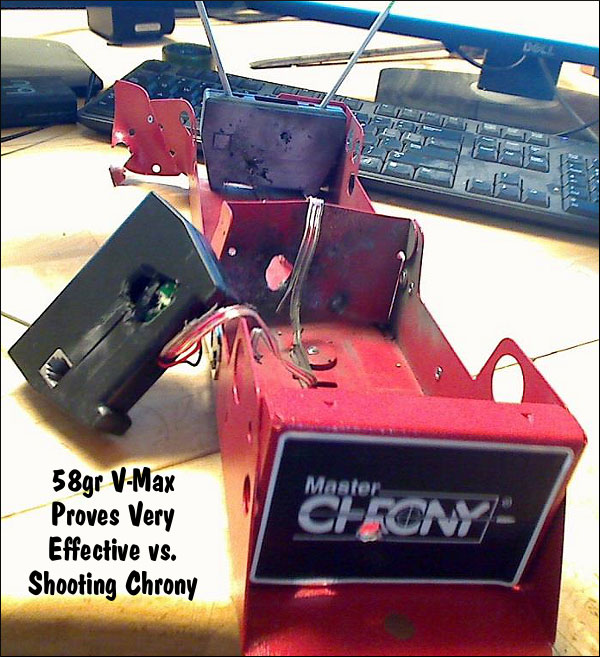
“Shooting Chrony” is a product name. “Shooting Chrony” should not describe (post-mortem) what you have been doing to your chronograph. Sooner or later all of us may make a mistake, and ventilate our chronograph. With luck, the bullet just “wings” your chronograph, and the damage is minor. But if you hit the unit smack dab in the middle, you may have to retire your chrono for good.
A while back, Forum member Jeff M. (aka “JRM850″) experienced a “low blow” that put his Shooting Chrony out of commission. With tongue firmly in cheek, Jeff started a Forum thread entitled Chronograph Not Picking Up Shots in Bright Sunlight Anymore. Looking at the photo at top, the problem is obvious — he ventilated his Chrono.
This was Jeff’s first chrono kill in 23 years of use, so we shouldn’t be too critical. Jeff explained: “I didn’t realize a friend was shifting from a 300-yard target to 100 yards.” The agent of destruction was a low-traveling 58gr V-Max running at 3415 fps. What happened? Well, when one is shooting at 300 yards, the trajectory will be higher than at 100 yards. We should say, however, that this may have been a low shot, or the 100-yard aiming point may have been placed lower to the ground (closer to the bottom of the target frame), as compared to the 300-yard aiming point.
Other Forum members offered some sarcastic responses:
Try it on an overcast day – it might work again.
It looks like the V-Max performed just about as advertised.
Aww…a little duct tape and some Super Glue and you’re good to go.
Double Check Your Aim Point and Trajectory BEFORE You Shoot
The lesson learned here is that you should never change targets (or aim points) without checking your bullet’s flight over the chronograph. We like to align the barrel so the bullet exits a good 6-8 inches above the electronics (check your manual for recommended shot height). In addition, we always boresight the barrel so we can see the actual target through the bore. Then, with gun UNLOADED, bolt removed and action clear, we look back down the barrel so we can see daylight through the bore, with the gun set on solid rests. If you look through the middle of the “V” formed by the sky screen supports and you can’t see light shining through the barrel’s bore, you probably have a set-up problem and you should re-align the rifle.
Use a Test Backer to Confirm Your Bullet Trajectory
You can put tape on the support rods about 6″ up from the unit. This helps you judge the correct vertical height when setting up your rifle on the bags. Another trick is to hang a sheet of paper from the rear skyscreen and then use a laser boresighter to shine a dot on the paper (with the gun planted steady front and rear). This should give you a good idea (within an inch or so) of the bullet’s actual flight path through the “V” over the light sensors. Of course, when using a laser, never look directly at the laser! Instead shine the laser away from you and see where it appears on the paper.
After you have used the laser boresighter to get the rifle centered up in the chrono’s “sweet spot”, confirm with a test shot or two (see photo). Even when using an in-chamber laser boresighter, it is not uncommon for the bullet’s actual point of impact to be different than the laser’s dot location.
Share the post "Chrono No-Nos: Remember this Device is a Tool, Not a Target"
“Shooting Chrony” is a product name. “Shooting Chrony” should not describe (post-mortem) what you have been doing to your chronograph. Sooner or later all of us may make a mistake, and ventilate our chronograph. With luck, the bullet just “wings” your chronograph, and the damage is minor. But if you hit the unit smack dab in the middle, you may have to retire your chrono for good.
A while back, Forum member Jeff M. (aka “JRM850″) experienced a “low blow” that put his Shooting Chrony out of commission. With tongue firmly in cheek, Jeff started a Forum thread entitled Chronograph Not Picking Up Shots in Bright Sunlight Anymore. Looking at the photo at top, the problem is obvious — he ventilated his Chrono.
This was Jeff’s first chrono kill in 23 years of use, so we shouldn’t be too critical. Jeff explained: “I didn’t realize a friend was shifting from a 300-yard target to 100 yards.” The agent of destruction was a low-traveling 58gr V-Max running at 3415 fps. What happened? Well, when one is shooting at 300 yards, the trajectory will be higher than at 100 yards. We should say, however, that this may have been a low shot, or the 100-yard aiming point may have been placed lower to the ground (closer to the bottom of the target frame), as compared to the 300-yard aiming point.
Other Forum members offered some sarcastic responses:
Try it on an overcast day – it might work again.
It looks like the V-Max performed just about as advertised.
Aww…a little duct tape and some Super Glue and you’re good to go.
If you are using a LabRadar or Magnetospeed, your chrono shouldn’t be in the line of fire, but for those will conventional chronos, here’s some good advice…
Double Check Your Aim Point and Trajectory BEFORE You Shoot
The lesson learned here is that you should never change targets (or aim points) without checking your bullet’s flight over the chronograph. We like to align the barrel so the bullet exits a good 6-8 inches above the electronics (check your manual for recommended shot height).
In addition, we always boresight the barrel so we can see the actual target through the bore. Then, with gun UNLOADED, bolt removed and action clear, we look back down the barrel so we can see daylight through the bore, with the gun set on solid rests. If you look through the middle of the “V” formed by the sky screen supports and you can’t see light shining through the barrel’s bore, you probably have a set-up problem and you should re-align the rifle.
Use a Test Backer to Confirm Your Bullet Trajectory
You can put tape on the support rods about 6″ up from the unit. This helps you judge the correct vertical height when setting up your rifle on the bags. Another trick is to hang a sheet of paper from the rear skyscreen and then use a laser boresighter to shine a dot on the paper (with the gun planted steady front and rear). This should give you a good idea (within an inch or so) of the bullet’s actual flight path through the “V” over the light sensors. Of course, when using a laser, never look directly at the laser! Instead shine the laser away from you and see where it appears on the paper.
After you have used the laser boresighter to get the rifle centered up in the chrono’s “sweet spot”, confirm with a test shot or two (see photo). Even when using an in-chamber laser boresighter, it is not uncommon for the bullet’s actual point of impact to be different than the laser’s dot location.
Share the post "How NOT to Ventilate Your Costly Chronograph — Set-UP Tips"
There is nothing more frustrating (or embarassing) than sending a live round into your expensive new chronograph. As the photo below demonstrates, with most types of chronographs (other than the barrel-hung Magnetospeed), you can fatally injure your expensive chrono if it is not positioned precisely.
When setting up a chrono, we always unload the rifle, remove the bolt and bore-sight to ensure that the path of the bullet is not too low. When bore-sighting visually, set up the rifle securely on the sandbags and look through the bore, breech to muzzle, lining up the barrel with your aim point on the target. Then (during an appropriate cease-fire), walk behind the chronograph. Looking straight back through the “V” formed by the sky-screens, you should be able to see light at the end of the barrel if the gun is positioned correctly. You can also use an in-chamber, laser bore-sighter to confirm the visual boresighting (see photo).
Adjust the height, angle and horizontal position of the chronograph so the bullet will pass through the middle of the “V” below the plastic diffusers, no less than 5″ above the light sensors. We put tape on the front sky-screen supports to make it easier to determine the right height over the light sensors.
Use a Test Backer to Confirm Your Bullet Trajectory
You can put tape on the support rods about 6″ up from the unit. This helps you judge the correct vertical height when setting up your rifle on the bags. Another trick is to hang a sheet of paper from the rear skyscreen and then use a laser boresighter to shine a dot on the paper (with the gun planted steady front and rear). This should give you a good idea (within an inch or so) of the bullet’s actual flight path through the “V” over the light sensors. Of course, when using a laser, never look directly at the laser! Instead shine the laser away from you and see where it appears on the paper.
Alignment of Chronograph Housing
Make sure the chrono housing is parallel to the path of the bullet. Don’t worry if the unit is not parallel to the ground surface. What you want is the bullet to pass over both front and rear sensors at the same height. Don’t try to set the chrono height in reference to the lens of your scope–as it sits 1″ to 2″ above your bore axis. To avoid muzzle blast interference, set your chronograph at least 10 feet from the end of the muzzle (or the distance recommended by the manufacturer).
Rifles with Elevated Iron Sights
All too often rookie AR15 shooters forget that AR sights are positioned roughly 2.4″ above the bore axis (at the top of the front sight blade). If you set your bullet pass-through point using your AR’s front sight, the bullet will actually be traveling 2.4″ lower as it goes through the chrono. That’s why we recommend bore-sighting and setting the bullet travel point about 5-8″ above the base of the sky-screen support shafts. (Or the vertical distance the chronograph maker otherwise recommends). NOTE: You can make the same mistake on a scoped rifle if the scope is set on very tall rings, so the center of the cross-hairs is much higher than the bore axis line.
TARGET AIM POINT: When doing chrono work, we suggest you shoot at a single aiming point no more than 2″ in diameter (on your target paper). Use that aiming point when aligning your chrono with your rifle’s bore. If you use a 2″ bright orange dot, you should be able to see that through the bore at 100 yards. Using a single 2″ target reduces the chance of a screen hit as you shift points of aim. If you shoot at multiple target dots, place them in a vertical line, and bore sight on the lowest dot. Always set your chron height to set safe clearance for the LOWEST target dot, and then work upwards only.
Other Chronograph Tips from Forum Members:
When using a chronograph, I put a strip of masking tape across the far end of the skyscreens about two-thirds of the way up. This gives me a good aiming or bore-sighting reference that’s well away from the pricey bits. I learned that one the hard way. — GS Arizona
A very easy and simple tool to help you set up the chronograph is a simple piece of string! Set your gun (unloaded of course) on the rest and sight your target. Tie one end of the string to the rear scope ring or mount, then pull the string along the barrel to simulate the bullet path. With the string showing the bullet’s path, you can then easily set the chronograph’s placement left/right, and up/down. This will also let you set the chrono’s tilt angle and orientation so the sensors are correctly aligned with the bullet path. — Wayne Shaw
If shooting over a chrono from the prone position off a bipod or similar, beware of the muzzle sinking as recoil causes the front of the rifle to drop. I “killed” my first chronograph shooting off a gravel covered firing point where I’d not given enough clearance to start with and an inch or two drop in the muzzle caused a bullet to clip the housing. — Laurie Holland
Share the post "Don’t Kill the Chrono! Setting up Chronos to Avoid Stray Shots"
Love your LabRadar chronograph? Or wish you owned one? Well now the LabRadar is even better. The makers of the advanced, Doppler-radar LabRadar system have introduced a versatile new LabRadar Mobile App that works with iOS (Apple) and Android systems.
The Mobile App lets you control the LabRadar remotely with your smartphone or laptop. This makes it easier when you position the LabRadar beyond arms reach (such as when using a suppressor). The App also makes it much easier and faster to change settings, display shot data, and download test results.
LabRadar Android Mobile App:
Initial feedback on the LabRadar Mobile App has been very positive, though it took some guys a couple tries to get everything working right. Android users — be sure to turn on your “Location Services”. You’ll find a full discussion of the LabRadar App, with set-up tips, on our Shooters’ Forum. Read HERE.
LabRadar iOS (Apple) App, iPad Version:
Here’s a recent review from a LabRadar owner using an Android phone: “[This App] makes the LabRadar exponentially more useful without additional cost. Firmware update to 1.20 was uneventful and quick. No issues running this on a Samsung Galaxy S9+. Shot series can be reviewed on the phone while disconnected from the radar. While connected you can change the radar settings from within the App. Great features and flawless execution.”
LabRadar Mobile App Functionality
With the new Mobile App, you can control your Labradar from your smartphone or tablet with its Bluetooth connection. Manage, store or delete the information in your series as you wish. View your data and summaries displayed in list or table formats. Even view a graph of speed vs. distance.
– Control your LabRadar from your smartphone or tablet
— Display Single Shot Stats: Velocity, Energy, Power Factor
— Display Shot Series Stats: Average, ES, SD, Hi/Lo Shot
— View Velocity by Distance as Graph and List
— Arm, disarm, and change your settings
How to Install and Use LabRadar Mobile App
First get the LabRadar App for your mobile device. Download the Android App from Google Play. Get the iOS (Apple) Version from the Apple App Store. You may also need to update your LabRadar Firmware.
Firmware Update to Enable Bluetooth
LabRadar owners may need to upgrade their chrono’s Firmware to allow the unit to communicate with the Mobile App. The latest firmware will enable the Bluetooth connectivity on your LabRadar device. Download the new Firmware v1.2.2 by following the link below.
1. Go to http://www.mylabradar.com/download/
2. Select: Labradar Firmware v1.2.2 (English) Mobile App Ready.
3. Copy the FWA and FWB files to a SD card (or use the USB cable method).
4. Insert the SD card in your Labradar and turn it on.
5. On your Android Device, make sure your location services is enabled.
6. IMPORTANT — Do NOT PAIR your Bluetooth device to the Labradar! When using the mobile App simply connect to your Labradar from within the App.
Share the post "New Mobile App for LabRadar Chronograph"
There is nothing more frustrating (or embarassing) than sending a live round into your expensive new chronograph. As the photo below demonstrates, with most types of chronographs (other than the barrel-hung Magnetospeed), you can fatally injure your expensive chrono if it is not positioned precisely.
When setting up a chrono, we always unload the rifle, remove the bolt and bore-sight to ensure that the path of the bullet is not too low. When bore-sighting visually, set up the rifle securely on the sandbags and look through the bore, breech to muzzle, lining up the barrel with your aim point on the target. Then (during an appropriate cease-fire), walk behind the chronograph. Looking straight back through the “V” formed by the sky-screens, you should be able to see light at the end of the barrel if the gun is positioned correctly. You can also use an in-chamber, laser bore-sighter to confirm the visual boresighting (see photo).
Adjust the height, angle and horizontal position of the chronograph so the bullet will pass through the middle of the “V” below the plastic diffusers, no less than 5″ above the light sensors. We put tape on the front sky-screen supports to make it easier to determine the right height over the light sensors.
Use a Test Backer to Confirm Your Bullet Trajectory
You can put tape on the support rods about 6″ up from the unit. This helps you judge the correct vertical height when setting up your rifle on the bags. Another trick is to hang a sheet of paper from the rear skyscreen and then use a laser boresighter to shine a dot on the paper (with the gun planted steady front and rear). This should give you a good idea (within an inch or so) of the bullet’s actual flight path through the “V” over the light sensors. Of course, when using a laser, never look directly at the laser! Instead shine the laser away from you and see where it appears on the paper.
Alignment of Chronograph Housing
Make sure the chrono housing is parallel to the path of the bullet. Don’t worry if the unit is not parallel to the ground surface. What you want is the bullet to pass over both front and rear sensors at the same height. Don’t try to set the chrono height in reference to the lens of your scope–as it sits 1″ to 2″ above your bore axis. To avoid muzzle blast interference, set your chronograph at least 10 feet from the end of the muzzle (or the distance recommended by the manufacturer).
Rifles with Elevated Iron Sights
All too often rookie AR15 shooters forget that AR sights are positioned roughly 2.4″ above the bore axis (at the top of the front sight blade). If you set your bullet pass-through point using your AR’s front sight, the bullet will actually be traveling 2.4″ lower as it goes through the chrono. That’s why we recommend bore-sighting and setting the bullet travel point about 5-8″ above the base of the sky-screen support shafts. (Or the vertical distance the chronograph maker otherwise recommends). NOTE: You can make the same mistake on a scoped rifle if the scope is set on very tall rings, so the center of the cross-hairs is much higher than the bore axis line.
TARGET AIM POINT: When doing chrono work, we suggest you shoot at a single aiming point no more than 2″ in diameter (on your target paper). Use that aiming point when aligning your chrono with your rifle’s bore. If you use a 2″ bright orange dot, you should be able to see that through the bore at 100 yards. Using a single 2″ target reduces the chance of a screen hit as you shift points of aim. If you shoot at multiple target dots, place them in a vertical line, and bore sight on the lowest dot. Always set your chron height to set safe clearance for the LOWEST target dot, and then work upwards only.
Other Chronograph Tips from Forum Members:
When using a chronograph, I put a strip of masking tape across the far end of the skyscreens about two-thirds of the way up. This gives me a good aiming or bore-sighting reference that’s well away from the pricey bits. I learned that one the hard way. — German Salazar
A very easy and simple tool to help you set up the chronograph is a simple piece of string! Set your gun (unloaded of course) on the rest and sight your target. Tie one end of the string to the rear scope ring or mount, then pull the string along the barrel to simulate the bullet path. With the string showing the bullet’s path, you can then easily set the chronograph’s placement left/right, and up/down. This will also let you set the chrono’s tilt angle and orientation so the sensors are correctly aligned with the bullet path. — Wayne Shaw
If shooting over a chrono from the prone position off a bipod or similar, beware of the muzzle sinking as recoil causes the front of the rifle to drop. I “killed” my first chronograph shooting off a gravel covered firing point where I’d not given enough clearance to start with and an inch or two drop in the muzzle caused a bullet to clip the housing. — Laurie Holland
Share the post "How NOT to Ventilate Your Chronograph — Set-Up Tips"
“Shooting Chrony” is a product name. “Shooting Chrony” should not describe (post-mortem) what you have been doing to your chronograph. Sooner or later all of us may make a mistake, and ventilate our chronograph. With luck, the bullet just “wings” your chronograph, and the damage is minor. But if you hit the unit smack dab in the middle, you may have to retire your chrono for good.
A while back, Forum member Jeff M. (aka “JRM850″) experienced a “low blow” that put his Shooting Chrony out of commission. With tongue firmly in cheek, Jeff started a Forum thread entitled Chronograph Not Picking Up Shots in Bright Sunlight Anymore. Looking at the photo below, the problem is obvious.
This was Jeff’s first chrono kill in 23 years of use, so we shouldn’t be too critical. Jeff explained: “I didn’t realize a friend was shifting from a 300-yard target to 100 yards.” The agent of destruction was a low-traveling 58gr V-Max running at 3415 fps. What happened? Well, when one is shooting at 300 yards, the trajectory will be higher than at 100 yards. We should say, however, that this may have been a low shot, or the 100-yard aiming point may have been placed lower to the ground (closer to the bottom of the target frame), as compared to the 300-yard aiming point.
Here’s good news for owners of Shooting Chrony Chronographs — you can purchase a Chrony LED Lamp (CLL) upgrade kit that allows your Chrony to work indoors. In addition, the new LED illuminators will enhance outdoor performance in uneven or shaded lighting conditions. The CLL kit costs $87.95 and can be ordered directly from the Shooting Chrony Website, or from vendors such as MidwayUSA.com.
Why the LED Illuminator Kit Is Needed
Shooting Chronys are popular “entry-level” chronographs. They are inexpensive to purchase and they stow compactly with their signature “folding box” design. This Editor used a Shooting Chrony (Beta Master model) for a few years with generally good results. However, I quickly learned that the Shooting Chrony gave the most reliable readings in diffuse mid-morning light with mildly overcast skies (thin cloud layer). The unit did not like to work in the late afternoon with the sun at a low angle. Likewise, uneven, shady conditions caused problems. In summertime, the ultra-bright, noontime summer sun, directly overhead, seemed to “over-power” the diffusers, causing errors. So, I learned to do my speed tests only when conditions were most favorable for the Shooting Chrony. Now, admittedly, not all Shooting Chronys are so temperamental — I’ve seen a few that worked great in bright overhead sunlight. But most Shooting Chronys do seem to struggle with shady conditions or low-angle sunlight.
LED Lamp Kit Components and Accessories
To improve Shooting Chrony reliability in all light conditions, Shooting Chrony offers a $87.95 LED kit (Item #110) that comes with LED-equipped 14″ white diffusers mounted on 16″ wire support rods. The LEDs provide a constant, consistent light source, so you can shoot in the late afternoon and evenings. The kit includes a 120V/220V AC Adapter, output 12VDC @500mA. If AC power is not available, you can run the LED Lamp with an optional 12v dc “Power Station” battery pack (Item #111, $47.95), or you can draw 12v current through an available cigarette lighter-style adapter (Item #112, $10.00).
LED Kit Users Say It Works
We haven’t tested the LED kit ourselves yet, but here’s what one kit buyer had to say:
“If you shot in poor light, you are going to miss velocities no matter what chronograph you are using. You go to all the work of assembling your handloads, set up the chronograph, and then shoot at the target through the detectors… only to get ‘Err 2′ or ‘Err 9′ and use up most or all of the carefully assembled handloads without getting any velocity data. The Chrony LED Lamp assembly has been perfect. Bright sun/no clouds, hazy/cloudy, or shadows/shade makes no difference — all the readings come through without a single ‘Err X’ code. Current draw is also surprisingly low. With the C.L.L. on for five straight hours, the battery pack still shows a full charge.”
Share the post "LED Lamp Kit Improves Shooting Chrony Low-Light Performance"


 When setting up a chrono, we always unload the rifle, remove the bolt and bore-sight to ensure that the path of the bullet is not too low. When bore-sighting visually, set up the rifle securely on the sandbags and look through the bore, breech to muzzle, lining up the barrel with your aim point on the target. Then (during an appropriate cease-fire), walk behind the chronograph. Looking straight back through the “V” formed by the sky-screens, you should be able to see light at the end of the barrel if the gun is positioned correctly. You can also use an in-chamber, laser bore-sighter to confirm the visual boresighting (see photo).


