Sinclair International has created a series of helpful articles on rifle cartridge reloading. Today’s feature lists ten basic steps for precision hand-loading, with links to longer, detailed Sinclair Int’l technical articles providing more complete information. There’s a lot of helpful info here guys, if you click all the links to access the ten “long form” articles.
Tying It All Together: 10 Steps To Precision Handloads
Feature based on article by Roy Hill, Brownells/Sinclair Copywriter
Sinclair International offers a series of detailed articles on hand-loading precision rifle ammunition. The articles are included in Sinclair’s GunTech Articles Archive, but sorting through the index to find each article takes time. To help you access all these articles quickly, here’s a handy summary of ten key topics, with links to longer articles covering each subject in detail.
Part 1: The first step in making high-quality handloads is to carefully choose the best brass for your application. You need to know how to identify the different types of brass and how to choose the best kind for the ammo you want to load. CLICK HERE for Part 1.
Part 2: Even high-quality brass can have burrs around the flash hole that can interfere with the primer flame and cause inconsistent ignition – which can lead to shot groups opening up. Flash hole deburring is a critical step in making sure primers ignite powder consistently. CLICK HERE for Part 2.
Part 3: The next step is to make sure the primer pockets are square and uniform. Like flash hole deburring, primer pocket uniforming may reduce variations in primer ignition by ensuring more consistent primer seating. CLICK HERE for Part 3.
Part 4: Making sure all your cases are precisely the same length is crucial, especially when you use cases that have been fired before. Case trimming is the way to get there. CLICK HERE for Part 4.
Part 5: After trimming, cases still have to be resized. In order for them to work through the resizing die, they have to be lubricated. The case lube method you choose is crucial to making precision handloads. CLICK HERE for Part 5.
Part 6: Now it’s time to choose the dies that will resize your cases. There are several important options to consider in selecting the right sizing dies. CLICK HERE for Part 6.
Part 7: Wait! You’re not quite ready to start sizing yet. There’s yet more to consider before you start cranking cases through the press. Learn more about setting up and adjusting your sizing dies. CLICK HERE for Part 7.
Part 8: Once the cases are completely prepped, it’s time to start putting fresh components back into them. We start off by seating primers. CLICK HERE for Part 8.
Part 9: After the primers are seated, it’s time to drop in the powder. There are several tools that will help you handle powder for precision handloads. CLICK HERE for Part 9.
Part 10: The final step in the process is carefully seating the bullet to just the right depth. And then… you’re ready to try your loads at the range. CLICK HERE for Part 10.
Share the post "Precision Handloading — TEN Important Steps — Start to Finish"
This article is part of Sinclair Int’l Step-By-Step Reloading Series. Most of the products mentioned in this article are sold through Brownells.com.
by Roy Hill, Brownells/Sinclair Copywriter
Making your own precision handloads is a meticulous journey with many steps, many important matters to consider, and many sets of measurements to calculate. For those who pursue the perfect group, the highest score, the really long accurate shot, the rewards more than outweigh the effort. Choosing the right cases, deburring the flash holes, making the primer pockets uniform, trimming the cases, and lubricating them are all familiar – and critical – steps along the journey. And now that your brass preparation is complete, you are at last ready to start running the cases through your press and fill them with primers, powder, and bullets. The very first die the brass encounters is the sizing die. You insert the case, work the press’s lever to return the case to its correct pre-fired dimensions – and the journey continues.
There are three types of sizing dies to think about: neck, full-length, and small base. All three have specific benefits and potential drawbacks, and you should choose the type of die you use by thinking very carefully about what kind of shooting you plan to do with your handloads. No matter which type you select, most sizing dies will also punch out the old spent primer with some sort of decapper assembly that uses a hardened steel rod. Many types of sizing dies use an expander ball inside the die to make sure the neck of the case will accommodate a bullet after being sized. With some size dies, the expanders are easily removable and interchangeable, letting you get exactly the neck tension you want. If you are reloading for pistol cartridges, carbide sizing dies allow you to quickly resize without applying any lube to the case. But rifle cases always need lube.
Neck-Sizing Dies Neck-sizing dies resize only the neck of the case. The benefit of sizing only the neck is that the brass is “worked” very little, letting you reuse the same cases many times over. Also, cases that have already been fired in your rifle are perfectly fireformed to fit that rifle’s chamber, which can help accuracy. However, neck-sized cases will fit only the specific rifle they were originally fired in, and may still require a little extra force to chamber or extract.
Sinclair recommends that neck-sized-only cartridges should not be used any in other rifle besides the one they were originally fired from [unless they are also FL-sized], or in any action other than a bolt-action. Neck-sized-only rounds are great for the target range or the benchrest but should not be used in critical situations like military or police operations, or hunting. And if you fire them enough times, neck-sized cases will still need to be full-length sized periodically for you to keep using them.
Full-Length Sizing Dies Full-length sizing dies do exactly what their name says: resize the full length of the case, not just the neck. Full-length sizing helps create handloads that will function in any rifle, not just the one from which the cases were originally fired. The potential downside of full-length sizing is that it may shorten case life because it works the brass more than neck sizing. But it’s possible to “tune” today’s full-length sizing dies so they barely work the brass at all, as this article by Sinclair Reloading Tech Ron Dague shows.
Illustration Shows How a Full-Length Sizing Die Works
Another way to reap the benefits of full-length sizing is to use Redding’s full-length bushing dies, which size the full length of the case but use a system of interchangeable bushings that enable you give the case neck the bare minimum of resizing needed. To see how finely adjustable bushing dies are, and how they resize the case while fully supported, CLICK HERE for Video. The neck bushing helps you precisely control the neck tension to help increase the consistency and accuracy of your handloads.
Small Base Dies
A Small Base Die is just another type of full-length sizing die, but one that is typically used when reloading for semi-automatic rifles, like the AR-15, M14, or AR-style .308 rifles. (It may also work well for bolt guns that need extra sizing on the lower section of the case.) A small base die works exactly like a full-length sizing die, only it compresses the brass just a bit more, usually about .001″ more, and may even push the case shoulder back just a hair. Small base dies give that extra bit of compression to the brass to help make sure the case will properly extract from a semi-automatic firearm. The upside is that you get precision handloads that should work flawlessly in your semi-automatic. The downside is case life is really shortened, especially compared to brass used only in one bolt-action rifle, because the brass is worked more.
Shoulder Bump Gauges
A handy tool for setting up your full-length sizing dies as close as possible to your rifle’s chamber is the Sinclair bump gauge. The bump gauge lets you resize the case as little as possible, to extend case life and help your handloads fit your rifle almost like a neck-sized only die. You use deprimed cases fired in your rifle and bump gauge inserts to help you set up the die so it resizes the case only about .001″ to .004″, depending on what type of rifle you’re shooting.
Video shows how to use a shoulder bump gauge to set up your full-length dies
Article Find by EdLongrange. We welcome reader submissions
Share the post "SIZING DIES: Full-Length Dies, Neck-Sizing Dies, Small Base Dies"
Shiny brass — it may not shoot more accurately, but it does make you feel better about your hand-loaded ammo. While it’s not necessary to get brass “bright and shiny” after every firing, it is a good idea to clean powder residue, grime, and grit off your brass before you run cases into sizing dies. There are many ways to clean cartridge cases. A quick wipe with solvent on a patch may suffice for recently-shot cases. Older brass with baked-on carbon may require lengthy tumbling. Ultrasonic cleaning is another popular option that gets your brass clean inside and out.
Sinclair International has a series of helpful videos on brass cleaning. These short “how-to” videos, hosted by Bill Gravatt, Sinclair’s past President, cover the various processes you can use — tumbling, ultrasonic cleaning, chemical cleaning, and cleaning by hand.
Video ONE — Cleaning Brass in Vibratory or Rotary Tumbler
TIP: Brass that has recently been shot will clean more easily than brass that has been sitting many days or weeks. If your tumbling media is fresh the job should be done in an hour or less. It’s your choice whether to tumble with primers removed or with primers still in the cases. If you choose to tumble with primers out, we suggest you deprime with a depriming die, rather that put dirty brass into your sizing die. Some people like to add a teaspoon of liquid polish to the media. This does work, cutting tumble time, and making your brass more shiny. However, if you add liquid polish, do that BEFORE you add the brass and let the tumbler run for a 15 minutes to get the polish completely mixed into the media. Otherwise you can else up with gooey gunk inside your cases — a very bad thing.
Video TWO — Ultrasonic Case Cleaning
TIP: There are many different types of solutions you can use. Soapy water suffices for some folks, particularly if you add a little Lemi-Shine. The Hornady and Lyman solutions work well, and can be used multiple times, provided you strain the solution to remove dirt and grit after cleaning sessions. Many ultrasonic cleaning machines have timers. Experiment with dwell time to see how long you need to immerse your brass. A very small amount of Ballistol in the solution will help lubricate your necks on the inside. This can make bullet seating go more smoothly, with more consistent neck tension.
Video THREE — Chemical Cleaners (Soaking without Ultrasound)
TIP: After using chemical cleaners, such as the Iosso solution, you need to water-rinse your brass thoroughly. A kitchen strainer helps with this (see video at 0:20). Also, don’t forget your brass in the chemical solution — follow the manufacturers recommendations and don’t exceed the recommended dwell time. Chemical cleaners work surprisingly well to remove grease and grime, and the solution can be re-used multiple times. However, if you want your cases to look bright and shiny (like new brass), you will probably have to tumble. [Editor: A very effective new chemical cleaner is the Brass Monkey product from the makers of Wipe-Out and Carb-Out. Add a teaspoon to a gallon of water then soak your brass for 20-30 minutes. It really works — the cases clean up dramatically].
Video FOUR — Manual Cleaning (By Hand)
TIP: Keep some oversize patches in your range kit. At the end of your shooting sessions, wipe off your fired brass with a patch dampened with a mild, non-corrosive solvent (once again Ballistol works well). Before the carbon sets up on your brass it is very easy to remove. For tougher jobs, you can use 0000 Steel Wool (as Bill recommends in the video). You may find that timely hand-cleaning lets you avoid tumbling altogether — or you may choose to tumble (or ultra-sound) your brass only after a half-dozen or so firings.
Share the post "Brass Cleaning Options — Tumbling, Ultrasonic, Chemical & More"
Sinclair Internationalhas released an interesting article about Case Concentricity* and bullet “run-out”. This instructional article by Bob Kohl explains the reasons brass can exhibit poor concentricity, and why high bullet run-out can be detrimental to accuracy.
Concentricity, Bullet Alignment, and Accuracyby Bob Kohl
The purpose of loading your own ammo is to minimize all the variables that can affect accuracy and can be controlled with proper and conscientious handloading. Concentricity and bullet run-out are important when you’re loading for accuracy. Ideally, it’s important to strive to make each round the same as the one before it and the one after it. It’s a simple issue of uniformity.
The reason shooters work with tools and gauges to measure and control concentricity is simple: to make sure the bullet starts down the bore consistently in line with the bore. If the case isn’t properly concentric and the bullet isn’t properly aligned down the center of the bore, the bullet will enter the rifling inconsistently. While the bore might force the bullet to align itself with the bore (but normally it doesn’t), the bullet may be damaged or overstressed in the process – if it even it corrects itself in transit. These are issues we strive to remedy by handloading, to maintain the best standard possible for accurate ammunition.
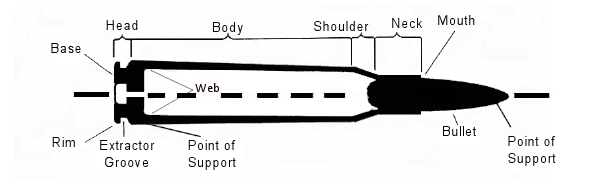
The term “concentricity” is derived from “concentric circle”. In simple terms it’s the issue of having the outside of the cartridge in a concentric circle around the center. That goes from case head and center of the flash hole, to the tip of the bullet.
Factors Affecting Concentricity
The point of using this term is to identify a series of issues that affect accurate ammunition. Ideally this would work best with a straight-walled case; but since most rifle cartridge cases are tapered, it equates to the smallest cross section that can be measured point by point to verify the concentric circle around the center. For the examples below, I’m working with .308 Winchester ammo.
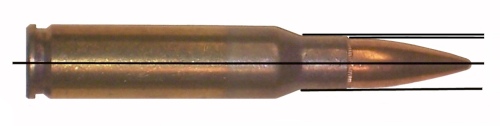
Figure 1: The cartridge.
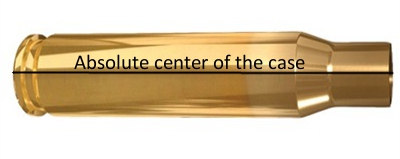
Figure 2: Centerline axis of the case, extending from flash hole to case mouth.
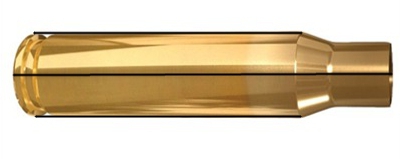
The case walls have to be in perfect alignment with the center, or axis, of that case, even if it’s measured at a thousandth of an inch per segment (in a tapered case).
Figure 3: Case body in alignment with its axis, or centerline, even in a tapered case.
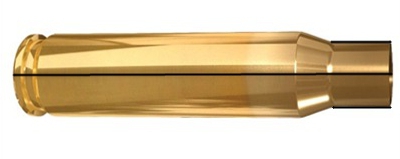
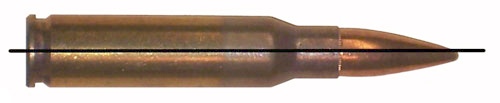
The case neck must also be in alignment with its axis. By not doing so you can have erratic bullet entry into the bore. The case neck wall itself should be as uniform as possible in alignment and in thickness (see the M80 7.62x51mm NATO cartridge in Figure 5) and brass can change its alignment and shape. It’s why we expand the case neck or while some folks ream the inside of the neck and then turn the outside for consistent thickness, which affects the tension on the bullet when seated.
Figure 4: Neck in alignment with center of the case axis.
Figure 5: Variations in case neck wall thickness, especially on some military brass, can cause an offset of the bullet in its alignment. This is an M80 ball round. Note the distinct difference of the neck walls.
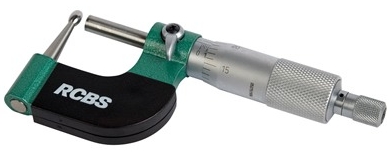
Having a ball micrometer on hand helps, especially with military brass like 7.62x51mm in a semi-auto rifle, where there are limits as to how thin you want the neck walls to be. In the case of 7.62 ball brass you want to keep the wall to .0145″.
Figure 6: A ball micrometer like this RCBS tool (#100-010-268) can measure case neck thickness.
Turning the outside of the neck wall is important with .308 military cases regardless of whether you expand or ream the neck walls. There are several outside neck turning tools from Forster, Hornady, Sinclair, and others. I’ve been using classic Forster case trimming (#100-203-301) and neck turning (#749-012-890) tools for 40 years.
Bullet Run-Out
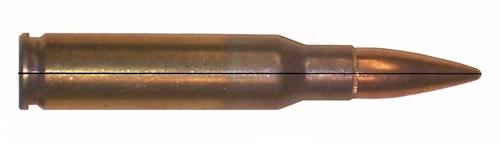
The cartridge, after being loaded, still needs to be in alignment with the center of the case axis. Figure 7 shows a bad example of this, a round of M80 ball. A tilted bullet is measured for what’s known as bullet “run-out”.
Figure 7: An M80 round with the bullet tilted and not aligned with the axis. This will be a flyer!
Run-out can be affected by several things: (1) improperly indexing your case while sizing, which includes not using the proper shell holder, especially while using a normal expander ball on the sizing die (it also can stretch the brass). (2) The head of a turret press can flex; and (3) improper or sloppy bullet seating. This is also relevant when it comes to using a progressive press when trying to load accuracy ammo.
Mid Tompkins came up with a simple solution for better bullet seating years ago. Seat your bullet half way into the case, back off the seater die and rotate the case 180 degrees before you finish seating the bullet. It cuts down on run-out problems, especially with military brass. You also want to gently ream the inside of the neck mouth to keep from having any brass mar the surface of the bullet jacket and make proper seating easier. A tilted bullet often means a flyer.
Figure 8: Proper alignment from the center of the case head to the tip of the bullet.
(NOTE: This links to a Web Archive version of older Sinclair Int’l article.)
*Actually some folks would say that if we are talking about things being off-center or out-of-round, we are actually talking about “eccentricity”. But the tools we use are called “Concentricity Gauges” and Concentricity is the term most commonly used when discussing this subject.
Story Tip from EdLongrange. We welcome reader submissions.
Share the post "Bullet Concentricity Basics — What You Need to Know"
Sinclair International has created a series of helpful articles on rifle cartridge reloading. Today’s feature lists ten basic steps for precision hand-loading, with links to longer, detailed Sinclair Int’l technical articles providing more complete information. There’s a lot of helpful info here guys, if you click all the links to access the ten “long form” articles.
Tying It All Together: 10 Steps To Precision Handloads
Feature based on article by Roy Hill, Brownells/Sinclair Copywriter
Sinclair International offers a series of detailed articles on hand-loading precision rifle ammunition. The articles are included in Sinclair’s GunTech Articles Archive, but sorting through the index to find each article takes time. To help you access all these articles quickly, here’s a handy summary of ten key topics, with links to longer articles covering each subject in detail.
Part 1: The first step in making high-quality handloads is to carefully choose the best brass for your application. You need to know how to identify the different types of brass and how to choose the best kind for the ammo you want to load. CLICK HERE for Part 1.
Part 2: Even high-quality brass can have burrs around the flash hole that can interfere with the primer flame and cause inconsistent ignition – which can lead to shot groups opening up. Flash hole deburring is a critical step in making sure primers ignite powder consistently. CLICK HERE for Part 2.
Part 3: The next step is to make sure the primer pockets are square and uniform. Like flash hole deburring, primer pocket uniforming may reduce variations in primer ignition by ensuring more consistent primer seating. CLICK HERE for Part 3.
Part 4: Making sure all your cases are precisely the same length is crucial, especially when you use cases that have been fired before. Case trimming is the way to get there. CLICK HERE for Part 4.
Part 5: After trimming, cases still have to be resized. In order for them to work through the resizing die, they have to be lubricated. The case lube method you choose is crucial to making precision handloads. CLICK HERE for Part 5.
Part 6: Now it’s time to choose the dies that will resize your cases. There are several important options to consider in selecting the right sizing dies. CLICK HERE for Part 6.
Part 7: Wait! You’re not quite ready to start sizing yet. There’s yet more to consider before you start cranking cases through the press. Learn more about setting up and adjusting your sizing dies. CLICK HERE for Part 7.
Part 8: Once the cases are completely prepped, it’s time to start putting fresh components back into them. We start off by seating primers. CLICK HERE for Part 8.
Part 9: After the primers are seated, it’s time to drop in the powder. There are several tools that will help you handle powder for precision handloads. CLICK HERE for Part 9.
Part 10: The final step in the process is carefully seating the bullet to just the right depth. And then… you’re ready to try your loads at the range. CLICK HERE for Part 10.
Share the post "Precision Hand-Loading — Ten Steps Explained by Sinclair Int’l"
We have all been there…..you place a piece of tumbled brass in the shell-holder of your press, raise it into the die, and suddenly it is like somebody hit the brakes. The case is stuck in the die. Your first instinct is to reverse it out. You crank on the handle, and BANG! The rim rips off the case head and you are looking at a piece of brass stuck in the die.
A stuck case is one of the boo-boos that all of us reloaders have faced from time to time. If proper lubrication is applied, then it should not be a problem. No matter if you are a seasoned reloader or new to it, this situation can happen. Take your time, use the proper procedures, and you will be back in business in no time! This article explains how to avoid stuck cases (through proper lubrication) and how to use a stuck case removal system.
What Causes Stuck Cases
One of the first common mistakes reloaders face is the stuck case. It can be caused by too much or too little lube. Too much and a vacuum can be formed causing the case to become suctioned into the die. Too little lube and friction is the culprit. So what is the cure? There is no exact cure, but the best lube that we have found so far is just a dab of Imperial Sizing Die Wax on your fingers and applied in a thin coat on the body of the case, not the shoulder or neck. Too much of this wax can cause the vacuum effect, or can eventually load your die up with gobs of residue. If it is applied to the shoulder area, or the leftover wax moves up into the shoulder region of the die, you will see dents or dimples in the shoulder. [AccurateShooter.com Editor’s Note: For normal full-length sizing of small cases such as 220 Russian/PPC, 6mmBR, 6.5 Grendel, or 6.5×47 Lapua we recommend Ballistol (aerosol) lube. It is very slippery, goes on very thin, and does not gum up the die.]
A great way to ensure that your dies are clean is to use a simple chamber mop with a dab of your favorite solvent on it and clean out the die. Be sure all of the solvent is out after cleaning by spraying the die out with Quickscrub III or use a clean chamber mop. If you are storing your dies, you can apply a thin coat of a good oil to protect the steel such as TM oil or Starrett M1 Spray.
Using a Stuck Case Removal Kit
If you do stick a case in your die there are a few good stuck case removal kits available. Each one works in a similar fashion. I have found the Hornady kit very effective and easy to use.
Basically what you do is remove the die from the press. Unscrew the decapping assembly and pull it out as far as you can. You then need to drill/tap threads into the stuck case head (this is why it is suggested to unscrew the decapping assembly as far as you can to get it clear of the drill bits). Once this is done screw the die back into the press. You then install the included shellholder attachment on the shellholder ram, and thread it into the case via a small wrench. With some elbow grease you can reverse the stuck case out of the die with the leverage of the press, and not damage the die.
However if the case is stuck….REALLY stuck, you may pull out the threads on the case and you are still left with a stuck case in the die without any way to pull it out. If the case is really difficult to remove even with the use of a stuck case removal kit, do not try to be Hercules with the press ram. Here is a trick that may work. Take the die with the stuck case and place it in your freezer for a couple of hours. Then repeat the removal with the cold die. The freezing temperatures may cause the brass to contract, and make removal easier. If this does not work it is recommended to send it to the die manufacturer. They will be able to remove the case without damaging the die.
Another fix if you can remove the decapping assembly completely is to use a tap hammer and a punch or small wooden dowel to knock the stuck case out. This isn’t the best way since it is very possible that you will damage the die internally or externally on the threads, or both. Send the die to the manufacturer to have this done properly. You will be happier in the long run.
Available for under $200.00 including front bag, the Caldwell Fire Control front rest is a remarkable value. It makes the co-axial, joystick design more affordable than ever. We used the Fire Control front rest when testing our Ultimate Varminter 20 Practical AR. Once we removed some sand from the tri-lobe front bag, the rest worked quite well.
Get a Fire Control Rest for $197.99 Precision Reloading is running a sale this week on Caldwell products. Now through May 23rd you can get the Caldwell Fire Control Front Rest for just $197.99. That’s a great deal for guys on a tight budget who want a modern joystick-style front rest. With the conversion described in this article, you can put together a system that works pretty darn well, and is more than adequate for many applications, including prairie-dog hunting (from a bench).
Upgrading Fire Control Front Rest with Sinclair Top
While most Fire Control owners are happy with the product, many have wanted to replace the tri-lobe front bag with a more conventional front bag from Protektor or Edgewood. This isn’t as easy as it looks because the width of the Fire Control top is too narrow for most standard 3″-wide front bags. On a “special order” basis, Protektor has crafted some narrower leather front bags that fit pretty well, but some shooters have decided to “upgrade” the entire front assembly.
Forum member Doug M. (aka DrJeckyl), has come up with an elegant solution that allows a Sinclair Int’l Benchrest Rest Top to be fitted to the Fire Control Rest. Doug notes: “The Caldwell Fire Control is a nice rest for the money, but it comes up short in the rest top department. The Sinclair RT-3 [or its replacement, the Gen II B/R top] fits perfect with minor modifications.” Shown below are the main components:
To adapt the Sinclair RT-3 or Gen II B/R top, Doug merely had to drill a couple holes in the RT-3 baseplate, and adapt a spacer to get the height correct: “The Caldwell factory top has a raised mounting portion so a 1/8″ piece of stock will be needed as a spacer to the flat-bottom RT-3. The spacer needs to be cut to the same length as the movable portion on the rest. And you should plan the mounting accordingly so the left thumbscrew clears the vertical height column at full left position (there is a cutaway in the rest under the thumbscrew that allows for easy access to the screw).” We have labeled the photo with dimensions, but Doug cautions you should measure your own original plate to insure the drill locations are correct for your unit.
The completed installation, with the RT-3 installed on the Fire Control rest is shown at the top of this article. Doug says it works very well. To learn more about this conversion, with Doug’s measurments for the hole-spacing and his specs on the fasteners, go to the original thread in our Shooter’s Forum. NOTE: Sinclair no longer sells the RT-3 top, but Sinclair’s $75.99 Gen II B/R top can be converted just as easily. LINK to Fire Control Rest Top Conversion Forum Thread.
Share the post "Budget Co-Axial Rest — The $200 Caldwell (Plus Upgrade)"
Most competitive shooters are pretty good about bore cleaning (some may even clean their bores too aggressively). However, we’ve found that many shooters neglect the chamber area and the bolt lug recesses. It’s too easy to clean the bore, slip out the guide rod and say “I’m done.” Sinclair Int’l explains why it’s important to clean the action interior: “Shooters use a lot of grease and oil on their bolts to reduce friction and to prevent wear[.] Unfortunately, both of these compounds attract grit, powder and primer residues. Cleaning your receiver is especially critical [with] custom actions where the fit between the action and bolt is held to very tight tolerances. Routine cleaning of the action will prevent unnecessary wear on the bolt body, locking lugs, and the action raceways/guide rails. Frequent action cleaning is also essential to keeping the trigger area free of debris which can cause trigger hang-ups and failures.” Below, we present action cleaning advice from Sinclair’s Reloading Press Newsletter.
Cleaning the Chamber
Combustion by-products, lubricants, and solvent residues can collect in your chamber. Severe build-up of grease and carbon can interfere with chambering. Also some solvents will promote corrosion. You need to keep your chambers clean.
1) Install a clean cotton mop of the correct size on the end of a chamber rod and insert the mop into the chamber. Rotate the mop several times to remove any brush bristles left behind and any excess solvent that was between the rod guide snout and the end of the chamber. Make sure the chamber is dry. Prior to storing a rifle you can oil the chamber but make sure the oil is removed prior to firing the rifle.
2) Alternatively, install an old bore brush on a chamber rod, overlap a couple of patches on the brush bristles, and wrap them around the brush completely. Then insert the patch-covered brush into the chamber while rotating it to remove the excess solvent and debris. Push it firmly into the neck area of the chamber. A similar method is to pierce a large patch on the end of the brush loop and insert it into the action, again rotating the brush as you push the patch up against the breech.
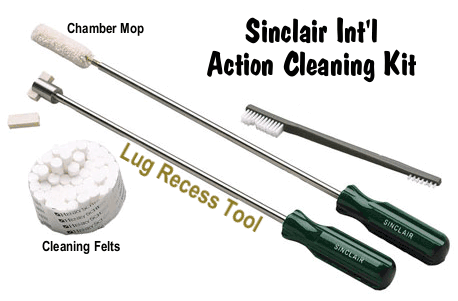
Cleaning the Lug Recess Area
The action lug recess area is one of the dirtiest places on a bolt-action rifle. To properly clean this area, always use a tool designed for the task, such as the $21.50 Sinclair Action Cleaning Tool (part # ACT1) which is part of the Sinclair Action Cleaning Tool Kit (now on sale for $29.99, part #ACT2).
1) Insert a cotton roll or cleaning felt into your lug recess cleaning tool and wet both ends and the face of the cotton roll/felt with solvent.
2) Insert the tool into the action and push it forward until it is positioned fully in the lug recess area and rotate the tool head several times. Then reverse the rotation for another few turns. While rotating the tool move it slightly in and out to cover the entire recess area and to also clean the breech face.
3) Remove the tool from the action and inspect the surface of the felt or cotton roll. If there is quite a bit of residue on both sides of the felt/roll, then repeat with another wet felt/roll.
4) When you feel the recess area is completely clean, insert a dry cotton roll into the tool and rotate the tool head to remove any remaining solvent and debris. If necessary, use a second dry cotton roll.
5) You can follow this step up with another pass of a mop or patches into the chamber to get any debris or solvent that pushed forward out of the lug recess area.
Cleaning Tips from The Reloading Press, used courtesy Sinclair Int’l, All Rights Reserved.
Share the post "TECH TIP: Clean Your Chamber and Lug Recesses"
Great news for shooters –Bill Gravatt (former owner and President of Sinclair International) has joined the team at Creedmoor Sports. Bill will work with Creedmoor on product development, customer service, and other key tasks, bringing his decades of experience to Creedmoor’s operations. Creedmoor Sports is a company on the rise — it now offers a full line of ammunition, and in recent years Creedmoor has launched its own successful “brick and mortar” retail stores.
Bill has worked in the shooting and reloading industry for over 25 years. His vast knowledge of “all things shooting and reloading” will help Creedmoor expand its product line and serve hand-loaders. Bill Gravatt commented: “The folks at Creedmoor Sports remind me of the great team I had at Sinclair International. They are all driven in pursuit of exemplary customer service, they create well-made products, love to shoot, and just enjoy the daily satisfaction that comes from helping fellow shooters enjoy their sport.”
Greg Kantorovich, owner and President of Creedmoor Sports, tells us: “We are excited to have Bill working with us in many areas including product innovation, content production, reloading expansion, and consulting with our management team.”
“Bill brings a passion for people, product, and process that is second to none. In the short time we have been working together he has helped us raise the bar on becoming a better company to serve our customers. Myself and my team are excited for the future of precision rifle shooting and what Creedmoor will continue to bring to market.”
About Creedmoor Sports, Inc.
Creedmoor Sports produces rugged, well-built equipment for precision-driven rifle shooters. Creedmoor offers products for centerfire, smallbore and air rifle/pistol disciplines, as well as hunting and recreational shooters. For more information, visit CreedmoorSports.com.
Share the post "Bill Gravatt Comes on Board at Creedmoor Sports"
Sinclair International offers a handy tool assembly that lets you sort bullets by base to ogive length. Yes you can do this with a comparator tool attached to calipers, but the Sinclair tool really speed up the process when you’re sorting large quantities of bullets.
The $79.99 Sinclair Bullet Sorting Stand with Dial Indicator (item 749-011-469WS) comes with a heavy black granite base that stays put on your loading bench. The included analog dial indicator has a quick-release lever allowing easy placement and removal of bullets into the comparator. This lever allow the spring-loaded indicator shaft to pop up out of the way.
In the video below, Sinclair shows how to use the Bullet Sorting device. Sinclair recommend sorting in batches with variance no greater than .005 (five-thousandths) in base-to-ogive length. We like to hold tolerances even tighter, trying to hold spreads to .003. The special base comparators used with this tool are offered for $10.99 in .22 caliber, 6mm, 6.5mm, 7mm, .30 caliber, and .338 caliber. The sorting stand can also be used with Sinclair’s handy multi-caliber hex-style comparators (items 749-002-942WS, or 748-002-833WS, $19.99).
Share the post "Bullet Base-to-Ogive Sorting Tool from Sinclair Aids Accuracy"
Sinclair International has a helpful, three-part video series on Full-Length Sizing. The full-length sizing die performs multiple important functions: it resizes the case body, resizes the neck, and adjusts the headspace relative to the chamber (it can also eject the spent primer if that was not done previously).
While neck-sizing-only can work with moderate loads (for a couple firings), after repeated firings the case can stretch, becoming too tight to chamber easily. If you shoot cases with high-pressure, near-max loads, you will probably benefit from full-length sizing your cases each reloading cycle. When full-length sizing, you will want to move the shoulder back (i.e. “bump” the shoulder) to provide proper clearance in the chamber. A case that has grown too much will exhibit stiff bolt lift after firing and be hard to chamber if it is not FL-sized during the reloading process.
Sinclair recommends bumping cases .001-.002″ (one to two thousandths) for cases used in bolt-action target-shooting rifles, or .003-.005″ (three to five thousandths) for hunting rifles or semi-auto rifles. To move the shoulder back you screw the FL-sizing die downwards in the press once you’ve determined “just touching” on the shoulder. You don’t have to screw the die down very far! With a normal 14-pitch die, 1/8th turn (45° rotation) yields approximately 0.009″ of downward movement. So it doesn’t take much to add a few thousandths of bump.
Case Sizing Part One — Why We Full-Length Resize
Case Sizing Part Two — How to Set Up Your Sizing Die
Case Sizing Part Three — How to Use a Bump Gauge
NOTE: These FLASH videos may not display on some mobile devices.
Share the post "How to Set Up Full-Length Sizing Dies and Control Shoulder Bump"
For decades, shooters have depended on Brownells to provide tools, parts and accessories for nearly all kinds of modern sporting and hunting firearms. Starting this month, gun owners can now purchase rifles, shotguns, and pistols from Brownells, which has opened a web-based, gun sales division. The company’s entry into selling firearms online makes Brownells a true, one-stop-shop for gun owners and shooting sports enthusiasts.
“We’ve been a gun company from the beginning,” said Pete Brownell, CEO of Brownells. “For 77 years, we’ve serviced all corners of the firearms market – new shooters to gunsmiths. This is just one example of many upcoming programs we’ll be launching to serve every portion of the gun industry.”
Brownells’ new Firearms Sales Center features more than 3,500 production firearms from over 30 popular gun manufacturers, including Remington, Ruger, Browning, CZ-USA, Smith & Wesson, Sig Sauer, Beretta, Benelli, Glock and more.
Customers can order guns online using the simple, step-by-step instructions. The quickest, easiest method for completing an online gun purchase will be to choose a Brownells Featured Dealer from the online list of FFL dealers who have already agreed to perform transfers on guns bought from Brownells.
News Tip from EdLongrange. We welcome reader submissions.
Share the post "Brownells Now Sells Guns — Large Inventory, 30+ Brands"


 Shiny brass — it may not shoot more accurately, but it does make you feel better about your hand-loaded ammo. While it’s not necessary to get brass “bright and shiny” after every firing, it is a good idea to clean powder residue, grime, and grit off your brass before you run cases into sizing dies. There are many ways to clean cartridge cases. A quick wipe with solvent on a patch may suffice for recently-shot cases. Older brass with baked-on carbon may require lengthy tumbling. Ultrasonic cleaning is another popular option that gets your brass clean inside and out.

 A stuck case is one of the boo-boos that all of us reloaders have faced from time to time. If proper lubrication is applied, then it should not be a problem. No matter if you are a seasoned reloader or new to it, this situation can happen. Take your time, use the proper procedures, and you will be back in business in no time! This article explains how to avoid stuck cases (through proper lubrication) and how to use a stuck case removal system.


 Sinclair International offers a handy tool assembly that lets you sort bullets by base to ogive length. Yes you can do this with a comparator tool attached to calipers, but the Sinclair tool really speed up the process when you’re sorting large quantities of bullets.