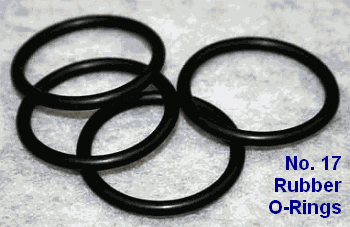
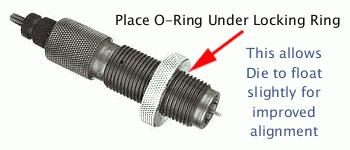
Here’s an inexpensive procedure that can help you load straighter ammo, with slightly better measured concentricity (i.e. less run-out) on the case necks and bullets. Simply use a Rubber O-Ring on the underside of the die locking ring. This allows the die to self-align itself (slightly) to the case that is being sized. Without the O-Ring, if the flat surface on the top of your press is not perfectly square with the thread axis, your die can end up slightly off-angle. This happens when the bottom of the locking ring butts up tight against the top of the press. The O-Ring allows the die to float slightly, and that may, in turn, reduce the amount of run-out induced during case sizing.
Top prone shooter GSArizona, who sadly passed last year, tried this trick and said it works: “Go to your local hardware store and get a #17 O-Ring (that’s the designation at Ace Hardware, don’t know if its universal). Slip the O-Ring on the die and re-adjust the lock ring so that the O-Ring is slightly compressed when the die is at the correct height. Size and measure a few more cases. You will probably see a slight improvement in neck concentricity as the die can now float a bit as the case enters and leaves it. This isn’t going to be a dramatic improvement, but it’s a positive one.”
We want to stress that adding O-Rings to sizing dies may help some reloaders, but we don’t offer this as a panacea. Try it — if using the O-Ring reduces measured runout that’s great. If it doesn’t, you’ve only spent a few pennies to experiment.
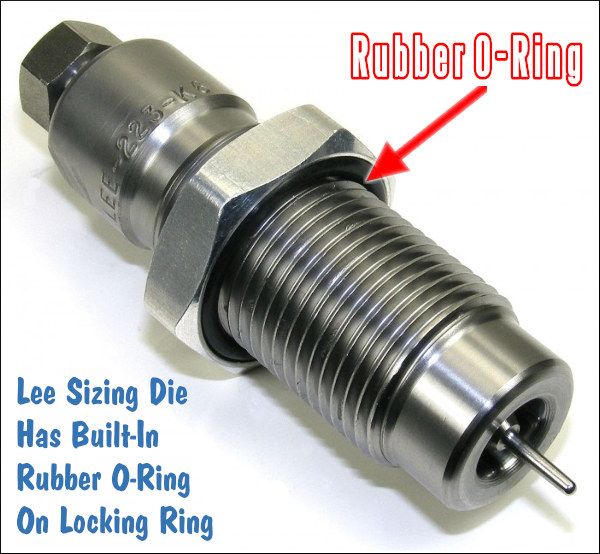
Lee Precision makes die lock rings with built-in O-Rings. Lee’s distinctive lock ring design allows the same kind of self-alignment, which is good. However, Lee lock rings don’t clamp in place on the die threads, so they can move when you insert or remove the dies — and that can throw off your die setting slightly. By using an O-Ring under a conventional die lock ring (that can be locked in place), you get the advantages of the Lee design, without the risk of the lock ring moving.
Share the post "Reloading TIP — O-Rings Can Help Reduce Run-out When Sizing"
With the Whidden Click-Adjustable Sizer Dies, you can change shoulder bump by .001″ (one-thousandth) with a simple click. Fast. Easy. Precise.
As handloaders have become more aware of shoulder bump and proper adjustment of the sizer die in recent years, there has become a need for an easier way to adjust the sizer die properly. For most folks, with their conventional dies, it takes lengthy trial trial and error to get the shoulder setback correct. Anyone who has done this can attest that it can be a slow and annoying job.
Whidden Gunworks has solved the problem with the innovative Click Adjustable Sizer Die. Patent No: 10,393,488. This die and lock ring work together to give the user a clicking feel to the adjustment just like a high end rifle scope. Each click moves the shoulder bump exactly .001″ so you can easily find the exact shoulder bump that you desire.
The Click Adjustable option is available on Whidden Custom Sizer dies as well (7/8”-14 format dies only)! Included with the Click Adjustable Sizer Die is a Shoulder Bump Gauge. This gauge attaches to standard calipers and allows measurement from the case shoulder to the base. Using the Shoulder Bump Gauge with the Click Adjustable Sizer Die will make the proper sizer die setup easier than ever before.
Click-adjustable die sets are available with both bushing and non-bushing configurations. Along with these complete die sets, Whidden Gunworks offers a separate click-adjustable ring to use with existing dies. Priced at $58.99, the Whidden Click-Adjust Lock Ring represents a modest investment for a major gain in die ease-of-use and precision adjustability.
The Whidden Universal Click Adjustable Lock Ring you can instantly turn your sizer die into a Click Adjustable Die. This ring works with any 7/8 OD sizer of any brand with adjustable shoulder bump. Simple in design, the inner and outer ring can rotate independently of each other. Each click is metered in true 1 thousandths adjustment and has 0.100″ total available travel. These work great with nearly all sizing 7/8 OD sizing dies, and one verified purchaser noted: “Not only are they useful on reloading dies, but it’s the cat’s meow on the Giraud Power Trimmer Case Holders.”
Dillon Users Take Note: The Whidden Click Adjustable Sizing Die will not work with the Dillon 550 or 650 progressive reloading press systems. The Universal Click Adjustable Lock Ring is not compatible with the Dillon floating toolhead.
Share the post "Click-Adjustable FL Sizing Die from Whidden Gunworks"
Here’s a handy new item, particularly if you load large quantities of bulk ammo for a variety of firearms. Lyman’s new Ammo Checkers check the diameters of reloaded rounds and factory ammo, so you can quickly confirm that your ammo fits a standard chamber. Just drop your loaded rounds in the Ammo Checker, and if the round fits into the gauge, it will fit in the gun’s chamber.
Lyman Ammo Checkers are multi-caliber — each orange block checks six or eight different cartridge types, with each caliber/cartridge name engraved on the gauge. Ammo Checkers are machined to SAAMI minimum chamber dimensions from solid blocks of 6061 T6 aluminum. Ammo Checkers are available in three versions covering most common handgun and rifle calibers:
Handgun Ammo Checker (#7833000) $35.99 at Brownells
Fits: 380 Auto, 9mm Luger, 38 Super, 40 S&W, 45 ACP, 38/357, 44 Spl/Mag, and 45 Colt
Why Use a Case Gauge?
We find that case gauges like the Lyman Ammo Checker are particularly useful for handgun reloaders using progressive presses. The chambers of many popular semi-auto pistols are partly unsupported. This allows the case to swell in the bottom quarter. The case may not be sized adequately by your sizing die, which can lead to misfeeds or malfunctions.
Additionally, if you have loaded a large quantity of ammo for a semi-auto rifle such as an AR15, it’s not a bad idea to check your cartridges before you load them into your magazines. All you need is one mis-sized round to cause a stoppage. That will ruin your day if you are competing in a Service Rifle match or 3-Gun event.
Share the post "Lyman Ammo Checker Multi-Caliber Case Gauges"
Many novice hand-loaders believe that neck bushing Inside Diameter (ID) size is the only important factor in neck tension. In fact, many different things will influence the grip on your bullet and its ability to release from the case neck. To learn more about neck tension and “case grip”, take the time to read this article carefully. We bet you’ll gain knowledge that will let you load more accurate ammo, with better ES/SD.
Editor: Guys, this is a VERY important article. You really should read it over carefully, twice. Variations in the force required to release a bullet can significantly affect accuracy and ES/SD. You really need to know how the grip on bullet can be altered by many different factors.
Neck Tension (i.e. Grip on Bullets) Is a Complex Phenomenon
While we certainly have considerable control over neck tension by using tighter or looser bushings (with smaller or bigger Inside Diameters), bushing size is only one factor at work. It’s important to understand the multiple factors that can increase or decrease the resistance to bullet release. Think in terms of overall brass-on-bullet “grip” instead of just bushing size (or the internal neck diameter in non-bushing full-length sizing dies).
Bullet grip is affected by many things, such as:
1. Neck-wall thickness.
2. Amount of bullet bearing surface (shank) in the neck.
3. Surface condition inside of neck (residual carbon can act as a lubricant; ultrasonic cleaning makes necks “grabby”).
4. Length of neck (e.g. 6mmBR neck vs. 6mm Dasher).
5. Whether or not the bullets have an anti-friction coating.
6. The springiness of the brass (which is related to degree of work-hardening; number of firings etc.)
7. The bullet jacket material.
8. The outside diameter of the bullet and whether it has a pressure ridge.
9. Time duration between bullet seating and firing (necks can stiffen with time).
10. How often the brass is annealed.
11. Amount (length) of neck sized (e.g. you can size only half the neck).
12. Interior diameter of bushing, or neck section of non-bushing die. – and there are others…
One needs to understand that bushing size isn’t the beginning and end of neck tension questions, because, even if bushing size is held constant, the amount of bullet “grip” can change dramatically as the condition of your brass changes. Bullet “grip” can also change if you alter your seating depth, and it can even change if you ultrasonically clean your cases.
6-time U.S. National Long-Range Champion John Whidden adds: “Our tests show us that the condition of the necks in regards to lubed or not, carbon inside or not, squeaky clean or not, etc., matter even more than the size of the bushing used. An ultrasonically cleaned or brand new dry case neck make for some quite high seating force.”
In our Shooters’ Forum a reader asked: “How much neck tension should I use?” This prompted a lengthy Forum discussion in which other Forum members recommended a specific number based on their experience, such as .001″, .002″, or .003″. These numbers, as commonly used, correspond to the difference between case-neck OD after sizing and the neck OD of a loaded round, with bullet in place. In other words, the numbers refer to the nominal amount of interference fit (after sizing).
While these commonly-used “tension numbers” (of .001″, .002″ etc.) can be useful as starting points, neck tension is actually a fairly complex subject. The actual amount of “grip” on the bullet is a function of many factors, of which neck-OD reduction during sizing is just one. Understanding these many factors will help you maintain consistent neck tension as your brass “evolves” over the course of multiple reloadings.
Seating Depth Changes Can Increase or Decrease Grip on Bullet
You can do this simple experiment. Seat a boat-tail bullet in your sized neck with .150″ of bearing surface (shank) in the neck. Now remove the bullet with an impact hammer. Next, take another identical bullet and seat it with .300″ of bearing surface in another sized case (same bushing size/same nominal tension). You’ll find the deeper-seated bullet is gripped much harder.
Neck-Wall Thickness is Important Too
I have also found that thinner necks, particularly the very thin necks used by many 6mm PPC benchrest shooters, require more sizing to give equivalent “grip”. Again, do your own experiment. Seat a bullet in a case turned to .008″ neckwall thickness and sized down .003″. Now compare that to a case with .014″ neckwall thickness and sized down .0015″. You may find that the bullet in the thin necks actually pulls out easier, though it supposedly has more “neck tension”, if one were to consider bushing size alone.
In practical terms, because thick necks are less elastic than very thin necks, when you turn necks you may need to run tighter bushings to maintain the same amount of actual grip on the bullets (as compared to no-turn brass). Consequently, I suspect the guys using .0015″ “tension” on no-turn brass may be a lot closer to the guys using .003″ “tension” on turned necks than either group may realize.
Toward a Better Definition of Neck Tension
As a convenient short-cut, we tend to describe neck tension by bushing size alone. When a guy says, “I run .002 neck tension”, that normally means he is using a die/bushing that sizes the necks .002″ smaller than a loaded round. Well we know something about his post-sizing neck OD, but do we really have a reliable idea about how much force is required to release his bullets? Maybe not… This use of the term “neck tension” when we are really only describing the amount of neck diameter reduction with a die/bushing is really kind of incomplete.
My point here is that it is overly simplistic to ask, “should I load with .001 tension or .003?” In reality, an .001″ reduction (after springback) on a thick neck might provide MORE “grip” on a deep-seated bullet than an .003″ reduction on a very thin-walled neck holding a bullet with minimal bearing surface in the neck. Bushing ID is something we can easily measure and verify. We use bushing size as a descriptor of neck tension because it is convenient and because the other important factors are hard to quantify. But those factors shouldn’t be ignored if you want to maintain consistent neck tension for optimal accuracy.
Consistency and accuracy — that’s really what this all about isn’t it? We want to find the best neck tension for accuracy, and then maintain that amount of grip-on-bullet over time. To do that you need to look not only at your bushing size, but also at how your brass has changed (work-hardened) with time, and whether other variables (such as the amount of carbon in the neck) have changed. Ultimately, optimal neck tension must be ascertained experimentally. You have to go out and test empirically to see what works, in YOUR rifle, with YOUR bullets and YOUR brass. And you may have to change the nominal tension setting (i.e. bushing size) as your brass work-hardens or IF YOU CHANGE SEATING DEPTHS.
Remember that bushing size alone does not tell us all we need to know about the neck’s true “holding power” on a bullet, or the energy required for bullet release. True bullet grip is a more complicated phenomenon, one that is affected by numerous factors, some of which are very hard to quantify.
Share the post "Case Grip on Bullets — Neck Bushing Size is Just ONE Factor"
Here’s an inexpensive procedure that can help you load straighter ammo, with slightly better measured concentricity (i.e. less run-out) on the case necks and bullets. Simply use a Rubber O-Ring on the underside of the die locking ring. This allows the die to self-align itself (slightly) to the case that is being sized. Without the O-Ring, if the flat surface on the top of your press is not perfectly square with the thread axis, your die can end up slightly off-angle. This happens when the bottom of the locking ring butts up tight against the top of the press. The O-Ring allows the die to float slightly, and that may, in turn, reduce the amount of run-out induced during case sizing.
Top prone shooter GSArizona has tried this trick and he says it works: “Go to your local hardware store and get a #17 O-Ring (that’s the designation at Ace Hardware, don’t know if its universal). Slip the O-Ring on the die and re-adjust the lock ring so that the O-Ring is slightly compressed when the die is at the correct height. Size and measure a few more cases. You will probably see a slight improvement in neck concentricity as the die can now float a bit as the case enters and leaves it. This isn’t going to be a dramatic improvement, but it’s a positive one.”
We want to stress that adding O-Rings to sizing dies may help some reloaders, but we don’t offer this as a panacea. Try it — if using the O-Ring reduces measured runout that’s great. If it doesn’t, you’ve only spent a few pennies to experiment.
Lee Precision makes die lock rings with built-in O-Rings. Lee’s distinctive lock ring design allows the same kind of self-alignment, which is good. However, Lee lock rings don’t clamp in place on the die threads, so they can move when you insert or remove the dies — and that can throw off your die setting slightly. By using an O-Ring under a conventional die lock ring (that can be locked in place), you get the advantages of the Lee design, without the risk of the lock ring moving.
Share the post "Go with the “O” — O-Rings May Reduce Run-Out When Sizing"
When your cases become hard to extract, or you feel a stiff bolt lift when removing a cartridge, it’s probably time to full-length size your cases, and “bump” the shoulder back. Short-range benchrest shooters, running high pressures, typically full-length size every load cycle, bumping the shoulder .001-.002″. The vast majority of mid-range and long-range F-Class shooters also full-length size every time. High Power shooters with gas guns should definitely full-length size every time, and may need to bump the shoulders .003″ or more to ensure reliable feeding and extraction.
Use Shims for Precise Control of Shoulder Bump
Some shooters like to set the “default” position for their full-length die to have an “ample” .003″ or .004″ shoulder bump. When they need less bump, a simple way to reduce the amount of shoulder movement is to use precision shims in .001″ (one-thousandth) increments. Brownells offers a set of seven (7) shims for your standard 7/8-14 FL sizing dies for $14.99. These Sinclair Int’l shims are Brownells Item 749-001-325WB. They may be out of stock, but they can be back-ordered.
Sinclair explains: “Each shim is notched for easy size identification. Just set your die using one of the middle thickness shims. Adjustments can be made easily by changing shims to increase or decrease die depth without changing the stem setting. This is a great upgrade for non-micrometer adjustable dies.”
Here are reports from Forum members who use the shims:
“Great product. I have my die lock ring(s) adjusted for the shortest headspace length on my multiple 6BRs and 6PPCs. When needing a longer headspace, I just refer to my notes and add the appropriate shim under the lock ring. Keep it simple.” — F.D. Shuster
Mats Johansson writes: “I’ve been using [shims] since Skip Otto (of BR fame) came out with them. I set up my dies with the .006″ shim, giving me the option of bumping the shoulder a bit more when the brass gets old and hardens while still having room to adjust up for zero headspace, should I have missed the original setup by a thou or two. Hunting rounds can easily be bumped an extra .002-.003″ for positive, no-crush feeding. Being a safety-oriented cheapskate, I couldn’t live without them — they let me reload my cases a gazillion times without dangerous web-stretching. Shims are a must-have, as simple as that.” — Mats Johansson
Brownells offers the seven-piece set of Sizing Die Shims that let you adjust the height of your die (and thereby the amount of bump and sizing) in precise .001″ increments. Sinclair explains: “Some handloaders will set their die up to achieve maximum sizing and then progressively use Sinclair Die Shims between the lock ring and the press head to move the die away from the shellholder. Doing this allows you to leave the lock ring in the same position. These shims are usually available in increments of .001″ and work very well.”
Seven Shims from .003″ to .010″
For use with 7/8-14 threaded dies, Sinclair’s $14.99 Die Shim Kit (Sinclair item 22400 or Brownells Code 749-001-325WB) includes seven shims in thicknesses of .003, .004, .005, .006, .007, .008, and .010. For ease of use, shim thickness is indicated by the number of notches cut in the outer edge of each shim. Even without looking you can “count” the notches by feel.
NOTE: These shim sets can also be use to adjust bullet seating depth for seating dies that lack micrometer adjustment. Use the same 7/8-14 shims with your non-micrometer seating dies.
Share the post "Handy Shim Sets for Sizing Dies — Quickly Adjust Shoulder Bump"
Tired of messing around with neck bushings? Is there a simpler (and potentially better) solution for controlling case neck tension? Yes there is — the precision honed non-bushing die.
You can purchase a Forster non-bushing Full-length sizing die for many popular cartridge types for under $50.00. Then you can send that die to Forster, and Forster will custom-hone the neck for a $24 fee (includes return shipping). When done right, the honed FL die can load ultra-straight ammo with the precise next tension you prefer for your brass and bullet choice.
Alternative to Bushings — Honed Full-Length dies
Conventional, non-bushing full-length sizing dies can create ultra-accurate ammo with very low run-out. For some applications, we prefer a non-bushing FL die over a bushing die — so long as the neck tension is correct. But many FL dies have an undersized neck diameter so you end up with excess neck tension, and you work the brass excessively. Forster offers a simple, inexpensive solution — honing the neck diameter to whatever size you want*.
If you purchase a Forster non-bushing, full-length sizing die, Forster will hone the neck dimension to your specs for $24.00 including return shipping. This way you can have a FL die that provides the right amount of tension for your particular load. (The max amount of diameter change Forster can do is about .008″) Forster dies are relatively inexpensive so you can afford to have a couple of FL dies with necks honed to different diameters — such as 0.266″ and 0.267″ for a no-turn 6mmBR. The die itself is fairly inexpensive — currently Precision Reloading charges $44.54 for a Forster 6mmBR FL sizing die (Forster Part #018121).
Forster FL dies, necks honed to .265″, .266″, and .267″.
Steve Rasmussen of IowaHighPower.com gave this a try. In fact, he had three dies made — each with a different neck dimension. Here’s his report: “My original Forster 6BR FL die sized the necks down a lot [to about 0.260″]. I sent my die in and asked if they could supply two more FL dies (for three total) to have the necks honed to 0.265″, 0.266″, and 0.267″.” In addition to the purchase cost of two more FL-sizing dies, Steve paid $36 ($12 per die) for the three dies to be honed.
Steve’s honed dies produced very straight loaded ammo:
“Brass springback after sizing is running 1 to 1.3 thousandths. My loaded rounds are running 0.2697-0.2699 using [older Gold Box Lapua brass]. So far the dies are working well. I sized 80 cases with the 0.266″ necked die. The shoulder is running 0.4582″ and 0.300″ up from the base is 0.4684". I spun 20 of ‘em and 16 had a runout of one thousandth (0.001) and the other 4 at 1.5 thousandths (0.0015).”
We custom hone the inside neck diameter by using a diamond stoning process. We enlarge the inside diameter to your specification to prevent over-sizing of the case neck due to thick neck walls. You may require this service for multiple reasons: 1) If you use some brands of brass cases which have thicker neck walls. 2) If you do not intend to outside neck turn case necks that have thickened after repeated firings. Please specify desired inside neck diameter. Note: 1) No more than .008″ stock removal from your existing die neck diameter is possible. 2) Honing is done in increments of one half thousandth of an inch (.0005″), meaning that your specified inside diameter must be either.XXX0″ or .XXX5″. FEES: $24.00, includes shipping within continental U.S. (lower 48 states). Please allow 1-3 weeks
Share the post "The Honed-Neck FL Sizing Die Option — Alternative to Bushings"
One of the most important aspects of precision reloading is setting the shoulder bump during the full-length (FL) sizing process. You want the amount of “bump” to be precise and identical for every loaded round. However, when you switch brands of brass you may need to change the die position to get the desired bump and case body sizing. And even with the same brand of brass, you may find that you need to adjust your FL die as the number of brass load cycles increases. Brass that has been fired many times will behave differently than new or near-new brass.
Also, even with the same cartridge type, brass loaded for a semi-auto rifle may need more bump than brass fired in a bolt gun. For example, with .223 Rem ammo, you’ll normally want to push the shoulder back farther if the ammo will be shot in a AR15 as opposed to a bolt-action rig.
So how do you make all these needed adjustments for your full-length dies? You can move a conventional locking ring up and down, but that can be a tedious, trial-and-error process. Some guys use shims in one-thousandth intervals, but that still requires taking your dies in and out of the press. Well there is a better way now…
PMA Tool Micro-Die Adjuster
Wouldn’t it be great if you could precisely adjust your FL die up and down in half-thousandth increments, with a simple indexed click. That is now possible with products offered by PMA Tool and Whidden Gunworks. PMA Tool offers a Micro-Die Adjuster that replaces your existing lock ring and can be used with nearly any 7/8-14 full length sizing die. The engraved marks correspond to approximately .001″ of shoulder bump adjustment. Splitting the engraved marks is therefore approximately equal to .0005″ (half a thousandth). Users love this product, saying it adds precision and saves time.
Whidden Click-Adjustable FL Sizing Die System
Whidden Gunworks offers a complete click-adjustable FL sizer die with a special, indexed ring. With Whidden’s patent-pending Click Adjustable Sizer Die system, the die and lock ring work together to allow rapid, precise bump adjustments. One click changes the bump .001″. It’s simple and fast. Included with the Click Adjustable Sizer Die is a shoulder bump gauge. John Whidden (in video below) explains:
“There has become a need for an easier way to adjust the sizer die properly. Until now there have been few options other than trial and error to get the shoulder setback correct. Anyone who has done this can attest that it’s a slow and imprecise job! Our die and lock ring work together to give the user a clicking feel to the adjustment. Each click moves the shoulder bump .001” so you can easily find the exact shoulder bump that you desire.” — John Whidden
General Tips on Setting Up and Using Sizing Dies
Share the post "PMA Micro-Die Adjuster and Whidden Click-Adjustable FL Dies"
After purchasing a new set of dies from Forster, Hornady, Redding, or Whidden Gunworks, you’ll want to disassemble the dies, inspect then, and then remove the internal grease and/or waxy coatings placed on the dies by the manufacturer. Here are two video that show how to de-grease and clean dies as they come “out of the box” from the manufacturer. In the first video, from Creedmoor Sports, Bill Gravatt shows various methods for cleaning dies both when new and after they have accumulated carbon and lube after use. This video is definitely worth watching. In the second video, a Hornady technician shows the method for degreasing dies before first use. A convenient aerosol spray cleaner is used in the video. You an also use a liquid solvent with soft nylon brush, and cotton patches. NOTE: After cleaning you may want to apply a light grease to the external threads of your dies.
Creedmoor Sports Die Cleaning Video with Bill Gravatt
Hornady Video Showing Aerosol Cleaner
Clean Your Sizing Dies and Body Dies Regularly
These same techniques work for cleaning dies after they have been used for reloading. Many otherwise smart hand-loaders forget to clean the inside of their dies, allowing old case lube, gunk, carbon residue, and other contaminants to build up inside the die. You should clean your dies fairly often, particularly if you do not tumble or ultrasound your cases between loadings. It is most important to keep full-length sizing and body dies clean. These dies accumulate lube and carbon residue quickly.
Share the post "How to Properly Clean Your Reloading Dies"
Many novice hand-loaders believe that neck bushing Inside Diameter (ID) size is the only important factor in neck tension. In fact, many different things will influence the grip on your bullet and its ability to release from the case neck. To learn the ins and outs of neck tension, take some time and read this article carefully.
Neck Tension (i.e. Grip on Bullets) Is a Complex Phenomenon
While we certainly have considerable control over neck tension by using tighter or looser bushings (with smaller or bigger Inside Diameters), bushing size is only one factor at work. It’s important to understand the multiple factors that can increase or decrease the resistance to bullet release. Think in terms of overall brass-on-bullet “grip” instead of just bushing size (or the internal neck diameter in non-bushing FL dies).
Bullet grip is affected by many things, such as:
1. Neck-wall thickness.
2. Amount of bullet bearing surface (shank) in the neck.
3. Surface condition inside of neck (residual carbon can act as a lubricant; ultrasonic cleaning makes necks “grabby”).
4. Length of neck (e.g. 6mmBR neck vs. 6mm Dasher).
5. Whether or not the bullets have an anti-friction coating.
6.The springiness of the brass (which is related to degree of work-hardening; number of firings etc.)
7. The bullet jacket material.
8. The outside diameter of the bullet and whether it has a pressure ridge.
9. Time duration between bullet seating and firing (necks can stiffen with time).
10. How often the brass is annealed.
11. Amount (length) of neck sized (e.g. you can size only half the neck).
12. Interior diameter of bushing, or neck section of non-bushing die.
— and there are others…
One needs to understand that bushing size isn’t the beginning and end of neck tension questions, because, even if bushing size is held constant, the amount of bullet “grip” can change dramatically as the condition of your brass changes. Bullet “grip” can also change if you alter your seating depth, and it can even change if you ultrasonically clean your cases.
In our Shooters’ Forum a reader recently asked: “How much neck tension should I use?” This prompted a Forum discussion in which other Forum members recommended a specific number based on their experience, such as .001″, .002″, or .003″. These numbers, as commonly used, correspond to the difference between case-neck OD after sizing and the neck OD of a loaded round, with bullet in place. In other words, the numbers refer to the nominal amount of interference fit (after sizing).
While these commonly-used “tension numbers” (of .001″, .002″ etc.) can be useful as starting points, neck tension is actually a fairly complex subject. The actual amount of “grip” on the bullet is a function of many factors, of which neck-OD reduction during sizing is just one. Understanding these many factors will help you maintain consistent neck tension as your brass “evolves” over the course of multiple reloadings.
Seating Depth Changes Can Increase or Decrease Grip on Bullet
You can do this simple experiment. Seat a boat-tail bullet in your sized neck with .150″ of bearing surface (shank) in the neck. Now remove the bullet with an impact hammer. Next, take another identical bullet and seat it with .300″ of bearing surface in another sized case (same bushing size/same nominal tension). You’ll find the deeper-seated bullet is gripped much harder.
Neck-Wall Thickness is Important Too
I have also found that thinner necks, particularly the very thin necks used by many PPC shooters, require more sizing to give equivalent “grip”. Again, do your own experiment. Seat a bullet in a case turned to .008″ neckwall thickness and sized down .003″. Now compare that to a case with .014″ neckwall thickness and sized down .0015″. You may find that the bullet in the thin necks actually pulls out easier, though it supposedly has more “neck tension”, if one were to consider bushing size alone.
In practical terms, because thick necks are less elastic than very thin necks, when you turn necks you may need to run tighter bushings to maintain the same amount of actual grip on the bullets (as compared to no-turn brass). Consequently, I suspect the guys using .0015″ “tension” on no-turn brass may be a lot closer to the guys using .003″ “tension” on turned necks than either group may realize.
Toward a Better Definition of Neck Tension
As a convenient short-cut, we tend to describe neck tension by bushing size alone. When a guy says, “I run .002 neck tension”, that normally means he is using a die/bushing that sizes the necks .002″ smaller than a loaded round. Well we know something about his post-sizing neck OD, but do we really have a reliable idea about how much force is required to release his bullets? Maybe not… This use of the term “neck tension” when we are really only describing the amount of neck diameter reduction with a die/bushing is really kind of incomplete.
My point here is that it is overly simplistic to ask, “should I load with .001 tension or .003?” In reality, an .001″ reduction (after springback) on a thick neck might provide MORE “grip” on a deep-seated bullet than an .003″ reduction on a very thin-walled neck holding a bullet with minimal bearing surface in the neck. Bushing ID is something we can easily measure and verify. We use bushing size as a descriptor of neck tension because it is convenient and because the other important factors are hard to quantify. But those factors shouldn’t be ignored if you want to maintain consistent neck tension for optimal accuracy.
Consistency and accuracy — that’s really what this all about isn’t it? We want to find the best neck tension for accuracy, and then maintain that amount of grip-on-bullet over time. To do that you need to look not only at your bushing size, but also at how your brass has changed (work-hardened) with time, and whether other variables (such as the amount of carbon in the neck) have changed. Ultimately, optimal neck tension must be ascertained experimentally. You have to go out and test empirically to see what works, in YOUR rifle, with YOUR bullets and YOUR brass. And you may have to change the nominal tension setting (i.e. bushing size) as your brass work-hardens or IF YOU CHANGE SEATING DEPTHS.
Remember that bushing size alone does not tell us all we need to know about the neck’s true “holding power” on a bullet, or the energy required for bullet release. True bullet grip is a more complicated phenomenon, one that is affected by numerous factors, some of which are very hard to quantify.
Share the post "Controlling Grip on Bullet — Why Bushing Size is Only One Factor"
Wouldn’t it be great if you could quickly and easily adjust shoulder bump during the full-length sizing process, without struggling to move die lock-rings by trial and error (or fiddle with shims). Well you can. The PMA Micro Die Adjuster is a brilliant little device that replaces the lock ring on your FL sizing die. It allows you to move the die up and down in precise, tiny increments. The tool has .001″ index marks, but you can easily set your die between the marks to achieve .0005″ (half-thousandth) adjustments.
To see how the PMA Micro-Die Adjuster works, watch this video by our friend Boyd Allen:
Many of our Forum members now use the PMA Micro Die Adjuster, and they give this specialty tool high praise. Here are actual reviews by Forum members and other verified tool buyers. Read more comments in this AccurateShooter Forum Thread.
PMA Micro Die Adjuster User Reviews
“No more ‘close enough’ for headspace[.] With this tool set-up it’s easy to put headspace exactly where you want it, then repeat it exactly for subsequent batches for the same cartridge.” — JohnF
“I have four of these Micro Adjuster rings and all I can say is that it works and it is repeatable. I bump my brass .0005″-.001″ and this die lock ring will do it without issue.” — TrapperT
“I size brass for four different 6.5×47 rifles (chambered with three different reamers) using a single die, set in the PMA Adjuster. I have to say… I should have bought one sooner. Adjusting it is very quick and repeatable to well under .001.” — /VH
“I’ve been using PMA’s lock ring for some time now and find it to be very easy to adjust to within .0005″ on a single piece of brass. Very quick to do as well. One thing I have found is that if you still need that half-thou adjustment I will run the brass once more at the same setting before I make that .0005″ adjustment and 50 percent of the time that does the trick. The marked increments are in .001″ scale so if you go half way in between there’s your half-thousandth.
PMA Micro-Adjuster vs. Shims
Many hand-loaders have abandoned shims after trying the PMA Micro Die Adjuster:
“Shims [require] you to completely remove the die. That gets old rather quickly after having used the PMA adjustable lock ring.” — Patch 700
“Great product. Shims used to drive me crazy, put a .002 in and get .0035 of change. With this if you want .0015 set it and that’s what you get.” — John B
“I like mine — adjustments are easy and it will adjust very fine. I used to use .001″ shims. Now can adjust my bump as fine as I want.” — Joe139
Product Description from PMA Tool
The PMA Tool Micro Die Adjuster (MDA) replaces your existing lock ring and can be used with nearly any 7/8-14 full length sizing die. We successfully used this tool with sizing dies from Redding, RCBS, Hornady, Lee, Harrells Precision and those made from Newlon Precision die blanks. It allows you to easily make adjustments to your “shoulder bump” as fine as .0005″. The engraved marks on the MDA are equal to approximately .001 inches (true adjustment .000992″) of adjustment to the shoulder bump. Splitting the engraved marks is therefore approximately equal to .0005″. The design of the MDA does not allow it to work with the Forster Co-Ax press. Some custom dies for very short cartridges may require the use of an extended shellholder. Micro Die Adjuster shown in use installed on Custom Newlon/Scott 6mm PPC Die and Harrells Precision Compact Press.
Share the post "PMA Micro-Die Adjuster — Try One And You’ll Be Spoiled"
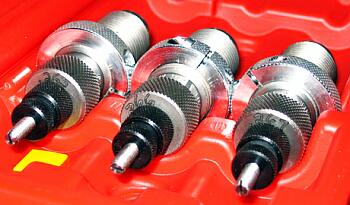
One of our Forum members complained that he wasn’t able to set his primers flush to the rim. He tried a variety of primer tools, yet no matter what he used, the primers still didn’t seat deep enough. He measured his primers, and they were the right thickness, but it seemed like his primer pockets just weren’t deep enough. He was mystified as to the cause of the problem.
Well, our friend Boyd Allen diagnosed the problem. It was the decapping rod. If the rod is adjusted too low (screwed in too far), the base of the full-diameter rod shaft (just above the pin) will contact the inside of the case. That shaft is steel whereas your case is brass, a softer, weaker metal. So, when you run the case up into the die, the shaft can actually stretch the base of the primer pocket outward. Most presses have enough leverage to do this. If you bell the base of the primer pocket outwards, you’ve essentially ruined your case, and there is no way a primer can seat correctly.
The fix is simple. Just make sure to adjust the decapping rod so that the base of the rod shaft does NOT bottom out on the inside of the case. The pin only needs to extend through the flash hole far enough to knock the primer out. The photo shows a Lyman Universal decapping die. But the same thing can happen with any die that has a decapping rod, such as bushing neck-sizing dies, and full-length sizing dies.
Whenever you use a die with a decapping pin for the first time, OR when you move the die to a different press, make sure to check the decapping rod length. And it’s a good idea, with full-length sizing dies, to always re-check the height setting when changing presses.
Lee Universal Decapping Die on SALE for $9.89
Speaking of decapping tools, MidwayUSA has the Lee Universal Decapping Die on sale this month (June, 2010), for just $9.89 (item 136543). There are many situations when you may want to remove primers from fired brass as a separate operation (prior to case sizing). For example, if your rifle brass is dirty, you may want to de-cap before sizing. Or, if you load on a progressive press, things will run much more smoothly if you decap you brass first, in a separate operation. The Lee Universal Decapping Die will work with cartridges from 17 Fireball all the way up to 45-70. However, NOTE that the decapping pin supplied with this Lee die is TOO LARGE for LAPUA 6.5×47, 6BR, 220 Russian, and Norma 6 PPC flash holes. Because the pin diameter is too large for these brass types, you must either turn down the pin, or decap with a different tool for cases with .059″ flash-holes. Otherwise, the Lee Decapping Die works well and it’s a bargain.
Share the post "Reloading Tip: Set Your Decapping Rod Insertion Depth Correctly"


 In our
  Neck-Wall Thickness is Important Too


 In our
  Neck-Wall Thickness is Important Too


