|
|
March 1st, 2024

Accurate, modular, and supremely versatile, the AR15 is America’s favorite semi-auto rifle. But let’s face it, the AR is a maintenance hog. The AR’s gas tube blows carbon and soot right into the middle of the bolt assembly where it cakes on to the metal. The AR bolt also has many tiny parts, and small recesses, which must be cleaned regularly. This author has seen numerous ARs fail simply because there was gunk (dried lube, carbon, brass shavings) in the ejector slot or extractor spring recess.
 A Clean AR is a Happy AR — Whether You Run ‘Wet’ or ‘Dry’ A Clean AR is a Happy AR — Whether You Run ‘Wet’ or ‘Dry’
There are various schools of thought when it comes to maintaining an AR. Some folks prefer to run their AR “dry” with minimal lube on the lugs and friction surfaces. Other shooters prefer to run their ARs “wet”, with lots of lube. But whatever your preference, you need to clean your AR regularly. And nothing is more important than the AR’s bolt/carrier assembly. Because it is involved in feeding, firing, and extracting, the AR-15 bolt/carrier assembly can be considered the most critical portion of the AR-15 from a maintenance standpoint.
Bolt Take-Down Guide on Top Quark Blog
The editor of the Top Quark Blog has created an excellent illustrated AR15 Bolt Take-Down Guide that shows how to disassemble an AR15 bolt and carrier for regular cleaning. Even if you’re an experienced AR15 shooter, you can learn something from this page (sample at right), and you may want to bookmark it for future reference. The photos are large and clear and there are helpful hints for each step of the process.
The author knows his stuff and offers some important insights. For example, he notes that “Extractor springs in most AR15 bolt assemblies are fairly weak, and this can lead to various extraction-related failures. One of the few high points about Colt assemblies is their usage of higher-strength extractor springs. You can tell the difference by looking at the inner plastic insert. ‘Normal’ springs feature a blue plastic insert, Colt strong springs have a black insert.”
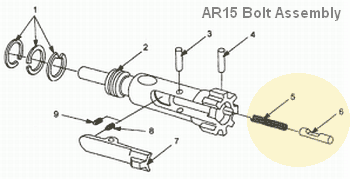
There is one notable oversight on this page — the author doesn’t cover disassembly and cleaning of the ejector assembly. This is actually quite important. A few small brass shavings, combined with carbon and lube in the ejector slot, WILL cause malfunctions. In fact, when this editor is called to diagnose problem ARs, the first things I look at (after swapping magazines) are the ejector recess and the slot for the extractor. Clogged ejectors are responsible for fail-to-ejects and other jams. It is essential that you keep the ejector hole clean. Old, gooey lube residues mixed with carbon and tiny brass shavings in the ejector recess will create all sorts of problems. As shown in the diagram below, it is simple to remove the ejector (#6) and ejector spring (#5), by drifting the ejector retaining pin (#4).
NOTE: The original Quark Blog Article appears to be offline (See Quark LINK.) However, this excellent article has been preserved via the WayBack Machine Internet Archives. CLICK HERE to access the Full Quark Blog Article via WayBack Machine Archive.
Share the post "Good Guide to Take-Down and Maintenance of AR Bolts"
August 6th, 2021
Accurate, modular, and supremely versatile, the AR15 is America’s favorite semi-auto rifle. But let’s face it, the AR is a maintenance hog. The AR’s gas tube blows carbon and soot right into the middle of the bolt assembly where it cakes on to the metal. The AR bolt also has many tiny parts, and small recesses, which must be cleaned regularly. This author has seen numerous ARs fail simply because there was gunk (dried lube, carbon, brass shavings) in the ejector slot or extractor spring recess.
A Clean AR is a Happy AR — Whether You Run ‘Wet’ or ‘Dry’
There are various schools of thought when it comes to maintaining an AR. Some folks prefer to run their AR “dry” with minimal lube on the lugs and friction surfaces. Other shooters prefer to run their ARs “wet”, with lots of lube. But whatever your preference, you need to clean your AR regularly. And nothing is more important than the AR’s bolt/carrier assembly. Because it is involved in feeding, firing, and extracting, the AR-15 bolt/carrier assembly can be considered the most critical portion of the AR-15 from a maintenance standpoint.
Bolt Take-Down Guide on Top Quark Blog
The editor of the Top Quark Blog has created an excellent illustrated AR15 Bolt Take-Down Guide that shows how to disassemble an AR15 bolt and carrier for regular cleaning. Even if you’re an experienced AR15 shooter, you can learn something from this page (sample at right), and you may want to bookmark it for future reference. The photos are large and clear and there are helpful hints for each step of the process.
The author knows his stuff and offers some important insights. For example, he notes that “Extractor springs in most AR15 bolt assemblies are fairly weak, and this can lead to various extraction-related failures. One of the few high points about Colt assemblies is their usage of higher-strength extractor springs. You can tell the difference by looking at the inner plastic insert. ‘Normal’ springs feature a blue plastic insert, Colt strong springs have a black insert.”
There is one notable oversight on this page — the author doesn’t cover disassembly and cleaning of the ejector assembly. This is actually quite important. A few small brass shavings, combined with carbon and lube in the ejector slot, WILL cause malfunctions. In fact, when this editor is called to diagnose problem ARs, the first things I look at (after swapping magazines) are the ejector recess and the slot for the extractor. Clogged ejectors are responsible for fail-to-ejects and other jams. It is essential that you keep the ejector hole clean. Old, gooey lube residues mixed with carbon and tiny brass shavings in the ejector recess will create all sorts of problems. As shown in the diagram below, it is simple to remove the ejector (#6) and ejector spring (#5), by drifting the ejector retaining pin (#4).
NOTE: The original Quark Blog Article appears to be offline (See Quark LINK.) However, this excellent article has been preserved via the WayBack Machine Internet Archives. CLICK HERE to access the Full Quark Blog Article via WayBack Machine Archive.
Share the post "TECH TIP: How to Take-Down and Maintain Your AR Bolt"
January 18th, 2017

Top to bottom – Remington firing pin assembly with ISS, Tubb SpeedLock alloy-composite system without ISS (current versions have dual, opposite-wound springs), and Remington short action firing pin assembly without ISS.
Each Wednesday, the U.S. Army Marksmanship Unit publishes a reloading “how-to” article on the USAMU Facebook page. Last week’s “Handloading Hump Day” article covered mechanical issues and related ignition irregularities that can cause vertical fliers even with good ammunition in an otherwise excellent rifle. We highly recommend you read this article, which offers some important tech tips.

Vertical Dispersion: Mechanical/Ignition Issues?
Poor or inconsistent ignition has long been known to be one of the “usual suspects” when one encounters vertical fliers that just shouldn’t be there. By having a sense of some of the basic principles involved, and a few basic areas to check, the shooter may avoid colsiderable frustration, not to mention time, expensive loading components and barrel wear.
 Is your well-built rifle of high-quality components plagued with vertical fliers across more than 1-3 handload combinations? Consider the bedding, crown and scope/sight mounts. Are they correct? If so, then you might check for ignition issues before boldly undertaking an extensive, expensive, and quite possibly fruitless quest for the “magic handload”. Is your well-built rifle of high-quality components plagued with vertical fliers across more than 1-3 handload combinations? Consider the bedding, crown and scope/sight mounts. Are they correct? If so, then you might check for ignition issues before boldly undertaking an extensive, expensive, and quite possibly fruitless quest for the “magic handload”.
SEEING IS BELIEVING: While the author had been aware for many years that poor ignition should be considered and ruled out when dealing with vertical fliers in an otherwise-excellent rifle, actually seeing the problem and its almost instantaneous cure really drove the lesson home.
He was working with a “dot” rifle – a .22 LR match rifle that really stacked bullets into little piles at 50 yards and beyond. With one lot of ELEY Tenex, it produced consistent “bughole” groups at 50, but with another, selected lot of Tenex, similar groups were regularly ruined by single, vertical fliers that did not appear in other rifles. Rather than spending days burning up expensive, select ammunition looking for “magic lots”, he contacted a well-respected rimfire gunsmith and explained the situation.
Without so much as batting an eye, the highly-experienced ‘smith tore into the rifle’s action, and quickly found the cause(s) of the problem. He discovered a demonstrably weak firing pin spring, plus a chip out of the face of the firing pin where it contacted the cartridge rim.
After replacing and tuning the offending parts, the rifle immediately began shooting tiny, bughole groups with the previously “unacceptable” lot of Tenex. Centerfire rifles can also benefit from ensuring positive, consistent ignition. A wise riflesmith is literally worth his weight in gold!
So, what are some issues we as shooters can inspect in our rifles to help determine if ignition woes could be part of our problem? At the club level, ask yourself if that “experienced” Remington, Winchester 70, or even Springfield-based match bolt gun you’re using is still running its’ original 40-80 year-old factory striker spring? If so, a new replacement is cheap insurance against current or future problems. (And BTW, it might be best to stick to the normal, factory-spec spring weight. A super-powerful spring can cause vertical, just as a weak one one can.) Along with that, a routine check for proper firing-pin protrusion is a quick preventive measure that can rule out potential issues.
Other areas to consider are the centering and consistency of the firing pin’s operation in the bolt. Admittedly, with the increasing use of precision-machined custom actions, this is becoming less an issue every day. Below is the firing pin assembly from a custom BAT action:

However, particularly with factory actions, a very quick and easy check is to remove the bolt, let the firing pin go forward, and look at the firing pin tip through the firing pin hole. Is the tip off-center in the hole, and possibly striking it as it moves forward? Is the hole out-of-round or burred from being struck repeatedly? If so, a trip to the riflesmith is likely in order.
Similarly, machining issues in the bolt/firing pin system can lead to rough and erratic firing pin movement, in which the firing pin drags against an internal surface of the bolt. In high-quality rifles these issues are relatively rare, but not unheard-of, and it takes mere minutes to rule them out. It may be worthwhile to remove the cocking piece/firing pin/spring assembly and look for any unusual gouges, dings, peening, burrs or signs of abnormal wear.
This task is especially easy with Winchester 70s, Springfields, and the similar Mauser 98s, involving little more than the push of a button and unscrewing the cocking piece assembly. This is just one of the many reasons these tried-and-true actions have earned such a loyal following in the field, among hunters who must maintain their rifles away from a shop.

Particularly with older rifles, watch for and remove excess grease (or even Cosmoline!) from both the firing pin assembly and inside the bolt. This can help improve firing pin speed and consistency. Other bolt-action designs may need a take-down tool or other measures.
As part of this inspection, AFTER ENSURING THE RIFLE IS UNLOADED, slowly cock the rifle, dry-fire, and repeat several times. Listen carefully near the action for inconsistency in the sounds it generates. Does the striker falling make the same sound each time? Do you hear or feel grinding upon operation? If so, where?
Be sure to check the operation of the cocking piece (bolt shroud), firing pin within the bolt shroud, the cocking piece cam and the rear of the bolt body where the cocking piece cam operates. As with our examination for abnormal wear marks discussed above, look for marks indicating roughness or a possible need for light polishing. Then, clean and lightly grease the bearing surfaces while you’re at it.
Remington 700 bolt shroud and cocking cam

These are relatively easy checks that shooters can undertake to perform a preliminary inspection on their own. Other mechanical issues can also cause ignition issues, chiefly centered around the action of the trigger, sear and sear spring. If these are suspected, a trip to an experienced, qualified riflesmith for diagnosis is recommended. We hope you find this information helpful! Join us again next week, and in the meantime, enjoy the shooting sports safely!
Share the post "Got Vertical Flyers? An Ignition Issue Could Be the Culprit"
October 31st, 2015

We like air rifles both for fun shooting and for competition. However, so many options are now available that is easy to get over-whelmed with the choices. Thankfully, there is a good book that helps air rifle shooters make informed decisions about air guns and gear. Steve Markwith’s new title, Air Rifles: A Buyer’s and Shooter’s Guide offers a wealth of useful information. This 154-page paperback book is now available for $12.95. The book is also offered as a FREE Kindle download for Amazon Prime and Kindle Unlimited members. Check it out — you may be able to get the book for free.
|
Read Free Sample Chapters Online
If you go to Amazon.com and click on the cover of this book, you can view a FREE preview with extensive samples from many chapters. The book covers all the most important types of air rifle systems, both pre-charged pneumatics and other self-charging guns. Markwith reviews the wide variety of pellets available, offering suggestions for particular applications. You’ll also find a useful discussion of Airgun Power, Range, and Accuracy. This will help you pick the right air rifle for your application.
Markwith explains the many attractions of airguns. They are not considered firearms (in most jurisdictions) so they can be purchased at local shops or mail-order outlets without FFL fees or background checks. You’ll find a huge online selection of airguns at PyramydAir.com that can ship direct to you — no FFL required. Air rifles are also quiet and very inexpensive to shoot. While .177 and .22 caliber air rifles are most common, there are also larger-caliber airguns offered for hunting or special applications. |
|

“This is a very informative book explaining the ins and outs of air rifles, their capabilities and limitations. I highly recommend this book to anyone considering purchasing an air rifle for marksmanship practice or small game hunting.” – L. Stanek, Verified Amazon Reviewer
Share the post "New Comprehensive Guide to Air Rifles by Steve Markwith"
December 16th, 2014
 Ernie Paull from California was an active competition shooter for many years. However, his eyesight has declined so he has turned his attention to providing components for shooters and gunsmiths. Through his Ernie the Gunsmith website, Paull sells a variety of useful products including gun trigger springs, pillar-bedding kits, Accu-Risers, and pillar installation tools. This Bulletin post focuses on Ernie’s trigger springs. Ernie offers springs for a wide variety of rifles: Browning (A-Bolt, A-Bolt 22), CZ (m452), Kimber, Remington (XR100, XCR, 7, 700, 722, 788, 7600 and more), Ruger (77, 77-22, LC6), Tikka (T-3), Weatherby (MK-V), and Winchester (M-70). Ernie Paull from California was an active competition shooter for many years. However, his eyesight has declined so he has turned his attention to providing components for shooters and gunsmiths. Through his Ernie the Gunsmith website, Paull sells a variety of useful products including gun trigger springs, pillar-bedding kits, Accu-Risers, and pillar installation tools. This Bulletin post focuses on Ernie’s trigger springs. Ernie offers springs for a wide variety of rifles: Browning (A-Bolt, A-Bolt 22), CZ (m452), Kimber, Remington (XR100, XCR, 7, 700, 722, 788, 7600 and more), Ruger (77, 77-22, LC6), Tikka (T-3), Weatherby (MK-V), and Winchester (M-70).
Springs start at just $6.95. Ernie also sells springs for the Rem-compatible Shilen Benchrest trigger, as well as Rem 700 ejector springs and trigger alignment springs. For Rem 700 rifles, Paull makes a spring that fits all Remington M-7 and M-700 triggers including the 2007-vintage X Mark-PRO trigger (but not the newer X Mark-PRO trigger introduced in 2009). Ernie says: “on average, installation of his Model-700 spring will reduce factory triggers’ weight of pull by 1½ to 2½ lbs with no other changes. The exact amount of creep, over-travel, and weight of pull are dependent upon the type and amount of tuning accomplished by your gunsmith.”
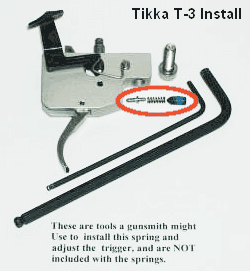 We often hear requests from Tikka T-3 owners asking how they can reduce their trigger pull weight. Paull offers a Tikka T-3 varmint trigger spring which can reduce the pull weight significantly. The photo at left shows the Tikka T-3 trigger assembly. We often hear requests from Tikka T-3 owners asking how they can reduce their trigger pull weight. Paull offers a Tikka T-3 varmint trigger spring which can reduce the pull weight significantly. The photo at left shows the Tikka T-3 trigger assembly.
While there is more to a good trigger job (in most cases) than just a spring swap, you need to have the proper rate spring when adjusting trigger pull weight downwards. NOTE: For safety reasons, we recommend you consult a competent gunsmith before modifying factory triggers. We stress the word competent…
Ernie has observed that some gunsmiths try to lighten trigger pulls by modifying factory springs in questionable ways: “I have worked with gunsmiths in the past who, when the subject turned to trigger springs, preferred to clip them, grind them, heat them, bend them, smash them, or simply back out the weight of pull screw until there was no or almost no pressure on the spring. With any of these methods, you get a spring whose rate is rapidly rising as the trigger is pulled. As the trigger is released, the spring rate rapidly decreases as it approaches full or near-full extension. A more uniform weight of pull will be achieved when the trigger spring is compressed within its normal working range throughout the entire movement of the trigger. In the long run, the benefits of saved time, plus more uniform and reliable results, will more than offset the cost of these [replacement] springs. If you want a lighter trigger pull, you need a lighter trigger spring.”
Share the post "Ernie-the-Gunsmith Offers Wide Selection of Trigger Springs"
February 26th, 2014
Accurate, modular, and supremely versatile, the AR15 is America’s favorite semi-auto rifle. But let’s face it, the AR is a maintenance hog. The AR’s gas tube blows carbon and soot right into the middle of the bolt assembly where it cakes on to the metal. The AR bolt also has many tiny parts, and small recesses, which must be cleaned regularly. This author has seen numerous ARs fail simply because there was gunk (dried lube, carbon, brass shavings) in the ejector slot or extractor spring recess.

 A Clean AR is a Happy AR — Whether You Run ‘Wet’ or ‘Dry’ A Clean AR is a Happy AR — Whether You Run ‘Wet’ or ‘Dry’
There are various schools of thought when it comes to maintaining an AR. Some folks prefer to run their AR “dry” with minimal lube on the lugs and friction surfaces. Other shooters prefer to run their ARs “wet”, with lots of lube. But whatever your preference, you need to clean your AR regularly. And nothing is more important than the AR’s bolt/carrier assembly. Because it is involved in feeding, firing, and extracting, the AR-15 bolt/carrier assembly can be considered the most critical portion of the AR-15 from a maintenance standpoint.
Bolt Take-Down Guide on Top Quark Blog
The editor of the Top Quark Blog has created an excellent illustrated AR15 Bolt Take-Down Guide that shows how to disassemble an AR15 bolt and carrier for regular cleaning. Even if you’re an experienced AR15 shooter, you can learn something from this page (sample at right), and you may want to bookmark it for future reference. The photos are large and clear and there are helpful hints for each step of the process.
The author knows his stuff and offers some important insights. For example, he notes that “Extractor springs in most AR15 bolt assemblies are fairly weak, and this can lead to various extraction-related failures. One of the few high points about Colt assemblies is their usage of higher-strength extractor springs. You can tell the difference by looking at the inner plastic insert. ‘Normal’ springs feature a blue plastic insert, Colt strong springs have a black insert.”
There is one notable oversight on this page — the author doesn’t cover disassembly and cleaning of the ejector assembly. This is actually quite important. A few small brass shavings, combined with carbon and lube in the ejector slot, WILL cause malfunctions. In fact, when this editor is called to diagnose problem ARs, the first things I look at (after swapping magazines) are the ejector recess and the slot for the extractor. Clogged ejectors are responsible for fail-to-ejects and other jams. It is essential that you keep the ejector hole clean. Old, gooey lube residues mixed with carbon and tiny brass shavings in the ejector recess will create all sorts of problems. As shown in the diagram below, it is simple to remove the ejector (#6) and ejector spring (#5), by drifting the ejector retaining pin (#4).
Share the post "TECH TIP: Take-Down Procedure for AR Bolt Assembly"
January 2nd, 2014
Ana Pereira, from Portugal, is a Field Target World Champion. In the three videos below, Ana explains her sport and interviews other Field Target shooters. Field Target competitors shoot air rifles from a variety of positions over a multi-station field course. Targets are typically placed 9m to 50m distant (minimum distance rules vary country-by-country). Targets are usually small animal shapes that fall down when hit. There are a variety of air gun classes for Field Target, with the most exotic pre-charged pneumatic rifles costing many thousands of dollars.
Watch Interview with Ana Pereira
Field Target Shooters use very high-magnification scopes fitted with large side-wheels that control the parallax. The shooters use the parallax control to range the distance to the target and then adjust their elevation accordingly. In the video below, featuring the Steyr LG110 Field Target Air Rifle, you can see how the large side wheels are used for distance-ranging.
In the United Kingdom, most shots may be taken in any stance, but the seated position is the most popular due to its stability (and often one must shoot over logs or tall grass, so the prone position is not practical). Most competitors carry a small beanbag or cushion to sit on while shooting. It may also be used under the knee or to support the ankle during kneeling shots.
Targets are shot from “gates” in a firing line, and are divided into “lanes” of two targets each. Targets are often placed at about the same height as the shooter, but it is not uncommon for them to appear high up banks or in trees, or down steep slopes. The hit zone of a target is circular, usually 40–45 mm in diameter, although “reducer” targets as small as 25 mm may be employed for closer-range shots.
Ana Periera Interviews Springer Class World Champion Heli Jalakas in Estonia.
This Video Also Shows Shooting Sequences from International Competition:
Share the post "Learn About Field Target Competition from Champion Ana Pereira"
July 19th, 2009
Ernie Paull from California was an active competition shooter for many years. However, his eyesight has declined so he has turned his attention to providing components for shooters and gunsmiths. Through his Ernie the Gunsmith website, Paull sells a variety of useful products including gun trigger springs, pillar-bedding kits, Accu-Risers, and pillar installation tools. This Bulletin post focuses on Ernie’s trigger springs. Ernie offers springs for a wide variety of rifles: Browning (A-Bolt, A-Bolt 22, X-Bolt), CZ (m452), Kimber, Remington (XR100, XCR, 7, 700, 722, 788, 7600 and more), Ruger (77, 77-22, LC6), Tikka (T-3), Weatherby (MK-V), and Winchester (M-70).
Springs start at just $6.95. Ernie also sells springs for the Rem-compatible Shilen Benchrest trigger, as well as Rem 700 ejector springs and trigger alignment springs. For Rem 700 rifles, Paull makes a spring that fits all Remington M-7 and M-700 triggers including the 2007-vintage X Mark-PRO trigger (but not the new X Mark-PRO trigger introduced in 2009). Ernie says: “on average, installation of his Model-700 spring will reduce factory triggers’ weight of pull by 1½ to 2½ lbs with no other changes. The exact amount of creep, overtravel, and weight of pull are dependant upon the type and amount of tuning accomplished by your gunsmith.”
We often hear requests from Tikka T-3 owners asking how they can reduce their trigger pull weight. Paull offers a Tikka T-3 varmint trigger spring which can reduce the pull weight significantly. The photo at left shows the Tikka T-3 trigger assembly.
While there is more to a good trigger job (in most cases) than just a spring swap, you need to have the proper rate spring when adjusting trigger pull weight downwards. NOTE: For safety reasons, we recommend you consult a competent gunsmith before modifying factory triggers. We stress the word competent…
Ernie has observed that some gunsmiths try to lighten trigger pulls by modifying factory springs in questionable ways: “I have worked with gunsmiths in the past who, when the subject turned to trigger springs, preferred to clip them, grind them, heat them, bend them, smash them, or simply back out the weight of pull screw until there was no or almost no pressure on the spring. With any of these methods, you get a spring whose rate is rapidly rising as the trigger is pulled. As the trigger is released, the spring rate rapidly decreases as it approaches full or near-full extension. A more uniform weight of pull will be achieved when the trigger spring is compressed within its normal working range throughout the entire movement of the trigger. In the long run, the benefits of saved time, plus more uniform and reliable results, will more than offset the cost of these [replacement] springs. If you want a lighter trigger pull, you need a lighter trigger spring.”
Share the post "Rifle Trigger Springs from Ernie-The-Gunsmith"
|


