


Innovative Borka Torque Setting Driver Belongs in Your Toolkit
 Ph.D Engineer Boris Teper has invented a remarkably compact yet effective torque-setting tool that is ideal for tensioning scope ring fasteners and action screws on rifles. The Torque Settings Driver from Borka Tools is brilliant in its simplicity. The lightweight tool is basically a lever, with a series of hex slots through which a spindle is fitted. The slot position sets the effective lever arm length. How does the tool prevent over-torquing? That’s the magic of Teper’s invention. On one end of the tool is a handle with a spring-loaded ball detent. Once desired torque is reached, the handle overrides the detent, snapping forward so you can’t crank too hard (figure 2 below).


The Borka Driver is very easy to use, and despite its simplicity, it is very precise. Lab testing of the Borka driver show that the tool yields the correct torque setting within 4-6% of the true nominal torque measured with a calibration device. That means, for example, if you set the driver for 40 inch-lbs. it will torque the fastener within ± 2.5 lbs of your target setting. That’s as good as some full-size torque wrenches — pretty impressive for a tool that weighs only 4 ounces complete with spindle. And every Borka driver is calibrated to ensure accuracy before it ships.
 Borka offers many versions of its tool, with torque ranges from 10 inch-lbs. up to 72 inch-pounds. The basic Borka driver, priced at $55.00, offers six (6) preset torque values. For $15.00 more Borka sells a driver that offers twelve (12) preset torque values. This 12-setting tool, which is not any bigger or heavier than the 6-setting model, is cleverly designed — you simply flip it over to switch from the first six torque settings to the second six. This works because the handle has variable “break” resistance depending on direction of travel. Smart.
Borka’s most popular torque tool is the 12-setting $75.00 “Military Grade” MG driver, model ATD-15×72-12FS-MG. This offers a dozen torque settings from 15- to 72-inch-pounds. We recommend the “Military Grade” model because it has torque settings laser-etched on the surface of the driver arm (see video). That way you’ll always know your torque values. The “Military Grade” model also comes with 1/4″ hex to 1/4″ square (M) and 1/4″ square (F) to 3/8″ square (M) adapters. The Military Grade Model, intended for use in the field by both DOD and LE personel, has already proved popular with “civilian” tactical shooters. You can store the tool in the supplied fabric carry pouch, or stash it (with needed bits) in your range kit.
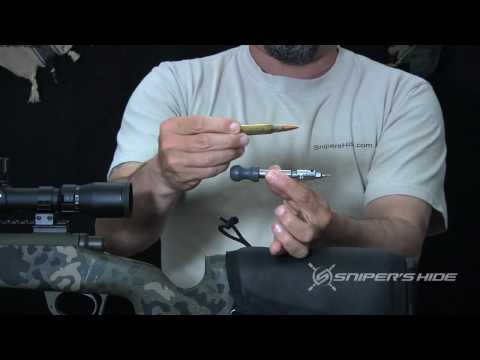
Video Shows How to Use Borka Driver When Mounting Scope
We suspect many readers are still a bit confused as to how the Borka driver actually works. We could explain in greater detail but a video is worth a thousand words. In the YouTube video below, Frank Galli (aka “LowLight”) from Snipers’ Hide explains how to use the Borka torque driver. Frank demonstrates the $75.00 “Military Grade” Model, but all the Borka lever arm drivers share the same basic operation. Frank shows how to set the spindle position to your desired torque setting and hold to hold the unit properly. Watch carefully and you’ll see how the cylindrical handle at the end of the tool snaps forward or “breaks” when the desired torque setting is reached. Frank notes that: “there is no backlash when torquing. This is an excellent feature as it breaks clean at the desired weight.”
Where can you get a Borka torque setting driver? All models can be purchased directly from Borka Enterprises by emailing info@borkatools.com. You can also purchase through Manson Precision Reamers, (810) 953-0732. (Dave Manson worked with Boris Teper to get this product to market.) In addition, four models are available from Brownells: ATD-20X4006FS (Brownells item #080-000-734), ATD25X5006FS (Brownells item #080-000-735), ATD-36X7206FS (Brownells item #080-000-736), and ATD-15X7212FS (Brownells item #080-000-737).
DOWNLOAD: Intro to Torque Setting Driver | Borka Torque Driver Users’ Manual | Tool Calibration
 Match shooters need to get that extra accuracy edge from our ammunition and firearm. It is easy to get one of the Savage rifles to shoot accurately — even to match standards. If you are looking for that little bit more from your rifle, then please read a method that I have found that works for me. For those of you that are familiar with tuning a receiver (such as a match rimfire action), this article will be nothing new. For the rest of you, this might be new material. The goal here is to find the “sweet spot” for the rifle in relation to the torque settings used on the receiver screws. The proper torque settings [can vary] from rifle to rifle, but they will usually have a noticeable effect on consistent group sizes. A properly-torqued rifle will optimize the “harmonics” of the barreled action using the receiver screws so that the gun delivers peak consistency.


