With hunting season coming up soon, we know that many readers will be out in the field — with a set of binoculars. On most game hunts, you’ll speed a lot more time glassing with binocs than looking through your riflescope. With wide field of view and extended low-light capability, a good set of binoculars will be your most important game-finder. And with premium LRF binoculars, such as the ZEISS Victory series, one tool serves both for spotting and laser ranging.
“Without the stabilization of your binoculars [provided by] a tripod … you will be missing a majority of the game you are glassing for.” — Outdoorsmans.com
In this article, Vortex Optics’ Mark Boardman, an experienced hunter, explains the benefits of using a tripod with high-magnification binoculars. Everybody knows that powerful spotting scopes work best when mounted to a stable tripod or otherwise secured to a steady mount. Yet when most folks use binoculars, they never even think of using a tripod, despite the fact that tripod adapters are available for many premium binoculars.
Outdoorsmans Tripod Adapters Outdoorsmans.com sells tripod adapters for various kinds of binoculars. These really work: “Mounting your binoculars to a quality tripod is a must for the serious western hunter. Without the stabilization of your binoculars [by] mounting them to a tripod … you will be missing a majority of the game you are glassing for.”
A serious hunter should learn how to glass with tripod support, using methods outlined here. With binoculars offering more that 8X magnification, you can really benefit from a steady mount. You’ll be amazed at the difference the tripod will make.
Share the post "Better Spotting for Hunters — Using Binoculars with a Tripod"
With hunting season underway (or coming up soon), we know that many readers will be out in the field — with a set of binoculars. On most game hunts, you’ll speed a lot more time glassing with binocs than looking through your riflescope. With wide field of view and extended low-light capability, a good set of binoculars will be your most important game-finder. And with premium LRF binoculars, such as the new Vortex Fury, one tool serves both for spotting and laser ranging.
“Without the stabilization of your binoculars [provided by] a tripod … you will be missing a majority of the game you are glassing for.” — Outdoorsmans.com
In this article, Vortex Optics’ Mark Boardman, an experienced hunter, explains the benefits of using a tripod with high-magnification binoculars. Everybody knows that powerful spotting scopes work best when mounted to a stable tripod or otherwise secured to a steady mount. Yet when most folks use binoculars, they never even think of using a tripod, despite the fact that tripod adapters are available for many premium binoculars.
Outdoorsmans Tripod Adapters Outdoorsmans.com sells tripod adapters for various kinds of binoculars. These really work: “Mounting your binoculars to a quality tripod is a must for the serious western hunter. Without the stabilization of your binoculars [by] mounting them to a tripod … you will be missing a majority of the game you are glassing for.”
A serious hunter should learn how to glass with tripod support, using methods outlined here. With binoculars offering more that 8X magnification, you can really benefit from a steady mount. You’ll be amazed at the difference the tripod will make.
Story tip by EdLongrange. We welcome reader submissions.
Share the post "Smarter Glassing for Hunters — Using Binoculars with a Tripod"
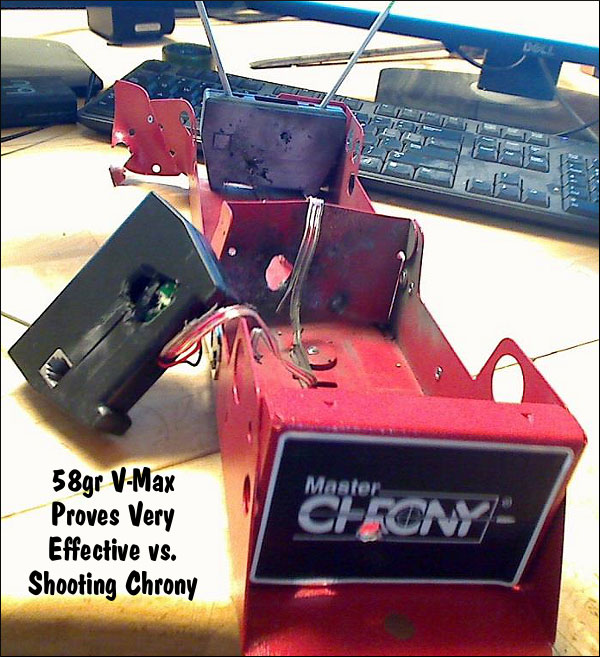
There is nothing more frustrating (or embarassing) than sending a live round into your expensive new chronograph. As the photo below demonstrates, with most types of chronographs (other than the barrel-hung Magnetospeed), you can fatally injure your expensive chrono if it is not positioned precisely.
When setting up a chrono, we always unload the rifle, remove the bolt and bore-sight to ensure that the path of the bullet is not too low. When bore-sighting visually, set up the rifle securely on the sandbags and look through the bore, breech to muzzle, lining up the barrel with your aim point on the target. Then (during an appropriate cease-fire), walk behind the chronograph. Looking straight back through the “V” formed by the sky-screens, you should be able to see light at the end of the barrel if the gun is positioned correctly. You can also use an in-chamber, laser bore-sighter to confirm the visual boresighting (see photo).
Adjust the height, angle and horizontal position of the chronograph so the bullet will pass through the middle of the “V” below the plastic diffusers, no less than 5″ above the light sensors. We put tape on the front sky-screen supports to make it easier to determine the right height over the light sensors.
Use a Test Backer to Confirm Your Bullet Trajectory
You can put tape on the support rods about 6″ up from the unit. This helps you judge the correct vertical height when setting up your rifle on the bags. Another trick is to hang a sheet of paper from the rear skyscreen and then use a laser boresighter to shine a dot on the paper (with the gun planted steady front and rear). This should give you a good idea (within an inch or so) of the bullet’s actual flight path through the “V” over the light sensors. Of course, when using a laser, never look directly at the laser! Instead shine the laser away from you and see where it appears on the paper.
Alignment of Chronograph Housing
Make sure the chrono housing is parallel to the path of the bullet. Don’t worry if the unit is not parallel to the ground surface. What you want is the bullet to pass over both front and rear sensors at the same height. Don’t try to set the chrono height in reference to the lens of your scope–as it sits 1″ to 2″ above your bore axis. To avoid muzzle blast interference, set your chronograph at least 10 feet from the end of the muzzle (or the distance recommended by the manufacturer).
Rifles with Elevated Iron Sights
All too often rookie AR15 shooters forget that AR sights are positioned roughly 2.4″ above the bore axis (at the top of the front sight blade). If you set your bullet pass-through point using your AR’s front sight, the bullet will actually be traveling 2.4″ lower as it goes through the chrono. That’s why we recommend bore-sighting and setting the bullet travel point about 5-8″ above the base of the sky-screen support shafts. (Or the vertical distance the chronograph maker otherwise recommends). NOTE: You can make the same mistake on a scoped rifle if the scope is set on very tall rings, so the center of the cross-hairs is much higher than the bore axis line.
TARGET AIM POINT: When doing chrono work, we suggest you shoot at a single aiming point no more than 2″ in diameter (on your target paper). Use that aiming point when aligning your chrono with your rifle’s bore. If you use a 2″ bright orange dot, you should be able to see that through the bore at 100 yards. Using a single 2″ target reduces the chance of a screen hit as you shift points of aim. If you shoot at multiple target dots, place them in a vertical line, and bore sight on the lowest dot. Always set your chron height to set safe clearance for the LOWEST target dot, and then work upwards only.
Other Chronograph Tips from Forum Members:
When using a chronograph, I put a strip of masking tape across the far end of the skyscreens about two-thirds of the way up. This gives me a good aiming or bore-sighting reference that’s well away from the pricey bits. I learned that one the hard way. — GS Arizona
A very easy and simple tool to help you set up the chronograph is a simple piece of string! Set your gun (unloaded of course) on the rest and sight your target. Tie one end of the string to the rear scope ring or mount, then pull the string along the barrel to simulate the bullet path. With the string showing the bullet’s path, you can then easily set the chronograph’s placement left/right, and up/down. This will also let you set the chrono’s tilt angle and orientation so the sensors are correctly aligned with the bullet path. — Wayne Shaw
If shooting over a chrono from the prone position off a bipod or similar, beware of the muzzle sinking as recoil causes the front of the rifle to drop. I “killed” my first chronograph shooting off a gravel covered firing point where I’d not given enough clearance to start with and an inch or two drop in the muzzle caused a bullet to clip the housing. — Laurie Holland
Share the post "Don’t Kill the Chrono! Setting up Chronos to Avoid Stray Shots"
With hunting season right around the corner, we know that many readers will soon be out in the field — with a set of binoculars. On most game hunts, you’ll speed a lot more time glassing with binocs than looking through your riflescope. With wide field of view and extended low-light capability, a good set of binoculars will be your most important game-finder. And with premium LRF binoculars, such as the new Vortex Fury, one tool serves both for spotting and laser ranging.
In this article, Vortex Optics’ Mark Boardman, an experienced hunter, explains the benefits of using a tripod with high-magnification binoculars. Everybody knows that powerful spotting scopes work best when mounted to a stable tripod or otherwise secured to a steady mount. Yet when most folks use binoculars, they never even think of using a tripod, despite the fact that tripod adapters are available for many premium binoculars.
Outdoorsmans Tripod Adapters Outdoorsmans.com sells tripod adapters for various kinds of binoculars. “Mounting your binoculars to a quality tripod is a must for the serious western hunter. Without the stabilization of your binoculars [by] mounting them to a tripod … you will be missing a majority of the game you are glassing for.”
A serious hunter should learn how to glass with tripod support, using methods outlined here. With binoculars offering more that 8X magnification, you can really benefit from a steady mount. You’ll be amazed at the difference the tripod will make.
Story tip by EdLongrange. We welcome reader submissions.
Share the post "Hunting Tip: How to Use Binoculars with a Tripod"
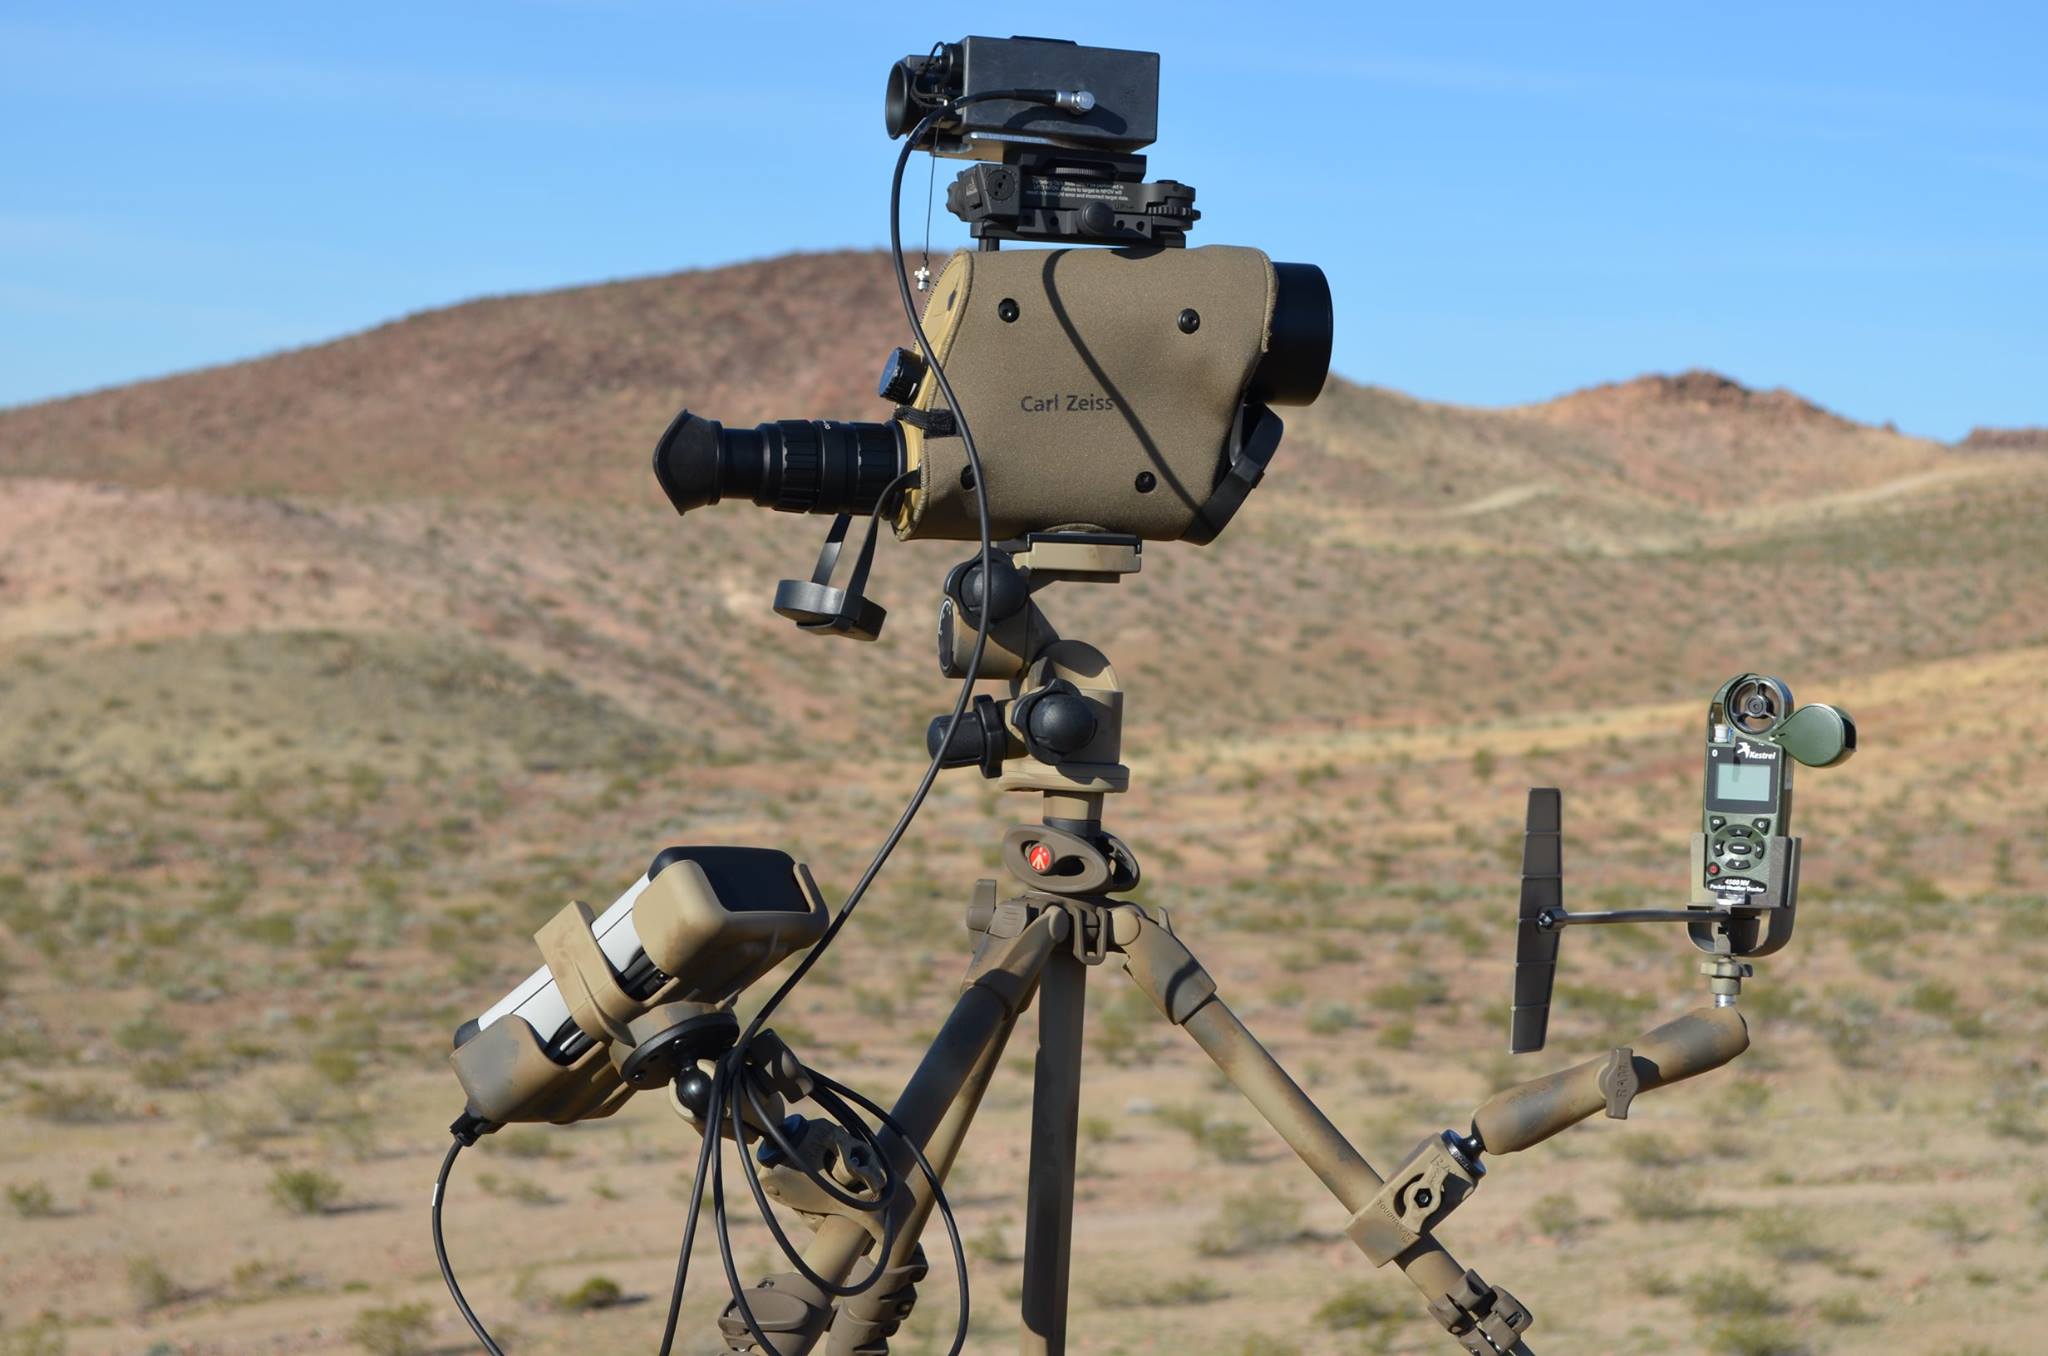
Here’s a triple-threat hardware package for long-range shooting. This cool set-up combines a folded-path spotting scope with a Laser Rangefinder (LRF) and a Kestrel Wind Meter. The LRF is mounted directly to the Hensoldt-Zeiss spotting scope ($4330.00 retail) so the two units stay aligned at all times. That makes it easy to spot and range your target quickly. LRF and weather data is piped into a PDA which automatically generates a firing solution (providing windage and elevation adjustments). That’s slick. Feeding the range and weather data directly into the Ballistics solver eliminates human input error and allows rapid updates to the ballistics solution.
Ashbury Precison Ordnance sent us these photos, noting: “The ingenuity of APO customers never ceases to impress us! This rig has a co-located LRF adjustable for azimuth and elevation, a Kestrel weather station (Bluetooth?) and Trimble NOMAD RPDA. Firing solutions are updated as data is transmitted to the PDA from the LRF and weather station. That Hensoldt Spotter 60 is a nice piece of glass for shooting at extremely long distances.” The spotting scope is mounted on a Manfrotto 410 3-axis geared head.
Click Image to View Full-Screen Version
Share the post "Tech Trio — Combo Kestrel, Rangefinder, Spotting Scope"
Everybody knows that powerful spotting scopes work best when mounted to a stable tripod or otherwise secured to a steady mount. Yet when most folks use binoculars, they never even think of using a tripod, despite the fact that tripod adapters are available for many premium binoculars. A serious hunter should learn how to glass with tripod support. With binoculars offering more that 8X magnification, you can really benefit from a steady mount. In this article, Mark Boardman of Vortex Optics, an experienced hunter, explains the benefits of using a tripod with high-magnification binoculars.
The R-F Cam Cradle is a smart new product that lets you securely mount a Laser Rangefinder (LRF), digital camera, and spotting scope all on a single tripod. The “game-changing” feature of the R-F Cam Cradle is that it allows you to colimmate (i.e. precisely align) all your optics on the same spot. This way you can simultaneously aim all three devices at a long range target by simply moving the tripod head. A tactical shooter can easily range his target while watching the wind though his spotting scope. And the long-range hunter can range and film his prey as he watches it through the spotter. This unit costs $179.95 from DefensiveEdge.net.
You’ll find a detailed product evaluation of the R-F Cam Cradle on the LongRangeOnly.com website. Reviewer Sam Millard uses the R-F Cam Cradle in the field with a variety of optics and rangefinders. Millard explains how the R-F Cam Cradle conveniently allows combined use of spotting scope, LRF, and compact video camera.
Millard was very impressed with the system: “I field-tested the R-F Cam Cradle in the mountains of northern Idaho and the wide open spaces of eastern Wyoming. I believe the most effective way to use the cradle is in a long range ambush; get the spotting scope, camera, and LRF aligned on a landmark, then lock it down. The LRF and spotter won’t be aligned perfectly, but they’ll be well within the field of view of each other, requiring only a gentle tilt of the tripod to center the beam of the LRF on the target. At ELR distances, a well-supported LRF is crucial to obtaining an accurate range. This mount makes it easy, and doesn’t require displacing your spotting scope to get it done.”
See R-F Cam Cradle Demonstrated in the Field:
Having a video camera mounted in alignment with spotting scope is great for Long Range applications notes Millard: “The camera mount is my favorite feature of the R-F Cam Cradle. It allows co-witnessing the video camera to the spotting scope, then aiming the field of view of both with one movement of the tripod head. This is a great improvement to the normal way of recording the shot and spotting at the same time, which previously required two tripods or a clamp-on head for the camera, both of which required separate aiming of the camera and spotting scope.”
R-F Cam-Cradle Product Details
Manufacturer: RLC Customs
Vendor: Defensive Edge, Inc.
Rathdrum, ID DefensiveEdge.net
Order Phone: (208) 687-2659
Material: 3/16” 53 Series aluminum
Finish: Powder-coated Matte Black
Total Weight: 16.5 ounces
Mount: ¼-20 Threaded Standard Camera Mount
Retail price: $179.95
Shawn Carlock of Defensive Edge explains: “The R-F Cam Cradle is a way for one person to run everything. Otherwise it’s really difficult to run the spotting scope, run the video camera, run the rangefinder, get dope — do all those different things. So RLC Customs has come up with the idea to put everything together in one platform, where you can sync it together and use it effectively, as a cluster.”
Product Find by Boyd Allen. We welcome reader submissions
Share the post "New 3-Way Mount Holds Spotting Scope, Rangefinder & Camera"
Here’s a very interesting spotting scope stand, from Forum member (and ace F-Class shooter) Monte Milanuk. You can see this stable rig can be adjusted super-low for prone shooting. The components are from Italian photography accessory maker Manfrotto (but it’s not as expensive as you might think).
Monte tells us about his spotting scope stand, which is really a conventional photography tripod adjusted to a very low position, with a special head:
This stand has a Manfrotto 322RC2 pistol-grip head to make positioning easier. It actually goes even lower, and much, much higher. Both the head and the tripod are about $170-ish each, so it’s a bit more expensive than a Ray-Vin, a little less than a Creedmoor Polecat, and a whole lot more flexible overall.
This Manfrotto 055XPROB Pro Tripod is actually a little on the big side – probably should have gone with a Manfrotto 190 model (couple inches shorter on the legs) so it can be a bit of a hassle to set up when you have to shoot two-to-a-mound a la Fullbore.
It’s probably not as [expensive] as you might think… a Ray-Vin F-Class stand (without head) is about $170 from Creedmoor Sports. A Ray-Vin stand head is $150, plus the outrigger attachment is another $100+. I’ve got two of them downstairs for when I used to shoot conventional prone[.]
Comments from Facebook Fans: Pretty high end setup, should work well for prone, not sure about other positions. — John T.
An excellent and sturdy Manfrotto stand. I have one that I use not only for a spotting scope but to mount the rifle on when allowed for unknown distance tactical matches.–Dennis Santiago
Share the post "Monte’s Manfrotto — F-Class Spotting Scope Stand"
F-Class shooting is the fastest-growing form of NRA rifle competition. While sling-shooting is in decline, the number of F-Class shooters grows every year. Recognizing this, the NRA Competitive Shooting Division has decided to expand the sport of F-Class with a new, third classification: F-TRipod. Like the current F-TR class, F-TRipod will be limited to .223 Remington or .308 Winchester chamberings. However, the rifle support can have three legs, and the weight of the tripod will NOT count in the rifle’s overall weight limit, which will be the same as F-TR, (8.25kg or 18.18 pounds). That way all current F-TR shooters will automatically “make weight” in the new F-TRipod class.
Three-legged shooting platforms can be adapted from photo tripods using a variety of mounts.
Why did the NRA create a new division for F-Class? According to Ryan Tromper of the NRA’s High Power Committee, “It’s all about improving the competitor’s experience. This new class should make the sport more popular among shooters of all ages and all levels of physical ability.” Ryan noted that many current F-Class shooters are not happy shooting on the ground: “At the 2014 F-Class Nationals in Phoenix, we polled F-Class shooters. The number one complaint was the shooting position. We heard many comments such as ‘I’m getting too old for this, I just can’t stay comfortable for a whole match anymore'”. After hearing many complaints about “eating dust all day on the ground”, the NRA realized there was a problem. F-TRipod is the solution.
The addition of the F-TRipod division should make F-Class competition more accessible for older competitors and for the many “weight-challenged” Americans who have difficulty getting down into the prone position. “We want F-Class to be inclusive. No matter what your age, your size, your shape, or your weight, we want you to be able to shoot F-Class and enjoy the experience”, said Tromper. This should make a big difference to shooters who have limited mobility.
With the advent of F-TRipod competition, shooters will no longer have to spend all day long on their belly in the dirt. Instead they can shoot from a comfortable seated position. F-TRipod competitors will be allowed to sit on the ground or in a portable chair.
F-TRipod Competition Should Be More Affordable
Affordability was another key factor in the NRA’s decision to create a new F-TRipod classification. As Derek Rodgers, the only man to win both F-TR and F-Open national titles, explains: “Let’s face it, F-Open has evolved into a hardware race. A complete F-Open rest set-up, with coaxial front rest, pad, and a couple custom rear bags, can run close to $1500.00. That’s not affordable for a lot of guys.” With the new F-TRipod division, all you need is a photo tripod and some kind of support head. With a used eBay tripod, and the $135.00 Pig Saddle, the whole system can be assembled for under $200.00. That’s half the cost of today’s most exotic F-TR bipods. Other than the tripod (with cradle) the only other accessory an F-TRipod competitor needs is a cushion for his or her posterior. (NRA rules will allow competitors to use cushions or camp chairs).
Favored by PRS competitors (and military snipers), tripods will soon be seen at F-Class matches as well. In the video below, the 6.5 Guys review various F-TRipod options.
Both current F-Class disciplines, F-Open and F-TR, are shot from the ground. Though rifle supports are permitted, this is essentially prone shooting (on your belly), and for many shooters, this is uncomfortable. Below, AccurateShooter’s Jason Baney demonstrates a modern rifle tripod system with a double cradle upper.
NRA F-Class Rifle Rules
3. EQUIPMENT AND AMMUNITION
3.4 F-Class Rifle
(c) F-Class Tripod Rifle (F-TRipod) – A rifle restricted to the chambers of unmodified .308 Winchester/7.62mm NATO or unmodified .223 Remington/5.56mm x 45 NATO cartridge cases. The rifle must be fired off a tripod, on which the rifle rests, or to which the rifle is attached. Any three-legged support, meeting the definition of a tripod, may be used but the tripod may not weigh more than 10 kilograms (approximately 22 pounds) and it may not contain any powered adjustment mechanisms or leveling systems. The tripod support may employ rigid or sliding mounts or cradles and manually-adjustable tilting heads are allowed. Any safe, manually-operated trigger is permitted. Any sighting system is permitted, but it must be included in the rifle’s overall weight.
(1) The rifle’s overall weight, including all attachments such as sights, sling, and rail(s), must not exceed 8.25 kilograms (approximately 18 pounds). The tripod and any mount or cradle permanently affixed to the tripod are not considered “attachments” if they can be separated from the rifle after the shooting sequence.
(2) The rifle must be fired in the seated or kneeling position from the shoulder of the competitor using rifle as defined in 3.4.1(b).
Share the post "F-Class News: NRA Introduces New F-TRipod Classification"
Camera Land’s One-Penny Tripod Promo Camera Land is offering a Vortex $129.99 Ball-head Tripod for just one penny ($0.01) if you purchase a Vortex spotting scope from the product list below. Cameraland’s marketing team states: “We thought it would be a nice thing to offer a special deal to all those forum members who support us so we came up with a wonderful offer. If you buy any new Vortex Viper Spotter from the list below, for an extra $.01 we’ll include a Vortex Dakota Tripod (PN#-DKA) with a Ball Head.”
Get a Tripod for a Penny More
If you purchase a Vortex Viper or Vortex Razor Spotting scope from the about list, Camera Land will include a Vortex Dakota Tripod (PN#-DKA) with a Ball Head for just one penny more. The Dakota ball-head tripod currently sells for $129.99.
Sale tip from EdLongrange. We welcome reader submissions.
Share the post "Vortex Spotting Scope Promo from Camera Land — $.01 Tripod"
It’s Black Friday, the busiest shopping day of the year. That means there are some spectacular deals available out there on name brand electronics and optics. You can fight the crowds at the malls, or shop online from the comfort of your home. Here are some great deals we found on Amazon.com.
Canon SX20-IS Digital Camera, $349.00
The Canon SX20-IS is an amazing still and video camera for the price. It takes still images up to 12.1 megapixels, using a 20X optical zoom. As you’d expect from Canon, it offers built-in image stabilization and outstanding color and contrast. But here’s what makes this camera special — it shoots HD movies in 16:9 (wide) format, plus SD movies in standard 4:3 format. And the movies are stored to an SDHC memory card, which you can easily transfer to your computer. Heck of a camera for $349.00 with FREE Shipping on Amazon.com.
Samsung 10″ Netbook computer, $339.99 (Windows XP)
This is the netbook used by your Editor. It has a very sharp screen and a battery rated for 9 hours. I’ve been able to get about 7.5 hours run-time from the battery. I really like this unit because it has a great keyboard (probably the best in class) and a rubberized shell that adds to durability. The built-in networking is excellent (it automatically logs on to nearby Wi-Fi hubs), and this computer isn’t stuffed with useless “bloatware” you have to remove. Note, if you want/need Windows 7, look for another brand, such as the latest Toshiba.
Manfrotto 410 Geared Head, $196.99
If you have an expensive spotting scope, this geared head is well worth the money. It permits you to make precise elevation or tracking (horizontal) adjustments without getting way off target. With most tripod heads you have to fiddle with a bunch of controls to move the scope, but then it usually goes too far and you have to start all over again. With the Manfrotto 410 head you can move the viewing point smoothly, in very small increments. Want to raise your view up 1 MOA at 1000 yards, without touching the horizontal position? No problem. Once you get one of these geared heads you’ll wonder how you lived without it.
The 2009 F-Class Nationals are underway right now at Camp Butner, NC. While riflescopes are allowed in both F-Open and F-TR classes, many competitors use a spotting scope as well. With a low-mounted spotting scope placed near the shooter, you can keep your riflescope trained on the target, then quickly check wind flags or mirage by looking through the spotter.
Here’s a smart product from Ray-Vin.com that lets F-Class and prone shooters mount their spotting scopes in the ideal viewing position. Ray-Vin’s patented MKII F-Stand is solid and sturdy, and “floats” the scope close to the shooter’s head without interfering with the placement of a front pedestal rest or ultra-wide bipod. The base can sit off the shooter’s mat.
How much? The entire F-Stand package costs $310.00, including 8″ bottom for prone, two 24″ extensions, Ray-Vin 360 Head, and Take-Off Knob. But if you don’t need the extensions, you can purchase components separately.
The F-Stand is shown with Ray-Vin’s $85.00 Scope Head. This head allows the shooter to adjust scope height, rotation (around the stand shaft), scope angular elevation, and eyepiece orientation, all with one control. Some other scope heads, though more expensive, require you to use multiple knobs or friction adjusters. Conveniently, most of the adjustments can be done easily with one hand, using the black adjusting handle. Smart engineering we’d say.
You can see that the F-Stand places the spotting scope right where the shooter wants it, yet the legs do not interfere with the shooting position. A heavy-duty milled metal bracket clamps the base stud and scope rod securely. The F-stand will hold even heavy 80mm spotting scopes without flexing.


 Outdoorsmans Tripod Adapters

 When setting up a chrono, we always unload the rifle, remove the bolt and bore-sight to ensure that the path of the bullet is not too low. When bore-sighting visually, set up the rifle securely on the sandbags and look through the bore, breech to muzzle, lining up the barrel with your aim point on the target. Then (during an appropriate cease-fire), walk behind the chronograph. Looking straight back through the “V” formed by the sky-screens, you should be able to see light at the end of the barrel if the gun is positioned correctly. You can also use an in-chamber, laser bore-sighter to confirm the visual boresighting (see photo).


 Camera Land’s One-Penny Tripod Promo


 The F-Stand is shown with Ray-Vin’s $85.00 Scope Head. This head allows the shooter to adjust scope height, rotation (around the stand shaft), scope angular elevation, and eyepiece orientation, all with one control. Some other scope heads, though more expensive, require you to use multiple knobs or friction adjusters. Conveniently, most of the adjustments can be done easily with one hand, using the black adjusting handle. Smart engineering we’d say.


