Do you know how gun primers are made — how the explosive elements are applied into those tiny cups? Find out by watching this video filmed at a Federal ammunition factory. It starts out with empty primer cups loaded, 1000 at a time, into trays using vibration (0:05 time-mark). While much of the process is automated, there is still a significant role played by production workers who apply a green, paste-like charging compound to the inside of hundreds of primer cups.
At the 0:17-second time-mark you can see the factory worker “charging” the primers with the priming compound. After the cups are filled, then the plate of cups “mates up with a plate of anvils” (0:40 time-mark). Then the primers are unloaded from trays and inspected.
Primer “Mysteries and Misconceptions” Article
There is an excellent article about primers on the Shooting Times website. This authoritative Shooting Times article explains the fine points of primer design and construction. The author reveals some little-known facts about primers and corrects common misconceptions. Here are some highlights:
Size Matters
Useful Trivia — even though Small Rifle and Small Pistol primer pockets share the same depth specification, Large Rifle and Large Pistol primers do not. The standard pocket for a Large Pistol primer is somewhat shallower than its Large Rifle counterpart, specifically, 0.008 to 0.009 inch less.
Magnum Primers
There are two ways to make a Magnum primer — either use more of the standard chemical mix to provide a longer-burning flame or change the mix to one with more aggressive burn characteristics. Prior to 1989, CCI used the first option in Magnum Rifle primers. After that, we switched to a mix optimized for spherical propellants that produced a 24% increase in flame temperature and a 16% boost in gas volume.
Foiled Again
Most component primers have a little disk of paper between the anvil and the priming mix. It is called “foil paper” not because it’s made of foil but because it replaces the true metal foil used to seal early percussion caps. The reason this little disk exists is strictly a manufacturing convenience. Wet primer pellets are smaller than the inside diameter of the cup when inserted and must be compacted to achieve their proper diameter and height. Without the foil paper, the wet mix would stick to the compaction pins and jam up the assembly process.
Box to Bench Precision (B2B) has developed an oversize (23.5″ x 30″) precisely-scaled target designed for Load Development and Scope Testing. This waterproof target is very innovative. On the target you’ll find clusters of aim points for various tasks. Upper left are orange aiming spots for testing various powder charges. In the upper right quadrant are more red aim points to be used when testing bullet seating depth. Running down the center of the target is a vertical line with horizontal marks showing precise MOA and Mil heights at 100 yards — use this feature to verify your click values. ORDER HERE.
And there’s more. In the lower right quadrant (far right) are three black targets to be used for chrono work. With these you can record cold velocity, hot barrel velocity and a “Final Velocity”. Over in the lower left quadrant, in the left-most column, are three dot targets for zeroing and recording group size with load data. Finally, four more black/white targets can be used for a scope box test (aka “shooting the square”). With a box test, you move from target to target, clicking in sequence to each corner of the square in sequence, eventually returning to your original aim point. If your scope tracks correctly, the last box test shot should end up right on top of the first shot.
Record the Entire Load Development Process on One Target
For those used to shooting at conventional bulleyes or benchrest targets, this target may seem confusing, but it can really help organize and simplify the process of load development. We like the idea of having a single, durable target that performs double-duty — serving for load development as well as scope checking. And we like the fact that the target is pretty strong — the maker says: “The target is Tear-Resistant and Water-Proof”. We’d expect a maker based in the Pacific NW to design a target that can handle wet weather.
Previous version of target shown. Current version has some minor enhancements.
How to Order
So how much does all this target technology cost? A pack of three 23.5″ x 30″ targets costs $27.00, a five-target pack is $40.00, a seven-target pack is $49.00, while a ten-target pack runs $55.00. These targets ship FREE in a durable cardboard tube. To order these targets, visit the Box To Box Precision Online Store.
Are you looking to get started in tactical/practical competitions? Or perhaps you already have have some PRS/NRL experience but want to upgrade your equipment and enhance your match results. Here are eight videos that can help you improve your game. These videos feature top PRS/NRL competitors and knowledgeable manufacturers’ representatives. You’ll find other related videos on the Long Range Precision Shooters YouTube channel.
Shooting a PRS Match for the First Time
Here’s an amusing video from the land Down-Under — Australia. The video covers a club PRS match, showing various shooting positions. Around the world, the PRS discipline is growing rapidly, particularly with younger marksmen under 35. The matches are fun and fast-paced and the sport is much more dynamic and physically challenging than benchrest or F-Class competition.
Building a Custom PRS/NRL Rig
Action, trigger, barrel, chassis, rails, and optics — this video from Burris covers all the key components of the modern PRS/NRL rifle. This video discusses the pros/cons of various configurations and the explains what to look for in a PRS/NRL riflescope.
How Accurate Are the Top PRS Shooters?
In this video, MDT put three top centerfire PRS shooters to the test, running them through some of the most difficult stages. The goal? To showcase the level of accuracy and precision these top shooters can achieve. From shooting off barricades to hitting targets from rooftops and rocks, these shooters demonstrate why they are considered among the best in the world. Top-tier modern PRS/NRL rifles when shot prone from a bipod at 100 yards can do 1/3-MOA or better for three shots.
Cartridge Choice for PRS and Tactical Competition
This video reviews many of the different cartridge options popular for PRS-style competition. The video examines pros and cons of various cartridge choices, focusing on accuracy, recoil, mag-feeding, and value for money. This segment features G.A. Precision owner/founder George Gardner.
Most top PRS shooters are using 6mm cartridges these days. These deliver excellent accuracy with lower recoil and cheaper bullet cost. Popular choices include 6 Dasher, 6 BRA, 6mm Creedmoor, 6XC, and the new 6GT cartridge, which is sort of a stretched version of a 6mmBR. It has a bit more case length for better feeding, and greater case capacity than a 6BR so you can shoot 105-108 grain bullets at 2950 fps with ease. That’s a popular Dasher accuracy node that the 6GT can achieve at somewhat lower pressures.
CLICK HERE for a full write-up on a 6GT rifle build by Mike McCasland (Texas Precision). This includes load development suggestions and a 6GT reamer print. The popular 0.120″ freebore chamber allows for the majority of high-BC 6mm projectiles. Mike had good luck with the pointed 107gr Sierra Match Kings (SMK), as well as the 110gr Hornady A-Tips in his rifle.
Road to the PRS
This video from Kestrel offers good advice on getting started in PRS/NRL shooting. Experts demonstrate multiple shooting positions and offer advice on shooting from barricades. Topics covered include rate of fire, scope use, and equipment selection.
PRS Tactical Division Explained
In this video MDT Shooter Matt Stiner explains the basics of competition in the PRS Tactical division. The video covers rifle, cartridge choice, optics, and key accessories. He also explains how to set up your PRS Tactical rig for best results. In addition Matt talks about bullet and brass options.
Savage 110 Elite Precision — Good Production Class Choice
This Alabama Arsenal video shows the Savage 110 Elite Precision on PRS Match stages using bags, tripods, and bipods, firing from stone barriers, field frames, and wood platform supports. If you are in the market for a PRS rifle, this video, which now has 355,000 views, is well worth watching. It covers specific features including trigger, chassis, magazines, and Atlas attachment. NOTE: The price limit for Production Class has risen significantly over the years, with a current MSRP max of $3000 for the rifle and $2500 for the optic.
PRS on a Budget — Converting a Basic Rifle for PRS Use
Top of the line rifles for competition are exceedingly expensive, but there is another option if you have a rifle in the safe that doesn’t get much use. Top F-Class shooter and wind coach Keith Glasscock notes: “I converted my .223 Remington varmint rifle into a Tactical class/PRS training rifle to save costs on ammunition and barrels so I can get better, faster.” Keith shows a very logical way to get started in the PRS/NRL game.
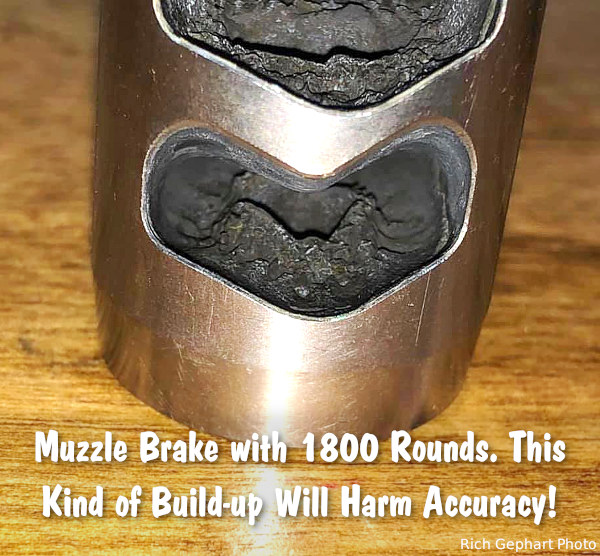
Many hunters and precision rifle competitors use muzzle brakes because these ported devices reduce felt recoil significantly. That makes a real difference getting back on target for quick follow-up shots. While many rifle owners appreciate the benefits of muzzle brakes, they may also neglect their brakes, allowing hard carbon and powder residue to build up. Not good. You should regularly clean your muzzle brake to remove fouling and carbon build-up.
As Mark Edgreen posted: “Carbon build up on the crown and in the brake is a recipe for poor accuracy.” And another gunsmith reported that customers complained about guns that “shot out way too early” but they only needed to have the brakes cleaned.
Gunsmith and PRS/NRL competitor Jim See recently reminded his Facebook Fans about the importance of cleaning muzzle brakes: “How many times do I have to say it? You need to maintain your rifles. Clean your muzzle brakes people!”. Jim, who runs Elite Accuracy LLC, notes that hard carbon build-up in brakes can definitely harm accuracy. Look at this example:
Muzzle Brake Cleaning Methods
There are various methods for cleaning a brake, we list a variety of techniques, but we would start with NON-corrosive ultrasound. You’ll want to remove the muzzle device before doing these tasks.
1. Use Ultrasonic Cleaning Machine with cleaning solution. This may be the most efficient method: “I place my brake in the ultrasonic cleaner. Shiney as new.” (Jim Moseley).
2. Spray with commercial Carb Cleaner and brush. Then apply anti-corrosion coating.
3. Soak in half hydrogen peroxide and half vinegar. Suggestion: “Let sit over night and carbon melts off. Brush remaining carbon off, rinse and put the brake back on.” Apply anti-corrosive before mounting.
4. Soak in 50/50 solution of water and white vinegar and brush. (Be sure to apply anti-corrosion coating, such as Eezox, after soaking).
5. Tumble in liquid solution with stainless pins. Comment: “Comes out slightly faded, but perfectly clean on stainless, non-painted brakes though.” Warning — do NOT do this with threaded brakes — tumbling could affect threads of screw-on brakes. Also, tumbling can harm painted or Cerakote finishes.
Gunsmithing Tip: By fitting the muzzle brake so that the barrel crown is slightly forward, it is easier to wipe carbon fouling off the end of the barrel. See photo:
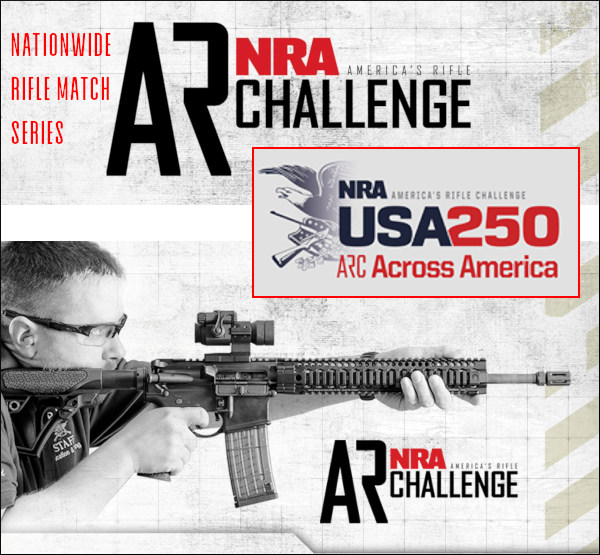
As the United States approaches its historic 250th Anniversary (July 4, 2026), the National Rifle Association invites Americans to celebrate freedom by competing in the NRA America’s Rifle Challenge (ARC). The expanded 2026 ARC Across America National Challenge is a nationwide competitive shooting event. From Memorial Day through Labor Day, gun owners across the country can compete in ARC matches at participating clubs and ranges with opportunities to win prizes from ARC partners and sponsors.
To learn more about participating in NRA America’s Rifle Challenge events, visit ARC.NRA.org.
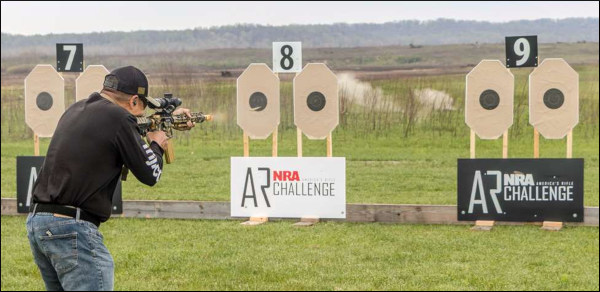
The heart of the program is the ARC Level 1 format, the foundation of the USA250 national event and the entry point for gun owners of all experience levels.
Built around practical rifle skills across four stages of fire, the Level 1 course challenges participants to demonstrate accuracy, control, and safe firearms handling.
Every ARC match is more than a competition — it’s a training opportunity. Each run on the course helps shooters grow more capable with their rifles. Participants can:
— Develop new rifle skills through structured competition
— Challenge friends and family in a fun and exciting environment
— Compete multiple times in a “Re-entry Match” format, allowing competitors to improve their score.
And, at the end of each ARC match, participants can see where they rank nationally across the country with other ARC competitors. And Veterans can meet other former service members.
How Clubs Can Host ARC Matches
The NRA’s goal is to have more than 250 clubs and ranges host ARC matches between Memorial Day and Labor Day. The program was built so clubs can run an organized, safe, and engaging event without requiring complex stages or extensive infrastructure. Clubs interested in hosting NRA America’s Rifle Challenge events can sign up on the ARC.NRA.org website.
ARC Competition Format Options
Clubs can host ARC matches using one of two range configurations:
Full Level 1 Course Format – designed for ranges with 100-yard capability Reduced Course Format – designed for ranges with 25-yard capability
Note: Both formats provide the same structured experience and competitive opportunity, ensuring that nearly any club can participate regardless of range size.
The NRA America’s Rifle Challenge (ARC) is a national rifle competition program designed to help firearm owners develop safe gun-handling skills, practical marksmanship, and confidence through structured competition. ARC events are hosted by local clubs and ranges across the country and welcome participants of all experience levels. Clubs willing to host an event will join a growing network of ranges across the country helping bring this celebration to life.
Summer is almost here, so it’s time to focus on fun. Here are four specialty targets with game themes: Dartboard, Billiards Table, Bowling Alley, and Poker Cards. Each target features multiple aiming points. Shoot the dartboard like a regular game or make up your own sequence. For the billiards target shoot the balls in number sequence or alternate stripes/solids. Click any target to load FREE downloadable PDF files. Then print the targets and take them to the range for a fun shooting session. A big thanks to our friends at NRABlog.com and NSSF for creating these colorful “fun & games” targets. Enjoy!
Dartboard Target
With this fun Dart-Board Target, aim for the four outer bullseyes, then go for the center bull. The colored darts provide additional targets. With an accurate rifle you can also aim for the colored stripes.
NSSF Billiards Table Target
This Billiards Table Target offers 15 brightly-colored numbered balls with the cue ball at the bottom. Aim for the numbers, shooting 1-15 in sequence, or alternate between stripes and solids. You can also draw an “X” on the white cue ball (or attach a paster), and use that to set your zero. This target is fun for shooting outdoors with rifles at 50 or 100 yards or indoors with pistols.
This billiards target is part of a set of 12 Fun Targets from the NSSF. These were issued a couple seasons back for National Shooting Sports Month, held in August of each year. The other free targets include Golf Links, Bowling Pins, Fireworks, Baseball Diamond, Dutch Windmill, Water Balloons, Light Bulbs, Dartboard, and three Bullseye targets.
NRA Bowling Pins with Bowling Ball Target
Here’s a fun target for close-range pistol or 100-yard rifle shooting. This NRA Bowling set target has 8 bulleyes. The largest bullseye is on the blue bowling pin. Then there are three slightly smaller bulls on the center of three of the seven bowling pins. Finally there are four small bullseyes located on the top of the first, third, fifth, and seventh pin. To test your skills, start with the bowling ball and then work up to the more challenging bulleyes.
Poker Target — Get the Best Hand
With this playing card-themed target, each shooter takes five shots and the one with the highest hand wins. With the Poker Game Target you can also shoot for 4-of-a-kind, against the clock, fastest four (without a mistake) wins.
Camp Perry Expansion — New Competition Center and Awards Plaza
The Civilian Marksmanship Program (CMP) has announced a major expansion project at Camp Perry, Ohio — a new Competition Center building, plus an Awards Plaza. The new Competition Center, building upon the success of the existing Gary Anderson CMP Competition Center, will be a large modern facility. This will provide a large, modern indoor range, expanded retail space, competitor support areas, and gathering spaces for competitors, coaches, spectators, sponsors and visitors. The new Competition Center will support training and competition for air gun, smallbore, and pistol disciplines.
This major CMP Camp Perry expansion project is aimed to strengthen the future of marksmanship training, education, coaching, competitions and youth development in the United States. The project is scheduled to break ground on August 3, 2026, with an estimated completion date of December 2027.
The lead photo above features a rendering of the new Competition Center building and below is a rendering of the new Awards Plaza.
This custom war wagon hauls varmint hunters around the Longmeadow Game Resort in Colorado.
Will you be heading to the varmint fields this summer? Proper planning is key to a safe, satisfying, and productive varmint holiday. Of course you’ll be busy reloading, but you should make a check-list of all the gear and supplies you need. Bring a variety of rifles if possible — you’ll need to switch off as one barrel gets hot, and the chambering that works best for your close shots may not be ideal for those longer shots out past 400 yards. Here are some tips from our Forum members that can help you shoot more effectively, and avoid problems on your varmint hunt. Here’s one key tip: at your shooting station, put a strip of surveyor’s tape on a tall stake to show the wind direction. Then shoot in the direction the wind blows. This will minimize the effect of cross-winds.
Varmint Safari Planning, Equipment, and Shooting Advice
From PatchHound: “The gear you bring will make or break a trip out to Prairie Dog land. A lot has to do with where you going and how far you are from [civilization]. For starters, bring lots of water. It will be hot in Wyoming in a few more weeks but it don’t hurt to bring warm clothes in case it snows. It’s best to wear leather boots unless you’re real good at dodging cactus while walking around. Good sunscreen [and a wide-brimmed hat] will save the day too. [What you need to bring] really depends on whether you’re shooting on some friendly ranch or 100 miles in the middle of [a wilderness area]. Good survival gear is a good thing to have for the latter!”
This photo is from a Dan Eigen TV Show video featuring a P-Dog hunt.
From Stoner25mkiv: “I’d suggest an adjustable bipod if you are going to do any walking. A laser rangefinder is a huge asset. Have a fanny pack or backpack for extra ammo, water, bore-snake, etc. when you go on your walkabouts. We also take a couple pivoting benches, heavy movers’ pad/blanket, sandbags (Uncle Bud’s Bulls Bag) for shooting from near the vehicle. Boonie hat for blocking the sun, sun glasses, sunscreen. High leather boots.
Anyway, on to the rifles…consider bringing a 17 HMR, .223 Ackley bolt gun, .223 Ackley AR, and a 243 WSSM. Some years the 17 HMR isn’t removed from its case. We had a couple windless days and the 17 was lots of fun. I’d walk into the dogtown and then lay down and wait. After five minutes or so I’d have dogs within easy rimfire range, and out to as far as I’d care to stretch the rimfire. 275 yards was about it.”
From CTShooter: “The .204 [Ruger] is a laser beam and good to 400 yards easy. Forget the rimfire! Do you have a portable bench that pivots? Bring bipod, binocs. Bring a LOT of water. I have a milspec sniper shooter’s mat/drag bag with shoulder straps. It is good to carry everything when you want to wander off and shoot prone with bipod. Here’s a view through my 6BR in ND.”
From RJinTexas: “In most of the locations that we’ll be shooting we’ll usually set up a minimum of 200 yards from the edge of a major dog town. We’ll start by working over the close-in dogs and shooting our way out, some of these towns may run in excess of 500/600 yards deep. I believe that a rimfire will put you at a distinct disadvantage. The only rimfire that will somewhat work is the 17 HMR and you can reload for your 204s for close to the cost of HMR ammo and you’ll be less apt to be under-gunned. Your 204 will work well out to 300/400 yards unless the wind is blowing hard. We classify a 10-mph crosswind as a very calm day and what makes it a little more challenging is that it is usually also gusting.”
From Wes (P1ZombieKiller): “[For my first PD trip] there are so many things I was not ready for. The one thing that I did bring (that no one told me about) was a canopy. I’m glad I did. Even though the weather was [near perfect], I know that sun can humble you real fast. With my pop-up canopy, I could shoot all day without getting killed by the sun. You had to tie the canopy down real well or the wind would blow it across the pasture.
We sat on shooting benches that pivot 360°, and are fast and easy to set up. Most all shots were 175-250 yards. I just felt comfortable at that range. It was more fun for me to be able to film the hits, and the camcorder I was using just did not get good video past 350 yards. The digital zoom distorted the image too much. I knew I would only get this one chance to film my first P-dog outing, and I wanted to get it on film for [posterity].”
Bring Multiple Rifles on Your Varmint Adventures
On our P-Dog adventures, we like to have multiple rifles — a .17 HMR for close work, then maybe a .20 Practical AR for 150-250 yards, then a larger caliber such as 6BRA, 6 Dasher or 6XC for those long shots. The classic 22-250 is also a wickedly effective varmint cartridge.
.20 Practical (20-223 Rem) AR-Platform Varminter
Here is a .20 Practical built by Robert Whitley. Whitley’s Ultimate Prairie Dog Rifle (PDR) features a 24″ Bartlein 11-twist cut-rifled barrel, DPMS side-charging upper, and a Jewell trigger. It is chambered in 20 Practical, a cartridge popularized by Warren “Fireball” Brookman.
This .20 Practical cartridge is simply the .223 Remington necked down to .204. You can use your existing .223 Rem brass — no special case-forming required! The 20 Practical is accurate, flat-shooting, and has almost no recoil. The advantage over the standard .223 Remington is that, grain for grain, the bullets have a higher BC and travel at a higher velocity for more dramatic effect on a small varmint. The ultra-low recoil allows you to easily see your hits, even without a muzzle brake. The 20 Practical, launching 40-grainers at about 3750 fps, shoots flatter than a .223 Rem with 55gr hollowpoints.
.17 HMR Savage A17 Varmint Rifle
We also like to have a Rimfire for the closer shots, inside 150 yards. The .17 HMR or .17 WSM are good choices. With a rimfire you save on ammo costs and you don’t waste precious centerfire barrel life.
This video shows a successful Prairie Dog hunt with a .17 HMR. Watch and you’ll see hits out to 160 yards (00:50), proving the effective range of the .17 HMR cartridge. The host is shooting a Savage A17 semi-auto .17 HMR rifle in a Boyds laminated stock.
We are often asked “Can I get more velocity by switching primer types?” The answer is “maybe”. The important thing to know is that changing primer types can alter your load’s performance in many ways — velocity average, velocity variance (ES/SD), accuracy, and pressure. Because there are so many variables involved you can’t really predict whether one primer type is going to be better or worse than another. This will depend on your cartridge, your powder, your barrel, and even the mechanics of your firing pin system.
BE SAFE: Be cautious when changing primer types. Glen Zediker recommended decreasing your load ONE FULL GRAIN when changing to a different primer type, one that you haven’t used before.
Interestingly, however, a shooter on another forum did a test with his .308 Win semi-auto. Using Hodgdon Varget powder and Sierra 155gr MatchKing bullets, he found that Wolf Large Rifle primers gave slightly higher velocities than did CCI-BR2s. Interestingly, the amount of extra speed (provided by the Wolfs) increased as charge weight went up, though the middle value had the largest speed variance. The shooter observed: “The Wolf primers seemed to be obviously hotter and they had about the same or possibly better ES average.” See table:
Varget .308 load
45.5 grains
46.0 grains
46.5 grains
CCI BR2 Primers
2751 fps
2761 fps
2783 fps
Wolf LR Primers
2757 fps
2780 fps
2798 fps
Speed Delta
6 fps
19 fps
15 fps
You can’t extrapolate too much from the table above. This describes just one gun, one powder, and one bullet. Your Mileage May Vary (YMMV) as they say. However, this illustration does show that by substituting one component you may see significant changes. Provided it can be repeated in multiple chrono runs, an increase of 19 fps (with the 46.0 grain powder load) is meaningful. An extra 20 fps or so may yield a more optimal accuracy node or “sweet spot” that produces better groups. (Though faster is certainly NOT always better for accuracy — you have to test to find out.)
WARNING: When switching primers, you should exercise caution. More speed may be attractive, but you have to consider that the “speedier” primer choice may also produce more pressure. Therefore, you must carefully monitor pressure signs whenever changing ANY component in a load. In his books, the late Glen Zediker recommended decreasing your load ONE FULL GRAIN when changing to a different primer type, one that you haven’t used before.
Over the past 12 months, this article was one of the TOP 20 most-read Daily Bulletin features. We’re reprising it today for those who may have missed it the first time. The above diagram comes from a TiborasurasRex YouTube Video comparing G1 and G7 BC models. CLICK HERE to watch the video.
The better, up-to-date ballistics programs let you select either G1 or G7 Ballistic Coefficient (BC) values when calculating a trajectory. The ballistic coefficient (BC) of a body is a measure of its ability to overcome air resistance in flight. You’ve probably seen that G7 values are numerically lower than G1 values for the same bullet (typically). But that doesn’t mean you should select a G1 value simply because it is higher.
Some readers are not quite sure about the difference between G1 and G7 models. One forum member wrote us: “I went on the JBM Ballistics website to use the web-based Trajectory Calculator and when I got to the part that gives you a choice to choose between G1 and G7 BC, I was stumped. What determines how, or which one to use?”
The simple answer is the G1 value normally works better for shorter flat-based bullets, while the G7 value should work better for longer, boat-tailed bullets.
G1 vs. G7 Ballistic Coefficients — Which Is Right for You?
G1 and G7 refer both refer to aerodynamic drag models based on particular “standard projectile” shapes. The G1 shape looks like a flat-based bullet. The G7 shape is quite different, and better approximates the geometry of a modern long-range bullet. So, when choosing your drag model, G1 is preferable for flat-based bullets, while G7 is ordinarily a “better fit” for longer, boat-tailed bullets.
Drag Models — G7 is better than G1 for Long-Range Bullets
Many ballistics programs still offer only the default G1 drag model. Bryan Litz, author of Applied Ballistics for Long Range Shooting, believes the G7 standard is preferrable for long-range, low-drag bullets: “Part of the reason there is so much ‘slop’ in advertised BCs is because they’re referenced to the G1 standard which is very speed sensitive. The G7 standard is more appropriate for long range bullets. Here’s the results of my testing on two low-drag, long-range boat-tail bullets, so you can see how the G1 and G7 Ballistic coefficients compare:
G1 BCs, averaged between 1500 fps and 3000 fps:
Berger 180 VLD: 0.659 lb/in²
JLK 180: 0.645 lb/in²
The reason the BC for the JLK is less is mostly because the meplat was significantly larger on the particular lot that I tested (0.075″ vs 0.059″; see attached drawings).
For bullets like these, it’s much better to use the G7 standard. The following BCs are referenced to the G7 standard, and are constant for all speeds.
Many modern ballistics programs, including the free online JBM Ballistics Program, are able to use BCs referenced to G7 standards. When available, these BCs are more appropriate for long range bullets, according to Bryan.
[Editor’s NOTE: BCs are normally reported simply as an 0.XXX number. The lb/in² tag applies to all BCs, but is commonly left off for simplicity.]
This article is copyright 2026 AccurateShooter.com. No 3rd Party republication of this article is allowed without advance approval and payment of licensing fees.


Size Matters


 From Wes (P1ZombieKiller): “[For my first PD trip] there are so many things I was not ready for. The one thing that I did bring (that no one told me about) was a canopy. I’m glad I did. Even though the weather was [near perfect], I know that sun can humble you real fast. With my pop-up canopy, I could shoot all day without getting killed by the sun. You had to tie the canopy down real well or the wind would blow it across the pasture.
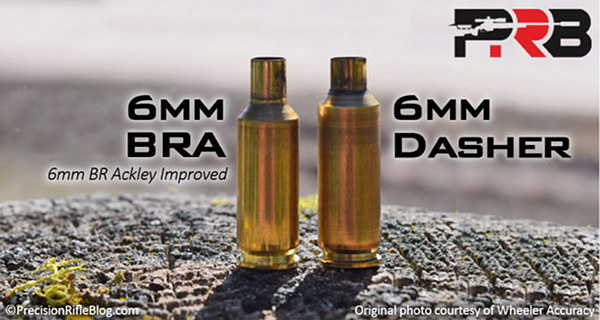


 The better, up-to-date ballistics programs let you select either G1 or G7 Ballistic Coefficient (BC) values when calculating a trajectory. The ballistic coefficient (BC) of a body is a measure of its ability to overcome air resistance in flight. You’ve probably seen that G7 values are numerically lower than G1 values for the same bullet (typically). But that doesn’t mean you should select a G1 value simply because it is higher.
 Drag Models — G7 is better than G1 for Long-Range Bullets


