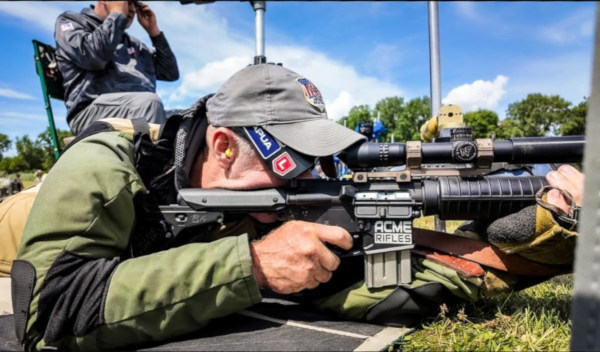
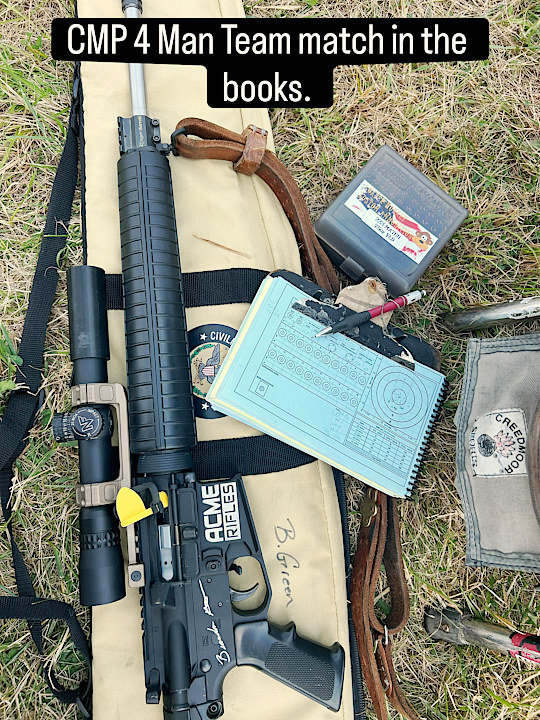
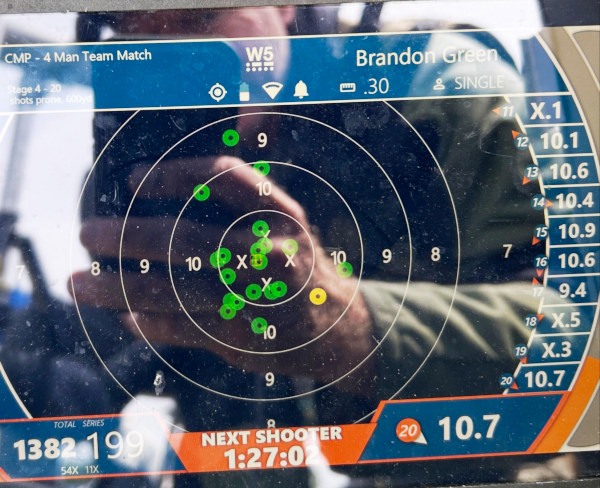
Report from Brandon Green at Camp Perry
Brandon Green — a multi-time Nat’l High Power and Long Range Champion — recently completed a 4-Man Team Match at the CMP Championships at Camp Perry, Ohio. His team did well but Brandon is hoping to do better in individual competition. Brandon posted: “Now on to the Civilian Marksmanship Program National Rifle Matches. I just want to thank TJ Jones and Krieger Barrels for cutting hammer barrels and building a lights out upper receiver! I didn’t point it as well as I should have, but the rifle wasn’t the problem! Also a big thank you to ACME Rifles/ACME Machine for a new lower and engraving my signature on the side! How cool is that! And thank you to Jack Abrams and Loader Monkey LLC for the ammo! Hopefully I can hold a little harder tomorrow!”
Rifle Training Clinics
The Junior and Advanced Rifle Clinics are in full swing. If you want to learn the finer points of highpower competition this is a good place to start! Thank you to VFB, ACME Rifles, and Civilian Marksmanship Program for getting events like this together. Iron sharpens iron! I also want to thank Krieger Barrels, Creedmoor Sports, and Berger Bullets.
Video from CMP Range with Junior and Advanced Rifle Clinics in Progress
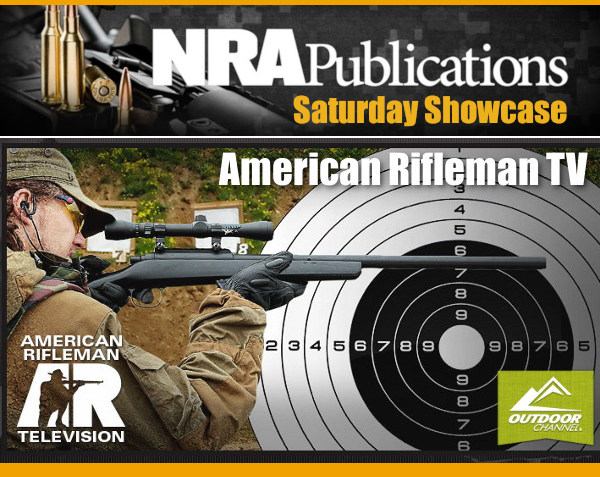
Most gun guys know that the NRA publishes a monthly magazine called American Rifleman. What you may not know is that NRA also offers a series of American Rifleman videos with recent American Rifleman TV episodes on the Outdoor Channel and over 4000 videos on the NRA Publication YouTube Channel. For today’s Saturday Showcase we offer seven noteworthy NRA-produced gun videos currently hosted on YouTube. CLICK HERE to access all NRA Videos.
Highlights from American Rifleman TV Episodes
Currently on YouTube you can access dozens of past episodes of the American Rifle television series, along with many recent gun/gear reviews. Here are eight NRA videos featuring important or interesting rifle types plus a Remington ammunition factory tour.
Remington Model 700 ADL and BDL
After Winchester came out with the Model 70, Remington Arms answered with the Model 700, one of the most recognized bolt-action designs of all time. The design emerged in 1962, as Remington sought to improve on its previous Models 721 and 722. Two versions of the Remington Model 700 existed at launch: ADL and BDL models. “You know, you could have it two ways. You had the ADL and the BDL,” said NRA Publications Editorial Director Mark Keefe. “You had the plainer ADL at a better price point, then you had the BDL and that had fleur-de-lis checkering and white spacers and a gloss finish and, you know, it was shinier.” The commercial market wasn’t the only area where the Model 700 was successful, as it was also adapted into the U.S. Army as the M24 sniper rifle. To this day, the Model 700 continues to be a popular bolt-action rifle platform for both commercial and military use.
CMP M1 Garand Matches
The Civilian Marksmanship Program (CMP) runs matches throughout the country, including the major summertime Camp Perry matches. This American Rifleman video covers the CMP’s M1 Garand Match, one of the most popular matches at Camp Perry every year. The Garand shoots the .30-06 Springfield cartridge. It is a surprisingly accurate semi-auto rifle, when fitted with an aftermarket barrel. The CMP recently started a program where the CMP is producing M1 Garands with completely new actions and barrels.
Rifleman Review: Tikka T3X Ace Target
Tikka’s T3x line of rifles is very popular, and Tikka currently offers the T3x Ace Target model, specifically designed for tactical competition. If you are looking for a good factory rifle for PRS/NRL centerfire competition, the T3x Ace Target is definitely worth checking out. It has been produced in multiple chamberings: .223 Rem, .22-250, 6mm Creedmoor, 6.5 Creedmoor, and .308 Win. Current selling price is $1799.99 – $1959.00 at EuroOptic, making this rifle eligible for PRS Factory Class. This is a recent up-to-date video, released on July 22, 2026.
Springfield M1A — Popular .308 Win (7.62×51) Semi-Auto Rifle
The M1A is one of the most popular rifles sold today by Springfield Armory. The M1A is a semi-auto version of the select-fire military M14 rifle developed in the 1950s. Designers adapted the action of the M1 Garand with a different gas system and dropped the 8-round internal magazine for 20-round detachable box magazines. Chambered for the 7.62×51 NATO cartridge, the M14 was adopted by the military in 1959, replacing the M1 Garand. However, its term as the official U.S. service rifle was short-lived, as Armalite was developing the M16, which evolved into the semi-auto AR15 for civilian use. Despite the M14 having a short-lived career as a service rifle, the semi-auto M1A remains quite popular for CMP rifle matches.
Model 1903-A3 Springfield — History of Wartime Rifle
While the U.S. Army’s Model 1903 Springfield rifle is one of the most well-recognized small arms of the 20th century, a lesser-known variant served as an important stop-gap rifle in the early years of World War II. Thanks to the efforts of engineers and arms designers at Remington, the U.S. Army eventually adopted an official pattern of the Springfield termed the “Model of 1903A3.” This NRA video covers the interesting history of the Springfield model 1903-A3.
Henry U.S. AR-7 Survival Rifle
This is an interesting video of a compact rimfire rifle originally issued to U.S. Air Force crews. In the event a crew was downed in a wilderness area, the rifle could be assembled and used to shoot game for food. Civilian versions of this ultra-lightweight 3.5-lb rifle are also available. In this video, American Rifleman contributor Jeremiah Knupp puts the Henry U.S. AR-7 Survival Rifle to the water test. The civilian version is sold by Henry as the Henry U.S. Survival Rifle. With the action, barrel, and magazines housed INSIDE the stock assembly, this rifle can easily be carried in a pack or stowed in a vehicle.
Revival of Remington Ammunition Production by Vista Outdoor
Remington Ammunition filed for bankruptcy in July 2020. Vista Outdoor, owner of Federal, CCI, and Speer, purchased the assets of Remington Ammunition. This video explains how Vista Outdoor revived Remington’s Lonoke, Arkansas plant. “This is one of the largest ammunition manufacturing plants in the world. It was set up in 1969 by DuPont, who owned Remington at the time” notes Mark Keefe, NRA Publications editorial director. Over the first 18 months of Vista’s ownership of Remington Ammunition, the facility added more than 1500 employees and increased centerfire-handgun ammunition production more than 40 percent, while shotshell production increased 15 percent.
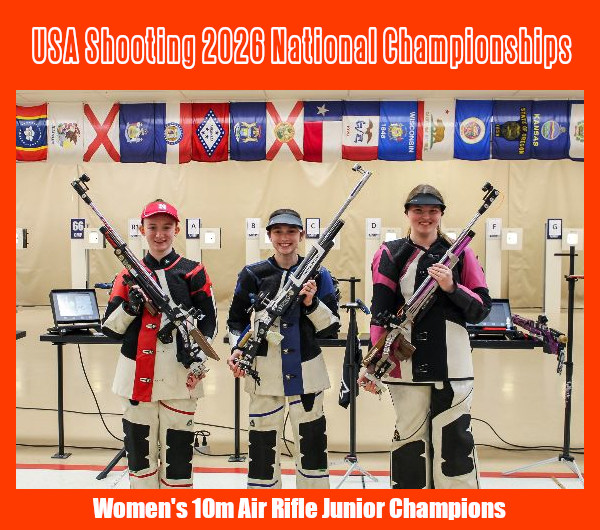
With two years remaining until the Olympic and Paralympic Games return to American soil in Los Angeles, USA Shooting’s 2026 National Championships showed what it takes to build a medal-winning team. Held throughout May and June, the championships brought together Olympians, Paralympians, National Team members, collegiate standouts, and the nation’s top junior athletes to compete for national titles across rifle, pistol, and shotgun. More than a championship season, the events served as a benchmark for the athletes pursuing Team USA selection while showcasing the growing depth of American shooting sports.
“This season is proof our pipeline is deep, and it’s growing,” said USA Shooting CEO Kelly Reisdorf. “We saw 3-year highs in participation across rifle, pistol, and shotgun, with some of the biggest gains coming from our women athletes. We also watched proven champions like Vincent Hancock and Samantha Simonton get pushed by a rising class of juniors who are closing the gap fast. That competitive pressure, top to bottom, is exactly what builds a team that wins in 2028.”
Throughout the season, Olympic veterans reaffirmed their place among the nation’s best while emerging athletes continued closing the gap. Every event carried significance as athletes battled not only for national titles but for momentum heading toward future National Team selections and international competition.
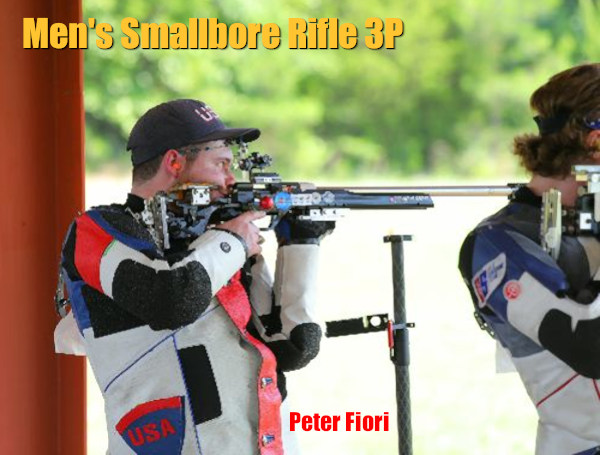
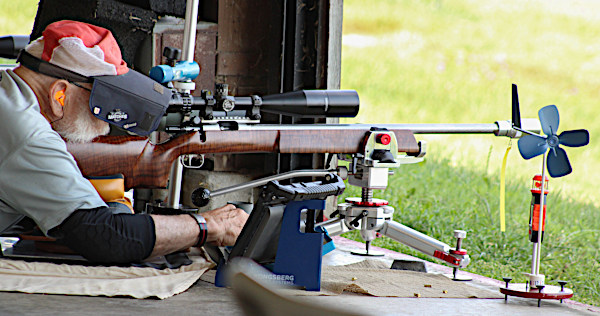
Smallbore Rifle and Air Rifle National Championships
Hosted by the Civilian Marksmanship Program (CMP) in Anniston and Talladega, Alabama, the Rifle National Championships showcased excellence across Olympic and Paralympic rifle events. Peter Fiori claimed the Men’s 10m Air Rifle National Championship while Griffin Lake earned the Junior National title. Isabella Baldwin won Women’s Air Rifle, and Elizabeth Probst captured the Junior Championship.
Lake added another national title in Men’s 50m Rifle Three Positions. Cecelia Ossi won Women’s 50m Rifle Three Positions. Para rifle competition featured standout performances across multiple classifications, highlighting the continued growth of the Paralympic program.
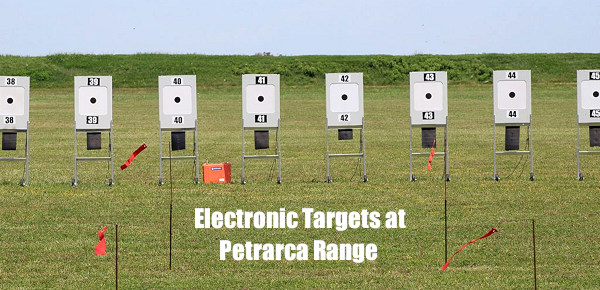
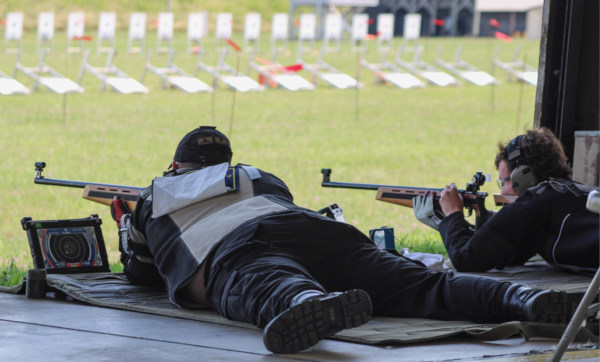
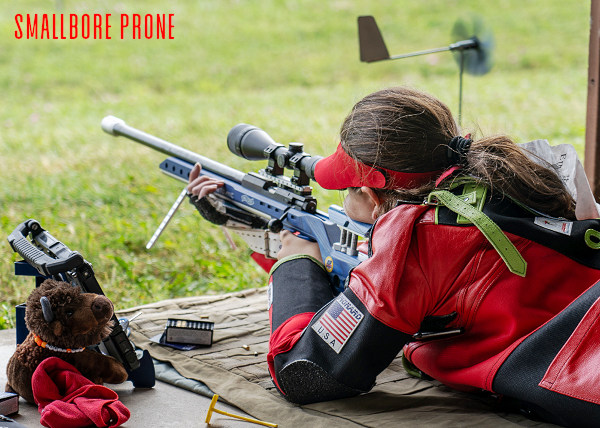
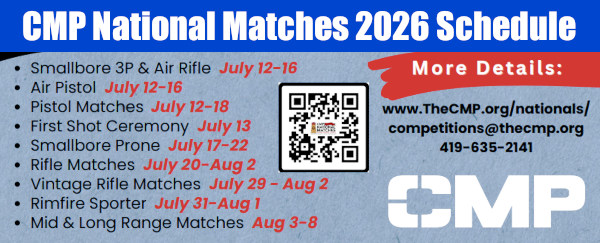
The CMP 2026 National Matches run July 12 through August 8, 2026. Right now the Smallbore Prone Matches are underway, running Friday, July 17 through Wednesday, July 22, 2026. Many of America’s most talented smallbore shooters are competing. Today, the event starts with competitors’ Check-In, Practice, and the initial Prone Metric Dewar Match. The National Smallbore rifle series will utilize electronic targets, which speeds up matches and allows fans to follow scoring in real time.
SCHEDULE
July 17, 2026 – Prone Metric Dewar, Check-in & Practice
July 18-19, 2026 – Prone Iron Sight Championship
July 20, 2026 – Prone Team Match, Prone Elimination Match
July 21-22, 2026 – Prone Any Sight Championship
Camp Perry is a National Guard facility located on the shore of Lake Erie in northern Ohio near Port Clinton. The shooting ranges have been modernized in recent years, with the installation of advanced electronic targets for many disciplines. SEE Full Camp Perry NM Calendar.
Smallbore Rifle
The National Smallbore events will be fired on the same electronic targets as Rimfire Sporter — also setup on Camp Perry’s Petrarca Range. The full match schedule includes three-position and prone events, complete with an F-Class category for interested individuals.
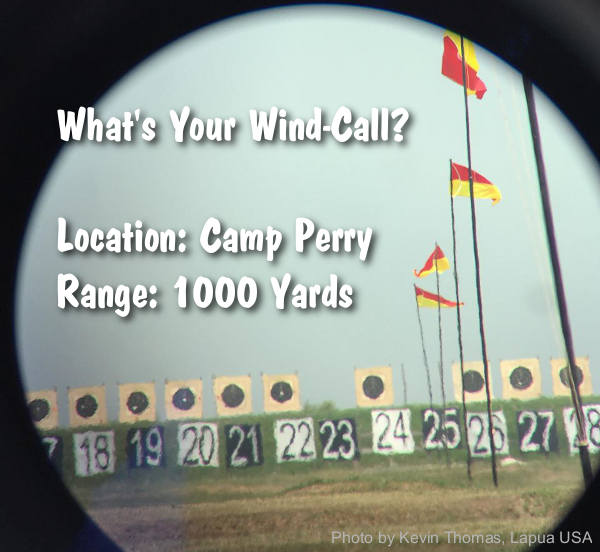
“The pessimist complains about the wind; the optimist expects it to change; the realist adjusts the sails.” — William Arthur Ward
Readers often ask us: “Is there a decent, easy-to-comprehend book that can help my wind-reading?” Many of our Forum members have recommended The Wind Book for Rifle Shooters by Linda Miller and Keith Cunningham.
New Edition — Hardback and eBook
The latest, updated edition of The Wind Book for Rifle Shooters was released in May 2020. This 144-page book, first published in 2007, is a great resource. But you don’t have to take our word for it. If you click this link, you can read book excerpts and decide for yourself. When the Amazon page opens, look below the book cover photo, and click the bar labeled “Read Sample”. This lets you preview chapters from the Wind Book, and view some illustrations. Along with the hardback edition ($22.99), Amazon offers a Kindle (eBook) edition for $14.99.
Other books cover wind reading in a broader discussion of ballistics or long-range shooting, such as Applied Ballistics for Long-Range Shooting by Bryan Litz. But the Miller & Cunningham book is ALL about wind reading from cover to cover, and that is its strength. The book focuses on real world skills that can help you accurately gauge wind angle, wind velocity, and wind cycles.
All other factors being equal, it is your ability to read the wind that will make the most difference in your shooting accuracy. The better you understand the behavior of the wind, the better you will understand the behavior of your bullet. — The Wind Book for Rifle Shooters
The Wind Book for Rifle Shooters covers techniques and tactics used by expert wind-readers. There are numerous charts and illustrations. The authors show you how to put together a simple wind-reading “toolbox” for calculating wind speed, direction, deflection and drift. Then they explain how to use these tools to read flags and mirage, record and interpret your observations, and time your shots to compensate for wind.
I believe this is a must-have book if you are a long-range sport shooter. I compete in F-Class Open and when I first purchased this book and read it from cover to cover, it helped me understand wind reading and making accurate scope corrections. Buy this book, read it, put into practice what it tells you, you will not be disappointed. — P. Janzso
If you have one book for wind reading, this should be it. Whether you’re a novice or experienced wind shooter this book has something for you. It covers how to get wind speed and direction from flags, mirage, and natural phenomenon. In my opinion this is the best book for learning to read wind speed and direction. — Muddler
Today we share some smart tips from a past F-Class and Sling Champion who is both a great shooter AND a ballistics wizard. Founder of Applied Ballistics LLC, Bryan Litz is the author of multiple books and creator of advanced Ballistics Software.
Bryan is also a highly skilled competitor. In 2015, Bryan Litz won the F-TR Mid-Range AND Long-Range National Championships hosted at Ben Avery. And at the 2014 Berger SW Nationals (SWN), Bryan took top honors among all sling shooters. If you only know Bryan Litz from his Applied Ballistics Books and DVDs, you may not realize that this guy is a also great marksman along with being an actual rocket scientist!
Given his impressive track record in both F-Class and Palma (Fullbore) out to 1000 yards, we asked Bryan if he had any advice for other long-range competitors.
First Bryan provided three tips concerning Ballistics, his special area of expertise. Next Bryan offered three more general tips about long-range competition — how to analyze your shooting, how to choose your ‘wind strategy’, and how to avoid the most costly mistakes, i.e. how to avoid the “train-wrecks”.
Bryan Litz won the 2015 F-TR Mid-Range and Long-Range Championships with this sleek rig:
Litz Ballistics Tips
Ballistics TIP ONE. If you’re having trouble getting your ballistic software to match actual drops, you need to look at a number of possible reasons. Here are some common issues that can cause problems.
Click Values Are Not Exact. Scopes and iron sights don’t always produce accurate adjustments. In other words, if your ballistics program predicts 30 MOA of drop, and you dial 30 MOA but hit low, it might be that your sight actually only moved 28 MOA (for example). To see if your sight is adjusting accurately, shoot a tall target at 100 yards and measure group separation when dialing your sight.
Barometric vs. Station Pressure. This is a commonly misunderstood input to ballistics programs. You can avoid this pitfall by remembering the following: station pressure is the actual measured pressure at your location, and you don’t need to tell the program your altitude when using station pressure. Barometric pressure is corrected for sea level. If you’re using barometric pressure, you also have to input your altitude.
Muzzle Velocity. Chronographs are not always as accurate as shooters think they are — your true MV may be off by 10-20 fps (or more). If your drop is different than predicted at long range, it might be because your muzzle velocity input is wrong.
Mixing Up BC (G1 vs. G7). Knowledgeable long range shooters know that the G7 standard is a more representative standard for modern LR bullets. However, using G7 BCs isn’t just a matter of clicking the ‘G7′ option in the program. The numeric value of the BC is different for G1 and G7. For example, the G1 BC of the Berger 155.5 grain Fullbore bullet is .464 but the G7 BC is .237. If you were to enter .464 but click on G7, the results would be way off.
Ballistics TIP TWO. A properly installed level is absolutely essential for long range shooting. Without a good level reference, your long range wind zero will be off due to minor canting of the rifle from side to side. You can verify that your level is installed correctly on a 100-yard ‘tall target’. Draw a plumb line straight up the target and verify that your groups track straight up this line as you go up in elevation.
Ballistics TIP THREE. If your long range ballistic predictions aren’t tracking, always come back and verify your 100-yard zero. Sometimes a simple zero shift can be misconstrued as errors in long range ballistics predictions.
Litz Competition Shooting Tips
Competition TIP ONE. Improving your scores in long range competition is a constant process of self-assessment. After each match, carefully analyze how you lost points and make a plan to improve. Beginning shooters will lose a lot of points to fundamental things like sight alignment and trigger control. Veteran shooters will lose far fewer points to a smaller list of mistakes. At every step along the way, always ask yourself why you’re losing points and address the issues. Sometimes the weak links that you need to work on aren’t your favorite thing to do, and success will take work in these areas as well.
Competition TIP TWO. Select your wind shooting strategy carefully. For beginners and veterans, most points are typically lost to wind. Successful shooters put a lot of thought into their approach to wind shooting. Sometimes it’s best to shoot fast and minimize the changes you’ll have to navigate. Other times it’s best to wait out a condition which may take several minutes. Develop a comfortable rest position so you have an easier time waiting when you should be waiting.
Competition TIP THREE. Actively avoid major train wrecks. Sounds obvious but it happens a lot. Select equipment that is reliable, get comfortable with it and have back-ups for important things. Don’t load on the verge of max pressure, don’t go to an important match with a barrel that’s near shot out, physically check tightness of all important screws prior to shooting each string. Observe what train wrecks you and others experience, and put measures in place to avoid them.
Looking down-range with F-TR rifle at Ben Avery Shooting Facility in Phoenix, Arizona.
Bullet Stability and Twist Rates
In this video, Bryan Litz talks about bullet in-flight stability and how to calculate barrel twist-rate requirements for long-range bullets. Bryan explains that bullet stability (for conventional projectiles) is basically provided by the spinning of the bullet. But this spin rate is a function of BOTH the nominal twist rate of the barrel AND the velocity of the projectile. Thus, when shooting the same bullet, a very high-speed cartridge may work with a slower barrel twist rate than is required for a lower-speed (less powerful) cartridge. For match bullets, shot at ranges to 1000 yards and beyond, Bryan recommends a twist rate that offers good stability.
You’ll find more expert information on long-range shooting and ballistics on the Applied Ballistics website and the Bryan Litz Ballistics Facebook page. Bryan’s most recent Facebook post talks about the Coriolis effect — the apparent drift of a rifle trajectory due to the rotation of the earth.
To learn more, we recommend you subscribe to the Applied Ballistics Science of Accuracy — with in-depth articles, brilliant podcasts, exclusive videos and more.
The following article by Tom Alves describes a very practical approach to physical training for those of us who are not as young and spry as we once were. Tom shows us how to give our bodies at least some of the maintenance we give our rifles. While we all realize that our rifles will outlive us, let’s see if we can’t narrow the margin a bit with some personal maintenance that just might help the shooting too!
This article originally appeared in German Salazar’s Rifleman’s Journal, and appears with permission. Sadly, German passed away in 2022. This was a very sad loss of a distinguished-class marksman and a great shooting sports writer. This Editor counted German as a close friend, who helped this site in many ways.
A Suggested Training Approach for Older Shooters
By Tom Alves Most articles and discussions regarding competitive shooting center around equipment. Now and then one will come across an article about physical training such as the USAMU piece on Physical Conditioning for Highpower Shooting. If you break the articles down they often discuss “core strength” and durability. The purpose of this paper is to elaborate on those points with a bit different perspective. Many of the articles you will read in books about position shooting and the one mentioned before are directed more toward the younger generation of shooters in their 20s. If you look down the line at a typical high power match these days you are likely to see quite a few folks who are in their middle 30’s and up. Many people in that age range have had broken bones and wear and tear on their joints so a training program needs to take that into account. For instance, while jogging for an extended period for heart and lung conditioning — often called cardio exercises — may be the recommended approach for younger folks, it may be totally inappropriate for older people. The procedure to repair meniscus tears in knees is one of the most frequently performed operations in this country. Another approach one often sees in training to improve core strength is the use of weight machines which isolate certain muscle groups in their operation. I would like to suggest an alternative approach that not only does not require special equipment but uses the body’s muscles in a coordinated fashion in the same way they are used in our natural movements. So, let’s set down some criteria:
1. The approach has to be low impact to conserve joints.
2. One goal is to improve the strength of the core muscles which are the muscles of our trunk that keep us erect and from where all movements initiate.
3. Along with core strength we need flexibility and full range of motion.
4. We want to improve our lung and heart function so we can have a good flow of oxygen going to our organs and muscles to reduce the rate at which we become fatigued during a competitive event.
Before I continue I believe it is appropriate for the reader to understand that I am a fellow shooter and this is a program I have designed for myself based on considerable reading and experience over a number of years. I am not a medical doctor, a formally trained exercise professional or any other type of specialist in the field. Consequently, this information is offered with the advice that you consult your medical advisor or similar authority before you embark on this or any similar regimen.
I will start with core strength and flexibility. Pilates exercises are resistance exercises that can incorporate the use of resistance bands, light weights and the weight of your body parts in order to strengthen the muscles in the abdomen, back, hips, chest and shoulders. The exercises can be performed alone but I recommend attending classes put on by a certified instructor who will ensure that you perform a balanced routine meaning you work on the front and back and both sides of your trunk. As to flexibility, yoga complements Pilates exercises and they are often taught together. In practical terms yoga strengthens through resistance using the weight of the body and increases flexibility by stretching the various muscle groups in a coordinated fashion. Some yoga exercises also work on balance which is helpful in position shooting and life in general. Again, I suggest attending formal yoga classes since an instructor can help you address such things as a joint misalignment. As an example, my right leg healed improperly after the femur was broken and my right foot splays out putting undue load on my left knee. There are a number of books available on Pilates and yoga and some of them get pretty involved; I leave that to the reader to explore. I will list some reference material at the end of the article that I have found useful.
Finally, heart and lung improvement. In order to exercise the heart and lungs while not abusing the joints, particularly the knees and hips, one has to resort to something other than jogging. Walking, bicycling, elliptical machines and swimming may be alternative methods you’d like to consider. Based on my reading, in order to get the most benefit it is important to exercise so that the pulse rate becomes elevated for periods of time rather than kept at a constant rate. The process I use, called PACE, is promoted by Al Sears, MD, http://www.alsearsmd.com/. It is interval training for the non-athlete. In simple terms one exercises, using whatever equipment one desires, to achieve a heart rate in which you are slightly above your ability to bring enough oxygen into your body to sustain the activity for an extended period. This is similar to wind sprints for a sprinter or a football player. After each episode you must rest until you have achieved recovery, meaning you can catch your breath easily. A series of three sets is recommended which covers a total time of about 20 minutes.
Report from the Author — Yes, Training Helps
As a result of this training program I have experienced increased strength in my legs and trunk, less joint stiffness, lower blood pressure, and lower resting pulse rate. The Pilates/yoga classes are usually attended 2 to 3 times a week and the interval training performed twice a week. [The author was 64 when this was first published. He is now 75, and still shooting Palma and Smallbore prone.]
Before I close I would like to touch briefly on two other related subjects: hydration and visual training. When one is exerting oneself, the body produces perspiration to keep the body’s temperature at an acceptable level. As one perspires the blood gets thicker and the ocular fluid in one’s eyes thickens as well. The heart has to work harder to supply oxygen and nutrients to the body so visual and cognitive functions degrade and fatigue sets in rapidly. Essential chemicals called electrolytes are also carried out of the body with the perspiration. As a result, it is necessary to replace moisture and electrolytes to maintain basic health and a competitive level of performance. If one goes on the Internet there is a multitude of articles on hydration. Due to the kindness of my lead Pilates/yoga instructor, Ms. Annette Garrison, I have a pretty comprehensive article on various aspects of hydration that I have included, http://www.ideafit.com/fitness-library/hyponatremia-other-side-hydration-story , for your information.
Last I want to mention visual performance training. The New Position Rifle Shooting, A How-To Guide for Shooters and Coaches by Bill Pullum and Frank Hanenkrat mentions sports vision training amongst other aspects of vision in competitive shooting. [Used book under $40.00 on Amazon]. If one goes on the Internet you will find training programs directed at golfers, baseball and football players. There is one site that has a demo which, if one looks at it for long, it is obviously very similar to a shooting gallery video game. The training involves rapid recognition and hand-eye coordination. Another source of visual training exercises, along with a wealth of other information, is the book Prone And Long Range Rifle Shooting by Nancy Tompkins.
Hopefully, I have provided some information which will be helpful in improving shooting performance and extending the time you can participate at a competitive level. It is important that you proceed at your own pace. I have pushed myself too hard in the interval training and now have to back off a bit. In closing I would like to thank Annette Garrison and German Salazar for their help, patience and encouragement.
Additional Reference Material
1. Framework by Nicholas A. DiNubile, MD This is required reading for anybody who has suffered an injury like a torn meniscus or has muscular skeletal issues. This is the book that led me to Pilates/yoga
2 P.A.C.E., The Twelve Minute Fitness Revolution by Al Sears, MD The approach I use to interval training. I am sure there are other sources.
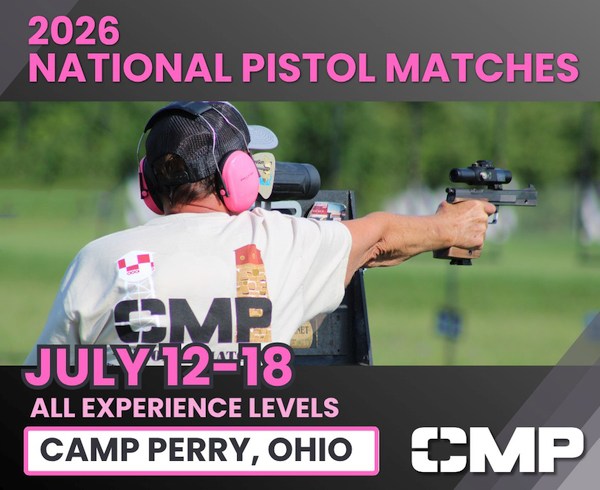
Today, 7/12/26, the 2026 Pistol Competitions officially commenced at the CMP 2026 National Matches at Camp Perry, Ohio. While the rifle competitions get the most coverage, the CMP National Matches also include very popular handgun competitions. Traditional Bullseye pistol shooting can bring nearly a thousand competitors to Camp Perry each summer, as part of the CMP National Championships. For these Camp Perry pistol matches, held July 12-18, 2026, targets are set at 25 and 50 yards. The shooting position is standing and firing one-handed in slow fire, timed fire, and rapid-fire.
Sunday 7/12/26
CMP Pistol Check-In Opens
Military & Police Pistol Match &
1911 As-Issued Pistol Match (PM)
Monday 7/13/26
Pistol Practice (AM & PM)
Small Arms Firing School (Pistol)
SAFS M17 Pistol EIC Match
SAFS/M17 Awards (CMP Headquarters)
Military & Police Pistol Match &
1911 As-Issued Pistol Match
Tuesday 7/14/26
Pistol Warm-Up Match
GSSF Glock National Challenge
Wednesday 7/15/26
CMP .22 Pistol 900 Aggregate
.22 Rimfire Pistol EIC Match
.22 Pistol Team Matches
Thursday 7/16/26
CMP CF Pistol 900 Aggregate
CMP Service Revolver EIC Match
CF Pistol Team Matches
Saturday 7/18/26
President’s 100 Pistol Match
National Trophy Individual Match
National Trophy Team Matches
CMP Shooter’s Reception (CMP Headquarters)
National Trophy Pistol Award Ceremony (Theatre)
Since their inception over a century ago*, the National Matches have become a major shooting sports festival with over 4,500 annual participants. Held at the Camp Perry Nat’l Guard Training Base, the National Matches now include both indoor and outdoor events. Adult and junior athletes are welcome.
Camp Perry Bullseye Pistol Competition
Camp Perry is synonymous with the oldest and most prestigious annual trophy matches in our nation’s history. And in a venue renowned for service rifle matches, the sport of precision pistol is no less important, no less challenging, and no less respected. The National Trophy Pistol Matches is all about traditional handgunning — the stance, the intense concentration, and of course, the one-handed grip. It’s all unmistakable as the game of Bullseye Pistol. Every year there are no fewer than 24 separate match trophies for the top Bullseye Pistol shooters, both military and civilian. And the very best will claim National Match Trophies and receive the President’s 100 Tab.
This video shows .45 ACP centerfire pistol competitors at Camp Perry
Civilians and military shooters competed together at the 2019 NTT Pistol Match.
The 2026 CMP Pistol Matches at Camp Perry include M9 EIC Match, the Pistol Warm-Up Match, the Pistol 2700 Aggregate, Team Matches, GSSF Glock National Challenge, Revolver Match, the CMP National Trophy Pistol Matches, and CMP Pistol Games Matches. To learn more about CMP events at the 2026 National Matches at Camp Perry, visit the CMP Nat’l Matches Website.
* The first National Matches at Camp Perry were held in 1907. SEE: A Short History of Perry and the National Championships by Hap Rocketto.
This content is Copyright 2026 AccurateShooter.com. No reproduction on any other website is authorized. Use of this content without payment of licensing fees is a violation of Federal law.
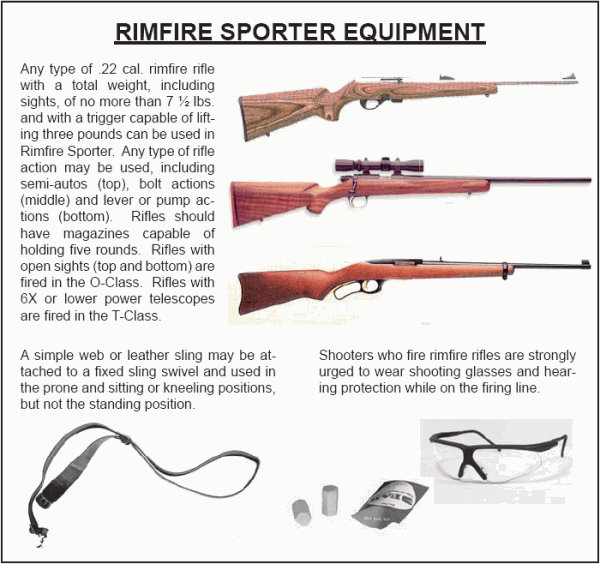
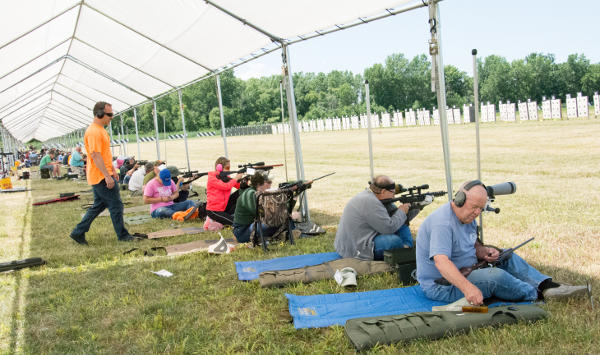
If there is a single CMP event at Camp Perry every summer that offers the highest level of shooter satisfaction, the most diverse group of competitors, and the lowest cost of entry, that would have to be the annual National Rimfire Sporter Match. This year’s match will be held Saturday, August 1, 2026 at Camp Perry. There will also be a rimfire Training Clinic on the afternoon of July 31st.
Each year, the Rimfire Sporter Match attracts hundreds of shooters to the shore of Lake Erie at Camp Perry. The CMP National Rimfire Sporter Rifle Match offers shooters a recreation-oriented competition where they use affordable, smallbore sporter rifles with either scopes or iron sights. All you need are a .22 LR rifle, sling, and ammo.
Rifles may be manually operated or semi-automatic, in four classes: the standard “O Class” for open-sight and iron-sight rifles, “T-Class” for rifles equipped with telescopic sights or rear aperture sights, “TU-Class” (Tactical/Unlimited) for tactical-style rimfire rifles and customized target rifles, and “M-Class” (Military Trainer) for vintage military rimfire training rifles that exceed the 7.5-pound weight limit.* Firing is done at 50 and 25 yards on a target with a 1.78″ ten-ring. The target is simple enough for a beginner to hit, yet challenging enough that only one competitor in the history of the match has ever fired a perfect 600 score. Here’s the young man who did that, Samuel Payne:
NOTE: Along with the three (3) classes shown above there is a new “M-Class” for vintage military rimfire rifles that exceed the 7.5-lb weight limit for the other classes.
Getting Ready for the 2026 Rimfire Sporter Match
Preparing for the Match: You need to bring your own .22 cal. Rimfire rifle(s) and ammunition. Special target shooting equipment, shooting jackets, or shooting gloves are not permitted, but feel free to bring a spotting telescope and ground cloth or shooting mat. You will be shooting on a grass firing point. Competitors are strongly urged to you wear hearing and eye protection.
A free Shooters’ Clinic will be held Friday, July 31st. The Clinic covers Rimfire Sporter rules, safety instructions, course of fire, and competition procedures. The Clinic will also demonstrate the firing positions, use of the sling, as well as slow and rapid-fire techniques. Shooters who have not previously attended a CMP Rimfire Sporter Match are strongly encouraged to attend.
Rimfire Sporter Course of Fire
Competitors will complete slow fire prone, rapid fire prone, slow fire sitting or kneeling, rapid fire sitting or kneeling, slow fire standing, and rapid fire standing shot sequences. To learn more about the National Rimfire Sporter Match, CLICK HERE.
Three different classifications of rifles can be used in Rimfire Sporter competition: “O Class” for open-sighted rifles, “T Class” for telescope-sighted rifles, “Tactical Rimfire” class, and recently-added “M-Class”. Awards are offered to High Juniors, High Seniors, High Women as well as Overall winners are named for each class.
* The M-Class was added as an “optional” Rimfire Sporter Rifle category in 2024. This rule was intended to allow rimfire military training rifles sold by the CMP to be used in a special Rimfire Sporter category where the 7.5 lb. weight limit does not apply. The intent was to give owners of these rifles opportunities to use them in CMP competitions. Recently, issues have come up regarding the wide range of rimfire rifles that the CMP acquired from government sources and subsequently sold to U. S. citizens. To answer those concerns the M-Class Rule (G9.2.1 d) has been amended to now read: “Match sponsors have the option of including an M-Class for rimfire rifles that were acquired by the U. S. Government for various purposes and subsequently sold by the CMP to U. S. citizens for their private use. Rimfire rifles eligible for inclusion in the M-Class must be repeater rifles suitable for use in firing the 60-shot Rimfire Sporter Rifle course of fire. There is no weight limit for rifles in this class (Rule 9.2.3), but they must have a minimum trigger pull of 3.0 lbs. (Rule 9.2.5) and aperture sights (Rule 9.2.6 d). The rule will be interpreted to allow any rimfire repeater rifle sold by the CMP that is suitable for Rimfire Sporter shooting will be accepted in this class. Note that M-Class rifles must have aperture receiver sights.”
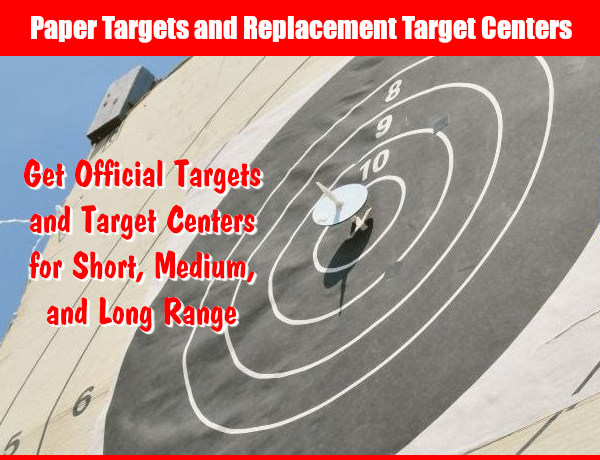
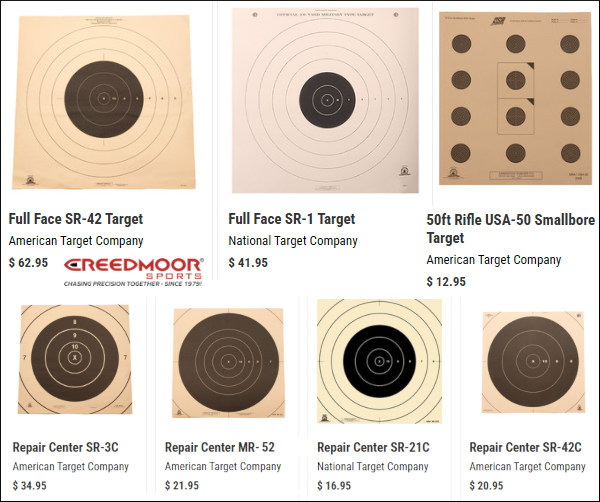
Are you a High Power or Smallbore marksman looking for bullseye paper targets? Here are bulk sets of 25, 50 and 100 targets from Creedmoor Sports. All these can can be used for general practice, fun matches, or official sanctioned events. Choose the 200-yard SR-1 target with seven scoring rings (X,10,9,8,7,6,5), priced at $41.95 for 100. For smallbore, you can get the USA-50 Smallbore Target $12.95 for 100. Creedmoor also offers a variety of Repair Centers, including the 300-Yard SR-3C Target Repair Center ($34.95), or the SR-21C Target Repair Center ($16.95). These target centers can be used on top of full targets, or by themselves for practice on smaller target frames.
Creedmoor Sports also offers match-grade shot spotter discs. These are used to mark shot locations. They are offered in three diameters: 1.5″, 3.0″, and 5.0″. In addition, you can purchase the spindles used with spotter discs along with range Golf Tees also employed to mark shots. These are placed in the shot holes by pit workers.
Frankly for practice, we recommend a target cam, or ShotMarker system.


 Most articles and discussions regarding competitive shooting center around equipment. Now and then one will come across an article about physical training such as the USAMU piece on
 Last I want to mention visual performance training. The