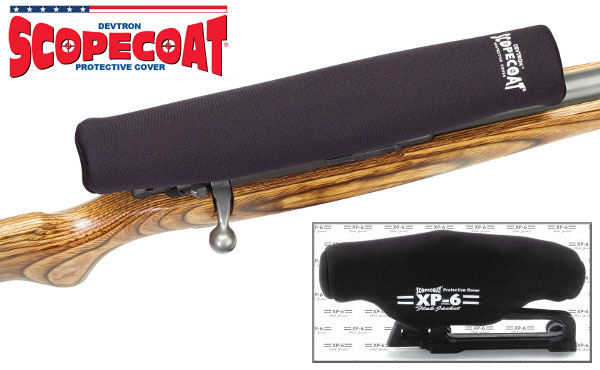
With the price of premium scopes approaching $3400.00 (and beyond), it’s more important than ever to provide extra protection for your expensive optics. ScopeCoat produces covers that shield scopes with a layer of neoprene rubber (wetsuit material) sandwiched between nylon. In addition to its basic covers, sold in a variety of sizes and colors, ScopeCoat has a line of heavy-duty 6mm-thick XP-6 covers that provide added security. CLICK HERE to review the full line of ScopeCoats on Amazon.
Triple-Thickness XP-6 Model for Added Protection
The XP-6 Flak Jacket™ is specifically designed for extra protection and durability. The 6mm-thick layer of neoprene is three times thicker than the standard ScopeCoat. XP-6 Flak Jackets are designed for tall turrets, with sizes that accommodate either two or three adjustment knobs (for both side-focus and front-focus parallax models). To shield an expensive NightForce, March, or Schmidt & Bender scope, this a good choice. XP-6 covers come in black color only, and are available for both rifle-scopes and spotting scopes.
The heavily padded XP-6 Flak Jacket is also offered in a Zippered version, shown at right. This is designed for removable optics that need protection when in storage. The full-length, zippered closure goes on quick-and-easy and provides more complete protection against dust, shock, and moisture. The line of XP-6 Scope Covers run $30 – $40 on Amazon.
Special Covers for Binoculars and Red-Dots
ScopeCoat offers many specialized products, including oversize covers for spotting scopes, protective “Bino-Bibs” for binoculars, rangefinder covers, even sleeves for small pistol scopes and red-dot optics. There are also custom-designed covers for the popular Eotech and Trijicon tactical optics.
Keith Glasscock is one of America’s greatest F-Class shooters and one of highly respected wind coach. A High Master, Keith finished second overall at the 2021 NRA F-Class Long Range Championship in F-Open division. He also finished second at the 2020 F-Open Nationals, and second at the 2019 F-Open Nationals. His consistency is unrivaled, which means he definitely knows the secrets of competition shooting and loading ultra-accurate ammo. In recent seasons, Keith has started PRS/NRL competition, bringing his impressive shooting skills to those popular tactical disciplines.
Keith has a great YouTube Channel with multiple new video releases every month. On Keith’s Winning in the Wind channel, Keith offers 265+ informative videos on a wide range of topics including wind reading, reloading, component selection, load development, and training.
For today’s Saturday Video Showcase, we offer nine of our favorite Keith Glasscock videos. These cover many key topics — ballistics, barrel care, gunsmithing, bullet sorting, reloading, maintenance and more. Each video has important points that can benefit any competitive rifle shooter, whether you shoot in local 100-yard fun matches or compete at the National Level in F-Class, LR Benchrest, Palma, High Power, or PRS/NRL.
Top 10 Methods to Improve Your Shooting Accuracy
To shoot top scores, you need great skills and great hardware. This video covers 10 things that can improve accuracy, starting with the most important. The #1 item, notes Keith, is rifle shooting skill — you need to be able to hold on target properly and run the rifle consistently shot after shot. The second most important thing is an accurate rifle — you need a rifle with an excellent barrel, quality components, and top-tier inherent accuracy. Third, you need very accurate ammo, and this means you need to perfect your reloading skills. You need precise powder measurement and good, consistent bullet seating. Fourth in the list is related to ammo — you need the ability to do effective load development to pick the best load for your particular barrel. Number 5 is the “right bullet”. You need a high-quality, ultra-consistent bullet that is a good match for your particular barrel and discipline. Watch the video for the other five items.
Wind Direction vs. Wind Speed — Which is More Important
Most shooters find wind reading somewhat intimidating. That is understandable. The wind can change constantly during a match, with variations in both wind velocity and angles. Sometimes you think you have a cycle figured out, but then there can be an unexpected lull. Or you may start a string in what you think is a stable condition, but then a surprise shift changes everything. In addition, wind flows can be influenced by terrain features, such as berms, which have varying effects depending on wind angle (e.g. a tailwind hitting a berm will act differently than a 90-deg crosswind). That is why a good wind reader needs to identify both the wind speed AND the wind angle. In this video, Keith explains when to focus primarily on direction and when to pay most attention to velocity. With headwinds and tailwinds, Keith notes, you should monitor angle changes carefully. With crosswinds, speed is the key variable to watch.
KEY Points to Remember
— Small changes in wind direction changes alter POI drastically at long range
— During head or tailwinds, focus on wind direction
— During crosswinds, focus more on wind speed
— The wind is cyclic — always be aware of the pattern
Reloading for PRS/NRL vs. F-Class
Keith Glasscock is one of the very few PRS/NRL competitors who has shot F-Class at the very highest level, finishing second three times in F-Class National Championships. PRS/NRL and F-Class are very different disciplines with different challenges. F-Class is shot prone with time between shots and target distances from 600 to 1000 yards. In PRS/NRL competition, you are shooting from multiple positions, at many distances from 100 yards on out, with fast follow-up shoots. For F-Open, you want an extremely accurate load that can deliver sub-quarter MOA groups at 200 yards. For PRS/NRL you don’t necessarily need that level of accuracy (though it helps). But you also need a load that is very consistent, has relatively low recoil, but can also provide sufficient impact energy to clearly show a hit on distant steel. In this video, Keith Glasscock explains his reloading objectives for the two disciplines.
How to Find (and Fine-Tune) Seating Depth
This is Keith’s most popular video, with 295,000 views on YouTube. Keith definitely knows how to maximize accuracy by finding the optimal seating depth for each particular barrel. He is achieving groups in the high Ones for three shots. That would be good for a short-range benchrest cartridge, but Keith is achieving that with a .284 Winchester which has much more recoil. If you shoot F-TR or F-Open or even PRS, you should watch this video.
How to Remove Carbon Build-Up in Barrels
Hard carbon is the bane of rifle shooters. Hard carbon build-up in the barrel can adversely affect accuracy, and in extreme cases, can lead to increased pressure. If possible, you should clean your barrel(s) soon after a match (or shooting session) before the carbon fully hardens. We’ve used Wipe-Out Foam right after a match (with an hour soak time) and that dramatically reduced the amount of brushing required. In this video Keith Glasscock explains the negatives of hard carbon in your barrel, and he discusses how to diagnose the problem and how to remove the carbon build-up efficiently.
Key Methods for Precision Load Development
Keith starts this video with this adage: “The best do the basics better.” He then explains how that applies to load development and achieving great accuracy. Your need to start with high-quality components then do every step of the reloading process — case prep, powder mesauring, bullet seating with precision. Keith then goes through his recommended process for developing an accurate load that will sustain accuracy throughout a match.
Recommended Barrel Break-In Methods
Barrel break-in is a controversial subject. With premium finish-lapped barrels from top manufacturers, some ace F-Class shooters get away with hardly no break-in — just shoot for score right from the get-go. On high-quality custom barrels, we’ve had success with minimalistic break-in with a few wet patches ever 3 rounds for the first 20 rounds. However, with relatively rough factory barrels, you may get better long-term results with a systematic break-in process, even using specialized products on your patches. In this video Keith Glasscock explains break-in procedures he’s found to work for various barrel types and applications.
What Counts More — ES or SD?
In general, we have gotten the best match results with loads showing an Extreme Spread (ES) under 13 FPS and an extremely low Standard Deviation (SD). We know that F-Class and ELR shooters competing at 1000 yards and beyond definitely want an extremely low ES to minimize vertical dispersion at long range. That said, some short-range Benchrest competitors look at group size more than ES/SD. In this video, Keith Glasscock talks about the reloading process and methods for lowering ES and SD. Proper brass prep is important, as is precise powder measuring. And long range shooters may want to test 3 or 4 different powder types to find the one that offers the best combination of accuracy and low ES/SD.
Sorting Bullets — Various Methods Compared
Should you sort your bullets? If so, should you sort by weight, OAL, base-to-ogive, or max diameter? Which factor? Well the answer is “it depends”. You need to carefully examine a couple dozen bullets from each batch to see how consistent they are. We had some Lapua bullets that were ultra-consistent with 97 out of 100 within .0015″ base to ogive length. We used those bullets unsorted to set a local range record at 600 yards. On the other hand if you find significant differences in weights, diameters, or bearing surface lengths, you probably should sort. One tip — many shooters do not consider the width difference in bullets. We have seen 6mm bullet diameters vary from 0.2428″ to 0.2436″. We have one 3-groove 6BR barrel that likes the skinny bullets and another 6-groove barrel that definitely prefers the fatter bullets.
Forum member Jacob spotted this simple, but effective set of scope ring inserts on the Brownells Website. With these inserts, you can use a scope with 1″-diameter main tube in 30mm rings. Non-marring, matte black Delrin sleeves surround the scope tube so it can fit larger-diameter rings. Each sleeve comes in two parts for easy installation around your scope tube. This way you can use the same 30mm rings for all your scopes.
Ring Reducers are sold as front/rear kits. Cost is $16.99 for the Delrin 30mm to 1″ converters, item 084-000-091WB. There are also sets that reduce 30mm rings to 26mm, and 1″ rings to 3/4″ or 7/8″.
Note: These Brownells units simply function as plastic bushings. Unlike Burris Signature Ring inserts, they do not allow you to “pre-load” windage or elevation. If your rings are misaligned, the Brownells Ring Reducers won’t correct that problem.
Do you find that the crosshairs in your scope get blurry after a while, or that you experience eye strain during a match? This is normal, particularly as you get older. Focusing intensely on your target (through the scope or over iron sights) for an extended period of time can cause eye strain. Thankfully, there are things you can do to reduce eye fatigue. For one — breathe deeper to take in more oxygen. Secondly, give your eyes a break between shots, looking away from the scope or sights.
In our Forum there is an interesting thread about vision and eye fatigue. One Forum member observed: “I have noticed recently that if I linger on the target for too long the crosshairs begin to blur and the whole image gradually darkens as if a cloud passed over the sun. I do wear contacts and wonder if that’s the problem. Anyone else experienced this? — Tommy”
Forum members advised Tommy to relax and breath deep. Increase oxygen intake and also move the eyes off the target for a bit. Closing the eyes briefly between shots can also relieve eye strain. Tommy found this improved the situation.
Keith G. noted: “Make sure you are still breathing… [your condition] sounds similar to the symptoms of holding one’s breath.”
Phil H. explained: “Tom — Our eyes are tremendous oxygen hogs. What you are witnessing is caused by lack of oxygen. When this happens, get off the sights, stare at the grass (most people’s eyes find the color green relaxing), breath, then get back on the rifle. Working on your cardio can help immensely. Worked for me when I shot Palma. Those aperture sights were a bear! The better my cardio got the better and longer I could see. Same thing with scopes. Try it!”
Watercam concurred: “+1 on breathing. Take a long slow deep breath, exhale and break shot. Also make sure you take a moment to look at the horizon without looking through rifle or spotting scope once in a while to fight fatigue. Same thing happens when using iron sights.”
Arizona shooter Scott Harris offered this advice: “To some extent, [blurring vision] happens to anyone staring at something for a long time. I try to keep vision crisp by getting the shot off in a timely fashion or close the eyes briefly to refresh them. Also keep moisturized and protect against wind with wrap-around glasses”.
Breathing Better and Relaxing the Eyes Really Worked…
Tommy, the shooter with the eye problem, said his vision improved after he worked on his breathing and gave his eyes a rest between shots: “Thanks guys. These techniques shrunk my group just a bit and every little bit helps.”
Read more tips on reducing eye fatigue in our Forum Thread: That Vision Thing.
To avoid eye fatigue, take your eyes away from the scope between shots, and look at something nearby (or even close your eyes briefly). Also work on your breathing and don’t hold your breath too long — that robs your system of oxygen.
In a helpful NSSF video, Ryan Cleckner explains why you normally should avoid canting your rifle — rotating it clockwise or counter-clockwise. Cleckner explains that canting the rifle in one direction or another will change the point of impact: “When you rotate the rifle, not only does the [POI move] in the direction that you’re rotated, [but] it also loses some of its elevation as it rolls down.” This, Cleckner explains, can make you miss on one side or the other:
Cant to the Left — You’re going to miss low and left.
Cant to the Right — You’re going to miss low and right.
In this video, starting at the one-minute mark, Cleckner shows the effect of rifle canting when engaging a 600-yard target. A few degrees of cant (either to the left or to the right), moves the shot POI completely off the steel silhouette target. The POI change occurs mainly because you are lowering (and laterally shifting) the scope sight-line relative to the bore axis, effectively changing your zero.
David Tubb has explained: “Every 1 degree you are off on a cant, is about six inches of difference laterally at 1000 yards”.
Position Shooting with Sling — Rifle Cant Considerations
Cleckner’s discussion assumes that the scope or sights are set to hit center with the rifle level and plumb. That works for most situations when shooting prone off bipod, front mechanical rest, or front sandbag. However, many sling shooters, including David Tubb and John Whidden, do tilt or cant their rifles slightly inward because this allows a more comfortable hold with sling, or allows better eye-to-sight alignment. Holding the rifle at an angle can work — but the angle of cant must be consistent for every shot. Canting the rifle is not a sin by itself. However, after you confirm your zero on your target, the degree of cant must be the same for EVERY shot. You must maintain that exact same degree of rotation on each shot or you will experience the shot POI movement Cleckner illustrates. Consistency is the key.
John Whidden, 5-time Nat’l Long Range Champion, holds a Palma rifle. John now shoots a match rifle with an Anschutz stock which he holds more upright, but still with some counter-clockwise cant. John also installed his iron sights at an angle so that the adjustments are correct (and plumb) even with his canted hold: “While it may not be obvious in the picture, the sights on my rifle are set up so that they’re straight vertical and horizontal while I hold the rifle canted. Making sure your adjustments (scope or sights) are vertical and horizontal is a critical piece of the pie.”
Inexpensive 30mm and 1″ Scope-Mounted Bubble Levels
The best way to avoid inconsistent rifle canting is to use a bubble level fitted to rail or scope. One very affordable product is the CVLIFE Scope Bubble Level. This features a 30mm milled inside diameter with a handy hinge to simplify mounting. This unit installs easily, the level is nicely elevated, and user reviews have been very positive. You could easily pay $40.00 or more for a 30mm scope level. This costs just $16.90 on Amazon. If you have a 1″ scope tube, consider the SME dual-diameter level. This fits 30mm tubes PLUS has an insert to fit 1″ tubes. It’s $19.99 at MidwayUSA.
Burris Signature Rings with polymer inserts are an excellent product. The inserts allow you to clamp your scope securely without ring marks. Moreover, using the matched offset inserts you can “pre-load” your scope to add additional elevation. This helps keep the scope centered in its elevation range while shooting at long range. Additionally, with a -20 insert set in the front and a +20 insert set in the rear, you may be able to zero at very long ranges without using an angled scope base — and that can save money. (To move your point of impact upwards, you lower the front of the scope relative to the bore axis, while raising the rear of the scope.)
Insert Elevation Values and Ring Spacing
People are sometimes confused when they employ the Burris inserts. The inset numbers (-10, +10, -20, +20 etc.) refer to hundredths of inch shim values, rather than to MOA. And you need the correct, matched top/bottom pair of inserts to give you the marked thousandth value. Importantly, the actual amount of elevation you get with Burris inserts will depend BOTH on the insert value AND the spacing between ring centers.
Forum member Gunamonth has explained this in our Shooters’ Forum:
Working with Burris Signature Rings
Burris inserts are [marked] in thousandths of an inch, not MOA. To know how many MOA you gain you also need to know the ring spacing. For example, with a -20 thou insert set in the front and a +20 thou insert set in the rear, if the ring spacing is 6″, the elevation change will be approximately +24 MOA upwards.
Here’s how we calculate that. If you have a 2 X 0.020″ “lift” over a distance of 6 inches (i.e. 0.040″ total offset at 0.5 feet) that’s equivalent to 0.080″ “lift” over 12 inches (one foot). There are 300 feet in 100 yards so we multiply 0.080″ X 300 and get 24″ for the total elevation increase at 100 yard. (Note: One inch at 100 yards isn’t exactly a MOA but it’s fairly close.)
Here’s a formula, with all units in inches:
Total Ring Offset
——————– X 3600 = Change @ 100 yards
Ring Spacing
(.020 + .020)
—————– X 3600 = 24 inches at 100 yards
Ring Spacing: 6 inches
NOTE: Using the above formula, the only time the marked insert offset will equal the actual MOA shift is when the center to center ring spacing is 3.60″. Of course, you are not required to use 3.60″ spacing, but if you have a different spacing your elevation “lift” will be more or less than the values on the inserts.
What is Parallax?
Parallax is the apparent movement of the scope’s reticle (cross-hairs) in relation to the target as the shooter moves his eye across the exit pupil of the riflescope. This is caused by the target and the reticle being located in different focal planes.
Here’s a good explanation of scope parallax. This video has been watched over 790,000 times.
Why is it Important?
The greater the distance to the target and magnification of the optic, the greater the parallax error becomes. Especially at longer distances, significant sighting error can result if parallax is not removed.
How to Remove Parallax
This Nightforce Tech Tip video quickly shows how to remove parallax on your riflescope.
While keeping the rifle still and looking through the riflescope, a slight nod of the head up and down will quickly determine if parallax is present. To remove parallax, start with the adjustment mechanism on infinity and rotate until the reticle remains stationary in relation to the target regardless of head movement. If parallax has been eliminated, the reticle will remain stationary in relation to the target regardless of eye placement behind the optic.
For many years, the Swarovski Optik website featured a blog with interesting technical articles. (Unfortunately some of these articles have been taken offline.) In the “On Target” series of blog stories, Swarovski provided a handy explanation of how optics systems work, with exploded diagrams of rifle scopes, spotting scopes, and binoculars. We’ve reproduced the key diagrams here. CLICK HERE for Swarovski On Target Archive.
Scope Terminology
Focusing Lens
The focusing lens is an adjustable lens inside the optical system for focusing the image at different distances…. In the case of rifle scopes, apart from focusing, the focusing lens also facilitates parallax compensation.
Objective Lens
The objective lens is the optical system’s front lens group facing the object and operates like a converging lens. Its purpose is to display an image which, at the image plane, appears upside down, laterally transposed and reduced, and which is subsequently displayed correctly again by the reversal system.
Diopter Adjustment
For rifle scopes, the reticle can be focused using the diopter adjustment on the eyepiece, thereby correcting any visual impairment. [Editor’s Note: Movable eyepiece diopter adjustment is not offered on all rifle scopes. It is a useful feature on Swarovski and other premium scopes. This allows shooters who need eyeglasses to get a sharply focus image even without wearing corrective lenses. Of course shooters should always wear ANSI-certified eye protection. With the diopter, folks who need correction can use inexpensive, non-Rx safety eyewear instead of expensive prescription safety glasses.]
Reversal System
The purpose of the reversal system is to reverse the image by means of prisms in binoculars and telescopes, and lenses in rifle scopes….The lens reversal system is needed in rifle scopes to control the variable magnification and move the exit pupil[.]
Resource tip by ELR Researcher. We welcome reader submissions.
What is Parallax?
Parallax is the apparent movement of the scope’s reticle (cross-hairs) in relation to the target as the shooter moves his eye across the exit pupil of the riflescope. This is caused by the target and the reticle being located in different focal planes.
Here’s a good explaination of scope parallax. This video has been watched over 790,000 times.
Why is it Important?
The greater the distance to the target and magnification of the optic, the greater the parallax error becomes. Especially at longer distances, significant sighting error can result if parallax is not removed.
How to Remove Parallax
This Nightforce Tech Tip video quickly shows how to remove parallax on your riflescope.
While keeping the rifle still and looking through the riflescope, a slight nod of the head up and down will quickly determine if parallax is present. To remove parallax, start with the adjustment mechanism on infinity and rotate until the reticle remains stationary in relation to the target regardless of head movement. If parallax has been eliminated, the reticle will remain stationary in relation to the target regardless of eye placement behind the optic.
Forum member Jacob spotted this simple, but effective set of scope ring inserts on the Brownells Website. With these inserts, you can use a scope with 1″-diameter main tube in 30mm rings. Non-marring, matte black Delrin sleeves surround the scope tube so it can fit larger-diameter rings. Each sleeve comes in two parts for easy installation around your scope tube. This way you can use the same 30mm rings for all your scopes.
Ring Reducers are sold as front/rear kits. Cost is $16.99 for the Delrin 30mm to 1″ converters, item 084-000-091WB. There are also sets that reduce 30mm rings to 26mm, and 1″ rings to 3/4″ or 7/8″.
Note: These Brownells units simply function as plastic bushings. Unlike Burris Signature Ring inserts, they do not allow you to “pre-load” windage or elevation. If your rings are misaligned, the Brownells Ring Reducers won’t correct that problem.


 With the price of premium scopes approaching $3400.00 (and beyond), it’s more important than ever to provide extra protection for your expensive optics. ScopeCoat produces covers that shield scopes with a layer of neoprene rubber (wetsuit material) sandwiched between nylon. In addition to its basic covers, sold in a variety of sizes and colors, ScopeCoat has a line of heavy-duty 6mm-thick XP-6 covers that provide added security. CLICK HERE to review the full line of ScopeCoats on Amazon.
 The heavily padded XP-6 Flak Jacket is also offered in a Zippered version, shown at right. This is designed for removable optics that need protection when in storage. The full-length, zippered closure goes on quick-and-easy and provides more complete protection against dust, shock, and moisture. The line of XP-6 Scope Covers run $30 – $40 on Amazon.
 Keith has a great