We are re-publishing this article at the request of Forum members who found the information very valuable. If you haven’t read this Safety Tip before, take a moment to learn how you can inspect your fired brass to determine if there may be a potential for case separation. A case separation can be dangerous, potentially causing serious injury.
On the highly-respected Riflemans’ Journal blog, created by our late, dear friend German Salazar*, there was an excellent article about Cartridge Case-Head Separation. In this important article, Salazar (aka GS Arizona) examined the causes of this serious problem and explained the ways you can inspect your brass to minimize the risk of a case-head separation. As cases get fired multiple times and then resized during reloading, the cases can stretch. Typically, there is a point in the lower section of the case where the case-walls thin out. This is your “danger zone” and you need to watch for tell-tale signs of weakening.
The photo below shows a case sectioned so that you can see where the case wall becomes thinner near the web. You can see a little arrow into the soot inside the case pointing to the thinned area. This case hadn’t split yet, but it most likely would do so after one or two more firings.
Paper Clip Hack for Detecting Problems
The article provided a great, easy tip for detecting potential problems. You can use a bent paper clip to detect potential case wall problems. Slide the paper clip inside your case to check for thin spots. GS Arizona explains: “This simple little tool (bent paper clip) will let you check the inside of cases before you reload them. The thin spot will be immediately apparent as you run the clip up the inside of the case. If you’re seeing a shiny line on the outside and the clip is really hitting a thin spot inside, it’s time to retire the case. If you do this every time you reload, on at least 15% of your cases, you’ll develop a good feel for what the thin spot feels like and how it gets worse as the case is reloaded more times. And if you’re loading the night before a match and feel pressured for time — don’t skip this step!”
* Sadly, German Salazar passed away unexpectedly on June 21, 2022 at age 62. German was a great inspiration to this site who helped guide the creation of the AccurateShooter Forum. A brilliant man, expert attorney, and top-tier marksman, German will be sorely missed in the shooting sports world.
Over the years, the U.S. Army Marksmanship Unit (USAMU) published a series of reloading articles on its Facebook Page. In this article, the second in a 3-part series, the USAMU covers the process of loading competition pistol ammunition. The authors focus on two key elements — the taper crimp and the quality/uniformity of the original brass. If you shoot pistol competitively, or just want to maximize the accuracy of your handguns, read this article. The taper crimp tips are very important.
Loading Accurate Competition Pistol Ammunition — Part 2 of 3
One often-overlooked aspect of handloading highly-accurate pistol ammunition is the amount of taper crimp used, and its effect on accuracy. (NOTE: this article pertains to loading for semi-autos — revolver crimp techniques involve some quite different issues.) Briefly, different amounts of taper crimp are used with various handloads to obtain best accuracy. The amount is based on bullet weight, powder burn rate and charge, plus other factors such as case neck tension. During machine-rest testing of experimental Service Pistol ammunition, many variables are examined. Among these, our Shop often varies a load’s crimp in degrees of 0.001″ when re-testing for finest accuracy.
How to Measure Taper Crimp on Pistol Cartridges
One question that often arises is, “How do I measure the taper crimp I’m putting on my cartridges?” Using the narrow part of one’s dial caliper jaws, carefully measure the case diameter at the exact edge of the case mouth on a loaded cartridge. It’s important to take several measurements to ensure consistency. Also, be sure to measure at several places around the case mouth, as case wall thickness can vary. After measuring 2-3 cartridges with a given crimp setting, one can be confident of the true dimension and that it can be repeated later, if needed.
However, for good results, one must use brass from one maker due to variances in case wall thickness. For example, the same degree of crimp that imparts a measurement of 0.471″ with Brand X brass may result in 0.469″ with Brand Y. Thus, for best accuracy, using brass from the same manufacturer is important — particularly for 50-yard Slow Fire. In a perfect world, it is better still to use brass from one lot number if possible. With the popularity of progressive presses using interchangeable tool heads, keeping separate tool heads adjusted for each load helps maximize uniformity between ammunition lots.
Brass Uniformity and Accuracy
Brass is important to pistol accuracy. While accurate ammunition can be loaded using brass of mixed parentage, that is not conducive to finest results, particularly at 50 yards. It is important for the serious competitor to pay attention to his brass – even if only for the 50-yard “Slow Fire” portions of “Bullseye” matches and practice. By segregating brass as described above, and additionally keeping track of the number of times a given batch of cases has been fired, one can ensure case neck tension and case length are at their most uniform.
Given the large volumes of ammunition consumed by active pistol competitors, using inexpensive, mixed surplus brass for practice, particularly at the “short line” (25 yards), is understandable. In NRA Outdoor Pistol (“Bullseye”), the 10-ring is relatively generous — especially for a well-trained shooter with an accurate pistol and load. However, for the “long line” (50 yards), purchasing and segregating a lot of high-quality brass to be used strictly for slow-fire is a wise idea. To keep track of your brass on the line, use a unique headstamp marking with 1 or 2 colors of marking pen ink.
Uniform Cartridge Overall Length is Important
Cartridge case Overall Length (OAL) uniformity as it comes from the factory is important to achieving utmost accuracy. More uniform case lengths (best measured after sizing) contribute to greater consistency of crimp, neck tension, ignition/burn of powder charge, headspace (rimless cartridges), etc. Cartridge case-length consistency varies noticeably by maker and, with lesser manufacturers, also from lot to lot. Some manufacturers are more consistent in their dimensions than others, and also in the hardness/ductility of their brass. Similarly, pay attention to primer brands, powder lot numbers, etc.
Consider Using a Lock-Out Die with Progressive Presses
When reloading pistol ammo with a Progressive press, we strongly recommend the use of a lock-out die, or other system that can detect double charges or low charges. If your progressive is manually advanced, the possibility of a double charge is very real — and that can have disastrous consequences.
On UltimateReloader.com website you’ll find an excellent two-part series on the function and set-up of the RCBS Lock-Out Die. This die prevents loading if a high or low powder charge is detected. The video below shows setup of the RCBS Lock-Out Die on the Dillon XL-650 progressive press.
Lyman’s popular Case Trim Xpress is an affordable, variable-speed case trimmer with a razor-sharp CARBIDE CUTTER. The Case Trim Xpress can quickly and accurately trim brass at a rate of approximately 15 cases a minute. The unit has its own power source — a strong variable-speed motor. Using the 10 provided bushings, the unit indexes off the case shoulder — that’s simple, fast and reliable. Plus a precision trim adjustment wheel allows case lengths to be easily “dialed in” to 0.001″ increments. To trim your brass, simply push the case against the carbide cutter until the shoulder stops on the bushing (with precise case OAL set by the wheel). The Case Trim Xpress comes with 10 bushings that fit the most popular bottleneck rifle cartridges, so no pilots are needed. This is available now for $150.28 on Amazon.
The Lyman Case Trim Xpress is an accurate, easy-to-adjust, shoulder-indexing, carbide-bladed, and SPEEDY case trimmer for $150.28 on Amazon.
Lyman Case Trim Xpress “Hands-On” Review
Review by F-Class John
Case trimming can be one of the most boring and tedious steps in the reloading processes. This is largely because of outdated tools that either require manual turning, clunky pilot systems, or difficult adjustments. In order to overcome these obstacles, you might have to spend $500 for some premium systems. But Lyman’s bright orange Case Trim Xpress delivers premium trimming performance at an affordable price. Available for around $150, this trimmer offers an easily-adjustable cutting head plus a smart, shoulder-indexing bushing system to improve consistency and speed up the trimming process.
CLICK photo for full-screen view of Case Trim Xpress unit.
Video Shows How Carbide Cutter Head Adjusts Easily with Index Wheel
The Lyman Case Trim Xpress comes with the main trimming unit, power cord, and 10 bushings in a storage case. These 10 orange bushings let you trim more than 50 popular cartridge types (yes including the 6mmBR, 6.5 Creedmoor, and .308 Win of course). Set-up was simple and straight-forward. Install the bushing you need, turn the unit on and slowly push a piece of brass towards the cutting head. Once the brass is fully depressed, you can start adjusting the dial one click at a time until the case makes contact. Then you start making progressive adjustments and trim until you reach your desired length. The process is so simple that it’ll leave you wondering how you ever used anything else.
Some top-flight components for a great-shooting rifle surely aren’t cheap — like a custom action ($1200 and up). And a premium, match-grade scope could set you back two grand or more. But there are still some great items that cost under $20.00 that can benefit any gun-owner. Here are our selection of six great shooting accessories under twenty bucks. Many of these are top-selling items on Amazon. The first item, a motion-sensitive light for your gun safe, has been a big hit with our readers.
1. Amazon — Motion-Sensor LED Interior Light, $16.99
Here’s a great accessory for your Gun Safe or closet. This rechargeable LED lamp turns itself on when you open the door, and off when you close the door. Select three brightness levels: 10LED, 20LED, 30LED. With the supplied 3M adhesive magnetic strip you can easily attach the light to the inner walls of your gun safe. And then quickly remove the unit for charging with a standard USB cord (no batteries to replace!). It works, it’s handy, and it’s inexpensive — just $16.99 on Amazon. These motion-sensor LED lamps can also be used in garages or stairwells. NOTE: this is Amazon’s choice for rechargeable LED Motion-Sensor lights.
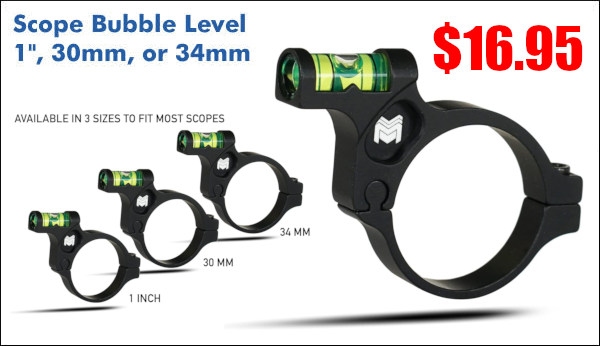
If you shoot long range, you need a scope level. The best way to avoid inconsistent rifle canting is to use a bubble level fitted to rail or scope. One very affordable and versatile product is the Monstrom Scope Bubble Level. This is offered in three sizes to fit all popular scope main tubes — choose 1″, 30mm, or 34 mmf main tubes. This Monstrom unit is nicely radiused, and has a low profile in the middle. User reviews have been very positive. This costs just $16.95 in all three sized. You could easily pay $45.00 or more for a 30mm scope level.
3. Home Depot — Low-Profile Muffs + Shooting Glasses, $18.75
Every shooter should have an extra set of shooting muffs and protective earwear. These will provide vital protection for friends/guests you bring to the range. And let’s face it, sooner or later you’ll forget your own muffs, so it’s wise to keep an extra set in your vehicle at all times. Home Depot offers a great deal on Walker’s NRR 22 Muffs + ANSI Z87.1-rated Shooting Glasses. Get both as a Combo Set for just $18.75. Midsouth shooters also has this combo for $18.99.
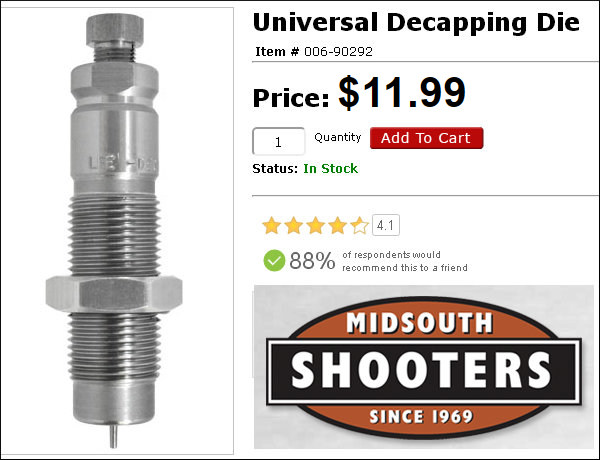
4. Midsouth Shooters — Lee Universal Decapping Die, $11.99
Midsouth sells the Lee Universal Decapping Die for just $11.99 (item 006-90292), a very good deal. There are many situations when you may want to remove primers from fired brass as a separate operation (prior to case sizing). For example, if your rifle brass is dirty, you may want to de-cap before sizing. Or, if you load on a progressive press, things will run much more smoothly if you decap you brass first, in a separate operation. The Lee Universal Decapping Die will work with cartridges from 17 Fireball all the way up to 45-70. However, NOTE that the decapping pin supplied with this Lee die is TOO LARGE for LAPUA 6.5×47, 6BR, 220 Russian, and Norma 6 PPC flash holes. Because the pin diameter is too large for these brass types, you must either turn down the pin, or decap with a different tool for cases with .059″ flash-holes. Otherwise, the Lee Decapping Die works well and it’s a bargain.
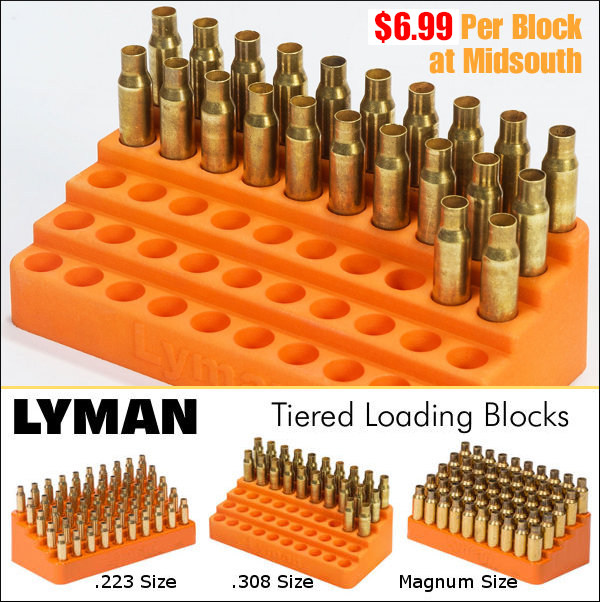
Lyman’s new Bleacher Block stepped cartridge holders are great. Use the different levels for sorting brass. Or, migrate the brass from top to bottom as you proceed through case prep stages. Made of durable polymer, Bleacher Blocks are molded in three sizes. The smallest size (with 0.388″-diam holes) fits .223 Rem-size case heads. The middle size (with 0.485″-diam holes) fits .308 Win-size case heads. The biggest Bleacher Block has 0.565″-diameter recesses for magnum-size cases. All three cartridge block sizes hold fifty (50) rounds. Purchase any size for just $6.99 per Block at Midsouth.
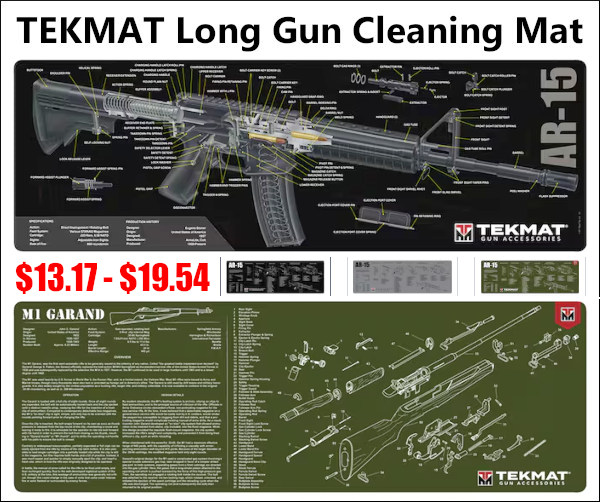
TEKMAT makes great products for cleaning long guns. This large 36″ x 12″ vulcanized rubber mat is offered with detailed diagrams for a variety of rifles: 10/22, Rem 700, AR-15, AR-10, M1 Carbine, M1 Garand, M14/M1A, Mini 14, AK47, HK MP5, FN-FAL, CZ Scorpion, SKS, and Moisin Nagant. For these rifle types you can get a rugged 36″ x 12″ mat starting at just $13.17 — a GREAT Deal! There are three color options for most versions: Black, Gray and Olive Green. The oil- and water-resistant surface helps protect your firearm from scratches while the diagrams help with take-down and reassembly.
Sierra Bullets has published load data for the 6mm Creedmoor cartridge, a necked-down version of the popular 6.5 Creedmoor. Sierra has released very comprehensive 6mm Creedmoor load data, covering fifteen (15) different bullets from 55 to 110 grains. NOTE: Hornady-brand brass was used for Sierra’s 6mm Creedmoor load tests, not the newer, stronger Lapua 6.5 CM brass with small primer pockets. Hand-loaders using Lapua 6.5 Creedmoor brass necked to 6mm may have to adjust their loads.
Sierra writes: “As soon as the 6.5 Creedmoor was released in 2007, a 6mm version was being envisioned. After the 6mm Creedmoor demonstrated its worth at 1000 yards it began to catch the attention of Precision Rifle Series (PRS) competitors. The 6mm Creedmoor is a great fit for those looking for an AR platform-friendly cartridge. It delivers velocities very similar to the .243 Win and yet fits the AR10 magazine length[.] The 30-degree shoulder makes this a very efficient case and helps prolong case life as well. The 6mm Creedmoor works well with powders such as H4350, [RE-16], RE-17, and Ramshot Hunter for heavier long-range bullet weights. Slightly faster powders such as RE-15, Win 760, and Vihtavuori N540 work well with lighter weight bullets.”
Sierra Bullets Tested for 6mm Creedmoor Load Data
55gr BlitzKing (#1502)
60gr HP (#1500)
70gr HPBT (#1505)
70gr BlitzKing (#1507)
75gr HP (#1510)
In developing its 6mm Creedmoor load data, Sierra tested a very wide selection of propellants, two dozen overall. For the smaller bullets, fast-burning powders such as Benchmark, H4895, and CFE223 were tested. For the heavier 100+ grain bullets, Sierra tested a selection of medium-burn-rate powders including H4350, Reloder 16, Reloder 17, Varget, and Superformance. Sierra did a very thorough job. We know this information will be welcomed by 6mm Creedmoor shooters.
Don’t know what powder to try first? For the 107-110 grain bullets, if you want best accuracy and low ES/SD, our Forum members recommend Alliant Reloder 16 and Hodgdon H4350. If you are seeking max velocity with the 110-grainer, look at Hodgdon Superformance and Reloder 19.
Here are Sierra’s 6mm Creedmoor Load Data Charts for 90-95 grain bullets plus the 107gr MK and 110gr MK. There are five other tables for other bullet types.
BONUS: PRB 6mm Creedmoor and 6.5 Creedmoor Load Survey
The Precision Rifle Blog compiled Load Data from PRS Competitors, for both 6mm Creedmoor and 6.5 Creedmoor. This is a good place to start. PRB surveyed the match loads for “173 of the top-ranked precision rifle shooters in the country”. One cautionary note: These PRS guys may be loading fairly hot, so work up gradually, 0.3 grains at a time. CLICK HERE.
Even with high-quality brass from Lapua, Peterson, Norma, Alpha and RWS, occasionally you may find one or two cases per box which have a small flake or obstruction in the flash-hole. This will appear like a thin crescent on one side of the flash hole (see photo). You should inspect ALL new brass before loading to identify any pieces with a partially-obstructed flash hole. It’s a good idea to remove any flake or thin crescent left as an artifact of the flash-hole forming process. Because the flash-hole itself is normally centered and of the correct diameter, it is not necessary to ream the flash-hole to a larger diameter. All you really need to do is remove the small obstruction(s). This can be done quickly with inexpensive tools.
Use a Small Pin Vise to Remove Flash-Hole Obstructions
Folks have asked if there is a tool that can remove obstructions from a Lapua small, BR-sized flash hole without opening the hole size. The Lapua PPC/BR flash hole is spec’d at 1.5mm, which works out to 0.059055″. Most of the PPC/BR flash-hole uniforming tools on the market use a 1/16″ bit which is nominally 0.0625″, but these often run oversize — up to 0.066″.
If you want to just clear out any obstructions in the flash hole, without increasing the flash hole diameter, you can use an inexpensive “pin vise” with an appropriate drill bit. For $5.39, Amazon sells a 10-piece set of cobalt steel 1.5mm drill bits, that matches the Lapua flash hole exactly. Other vendors offer a #53 pin vise drill bit that measures .0595″ or .060″ (depending or source). An 0.0595″ bit is close enough. You can find pin vises and these small-diameter drill bits at hobby stores.
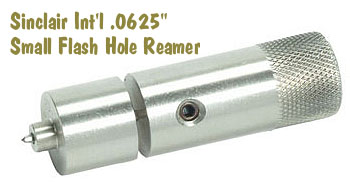
For quite some time, Sinclair Int’l has sold a similar device for small (PPC and BR-size) flash holes. Like the 07-3081 unit for large flash holes, the 073000 Reamer for small flash holes works from the outside, so it can index off the primer pocket. It reams to .0625″, and also costs $29.99. The standard dimension for Lapua 220 Russian and 6mmBR flash holes is 1.5mm or .0590″. This tool will permit standard-size decapping rods with .0625″ tips to work without binding. However, note that both Forster and Redding normally supply .057″ decapping pins with their PPC and BR dies. So, it is NOT necessary to ream your Lapua BR/PPC flashholes, unless you prefer to do so for uniformity. It IS, however, a good idea to check BR/PPC flash holes for burrs before loading the first time.
NOTE: If you purchase either the 073081 or 073000 Sinclair Flash Hole Reamer tools, we recommend you mic the cutter tip before you process a bunch of cases. Sometimes a tip comes through that is oversize. This will ream the flash holes larger than you may intend.
At the request of our readers, we provide select “Deals of the Week”. Every Sunday afternoon or Monday morning we offer our Best Bargain selections. Here are some of the best deals on firearms, hardware, reloading components, optics, and shooting accessories. Be aware that sale prices are subject to change, and once clearance inventory is sold, it’s gone for good. You snooze you lose.
NOTE: All listed products are for sale to persons 18 years of age or older. No products are intended for use by minors.
Brownells — Observation Optics Super Summer Cleanout Sale
⏺️ » Save hundreds on Spotters, Binocs, and Rangefinders
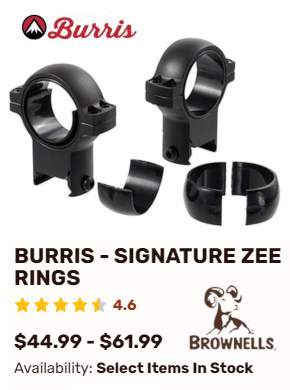
If you need some new, high-quality optics, visit Brownells for the Optics Summer Cleanout Sale. There are many “Observation Optics” with prices reduced by 20-30% and some items discounted by 70% or more! You’ll find binoculars, spotting scopes, and rangefinders on sale as well as tripods and other accessories. Brands include Vortex, Leupold, Burris, Revic, and Longshot.
Precision Reloading — Sale on Primers, All Types in Stock
⏺️ » Primer Sale for CCI, Federal, Rem, Winchester, and more
If you need primers for your rifle, pistol, or shotguns, here is a great chance to save 30% or more on quality primers. Precision Reloading is running a major primer sale with discounts on ALL in-stock primers. This sale includes all leading primer brands including CCI, Federal, Remington, Winchester, Fiocchi, Cheddite, and Nobel Sport. Prices are great — such as $54.99 for 1000 CCI #400 Small Rifle Primers and $53.99 for 1000 Remington #7-1/2 Small Rifle BR primers.
As an Amazon affiliate, this site can earn revenues through sales commissions.
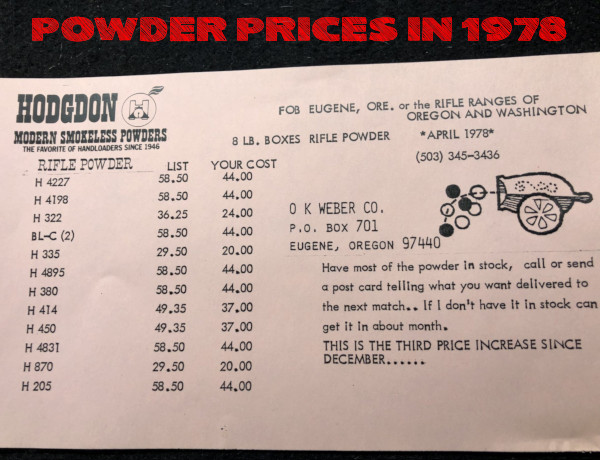
Have inflation (and supply chain shortages) affected the price of powder? You bet. Probably WAY more than you could imagine. Forum member “Two Time HM LR” posted this interesting photo (above) showing Hodgdon powder prices from 1978, as sold by O.K. Weber in Oregon.
Now the prices — $20 to $44 — may not get your attention at first. But take note that these numbers are for EIGHT pound jugs. Yep eight-pounders were all under $45! For example, H4895 was $44 for 8 pounds back in 1978, 45 years ago. And H335 was $20 for eight pounds — that’s just $2.50 per pound!
These days a single pound of a desirable powder such as Varget might cost $65 at some stores IF you can find it at all. On Hodgdon’s web site, H4895 powder is now priced at $68.99 per pound in July 2026. Using that current $68.99/lb figure, H4895 is now 12.5 times (1250%) higher than it was in 1978, when H4895 cost $44 for 8 pounds, i.e. $5.50 per pound.
Here are some comments from our Forum Members:
“Heck those prices are just about the same as current ones, just a little smaller container now.” — Joe
“I’ve got some H4831 in a can marked ‘WWII Surplus Powder’ with a price tag of $2.75. We’ll never see that again either.” Rick in Oregon
“1978 prices and [2024] income would be nice. Unfortunately that doesn’t work. If you compare prices and income, powder cost about the same. You also have to discount the temporary gouging that we are seeing.” — Tmwinds
“So I used to buy gas for 10 cents per gallon and they’d pump it, check the oil, and clean the windshield.” — Pirate Ammo
One comment suggests that the powder price hike actually tracks general U.S. currency inflation over the last four decades. So perhaps powder price increases are not as bad as they seem, when compared to how all prices have risen since 1978:
“Using H4895 [8 lbs.] as a comparison basis at $58.50 (list price) in 1978 calculates it to $276 in today’s money. Looking at … prices it looks like around [$380] for the same item in today’s money, so it really hasn’t gone up [that much as corrected for inflation]. Availability is another issue though and if someone is really needing powder they may well have to pay above suggested retail.” — Drover
The Shooting Sports USA website includes two excellent articles about the basics of metallic cartridge reloading. These two articles provide an excellent summary of the key procedures. If you are new to reloading, we recommend you read both articles:
Part II is particularly helpful because it explains the entire reloading process step-by-step, with 14 listed steps. The author notes: “In this, the second installment on metallic cartridge reloading, we’ll follow the sequence of steps involved in reloading a rifle cartridge and refining a metallic cartridge load. These steps are based on the use of a single-stage reloading press and a separate priming tool.”
Much important advice is provided as this article runs through the 14 Steps of Reloading. For example, when explaining Step 13, Bullet Seating, the article states:
“Proper seating depth is critical. Too much bullet protrusion and the cartridge may not work through the gun’s magazine, or it may fail to chamber. Too little and the bullet intrudes excessively into the powder chamber, decreasing volume and raising pressure. Neck tension is also important; any bullet that fails to seat with some resistance may be held only loosely by the neck and may be driven back into the case when the round is chambered, especially in semi-automatic arms.”
Important Guide to Detecting Over-Pressure Signs in Brass
As an example of the invaluable advice provided in these two articles, here’s a sample from Part II that explains how to determine if your load is over-pressure. We recommend that EVERY reader read this twice. There are more things to consider than a stiff bolt lift. You need to inspect cartridges very carefully:
After purchasing a new set of dies from Forster, Hornady, Redding, or Whidden Gunworks, you’ll want to disassemble the dies, inspect then, and then remove the internal grease and/or waxy coatings placed on the dies by the manufacturer. Below are two videos that show how to de-grease and clean dies as they come “out of the box” from the manufacturer. The videos also explain how to clean your dies after regular use. Cleaning your dies helps remove carbon, brass shavings, lube residues and other stuff that can get inside the dies.
In the first video, from Creedmoor Sports, Bill Gravatt (Creedmoor’s President) shows various methods for cleaning dies both when new and after they have accumulated carbon and lube after use. This video is definitely worth watching. In the second video, a Hornady technician shows the method for degreasing dies before first use. A convenient aerosol spray cleaner is used in the video. You can also use a liquid solvent with soft nylon brush, and cotton patches. NOTE: After cleaning you may want to apply a light grease to the external threads of your dies.
Creedmoor Sports Die Cleaning Video with Bill Gravatt
Hornady Video Showing Aerosol Cleaner
Clean Your Sizing Dies and Body Dies Regularly
These same techniques work for cleaning dies after they have been used for reloading. Many otherwise smart hand-loaders forget to clean the inside of their dies, allowing old case lube, gunk, carbon residue, and other contaminants to build up inside the die. You should clean your dies fairly often, particularly if you do not tumble or ultrasound your cases between loadings. It is most important to keep full-length sizing and body dies clean. These dies accumulate lube and carbon residue quickly.


 On the highly-respected Riflemans’ Journal blog, created by our late, dear friend German Salazar*, there was an excellent article about Cartridge Case-Head Separation. In this important article, Salazar (aka GS Arizona) examined the causes of this serious problem and explained the ways you can inspect your brass to minimize the risk of a case-head separation. As cases get fired multiple times and then resized during reloading, the cases can stretch. Typically, there is a point in the lower section of the case where the case-walls thin out. This is your “danger zone” and you need to watch for tell-tale signs of weakening.