Shown are funnel with ultra-long drop tube (which helps get more kernels in the cases), RCBS Chargemaster (in wood box), and Hood Press (similar to Harrell’s Combo press).
Loading at the range remains important in the Benchrest for Group discipline. In a Special Report below, past IBS President Jeff Stover explains how loading methods (and hardware) have evolved over the years. The advent of accurate, affordable electronic powder dispensers, such as the RCBS ChargeMaster and Frankford’s new Intellidropper, have changed the game and made it easier to load efficiently at the range. And quality manual powder measures are fast and can be very consistent, with a little practice. Loading at the range permits competitors to tune their load to the conditions, change seating depths, or even choose different bullets to suit the barrel’s preferences on any given day.
Although pre-loading is not uncommon, most 100/200-yard group shooters usually load at the match, often between relays. The goal is to shoot smaller groups by staying “in tune”. In a game where 5-shot groups “in the 1s and Zeros” is the goal, tuning loads for the conditions helps deliver match-winning accuracy. Nearly all competitors in this short-range discipline shoot the 6mm PPC cartridge, or a PPC variant.
Loading at the Range — Then and Now
In benchrest shooting for group, loading at the range has been de rigueur for decades. In the Score discipline, preloading is usually the custom. The main reason is that, in Score competition, only one Aggregate (warm-up match and five record targets) per day is usually shot. That would be less than 50 shots, assuming a few sighter shots. Also, the 30BR, the dominant Benchrest-for-Score cartridge, is very amenable to pre-loading.
By contrast, the Group discipline includes 21 targets (two warm-ups and twenty record targets) over a weekend, usually shot with 6PPC-chambered rifles. Many times, the 6PPC shooters may tweak their loads through the day given changing atmospheric conditions or simply trying to find the correct tune to “dot up”. This term, “Dot up”, means the shots are essentially going through the same hole, or closely so.
Loading at the range was a bit different when benchrest competition was in its infancy. The 1951 book, Modern Accuracy by Bob Wallack, is the best of the early benchrest books. Copies can be found, from time to time, on eBay or Alibris. It is a fascinating survey of benchrest as it existed more than six decades ago. There’s even coverage of a controversial target that was argued over at the time. In it, there is a photo of Wallack using the rear bumper of a car at the bench to clamp his reloading tools. Things have come a long way compared to the range loading set-ups of modern shooters. Here you can see Bob Wallack way back in 1950:
Modern loading bench set-ups shown in this Special Report belong to top shooters Howie Levy, Bob Hamister, and Kent Harshman.
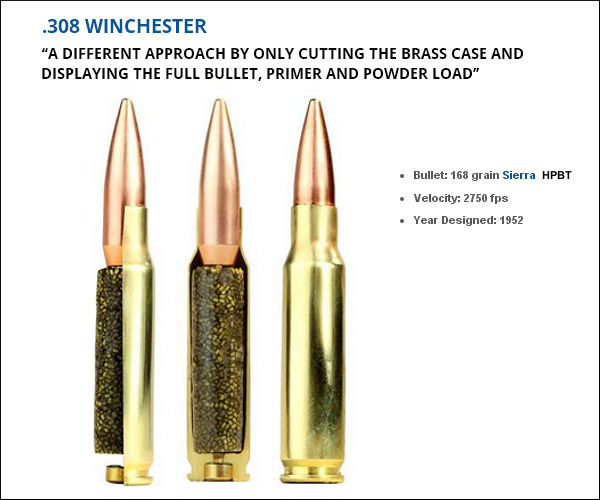
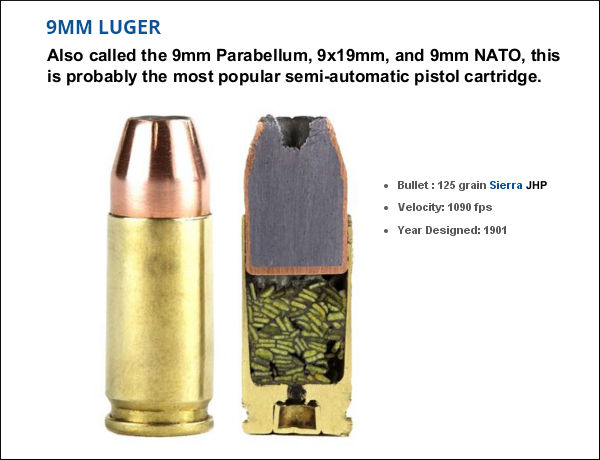
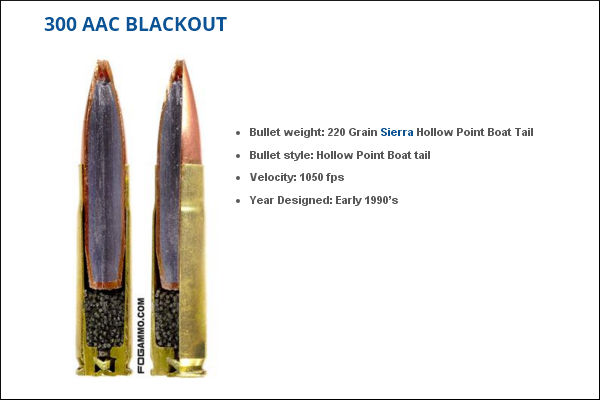
Here’s something you don’t see every day — the inside of loaded cartridges, sliced halfway through. This lets you see how bullet core, jacket, cartridge case, powder, and primer all fit together. Give credit to the folks at FOG Ammunition for creating this interesting series of cut-through ammo images. We show four cartridges here: the .308 Winchester, 9mm Luger, 300 BLK, and .50 BMG. You’ll find two more (the .223 Remington and .45 ACP) on the original FOG Ammo Blog Article.
This .308 Winchester model took on a different approach by only cutting the brass case and displaying the full bullet, primer and powder load. A spec amount of powder was used to create the model powder form. An estimated 10% volume was added during the forming process, along with an undetermined amount of air pockets.
This bisection is a 9mm Luger Jacketed Hollow Point round with flake powder held together with super glue. After this self-defense round was cut by a trained professional the round was polished by hand. This might look like stick powder, but those are in fact flakes stacked up in cross-section. Designed in 1901 by Georg Luger, this popular cartridge is used by civilians, military, and law enforcement.
For this model of the .300 AAC Blackout (aka 300 BLK), a Dremel tool was used to create a pie cut within the bullet and brass case. A measured amount of power, roughly 65% of spec charge, was placed inside the case with super glue. This cartridge was originally optimized for subsonic use with a suppressor, so the amount of powder used is small relative to the nominal case capacity. That leaves more room for the relatively large .30-caliber bullet.
Last but definitely not least is the .50 Caliber BMG round (aka .50 Browning Machine Gun). Famed for its wartime use in the M2 Machine gun, the .50 BMG round is also used in civilian Long Range competitions. A typical .50 BMG cartridge holds over 225 grains of powder. That’s almost ten times the amount in a 5.56×45 NATO Round! To demonstrate the size of the .50 BMG, check out that .223 Rem for comparison.
Close-up view of a sectioned case. This one here was “fixin’ to pop”, observed Glen Zediker.
Here are highlights from an article Glen Zediker wrote for the Midsouth Blog. In that article Glen, who sadly passed away in 2020, focused on cartridge brass. Glen identified the most common failures that appear with brass that has been shot multiple times, or which has been fired at excessive pressures. Glen explained some simple ways to check your cartridge brass to detect “early warning signs” of case failure, particularly case head separation, which can be very dangerous.
How Cases Degrade with Multiple Firings By Glen Zediker
This article explains when, and then how, to check after the progress of changes commencing with the firing on a new case. It’s the “progress of degeneration,” in a way of looking at it because the concern is getting a handle on when enough change in the brass has come about to require attention. Or abandonment. As said then, for me that’s 4 firings. That, as said last time, is when I might see changes that need attention. Also as said, that figure didn’t come out of a hat, but from my own notes in running my competition NRA High Power Rifle loads. [Editor’s Note: With Lapua brass, using moderate loads, in bolt-action rifles, we typically get about 10 good (match-worthy) firings. But if you anneal your Lapua brass, and run modest pressures, Lapua brass can perform well for 20 or more load cycles.]
The areas most affected are the case neck and case head area. Case neck walls get thicker [but] the case head area body walls get thinner. Primer pockets get shallower and larger diameter.
This case shows a cracked neck AND a crack (separation) above the case head. Zediker says it is “rare to see one case with both of the most common failures. [This case] was attacked by an M14.”
Case Head — Causes of Separation and Cracking
When a case is under pressure during firing, the brass, like water, flows where it can, where it’s more free to move. Of course, the chamber steel limits the amount it can expand. The case shoulder blows fully forward and the case base is slammed back against the bolt face. There is, therefore and in effect, a tug on both ends — it gets stretched. The shoulder area is relatively free to expand to conform to the chamber, but the other end, the case head area, is not. Since that’s the area of the case with the thickest walls, it doesn’t expand “out” much at all. What it does is stretch. The “case head area,” as I refer to it here, is the portion of the case above the web, which is just above the taper that leads in to the extractor groove. The “area” extends approximately an eighth-inch up the case body.
Here’s a “pressure ring.” You’ll see this after firing, if you see it. And, if you see it, that case is done. The bright ring indicates excessive stretching, which indicates excessive thinning. If you see a ring circling the case, noticeable because it’s lighter color than the case body, and it’s in this area, I’d say that case is done. And that’s right where a “head separation” occurs. It can crack and also blow slap in two, and that’s the “separation” part of case head separation.
Photo courtesy GS Arizona.
This is a spot to keep close watch on as cases age. It is also the area that is more “protected” by sizing with less case shoulder set-back. That is, pretty much, where the freedom for the stretching movement in this area comes from (the case shoulder creates a gap). If you’re seeing a sign that a head separation [might happen with relatively few firings], chances are the shoulder set-back is excessive, and also… the load pressure level.
Bent Paper Clip Case-Wall Gauge
Editor: You can use a bent paper clip to detect potential case wall problems. Slide the paper clip inside your case to check for thin spots. GS Arizona explains: “This simple little tool (bent paper clip) will let you check the inside of cases before you reload them. The thin spot will be immediately apparent as you run the clip up the inside of the case. If you’re seeing a shiny line on the outside and the clip is really hitting a thin spot inside, it’s time to retire the case.” Photo by GS Arizona.
Monitor Primer Pocket Dimensional Changes
Another case-head-area and pressure-related check is the primer pocket. As said, the primer pocket will get larger in diameter and shallower in depth each firing. As with many such things, the questions are “when” and “how much,” and the main thing, “how much?”
If the pocket gets excessively shallow, and that’s judged by a primer that seats fully but isn’t at least a tick below flush with the case base, there could be function issues. There’s a risk of a “slam-fire” with a semi-auto that uses a floating firing pin, and, if there is actual protrusion, that has the same effect as insufficient headspace. A primer pocket uniformer can reset the depth of a shallowed primer pocket to what it should be, but the real test for me is how easily the next primer seats into it. If it’s significantly less resistance, I’ll say that case is done. Shallower can be refurbished. That’s a primary function of a primer pocket uniformer. Larger diameter, though, can’t be fixed. I’ve mentioned in another article or two that, any more at least, my main gauge of load pressure has become how much primer pocket expansion there’s been.
Guys — honestly, if you do anything today on this site, watch this video. You won’t be disappointed. Guaranteed. This is a very informative (and surprisingly entertaining) video. Every serious hand-loader should watch this video to see how cartridge cases are made. Your Editor has watched the video 5 times now and I still find it fascinating. The camera work and editing are excellent — there are many close-ups revealing key processes such as annealing and head-stamping.
VERY Informative Video Show Cartridge Brass and Ammunition Production:
Norma has released a fascinating video showing how bullet, brass, and ammunition are produced at the Norma Precision AB factory which first opened in 1902. You can see how cartridges are made starting with brass disks, then formed into shape through a series of processes, including “hitting [the cup] with a 30-ton hammer”. After annealing (shown at 0:08″), samples from every batch of brass are analyzed (at multiple points along the case length) to check metal grain structure and hardness. Before packing, each case is visually inspected by a human being (3:27″ time-mark).
The video also shows how bullets are made from jackets and lead cores. Finally, you can watch the loading machines that fill cases with powder, seat the bullets, and then transport the loaded rounds to the packing system. In his enthusiasm, the reporter/narrator does sometimes confuse the term “bullets” and “rounds” (5:00″), but you can figure out what he means. We definitely recommend watching this video. It’s fascinating to see 110-year-old sorting devices on the assembly line right next to state-of-the art, digitally-controlled production machinery.
Video tip by EdLongrange. We welcome reader submissions.
Here’s an inexpensive product that can make your case prep and loading tasks easier. We use and recommend the cleverly-designed Lyman Bleacher Blocks. These multi-level (stepped) cartridge holders save space on your bench AND make it easier to select a particular case/cartridge from a full block. Each row is a different height for convenience. With Bleacher Blocks it’s also easier to check for powder levels, or place bullets before the seating process.
Lyman’s Bleacher Block cartridge holders have many advantages over conventional, single-level blocks. Use the different levels for sorting brass. Or, migrate the brass from top to bottom as you proceed through case prep stages. If you are assembling loads with different bullets for load testing, you could arrange the loaded rounds on different levels for easy recognition. For example put V-Max loaded rounds on the top tier, and Berger Hybrid loaded rounds on the bottom tier. Or, if you are experimenting with neck tension, you can use different rows for cases processed with different bushings.
Made of durable orange polymer, Lyman Bleacher Blocks are now molded in five sizes — small pistol, large pistol, and three rifle sizes. The smallest rifle block (with 0.388″-diam holes) fits .223 Rem-size case heads. The middle size rifle block (with 0.485″-diam holes) fits .308 Win-size case heads. That works for 6mmBR/Dasher sized cases perfectly. The biggest rifle Bleacher Block has 0.565″-diameter recesses for magnum-size cases. There are also two pistol blocks — .445″ hole size for 9mm/.357 size and .565″ diameter for larger .44/.45 pistol cartridges.
Here’s what Lyman says about its innovative cartridge block design: “Our [stepped] loading blocks allow for easier handling of cases in and out of the loading block. Our stepped design allows you to easily grip a single case without jamming your fingers down into a group of cases like in traditional loading blocks, and allows for a smaller ‘footprint’ on your bench.”
Lyman Bleacher Blocks are among the Reloading Tools reviewed in this helpful video:
Wouldn’t it be nice to have a print resource at your fingertips that has hundreds of true-size cartridge illustrations, plus technical descriptions of thousands of popular cartridge types? That could be a real time-saver. It’s no wonder this book is an Amazon category best-seller.
If you’re a serious shooter, the latest 7th Edition of the Ammo Encyclopedia belongs in your library. Released in late 2022, this 928-page book is probably the most comprehensive and up-to-date book in print covering current and obsolete cartridge and shotshell types. The Ammo Encyclopedia is a massive resource work with 100+ chapters, covering thousands of handgun, rifle, and shotgun cartridges from the past century and a half. This 928-page edition includes over 150 new cartridge profiles. An expanded Trademark Index lists contact information for all current ammunition manufacturers.
One of the best features is a full-color section with actual size drawings of over 320 current rimfire/centerfire cartridges and shotshells. You won’t find that many “life-size” cartridge drawings in one place even on the internet. Cartridge profiles and ballistic charts have been expanded to include many new factory cartridges. An updated Cartridge Index lists both the standard and alternate names for each cartridge in chronological order. The authors have even included air rifle pellets and historical images and charts. This 928-page softcover book is now just $29.99 on Amazon, 40% off list price.
Comments from guys who bought the book:
“This book contains a vast array of information on many modern and even obsolete ammunition. Definitely recommend for any modern reloader novice or experienced.” – Duggaboy460
“It’s a great reference book for individuals who reload their own ammunition. There is a lot more info in this Edition. Everyone who likes this information should have it in their library.” – Reloader
“Very comprehensive with great photos and detailed information. A Must have for anybody with several guns/ammo.” – M.Ibarra
Hodgdon Powder Company (Hodgdon) offers a series of informative, “how-to” instructional videos through its online Reloading Data Center. These 3.5-minute videos present rifle, pistol, and shotshell reloading basics in an easy-to-understand, step-by-step format. These mobile-friendly, informative videos can also be viewed on a smart phone or tablet.
To watch the reloading videos go to the Reloading Data Center at hodgdon.com. Click to the right/left of the displayed video to switch between pistol, rifle, and shotgun videos. Or, for your convenience, we have embedded the Rifle and Pistol videos here. Just click to watch!
Click to Watch Hodgdon Rifle Reloading Video:
Click to Watch Hodgdon Pistol Reloading Video:
In addition to these videos, Hodgdon’s Reloading Data Center (RDC) provides a wealth of information on Hodgdon, IMR, Accurate, Winchester, and Ramshot propellants. Along with reliable load data, you’ll find explanations of reloading basics, safety procedures, plus answers to frequently asked questions (FAQ).
Today we showcase seven videos from video producer, skilled marksman, and Forum Member F-Class John. A talented F-Class competitor (and past Mid-Range National Champion), John analyzes product features with a smart, technically-focused mind. John has created hundreds of videos about reloading and precision tools, along with rifle and shooting accessories. And John also has created many videos showing how to improve your rifle handling and wind-calling. Many of John’s product review videos are very detailed and thorough. You’ll find over 920 informative videos on F-Class John’s popular YouTube Channel.
Many folks getting started in the cartridge reloading game are not fully familiar with seating depth options. They may only be looking to achieve a listed Overall Length (OAL) from base to bullet tip. But, for optimal accuracy and safe functionality, you need to look at the position of the bullet’s ogive relative to the start of the barrel’s rifling (i.e. the point where bullet jacket contacts the barrel rifling). Before you start reloading you want to measure the distance to the lands. Then, for most applications you want to start with the ogive’s contact point at least .010″ or more back away from the lands — that is called “jumping”.
For some benchrest applications you may want to actually have the bullets seated longer so the bullet actually contacts the lands. That is called “jam” seating. But there are variations in that. There is both a “mild” jam — a few thousands into the lands — as well as a full jam where the bullet is seated very long (and may even push back if case neck tension is light). Be very cautious with a full jam as this can significantly increase case pressure.
How to Improve Accuracy
In this video, F-Class John explains some key techniques on optimizing match ammo. He explains how to get very precise powder loads. In the video he respond to multiple questions from his Patreon subscribers. One topic is how to avoid the outliers in a 10-shot group. If those “flyers” are consistently coming at the end of a long string, John explains the problem is not likely the ammunition. Rather it could be a variety of factors such as “driver fatigue”, wind changes, barrel heating or other issues. For competitive shooters, this video is worth watching start to finish.
Patriotic July 4 Accuracy Target
The USA’s 250th birthday is behind us, having been celebrated on July 4, 2026. In this video F-Class John shows a fun 5-star red, white, and blue patriotic target and explains some of the challenges in getting an optimal score. There is a black bull inside the center star. Another feature of this target is that you can use the points on the stars to precisely aim your cross-hairs. This is a good target for centerfire at 100 yards, rimfire at 50 yards, and handguns at closer ranges.
Rear Bag Filling — Tips for Best Results
In benchrest and F-Class disciplines, you need a good rear bag to optimize accuracy and scores. A quality rear bag both supports and stabilizes the rifle and helps the rifle track properly during recoil. To get the best, most consistent performance from rear bags, you need to optimize the fill. In this video F-Class John discusses fill options and shows the process to fill your rear bag properly. He also talks about notable bag features including bag weight, footprint, and ear height/material.
Budget-Priced Arken EPL-4 Scope That Performs Well
Top competitors may spend $2500 or more on a top-quality, high-magnification rifle scope. But for those on a tighter budget, the Arken EPL-4 offers pretty impressive performance for under $350.00. In this video John tests this optic from the bench and shows that it has good glass and functions well. The EPL-4 combines Japanese ED glass with illuminated VPR or VHR FFP reticles. The Arken EPL-4 is offered in two sizes: 4-16x44mm ($299.99 at MidwayUSA) and 6-24x50mm ($329.99 at MidwayUSA).
Advanced AMP Press for Precision Bullet Seating
The AMP Electronic Bullet Seating Press is a state-of-the-art bullet seating press that tracks seating force round by round. The AMP Press combines a motor driven ram, a distance sensor, and a load cell to deliver extremely accurate and precise bullet seating measurements. It is designed for use with inline bullet seating dies. With this press you can quickly and easily change seating depths, which is useful during load development. In addition, the AMP press outputs data from the seating process to a linked computer. This allows you to see if there is an unusual seating value. You can mark those “outlyer” rounds and use them for fouling or warm-up shots.
F-Class Front Rests Reviewed
This is a great summary of multiple quality front rests. This is a must-watch video for all F-Open and Benchrest shooters! If you are shopping for a front rest, definitely watch this comprehensive 42-minute video from start to finish. This is probably the most informative video about premium shooting rests available on YouTube. Top F-Class shooter and video-maker F-Class John covers a wide selection of front rests, with some observations about coaxial bipods as well. John covers the impressive new SEB NEO-X, the easy-to-transport SEB Mini-X, the excellent Rodzilla Rest, the innovative 21st Century Hybrid Rest, the sleek Italian Lenzi Rest. At the end of the video John reviews the very affordable Caldwell Fire Control Rest ($289.99 at MidwayUSA), explaining how it can be a decent choice for shooters on a limited budget.
This impressive 15-round group was shot by Jim See of Elite Accuracy LLC.
Different shooting disciplines demand different levels of precision/accuracy. In the rapid-fire 3-Gun game, you could probably “clean” most stages with a 2-MOA rifle. By contrast, in the short-range group benchrest game, to compete with the best, you’ll need a rifle that shoots in the “ones” (i.e. 0.1-0.19 MOA) in perfect conditions. In 1000-yard F-Class competition, the top shooters want a rifle that will hold one-third-MOA of vertical at that distance.
What is your standard of accuracy? How good is “good enough”. Jim See, a skilled gunsmith and successful PRS competitor, has answered that question for his tactical discipline. For the kind of matches Jim shoots, he likes to have a rifle that will hold half-MOA for five (5) shots, 3/4-MOA for 15 shots, and 1 MOA for twenty shots. Remarkably, Jim’s rifle can do that with factory ammo. Above is an impressive 15-shot group shot with .260 Remington Federal Premium Ammo.
“I say it all the time, my loads need to print 5 under 1/2″, 10 under 3/4″, and 20 under 1″. It’s simple, if a hot barrel will keep 20 rounds fired in succession under my standard it will be a good barrel and load for Precision Match Shooting. Federal Premium Gold Metal Match .260 with Sierra bullets made the cut for me today. 15 consecutive shots under 3/4 MOA.” –Jim See
It’s said that you “can never have too much accuracy”, but there are acceptable standards for each discipline, and they’re not the same. A 100/200 yard Benchrest shooter will be sorely disappointed with a rifle/ammo set-up that can only deliver half-MOA. On the other hand, a PRS competitor like Jim See can achieve great success with a lesser degree of precision. This means you can save time and money. You can run your barrels longer between cleanings, and you don’t have to go “full OCD” when loading your ammo. The PRS shooter does not need to weigh-sort primers, or load powder to single-kernel standards. Proof is the performance. Proof is the performance. Jim See has been a podium finisher at many PRS and tactical events. Learn more about Jim’s gunsmithing and training operations at Jim’s Facebook Page and watch his Accuracy Standard VIDEO.
Download This Load Development Target
Jim’s target seemed a bit familiar. AccurateShooter.com created this Diamond and Dot Target a few years back. On each aiming point, there are high-contrast black horizontal and vertical lines for aligning your cross-hairs. The gray circle lets you see the bullet impacts above, without obliterating the red diamond, which is quite useful for precise aiming (we put fine cross-hairs on the points of the diamond). This target sheet includes data entry tables below each of the three aim points. There are many other free targets out there, but this format is very popular. We’re pleased to see Jim using it. You can download this and dozens of other FREE Targets from the AccurateShooter.com Target Page.
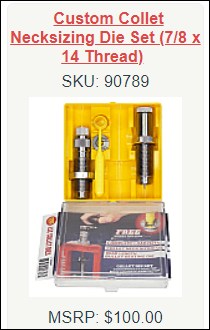
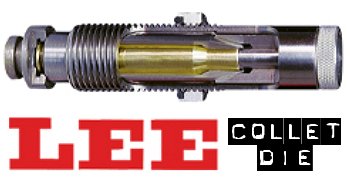
For those who prefer to neck-size their brass (rather than full-length-size), the LEE Collet Die is a popular, inexpensive option. It works by having collet tangs or “fingers” press the neck against a central mandrel. The benefit is that you get a very straight neck, which is sized consistently from top to bottom. Canadian shooter Jerry Teo explains: “LEE Collet Dies produce sized cases with very low runout (measured runout is under .001″ using a Sinclair concentricity gauge). You also don’t get the build-up of brass at the base of the neck, as can happen with bushing neck dies. The neck-shoulder junction stays nice and crisp.”
NOTE: For most handloading, we recommend FULL-LENGTH sizing of cases. You should always have a good Full-length sizing die for your brass. But there are some situations where neck-sizing may be useful. This article explains how to neck-size effectively with a LEE Collet Die.
Here’s a good video that explains how to use a Lee Collet Die to Neck-Size .243 Win brass:
TIP ONE — Adjusting Tension
LEE Collet dies don’t have a specific mechanical adjustment for neck tension. But you CAN easily modify the die to provide more or less tension. If you want to adjust the neck tension using a Lee Collet die, you can simply chuck the mandrel in a drill and reduce the diameter with some sand-paper (to increase neck tension) or you can order a mandrel the next caliber larger and turn it to whatever diameter you want (the larger the mandrel diameter, the less the neck tension). You can also order custom mandrels from Lee sized to any diameter you want.
Regarding neck tension, Boyd Allen makes an important point: “The only way to properly get more neck tension with collet dies is to either reduce the diameter of the mandrel, or order a smaller-diameter mandrel from Lee. I remind folks that adjusting the die position to have more toggle at the top of the ram stroke (not the factory recommended method), or leaning on the press handle with more force than recommended will NOT increase neck tension.”
TIP TWO — Polish and Tune for Easy Case Removal
Some users have complained that their Collet Dies grab the case-neck too firmly, making the case hard to remove. There are solutions to this problem. First inspect the collet fingers and smooth the inner surface up a bit with polishing compound or an extra-fine sanding pad. Second, you can open up the fingers a little bit. LEE recommends that if your Collet Die is sticking, take a steel punch and tap the fingers apart a little bit so that the natural “unloaded” position is wider. Lastly, you should lightly lubricate the outside of the collet fingers (see arrows) before you re-assemble the die. This will ensure they slide smoothly. Also, to prevent the collet fingers from closing too tight, never load up the die with your press without putting a case in place first. Without a case neck between the collet fingers and the mandrel, the collet can clamp itself too tight as you raise the ram.
TIP THREE — Always Have a Case Inside When Operating Collet Die
Our friend Boyd Allen tells us that you need to follow directions and NEVER operate the die without a case inside. Boyd explains: “This is because doing so will spring the quadrants of the collet inward so that they interfere with the insertion of a case, and the user will have to figure out how to undo the damage if the die is to operate properly. This advice would not be needed if everyone read the instructions before using the die…. but many times, they don’t. Another thing that I tell new users is to take the die apart so that they will have a better chance of understanding how it works.”
TIP FOUR — Size Twice and Spin Your Case 1/8th Turn
After reaching fully “down” on your press handle, withdraw the case about an inch and manually rotate it about 1/8th (NOT 1/4 or 1/2) turn while still in the shell-holder, then size again. This will place the die’s collet petals on the four “high spots” of the case neck and will result in a rounder, more evenly-sized neck with slightly more bullet tension. This takes only about one second more per case and is well worth the slight extra effort. (We thank reader Stonecreek for this smart tip).




 Norma has released a fascinating video showing how bullet, brass, and ammunition are produced at the





 TIP ONE — Adjusting Tension
 TIP TWO — Polish and Tune for Easy Case Removal