|
|
July 5th, 2026

This site is for and about accurate shooters. So today we feature the short-range group Benchrest game, where it’s all about shooting tiny groups in the ones and even “zeros”. Seeing the tiny groups 6 PPC aces produce, it’s easy to think the precision is all about the equipment. But there is a lot more involved. A talented human still has to watch the flags, run the gun properly, and tune his loads for the conditions. Here are some tips from one of the world’s best benchresters, Charles Huckeba.
Texan Charles Huckeba was the top individual shooter at the 2013 World Benchrest Championships (WBC) held near Sydney Australia in October 2013. In this video, 2013 WBC Two-Gun Overall winner Charles shoots a 1/8th MOA group at 200 yards — “a little bitty dot” as a fellow Team USA shooter observes. That’s impressive. If you can describe Huckeba’s style in a nutshell it would be “smooth, consistent, and rapid but not hurried”.
Charles also employed some unusual hardware. In the video, take a close look at the joystick on the Farley Coaxial front rest. There’s no knob at the end. In its place is a small, wood ammo caddy. Charles removed the standard knob from the handle of his Farley rest and replaced it with a home-made wood block that holds cartridges for the record target. The 10.5-lb Light Varmint rifle is chambered in 6PPC with a BAT Machine Action and a composite wood and carbon-fiber stock.
Watch Charles Huckeba Shoot 1/8 MOA, 200-yard group at World Benchrest Championships
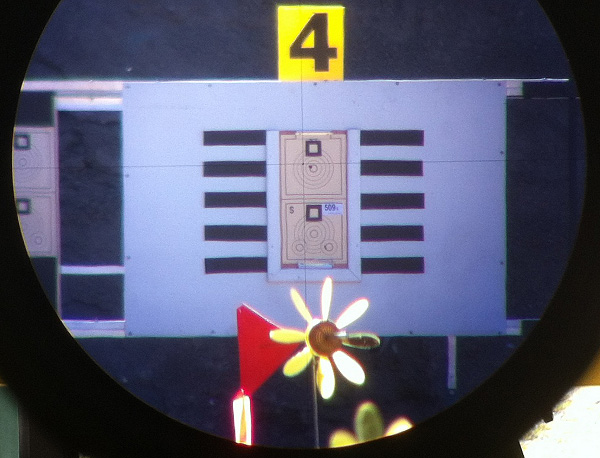
Here is the actual 200-yard, 5-shot group Charles shot in the video. Photo (by Stuart Elliot) taken through the lens of Huckeba’s 50X March scope (reticle has 1/16th MOA Dot).

Analyzing the Fine Points — What Makes Huckeba So Good
Short-range benchrest shooter Boyd Allen saw some interesting things in Huckeba’s WBC performance, as captured on video. Boyd noticed Huckeba’s smooth gun-handling and efficient loading. But Boyd also spied some interesting equipment, including an innovative joystick “handle-caddy”.
1. Low Friction Bags — When Huckeba slid his rifle, there was very little apparent friction. The front bag features the new 3M material (ScotchLite) on the sliding surfaces. The rear Protektor bag has ears of the same low-friction material.
2. Pause Before Chambering — While he was watching the flags and deciding when to start firing, Charles kept his first round in the action, but out of the barrel’s chamber, probably so as not to heat the cartridge and change the round’s point of impact.
 3. Ammo Caddy on Joystick Arm – Charles shoots a Right Bolt/Left Port action, so he pulls his rounds with his left hand. Note that Huckeba’s record rounds rest in a small, wood ammo caddy attached to the end of the joystick shaft. Look carefully, you’ll see the wood ammo block in place of the normal black ball at the end of the joystick. That allows Charles to pull shots with the absolute minimum of hand movement. Ingenious! Huckeba is very fast, with a great economy of motion. I believe that because his ammo was literally at hand, Charles was better able to keep his focus on aiming and the flags. 3. Ammo Caddy on Joystick Arm – Charles shoots a Right Bolt/Left Port action, so he pulls his rounds with his left hand. Note that Huckeba’s record rounds rest in a small, wood ammo caddy attached to the end of the joystick shaft. Look carefully, you’ll see the wood ammo block in place of the normal black ball at the end of the joystick. That allows Charles to pull shots with the absolute minimum of hand movement. Ingenious! Huckeba is very fast, with a great economy of motion. I believe that because his ammo was literally at hand, Charles was better able to keep his focus on aiming and the flags.
4. Smooth-Cycling BAT Action — Note how smoothly Huckeba’s action operates. When Charles lifts the bolt handle (to extract a round and cock the firing pin), this does not disturb the rifle. Likewise, as he closes the bolt, the gun doesn’t wobble. The smooth action allows Charles to hold point of aim even when shooting relatively quickly. Huckeba’s BAT action is chrome-moly steel. Some shooters believe this metal makes for a smoother action than stainless steel or aluminum.
5. Long-Wheelbase Stock — The wood and carbon fiber stock is light, long, and stiff. Yet, importantly, the stock is also well-damped. The longer-than-average stock length (with extended forearm) seems to help the gun track well without jumping or rocking. The longer forearm allows a longer “wheelbase”, effectively shifting the weight distribution rearward (less weight on the front, more weight on the rear). This places a greater share of the gun’s weight on the rear bag, as compared to a more conventional benchrest stock. Huckeba’s stock, built by Bob Scoville, is at the cutting edge of short-range benchrest design. Its light-weight balsa wood and carbon fiber construction provides a combination of stiffness and vibration damping that allows its relatively long fore-end to be fully utilized to increase the weight on the rear bag (always an issue with 10.5-pound rifles).
To learn more about this benchrest stock design, read the comments by stock-builder Bob Scoville in our PPC with Pedigree story in our Gun of the Week Archives. Bob observed:
“There is a lot more to the structure of the stocks than meets the eye. The carbon fiber skin with which I cover the stocks creates a light, tough exterior surface. However, this contributes very little to the overall performance of the stocks. The real strength and stiffness is the result of an internal beam utilizing balsa core/carbon fiber technology.
This type construction can be found in aircraft, race cars, powerboats, and sailboats. It is interesting to note, balsa has the highest strength to weight ratio of all woods and carbon fiber is one of the lowest stretch (modulus of elasticity) relative to weight of all materials. The marriage of these two materials is common in the high-performance world. Additionally, balsa is used commercially for vibration dampening and sound reduction.”
Video find by Boyd Allen. Video by Stuart Elliot of BRT Shooters Supply, Brisbane, Australia.
June 25th, 2026

Try a club match this summer! Every summer weekend hundreds of local club “fun matches” are conducted around the country. And the first official day of summer — the Summer Solstice — is June 20, 2025, just 9 days away. That means local summer weekend fun matches will be held at ranges across the country. So load some ammo, get your rifle, and have some fun.
One of the good things about club shoots is that you don’t have to spend a fortune on equipment to have fun. But we’ve seen that many club shooters handicap themselves with a few common equipment oversights or lack of attention to detail while reloading. Here are SIX TIPS that can help you avoid these common mistakes, and build more accurate ammo for your club matches.
 1. Align Front Rest and Rear Bag 1. Align Front Rest and Rear Bag
We see many shooters whose rear bag is angled left or right relative to the bore axis. This can happen when you rush your set-up. But even if you set the gun up carefully, the rear bag can twist due to recoil or the way your arm contacts the bag. After every shot, make sure your rear bag is aligned properly (this is especially important for bag squeezers who may actually pull the bag out of alignment as they squeeze).
Forum member ArtB adds: “To align my front rest and rear bag with the target, I use an old golf club shaft. I run it from my front rest stop through a line that crosses over my speed screw and into the slot between the two ears. I stand behind that set-up and make sure I see a straight line pointing at the target. I also have a piece of tape that I’ve placed on the golf shaft that indicates how far the back end of the rear bag should be placed from the front rest stop.”
2. Avoid Contact Interference
We see three common kinds of contact or mechanical interference that can really hurt accuracy. First, if your stock has front and/or rear sling swivels make sure these do NOT contact the front or rear bags at any point of the gun’s travel. When a sling swivel digs into the front bag that can cause a shot to pop high or low. To avoid this, reposition the rifle so the swivels don’t contact the bags or simply remove the swivels before your match. Second, watch out for the rear of the stock grip area. Make sure this is not resting on the bag as you fire and that it can’t come back to contact the bag during recoil. That lip or edge at the bottom of the grip can cause problems when it contacts the rear bag. Third, watch out for the stud or arm on the front rest that limits forward stock travel. With some rests this is high enough that it can actually contact the barrel. We encountered one shooter recently who was complaining about “vertical flyers” during his match. It turns out his barrel was actually hitting the front stop! With most front rests you can either lower the stop or twist the arm to the left or right so it won’t contact the barrel.

3. Weigh Your Charges — Every One
This may sound obvious, but many folks still rely on a powder measure. Yes we know that most short-range BR shooters throw their charges without weighing, but if you’re going to pre-load for a club match there is no reason NOT to weigh your charges. You may be surprised at how inconsistent your powder measure actually is. One of our testers was recently throwing H4198 charges from a mechanical measure for his 30BR. Each charge was then weighed twice with a Denver Instrument lab scale. Our tester found that thrown charges varied by up to 0.7 grains! And that’s with a premium measure.
4. Measure Your Loaded Ammo — After Bullet Seating
Even if you’ve checked your brass and bullets prior to assembling your ammo, we recommend that you weigh your loaded rounds and measure them from base of case to bullet ogive using a comparator. If you find a round that is “way off” in weight or more than .005″ off your intended base to ogive length, set it aside and use that round for a fouler. (Note: if the weight is off by more than 6 or 7 grains you may want to disassemble the round and check your powder charge.) With premium, pre-sorted bullets, we’ve found that we can keep 95% of loaded rounds within a range of .002″, measuring from base (of case) to ogive. Now, with some lots of bullets, you just can’t keep things within .002″, but you should still measure each loaded match round to ensure you don’t have some cases that are way too short or way too long.
 5. Check Your Fasteners 5. Check Your Fasteners
Before a match you need to double-check your scope rings or iron sight mounts to ensure everything is tight. Likewise, you should check the tension on the screws/bolts that hold the action in place. Even with a low-recoiling rimfire rifle, action screws or scope rings can come loose during normal shooting.
6. Make a Checklist and Pack the Night Before
Ever drive 50 miles to a match then discover you have the wrong ammo or that you forgot your bolt? Well, mistakes like that happen to the best of us. You can avoid these oversights (and reduce stress at matches) by making a checklist of all the stuff you need. Organize your firearms, range kit, ammo box, and shooting accessories the night before the match. And, like a good Boy Scout, “be prepared”. Bring a jacket and hat if it might be cold. If you have windflags, bring them (even if you’re not sure the rules allow them). Bring spare batteries, and it’s wise to bring a spare rifle and ammo for it. If you have just one gun, a simple mechanical breakdown (such as a broken firing pin) can ruin your whole weekend.
June 19th, 2026

Forum member Evan K. (aka “Katokoch”) has crafted a nice rimfire benchrest rig using a Suhl action fitted into a handsome home-built cedar and carbon fiber stock. This shows what a skilled hobbyist wood-worker can create in his garage.
When the rifle was crafted some years ago, Evan told us: “Here is my Suhl 150-1 with a factory 1:19″ twist barrel, Leupold 36X scope, Harrell tuner, and my handmade cedar/carbon fiber stock. I started working on the laminate blank a couple years ago and finally finished it earlier this year. I’ve been using it in my IR 50/50 matches this summer. I haven’t shot a 250 with it yet but I know the rifle is very capable — as usual, I am the weak link!”

We think Evan did a great job on his stock, though he has limited stock-building experience. Evan explained: “The stock is my first attempt at making a very lightweight laminate and also gluing both vertical and horizontal seams in a blank. The wood is Spanish and Red Cedar and I made the trigger guard and buttplate with carbon fiber too (great use for small scrap pieces). The finish is hand-rubbed spar urethane and the action is semi-glued-in with Devcon 10110 and stainless pillars.”

USRA-IR50/50 is a popular .22 rimfire benchrest discipline with three (3) classes: 13.5 lb., 10.5 lb., and 7.5 lb. (Sporter). The matches are shot at 50 yards and 50 meters.
June 18th, 2026

Barrel-maker Dan Lilja’s website, RifleBarrels.com has an excellent FAQ page that contains a wealth of useful information. On the Lilja FAQ Page you’ll find answers to many commonly-asked questions. For example, Dan’s FAQ addresses the question of barrel life. Dan looks at factors that affect barrel longevity, and provides some predictions for barrel life, based on caliber, chambering, and intended use.
NOTE: This article was very well-received when it was first published. We are reprising it for the benefit of readers who missed it the first time.
Dan cautions that “Predicting barrel life is a complicated, highly variable subject — there is not a simple answer. Signs of accurate barrel life on the wane are increased copper fouling, lengthened throat depth, and decreased accuracy.” Dan also notes that barrels can wear prematurely from heat: “Any fast varmint-type cartridge can burn out a barrel in just a few hundred rounds if those rounds are shot one after another without letting the barrel cool between groups.”
Q. What Barrel Life, in number of rounds fired, can I expect from my new barrel?
A: That is a good question, asked often by our customers. But again there is not a simple answer. In my opinion there are two distinct types of barrel life. Accurate barrel life is probably the type most of us are referencing when we ask the question. But there is also absolute barrel life too. That is the point where a barrel will no longer stabilize a bullet and accuracy is wild. The benchrest shooter and to a lesser extent other target shooters are looking at accurate barrel life only when asking this question. To a benchrest shooter firing in matches where group size is the only measure of precision, accuracy is everything. But to a score shooter firing at a target, or bull, that is larger than the potential group size of the rifle, it is less important. And to the varmint hunter shooting prairie dog-size animals, the difference between a .25 MOA rifle or one that has dropped in accuracy to .5 MOA may not be noticeable in the field.
The big enemy to barrel life is heat. A barrel looses most of its accuracy due to erosion of the throat area of the barrel. Although wear on the crown from cleaning can cause problems too. The throat erosion is accelerated by heat. Any fast varmint-type cartridge can burn out a barrel in just a few hundred rounds if those rounds are shot one after another without letting the barrel cool between groups. A cartridge burning less powder will last longer or increasing the bore size for a given powder volume helps too. For example a .243 Winchester and a .308 Winchester both are based on the same case but the .308 will last longer because it has a larger bore.
And stainless steel barrels will last longer than chrome-moly barrels. This is due to the ability of stainless steel to resist heat erosion better than the chrome-moly steel.
Barrel Life Guidelines by Caliber and Cartridge Type
As a very rough rule of thumb I would say that with cartridges of .222 Remington size you could expect an accurate barrel life of 3000-4000 rounds. And varmint-type accuracy should be quite a bit longer than this.
For medium-size cartridges, such as the .308 Winchester, 7×57 and even the 25-06, 2000-3000 rounds of accurate life is reasonable.
Hot .224 caliber-type cartridges will not do as well, and 1000-2500 rounds is to be expected.
Bigger magnum hunting-type rounds will shoot from 1500-3000 accurate rounds. But the bigger 30-378 Weatherby types won’t do as well, being closer to the 1500-round figure.
These numbers are based on the use of stainless steel barrels. For chrome-moly barrels I would reduce these by roughly 20%.
The .17 and .50 calibers are rules unto themselves and I’m pressed to predict a figure.
The best life can be expected from the 22 long rifle (.22 LR) barrels with 5000-10,000 accurate rounds to be expected. We have in our shop one our drop-in Anschutz barrels that has 200,000 rounds through it and the shooter, a competitive small-bore shooter reported that it had just quit shooting.
Remember that predicting barrel life is a complicated, highly variable subject. You are the best judge of this with your particular barrel. Signs of accurate barrel life on the wane are increased copper fouling, lengthened throat depth, and decreased accuracy.

Benchrest Barrel Life — You May Be Surprised
I thought it might be interesting to point out a few exceptional Aggregates that I’ve fired with 6PPC benchrest rifles with barrels that had thousands of rounds through them. I know benchrest shooters that would never fire barrels with over 1500 shots fired in them in registered benchrest matches.
I fired my smallest 100-yard 5-shot Aggregate ever in 1992 at a registered benchrest match in Lewiston, Idaho. It was a .1558″ aggregate fired in the Heavy Varmint class. And that barrel had about 2100 rounds through it at the time.

Another good aggregate was fired at the 1997 NBRSA Nationals in Phoenix, Arizona during the 200-yard Light Varmint event. I placed second at this yardage with a 6PPC barrel that had over 2700 rounds through it at the time. I retired this barrel after that match because it had started to copper-foul quite a bit. But accuracy was still good.

June 4th, 2026

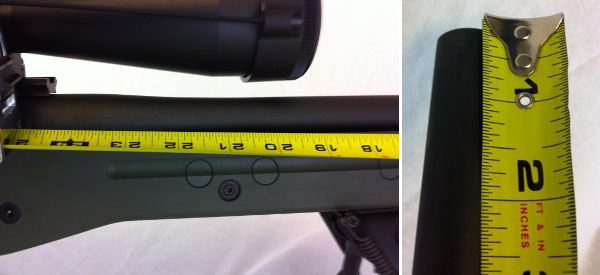
To get the best accuracy out of any benchrest rifle, you need to find the optimal position of front rest and rear bag. The important point to remember is that each rig is different. One gun may perform best with the front rest right at the tip of the forearm (Position ‘D’ in photo), while another gun will work best with the rest positioned much further back. This Editor’s own 6mmBR rifle has a laminated stock that is pretty flexy in the front. It shoots best with the front rest’s sandbag located a good 6″ back from the forearm tip (position ‘A’).
Here’s some benchrest advice that can help you reduce vertical and shoot tighter groups… without spending another penny. Many benchrest shooters spend a fortune on equipment and devote countless hours to meticulous handloading, but they never experiment with their rifle’s position/balance on the bags. This article explains why you should test your rifle in various positions. What you learn may surprise you (and improve your scores).
Next time you go to the range, experiment with the position of your rifle on the front rest, and try a couple different positions for the rear bag. You may find that the rifle handles much better after you’ve made a small change in the placement of your gun on the bags. Recoil can be tamed a bit, and tracking can improve significantly, if you optimize the front rest and rear bag positioning.

This competitor has the front rest positioned fairly far forward but not all the way out. Note the stop on the front rest — this limits forward stock travel.
A small change in the position of the forearm on the front rest, or in the placement of the rear bag, can make a big difference in how your gun performs.
Balance Your Gun BEFORE You Spend Hours Tuning Loads
In the pursuit of ultimate accuracy, shooters may spend countless hours on brass prep, bullet selection, and load tuning. Yet the same shooters may pay little attention to how their gun is set-up on their front rest and rear bag. When you have acquired a new rifle, you should do some basic experimentation to find the optimal position for the forearm on the front rest, and the best position for the rear bag. Small changes can make a big difference.

Joel Kendrick, past IBS 600-yard Shooter of the Year, has observed that by adjusting forearm position on the front rest, he can tune out vertical. He has one carbon-fiber-reinforced stock that is extremely rigid. When it was placed with the front rest right under the very tip of the forearm, the gun tended to hop, creating vertical. By sliding the whole gun forward (with more forearm overhang ahead of the front sandbag), he was able to get the whole rig to settle down. That resulted in less vertical dispersion, and the gun tracked much better.

Fore/aft stock position is important even with very wide fore-ends.
Likewise, the placement of the rear bag is very important. Many shooters, by default, will simply place the rear bag the same distance from the front rest with all their guns. In fact, different stocks and different calibers will NOT behave the same. By moving the rear bag forward and aft, you can adjust the rifle’s overall balance and this can improve the tracking significantly. One of our shooters had a Savage 6BR F-Class rifle. By default he had his rear bag set almost all the way at the end of the buttstock. When he slid the rear bag a couple inches forward the gun tracked much better. He immediately noticed that the gun returned to point of aim better (crosshairs would stay on target from shot to shot), AND the gun torqued (twisted) less. The difference was quite noticeable.
A small change in the position of the forearm on the front rest, or in the placement of the rear bag, can make a big difference in how your gun performs. You should experiment with the forearm placement, trying different positions on the front rest. Likewise, you can move the rear bag back and forth a few inches. Once you establish the optimal positions of front rest and rear bag, you should find that your gun tracks better and returns to battery more reliably. You may then discover that the gun shoots smaller groups, with less vertical dispersion. And all these benefits are possible without purchasing any expensive new gear.
Rifle photo courtesy Johnson’s Precision Gunsmithing (Bakersfield, CA).
May 18th, 2026

When a rifle isn’t shooting up to it’s potential, we need to ask: “Is it the gun or the shooter?” Having multiple shooters test the same rifle in the same conditions with the same load can be very revealing…
When developing a load for a new rifle, one can easily get consumed by all the potential variables — charge weight, seating depth, neck tension, primer options, neck lube, and so on. When you’re fully focused on loading variables, and the results on the target are disappointing, you may quickly assume you need to change your load. But we learned that sometimes the load is just fine — the problem is the trigger puller, or the set-up on the bench.
Here’s an example. A while back we tested two new Savage F-Class rifles, both chambered in 6mmBR. Initial results were promising, but not great — one gun’s owner was getting round groups with shots distributed at 10 o’clock, 2 o’clock, 5 o’clock, 8 o’clock, and none were touching. We could have concluded that the load was no good. But then another shooter sat down behind the rifle and put the next two shots, identical load, through the same hole. Shooter #2 eventually produced a 6-shot group that was a vertical line, with 2 shots in each hole but at three different points of impact. OK, now we can conclude the load needs to be tuned to get rid of the vertical. Right? Wrong. Shooter #3 sat down behind the gun and produced a group that strung horizontally but had almost no vertical.
Hmmm… what gives?

Shooting Styles Created Vertical or Horizontal Dispersion
What was the problem? Well, each of the three shooters had a different way of holding the gun and adjusting the rear bag. Shooter #1, the gun’s owner, used a wrap-around hold with hand and cheek pressure, and he was squeezing the bag. All that contact was moving the shot up, down, left and right. The wrap-around hold produced erratic results.
Shooter #2 was using no cheek pressure, and very slight thumb pressure behind the tang, but he was experimenting with different amounts of bag “squeeze”. His hold eliminated the side push, but variances in squeeze technique and down pressure caused the vertical string. When he kept things constant, the gun put successive shots through the same hole.
Shooter #3 was using heavy cheek pressure. This settled the gun down vertically, but it also side-loaded the rifle. The result was almost no vertical, but this shooting style produced too much horizontal.
A “Second Opinion” Is Always Useful
Conclusion? Before you spend all day fiddling with a load, you might want to adjust your shooting style and see if that affects the group size and shape on the target. Additionally, it is nearly always useful to have another experienced shooter try your rifle. In our test session, each time we changed “drivers”, the way the shots grouped on the target changed significantly. We went from a big round group, to vertical string, to horizontal string.
Interestingly, all three shooters were able to diagnose problems in their shooting styles, and then refine their gun-handling. As a result, in a second session, we all shot that gun better, and the average group size dropped from 0.5-0.6 inches into the threes — with NO changes to the load.
That’s right, we cut group size in half, and we didn’t alter the load one bit. Switching shooters demonstrated that the load was good and the gun was good. The skill of the trigger-puller(s) proved to be the limiting factor in terms of group size.
April 8th, 2026

 Want to shoot better scores at your next match? Here’s a smart, inexpensive do-it-yourself project from the good folks at Criterion Barrels. For less than a dollar or two in materials, in just a few minutes you can create a handy, effective mirage shield, custom-fitted to your favorite rifle. Want to shoot better scores at your next match? Here’s a smart, inexpensive do-it-yourself project from the good folks at Criterion Barrels. For less than a dollar or two in materials, in just a few minutes you can create a handy, effective mirage shield, custom-fitted to your favorite rifle.
All precision shooters should be familiar with mirage, a form of optical distortion caused primarily by variations in air temperature. Savvy shooters will use mirage as a valuable tool when gauging wind speed and direction. Natural mirage is unavoidable, but there are many techniques designed to limit its influence in long-range marksmanship.
A form of mirage can be produced by the barrel itself. Heat rising from the barrel may distort sight picture through your optics, leading to erratic results. Mirage caused by barrel heat can be reduced dramatically by a simple, light-weight mirage shield.
How to Make a Mirage Shield
|
A mirage shield is an extremely cost-effective way to eliminate a commonly-encountered problem. Making your own mirage shield is easy. Using old venetian blind strips and common household materials and tools, you can construct your own mirage shield for under one dollar. |
Materials Required:
1. Vertical PVC Venetian blind panel
2. Three 1”x1” pieces adhesive-backed Velcro
3. Ruler or tape measure
4. Scissors or box cutter
5. Pencil or marker |
1. Measure the distance from the end of the receiver or rail to the crown of the barrel.
2. Using a pencil and ruler, measure the same distance and mark an even line across the blind.

3. Cut across the line using scissors or a box cutter, shortening the blind to the required length. (Remember, measure twice, cut once!)
4. Expose the adhesive backing on the loop side of the Velcro. Center and apply the Velcro strips on the barrel at regular intervals.

5. Expose the adhesive backing of the fuzzy side of the Velcro.
6. Place the blind on the upper side of the barrel. Apply downward pressure. Once the Velcro has secured itself to the barrel, separate the two sides. Proceed to mold both sides of the Velcro to fit the contour of their respective surfaces.
7. Reaffix the blind. Barrel related mirage is now a thing of the past!

NOTE: You can attach the Velcro on the opposite side of the blind if you want the blind to curve upwards. Some folks thinks that aids barrel cooling — it’s worth a try.
How to Remove and Re-Attach the Mirage Shield
Removal of your mirage shield is accomplished by simply removing the blind. You can un-install the Velcro by pulling off the strips and then gently removing any adhesive residue left behind using an appropriate solvent. (Simple cooking oil may do the job.) Caution: With fine, high-polish blued barrels, test any solvent on a non-visible section of the barrel. Before storing the gun, re-oil the barrel to remove active solvents and residual fingerprints.
March 31st, 2026

 Credit our buddy Joe Friedrich for this simple yet effective accessory for your benchrest rifle. Joe shoots a .22 LR benchrest rig with a barrel tuner. When he added weights to his tuner, he found his rifle no longer balanced well. He wanted to add some weight in the rear without drilling holes in the stock. He also wanted the weight to be removable, and easily placed on another rifle in his stable. He wanted a weight that could be moved from gun to gun as needed. Credit our buddy Joe Friedrich for this simple yet effective accessory for your benchrest rifle. Joe shoots a .22 LR benchrest rig with a barrel tuner. When he added weights to his tuner, he found his rifle no longer balanced well. He wanted to add some weight in the rear without drilling holes in the stock. He also wanted the weight to be removable, and easily placed on another rifle in his stable. He wanted a weight that could be moved from gun to gun as needed.
At a local sporting goods shop Joe found a 1.5-lb ankle weight that comes in a padded, tubular elastic cover. It’s like a 1.5-lb sausage in a soft, stretchy nylon cover. (Imagine a really fat, heavy bungee cord). Joe simply attached a plastic zip tie at the end to make a loop that fits perfectly over his buttstock. CLICK HERE for full-screen photo.
To “tune” the rifle’s balance, Joe just slides the ankle weight fore and aft on the stock. We have tried this moveable ankle weight on a variety of different BR stocks (including a McMillan Edge) and it worked perfectly. This is a great invention, and would work with sporter rifles and ARs just as well.

NOTE: Obviously, this ring will increase the measured weight of your rifle. So, if you are competing in a registered match with weight restrictions, you have to ensure that your rifle still makes class weight limits with the ankle weight ring in place.
March 25th, 2026

Click Photo to View Larger Image
Here is Ernie Bishop’s pride and joy, a specialty pistol nicknamed “Batman” because the black carbon-fiber stock looks like the Batmobile. This is one sophisticated handgun. Complete with scope, the Batman pistol weighs under 7.5 pounds, thanks to the ultra-light stock. The carbon stock is 6 inches wide at the fore-end, yet weighs just one pound. Ernie tells us: “This gun shoots amazing and is easy to shoot especially with my SEB MAX Rest.” After these photos were taken, Ernie added a “field-usable rear-grip stock so [he could] shoot it prone from a bipod as well.”
The Batman pistol is chambered for the 6mm “Long Dasher”, a 6mm 40°-shouldered variant of the 6.5×47 Lapua. Ernie loads Berger 105gr Hybrid bullets pushed by Hodgdon H4350 powder.
Gun Specifications
 The gun, crafted by Eric Wallance of Nawaka Firearms, features an XP-100 action, Jewell trigger, and 15″-long, Brux 1:8″-twist barrel with aluminum muzzle brake. Interestingly, this gun does not have a traditional recoil lug. Instead, gunsmith Wallace milled out a lug from the bottom of the XP-100 action to save weight. On top of the action, the rig carries a Sightron Inc S-III 6-24X56mm scope in Kelbly rings on a custom +20 MOA rail. The gun, crafted by Eric Wallance of Nawaka Firearms, features an XP-100 action, Jewell trigger, and 15″-long, Brux 1:8″-twist barrel with aluminum muzzle brake. Interestingly, this gun does not have a traditional recoil lug. Instead, gunsmith Wallace milled out a lug from the bottom of the XP-100 action to save weight. On top of the action, the rig carries a Sightron Inc S-III 6-24X56mm scope in Kelbly rings on a custom +20 MOA rail.
Long Dasher Wildcat
Shown at right is a “Long Dasher” 40° wildcat created by Forum member Sunbuilder. This is very similar to Ernie Bishop’s chambering, though there may be small variations related to reamer design (such as freebore). Sunbuilder’s 6-6.5×47 Improved (aka “Long Dasher”) reamer was made by Dave Kiff of Pacific, Tool & Gauge. This wildcat cartridge adds about 2.0 grains capacity to the 6.5×47 necked down to 6mm. The case certainly is impressive with that 40° shoulder. We’re just waiting for the tactical guys to starting run this improved cartridge with its original 6.5mm bore.
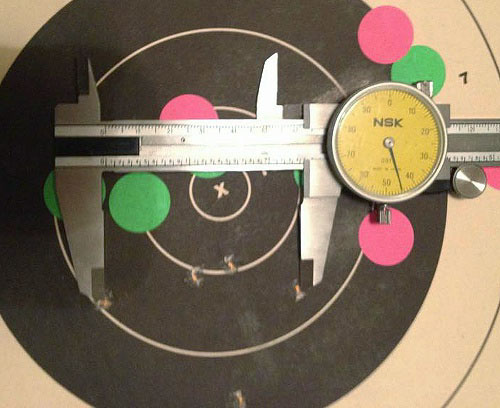
Here are three FIVE-shot groups at 500 yards, shot by Ernie’s Batman pistol. The first 5-shot group is marked with pink dots, the second with green dots, and the third is measured with the calipers:
March 19th, 2026

Here’s something of interest for benchrest competitors, particularly those who shoot at 100/200/300 yards. In those disciplines, high magnification is very important, and fixed-power options are popular. And in a game where the goal is to shoot in the ones and zeros, it is absolutely vital to have a scope that never experiences even the slightest shot-to-shot change (drift), and that allows very precise adjustments for windage and elevation. If you have a scope that moves internally, even the slightest amount, from one shot to the next, that can ruin a group.
Sightron offers a competition scope that should be a serious option for benchrest shooters. The Sightron SIII Competition 36x45mm ED riflescopes offer quality glass, precise adjustments, and reticles that hold steady — with no drift from shot to shot. This is a side-parallax scope with 1/10 MOA click values. Two Reticles are offered: Fine Crosshair (FCH), and FCH with 0.125 MOA Target Dot. This scope is in stock now at Creedmoor Sports for $1259.99, or direct from Sightron for the same $1259.99 price.
| Sightron SIII Competition 36x45mm ED Specifications: |
Click Value @ 100 yards: 1/10 MOA
Windage/elevation adjustment @ 100 yards: 50 MOA
Eye Relief: 3.6 inches
FOV @ 100 yards: 3 feet |
Minutes per revolution: 5 MOA
Tube Diameter: 30mm
Weight: 20.5 ounces
MSRP: $1,249.99 |

Sightron ExacTrack Windage and Elevation
When you’re trying to shoot one-hole groups, you need a scope that holds its values, and can also give precise, 100% repeatable adjustments when you need to dial a windage or elevation change. This SII ED’s ExacTrack windage and elevation adjustment system maintains proper alignment of the adjustments to the erector tube. That, Sightron says, ensures “precision and accuracy even when the most dramatic adjustments are applied.” NOTE: The adjustment values for both windage and elevation are 1/10th MOA. That is unusual. We usually see 1/8th MOA clicks in this type of scope. Here the click values are one-tenth Minute of Angle. (NOT 1/10 MIL). Sightron notes: “Precise target knobs with 1/10th MOA click value provide hair-splitting accuracy.”
ED (Extra Low-Dispersion) Glass in New 36x45mm Optic
The SIII Competition 36×45 ED features precision ED glass for crisp, razor-sharp views with minimal chromatic aberration — Sightron promises “crystal-clear target definition” with no color hazing. The SIII SS 36x45mm ED boasts Zact-7 Revcoat multi-coated precision ground lenses. Sightron claims “the highest quality light transmission in the industry”. A side parallax adjustment knob allows the riflescope to focus from 10 yards to infinity.
NOTE: If you want more magnification, Sightron also offers a 45x45mm SIII scope with ED Glass. To learn about that, READ Sightron 45x45mm SIII ED Review.
NOTE: All SIII Competition ED target riflescopes are compatible with all air guns and are backed by SIGHTRON’s lifetime limited warranty.
|


