If you will be flying with firearms this summer, here are six videos you should watch before you travel. You need to familiarize yourself with current Federal Regulations on gun transport before you get anywhere near an airport. Thankfully, the Transportation Security Administration (TSA) has an official INFO page that states the important requirements for airline passengers traveling with firearms and/or ammunition.
You’ll want to visit the TSA Firearms and Ammunition webpage, and read it start to finish. In addition, before your trip, you should check the regulations of the airline(s) with which you will fly. Some airlines have special requirements, such as weight restrictions.
We have two other key tips: 1) WEIGH Your Guns and ammo (as packed) BEFORE you get to the airport — so you comply with all airline flight limits without being surcharged; 2) Carry a printed copy of TSA and airline baggage regulations pertaining to firearms — this can help when dealing with airline personnel.
TSA offers this general advice: “You may transport unloaded firearms in a locked, hard-sided container as checked baggage only. Declare the firearm and/or ammunition to the airline when checking your bag at the ticket counter. The container must completely secure the firearm from being accessed. Locked cases that can be easily opened are not permitted. Be aware that the container the firearm was in when purchased may not adequately secure the firearm when it is transported in checked baggage.”
Traveling by Air with Firearms — Advice from Legal Expert
This is a good video by a very knowledgeable attorney. Washington Gun Law President William Kirk goes over everything you need to know in order to fly safely, and legally, with a firearm if you travel domestically. Kirk states: “While many believe this is a complicated formula of various state laws, in actuality TSA regulations govern all travel domestically with a firearm. There are very specific rules which must be followed in order to do this correctly.”
Colion Noir — Air Travel with Packed Firearms
Popular YouTube host and lawyer Colion Noir has created a good video that shares important points about traveling with firearms. Colion says: “Don’t risk making costly mistakes — get informed and ensure your firearm journey is hassle-free and lawful.” In this video, Colion covers these key points:
1. Bag Check: Learn the crucial pre-flight checklist to avoid any unwanted surprises at the TSA checkpoint.
2. Airline Check: Discover the differences in airline policies and ensure a smooth journey by reviewing your chosen carrier’s firearm guidelines.
3. Law Check: Stay on the right side of the law by understanding the gun regulations in every state you’ll visit during your trip.
4. The Gun Case: Explore the essential details about the TSA-required hard-sided lockable case and find out which one is my top choice.
5. Ammo Transport: Learn the correct way to transport ammunition separately from your firearm, all while staying within the weight limit.
Step-By-Step Guide to Gun Transport — Good Tips
This 18-minute Spiritus Systems video provides some very valuable practical tips for gun owners traveling by air. The host explains what to look for in a rifle case and locking system. He also explains how to pack the rifle and gear efficiently and how to label and track your gun/ammo cases. If you’re new to airline travel with guns, this video is worth watching start to finish. Here are highlights are listed by video times:
00:01 Introduction and Regulations
00:51 Storage Container Options
2:50 Type of Lock You Should Use
6:25 Tape Tip
7:16 Contact Information, and Labeling Your Bag
8:07 Firearm Considerations / Configuration
10:03 Documents
12:30 Tracking Your Bag
13:20 Packing Your Ammo
16:00 Prepping Your Magazines
How to Efficiently Pack Your Rifles and Gear
Our friend F-Class John often travels by air to major F-Class matches (most recently to the V2 Finale in Texas). John has learned how to transport valuable match rifles and optics most efficiently and economically. In these two videos F-Class John shows how to pack your rifles and equipment, and how to employ carry-on bags to secure optics and other non-regulated equipment.
TSA Video about Airline Travel with Guns and/or Ammo
This is the latest official TSA video covering gun/ammo transport via airlines. When packing for a flight be sure to start with an empty bag (make sure there are no forgotten gun parts or ammo inside before you pack). If you’re planning to travel with a firearm, follow the tips in this video and remember that you may NEVER bring a firearm in your carry-on bag. Also make sure you are not “packing” when entering the airport even if you have a CCW permit. TSA.gov Firearms/Ammo Transport INFO Page.
Official TSA Guidelines for Airline Travel with Firearms and Ammo
When traveling, comply with the laws concerning possession of firearms as they vary by local, state, and international governments.* Declare each firearm each time you present it for transport as checked baggage. Ask your airline about limitations or fees that may apply.
Firearms must be unloaded and locked in a hard-sided container and transported as checked baggage only. As defined by 49 CFR 1540.5 a loaded firearm has a live round of ammunition, or any component thereof, in the chamber or cylinder or in a magazine inserted in the firearm. For civil enforcement purposes, TSA also considers a firearm to be loaded when both the firearm and ammunition are accessible to the passenger.
Only the passenger should retain the key or combination to the lock unless TSA personnel request the key to open the firearm container to ensure compliance with TSA regulations. You may use any brand or type of lock to secure your firearm case, including TSA-recognized locks.
Bringing an unloaded firearm with accessible ammunition to the security checkpoint carries the same civil penalty/fine as bringing a loaded firearm to the checkpoint. You may find information on civil penalties at the Civil Enforcement page.
Firearm parts, including magazines, clips, bolts and firing pins, are prohibited in carry-on baggage, but may be transported in checked baggage. Replica firearms, including firearm replicas that are toys, may be transported in checked baggage only.
Rifle scopes are permitted in carry-on and checked baggage.
TSA Guidelines for Transporting Ammunition on Flights
Ammunition is prohibited in carry-on baggage, but may be transported in checked baggage. NOTE: Check with your airline for quantity limits for ammunition.
Firearm magazines and ammunition clips, whether loaded or empty, must be securely boxed or included within a hard-sided case containing an unloaded firearm. Read the requirements governing the transport of ammunition in checked baggage as defined by 49 CFR 175.10 (a)(8).
Small arms ammunition (up to .75 caliber and shotgun shells of any gauge) must be packaged in a fiber (such as cardboard), wood, plastic, or metal box specifically designed to carry ammunition and declared to your airline.
Ammunition may be transported in the same hard-sided, locked case as a firearm if it has been packed as described above. You cannot use firearm magazines or clips for packing ammunition unless they completely enclose the ammunition. Firearm magazines and ammunition clips, whether loaded or empty, must be boxed or included within a hard-sided, locked case.
*INTERNATIONAL: If you are traveling internationally with a firearm in checked baggage, please check the U.S. Customs and Border Protection website for information and requirements prior to travel.
“The pessimist complains about the wind; the optimist expects it to change; the realist adjusts the sails.” — William Arthur Ward
Readers often ask us: “Is there a decent, easy-to-comprehend book that can help my wind-reading?” Many of our Forum members have recommended The Wind Book for Rifle Shooters by Linda Miller and Keith Cunningham.
New Edition — Hardback and eBook
The latest, updated edition of The Wind Book for Rifle Shooters was released in May 2020. This 144-page book, first published in 2007, is a great resource. But you don’t have to take our word for it. If you click this link, you can read book excerpts and decide for yourself. When the Amazon page opens, look below the book cover photo, and click the bar labeled “Read Sample”. This lets you preview chapters from the Wind Book, and view some illustrations. Along with the hardback edition ($22.99), Amazon offers a Kindle (eBook) edition for $14.99.
Other books cover wind reading in a broader discussion of ballistics or long-range shooting, such as Applied Ballistics for Long-Range Shooting by Bryan Litz. But the Miller & Cunningham book is ALL about wind reading from cover to cover, and that is its strength. The book focuses on real world skills that can help you accurately gauge wind angle, wind velocity, and wind cycles.
All other factors being equal, it is your ability to read the wind that will make the most difference in your shooting accuracy. The better you understand the behavior of the wind, the better you will understand the behavior of your bullet. — The Wind Book for Rifle Shooters
The Wind Book for Rifle Shooters covers techniques and tactics used by expert wind-readers. There are numerous charts and illustrations. The authors show you how to put together a simple wind-reading “toolbox” for calculating wind speed, direction, deflection and drift. Then they explain how to use these tools to read flags and mirage, record and interpret your observations, and time your shots to compensate for wind.
I believe this is a must-have book if you are a long-range sport shooter. I compete in F-Class Open and when I first purchased this book and read it from cover to cover, it helped me understand wind reading and making accurate scope corrections. Buy this book, read it, put into practice what it tells you, you will not be disappointed. — P. Janzso
If you have one book for wind reading, this should be it. Whether you’re a novice or experienced wind shooter this book has something for you. It covers how to get wind speed and direction from flags, mirage, and natural phenomenon. In my opinion this is the best book for learning to read wind speed and direction. — Muddler
“Science tells us that exposure to continuous noise of 85 dB for eight hours is enough to cause permanent hearing loss, and worse, spikes of 130 dB and more can result in permanent hearing damage instantly.” Source: NRA Blog.
The Risk of Hearing Loss
Hearing loss can be progressive and irreversible. If you are a shooter, this is serious business. As the NRA Blog cautions: “You may not even realize you’re harming your hearing. Hearing loss occurs gradually, and can go effectively unnoticed until symptoms become severe. By then, the damage is done.”Effective hearing protection is a must whenever you are shooting firearms or when you are in the vicinity of gun-shots. For ultimate protection, we recommend a good set of tapered foam earplugs, topped by ear-muffs. However, there are situations when you may prefer lighter-weight hearing protection that can be quickly removed. For example, if you are standing well behind the firing line as an observer, or if you are working as a rangemaster or waddie some distance away from the shooters.”
Sound Levels for Common Noises:
9mm Luger pistol: 160 dB
Jet aircraft engine (near): 140 dB
.22 LR pistol: 134 dB
Normal human pain threshold: 120 dB
Noisy Nightclub: 110 db
Riding Motorcycle at 65 mph: 103 db
Power Lawnmower: 95 dB
Hearing damage possible: 85 dB (sustained for 8+ hours)
Ringing Telephone: 80 dB
Normal conversation: 60 dB
What about suppressors? If you use a suppressor is it OK to dispense with hearing protection? Not really. Even the most effective suppressors, on the smallest and quietest calibers (.22 LR), reduce the peak sound level of a gunshot to between 110 to 120 dB. To put that in perspective, according to the National Institute for Occupational Safety and Health (NIOSH), that is as loud as a jackhammer (110 dB) or an ambulance siren (120 dB). For normal caliber handguns and rifles, suppressed sound levels routinely exceed 130 dB, just shy of OSHA’s “hearing safe” threshold of 140 dB. Accordingly, we recommend use of hearing protection even when shooting suppressed.
Compact, Low-Profile NRR 27 dB-Rated Ear Muffs
Many hunters and competitive shooters prefer low-profile ear muffs such as the Walker Razor Slim Muffs (above). As these typically have a lower Noise Reduction Rating, perhaps NRR 22-27, we recommend running earplugs under muffs. If you use low-profile electronic muffs, such as Howard Leight Impact Sport Muffs, you should still be able to hear range commands even with plugs underneath.
Another good option for hunters and range visitors are hearing bands, basically earplugs connected with a semi-rigid plastic band. These banded products provide “quick access” hearing protection for hunters. You can keep them handy around the neck while spotting game, and then insert the plugs before shooting.
Howard Leight MAX NRR 33 Earplugs — Effective& Comfortable
These Howard Leight NRR 33 Max-1 Plugs are your Editor’s favorite foam earplugs. Between shooting, motorcycling and mowing lawns, I probably have Howard Leight foam plugs in my ears 3-4 days a week. They are comfortable and the flared outer edge helps the NRR. You can get 20 pairs for $8.95 on eBay. There is also a Max-30 corded version, with the same excellent 33 dB Noise Reduction Rating. Get 5 pairs of Max-30 Corded Plugs for $4.49 on Zoro.com, or 100 pairs of Max-30s for $48.95 on Amazon.
Note, if you prefer thin, light-weight earmuffs, we recommend running earplugs underneath for double protection while shooting firearms (or when you’re on the firing line). Sound experts tell us that running plugs and muffs together can effectively improve your effective noise reduction by 4-7 dB NRR.
The 17 Mach 2 (aka “17 HM2″) is making a come-back. We’re glad. This high-velocity round fits actions and magazines designed for the .22 LR, so it’s an easy barrel-swap upgrade for most rimfire bolt-guns (semi-autos are more complicated). The 17 Mach 2 cartridge doesn’t deliver the velocity of the 17 HMR, but it is still way faster than a .22 LR. Expect 2000-2100 fps with 17 Mach 2 compared to 1250 fps for “High-Velocity” .22 LR ammo. And, importantly, 17 Mach 2 ammo is much less expensive than 17 HMR. If you shop around, you can get 50 rounds of 17 Mach 2 for about $8.50 (or less). That’s 43% cheaper than a better-than-average $14.99 price of 17 HMR — a significant savings at 17 cents/round vs. 30 cents/round! And may vendors are selling 17 HMR ammo for $16-$18 for 50 rounds (i.e. up to 36 cents/round).
17 Mach 2 Major Selling Points:
1. 60% more velocity than typical “High-Velocity” .22 LR ammo.
2. 40% less cost than average 17 HMR ammo.
3. 17 Mach 2 OAL is compatible with .22 LR receivers and magazines.
17 Mach 2 — Best High Velocity Rimfire Bang for the Buck?
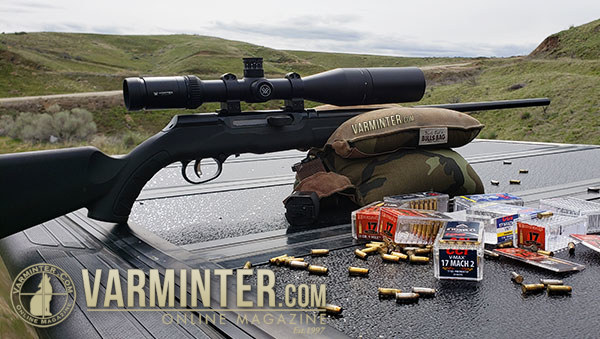
If you are looking for a capable, squirrel-busting round or a fun plinking round, you should definitely consider the 17 Mach 2, especially since CCI has committed to production of the little cartridge. CCI recently rolled out its “Gen 2″ 17 Mach 2 VNT Ammo with polymer tip (see top of article).
Considering that 17 HMR ammo is typically $15 to $18 per box, the 17 Mach 2 is a good value by comparison. It is available from vendors for under $8.50 per 50ct box. That’s $0.17 per round. When you consider overall “bang for the buck”, for many shooters, it makes sense to use the 17 Mach 2 rather than a 17 HMR. You save money, barrel life is a little longer, and the 17 Mach 2 is still a much more potent cartridge than the .22 LR. Check out this comparison, and note how the 17 Mach 2 has a much flatter trajectory than the .22 LR. For varmint shooting, the 17 Mach 2 is clearly the better choice.
And you can easily adapt a .22 LR Rifle to shoot the 17 Mach 2 just by changing the barrel. The magazine and bolt operation should work as the cartridge length, cartridge body diameter, and rim size is the same as the .22 LR.
Hornady’s 17 Mach 2 has a 2100 FPS muzzle velocity vs. 1255 FPS for “High-Velocity” .22 LR.
17 Mach 2 Rifle Reviews
Gun-makers have taken notice of the availability of 17 Mach 2 ammo, introducing new models chambered for this versatile little rimfire round. For a high-volume, small-species varminting, the 17 Mach 2 is much more effective than the .22 LR, and much less expensive than the larger 17 HMR.
Savage A17 in 17 Mach 2
There are a number of reviews on new-generation 17 Mach 2 rifles. Varminter.com reviewed the Savage A17 in 17 HM2. Editor Eric Mayer wrote: “This new addition to the A17 line comes at a time when the 17 Mach 2 round is experiencing a resurgence, with ammo now available from CCI and Hornady, including the lead-free NTX round from Hornady. This means … you don’t have to break the bank to buy a current, functioning, semi-auto 17 Mach 2 and you don’t have to … convert your 10/22.”
Eric shot four different types of 17 Mach 2 ammo, putting 1000+ rounds through the Savage. He was impressed: “I am very excited that Savage Arms has chambered their A17 rifle in the 17 Mach 2 / 17 HM2 round. After shooting the prototype, I can confidently say that this new A17 will become my go-to 17 Mach 2 rifle. This new rifle is a great option for varminters everywhere!”
Toggle Bolt Volquartsen Summit in 17 HM2
It’s rare for us to see a rimfire that we’d really like to own, but the Summit from Volquartsen fits the bill. This versatile rifle features a cool, straight-pull toggle bolt, similar to those on elite Biathlon rifles. You can see how this gun shoots in this informative 22 Plinkster video:
22 Plinkster Tests Volquartsen Summit Rifle in 17 Mach 2
The 17 Mach 2 (17 HM2) is making a comeback. Now leading manufacturers are offering this efficient little rimfire cartridge in some nice rifles. Both Anschutz and Volquartsen will offer new 17 Mach 2 rifles in 2019. The Volquartsen Summit features a lightweight, carbon fiber-wrapped barrel threaded 1/2-28 for brakes or suppressors. The Summit boasts a nice 1.75-lb trigger pull. The Summit’s CNC-machined receiver features a +20 MOA Rail. NOTE: The video shows a silhouette-style laminated wood stock. However, the Summit comes standard with a composite Magpul stock that actually works better for shooting from a bench.
Precision Benchrest and F-Class shooters favor premium brass from Lapua, Norma, Peterson, or RWS. (Lake City also makes quality brass in military calibers.) Premium brass delivers better accuracy, more consistent velocities, and longer life. Shooters understand the importance of good brass, but many of us have no idea how cartridge cases are actually made. Here’s how it’s done.
The process starts with a brass disk stamped from strips of metal. Then, through a series of stages, the brass is extruded or drawn into a cylindrical shape. In the extrusion process the brass is squeezed through a die under tremendous pressure. This is repeated two or three times typically. In the more traditional “draw” process, the case is progressively stretched longer, in 3 to 5 stages, using a series of high-pressure rams forcing the brass into a form die. While extrusion may be more common today, RWS, which makes some of the most uniform brass in the world, still uses the draw process: “It starts with cup drawing after the bands have been punched out. RWS cases are drawn in three ‘stages’ and after each draw they are annealed, pickled, rinsed and subjected to further quality improvement measures. This achieves specific hardening of the brass cases and increases their resistance to extraordinary stresses.” FYI, Lapua also uses a traditional draw process to manufacture most of its cartridge brass (although Lapua employs some proprietary steps that are different from RWS’s methods).
After the cases are extruded or drawn to max length, the cases are trimmed and the neck/shoulder are formed. Then the extractor groove (on rimless cases) is formed or machined, and the primer pocket is created in the base. One way to form the primer pocket is to use a hardened steel plug called a “bunter”. In the photos below you see the stages for forming a 20mm cannon case (courtesy OldAmmo.com), along with bunters used for Lake City rifle brass. This illustrates the draw process (as opposed to extrusion). The process of draw-forming rifle brass is that same as for this 20mm shell, just on a smaller scale.
River Valley Ordnance explains: “When a case is being made, it is drawn to its final draw length, with the diameter being slightly smaller than needed. At this point in its life, the head of the draw is slightly rounded, and there are no provisions for a primer. So the final drawn cases are trimmed to length, then run into the head bunter. A punch, ground to the intended contours for the inside of the case, pushes the draw into a cylindrical die and holds it in place while another punch rams into the case from the other end, mashing the bottom flat. That secondary ram holds the headstamp bunter punch.
This video employs DEFORM-2D software to show the draw process for brass casings.
The headstamp bunter punch has a protrusion on the end to make the primer pocket, and has raised lettering around the face to form the headstamp writing. This is, of course, all a mirror image of the finished case head. Small cases, such as 5.56×45, can be headed with a single strike. Larger cases, like 7.62×51 and 50 BMG, need to be struck once to form a dent for the primer pocket, then a second strike to finish the pocket, flatten the head, and imprint the writing. This second strike works the brass to harden it so it will support the pressure of firing.”
Thanks to Guy Hildebrand, of the Cartridge Collectors’ Exchange, OldAmmo.com, for providing this 20mm Draw Set photo. Bunter photo from River Valley Ordnance.
Photos and Facebook post by Tactical Rifle Shooters
Yet another .300 Blackout disaster. Unfortunately, that .300 Blackout cartridge can fit in a .223 Rem chamber. Shooting a .308-caliber bullet in .223 bore is a recipe for disaster.
The .300 AAC Blackout aka “300 BLK”, is a compact 30-caliber cartridge designed to work in AR-15 rifles. It has a shorter cartridge case to accommodate the bigger 30-caliber bullet while still fitting in a standard AR-15 magazine. Unfortunately, that’s the danger. A careless shooter can toss a .300 Blackout cartridge in with .223 Rem rounds without noting. And because the case-head size is the same as the .223 Rem (5.56×45) the rifle’s bolt assembly will happily chamber and fire the .300 BLK round. Problem is, that forces a .308 diameter bullet down an undersized .223-caliber bore. Not good!
This images were provided by Tactical Rifle Shooters on Facebook. The message was clear: “Don’t try to run 300 Blackout in your .223/5.56mm. It won’t end well. The problem is identical rifles and identical magazines but different calibers.”
Image from Accurate Shooter Forum. Cutaway shows the jammed .30-Cal bullet:
For those who MUST have a .300 Blackout, here are some things you can do:
1. Use different colored magazines for .300 Blackout vs. .223 Rem.
2. Fit all your uppers with caliber-labeled ejection port covers.
3. Mark .223 Rem upper handguards with the caliber in bright paint.
4. Mark all .300 BLK Rounds with heavy black marker.
Comments by Folks Who Viewed these .300 Blackout Disaster Photos:
“The .300 Blackout is simply a badly-designed round. A properly-designed round would have had a feature in the shape that would have prevented cross loading in the first place.” — D. Santiago
“I almost made that mistake… I had a magazine of 300 BLK inserted in my .223/5.56 all night. Fortunately, I never pulled the trigger. Once I realized the mistake, I almost got ill. [After that incident] I no longer own a 300 BLK.” — B. Welch
“Happened to me hog hunting from a helo. Gun exploded in my face.” — B. Hood
“Fire-forming projectiles [is] so wrong in centerfire!” — M. Stres
“Had some dude come into the store the other day wanting .300 Blackout ammo to shoot in his 5.56 AR. It took 15 minutes of explaining for him to understand you got to have a .300 Blackout Upper!” — R. Williams
The Shooting Sports USA website includes two excellent articles about the basics of metallic cartridge reloading. These two articles provide an excellent summary of the key procedures. If you are new to reloading, we recommend you read both articles:
Part II is particularly helpful because it explains the entire reloading process step-by-step, with 14 listed steps. The author notes: “In this, the second installment on metallic cartridge reloading, we’ll follow the sequence of steps involved in reloading a rifle cartridge and refining a metallic cartridge load. These steps are based on the use of a single-stage reloading press and a separate priming tool.”
Much important advice is provided as this article runs through the 14 Steps of Reloading. For example, when explaining Step 13, Bullet Seating, the article states:
“Proper seating depth is critical. Too much bullet protrusion and the cartridge may not work through the gun’s magazine, or it may fail to chamber. Too little and the bullet intrudes excessively into the powder chamber, decreasing volume and raising pressure. Neck tension is also important; any bullet that fails to seat with some resistance may be held only loosely by the neck and may be driven back into the case when the round is chambered, especially in semi-automatic arms.”
Important Guide to Detecting Over-Pressure Signs in Brass
As an example of the invaluable advice provided in these two articles, here’s a sample from Part II that explains how to determine if your load is over-pressure. We recommend that EVERY reader read this twice. There are more things to consider than a stiff bolt lift. You need to inspect cartridges very carefully:
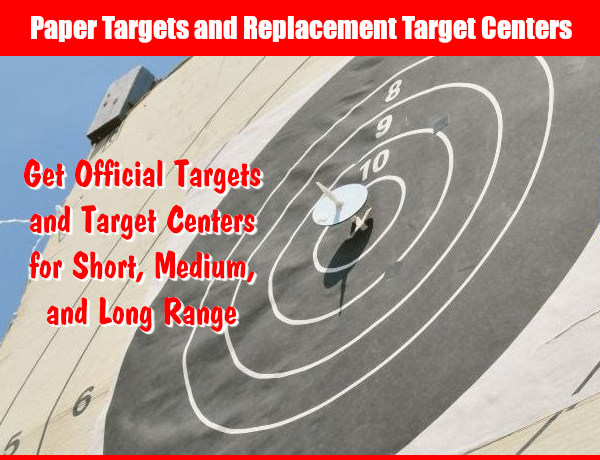
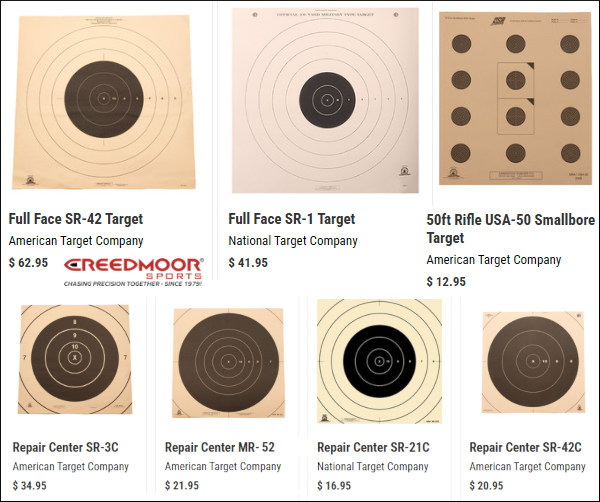
Are you a High Power or Smallbore marksman looking for bullseye paper targets? Here are bulk sets of 25, 50 and 100 targets from Creedmoor Sports. All these can can be used for general practice, fun matches, or official sanctioned events. Choose the 200-yard SR-1 target with seven scoring rings (X,10,9,8,7,6,5), priced at $41.95 for 100. For smallbore, you can get the USA-50 Smallbore Target $12.95 for 100. Creedmoor also offers a variety of Repair Centers, including the 300-Yard SR-3C Target Repair Center ($34.95), or the SR-21C Target Repair Center ($16.95). These target centers can be used on top of full targets, or by themselves for practice on smaller target frames.
Creedmoor Sports also offers match-grade shot spotter discs. These are used to mark shot locations. They are offered in three diameters: 1.5″, 3.0″, and 5.0″. In addition, you can purchase the spindles used with spotter discs along with range Golf Tees also employed to mark shots. These are placed in the shot holes by pit workers.
Frankly for practice, we recommend a target cam, or ShotMarker system.
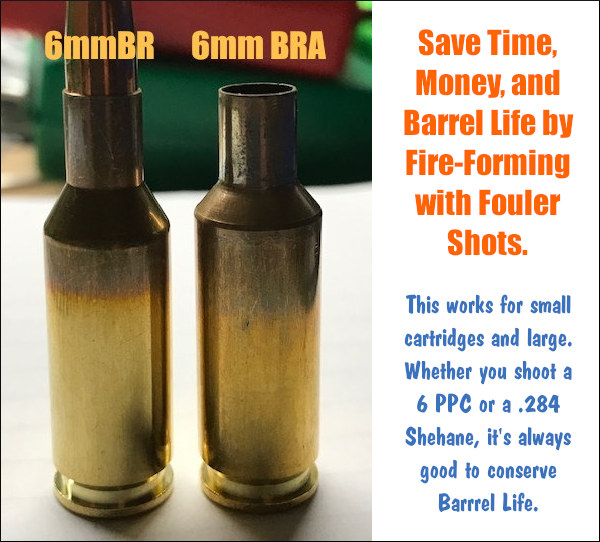
Here’s a tip for guys who shoot the 6 PPC, 6 Dasher, 6 BRA, .284 Shehane, or other wildcat cartridges that require fire-forming. Use your fouler shots to fire-form new cases. That way your fouler shots do “double-duty” and you get your brass fire-formed without putting extra rounds through your expensive barrel.
This procedure is recommended by Joel Kendrick, the 2004 IBS 600-yard Shooter of the Year. After he cleans his barrel, Joel knows it takes two or three shots to foul in the bore before accuracy returns. When shooting his PPC, Joel uses those fouler shots to fire-form his new brass. Joel explains: “I like to have relatively new brass always ready. By fire-forming a couple cases after each barrel-cleaning during a match, by the end of the weekend I’ve got a dozen or more freshly fire-formed cases to put into the rotation. If you do this with your fouler shots you get your fire-forming accomplished without using up any extra barrel life.”
This not only saves barrel wear, but it saves you trips to the range for the purpose of fire-forming. We thank Joel for this smart suggestion. For those who do not have a dedicated barrel for fire-forming, this should help keep your round-count down. Note: With this fouler fire-forming routine, you should ALWAYS do the fire-forming with the SAME POWDER you load for your match ammo. Joel currently works as the Supplier Quality Process Engineer for MMI-TruTec, a company that offers barrel surface coatings that can further extend your barrel life.
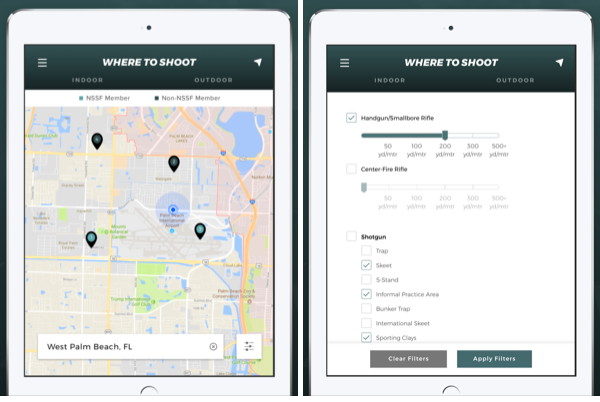
The Where To Shoot Mobile App quickly locates shooting ranges near you, drawing on North America’s most comprehensive directory of shooting ranges. Users can search by current location, state, or zip code. Once you locate a range, you can view activities offered along with a summary of range facilities. You can even get driving directions.
The app is modeled after NSSF’s popular WhereToShoot.org® website and is updated frequently with range information for every U.S. state and Canadian province. Once you’ve located a place to shoot, the App can provide directions to the range. The App also includes video tips for shooters, news, and firearm-safety information.


 When traveling, comply with the laws concerning possession of firearms as they vary by local, state, and international governments.* Declare each firearm each time you present it for transport as checked baggage. Ask your airline about limitations or fees that may apply.
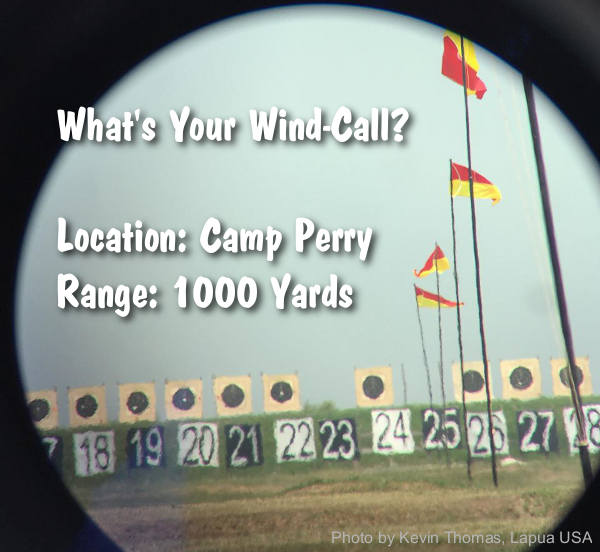


 The Risk of Hearing Loss


 Precision Benchrest and F-Class shooters favor premium brass from


 The headstamp bunter punch has a protrusion on the end to make the primer pocket, and has raised lettering around the face to form the headstamp writing. This is, of course, all a mirror image of the finished case head. Small cases, such as 5.56×45, can be headed with a single strike. Larger cases, like 7.62×51 and 50 BMG, need to be struck once to form a dent for the primer pocket, then a second strike to finish the pocket, flatten the head, and imprint the writing. This second strike works the brass to harden it so it will support the pressure of firing.”

 The
The 


 Here’s a tip for guys who shoot the 6 PPC, 6 Dasher, 6 BRA, .284 Shehane, or other wildcat cartridges that require fire-forming. Use your fouler shots to fire-form new cases. That way your fouler shots do “double-duty” and you get your brass fire-formed without putting extra rounds through your expensive barrel.