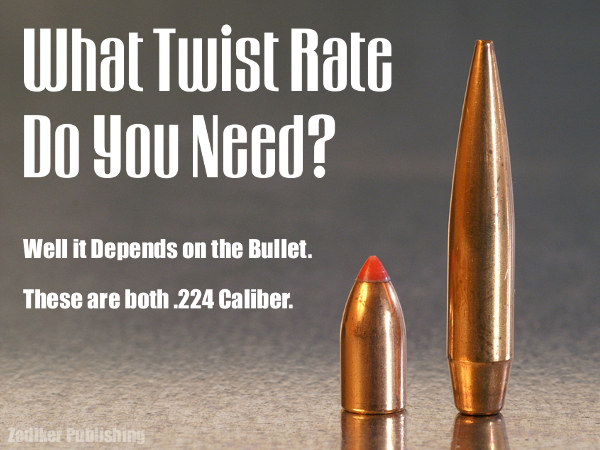
Here’s an extreme range of .224-Caliber bullets: 35gr varmint bullet and 90gr match bullet. Of course, along with bullet length/design, you need to consider MV when choosing twist rate.
Even with the same caliber (and same bullet weight), different bullet types may require different rates of spin to stabilize properly. The bullet’s initial spin rate (RPM) is a function of the bullet’s muzzle velocity and the spin imparted by the rifling in the barrel. You want to ensure your bullet is stable throughout flight. It is better to have too much spin than too little, according to many ballistics experts, including Bryan Litz of Applied Ballistics. The late Glen Zediker put together some basic tips concerning barrel twist rates and bullet stability. These come from Glen’s book, Top Grade Ammo.
Choosing the Right Twist Rate
I’d always rather have a twist too fast than not fast enough. Generally… I recommend erring toward the faster side of a barrel twist decision. 1:8″ twist is becoming a “new standard” for .224 caliber, replacing 1:9″ in the process. The reason is that new bullets tend to be bigger rather than smaller. Don’t let a too-slow twist limit your capacity to [achieve] better long-range performance.
Base your next barrel twist rate decision on the longest, heaviest bullets you choose to use, and at the same time realize that the rate you choose will in turn limit your bullet choices. If the longest, heaviest bullet you’ll shoot (ever) is a 55-grain .224, then there’s honestly no reason not to use a 1:12″. Likewise true for .308-caliber: unless you’re going over 200-grain bullet weight, a 1:10″ will perform perfectly well.
Bullet Length is More Critical than Weight
Bullet length, not weight, [primarily] determines how much rotation is necessary for stability. Twist rate suggestions, though, are most usually given with respect to bullet weight, but that’s more of a generality for convenience’s sake, I think. The reason is that with the introduction of higher-ballistic-coefficient bullet designs, which are longer than conventional forms, it is easily possible to have two same-weight bullets that won’t both stabilize from the same twist rate.
Evidence of Instability
The tell-tale for an unstable (wobbling or tumbling) bullet is an oblong hole in the target paper, a “keyhole,” and that means the bullet contacted the target at some attitude other than nose-first.
Increasing Barrel Length Can Deliver More Velocity, But That May Still Not Provide Enough Stability if the Twist Rate Is Too Slow
Bullet speed and barrel length have an influence on bullet stability, and a higher muzzle velocity through a longer tube will bring on more effect from the twist, but it’s a little too edgy if a particular bullet stabilizes only when running maximum velocity.
My failed 90-grain .224 experiment is a good example of that: I could get them asleep in a 1:7″ twist, 25-inch barrel, which was chambered in .22 PPC, but could not get them stabilized in a 20-inch 1:7″ .223 Rem. The answer always is to get a twist that’s correct.
These tips were adapted from Glen’s popular 2016 book, Top-Grade Ammo. That work, now getting harder to find, has numerous helpful articles on technical topics. Berger Bullets also has a FREE online Twist Rate Stability Calculator, developed by Applied Ballistics.
Here is a simple technique that can potentially help you load straighter ammo, with less run-out (as measured on the bullet). This procedure costs nothing and adds only a few seconds to the time needed to load a cartridge. Next time you’re loading ammo with a threaded (screw-in) seating die, try seating the bullet in two stages. Run the cartridge up in the seating die just enough to seat the bullet half way. Then lower the cartridge and rotate it 180° in the shell-holder. Now raise the cartridge up into the die again and finish seating the bullet.
Steve, aka “Short Range”, one of our Forum members, recently inquired about run-out apparently caused by his bullet-seating process. Steve’s 30BR cases were coming out of his neck-sizer with good concentricity, but the run-out nearly doubled after he seated the bullets. At the suggestion of other Forum members, Steve tried the process of rotating his cartridge while seating his bullet. Steve then measured run-out on his loaded rounds. To his surprise there was a noticeable reduction in run-out on the cases which had been rotated during seating. Steve explains: “For the rounds that I loaded yesterday, I seated the bullet half-way, and turned the round 180 degrees, and finished seating the bullet. That reduced the bullet runout by almost half on most rounds compared to the measurements from the first test.”
Steve recorded run-out measurements on his 30 BR brass using both the conventional (one-pass) seating procedure, as well as the two-stage (with 180° rotation) method. Steve’s measurements are collected in the two charts above. As you can see, the run-out was less for the rounds which were rotated during seating. Note, the change is pretty small (less than .001″ on average), but every little bit helps in the accuracy game. If you use a threaded (screw-in) seating die, you might try this two-stage bullet-seating method. Rotating your case in the middle of the seating process won’t cost you a penny, and it just might produce straighter ammo (nothing is guaranteed). If you do NOT see any improvement on the target, you can always go back to seating your bullets in one pass. READ Forum Thread..
Here’s a helpful, time-saving tool for handgun owners. MidwayUSA’s online Holster Finder lets you quickly find the right holsters for virtually all popular makes and models of pistols and revolvers. The wide variety of carry styles, materials, and features can make finding the right holster difficult or confusing. Drawing on a database of over 125,000 gun/holster combinations, the MidwayUSA Holster Finder turns that complex task into an easy three-step process.
The selection process is simple: 1. Choose Pistol or Revolver; 2. Select Make and Model of Handgun (and barrel type/length); 3. Click to view results. Just choose your gun type, select your make, model and barrel, then view the results. All major holster types are included: Ankle, Belly Band, Belt (outside waistband), Chest, Competition, Drop Leg, Inside Waistband (IWB), Paddle, Pocket, and Shoulder. Check out the MidwayUSA Holster Finder at MidwayUSA.com/holster-finder.
Peterson Cartridge Company (“Peterson”) has released a lengthy, authoritative guide to the 22 Creedmoor cartridge, a popular wildcat based on the 6.5 Creedmoor or 6mm Creedmoor necked down to .224 caliber. We think the .22 Creedmoor would be a great long-range varmint cartridge, similar to the .22-250 Rem, but with a more modern, efficient cartridge design. In addition, some PRS/NRL competitors may turn to the .22 Creedmoor because it has less recoil and is flatter-shooting than the 6mm Creedmoor. In addition, .224-caliber match bullets are typically less expensive than heavier 6mm and 6.5mm projectiles. Less recoil, and less cost — what’s not to like?*
Along with load data, this article has specific sections dedicated to: Primers, Rifling Twist Rates, and Reloading Supplies. If you are considering building a .22 Creedmoor, we recommend you download the full Peterson .22 Creedmoor article, which is available in PDF format.
Peterson states, “Since its inception in 2007… the 6.5 Creedmoor has seen some pretty meteoric growth in popularity. That growth continues as of this writing, as the cartridge has now gone mainstream with hunters and shooters alike. As the popularity of the 6.5 Creedmoor has increased, so has the number of wildcat cartridges based off of it. Some of those popular wildcat cartridges are the 6mm Creedmoor, the .25 Creedmoor, and now the .22 Creedmoor. This data sheet will cover the .22 Creedmoor.
To help our customers, and anyone else who shoots .22 Creedmoor, we decided to create this Data Sheet and distribute it. [In this LOAD DATA Document] you will find four (4) common bullets, and four (4) common rifle powders used when handloading the .22 Creedmoor cartridge. We then took the different bullet and powder combinations and loaded them up to the SAAMI Maximum Average Pressure (MAP) for the 6.5 Creedmoor and 6mm Creedmoor cartridges, which is 62,000 PSI. [O]ur goal was to provide a wide spectrum of bullet weights and the powders used with them.
All of the following data was gathered by our ballistician in our indoor ballistics lab located in our factory in Pennsylvania. Although we were able to gather pressure and velocity data in our lab, we have NOT tested these loads for accuracy. Again, these loads are just designed to give shooters information regarding what velocity, a given bullet and powder charge combination, will produce the SAAMI Maximum Average Pressure (MAP) of 62,000 psi.”
Sample 22 Creedmoor LOAD DATA
IMPORTANT — Pressures can vary significantly with different Cartridge Overall Lengths (COAL). In addition, ANY change to ANY load components — primers, bullets, brass, powder — can affect pressure. Always load conservatively. In addition, because of variances in bore dimensions, some barrels may show higher pressures than others. Again, always start with conservative loads, well below MAX pressures.
*Actually there IS a potential downside — reduced barrel life. We expect that a .22 Creedmoor running hot varmint loads would experience shorter useful barrel life compared to a 6.5 Creedmoor. This is based on what we’ve observed with .22-250 and .22-250 Ackley barrels compared to our 6.5 CM barrels.
Here’s inspiration for rimfire shooters out there. The video below shows some mighty impressive .22 LR iron sights lever gun shooting by a very talented young lady. In this video, Kirsten performs a classic Annie Oakley trick shot, cutting a playing card in half with a bullet. We hope this display of marksmanship brings a smile to our readers.
Kirsten Joy Weiss is a phenomenal off-hand rifle shooter. Splitting a playing card would be hard enough with a scoped rifle shot from the bench. But Kirsten makes this amazing shot from standing position, shooting over iron sights, with an inexpensive rimfire lever gun. Trust us, that’s not easy. It did take Kirsten three tries, but we’re still impressed.
To accomplish this trick shot, Kirsten’s horizontal aim had to be ultra-precise. A playing card is only 0.25mm thick (about 1/100th of an inch). That leaves almost no room for error.
GIF Animation Shows Bullet Slicing Card in Half:
We know top benchresters can put five shots in one ragged hole at 100 yards, used a scoped rifle sitting on a stable rest. But make those folks stand on their hind legs, hold the rifle, and aim over primitive iron sights, and some of those benchrest aces would be lucky to hit a dinner plate at 100 yards. Kudos to Kirsten for making this great shot.
Looking for a fun, DIY project this winter? Here’s a useful project — a handy ammo caddy you can craft at home pretty easily. And your shooting buddies will be impressed with your ingenuity. Plus the wife won’t mind having a spare knife-holder for the kitchen.
Forum member Alex W. (aka “zfastmalibu”) came up with a clever adaptation of an item you may already have on your kitchen counter. By drilling a few strategically-placed holes in a wood knife-holding block, Alex created a handy, 20-round ammo holder for the bench. We’re not sure the wife will appreciate the new holes in her kitchen accessory, but we think this is a smart invention. Alex asked fellow Forum members: “What do you think, is there a market for it?” We think there is. Of course, with a ruler and an electric drill you could probably make your own version easily enough.
Most bolt-action rifle shooters work the bolt with their trigger-pulling hand. This is because most rifles sold to right-handed shooters come with right-side bolts, while “lefty” rifles come with left-side bolts. This “standard” configuration requires the shooter to take his dominant, trigger-pulling hand off the stock to cycle the bolt, then re-position his hand on the stock, and “re-claim” the trigger. Often the shooter must lift or move his head to work the bolt, and that also requires him to re-establish his cheek weld after each and every shot. Not good.
This really doesn’t make much sense for precision shooting with fore-end support*. There is a better way. If you leave your trigger hand in position and work the bolt (and feed rounds) with the opposite hand, then you don’t need to shift grip and head position with each shot. All this requires is a weakside-placed bolt, i.e. a left bolt for a right-handed shooter or a right bolt for a left-handed shooter. The video below shows a “Lefty” working a right bolt. Note how efficient this is:
As our friend Boyd Allen explains: “If you think about it, if you are going to work with a factory action where your options are left bolt and left port or right bolt and right port, and you are building a rifle that will only be shot from a rest, using the left/left for a RH shooter or using a right/right for a LH shooter works better than the conventional configuration”.
Shoot Like a Champ and Work the Bolt with Your Weakside Hand
Derek Rodgers is a recent F-TR World Champion, a King of 2 Miles champion, AND is the only person to have won BOTH the U.S. F-Open and the U.S. F-TR National Championships.
And guess what? Derek runs this kind of “opposite” bolt set-up. Yep, Derek shoots right-handed with a left bolt. Though Derek is a right-hander, he shoots with a Left Bolt/Left Port (LBLP) action. He pulls the trigger with his right index finger, while working the left-side bolt with his left (weakside) hand. This allows him to stay in position, and maintain his cheekweld. He places his right hand on the grip, while manipulating the bolt (and feeding rounds) with his non-trigger-pulling hand.
Past F-TR World Champion and Past King of 2 Miles Derek Rodgers
This is the rifle with which Derek won the 2013 F-TR National Championship.
*For true standing, off-hand shooting (whether in competition or on a hunt), a conventional strongside bolt placement makes sense, since the non-dominant arm must support the front of the rifle all the time. When shooting from bipod or rest, it’s a different story.
Our take on Bore-Store Gun sleeves is simple: They work great, so buy them and use them — for ALL your valuable firearms.
Winter’s here, with rain and snow in much of the country. We known readers will have their guns in the safe for long periods. For winter storage, we recommend Bore-Stores. These thick, synthetic-fleece sacks cushion your guns, preventing nicks and scratches. The breathable fabric wicks away moisture, and the fibers are coating with corrosion inhibitors. I personally use Bore-Stores for in-safe storage with all my guns, and I have never had one of my guns rust inside a Bore-Store, even when I lived a stone’s throw from the ocean and its salty air.
Bore-Stores are offered in a range of sizes to fit everything from a snub-nosed revolver to a 33″-barrelled Black Powder Rifle. Bore-Stores can be purchased for $9.99 – $28.99 from Borestores.com. For most scoped rifles, we recommend the 10″x46″ SCR-1 case ($25.99). The Bore-Store manufacturer, Big Spring Enterprises will also craft custom sizes on request. For a long-barreled F-Class or ELR rig you may need a custom length. Or you can remove the scope and use the 7″x52″ SG-1 Shotgun Bore-Store for up to 32″ barrel ($28.99).
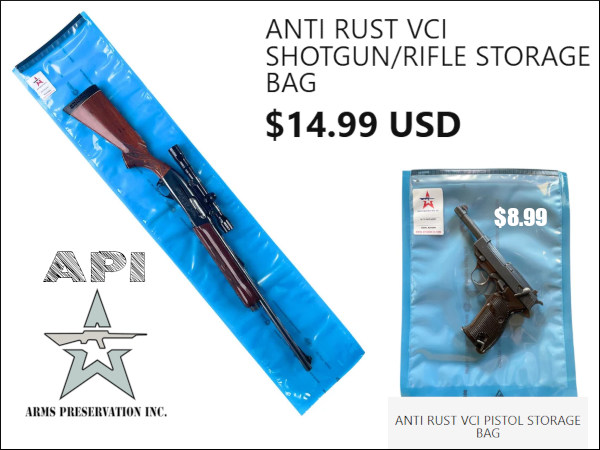
API-Brand Anti-Rust VCI Storage Bags — Affordable and Effective
Consider VCI Bags for Long-Term Storage
While we prefer Bore-Stores for regularly-used guns, if you have heirloom firearms that will be kept in storage for very long periods without seeing any use, you may want to grease them up and place them in the thin, but rugged API brand VCI Storage Bags. The interior VCI lining emits a safe corrosion inhibitor vapor. The multi-layer exterior locks out humidity and airborne contaminants. These bags are also resistant to petroleum-based chemicals and seal out moisture. They have a handy velcro opening.
Here’s one VITAL bit of advice for using sealed gun storage bags. Be absolutely sure, before you seal up the bags, that your guns are DRY and that all metal surfaces have been coated with an effective anti-corrosive, such as BoeShield T9 or Eezox. NOTE: If you can’t afford the $15 API sacks, Brownells offers a three-pack of 12″x 60″ anti-rust rifle sacks for $22.99 — under 8 bucks a gun. That’s certainly cheap insurance for rifles and shotguns that may cost many thousands of dollars.
Get Your Guns Out of Foam-lined Cases — They Are Rust Magnets
Just about the worst thing you can do for long-term storage (short of leaving your rifle outside in the rain) is to store firearms in tight, foam-padded cases. The foam in these cases actually collects and retains moisture from the air, acting as the perfect breeding ground for rust. Even in warm summer months, humid air can leave moisture in the foam.
Remember, those plastic-shelled cases with foam interiors are for transport, not for long-term storage. Don’t repeat the mistake of a wealthy gun collector I know. He stored four valuable Colt Single Action Army (SAA) revolvers in individual foam-padded cases, and locked these away in his gun safe. A year later, every one of his precious SAAs had rusted, some badly.
Shiny brass — it may not shoot more accurately, but it does make you feel better about your hand-loaded ammo. While it’s not necessary to get brass “bright and shiny” after every firing, it is a good idea to clean powder residue, grime, and grit off your brass before you run cases into sizing dies. There are many ways to clean cartridge cases. A quick wipe with solvent on a patch may suffice for recently-shot cases. Older brass with baked-on carbon may require lengthy tumbling. Ultrasonic cleaning is another popular option that gets your brass clean inside and out.
Sinclair International has a series of helpful videos on brass cleaning. These short “how-to” videos, hosted by Bill Gravatt, former head honcho at Sinclair Int’l and Creedmoor Sports, cover the various processes you can use — tumbling, ultrasonic cleaning, chemical cleaning, and cleaning by hand.
Video ONE — Cleaning Brass in Vibratory or Rotary Tumbler
TIP: Brass that has recently been shot will clean more easily than brass that has been sitting many days or weeks. If your tumbling media is fresh the job should be done in an hour or less. It’s your choice whether to tumble with primers removed or with primers still in the cases. If you choose to tumble with primers out, we suggest you deprime with a depriming die, rather that put dirty brass into your sizing die. Some people like to add a teaspoon of liquid polish to the media. This does work, cutting tumble time, and making your brass more shiny. However, if you add liquid polish, do that BEFORE you add the brass and let the tumbler run for a 15 minutes to get the polish completely mixed into the media. Otherwise you can else up with gooey gunk inside your cases — a very bad thing.
Video TWO — Ultrasonic Case Cleaning
TIP: There are many different types of solutions you can use. Soapy water suffices for some folks, particularly if you add a little Lemi-Shine. The Hornady and Lyman solutions work well, and can be used multiple times, provided you strain the solution to remove dirt and grit after cleaning sessions. Many ultrasonic cleaning machines have timers. Experiment with dwell time to see how long you need to immerse your brass. A very small amount of Ballistol in the solution will help lubricate your necks on the inside. This can make bullet seating go more smoothly, with more consistent neck tension.
Video THREE — Chemical Cleaners (Soaking without Ultrasound)
TIP: After using chemical cleaners, such as the Iosso solution, you need to water-rinse your brass thoroughly. A kitchen strainer helps with this (see video at 0:20). Also, don’t forget your brass in the chemical solution — follow the manufacturers recommendations and don’t exceed the recommended dwell time. Chemical cleaners work surprisingly well to remove grease and grime, and the solution can be re-used multiple times. However, if you want your cases to look bright and shiny (like new brass), you will probably have to tumble. [Editor: A very effective new chemical cleaner is the Brass Monkey product from the makers of Wipe-Out and Carb-Out. Add a teaspoon to a gallon of water then soak your brass for 20-30 minutes. It really works — the cases clean up dramatically].
Video FOUR — Manual Cleaning (By Hand)
TIP: Keep some oversize patches in your range kit. At the end of your shooting sessions, wipe off your fired brass with a patch dampened with a mild, non-corrosive solvent (once again Ballistol works well). Before the carbon sets up on your brass it is very easy to remove. For tougher jobs, you can use 0000 Steel Wool (as Bill recommends in the video). You may find that timely hand-cleaning lets you avoid tumbling altogether — or you may choose to tumble (or ultra-sound) your brass only after a half-dozen or so firings.
NRA Media offers a series of 40 informative videos about the Science of Shooting, covering a wide range of topics, from eye dominance to long-range ballistics. These videos feature high production values, with super-slow motion segments, as well as helpful computer graphics to illustrate the principles covered.
The videos are narrated by Jessie Duff, a top action pistol shooter (and the first women ever to achieve USPSA Grand Master status). Jessie is assisted by talented shooters such as Top Shot Season 4 Champion Chris Cheng. There are forty videos in the Firearm Science Video Series. Here are five NRA videos, with links to others below. You’ll find all 40 NRA Firearm Science Videos HERE.
Eye Dominance — How to Determine Which Eye is Dominant
Host Jessie Duff and longtime shooter Krystie Messenger demonstrate how eye dominance affects aim and teach you how to determine your dominant eye in this edition of Firearm Science. There are very simple tests you can do to determine your eye dominance. This Editor is right-handed but left-eye dominant. All competitive shooters should check for eye dominance. If you are cross-dominant, you can alter your head position or put a paper patch on one frame of your shooting glasses.
Eye Protection — Effect of Different Color Lenses
No matter what you’re shooting, eye protection should always be worn. But with so many choices, what should you wear? In this edition of Firearm Science, two-time Olympic trap shooter Corey Cogdell explains lens color options for protective eyewear. Different colors may be selected according to the light conditions and the sport. For most rifle shooters using magnified scopes, clear lenses are probably the best choice, except on very bright summer days.
Iron Sights vs. Optics
Host Jessie Duff and shooter Krystie Messenger demonstrate the benefits and drawbacks of using iron sights and optics in this edition of Firearm Science. For AR-type rifles, choosing the right option depends on the intended use of the rifle and the rules of competition. For example, a “Standard military Rifle” for CMP competition must have iron sights. But current NRA service rifle competition (and CMP unlimited military rifle class) allows scopes. Olympic smallbore shooters and Palma shooters have shown that extreme accuracy IS possible with sophisticated target sights. Below is the iron-sights Palma rifle with which John Whidden (Whidden Gunworks) won NRA Long-Range National Championships.


 Increasing Barrel Length Can Deliver More Velocity, But That May Still Not Provide Enough Stability if the Twist Rate Is Too Slow


 Here’s one VITAL bit of advice for using sealed gun storage bags. Be absolutely sure, before you seal up the bags, that your guns are DRY and that all metal surfaces have been coated with an effective anti-corrosive, such as BoeShield T9 or Eezox. NOTE: If you can’t afford the $15 API sacks, Brownells offers a three-pack of
  Remember, those plastic-shelled cases with foam interiors are for transport, not for long-term storage. Don’t repeat the mistake of a wealthy gun collector I know. He stored four valuable Colt Single Action Army (SAA) revolvers in individual foam-padded cases, and locked these away in his gun safe. A year later, every one of his precious SAAs had rusted, some badly.
 Shiny brass — it may not shoot more accurately, but it does make you feel better about your hand-loaded ammo. While it’s not necessary to get brass “bright and shiny” after every firing, it is a good idea to clean powder residue, grime, and grit off your brass before you run cases into sizing dies. There are many ways to clean cartridge cases. A quick wipe with solvent on a patch may suffice for recently-shot cases. Older brass with baked-on carbon may require lengthy tumbling. Ultrasonic cleaning is another popular option that gets your brass clean inside and out.


