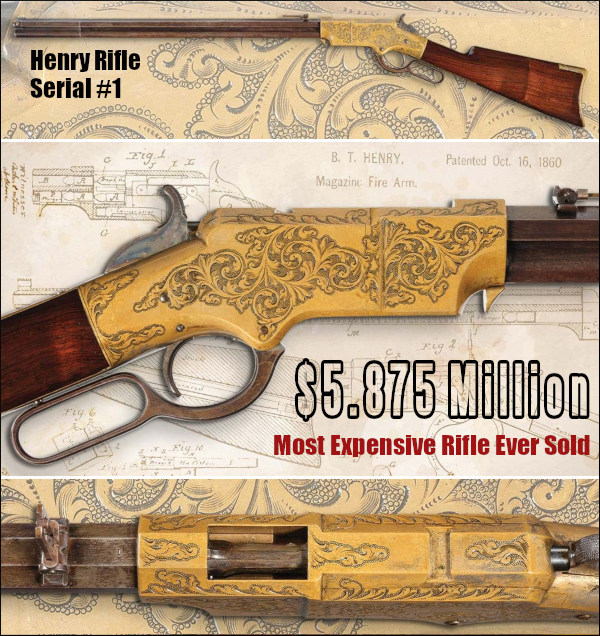
Henry Rifle serial number 1, the first production Henry rifle, is now the most valuable long gun ever made. This historic rifle, Henry serial number 1, recently sold for $5.875 million, the highest price ever paid for a rifle. This wasn’t a rare prototype — Henry Rifle serial number 1 was the very first production Henry, built by New Haven Arms Company in the 1860s.
The Most Expensive Rifle Ever Sold | Henry Serial No. 1 | ($5.875 MILLION)
Technological Innovation — 16-round Lever-Action Rifle
Patented by Benjamin Tyler Henry in 1860, this lever-action rifle chambered in .44 rimfire was a massive breakthrough, allowing soldiers to rapidly fire 16 rounds without reloading one round at a time. This design directly paved the way for the Winchester dynasty. The auction description noted: “Serial number 1 is not merely an early production example but the genesis of an entire technological and cultural legacy. Every Winchester that followed traces its lineage to this [rifle] that launched a company and helped define an era. As the starting point of the Winchester story … this rifle stands at the beginning of a legend, where Oliver Winchester’s vision took form and the repeating rifle that would shape the American West was born.”
The Birth of America’s Lever Action Rifle
It can be argued that EVERY lever-action rifle built in the 160-plus years since Henry serial number 1 was crafted — every model, every maker, every variation on that under-barrel magazine and swinging lever — traces its lineage back to this one gun.
The 1860 Henry was the design that proved a repeating rifle could actually work in the field, and it set the template that the entire lever-action category has followed ever since. Since its creation a century and a half ago, the lever-action rifle has been the rifle of hunters, ranchers, and everyday Americans who needed a dependable repeater they could trust with their lives.
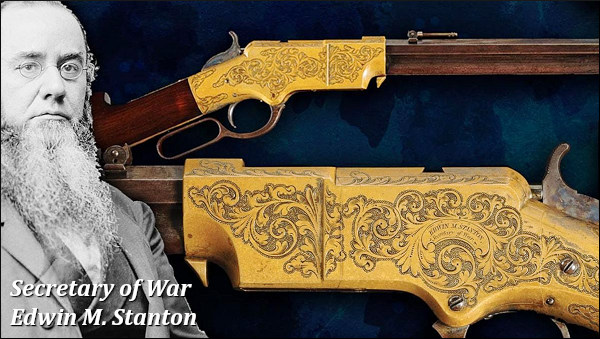
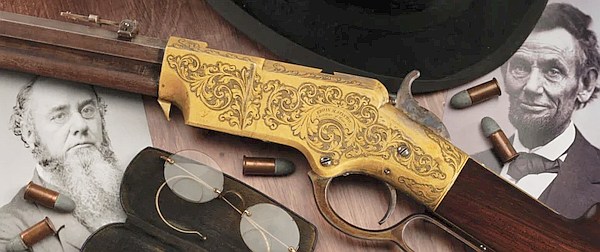
Henry Rifle serial number 1 was presented to President Abraham Lincoln’s Secretary of War, Edwin Stanton during the Civil War. This rifle is part of an exclusive trio of factory-engraved Henry rifles presented by Oliver Winchester to high-ranking Union officials to secure military contracts. The other two include Lincoln’s rifle (Serial No. 6, now in the Smithsonian National Museum of American History) and Secretary of the Navy Gideon Welles’ rifle (Serial No. 9, housed at the Autry Museum of the American West).
Henry Rifle serial number 1 is not simply the first Henry rifle ever made — it is arguably the most important lever action rifle in existence. Manufactured during the American Civil War and presented to President Abraham Lincoln’s Secretary of War, Edwin Stanton, this historic Henry repeating rifle launched the era of metallic cartridge repeating long guns in America produced by Winchester Repeating Arms. Every legendary Winchester rifle that followed the Henry — from the Model 1866 to the famed Model 1873 — owes its existence to the Henry lever-action rifle.
This rifle features elaborate engraving and an inscription to Secretary Stanton.
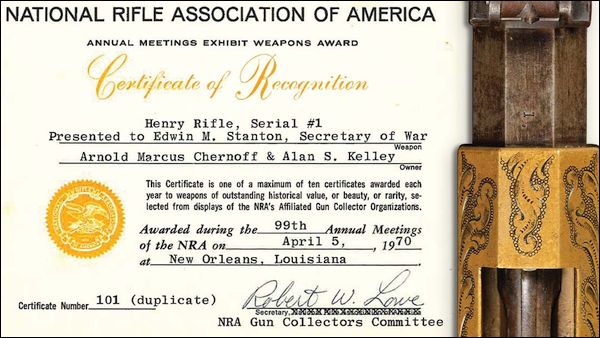
Henry Rifle Serial Number 1 Henry Rifle serial number 1 was awarded a certificate of recognition from the National Rifle Association at the NRA annual meeting in New Orleans in 1970.
Presented alongside other famous “Lincoln Cabinet” Henry rifles gifted to Abraham Lincoln and Gideon Welles, this extraordinary Civil War firearm represents a pivotal turning point in American military and technological history. Featuring factory engraving by Samuel J. Hoggson, with early production features unique to the first Henry rifles, the Henry serial number 1 remains one of the most coveted and historically important American firearms ever made.
This video includes footage from the auction where Henry Rifle Serial Number 1 was sold.
Rifle Was Gift for Lincoln’s Right Hand Man — Secretary of War Stanton
In the 1860s, arms-makers often gave their finest work to key government leaders. After Benjamin Tyler Henry had introduced his lever-action repeating rifle that could fire 16 rounds without reloading, there was good reasons to showcase this for the government. This rifle represented a major breakthrough that could dramatically change how military operations could be conducted. So the company presented engraved Henry rifles to three men close to President Lincoln: Secretary of War Edwin Stanton received serial no. 1, Lincoln himself received serial no. 6, and Secretary of the Navy Gideon Welles received serial no. 9.
Engraved brass rifle shown with portraits of Edwin Stanton and Abraham Lincoln.
Today, collectors know these three rifles as the Lincoln Cabinet Guns. Lincoln’s rifle now sits in the Smithsonian, while the Welles rfle is at the Autry Museum of the American West. The Stanton rifle, Henry serial no. 1, was the last of the three still in private hands, and the only one anyone could actually buy. Stanton is best remembered for the words he spoke at Lincoln’s deathbed: “Now he belongs to the ages.”
Henry No. 1 Is Highest Priced Rifle, But NOT the Most Expensive Gun Ever Sold
Is Henry serial number 1 the most valuable gun ever sold? Actually not. It is the most expensive rifle, but a famous handgun, a Colt revolver, represents the most expensive gun ever sold. Sheriff Pat Garrett’s Colt Single Action Army revolver, which he seized from gang member Billy Wilson in 1880 and used to kill Billy the Kid (William Bonney) in 1881, sold at a Bonham’s Auction on August 27, 2021, for a record-breaking $6,030,313 (including buyer’s premium).
Details of Rifle (from Auction Description):
Condition: Extremely fine overall with crisp original barrel address and serial number “1” on the barrel. The engraving and historic inscription are all crisp and of extraordinary detail. 85% plus original vibrant case colors remain on the hammer. 40% of the original blue finish mixed with attractive even brown patina remains on the barrel. Significant patches of original silver plating are found in the protected areas of the frame such as the lower tang as well as on the heel extension of the buttplate, attractively aged patina on the exceedingly attractive brass, a mostly even brown patina on the lever, and generally minimal overall wear consistent with the rifle’s age[.] The stock is also fine and has attractive natural grain and color, with an overcoat of protective varnish, faint flakes at the edges of the wrist, a tight hairline crack follows the grain in the butt, and slight storage dings and scratches. Mechanically excellent.
On this 4th of July, 2026, the 250th Anniversary of American Independence Day, we thought it would be good to feature lever-action rifles. Lever-action rifles have been an important element of American history. These were truly the rifles that “Won the West”. Today, lever-action rifles remain popular with hunters and cowboy-action shooters. And rimfire lever guns are fun for short-range shooting at reactive targets. Easy to carry, lever guns can also be very effective on varmints.
For this Saturday-at-the-Movies installment, we feature seven videos about lever-action rifles. These videos review modern lever guns as well as historic 19th-century lever-action rifles. Two of these videos features sophisticated 3D computer animation so you can look inside the rifles to see how the internal mechanisms function to feed, fire, and eject cartridges.
How a Lever-Action Rifle Functions
This video shows the inner mechanisms of a classic lever-action rifle. It shows how the lever actuates case-feeding from the under-barrel tube, then how the hammer is cocked/fired, and finally how the ejection works after the shot is fired. This video also covers lever-action rifle history, looking at the Winchester 1873 as well as popular modern lever-action firearms.
Classic American Lever-Action Rifles — Hickok45’s Insights
Hickok45 is one of the more knowledgeable YouTube gun reviewers, and he personally owns a number of lever guns. In this video, which has over 2.5 million views, Hickok45 first showcases the original Henry Rifle, and the brass-receiver model 1866 (aka “Yellowboy”). Then he reviews Winchester’s model 1873 and model 1876 (Centennial). Next comes Winchester designs by J.M. Browning — the model 1886, model 1892, model 1894, and lastly the distinctive model 1895 with vertical magazine. The Model 1895 was a favorite of President Theodore Roosevelt.
This insightful Hickok45 video has garnered 2.5 million YouTube views. If you can take the time to watch the entire 37-minute video, this is a great history lesson for 19th-century lever guns. In the video, Hickok45 also shows cartridges used in the various rifles.
Top Five Lever-Action Rifle for Hunting and Home Defense
This video combines reviews from multiple YouTube hosts, including .22 Plinkster. It is a good starting point if you are considering purchase of a modern, lever-action rifle for hunting or home defense. We recommend, prior to purchase, that you go to a gun store to inspect the rifles and work the actions. Some lever guns are significantly smoother in operation than others. You’ll also want to check the triggers, and see the options for mounting optics. This video provides a quick look at a variety of lever guns including: Henry Side Gate Lever Rifle; Winchester Model 1866 Short Rifle (replica); Browning BLR Lever Rifle; Marlin Dark Model 336; and Marlin 1895 Custom Shop 45-70.
Seven Reasons to Own a Lever-Action Rifle
We own a variety of lever-action rifles, including Marlins well as handsome replica Uberti 1866 and 1873 rifles. There is much to be said about the lever gun design. Compared to typical modern bolt-actions, lever guns are narrower and lighter. With a little tuning, the replica 19th-century lever-action rifles cycle very quickly and smoothly. And the modern lever guns are good choices for hunters, with their ability to mount scopes and fire modern high-velocity cartridges. This video reveals the reasons every serious shooter should have at least one lever-action rifle in his or her collection.
How a Winchester 1873 Works
This video has over 15 million views on YouTube. The Model 1873 was one of the most successful Winchester rifles of its day, with Winchester marketing it as “The Gun that Won the West”. The original Model 1873 was manufactured between 1873 and 1923, and it is still available today in replica versions. The 1873 was originally chambered for the .44-40 cartridge, the first significant centerfire cartridge. The 1873 was later produced in .38-40 and .32-20, all of which later became popular handgun cartridges of the day. The Model 1873 was produced in four variations: a 24-inch barrel rifle, a 20-inch barrel carbine, and a “musket”—which was aimed at military contracts and only made up less than 5% of production. The standard rifle-length version was most popular in the 19th century, although Winchester would make rifles to order in any configuration the customer wished, including longer barrels or baby carbines with barrels as short as 12 inches, octagonal-shaped barrels, color case-hardened receivers and fancy engraving.
The Henry Big Boy Lever-Action .44 Magnum
Here’s good, thorough 16-minute review of a modern Henry Big Boy side-gate lever-action rifle chambered for the potent .44 Magnum round. This rifle shows the benefits of modern manufacturing methods, and shows good fit and finish. The review puts the rifle through its paces, show how quickly a modern lever gun can be cycled. We think this would be a good choice for a home defense rifle that could share ammunition with a defensive revolver.
Marlin 336 XLR Tactical-Style Lever-Action Rifle
And now for something a bit different… Here a Marlin 336 XLR lever-action rifle has been updated with a tactical-style forearm, rail-mounted optic, and suppressor. The reviewer noted how well the rifle functioned: “Recently I got my hands on this 336 XLR from Marlin and all of my preconceptions of tactical lever action rifles has now changed. What I found was a very modern and capable twist to an old school platform.”
More Information on Lever-Action Rifles
Want to learn more about lever-action rifles? RifleShooter magazine has published an interesting article, the 10 Greatest Lever-Action Rifles of All Time. Writing for RifleShooter, Brad Fitzpatrick examined a wide selection of lever guns produced in the past 150 years, and came up with this list of ten “all-star” lever-action rifles:
Savage Model 99
Winchester Model 1873/73
Winchester Model 1888/88
Winchester Model 1892/92
Winchester Model 1894/94
As with all “Top 10″ lists, this will be controversial. Where is the Winchester model 1866 “Yellowboy”, the favorite of Native Americans? Where is the iconic Winchester model 1895, the beloved gun Teddy Roosevelt called “Big Medicine”? But other choices are hard to fault. The classic 1860 Henry Rifle surely belongs on the list. And, believe it or not, the Winchester Model 94 is the best-selling sporting rifle of all time in the USA, according to RifleShooter.
Forum member Evan K. (aka “Katokoch”) has crafted a nice rimfire benchrest rig using a Suhl action fitted into a handsome home-built cedar and carbon fiber stock. This shows what a skilled hobbyist wood-worker can create in his garage.
When the rifle was crafted some years ago, Evan told us: “Here is my Suhl 150-1 with a factory 1:19″ twist barrel, Leupold 36X scope, Harrell tuner, and my handmade cedar/carbon fiber stock. I started working on the laminate blank a couple years ago and finally finished it earlier this year. I’ve been using it in my IR 50/50 matches this summer. I haven’t shot a 250 with it yet but I know the rifle is very capable — as usual, I am the weak link!”
We think Evan did a great job on his stock, though he has limited stock-building experience. Evan explained: “The stock is my first attempt at making a very lightweight laminate and also gluing both vertical and horizontal seams in a blank. The wood is Spanish and Red Cedar and I made the trigger guard and buttplate with carbon fiber too (great use for small scrap pieces). The finish is hand-rubbed spar urethane and the action is semi-glued-in with Devcon 10110 and stainless pillars.”
USRA-IR50/50 is a popular .22 rimfire benchrest discipline with three (3) classes: 13.5 lb., 10.5 lb., and 7.5 lb. (Sporter). The matches are shot at 50 yards and 50 meters.
Jonathan Ocab, a High Power shooter from California, had gunsmith Doan Trevor install a Sako-style extractor in the Rem 700 bolt in Ocab’s 6mmBR Eliseo R5 tubegun. Jonathan produced an excellent video showing how the Sako extractor improves the ejection of the short, fat 6mmBR cartridges in his rifle. Jonathan’s video demonstrates 6mmBR case ejection with an unmodified Rem 700 factory bolt versus a factory bolt fitted with a Sako-style extractor.
Johnathan explains: “Note how even when slowly operating the bolt, the bolt with the Sako extractor easily ‘kicks’ out the brass on ejection with minimal chance of operator error resulting in a failure to extract. While the unmodified bolt has issues ejecting brass on slow operation, it will eject if the operator pulls the bolt back quickly (fast and with some force).
While a Sako-style extractor isn’t an absolute necessity, this video shows the definite improvement this modification provides. For short cartridges like the 6mmBR, this is very useful. This modification is highly recommended for competition shooters, especially High Power competitors who seek improved function in rapid-fire stages. This modification is fairly inexpensive and any competent gunsmith should be able to perform the work (usually under $100 with parts and labor).”
EDITOR’s NOTE: In his video, Jonathan deliberately worked the unmodified Remington bolt slowly to show how the standard Rem extractor can struggle with short fat cases like the 6mmBR. In fact, when you work a standard, unmodified bolt more quickly, the extraction can be much more positive. Cycling the bolt with more “snap” provides more energy to eject the cases. We have run an R5 Tubegun chambered in 6mmBR with an unmodified Rem 700 bolt (no SAKO extractor), and the extraction was reliable, provided the bolt was worked quickly.
How and Why to Create a Dummy Round
When you have a new custom rifle built, or a new barrel fitted to an existing rifle, it makes sense to create a dummy round. This should have your preferred brass and bullet types, with the bullet positioned at optimal seating depth. A proper dummy round helps the gunsmith set the freebore correctly for your cartridge, and also ensure the proper chamber dimensions.
Respected machinist, tool-maker, and gunsmith Greg Tannel of Gre-Tan Rifles explains: “I use the dummy round as a gauge to finish cut the neck diameter and throat length and diameter so you have [optimal] clearance on the loaded neck and the ogive of the bullet just touches the rifling.” He recommends setting bullet so the full diameter is just forward of the case’s neck-shoulder junction. “From there”, Greg says, “I can build you the chamber you want… with all the proper clearances”.
Greg Tannel has created a very helpful video showing how to create a dummy round. Greg explains how to measure and assemble the dummy and how it will be used during the barrel chambering process. Greg notes — the dummy round should have NO Primer and No powder. We strongly recommend that every rifle shooter watch this video. Even if you won’t need a new barrel any time soon, you can learn important things about freebore, leade, and chamber geometry.
Must Watch Video — This has been viewed over 810,000 times on YouTube:
This has been a very popular video, with over 810,000 views! Here are actual YouTube comments:
That is the best explanation I’ve ever seen. Thank you sir. — P. Pablo
Nice video. You do a very good job of making this easy for new reloaders to understand. I sure wish things like this were available when I started reloading and having custom rifles built. Once again, great job, and your work speaks for itself. — Brandon K.
Beautiful job explaining chambering clearances. — D. Giorgi
Another Cool Tool — The Stub Gauge
When you have your gunsmith chamber your barrel, you can also have him create a Stub Gauge, i.e. a cast-off barrel section chambered like your actual barrel. The stub gauge lets you measure the original length to lands and freebore when your barrel was new. This gives you a baseline to accurately assess how far your throat erodes with use. Of course, as the throat wears, to get true length-to-lands dimension, you need take your measurement using your actual barrel. The barrel stub gauge helps you set the initial bullet seating depth. Seating depth is then adjusted accordingly, based on observed throat erosion, or your preferred seating depth.
Get WAY Better Groups with New Criterion Pre-Fit Custom Barrel
In our Shooters’ Forum, you’ll find a lengthy thread about accuracy problems with a Savage LRPV, chambered in 6mmBR. The gun would repeatedly split groups at 100 yards, and at 300 yards, the “flyers” would open up the groups to 1.5 MOA or larger. Interestingly, the factory test target (at right) showed a split group — not a good sign.
The gun’s owner, forum member LR_Shooter, tried a variety of tweaks: “I did this, done that… [changed] torque, tang floated, bedded action, recut chamber, and [adjusted firing pin]”. But nothing really helped. Frustrated, LR_Shooter asked his fellow Forum members for help. Much advice was proffered, including the novel idea of removing the middle action screw in the Savage 3-screw target action. Some of the advice proved helpful, but none of the suggested remedies produced a major improvement. This rifle, out of the box, tossed flyers and no amount of tweaking (or changes in shooting technique) really cured the basic problem. That is, until, the factory barrel got replaced…
New Criterion Pre-Fit Barrel Works Wonders
LR_Shooter acquired a Criterion pre-fit barrel from Jim Briggs at Northland Shooters Supply (NSS). These pre-fits are designed for easy installation with the standard Savage barrel nut. Wouldn’t you know it, with a new 30″ heavy-contour barrel on the LRPV, the gun started shooting way better. No more crazy fliers, no more split groups, no more excessive vertical. And the improvement came without any other major modifications. LR_Shooter reports: “I got a replacement barrel from Jim at NSS. It is a 30″ bull Criterion barrel. So far, without playing with torque screws and having my old setup… I’m very satisfied with the barrel I got. Now I have no problem getting [groups] under 0.25 MOA. Finally this thing can shoot!” The targets below, shot with the new Criterion barrel, speak for themselves. The left target was shot at 100 yards, while the target on the right was shot at 300 yards (very impressive).
Targets Shot with Savage LRPV Fitted with Criterion Barrel
Moral of the Story — Sometimes A New Barrel Really Is the Right Solution
All of us have struggled at times with a rifle that won’t live up to expectations. This Editor personally struggled for over a year with a .260 Rem Savage with a factory tube. The gun tended to split groups and the POI walked as the barrel heated. I tried one powder/primer combination after another, working through a variety of seating depths over many months. I was persistent. Out of stubbornness, I just believed that sooner or later I’d find the magic load.
Well folks, sometimes there’s really nothing you can do about a sub-par barrel. It is what it is. To really improve a gun’s accuracy (particularly a gun with a factory tube), you may need to open your wallet and get a quality aftermarket barrel. Spending months trying one recipe after another may simply be an overwhelming waste of powder, bullets, and your precious time.
Albert Einstein supposedly said: “Insanity is defined as doing the same thing over and over again, and expecting different results.” Well that sort of describes my efforts with my .260 Rem. Once I had enough evidence that my barrel split groups no matter what load combo (and seating depth) I tried, it was time to pony up for a new barrel. When I did finally screw on a nice PacNor 3-groove SuperMatch, that Savage suddenly became a true tack-driver. As re-chambered in 6mmBR with the Pac-Nor, in calm conditions, my Savage will now consistently shoot in the twos with heavy bullets, and it can sometimes dip down into the ones with Berger 80gr flat-base bullets. The moral of the story here is simple — don’t waste weeks or months chasing your tail with a barrel that just won’t deliver (after a reasonable amount of testing). Save up for a custom barrel, get it chambered properly, and stop your cycle of frustration.
Editor: This story by Tommy C. (aka “dc.fireman”) comes from our Shooters’ Forum. It’s fascinating to see how a relatively inexpensive Savage M12 BVSS varmint rig was transformed into a sophisticated 300M match rifle with a modern chassis, Shilen barrel, and top-of-line sights. With some ingenuity, and careful parts selection, Tommy created a rifle that can compete with match rifles costing many thousands of dollars more. American ingenuity at work!
Savage Reborn — Old BVSS Transformed into 300M Match Rifle
by Tommy C. (aka “dc.fireman”)
So, I began the project of building a 300M International competition gun, about a year ago, intending to compete at the 300M Nationals this year in Minnesota at the Minneapolis Rifle Club. Realistically, I didn’t want to pay the price-tag demanded of the Bleikers, Grunig & Elmigers, Hammerlis, or Tanners that (infrequently) pop-up for sale from time to time. So I decided to build my own 300M Match rifle with an American action, barrel, chassis, and trigger.
Here is Tommy’s completed 300M Match rifle with Savage action in PDC Custom chassis.
I had decided on the .260 Remington (aka 6.5-08) as the caliber choice. This beat out 6.5×47 Lapua simply due to the cost/availability of brass. The .260 Rem cartridge is based on the .308 Win parent. I made my first batch of brass by necking down some Federal .308, and it worked great. [Editor: We do recommend Lapua .260 Remington brass for match purposes for those who don’t have a supply of good .308 Win brass.]
I had an older Savage M12 stagger-feed action, originally from an old .22-250 BVSS. I contacted James at Northland Shooter Supply, and he walked me through the game plan and equipment I needed: Shilen Select Match 26″ barrel, NSS Stainless recoil lug and nut, a set of Forster headspace gauges, and the NSS action wrench.
Catalog photo of current Savage M12 BVSS in .22-250 Rem.
A few months later, I replaced the original Accu-trigger with a Rifle Basix SAV-II trigger, and immediately wondered why I waited so long to do that. The Rifle Basix is perfect for my application. Mind you the he safety DOES NOT work now, but, I don’t need it for my application.
Another member on the AccurateShooter Forum sold me a BVSS stock that has been re-worked by Alex Sitman of Masterclass Stocks, and it served as a placeholder, until I could find a maker who could nearly replicate my Feinwerkbau 2700 Alu stock in my smallbore match gun.
After scouring the AccurateShooter Forum, and multiple internet searches, I found PDC Custom in Michigan. I spoke with Craig Kierstadt a few times, before finally deciding to pull the proverbial trigger on his chassis. He had a few of the older chassis stocks with spacing for the Savage stagger-feed action. He machined an Anschutz rail into the fore-end for my hand stop and sling. Then he powder-coated the chassis black, and sent it to me sans grip and butt plate.
Photo of action/chassis. Tommy says: “It locks up really tightly, and you can tell Craig spent some time on the CNC work need to make this all fit.”
There are a few minor issues with the PDC chassis, but overall, I would rate this a 9.5 out of a possible 10. The price, and the features built into it, plus the ease of which everything fit together, far outweigh any minor issues. And two of the issues I quickly corrected with Teflon tape. I will need to make a walnut cheek piece — a curved one isn’t conducive to aperture iron sight shooting.
Savage Action .260 Rem 300M Match Rifle Components:
Action, Barrel, Stock, Grip
Savage M12 stagger-feed action, 4.27″ spacing
Shilen Select Match Barrel, 26″
Rifle Basix SAV-II Trigger
PDC Custom Chassis — tool-less adjustments
Bobsled SLED for single loading (required)
MEC Contact III Butt plate (German)
MEC handstop/sling swivel (German)
Walnut Target grip for AR-15 (eBay sourced)
Sight Components and Hardware
MEC Spy Long rear sight (German)
Centra front sight tunnel (German)
Centra adjustable aperture (German)
Medesha sight extension tube + collar
Champion’s Choice front sight base
Champion’s Choice mirage band
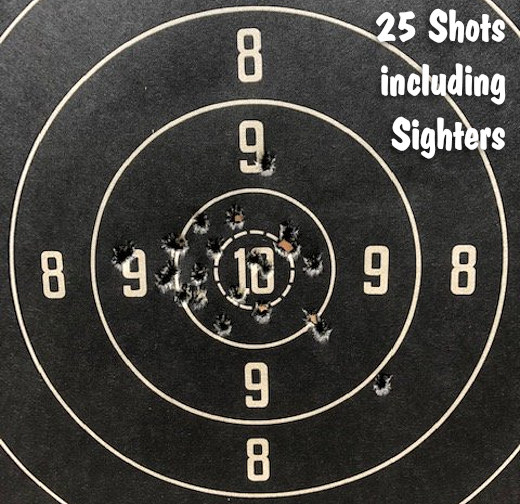
For his practice load, Tommy shot 123gr Hornady ELD-M bullets with H4831 powder and CCI BR2 primers. This load performed well — Tommy posted: “My 25-shot initial prone test today shows promise. There are five sighter shots, and 20 record shots. One of the 9s at 9 o’clock is my first sighter, the other one I own. The 8 out at 4 O’clock was a round that was difficult to chamber. My initial scoring puts me somewhere in the vicinity of 193-7X.”
The target used is the NRA C2, “300M International Rifle Target, reduced for 200 yards”. The 10 Ring is 2.40″ in diameter, while the Inner 10 (X-Ring) is 1.24″.
Match Load — Varget and Nosler Bullets
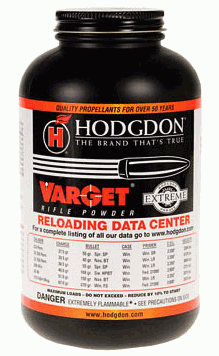
For his match load, Tommy switched to Varget and Nosler bullets: “My match load uses 37.9 grains Hodgdon Varget with a Nosler 123gr bullet. This was a recommendation by a gentleman with a lot of experience in 300M shooting.”
Tommy adds: “The amount of knowledge gained via the AccurateShooter Forum has made this all a reality, instead of just a passing thought.”
You have to admire someone with serious do-it-yourself skills. Not just hammer and nail skills, but formidable design and fabrication skills. Well Forum Member Dave D. (aka “AKShooter”) has a DIY skill set that might put some trained machinists to shame. You see, “DIY Dave” crafted his own pedestal front rest from scratch, using his own design and about $100.00 in materials (not counting the Edgewood front bag). Dave estimates he put 20 hours of labor into the project, but the end result was worth it: “This Do-It-Yourself rest drives like a dream. I’ve played with the Caldwell and a Sinclair, they have nothing on this one.”
Dave tells us: “Here is my Do-It-Yourself front rest. I wanted to show other folks who are handy that a solid front rest is doable with a bit of time — and you don’t need to spend $1000.00. (You could say this is a design for shooters with more time than money.) This is for F-Class. I was originally overwhelmed by the equipment needed, so I decided to make my own rest. I didn’t have the money for a SEB or Farley Coaxial. This is what I’ll run this season (my second as an F-Class competitor).”
We asked Dave what equipment was used to make the rest. He explained: “My brother has a CNC cutter. But most water-jet outfits would do the work for $100 or less. All the plates are tapped and screwed. I found small machine screws on eBay.” Dave says there are other ways to build a front rest: “You could do the same with a welder and plate stock for base. It’s easier to do the top out of aluminum though, with all the tapping.”
Dave enjoys fabricating his own gear, but he admits the process can be time-consuming: “I’m a DIY guy. Sometimes I wrap up a project and wonder why the heck I just spent X amount of time on it.” Dave has other projects in the works: “Another option we are making for a friend is taking a cheap front rest and bolting to a 3/4″ thick, wide MDF base and adding additional adjustment screws. The hardware store is your friend!”
On the competition front, Dave is tuning up a 6mm Dasher: “My rifle last year was a .260 Rem Savage repeater. I was about middle of the pack in my group of shooters. Just went with unsorted Bergers and Lapua brass, and had a ton of fun. Now I’m in — hook, line, and sinker. I have an unfired 6 Dasher barreled action from the folks at Kelbly’s to break in. I’m cheap, so I ended up with a Do-It-Yourself stock for the Dasher.” Hopefully Dave will send us a photo of his DIY-stocked Dasher when the gun is dialed-in and “ready to rumble”.
Mike Kurtz’s Competition Machine F1 “Pro-Mod” F-Open Rifle
Today’s Sunday GunDay article showcases a modern F-Open Rifle built on a Competition Machine Aluminum Chassis. This is quite a bit different than a typical F-Open rifle with a laminated wood or wood/carbon stock. But the rifle shoots extremely well, and has already won some mid-range F-Open matches.
The rifle’s owner, a highly respected vehicle mechanic, explained his objective with this rifle: “I wanted to build a second F-Open rifle to shoot primarily 600-yard Mid-Range and also serve as my back-up long range rifle. That way I can use the same brass, bullets, and primers. So it would be chambered in 7mm-6.5 PRC, the same as my other F-Open rifle. That rig is a 7mm-6.5 PRC with Cerus XR stock, BAT Neuvo action, and Bartlein 1:9-8.7″ gain-twist barrel. I absolutely love that rifle and it has achieved several top honors. But for this project, I wanted to try some different rifle components to see how they performed in this same caliber. So I decided to go with Brux barrels, BAT Neuvo aluminum action (but see below), and an Eliseo Competition Machine F1 aluminum alloy chassis.”
BARREL SPECIFICATIONS: I ordered two Brux 7mm x 33″ barrels with 1:8.5″ twist. The contour was supposed to be 1.350″ diameter for 5″, tapered-down to 1.150″ diameter at the muzzle end. However, when the barrels arrived they were tapered down to 1.050″, a bit smaller. The folks at Brux admitted the work order was mis-read and offered to take back the barrels and make me two more. Or, I could keep the barrels with nice discount. I contacted my gunsmith, Omar Alonzo, for his advice and he said to keep them, they would shoot just fine. That turned out to be a blessing because the total rifle weight is now just three ounces under 22 pounds with one of these barrels. Omar chambered it with his 7mm-6.5PRC “no-turn” reamer that was used on my Cerus rifle. The Brux barrel was finished at 32″ with the muzzle end threaded for a V2 tuner.
ACTION and TRIGGER: I intended to use an aluminum BAT Neuvo action because I anticipated weight may be a concern, but they were on back-order with no lead time in sight. So for now I went with a used steel BAT Model M, 1.47 Octagon action that I acquired via the AccurateShooter Forum marketplace. This is a RBLP Right Eject action with magnum bolt face and 20 MOA integral Picatinny rail. The trigger is a Bix’N Andy Competition also scored on the Forum, set at 3 ounces. [NOTE: I now have an aluminum Neuvo AL in my possession. However, the F1 rifle is shooting so well, I’ll save the aluminum Neuvo for a future build.]
STOCK and FINISH: When I was planning my second F-Open 7mm-6.5 PRC rifle build, Gary Eliseo’s F1 aluminum chassis was my immediate choice. I was already familiar with Gary’s products since I started out three years ago with a used 6BR-chambered R1 tube gun. I purchased it from a Forum member and I adapted it for Mid-Range F-Open very successfully. Being a long-time drag racer and fabricator piqued my interest in these aluminum chassis combos. I contacted Gary Eliseo at Competition Machine and ordered his F1 F-Open Chassis System with one of his custom-machined bedding blocks for the Bat M action I acquired off the Forum.
Video of F1 Chassis Rifle in Action
Turn-around time was just about eight weeks, including aligning and epoxying the action bedding block into the chassis. Gary Eliseo offers full custom Cerakote services for his customers but I had something else in mind so I had the chassis sent to me “raw”, i.e. with a bare aluminum finish. At first I thought about polishing some or all the entire chassis but that would be too high maintenance. I decided to go with anodizing as I have done in the past with many race car components. Anodizing is an electrochemical process that converts the metal surface into a decorative, very durable, corrosion-resistant, anodic oxide finish that’s pretty tough and looks great!. This finish is available in many colors and in clear.
While I was surfing the internet looking for some color/combo ideas I stumbled on a local custom anodizer who had dozens of some really wild and crazy anodizing patters and color mash-ups. I messaged Stephen @ Caustic Customs and told him about my project. He replied that his specialty is paint-ball guns and this would be his first long gun but, hey, it’s aluminum! I gave him all the pieces of my F1 chassis. There were a couple of his patterns I really liked so I asked his opinion which he thought might look best for my project. He replied why not both? So I instructed him take both patterns and “run with it”. The end result is the Icy-Hot blue/red finish as seen in the pictures.
It all came together at Alonzo’s Custom Rifles in Pasadena, Texas. Omar hand-lapped the action bedding block surface to smooth-out some tiny high spots. He then skim-bedded the action with an epoxy filler to make sure the action made 100% contact with the bedding block. Barrel chambering, action fitting, trigger tuning, and final assembly was performed by Omar.
I finished the rifle with a hydraulic recoil pad from Falcon Strike and Anarchy Outdoor’s Penguin Precision Grip. Gary designed the F1 to utilize AR15-style grips. The Falcon Strike pad is not as sexy as the R.A.D. unit I have on my Cerus-stocked rifle, but I think its recoil-absorbing performance is up there with the R.A.D. unit. So, if a RAD is not in your budget or if weight is a concern, you can’t go wrong with a Falcon Strike recoil pad.
SCOPE/RINGS: My intention was to switch my March-X 8-80x56mm Majesta High Master scope between my two rifles. However the hefty stainless Bat M action nixed that idea. So to ensure the new rifle would be F-Open legal weight I went with a used March-X 10-60x56mm High Master scope that I acquired through the AccurateShooter Forum Marketplace. That 10-60X March, shown in the video, is almost 11 oz. lighter that my 8-80X March-X Majesta HM. NOTE: In some of the photos here, the rifle is fitted with an older March 8-80X scope (NOT the latest Majesta). The rings are March Superlight Titanium Ghost Rings — under 5 oz. for the set, the lightest I could find.
F-Open F1 Chassis Rifle Specifications
Chambered for: 7mm-6.5 PRC Wildcat
Stock: Competition Machine F1, F-Open Chassis, Falcon Strike Recoil Pad, Anarchy Outdoors Penguin Grip. Custom anodizing by Caustic Customs.
Trigger: Bix’N Andy Competition trigger
Action: Bat Model M — Right Bolt, Left Port, Right Eject with 20 MOA scope rail
Barrel: Brux 7mm, 1:8.5″ twist, 32″ overall, 1.350″ x 5″, tapering down to 1.050″, V2 Tuner
Scope: March-X 10-60 High Master, MTR-1 reticle. March Ultra-Lite Titanium Ghost scope rings.
Gunsmith: Alonzo Custom Rifles
CARTRIDGE COMPONENTS and LOADING METHOD: I use Lapua 6.5 PRC brass, Berger 180gr Hybrid bullets and Federal 210M primers. New brass necks are expanded to 7mm and skim-turned to get a consistent .014″ neck thickness. I use a 35-degree cutter and go just a slight bit into the shoulder to ward off donuts. I then chamfer the flash holes, uniform the primer pockets, full-length size the cases, then expand and trim/chamfer the necks. My fired brass gets annealed, wet-tumble cleaned, full-length sized/expanded, and trimmed in that order. Bullets are pointed and then sorted by OAL. Primers are sorted by height and then by weight. I apply Neo-Lube to the inside of the necks with a foam Q-Tip for consistent seating psi.
This is from a 600-yard match shot with the F1 rifle a few months ago. Despite a strong wind from behind constantly switching right to left, I scored a 200-12X — good enough for Second Place.
LOAD DEVELOPMENT PROCESS: Thanks to some good 7mm-6.5 PRC load data posted on AccurateShooter.com, it helped me with a starting point to find a nice velocity node at 2865 fps using Hodgdon H4350. I did this by shooting some 2-shot groups seated .010″ off the lands. my focus was to find a node where the velocity leveled-out in at least two 0.5 grain increments in the 2850-2880 fps range. I then did a seating depth test at 100 yards to find my ideal seating depth which ended up at .024″ jumped. Next, I did some 3-shot groups at 100 yards to dial-in he barrel tuner until I got at least two consecutive ultra-tight groups. I verified that setting with a one-hole, three-shot group.
About Mike Kurtz
Michael Kurtz is owner/operator of Century Automotive & Transmission. An ASE Master L1 Technician since 1983, Mike has been an avid drag racer over the last 40 years. Mike notes: “I never owed any kind of rifle until I retired from racing. Got bit by the accuracy bug and learned about F-Class in 2021. I read several reloading and long range shooting books while I scoured the AccurateShooter Forum Marketplace for a rifle, scope, rests, and reloading equipment for my first F-Open rig. Most all of my major components I acquired via online Forums. I have to attribute the early success of my F-Open accomplishments to the vast content found on AccurateShooter.com.
I am also a member at Bayou Rifles Inc. in Houston Texas where I’ve learned from some of the best shooters in the country. The competition here is fierce but the camaraderie is second to none!”
Rimfire is hot now. Across the nation, .22 LR rimfire disciplines are now the fastest growing types of rifle competition. And with today’s featured rig, the Competition Machine (Eliseo) Universal Match Rimfire Rifle (UMRR), you can shoot a variety of matches — NRA rimfire, NRL22, NRL22X, PRS Rimfire, local silhouette-style steel matches, even local rimfire benchrest matches (with a bag-rider fitted up front).
Compared to shooting centerfire, rimfire shooting is much less costly. You can get pretty good match ammo for under $8.00 per box. That works out to just 16 cents per round. Compare that to $1.60 or more per round for handloaded centerfire ammunition (counting powder, bullet, primer and brass). And you don’t have to deal with shortages of your preferred powder or primers, or spend hours hand-loading. With rimfire, just open your .22 LR ammo box, load your magazine, and shoot.
Versatile, Accurate, Affordable — Universal Match Rimfire Rifle
If you’re a Palma shooter and want to shoot rimfire with a rifle with identical ergonomics and “feel” as your centerfire tubegun, Gary Eliseo’s new Universal Match Rimfire Rifle (UMRR) is your logical choice. Or if you are looking for a high-quality bolt-action chassis rifle for NRL22 (rimfire tactical) competition, this is a great option. Running a smooth Tikka T1x action, the UMRR offers match-grade performance at an attractive price — $1950.00 for the Sport-Target model with 20″ Tikka factory barrel.*
The Tikka T1x action is a smooth, short-throw action that cycles quickly and easily:
Gary Eliseo, head honcho of Competition Machine in Arizona, explained the features of the UMRR: “Our Universal Match Rimfire Rifle system has all the features of its big brother the Universal Match Rifle System (UMRS) and will accept all the same accessories and attachments. The rimfire UMRR is identical in size to the centerfire version so it’s possible to have your centerfire and rimfire rifles set up exactly alike.” That’s ideal for guys who compete in both centerfire and smallbore matches, and likewise it is ideal for cross-training using lower-cost rimfire ammo.
The UMRR is built around the excellent Tikka T1x platform. Gary notes: “We have accurized and tuned the T1x to give the best possible performance from factory barrel and trigger. The UMRR can also be customized with a high-end match barrel and trigger. By just changing the attachments, the UMRR can be used in multiple shooting disciplines like NRL22 and NRA rimfire competitions.” Gary also noted that Tikka recently updated the T1x bolt and magazine for improved feeding and extraction. See video below.
Sport-Target UMRR Shows Excellent Accuracy with Factory Barrel
Eliseo confirms that the Sport-Target UMRR with factory Tikka barrel and trigger is easily capable of sub-MOA precision. Check out those five-shot groups shot at 50 yards. The smallest group (.210″) works out to 0.40 MOA, while the largest group (0.39″) is 0.74 MOA. Remember this is with Tikka factory barrel!
The Sport-Target UMRR with factory Tikka barrel and trigger is capable of sub-MOA precision.
The Sport-Target version uses the factory 20″ Tikka barrel with threaded muzzle that has been set back and re-chambered so the bullet will engrave the rifling, which increases the precision of the rifle significantly. The excellent Tikka trigger is tuned to a pull weight of one pound. Overall the UMRR is a great choice as an XTC/LR prone trainer or NRL competition rifle at very reasonable cost.
Superb Accuracy from UMRR Match-Target Model
The Match-Target version comes with a top of the line Benchmark match barrel and Eley match chamber with the muzzle configured for your application to accept a front sight, tuner, or threaded, there are several aftermarket single-stage or two-stage match triggers available. Current Eliseo Rifles price for the UMRR Match-Target is $2650.00.*
The Match Target with Benchmark match barrel is capable of competing at the highest level. Shown above are 50-meter sling targets and Lapua 50-meter test center results. The bottom box shows 20 shots with a superb 10.52 average score.
Updates from Tikka Improve the T1x Action and Magazine
Gary noted that Tikka has updated the Tikka bolt and magazine to improve feeding and extraction. Tikka replaced a wire-type system with a solid ejector element in the magazine. Gary says that improves the reliability of both feeding and extraction. Watch the video to see how this works.
Centerfire Accesories Will Work on UMRR
Gary notes that all the centerfire UMRS attachments will fit the UMRR, including handstop, rear balance weights, Picatinny scope rail, ARCA accessory rail, rear bag-rider, bipod mount, and front bag riding attachments. This easy adaptability makes the UMRR a true multi-discipline system for smallbore matches, NRL22/PRS rimfire competition, and cross-training.
Adapt the UMRR Easily to Multiple Shooting Disciplines
The UMRR can be easily configured for NRL, PRS, or NRA rimfire competitions by just changing the attachments. The UMRR is built on the excellent Tikka T1x barreled action that’s been accurized and bonded into the UMRR chassis system. Gary says the UMRR feeds .22 LR rounds flawlessly from the Tikka 10-round magazine, especially with the new, improved magazines. The UMRR is currently available in two basic configurations, both of which can be customized to your specifications.
Two Versions — Sport-Target and Match-Target
The Sport-Target version of the UMRR uses the factory 20″ Tikka barrel with threaded muzzle. Gary can tune the excellent Tikka T1x trigger down to a pull weight of around one pound, though for tactical work he says you may want to leave it stock. Gary tells us the Sport-Target is a great choice as an XTC/LR prone trainer or NRL22 competition rifle.
Match Target UMRR with Benchmark Custom Barrel
The Match-Target version comes with a top-of-the-line Benchmark match barrel and Eley match chamber with the muzzle configured for your application to accept a front sight, tuner, or suppressor. There are several aftermarket single-stage or two-stage match triggers available.
Tikka T1x — Quality Rimfire Technology from Finland
Gary Eliseo’s impressive UMRR is based on the smooth, reliable Tikka T1x rimfire action shown below. Note the nice craftsmanship of action, bolt, mag system, and trigger group. There is an extensive review of the T1x (.22 LR version) on our friend Jonathan Ocab’s Ocabj.net website.
Gary Eliseo of Competition Machine. Here is UMRR designer Gary Eliseo at the 2017 Berger SW Nationals. Gary is a talented rifle marksman who competes in both smallbore and high power disciplines.
* Price is subject to change. Price may be increased based on increased costs of actions, barrels, and components. Contact Eliseo Rifles for current pricing.


 In our


 Match Load — Varget and Nosler Bullets
 You have to admire someone with serious do-it-yourself skills. Not just hammer and nail skills, but formidable design and fabrication skills. Well Forum Member Dave D. (aka “AKShooter”) has a DIY skill set that might put some trained machinists to shame. You see, “DIY Dave” crafted his own pedestal front rest from scratch, using his own design and about $100.00 in materials (not counting the Edgewood front bag). Dave estimates he put 20 hours of labor into the project, but the end result was worth it: “This Do-It-Yourself rest drives like a dream. I’ve played with the Caldwell and a Sinclair, they have nothing on this one.”


 I am also a member at