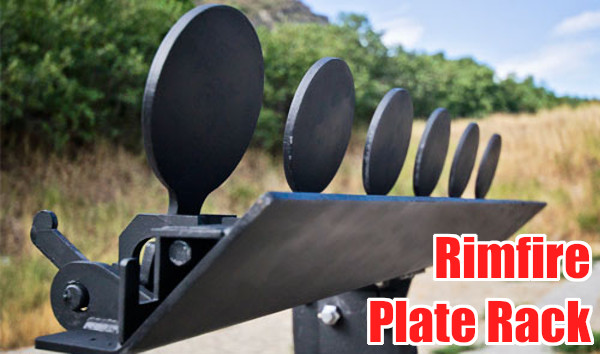
The Action Target Sport Plate Rack is specifically designed for .22 LR Rimfire shooting. This rack features six 4″-diameter plates that reset with a provided cable.
Shooting plates is fun. You get immediate feedback — “instant gratification” when you make a hit. When shooting steel inside 100 yards, we like to use .22 LR rimfire guns. The ammo is inexpensive, noise levels are lower (though you still need ear protection), and at close ranges there are fewer issue with ricochets and bullet splash-back. Additionally, for busy folks who don’t have time to reload, you can pick up a .22 LR rifle or pistol, grab a couple $5 boxes of ammo, and get to the range in a few minutes. The convenience means it is easier to shoot every week if you like.
In the video below, SFC Joel Turner from the USAMU’s Action Shooting Team offers a few pointers on how to shoot plates quickly and accurately. He’s using a centerfire pistol, but the same principles apply for rimfire handguns. Click speaker icon to activate audio.
High-Capacity KelTec .22 LR CP33 Pistol is Great for Plates
If you like shooting plates with rimfire guns, one of the better new pistols for the job is Kel-Tec’s CP33. We tested this interesting handgun at the 2019 SHOT Show Media Day at the Range, and were impressed. The pistol is big, but balances well. The sights are easy to see, and the full-length rail lets you easily mount a variety of optics. The trigger is surprisingly good — better than 90% of rimfire handguns out there. For the plates game, this “quad-stack” gun can handle long stages without mag changes. The standard clear-sided CP33 magazine holds 33 rounds of .22 LR ammo.
If you are interested in an affordable, but very accurate, high-capacity semi-auto rimfire pistol you should consider Kel-Tec’s new CP33. Shooting Sports USA (SSUSA) notes: “The rapid growth of rimfire competition in Steel Challenge has prompted some gun makers to enter the fray. Kel-Tec is one, and their new CP33 .22 LR pistol has a lot of potential.”
Overall SSUSA’s tester, Chris Christian, was impressed with the gun, saying it balanced well and the sights aligned naturally: “…the neutral-balance-point grip produced an almost instinctive sight alignment.”
Progressive reloading presses offer shooters speed and efficiency in producing custom-tailored rifle and pistol ammunition. However, there is a wide choice of Progressive Presses and a bewildering array of options to consider. In this video, the 6.5 Guys and UltimateReloader.com’s Gavin Gear provide an overview of the leading Progressive Presses on the market along with key considerations for precision rifle shooters. If you are considering getting a Progressive for rifle ammo reloading, you should watch this informative, 25-minute video.
10 Tips for Reloading Rifle Ammo on a Progressive Press:
1. Make sure the brass is very clean. Don’t mix old range pick-up brass with newer brass.
2. Apply a thin, spray lube to all cases before the sizing/loading cycle.
3. Consider priming your brass separately (with a hand or bench tool) before the operation. Then inspect the primers before loading powder and bullets.
4. Always wear eye protection when loading with the Progressive, particularly if you are priming cases.
5. With masking tape, mark the powder measure/dropper with the powder type and cartridge charge weight. Check the charge mass multiple times (see below).
6. Cycle a few cases, sizing and adding powder but NOT seating bullets. Weigh the powder charges to ensure the powder measure is dispensing the correct charge. Sometimes this will change a couple tenths as it “settles down” after the first few charges.
7. Check the brass for shoulder bump and bullet seating depth carefully for the first few rounds, then check again periodically.
8. Try to maintain a steady pace and operate the handle the same way every time.
9. Visually inspect the powder charge in each case (before bullet seating), and use a lock-out die if your Progressive Press has enough stations.
10. Never, ever mix pistol and rifle powders! If you have previously loaded pistol ammo with your Progressive, make sure ALL the powder (every flake and kernel) is removed from all parts of the powder-dropping system before you add rifle powder.
Visit these sites for more Reloading and Precision Shooting Videos:
If you are considering purchasing a progressive reloading press, definitely watch this 79-minute video covering a dozen presses from six leading manufacturers: Dillon, Frankford Arsenal, Hornady, Lee, Mark 7 (Lyman), and RCBS. Along with the big comparison video, Gavin Gear has prepared a detailed, 17-page online article which covers all of the presses in the shootout.
In this Ultimate Reloader Progressive Shootout video reviewer Gavin Gear demonstrates how each press works and provides data on costs, output rates, capabilities, and accessories.
Here is a cool video that shows the entire production process for a SilencerCo Octane pistol suppressor start to finish. Beginning with the raw materials, this video shows a wide variety of cutting, milling, drilling, burnishing, fitting, metal bathing, surface finishing, and laser etching processes.
If you have any interest in production methods you’ll want to watch this video all the way through, and maybe a second time.
SilencerCo states: “From cutting metal to chemical baths, to extensive quality control every step of the way, our streamlined process is more than just a few steps.” We think you may be surprised by how many steps are involved in producing this silencer (aka “suppressor”).
The Octane is a user-maintainable, multi-caliber centerfire pistol silencer featuring a modular mounting system for use across a wide range of hosts. High strength, stainless steel CTA™ (Click Together Assembly) baffles are easily disassembled for cleaning. This design makes the Octane one of the most durable small-caliber suppressors on the market.
In its Octane 45 review, SilencerShop notes: “When it comes to ease of maintenance, the Octane 45 is probably the simplest .45 suppressor on the market. It uses the new click-together baffle system from Silencerco/SWR – which allows the suppressor to come apart like a monocore suppressor, while providing performance that is closer to a K-Baffle design.””
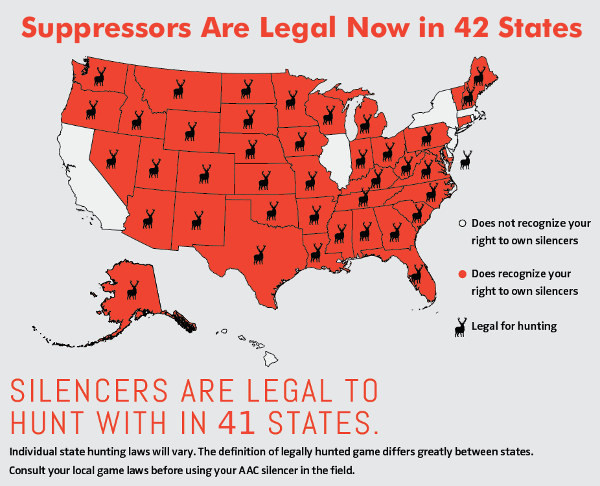
There is an informative article on the NRA’s American Hunter website regarding suppressor use for hunting. The article, What Hunters Need to Know About Suppressors, answers common questions about suppressor use on hunts. Suppressors are currently legal in 42 states, and can be used for hunting in 41 states (Connecticut prohibits suppressor use while hunting).
As that NRA article is a few years old, it does NOT have current information on suppressor purchasing rules and fees. Effective 1/1/2026, there is NO $200 fee to acquire a suppressor (aka silencer). There have been recent legal challenges to the NFA paperwork rules for purchasing a suppressor. Some states are honoring the injunction issued by a Federal court in Silencer Shop v. ATF, so in some states an NFA Form 4 may not be required. But you should still expect to fill out some paperwork in most states. Get current suppressor regulations by state on the Silencer Shop website.
The American Hunter article also discusses how well suppressors actually reduce noise. User should be aware that the sound level of a large, centerfire hunting cartridge will still exceed 130 decibels (dB) on average, even with a typical suppressor (silencer) in place. For that reason, we recommend that hunters continue to wear ear protection even when they shoot suppressed.
For example, Thunder Beast Arms says its Ultra 9 Suppressor will reduce the report of a .308 Win to 132-134 dB: “The ULTRA 9 will suppress a typical .308 bolt-action rifle down to approx. 132-134 dB. It also has very little or no ‘first round pop’ (FRP) in most applications.” NOTE: These dB levels are measured in accordance with MIL-STD-1474D using BK 2209 SLM offset one meter from muzzle.
How Loud Are Unsuppressed Rifles?
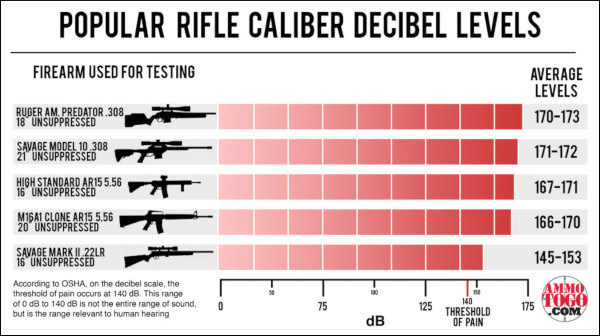
Firearms Are Loud — 140 dB to 175 dB. Audiology group ASHA explains: “Almost all firearms create noise that is over the 140-dB level. Exposure to noise greater than 140 dB can permanently damage hearing. A small .22-caliber rifle can produce noise around 140 dB, while big-bore rifles and pistols can produce sound over 175 dB. Firing guns in a place where sounds can reverberate, or bounce off walls and other structures, can make noises louder and increase the risk of hearing loss. Also, adding muzzle brakes or other modifications can make the firearm louder. People who do not wear hearing protection while shooting can suffer a severe hearing loss with as little as one shot[.] Audiologists see this often, especially during hunting season when hunters and bystanders may be exposed to rapid fire from big-bore rifles, shotguns, or pistols.” Source: ASHA, Recreational Firearm Noise Exposure.
How Much Does a Good Suppressor Really Reduce Firearm Sound Levels?
That depends on the rifle, the cartridge, and the effectiveness of the suppressor. The American Hunter article explains: “Suppressors retard the speed of propellant gases from the cartridge that rapidly expand and rush out of the barrel. It’s these gases that produce the loud boom that’s heard for miles. A suppressor’s series of internal baffles slows these gases so they are not all released at once, thereby muffling the sound.” Many good commercial suppressors can achieve 30-35 dB sound suppression. However, Zak Smith of Thunder Beast Arms says: “There are a bunch of manufacturers who publish values that are not reproducible, or use an ad-hoc test instead of a mil-spec test. In many cases we’ve tested the exact same suppressors they’ve advertised with 30-40 dB reductions and found they are actually in the high 20s instead.”
Again, for this reason, we recommend that hunters use ear protection, such as NRR 25+ banded ear plugs, even when shooting suppressed.
Choosing a Suppressor for Hunting Use
The American Hunter article explains that there are many types of suppressors on the market. Bigger suppressors are heavier, but they normally are more effective. You also have a choice in muzzle attachments:
“For most hunting applications, direct thread is the best choice. If you intend to buy only one suppressor yet you have multiple guns, it’s advantageous to buy a model sized and rated for the largest caliber you intend to use. While a suppressor made specifically for a .223 Rem. will reduce the sound of that round slightly better than a model made for .30 caliber, for example, you can use a .30-caliber can for smaller calibers — but not vice-versa. In general, the bigger the can, the more it reduces sound. Smaller suppressors, however, are easier to carry in the woods.” — American Hunter
States Where Suppressor Ownership is Allowed
Currently, the following 42 states allow private ownership of suppressors: AL, AK, AZ, AR, CO, CT, FL, GA, ID, IN, IA, KS, KY, LA, ME, MD, MI, MN, MS, MO, MT, NE, NV, NH, NM, NC, ND, OH, OK, OR, PA, SC, SD, TN, TX, UT, VT, VA, WA, WV, WI, WY. NOTE: Suppressors are legal in Connecticut, but hunting with silencers is not allowed in Connecticut.
How to Acquire a Suppressor
To acquire a quality suppressor, you first should shop around, comparing verified performance and price. Unfortunately some manufacturer’s dB (sound level) claims are exaggerated. Give due consideration to size, weight, and durability. When you’ve selected a brand and model, find a reputable dealer authorized to sell suppressors. There have been many recent policy changes by the ATF. Such changes are covered by this video:
BENEFITS OF SILENCERS
NOISE REDUCTION
According to OSHA, the threshold for a hearing safe impulse noise is 140 dB. Without hearing protection, exposure to any impulse noise over 140 dB causes varying degrees of permanent noise-induced hearing loss, which can also lead to tinnitus. Most well-engineered silencers take the dB level of their host firearm well below 140 dB, making those silencers effective primary hearing safety devices. You should always still wear hearing protection (muffs or plugs) when using suppressors.
RECOIL REDUCTION
By containing the explosion at the muzzle, suppressors significantly reduce perceived recoil energy, reduce the rifle’s rearward movement on recoil, and reduce rifle torquing and muzzle flip. The reduction of recoil (and rifle torquing/hopping) lessens shooter fatigue and helps the shooter get his sight picture back on target rapidly after firing. With smaller calibers, a suppressor may enable the shooter to maintain a nearly-continuous sight picture, following the shot into the target. In addition, by reducing felt recoil (and muzzle blast), a suppressor can help inexperienced shooters avoid flinching.
Hunting season has started in many parts of the country. And today, Saturday, September 26, 2026, is National Hunting and Fishing Day. Every year, this event is held on the 4th Saturday of September. First recognized by President Nixon in 1972, this is now the 54th year the event has been celebrated across the USA. To help mark this day, we are offering six informative videos for hunters. These cover planning your hunt, selecting good optics, and optimizing your rifle.
This video and related article offer good basic advice for sighting-in a hunting rifle. There are a series of six points covered. Here’s Tip #1: “Find a safe place to shoot your rifle with a backstop. If possible, use a bench and a rock-solid shooting rest. Sighting-in is all about consistency, so the less human error you have, the better. For safety, be sure to also bring ear and eye protection.” READ FULL ARTICLE on NRAWomen.com.
Prepare For Your Hunt — Get Fit and Practice Positions
As part of the NRA’s Tips & Tactics video series, Kristy Titus explains how to prepare for a hunt. Titus, co-host of the Team Elk TV show has hunted around the globe. She grew up in the outdoors, running pack mules in Oregon with her father. In this video, Kristy discusses fitness training and demonstrates field positions that can be employed during a hunt.
Kristy explains: “Hunting can lead you into some steep, rough country. It’s really important that you train both your body and your mind to handle the elements and the rigors of hunting So, if you plan on going on a mountain hunt, get out and train your body. Train with your firearm. Get off the bench and have some fun with this. Do some positional shooting or, if you want to add a stress dynamic… have someone put you under a time parameter.”
Elk Hunting — Great North American Adventures
A North American elk hunt represents the adventure of a lifetime for many. Before heading out on an elk hunt, you want to maximize your chances of success by having the right equipment, and by doing your homework before the hunt. This National Shooting Sport Foundation (NSSF) video offers good advice on planning your first elk hunt.
Success! Elk hunt photo from West Canyon Ranch, a private hunting ranch in Utah.
Photo courtesy Rocky Mountain Elk Foundation (RMEF).
Deer Hunting in Norway’s Fjord Mountains
Here’s a video with some truly stunning scenery. Watching this video is like taking a virtual vacation to Norway, where you can explore the scenic mountains in the Fjord region. Forum member Kenneth Skorpen (aka “Sal”) has created a cool video of a deer-hunting trip he took in Norway. He didn’t bag a buck on this trip, but the walk in the Fjordland mountains took Kenneth through some spectacular scenery. (At the 11:25 time mark you’ll see an amazing sunset over the Fjord.)
Kenneth did encounter a doe that had fallen down the mountain, and apparently broken its neck (14:35 time mark). The terrain is very steep, and Kenneth observed that: “I feel fortunate to be able to do this, but I also feel very tired in my legs. Did you know that the hares around here have shorter left legs due to the steep hills?”
Load Development for .308 Win Hunting Rifle
In this video, F-Class ace Keith Glasscock shows load development with a .308 Winchester hunting rifle. Here Keith uses a large X-type sandbag for a front support. He is shooting a Remington 700 bolt-action rifle, with Barnes TSX solid copper bullets, PPU Brass, Federal 210m primers, and AR Comp powder. Keith said the Barnes bullets were excellent — he commented that these bullets were “match quality in terms of precision”. Keith achieved some very small three-shot groups with AR Comp and the TSX projectiles. Keith did note that point-of-impact shifted up significantly with increases in charge weight (see 6:20-7:10). With thinner-contour hunting barrels, this is not unexpected. But POI change should be observed carefully during load development, as you may need to adjust your zero after completing testing.
The 41st Annual Gun Rights Policy Conference (GRPC) kicks off today (9/25/26) in Dallas, Texas. The event will continue through Sunday, September 27, 2026.
Co-hosted by the Second Amendment Foundation (SAF) and the Citizens Committee for the Right to Keep and Bear Arms (CCRKBA), this is one of the most important gatherings of Second Amendment legal experts and Federal ATF and DOJ administrators. To view the full list of GRPC 2026 speakers and the final agenda visit SAF.org/GRPC.
LIVEstream GRPC Events Saturday and Sunday
For those who can’t make the event, the Saturday and Sunday GRPC 2026 sessions will be livestreamed on SAF’s YouTube channel beginning at 8 a.m. (CST) on Saturday and 9 a.m. (CST) on Sunday. You can also view via the SAF Livestream links below, or click on the Video starting Saturday morning.
The 2026 GRPC event runs at the Westin Dallas Fort Worth Airport hotel. The $25 Registration Fee includes access to all Gun Rights Policy Conference events, including Friday and Saturday evening receptions.
This year’s keynote address will be given by the Honorable Roger T. Benitez (Ret.), a highly respect Federal Judge who authored many landmark decisions while serving as a Federal District Judge in California. Judge Benitez authored multiple key decisions which have helped to restore and safeguard gun rights in California. Judge Benitez is considered to be one of the most important judicial defenders of the Second Amendment in the post-Heller era. Other notable speakers are ATF Director Rober Cekada, and William Kirk, Second Amendment attorney, and host of the Washington Gun Law YouTube channel.
Additional Notable Speakers Will Include: Robert Leider, ATF Chief Counsel Barry Arrington, Acting Chief of Civil Rights Division (2d Amend. section), U.S. Department of Justice Joseph Greenlee, NRA Institute for Legislative Action Litigation Counsel Office Alan M. Gottlieb, Founder and Executive V.P., Second Amendment Foundation Adam Kraut, Executive Director, Second Amendment Foundation Chris Boeck, General Counsel and Chief Legal Officer at Silencer Shop Mark Smith, Constitutional lawyer and host of The Four Boxes Diner YouTube Channel Cam Edwards, Editor of BearingArms.com and the host of the Cam & Company podcast Brandon Herrera, Second Amendment advocate and Congressional candidate
Pre-Conference AMM-Con Event
In addition to attending GRPC, registrants can also participate in the AMM-Con pre-conference event on Friday, September 25. This is a gathering of leading Second Amendment media personnel.
2026 GRPC Official Sponsors
GRPC 2026 is sponsored by NSSF, USCCA, U.S. Law Shield, Silencer Shop, Colt, Vortex, Magpul, Credova, Volquartsen, Trijicon, GrabAGun, RAYVN Group, AZFirearms Auctions, and Taurus.
Tomorrow, September 26, 2026, is National Hunting and Fishing Day. Hunting season is here — and we know many of our readers will soon head to the woods in pursuit of deer, elk, or other game. To make a good shot, it’s wise to rest your rifle when possible. In this video, methods for stabilizing a rifle in the field are demonstrated by Forum member Thomas Haugland, who hails from Norway. Thomas focuses on practical field shooting skills for hunters. Thomas (aka ‘Roe’ on Forum and Sierra645 on YouTube) shows how to verify his zeros from bipod and then he demonstrates improvised field rests from the prone, kneeling, and sitting positions.
Thomas explains: “In this video I focus on basic marksmanship techniques and making ready for this year’s hunt. As a last check before my hunting season, I got to verify everything for one last time. My trajectory is verified again, the practical precision of the rifle is verified. I also practice making do with the best [improvised] rest possible when an opportunity presents itself. After getting knocked in the face by a .338 Lapua Magnum rifle during a previous filming session, I had to go back to basics to stop [flinching]. I include some details from bipod shooting that hopefully some hunters will find useful. Fingers crossed for this years season, good luck!”
How to Stalk Game — Tips from Thomas
If you liked that video, here is another valuable video from Thomas. In this “How to Approach Deer” video, Thomas explains the basics of a successful stalk. If you are headed into deer country this fall, definitely watch this video.
Resting a Hunting Rifle on Backpack
Here’s a great practical tip that can help you make that perfect shot. Thomas shows the best way to use a conventional backpack to provide a steady support for your hunting rifle. He also explains how to correctly deal with parallax in your scope.
You can never be too safe when hand-loading your own ammunition. This article outlines the Seven Fundamental Reloading Safety Tips, as explained by Brownells. This is important information for novice hand-loaders and a good refresher for those with reloading experience! The Ulimate Reloader video below has some specific tips on loading hunting ammo, as it’s now hunting season throughout much of the nation.
Summary of the Seven Safety Tips:
1. Do NOT mix powders. Keep your powders clearly marked and dated. You can use masking tape to write the date on the container.
2. Check cases frequently. Look for split necks, case head separation or other signs of fatigue and excessive pressure.
3. Store your reloading supplies in a safe and dry location, away from children and away from any possible source of ignition. It is also smart to keep your powder and primers separate.
2. Get and use respected reloading manuals, especially for new cartridges. Start low and work up slowly while watching for warning signs of pressure and/or case fatigue.
5. Make sure you cannot be distracted when reloading. Turn off your phone. If you get interrupted, stop. (Distractions will eventually lead to mistakes.)
6. Make sure your ammo headspaces properly in each gun if you load the same cartridge type for different firearms. Even with the same cartridge, different guns may require different loads.
7. If reloading military brass, be aware that case capacity is usually reduced, and initial loads should be at least 10-15% lower than published data.
Here are some other tips that will help your avoid making costly mistakes (such as using the wrong powder, or undercharging a case):
Powder Type — Always double-check the label on your powder containers. After placing powder in the powder measure, put a piece of tape on the measure with the powder type written on it. Some guys write the powder type on a card and place that right in the hopper.
Scale Drift — Electronic balances can drift. If you are using a digital powder scale, calibrate the scale with a test weight every 50 rounds or so.
Case Fill — If you throw more than one charge at a time, look INSIDE every case before seating a bullet. Squib charges can be dangerous if you don’t notice them before firing the next round.
Progressive Presses — When using a progressive press, consider using an RCBS Lock-Out Die. This will detect a low charge and stop the machine. These dies will work with RCBS, Hornady, and Dillon progressives.
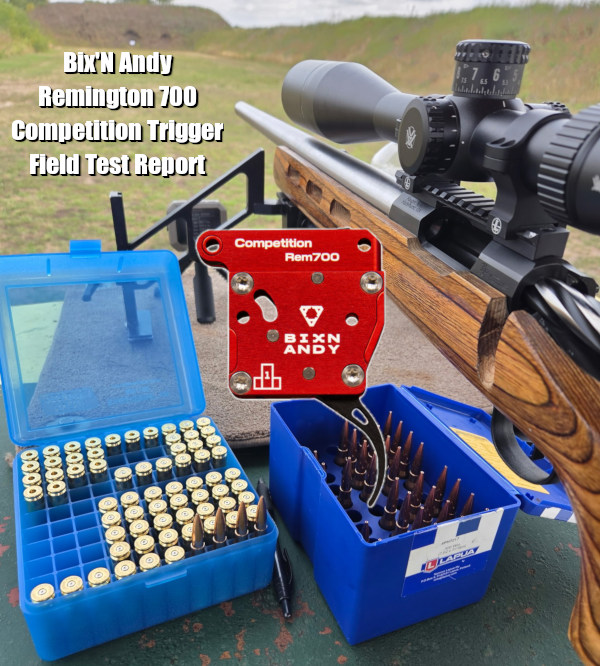
ADDING ESSENTIAL EQUIPMENT — Bix’N Andy Rem 700 Competition Trigger By Les Voth
An accomplished shooter buddy of mine is going to Tennessee for a family visit, but with the priorities a guy’s gotta have, he’s going to stop off at a F-Class match in Indiana on his way there. F-TR is his chosen corner of that discipline.
A Krauger Arms action is the rifle’s anchor/foundation, with a 28” Heavy Varmint MullerWorks cut barrel, Richards Microfit self-finished stock, Vortex scope, Leupold rings, Sinclair bipod makes up the equipment. He’s running Lapua brass and Berger 185 Juggernaut Target bullets. The powder? VV N150.
Benefits of a Trigger Upgrade
What we are encouraged to do as competitive shooters is run what we brung until some part of that is clearly holding us back. But sometimes some don’t know if something will, actually, make them better. Anyone who has already won their division in a F-Class match, and consistently scored right up at the top, must know their equipment and what that package brings to the target. My buddy knew, said so, and I believed him. But if there was a way to help even incrementally, I was after that increment.
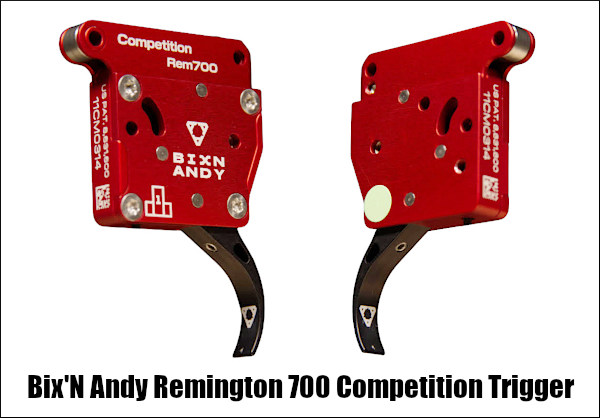
Pulling out a used Bix’N Andy Remington 700 Competition trigger, I handed it to him and said, “I built this out of the used parts bin. Put it into your gun. Shoot it in Indiana, and give it back to me when you get back home.” Buddy put it in his gun and went to the underground range and shot it at 100 yards that night.
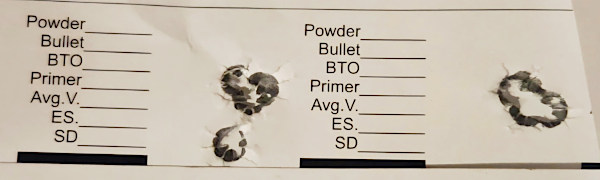
This target is the result of the use of the borrowed trigger. In the first group, on the left, the 30 cal hole on the bottom is the cold bore shot, out of a newly cleaned barrel. The group above the cold bore shot is seven rounds. The second group, on the right, is also seven rounds, shot immediately after the first group.
Buddy said, “I’ve done that before — but it’s never been that easy before! It’s always taken everything I’ve had to get those results!” Here’s how he described his first experience with this trigger: “Effortless”. For him to see the result of his ongoing lack of effort was exciting and exhilarating. It was easier than it had ever been. The kicker was that he did not have to concentrate on the trigger at all. He said he could concentrate on fundamentals more completely, and was not distracted by anything trigger-related.
Comparing Previously Installed Trigger
I will not mention the brand of trigger this Bix’N Andy Comp trigger replaced, but he brought it in the next morning so we could use our measuring device/fixture to compare pull force with the Comp trigger. To his astonishment the trigger force required to between the Bix’N Andy Competition trigger and what he had been using was within an ounce and a half. The difference was in the inner mechanisms of each trigger. The Bix’N Andy felt effortless. With the other, it felt like he had to “overcome” something.
Conclusion
I’m glad he’s happy with the Bix’N Andy Rem 700 trigger. I’ll get the used-bin trigger back when he gets home, but he’ll acquire a brand new Bix’N Andy Remington 700 Single Stage Competition trigger from Bullet Central as soon as he relinquishes that borrowed piece.
This coming Saturday, September 26th, is National Hunting and Fishing Day, held each year on the fourth Saturday of September. To help the avid hunters among our readers, here are Twenty Tips that can help ensure a safe and successful hunt. These tips have been compiled from our AccurateShooter Hunting Forum, with help from Hunting Editor Colton Reid (who has already been out hunting this month). Some items are preparatory — such as working with maps, sighting in the rifle, and improving physical fitness. We also talk about equipment — having the right gear, from proper boots to a GPS for multi-day hunts.
Of course there are entire volumes written on hunting, but these 20 Tips can benefit all hunters. Follow these suggestions and you should have a safer hunting experience with greater likelihood of success. If you liked these pointers, you’ll find two dozen more helpful hints on the NSSF Website.
Preparations Before The Hunt
1. Map Your Hunt and Notify Others — Before your hunt, make a plan and notify friends and family members about WHERE you are going and your intended return date and time. Print out a Google Satellite map and locate landmarks and trailheads. Mark where you plan to park your vehicle and give a copy of this map to friend and/or family members. A hunter may injure himself by falling off a rock, or tumbling in a creek-bed. After that kind of injury the hunter may be confused or unable to walk. If you get stranded in the wilderness, you want trusted persons to know where you are. So, before you leave on a trip, provide a map to a friend or family member. Show them where you will leave your vehicle, and where you expect to be every day of your hunting adventure.
2. Licenses and Permits — Make sure you have a valid hunting licenses and all the necessary tags. Begin this process with ample time before your intended hunt(s). The NSSF adds: “If you are crossing state or national borders, find out about any special considerations you must take care of. Border crossings can mean knowing about firearm transport laws or Chronic Wasting Disease-related regulations.”
3. Work on Your Fitness — On a multi-day hunt you may be trekking many miles. You need to be in good shape. If you are out of shape you may be putting yourself in a precarious situation, particularly if you underestimate the terrain difficulty. As the NSSF says: “Not being able to handle the conditions lessens your chances of success, can turn a great experience into an agonizing one and can endanger your health.”
4. Do Your Homework — Study the area you will be hunting. Talk to other hunters. Look at satellite photos. Get a real sense of the walking and terrain challenges. For a multi-day hunt, MAKE a PLAN. The NSSF states: “Eliminate surprises. Learn as much about where you will be staying, the area you will be hunting, what the weather might be like and what you need to bring[.]”
5. Rifle and Ammo — Make sure your rifle is sighted-in and your ammo is tested. Sight-in your rifle with the ammo you plan to use on your hunt. CLICK HERE for 4-Shot Sight-in Method. After sighting-in from the bench, confirm your zero by shooting from typical hunting positions (kneeling and with forearm supported on a rock or post).
6. Shooting Positions — Practice the shooting positions you will use in the field. Practice sitting, kneeling, and prone positions. You should also practice with shooting sticks, using your day pack as a rest, and with a bipod. Try to have a rock-steady rest before taking your shot.
7. Back-Up Irons — If possible, select a rifle with back-up iron sights. While modern scopes are very durable, they can and do fail (glass can crack). If you’ve invested a lot of time and money in your hunt, back-up iron sights can keep you in the game even if your riflescope fails.
8. Communications and GPS — Bring a GPS if you are in a wilderness area far from civilization. It’s a good idea to bring a cell phone, but you may not have coverage if you’re quite a distance from populated areas. A smart-phone also doubles as a digital camera to record your trophies. For navigation and safety, consider getting Garmin inReach Explorer+. This high-tech handheld unit features interactive SOS, connecting you to the GEOS 24/7 search-and-rescue monitoring center. They also allow you to send and receive text messages, no matter where you are, via advanced inReach satellite technology. Yes you can communicate even if you are miles from the nearest cell tower.
9. Select Good Gear — Make sure you have GOOD BOOTS that are comfortable — you’ll spend a lot of time on your feet. You may want a pack with harness for your rifle so you have both hands free. On a multi-day trip, make sure you can carry enough water, and that you will stay warm enough at night. Good practices for backpacking apply to multi-day hunts.
10. Make a Gear Checklist — Create a complete checklist of the gear and supplies you need. That includes arms, ammunition, rangefinder, binoculars, proper clothing (including spare clothes), hunting accessories, sleeping gear (on multi-day hunts), toiletries, medications. Don’t forget a good first aid kit — lots of bad things can happen during any wilderness trip. You can cut a hand, break an ankle or worse.
During The Hunt
11. Have a Plan — know where you plan to go and when. Try to be where you want in the early morning and early evening hours when deer are likely most active.
12. Take Your Time — If you spot a deer and get too excited and don’t take your time you may spook him. Go slow and glass. If possible, wait for the animals to bed down and relax. Then work out the best way to approach your prey. Remember, “You get so few opportunities, don’t screw it up!”
13. Glass More, Walk Less — Let your eyes do the walking — get good binoculars and use them. With their heightened senses of smell and hearing, deer/elk are able to spot you way better than you can spot them. If you are walking around a lot, chances are you are getting spotted by your prey.
14. Riflescopes Are Not Binoculars — Never use a riflescope as a substitute for binoculars. The temptation to do so is real, but when one does this, one is by definition pointing the muzzle of the gun at unknown targets. We like binoculars with built-in rangefinders. When glassing at long range, try supporting your binoculars on your pack.
15. Be Sure of Your Target before Shooting — Every year during whitetail season, farmers are forced to spray-paint their cattle or risk having them “harvested” by hunters who don’t bother confirming the species in their sights. Hunters with “buck fever” can make mistakes. When in doubt, don’t shoot.
16. Know When to Unload — When finished hunting, unload your firearm before returning to camp. You should also unload your gun before attempting to climb a steep bank or travel across slippery ground.
17. Bring Hearing Protection — While pursuing and stalking your prey you’ll want full sensory use of your ears. But when you’re finally ready to take the shot, slip in hearing protection. A shot from a large-caliber hunting rifle can exceed 170 decibels. Unprotected exposure to noise from a SINGLE 170+ dB shot can cause permanent hearing damage. (Source: ASHA.org). If you make a follow-up shot, you double that noise hazard. Therefore a hunter with a non-suppressed rifle should have hearing protection available.
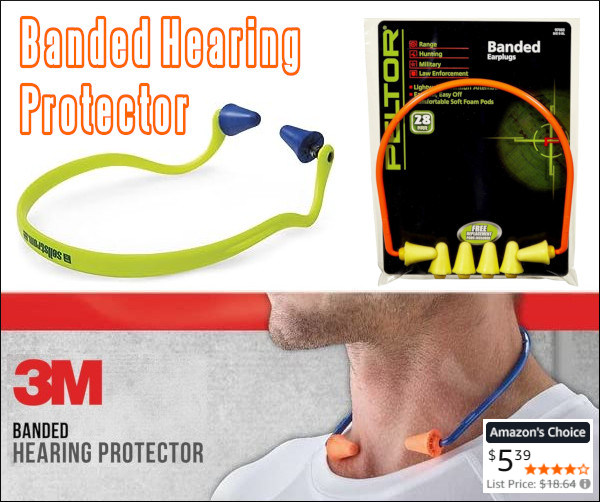
You can keep a pair of easy-to-use quick-insert ear plugs on a cord around your neck. Or, get a lightweight neck band with earbuds, such as the Sellstrom Band, Peltor Band, or 3M Safety Band, all with a good 25 dB or better Noise Reduction Rating. You can keep these lightweight bands around your neck for quick deployment before you shoot.
“Once a hunter is successful, the REAL work begins.” — Colton Reid
18. Harvesting the Animal — When dressing your animal, be careful with the meat. You’ll want very sharp knives. Some hunters prefer knives with replaceable, razor-sharp blades. Don’t rush the task. Make sure you don’t get moisture or dirt on meat. The three spoilers of meat are heat, moisture, and dirt.
19. Pace Yourself When Packing Out — If you DO succeed, and bring down a big buck, will you be able to dress the animal and carry out the meat? Always be prepared to hike out with extra weight. If you are successful, make sure not to waste the meat you worked so hard for. Choose a pack that can help you carry a heavy load. Remember, this is not an insignificant challenge — you may be carrying 60 to 100 extra pounds in addition to your other gear. Again, take your time. Rest as needed. Don’t hurt yourself.
20. Remember to Enjoy the Experience — Our Hunting Editor, Colton Reid, offers this sage advice to all hunters, but particularly to novices: “Have fun, and appreciate your hunt, whether you bag a buck or not. It is a privilege to experience the wilderness and to get away from the city. Enjoy it while you’re out there. And keep your spirits up. You may get tired, but remember that ‘comes with the territory’. At the end of the day, yes you may be exhausted. And you may want to quit and go home. But stay positive, stay focused. Be patient, the experience is worth it.”
CLICK HERE for Hunter Training/Mentoring Programs State-by-State.
Visit WhereToHunt.org
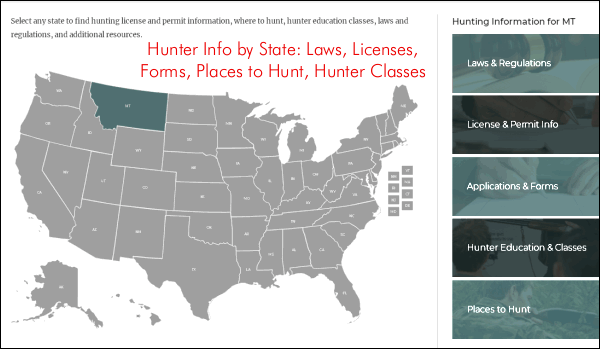
There’s a great online resource for hunters that will help you find game locations in your state and ensure you have all the proper permits and game tags. WheretoHunt.org features an interactive map of the country. For all 50 states, the NSSF has compiled information about hunting license and permits, where to hunt, hunter education classes, laws and regulations and more. For each state you’ll also find a link for required applications and license forms.






 Here’s a video with some truly stunning scenery. Watching this video is like taking a virtual vacation to Norway, where you can explore the scenic mountains in the Fjord region. Forum member Kenneth Skorpen (aka “Sal”) has created a cool video of a deer-hunting trip he took in Norway. He didn’t bag a buck on this trip, but the walk in the Fjordland mountains took Kenneth through some spectacular scenery. (At the 11:25 time mark you’ll see an amazing sunset over the Fjord.)




 Tomorrow, September 26, 2026, is National Hunting and Fishing Day. Hunting season is here — and we know many of our readers will soon head to the woods in pursuit of deer, elk, or other game. To make a good shot, it’s wise to rest your rifle when possible. In this video, methods for stabilizing a rifle in the field are demonstrated by Forum member Thomas Haugland, who hails from Norway. Thomas focuses on practical field shooting skills for hunters. Thomas (aka ‘Roe’ on Forum and