The Shooting Sports USA website includes two excellent articles about the basics of metallic cartridge reloading. These two articles provide an excellent summary of the key procedures. If you are new to reloading, we recommend you read both articles:
Part II is particularly helpful because it explains the entire reloading process step-by-step, with 14 listed steps. The author notes: “In this, the second installment on metallic cartridge reloading, we’ll follow the sequence of steps involved in reloading a rifle cartridge and refining a metallic cartridge load. These steps are based on the use of a single-stage reloading press and a separate priming tool.”
Much important advice is provided as this article runs through the 14 Steps of Reloading. For example, when explaining Step 13, Bullet Seating, the article states:
“Proper seating depth is critical. Too much bullet protrusion and the cartridge may not work through the gun’s magazine, or it may fail to chamber. Too little and the bullet intrudes excessively into the powder chamber, decreasing volume and raising pressure. Neck tension is also important; any bullet that fails to seat with some resistance may be held only loosely by the neck and may be driven back into the case when the round is chambered, especially in semi-automatic arms.”
Important Guide to Detecting Over-Pressure Signs in Brass
As an example of the invaluable advice provided in these two articles, here’s a sample from Part II that explains how to determine if your load is over-pressure. We recommend that EVERY reader read this twice. There are more things to consider than a stiff bolt lift. You need to inspect cartridges very carefully:
Sinclair Internationalhas released an interesting article about Case Concentricity* and bullet “run-out”. This instructional article by Bob Kohl explains the reasons brass can exhibit poor concentricity, and why high bullet run-out can be detrimental to accuracy.
Concentricity, Bullet Alignment, and Accuracyby Bob Kohl
The purpose of loading your own ammo is to minimize all the variables that can affect accuracy and can be controlled with proper and conscientious handloading. Concentricity and bullet run-out are important when you’re loading for accuracy. Ideally, it’s important to strive to make each round the same as the one before it and the one after it. It’s a simple issue of uniformity.
The reason shooters work with tools and gauges to measure and control concentricity is simple: to make sure the bullet starts down the bore consistently in line with the bore. If the case isn’t properly concentric and the bullet isn’t properly aligned down the center of the bore, the bullet will enter the rifling inconsistently. While the bore might force the bullet to align itself with the bore (but normally it doesn’t), the bullet may be damaged or overstressed in the process – if it even it corrects itself in transit. These are issues we strive to remedy by handloading, to maintain the best standard possible for accurate ammunition.
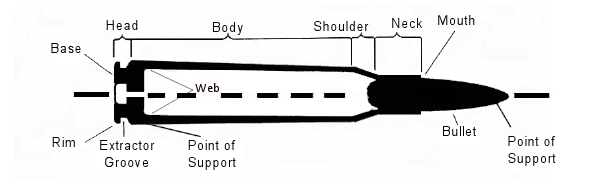
The term “concentricity” is derived from “concentric circle”. In simple terms it’s the issue of having the outside of the cartridge in a concentric circle around the center. That goes from case head and center of the flash hole, to the tip of the bullet.
Factors Affecting Concentricity
The point of using this term is to identify a series of issues that affect accurate ammunition. Ideally this would work best with a straight-walled case; but since most rifle cartridge cases are tapered, it equates to the smallest cross section that can be measured point by point to verify the concentric circle around the center. For the examples below, I’m working with .308 Winchester ammo.
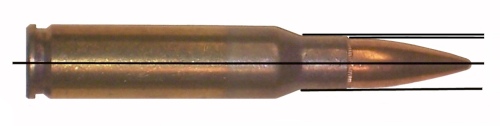
Figure 1: The cartridge.
Figure 2: Centerline axis of the case, extending from flash hole to case mouth.
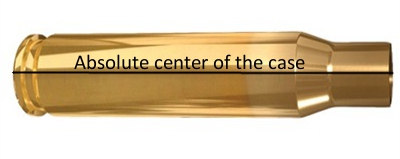
The case walls have to be in perfect alignment with the center, or axis, of that case, even if it’s measured at a thousandth of an inch per segment (in a tapered case).
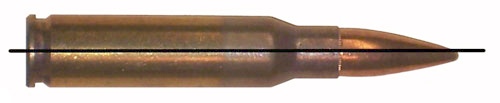
Figure 3: Case body in alignment with its axis, or centerline, even in a tapered case.
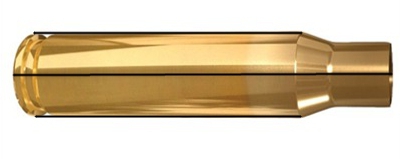
The case neck must also be in alignment with its axis. By not doing so you can have erratic bullet entry into the bore. The case neck wall itself should be as uniform as possible in alignment and in thickness (see the M80 7.62x51mm NATO cartridge in Figure 5) and brass can change its alignment and shape. It’s why we expand the case neck or while some folks ream the inside of the neck and then turn the outside for consistent thickness, which affects the tension on the bullet when seated.
Figure 4: Neck in alignment with center of the case axis.
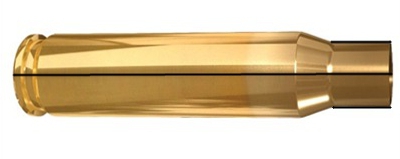
Figure 5: Variations in case neck wall thickness, especially on some military brass, can cause an offset of the bullet in its alignment. This is an M80 ball round. Note the distinct difference of the neck walls.
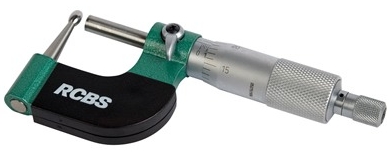
Having a ball micrometer on hand helps, especially with military brass like 7.62x51mm in a semi-auto rifle, where there are limits as to how thin you want the neck walls to be. In the case of 7.62 ball brass you want to keep the wall to .0145″.
Figure 6: A ball micrometer like this RCBS tool (#100-010-268) can measure case neck thickness.
Turning the outside of the neck wall is important with .308 military cases regardless of whether you expand or ream the neck walls. There are several outside neck turning tools from Forster, Hornady, Sinclair, and others. I’ve been using classic Forster case trimming (#100-203-301) and neck turning (#749-012-890) tools for 40 years.
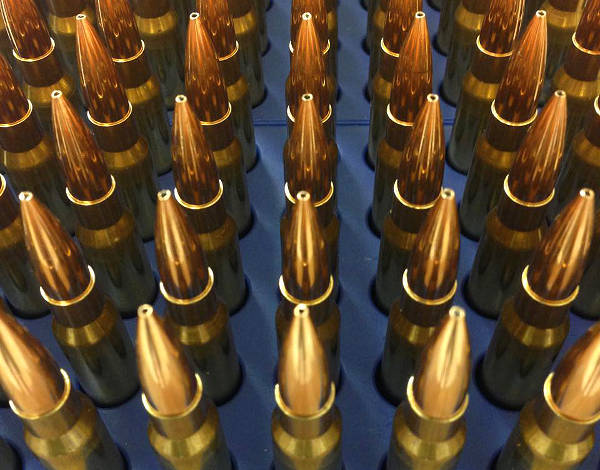
Bullet Run-Out
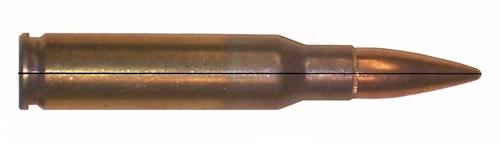
The cartridge, after being loaded, still needs to be in alignment with the center of the case axis. Figure 7 shows a bad example of this, a round of M80 ball. A tilted bullet is measured for what’s known as bullet “run-out”.
Figure 7: An M80 round with the bullet tilted and not aligned with the axis. This will be a flyer!
Run-out can be affected by several things: (1) improperly indexing your case while sizing, which includes not using the proper shell holder, especially while using a normal expander ball on the sizing die (it also can stretch the brass). (2) The head of a turret press can flex; and (3) improper or sloppy bullet seating. This is also relevant when it comes to using a progressive press when trying to load accuracy ammo.
Mid Tompkins came up with a simple solution for better bullet seating years ago. Seat your bullet half way into the case, back off the seater die and rotate the case 180 degrees before you finish seating the bullet. It cuts down on run-out problems, especially with military brass. You also want to gently ream the inside of the neck mouth to keep from having any brass mar the surface of the bullet jacket and make proper seating easier. A tilted bullet often means a flyer.
Figure 8: Proper alignment from the center of the case head to the tip of the bullet.
(NOTE: This links to a Web Archive version of the original Sinclair Int’l article.)
*Actually some folks would say that if we are talking about things being off-center or out-of-round, we are actually talking about “eccentricity”. But the tools we use are called “Concentricity Gauges” and Concentricity is the term most commonly used when discussing this subject.
The U.S. Army Marksmanship Unit published a series of reloading “how-to” articles on the USAMU Facebook page. A while back the USAMU’s reloading gurus looked at the subject of cartridge run-out and what can be done to produce straighter ammo. Tasked with producing thousands of rounds of ammo for team members, the USAMU’s reloading staff has developed smart methods for improving concentricity, even with budget-priced dies. For other hand-loading tips, visit the USAMU Facebook page.
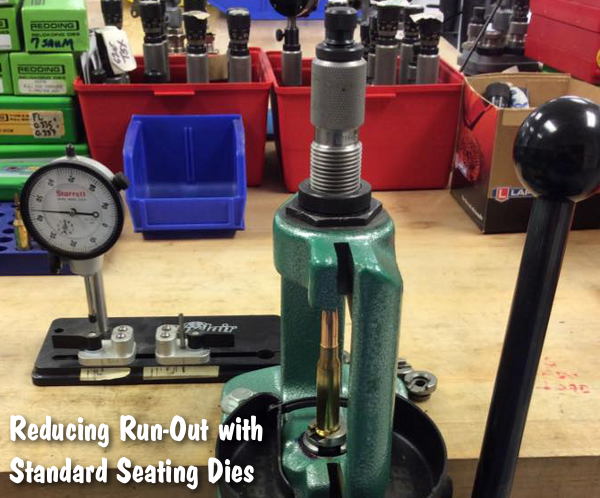
Minimizing Runout with Standard Seating Dies
This USAMU article explains how to set up standard bullet seating dies dies to minimize Total Indicated Run-out (TIR). The loading process is described using a single-stage press since most handloaders have one. A high-quality run-out gauge is essential for obtaining consistent, accurate results.
Having sized, primed, and charged our brass, the next step is bullet seating. Many approaches are possible; one that works well follows. When setting up a standard seating die, insert a sized, trimmed case into the shellholder and fully raise the press ram. Next, back the seating stem out and screw the die down until the internal crimping shoulder touches the case mouth.
Back the die out ¼ turn from this setting to prevent cartridge crimping. Next, lower the press ram and remove the case. Place a piece of flat steel (or window glass, which is quite flat) on the shellholder and carefully raise the ram.
Place tension on the die bottom with the flat steel on the shellholder. This helps center the die in the press threads. Check this by gently moving the die until it is well-centered. Keeping light tension on the die via the press ram, secure the die lock ring. If one were using a match style, micrometer-type seating die, the next step would be simple: run a charged case with bullet on top into the die and screw the seating stem down to obtain correct cartridge OAL.
However, with standard dies, an additional step can be helpful. When the die has a loosely-threaded seating stem, set the correct seating depth but don’t tighten the stem’s lock nut. Leave a loaded cartridge fully raised into the die to center the seating stem in the die. Then, secure the stem’s lock nut. Next, load sample cartridges and check them to verify good concentricity.
One can also experiment with variations such as letting the seating stem float slightly in the die to self-center, while keeping correct OAL. The run-out gauge will show any effects of changes upon concentricity. However, this method has produced excellent, practical results as evidenced by the experiment cited previously. These results (TIR Study 2) will reproduced below for the reader’s convenience.
First, however, let’s examine run-out figures of some factory-loaded match ammunition. This should give readers who are new to TIR gauges some perspective about the TIR ranges one might encounter.
TIR Study 1: 50 rounds Lake City M852 Match 7.62mm
(168 gr. Sierra MatchKings)
0.000” – 0.001” = 2%
0.001” – 0.002” = 30%
0.002” – 0.003” = 16%
0.003” – 0.004” = 22%
0.004” – 0.005” = 14%
0.005” – 0.006” = 14%
0.006” – 0.007” = 0%
0.007” – 0.008” = 2%
TIR Study 2: 50 rounds of .308 match ammo loaded using carefully-adjusted standard dies, vs. 50 using expensive “Match” dies from the same maker.
Standard dies, TIR:
0.000” — 0.001” = 52%;
0.001”– 0.002” = 40%;
0.002”– 0.003” = 8%.
None greater than 0.003”.
Note: both samples were loaded using the O-Ring method, i.e. with a rubber O-Ring placed under the locking ring of the Full-length sizing die to allow that die to float.
These tips are intended to help shooters obtain the best results from inexpensive, standard loading dies. Especially when using cases previously fired in a concentric chamber, as was done above, top-quality match dies and brass can easily yield ammo with virtually *no* runout, given careful handloading.
As a cartridge case is reloaded multiple times, burnt powder residue and carbon builds up on the inside of the case. Unless the case interior is cleaned in some fashion, eventually you’ll see a slight reduction in case capacity. One of our Forum members from Australia wonders about the effects of reduced case capacity: “If the capacity of the case decreases as the crud builds up, then it effectively reduces the size of the cartridge (inside). Wouldn’t that change the pressure produced from that of an equivalent clean case?”
Interesting Test of Case Capacity Changes
Forum member Fred Bohl has actual test results that can help answer the above question. Fred proved that, over a 20-reload cycle, the case capacity of uncleaned cases did decline a small amount. However, surprisingly, this did not seem to affect the actual chronographed velocity of the load. Extreme Spread (ES) did increase, but Fred believes the higher ES was due to changes in case-neck tension, rather than due to the slight reduction in case capacity. Fred reports:
“Back when beginning to use ultrasonic case cleaning, part of the motivation was to get the inside clean based on the assumption that allowing burnt residue to build up inside cases would affect capacity, and, ultimately, performance. An experiment was done to test this hypothesis. The load used, 30.5 grains of RL15 behind 107gr SMKs in a 6mmBR, was selected for best group and lowest ES in prior load development. It turned out to be 92% of initial case capacity and neither “full” or compressed. (I would suspect that different powders, load weight, and total case capacity might produce very different results.)
We took 30 cases of identical initial capacity and tracked three lots of 10 each:
LOT 1: No Internal cleaning LOT 2: Cleaned with media in tumbler LOT 3: Cleaned with Ultrasound machine
Each case (in each lot) was shot and reloaded 20 times. The simplified results after 20 reloads of each lot were as follows:
Lot 1 (not cleaned) – 0.3 to 0.4 gr. loss of capacity, 5 to 8 fps greater ES.
Lot 2 (tumble cleaned) – 0.1 to 0.3 gr. loss of capacity, 4 to 6 fps greater ES.
Lot 3 (ultrasonic cleaned) – no loss of capacity, no detectable change in ES.
FINDINGS There was no detectable correlation of velocity change to the lots. An oddity was that on very hot days Lot 1 velocities were, occasionally, slightly higher. From results of another ongoing test, I believe the above differences in ES are probably due more to variance in bullet grip tension than case capacity. The ultrasound cleaned cases (LOT 3) did maintain the lowest ES, but we are not 100% sure of the reasons why. More consistent bullet seating might be the reason.”
Editor’s NOTE: Fred’s results do suggest that carbon build-up inside the uncleaned cases might cause a slight increase in pressure that shows up on hot days. Fred has posted that: “A local shooter reported doing the 20 reload, no-clean test on a .308 that gave a loss of capacity of 2.0 grains, doubled ES and significant velocity changes. However, I don’t have any details on his load weight or powder.” Obviously a lot of carbon can build up with 20 reloads. Many shooters retire their brass before then.
Ultrasonic Cleaning and Neck Lube
Some time ago, Jason Baney did a lengthy test on ultrasonic cleaning. Jason found that with his ultrasonically-cleaned cases, the inside of the necks got so “squeaky clean” that he needed to use dry lube in the necks. Jason uses the dry lube kit from Neconos.com. This applies ultra-fine Moly powder to the neck interior using small carbon steel balls.
There is an excellent article about primers on the Shooting Times website. We strongly recommend you read Mysteries And Misconceptions Of The All-Important Primer, written by Allan Jones. Mr. Jones is a bona fide expert — he served as the manager of technical publications for CCI Ammunition and Speer Bullets and Jones authored three editions of the Speer Reloading Manual.
This authoritative Shooting Times article explains the fine points of primer design and construction. Jones also reveals some little-known facts about primers and he corrects common misconceptions. Here are some highlights from the article:
Size Matters
Useful Trivia — even though Small Rifle and Small Pistol primer pockets share the same depth specification, Large Rifle and Large Pistol primers do not. The standard pocket for a Large Pistol primer is somewhat shallower than its Large Rifle counterpart, specifically, 0.008 to 0.009 inch less.
Magnum Primers
There are two ways to make a Magnum primer — either use more of the standard chemical mix to provide a longer-burning flame or change the mix to one with more aggressive burn characteristics. Prior to 1989, CCI used the first option in Magnum Rifle primers. After that, we switched to a mix optimized for spherical propellants that produced a 24% increase in flame temperature and a 16% boost in gas volume.
Foiled Again
Most component primers have a little disk of paper between the anvil and the priming mix. It is called “foil paper” not because it’s made of foil but because it replaces the true metal foil used to seal early percussion caps. The reason this little disk exists is strictly a manufacturing convenience. Wet primer pellets are smaller than the inside diameter of the cup when inserted and must be compacted to achieve their proper diameter and height. Without the foil paper, the wet mix would stick to the compaction pins and jam up the assembly process.
Try a club match this summer! Every summer weekend hundreds of local club “fun matches” are conducted around the country. And the first official day of summer — the Summer Solstice — is June 20, 2025, just 9 days away. That means local summer weekend fun matches will be held at ranges across the country. So load some ammo, get your rifle, and have some fun.
One of the good things about club shoots is that you don’t have to spend a fortune on equipment to have fun. But we’ve seen that many club shooters handicap themselves with a few common equipment oversights or lack of attention to detail while reloading. Here are SIX TIPS that can help you avoid these common mistakes, and build more accurate ammo for your club matches.
1. Align Front Rest and Rear Bag
We see many shooters whose rear bag is angled left or right relative to the bore axis. This can happen when you rush your set-up. But even if you set the gun up carefully, the rear bag can twist due to recoil or the way your arm contacts the bag. After every shot, make sure your rear bag is aligned properly (this is especially important for bag squeezers who may actually pull the bag out of alignment as they squeeze).
Forum member ArtB adds: “To align my front rest and rear bag with the target, I use an old golf club shaft. I run it from my front rest stop through a line that crosses over my speed screw and into the slot between the two ears. I stand behind that set-up and make sure I see a straight line pointing at the target. I also have a piece of tape that I’ve placed on the golf shaft that indicates how far the back end of the rear bag should be placed from the front rest stop.”
2. Avoid Contact Interference
We see three common kinds of contact or mechanical interference that can really hurt accuracy. First, if your stock has front and/or rear sling swivels make sure these do NOT contact the front or rear bags at any point of the gun’s travel. When a sling swivel digs into the front bag that can cause a shot to pop high or low. To avoid this, reposition the rifle so the swivels don’t contact the bags or simply remove the swivels before your match. Second, watch out for the rear of the stock grip area. Make sure this is not resting on the bag as you fire and that it can’t come back to contact the bag during recoil. That lip or edge at the bottom of the grip can cause problems when it contacts the rear bag. Third, watch out for the stud or arm on the front rest that limits forward stock travel. With some rests this is high enough that it can actually contact the barrel. We encountered one shooter recently who was complaining about “vertical flyers” during his match. It turns out his barrel was actually hitting the front stop! With most front rests you can either lower the stop or twist the arm to the left or right so it won’t contact the barrel.
3. Weigh Your Charges — Every One
This may sound obvious, but many folks still rely on a powder measure. Yes we know that most short-range BR shooters throw their charges without weighing, but if you’re going to pre-load for a club match there is no reason NOT to weigh your charges. You may be surprised at how inconsistent your powder measure actually is. One of our testers was recently throwing H4198 charges from a mechanical measure for his 30BR. Each charge was then weighed twice with a Denver Instrument lab scale. Our tester found that thrown charges varied by up to 0.7 grains! And that’s with a premium measure.
4. Measure Your Loaded Ammo — After Bullet Seating
Even if you’ve checked your brass and bullets prior to assembling your ammo, we recommend that you weigh your loaded rounds and measure them from base of case to bullet ogive using a comparator. If you find a round that is “way off” in weight or more than .005″ off your intended base to ogive length, set it aside and use that round for a fouler. (Note: if the weight is off by more than 6 or 7 grains you may want to disassemble the round and check your powder charge.) With premium, pre-sorted bullets, we’ve found that we can keep 95% of loaded rounds within a range of .002″, measuring from base (of case) to ogive. Now, with some lots of bullets, you just can’t keep things within .002″, but you should still measure each loaded match round to ensure you don’t have some cases that are way too short or way too long.
5. Check Your Fasteners
Before a match you need to double-check your scope rings or iron sight mounts to ensure everything is tight. Likewise, you should check the tension on the screws/bolts that hold the action in place. Even with a low-recoiling rimfire rifle, action screws or scope rings can come loose during normal shooting.
6. Make a Checklist and Pack the Night Before
Ever drive 50 miles to a match then discover you have the wrong ammo or that you forgot your bolt? Well, mistakes like that happen to the best of us. You can avoid these oversights (and reduce stress at matches) by making a checklist of all the stuff you need. Organize your firearms, range kit, ammo box, and shooting accessories the night before the match. And, like a good Boy Scout, “be prepared”. Bring a jacket and hat if it might be cold. If you have windflags, bring them (even if you’re not sure the rules allow them). Bring spare batteries, and it’s wise to bring a spare rifle and ammo for it. If you have just one gun, a simple mechanical breakdown (such as a broken firing pin) can ruin your whole weekend.
A while back, Sinclair International’s Reloading Press Blog featured a “round-table” discussion of reloading techniques. Sinclair’s team of tech staffers were asked: “What do you feel is the one-most crucial step in precision reloading?”
Here are their responses (along with comments from our Editors):
Phil Hoham: “I feel that when working up a load do not go too high or too low in your powder charge. Stay away from ‘suggested loads’ you hear at the range, or on the internet. Always be sure to use a published reloading manual that presents not only minimums and maximums, but also pressure, velocity, and a proper range of powders used. Do not get distracted in the reloading process, and remain focused at all times during each step involved.”
AccurateShooter.com: Some loads presented on the Internet are OK as a starting point, but it is absolutely critical to understand that pressure maximums will vary considerably from one rifle to another (of the same chambering). For example, one 6mmBR rifle shooting 105gr bullets can max out with 30.0 grains of Varget powder, while another rifle, with the same chamber dimensions, but a different barrel, could tolerate (and perform better) with half a grain more powder. You need to adjust recommended loads to your particular rifle and barrel.
Pete Petros: “This could be a very broad topic, but if I were to pick one, it would be making sure to pay close attention, and weigh each and every powder charge to ensure that each load is exact and consistent. This is important not only for accuracy, but also for safety reasons.”
AccurateShooter.com: If you’re shooting beyond 200 yards, it is critical to weigh your loads with an accurate scale or automated system such as the AutoTrickler V3/V4. Loads that are uniform (within a few kernels) will exhibit lower Extreme Spread and Standard Deviation. And remember, even if you stick with the same powder, when you get a new powder lot, you may have to adjust your load quite a bit. For example, .308 Palma shooters have learned they may need to adjust Varget loads by up to a full grain from one lot of Varget to the next.
Ron Dague: “I feel that the most important step(s) in reloading for accuracy are in the initial case prep. Uniforming the primer pocket to the same depth to ensure consistency in primer seating is a crucial step. Additionally de-burring the flash holes, each in the same way to clean up and chamfer the inside is important. It ensures that the ignition from the primer is uniform and flows out in the same consistent pattern. Doing so will create uniform powder ignition and tighten up your velocity Extreme Spread.”
AccurateShooter.com: With some brands of brass, primer pocket uniforming and flash-hole deburring is useful. However, with the best Lapua, Norma, and RWS brass it may be unnecessary, or worse, counter-productive. So long as your Lapua brass flash-holes are not obstructed or smaller than spec, it may be best to leave them alone. This is particularly true with the small flash holes in 220 Russian, 6BR, and 6.5×47 cases. MOST of the flash-hole reaming tools on the market have cutting bits that vary in size because of manufacturing tolerances. We’ve found tools with an advertised diameter of .0625″ (1/16″) that actually cut an 0.068″ hole. In addition, we are wary of flash-hole deburring tools that cut an aggressive inside chamfer on the flash-holes. The reason is that it is very difficult to control the amount of chamfer precisely, even with tools that have a depth stop.
Rod Green: “I feel that bullet seating is the most important step. If you had focused on making sure all prior steps (case prep, powder charge, etc.) of the process have been carefully taken to ensure uniformity, bullet seating is the last step, and can mean all the difference in the world in terms of consistency. Making sure that the bullet is seated to the same depth each time, and time is taken to ensure that true aligned seating can make the load.”
Bob Blaine: “I agree with Rod. I strongly feel that consistent bullet seating depth is the most important step in creating the most accurate hand loads. I have seen the results in both my bench and long range rifles. Taking the time to ensure exactness in the seating process is by far, the number one most important step in my book.”
AccurateShooter.com: Agreed. When loading match ammo, after bullet seating, we check every loaded round for base of case to ogive length. If it varies by more than 3 thousandths, that round is segregated or we attempt to re-seat the bullet. We measure base of case to bullet ogive with a comparator mounted on one jaw of our calipers. You may have to pre-sort your bullets to hold the case-base to ogive measurement (of loaded rounds) within .003″.
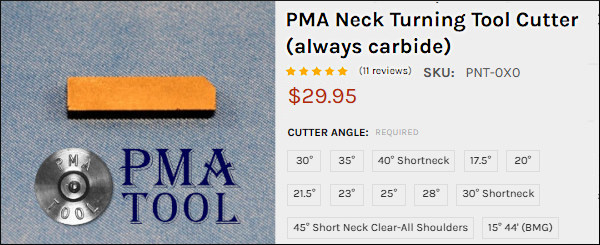
When neck-turning cases, it’s a good idea to extend the cut slightly below the neck-shoulder junction. This helps keep neck tension more uniform after repeated firings, by preventing a build-up of brass where the neck meets the shoulder. One of our Forum members, Craig from Ireland, a self-declared “neck-turning novice”, was having some problems turning brass for his 20 Tactical cases. He was correctly attempting to continue the cut slightly past the neck-shoulder junction, but he was concerned that brass was being removed too far down the shoulder.
Craig writes: “Everywhere I have read about neck turning, [it says] you need to cut slightly into the neck/shoulder junction to stop doughnutting. I completely understand this but I cant seem to get my neck-turning tool set-up to just touch the neck/shoulder junction. It either just doesn’t touch [the shoulder] or cuts nearly the whole shoulder and that just looks very messy. No matter how I adjust the mandrel to set how far down the neck it cuts, it either doesn’t touch it or it cuts far too much. I think it may relate to the bevel on the cutter in my neck-turning tool…”
Looking at Craig’s pictures, we’d agree that he didn’t need to cut so far down into the shoulder. There is a simple solution for this situation. Craig is using a neck-turning tool with a rather shallow cutter bevel angle. This 20-degree angle is set up as “universal geometry” that will work with any shoulder angle. Unfortunately, as you work the cutter down the neck, a shallow angled-cutter tip such as this will remove brass fairly far down. You only want to extend the cut about 1/32 of an inch past the neck-shoulder junction. This is enough to eliminate brass build-up at the base of the neck that can cause doughnuts to form.
The answer here is simply to use a cutter tip with a wider angle — 30 to 40 degrees. The cutter for the K&M neck-turning tool (above) has a shorter bevel that better matches a 30° shoulder. There is also a 40° tip available. PMA Tool and 21st Century Shooting also offer carbide cutters with a variety of bevel angles to exactly match your case shoulder angle*. WalkerTexasRanger reports: “I went to a 40-degree cutter head just to address this same issue, and I have been much happier with the results. The 40-degree heads are available from Sinclair Int’l for $15 or so.” Forum Member CBonner concurs: “I had the same problem with my 7WSM… The 40-degree cutter was the answer.” Below is Sinclair’s 40° Cutter for its NT-series neck-turning tools. Item NT3140, this 40° Cutter sells for $14.99. For the same price, Sinclair also sells the conventional 30° Cutter, item NT3100.
Al Nyhus has another clever solution: “The best way I’ve found to get around this problem is to get an extra shell holder and face it off .020-.025 and then run the cases into the sizing die. This will push the shoulder back .020-.025. Then you neck turn down to the ‘new’ neck/shoulder junction and simply stop there. Fireforming the cases by seating the bullets hard into the lands will blow the shoulder forward and the extra neck length you turned by having the shoulder set back will now be blended perfectly into the shoulder. The results are a case that perfectly fits the chamber and zero donuts.”
Keith Glasscock is one of America’s greatest F-Class shooters and one of highly respected wind coach. A High Master, Keith finished second overall at the 2021 NRA F-Class Long Range Championship in F-Open division. He also finished second at the 2020 F-Open Nationals, and second at the 2019 F-Open Nationals. His consistency is unrivaled, which means he definitely knows the secrets of competition shooting and loading ultra-accurate ammo. In recent seasons, Keith has started PRS/NRL competition, bringing his impressive shooting skills to those popular tactical disciplines.
Keith has a great YouTube Channel with multiple new video releases every month. On Keith’s Winning in the Wind channel, Keith offers 265+ informative videos on a wide range of topics including wind reading, reloading, component selection, load development, and training.
For today’s Saturday Video Showcase, we offer nine of our favorite Keith Glasscock videos. These cover many key topics — ballistics, barrel care, gunsmithing, bullet sorting, reloading, maintenance and more. Each video has important points that can benefit any competitive rifle shooter, whether you shoot in local 100-yard fun matches or compete at the National Level in F-Class, LR Benchrest, Palma, High Power, or PRS/NRL.
Top 10 Methods to Improve Your Shooting Accuracy
To shoot top scores, you need great skills and great hardware. This video covers 10 things that can improve accuracy, starting with the most important. The #1 item, notes Keith, is rifle shooting skill — you need to be able to hold on target properly and run the rifle consistently shot after shot. The second most important thing is an accurate rifle — you need a rifle with an excellent barrel, quality components, and top-tier inherent accuracy. Third, you need very accurate ammo, and this means you need to perfect your reloading skills. You need precise powder measurement and good, consistent bullet seating. Fourth in the list is related to ammo — you need the ability to do effective load development to pick the best load for your particular barrel. Number 5 is the “right bullet”. You need a high-quality, ultra-consistent bullet that is a good match for your particular barrel and discipline. Watch the video for the other five items.
Wind Direction vs. Wind Speed — Which is More Important
Most shooters find wind reading somewhat intimidating. That is understandable. The wind can change constantly during a match, with variations in both wind velocity and angles. Sometimes you think you have a cycle figured out, but then there can be an unexpected lull. Or you may start a string in what you think is a stable condition, but then a surprise shift changes everything. In addition, wind flows can be influenced by terrain features, such as berms, which have varying effects depending on wind angle (e.g. a tailwind hitting a berm will act differently than a 90-deg crosswind). That is why a good wind reader needs to identify both the wind speed AND the wind angle. In this video, Keith explains when to focus primarily on direction and when to pay most attention to velocity. With headwinds and tailwinds, Keith notes, you should monitor angle changes carefully. With crosswinds, speed is the key variable to watch.
KEY Points to Remember
— Small changes in wind direction changes alter POI drastically at long range
— During head or tailwinds, focus on wind direction
— During crosswinds, focus more on wind speed
— The wind is cyclic — always be aware of the pattern
Reloading for PRS/NRL vs. F-Class
Keith Glasscock is one of the very few PRS/NRL competitors who has shot F-Class at the very highest level, finishing second three times in F-Class National Championships. PRS/NRL and F-Class are very different disciplines with different challenges. F-Class is shot prone with time between shots and target distances from 600 to 1000 yards. In PRS/NRL competition, you are shooting from multiple positions, at many distances from 100 yards on out, with fast follow-up shoots. For F-Open, you want an extremely accurate load that can deliver sub-quarter MOA groups at 200 yards. For PRS/NRL you don’t necessarily need that level of accuracy (though it helps). But you also need a load that is very consistent, has relatively low recoil, but can also provide sufficient impact energy to clearly show a hit on distant steel. In this video, Keith Glasscock explains his reloading objectives for the two disciplines.
How to Find (and Fine-Tune) Seating Depth
This is Keith’s most popular video, with 295,000 views on YouTube. Keith definitely knows how to maximize accuracy by finding the optimal seating depth for each particular barrel. He is achieving groups in the high Ones for three shots. That would be good for a short-range benchrest cartridge, but Keith is achieving that with a .284 Winchester which has much more recoil. If you shoot F-TR or F-Open or even PRS, you should watch this video.
How to Remove Carbon Build-Up in Barrels
Hard carbon is the bane of rifle shooters. Hard carbon build-up in the barrel can adversely affect accuracy, and in extreme cases, can lead to increased pressure. If possible, you should clean your barrel(s) soon after a match (or shooting session) before the carbon fully hardens. We’ve used Wipe-Out Foam right after a match (with an hour soak time) and that dramatically reduced the amount of brushing required. In this video Keith Glasscock explains the negatives of hard carbon in your barrel, and he discusses how to diagnose the problem and how to remove the carbon build-up efficiently.
Key Methods for Precision Load Development
Keith starts this video with this adage: “The best do the basics better.” He then explains how that applies to load development and achieving great accuracy. Your need to start with high-quality components then do every step of the reloading process — case prep, powder mesauring, bullet seating with precision. Keith then goes through his recommended process for developing an accurate load that will sustain accuracy throughout a match.
Recommended Barrel Break-In Methods
Barrel break-in is a controversial subject. With premium finish-lapped barrels from top manufacturers, some ace F-Class shooters get away with hardly no break-in — just shoot for score right from the get-go. On high-quality custom barrels, we’ve had success with minimalistic break-in with a few wet patches ever 3 rounds for the first 20 rounds. However, with relatively rough factory barrels, you may get better long-term results with a systematic break-in process, even using specialized products on your patches. In this video Keith Glasscock explains break-in procedures he’s found to work for various barrel types and applications.
What Counts More — ES or SD?
In general, we have gotten the best match results with loads showing an Extreme Spread (ES) under 13 FPS and an extremely low Standard Deviation (SD). We know that F-Class and ELR shooters competing at 1000 yards and beyond definitely want an extremely low ES to minimize vertical dispersion at long range. That said, some short-range Benchrest competitors look at group size more than ES/SD. In this video, Keith Glasscock talks about the reloading process and methods for lowering ES and SD. Proper brass prep is important, as is precise powder measuring. And long range shooters may want to test 3 or 4 different powder types to find the one that offers the best combination of accuracy and low ES/SD.
Sorting Bullets — Various Methods Compared
Should you sort your bullets? If so, should you sort by weight, OAL, base-to-ogive, or max diameter? Which factor? Well the answer is “it depends”. You need to carefully examine a couple dozen bullets from each batch to see how consistent they are. We had some Lapua bullets that were ultra-consistent with 97 out of 100 within .0015″ base to ogive length. We used those bullets unsorted to set a local range record at 600 yards. On the other hand if you find significant differences in weights, diameters, or bearing surface lengths, you probably should sort. One tip — many shooters do not consider the width difference in bullets. We have seen 6mm bullet diameters vary from 0.2428″ to 0.2436″. We have one 3-groove 6BR barrel that likes the skinny bullets and another 6-groove barrel that definitely prefers the fatter bullets.
He who dies with the most toys wins — right? Well Sinclair has another interesting gadget you can add to your reloading bench. The Sinclair Case Neck Sorting Tool lets you quickly sort brass by neck-wall thickness. For those who shoot “no-turn” brass, this can improve neck-tension consistency. Large variances in neck-wall thickness can cause inconsistent neck “grip” on the bullet. Generally, we’ve found that more consistent neck tension will lower ES and (usually) improve accuracy. We know some guys who shoot no-turn 6mmBR brass in competition with considerable success — but their secret is pre-sorting their brass by neck-wall thickness. Cases that are out-of-spec are set aside for sighters (or are later skim-turned).
Watch Case Neck Sorting Tool Operation in Video
How the Case Neck Sorting Tool Works
Here’s how the Sinclair tool works. Cases are rotated under an indicator tip while they are supported on a case-neck pilot and a support pin through the flash hole. The unit has a nice, wide base and low profile so it is stable in use. The tool works for .22 through .45 caliber cases and can be used on .17- and .20-caliber cases with the optional carbide alignment rod. The MIC-4 pin fits both .060 (PPC size) and .080 (standard size) flash holes. Sinclair’s Case Neck Sorting Tool can be ordered with or without a dial indicator. The basic unit without dial indicator (item item 749006612) is priced at $59.99. With this standard tool you can use your own dial indicator with standard specifications. You can also buy the tool complete with dial indicator (item 749007129) for $89.99. IMPORTANT: This sorting tool requires caliber-specific Case Neck Pilots which must be ordered separately.
Editor’s Comment: The purpose of this Sinclair tool is rapid, high-quantity sorting of cartridge brass to ascertain significant case-neck-wall thickness variations. Consider this a rapid culling/sorting tool. If you are turning your necks, you will still need a quality ball micrometer tool to measure neck-wall thickness (to .0005) before and after neck-turning operations.


 1. Align Front Rest and Rear Bag
 5. Check Your Fasteners
 A while back, Sinclair International’s Reloading Press Blog featured a “round-table” discussion of reloading techniques. Sinclair’s team of tech staffers were asked: “What do you feel is the one-most crucial step in precision reloading?”

 When neck-turning cases, it’s a good idea to extend the cut slightly below the neck-shoulder junction. This helps keep neck tension more uniform after repeated firings, by preventing a build-up of brass where the neck meets the shoulder. One of our Forum members, Craig from Ireland, a self-declared “neck-turning novice”, was having some problems turning brass for his 20 Tactical cases. He was correctly attempting to continue the cut slightly past the neck-shoulder junction, but he was concerned that brass was being removed too far down the shoulder.


 Keith has a great

 He who dies with the most toys wins — right? Well Sinclair has another interesting gadget you can add to your reloading bench. The Sinclair


