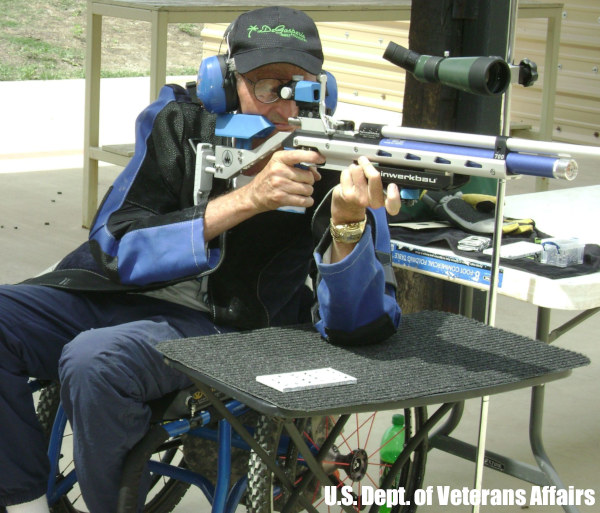
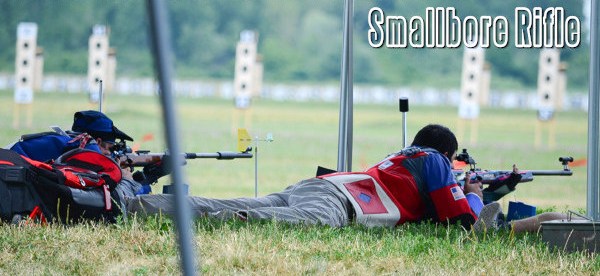
One of the great thing about shooting is that marksmanship is one of the few sports where physically-challenged persons can compete at the highest level — with some provisions for wheelchair access and mobility. For example, in the world of F-Class competition, Matt Schwartzkopf is one of the best in the nation. Matt, a rangemaster at Ben Avery in Arizona, is a double amputee (below the knee). He hasn’t let that challenge stop him. He has been a Top-10 finisher at major F-Class matches, and was chosen to shoot with F-TR Team USA.
F-TR Team USA member Matt Schwartzkopf is a double amputee below the knee, having had his lower legs removed due to a birth defect. That hasn’t held him back. Matt is an inspiration to us all. He told us: “This condition has not held me back from anything.” Jokingly, he added, “I may not have ‘a leg to stand on’, but that doesn’t mean I can’t still shoot 10s and Xs at 1000.” Matt is living proof that competitive shooting is a sport for all individuals — young and old, able-bodied and physically challenged.
Matt isn’t just a talented shooter — he runs range operations at Ben Avery in Arizona. During a major match, Matt can be seen supervising the firing line, organizing pit crews, and posting match results.
New USA Nationwide Adventure Database for Adaptive Shooters
Here’s a great new opportunity for shooters and sportsmen with physical limitations. The NRA has created a nationwide database of hunting and fishing adventures for individuals with disabilities. There are programs throughout the country with 45+ organizations such as Buckmasters, Freedom Hunters, Hope Outdoors, Hunting with Heroes, and Safari Club International.
“Venturing into the outdoors has long been acknowledged as healing for the body and soul”, said NRA National Adaptive Shooting Programs Manager Dr. Joe Logar, PT, DPT. “These benefits can be even more profound for someone experiencing an illness, injury, or disability.”
NRA’s Hunter Services and Adaptive Shooting Programs have maintained a list of organizations offering people with disabilities outdoor opportunities. Now available in a searchable database, any adaptive shooter can easily choose from adventures such as guided whitetail hunts, chartered fishing trips, and accessible hiking trails anywhere across the country. To find a program, visit the NRA Adaptive Shooting Program’s Hunting/Fishing Trip Database.
NRA Resources for Adaptive Shooting Events
The NRA Adaptive Shooting Program also provides information for organizations planning an event to include person with disabilities. Events may be organized by veterans’ groups, rehabilitation facilities, and gun clubs. For more information visit AdaptiveShooting.NRA.org.
Adaptive Shooting Programs in the United Kingdom
Across the pond, the National Rifle Association of the United Kingdom (NRAUK) also has adaptive shooting programs. The NRA.ORG.UK website has a wealth of information for shooters with physical challenges.
The NRAUK states: “There are many different types of target shooting available for people to try in Great Britain. Some of them are readily accessible to disabled people, others less so. Also, shooting clubs and facilities do not all cater for every discipline; some only offer one, whilst larger complexes can cater for many of them. The only place in the country where almost all disciplines can be tried is Bisley Camp in Surrey. Access to the outdoor ranges is being improved all the time, although most are already accessible.
If the disciplines that you particularly fancy are not suitable for your type of disability at the moment, or are not currently available in your area, do not give up hope! The key skills for target shooting are very similar for all disciplines, so you could start with a different but similar option, learn those key skills, and take up your first choice when it is available to you.”
Making Ranges Suitable for Disabled Shooters
The Summer 2019 issue of NRA Club Connections magazine has a feature on Adaptive Shooting. This article explains how range owners can make their lines of fire more accessible with the addition of a simple mat.
Sinclair Internationalhas released an interesting article about Case Concentricity* and bullet “run-out”. This instructional article by Bob Kohl explains the reasons brass can exhibit poor concentricity, and why high bullet run-out can be detrimental to accuracy.
Concentricity, Bullet Alignment, and Accuracyby Bob Kohl
The purpose of loading your own ammo is to minimize all the variables that can affect accuracy and can be controlled with proper and conscientious handloading. Concentricity and bullet run-out are important when you’re loading for accuracy. Ideally, it’s important to strive to make each round the same as the one before it and the one after it. It’s a simple issue of uniformity.
The reason shooters work with tools and gauges to measure and control concentricity is simple: to make sure the bullet starts down the bore consistently in line with the bore. If the case isn’t properly concentric and the bullet isn’t properly aligned down the center of the bore, the bullet will enter the rifling inconsistently. While the bore might force the bullet to align itself with the bore (but normally it doesn’t), the bullet may be damaged or overstressed in the process – if it even it corrects itself in transit. These are issues we strive to remedy by handloading, to maintain the best standard possible for accurate ammunition.
The term “concentricity” is derived from “concentric circle”. In simple terms it’s the issue of having the outside of the cartridge in a concentric circle around the center. That goes from case head and center of the flash hole, to the tip of the bullet.
Factors Affecting Concentricity
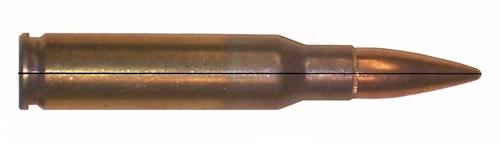
The point of using this term is to identify a series of issues that affect accurate ammunition. Ideally this would work best with a straight-walled case; but since most rifle cartridge cases are tapered, it equates to the smallest cross section that can be measured point by point to verify the concentric circle around the center. For the examples below, I’m working with .308 Winchester ammo.
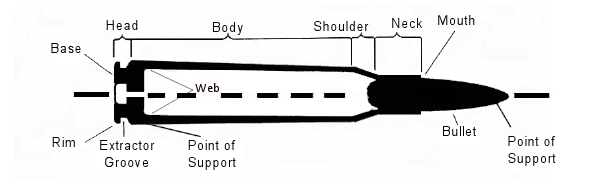
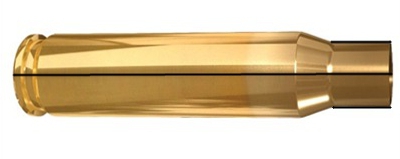
Figure 1: The cartridge.
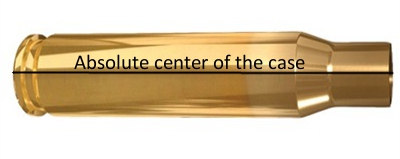
Figure 2: Centerline axis of the case, extending from flash hole to case mouth.
The case walls have to be in perfect alignment with the center, or axis, of that case, even if it’s measured at a thousandth of an inch per segment (in a tapered case).
Figure 3: Case body in alignment with its axis, or centerline, even in a tapered case.
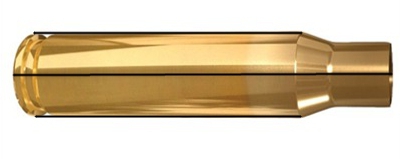
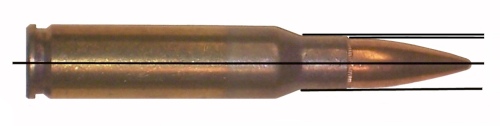
The case neck must also be in alignment with its axis. By not doing so you can have erratic bullet entry into the bore. The case neck wall itself should be as uniform as possible in alignment and in thickness (see the M80 7.62x51mm NATO cartridge in Figure 5) and brass can change its alignment and shape. It’s why we expand the case neck or while some folks ream the inside of the neck and then turn the outside for consistent thickness, which affects the tension on the bullet when seated.
Figure 4: Neck in alignment with center of the case axis.
Figure 5: Variations in case neck wall thickness, especially on some military brass, can cause an offset of the bullet in its alignment. This is an M80 ball round. Note the distinct difference of the neck walls.
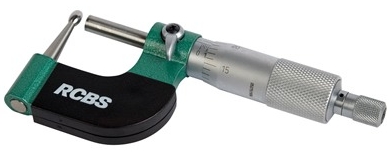
Having a ball micrometer on hand helps, especially with military brass like 7.62x51mm in a semi-auto rifle, where there are limits as to how thin you want the neck walls to be. In the case of 7.62 ball brass you want to keep the wall to .0145″.
Figure 6: A ball micrometer like this RCBS tool (#100-010-268) can measure case neck thickness.
Turning the outside of the neck wall is important with .308 military cases regardless of whether you expand or ream the neck walls. There are several outside neck turning tools from Forster, Hornady, Sinclair, and others. I’ve been using classic Forster case trimming (#100-203-301) and neck turning (#749-012-890) tools for 40 years.
Bullet Run-Out
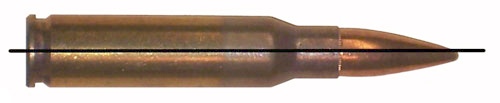
The cartridge, after being loaded, still needs to be in alignment with the center of the case axis. Figure 7 shows a bad example of this, a round of M80 ball. A tilted bullet is measured for what’s known as bullet “run-out”.
Figure 7: An M80 round with the bullet tilted and not aligned with the axis. This will be a flyer!
Run-out can be affected by several things: (1) improperly indexing your case while sizing, which includes not using the proper shell holder, especially while using a normal expander ball on the sizing die (it also can stretch the brass). (2) The head of a turret press can flex; and (3) improper or sloppy bullet seating. This is also relevant when it comes to using a progressive press when trying to load accuracy ammo.
Mid Tompkins came up with a simple solution for better bullet seating years ago. Seat your bullet half way into the case, back off the seater die and rotate the case 180 degrees before you finish seating the bullet. It cuts down on run-out problems, especially with military brass. You also want to gently ream the inside of the neck mouth to keep from having any brass mar the surface of the bullet jacket and make proper seating easier. A tilted bullet often means a flyer.
Figure 8: Proper alignment from the center of the case head to the tip of the bullet.
(NOTE: This links to a Web Archive version of the original Sinclair Int’l article.)
*Actually some folks would say that if we are talking about things being off-center or out-of-round, we are actually talking about “eccentricity”. But the tools we use are called “Concentricity Gauges” and Concentricity is the term most commonly used when discussing this subject.
The U.S. Army Marksmanship Unit published a series of reloading “how-to” articles on the USAMU Facebook page. A while back the USAMU’s reloading gurus looked at the subject of cartridge run-out and what can be done to produce straighter ammo. Tasked with producing thousands of rounds of ammo for team members, the USAMU’s reloading staff has developed smart methods for improving concentricity, even with budget-priced dies. For other hand-loading tips, visit the USAMU Facebook page.
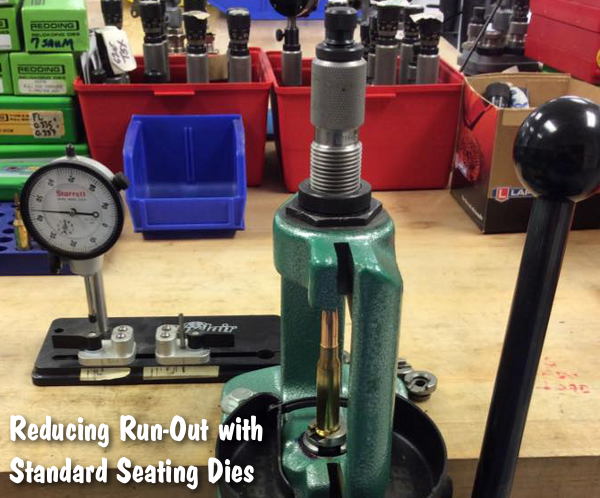
Minimizing Runout with Standard Seating Dies
This USAMU article explains how to set up standard bullet seating dies dies to minimize Total Indicated Run-out (TIR). The loading process is described using a single-stage press since most handloaders have one. A high-quality run-out gauge is essential for obtaining consistent, accurate results.
Having sized, primed, and charged our brass, the next step is bullet seating. Many approaches are possible; one that works well follows. When setting up a standard seating die, insert a sized, trimmed case into the shellholder and fully raise the press ram. Next, back the seating stem out and screw the die down until the internal crimping shoulder touches the case mouth.
Back the die out ¼ turn from this setting to prevent cartridge crimping. Next, lower the press ram and remove the case. Place a piece of flat steel (or window glass, which is quite flat) on the shellholder and carefully raise the ram.
Place tension on the die bottom with the flat steel on the shellholder. This helps center the die in the press threads. Check this by gently moving the die until it is well-centered. Keeping light tension on the die via the press ram, secure the die lock ring. If one were using a match style, micrometer-type seating die, the next step would be simple: run a charged case with bullet on top into the die and screw the seating stem down to obtain correct cartridge OAL.
However, with standard dies, an additional step can be helpful. When the die has a loosely-threaded seating stem, set the correct seating depth but don’t tighten the stem’s lock nut. Leave a loaded cartridge fully raised into the die to center the seating stem in the die. Then, secure the stem’s lock nut. Next, load sample cartridges and check them to verify good concentricity.
One can also experiment with variations such as letting the seating stem float slightly in the die to self-center, while keeping correct OAL. The run-out gauge will show any effects of changes upon concentricity. However, this method has produced excellent, practical results as evidenced by the experiment cited previously. These results (TIR Study 2) will reproduced below for the reader’s convenience.
First, however, let’s examine run-out figures of some factory-loaded match ammunition. This should give readers who are new to TIR gauges some perspective about the TIR ranges one might encounter.
TIR Study 1: 50 rounds Lake City M852 Match 7.62mm
(168 gr. Sierra MatchKings)
0.000” – 0.001” = 2%
0.001” – 0.002” = 30%
0.002” – 0.003” = 16%
0.003” – 0.004” = 22%
0.004” – 0.005” = 14%
0.005” – 0.006” = 14%
0.006” – 0.007” = 0%
0.007” – 0.008” = 2%
TIR Study 2: 50 rounds of .308 match ammo loaded using carefully-adjusted standard dies, vs. 50 using expensive “Match” dies from the same maker.
Standard dies, TIR:
0.000” — 0.001” = 52%;
0.001”– 0.002” = 40%;
0.002”– 0.003” = 8%.
None greater than 0.003”.
Note: both samples were loaded using the O-Ring method, i.e. with a rubber O-Ring placed under the locking ring of the Full-length sizing die to allow that die to float.
These tips are intended to help shooters obtain the best results from inexpensive, standard loading dies. Especially when using cases previously fired in a concentric chamber, as was done above, top-quality match dies and brass can easily yield ammo with virtually *no* runout, given careful handloading.
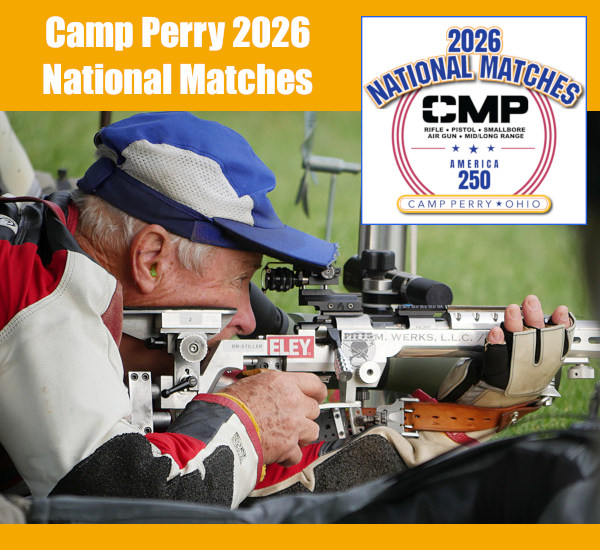
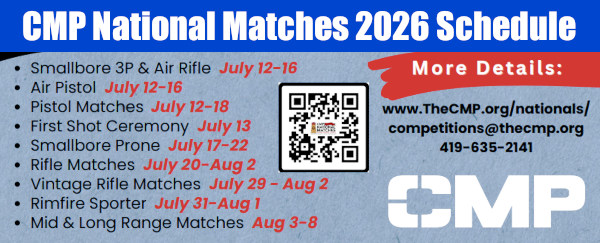
The CMP 2026 National Matches at Camp Perry, Ohio start in six days. The 2026 CMP National Matches will take place at Camp Perry from July 12 through August 8, 2026, with the First Shot Ceremony on Monday, July 13, 2026.
The rifle segments of the CMP National Matches commence next week at Camp Perry. First there will be smallbore competition July 12-22, with centerfire rifle matches commencing on July 20, and running through August 8, concluding with the Mid-Range and Long Range Matches.
To help those who will be competing this year, we offer Ten Lessons from Gary Anderson, DCM Emeritus.
TEN WAYS to Win — Competition Advice from Gary Anderson
In the archives of On The Mark magazine, Gary Anderson, an Olympic Gold medal-winning shooter, offers sage advice for competitive shooters.
In his article Ten Lessons I Wished I Had Learned as a Young Shooter, Anderson provides ten important guidelines for everyone involved in competitive shooting. Here are the Ten Lessons, but you should read the full article. Anderson provides detailed explanations of each topic with examples from his shooting career.
LESSON 1 – NATURAL ABILITY WILL NOT MAKE YOU A SHOOTING CHAMPION.
(You also need hard work, training effort and perseverance.)
LESSON 2 – ANGER IS THE ENEMY OF GOOD SHOOTING.
(The key to recovering from a bad shot is to stay cool, no matter what happens.)
LESSON 3 – BAD SHOTS CAN TEACH YOU MORE THAN GOOD SHOTS.
(Today, error analysis is one of the most powerful tools for improving scores.)
LESSON 4 – NEVER GO WITHOUT A SHOT PLAN.
(A shot plan is a detailed breakdown of each of the steps involved in firing a shot.)
LESSON 5 – PRACTICE IN BAD CONDITIONS AS WELL AS GOOD CONDITIONS.
(Most competitions are fired in windy conditions or where there are plenty of distractions.)
LESSON 6 – CHAMPIONS ARE POSITIVE, OPTIMISTIC PEOPLE.
(Negative shooters expect bad results; positive shooters expect to train hard to change bad results.)
LESSON 7 – IT’S NOT ABOUT WHETHER YOU WIN OR LOSE.
(It’s about how hard you try to win.)
LESSON 8 – YOUR DOG WON’T BITE YOU AFTER SHOOTING A BAD SCORE.
(Hopefully your coach, parents and friends won’t bite you either.)
LESSON 9 – YOUR PRESS CLIPPINGS CAN HURT YOU OR HELP YOU.
(Winning can go to our heads. We start thinking we are so good we don’t have to work hard any more.)
LESSON 10 — YOU NEVER SHOT YOUR BEST SCORE.
(Great champions are always looking for ways to improve.)
About Gary Anderson Gary Anderson served as the Director of the Civilian Marksmanship Program (CMP) from 1999-2009, and is now DCM Emeritus. In 1959, he joined the elite U.S. Army Marksmanship Unit. Just two years later, he won his first national championship. Over his competitive career, Anderson won two Olympic Gold Medals, seven World Championships, and sixteen National Championships. He is unquestionably one of the greatest American marksmen ever.
At the 1962 World Shooting Championships in Egypt, Anderson won four individual titles and set three new world records. At the 1964 Tokyo Olympics, Gary won the 300m free-rifle Gold Medal, setting a new world record. At the 1966 World Shooting Championships in Germany, Anderson won three additional world titles. At the 1968 Olympics, Gary won a second gold medal in the 300m free-rifle event. After his “retirement” from international competition, Gary competed in the National High Power Championships, winning the President’s National Trophy in 1973, 1975 and 1976.
This USAMU article explores three different “Philosophies” of precision reloading. Some handloaders seek to produce ammo that yields the very tightest groups (without factoring in the wind). Other shooters load their ammo to deliver the highest safe velocity. That’s because a projectile launched at higher velocity will drift less in the wind. The theory is that even if fast ammo doesn’t produce the tightest groups in zero wind conditions, it will yield higher scores in a the real world (where the wind blows). Lastly, some handloaders favor ammo that is ultra-consistent across a wide temperature range. This last philosophy dictates selection of a powder that is temp-insensitive, even if it may not produce the very best raw accuracy (or speed).
What’s Your Handloading Philosophy?
Objectives of Reloading — Accuracy, Velocity, Temp Stability What do you, the reader, primarily value in your handloads?
Viewpoint ONE: Accuracy Trumps Everything
Some shooters prize consistent, excellent medium/long range accuracy enough that they’re willing to give up some extra velocity (and reduced wind deflection) to obtain that. Their underlying philosophy could be stated: “Superior accuracy is present for every shot, but the wind isn’t”. One’s ability to hold well, aim well and read the wind are all factors in making this type decision. The photo below shows stellar raw accuracy. This is an 0.67″, 10-shot group at 300-yards fired from a text fixture. The group measures just 0.67″. (This shows the USAMU’s 600-yard load with 75gr bullets).
Viewpoint TWO: Load to Highest Safe Velocity for Less Wind Drift
Some shooters value obtaining the highest safe velocity, even if one’s pure, consistent mechanical accuracy at medium/long range isn’t quite as brilliant. The theory here seems to be that a really good hold extracts as much mechanical accuracy from the rifle/ammo as possible, and faster bullets equal occasional “bonus” points snatched from the jaws of wind.
[For example] one of the USAMU’s many Service Rifle National Champions revealed his philosophy. It can be stated thus: a super-accurate, but [relatively] “slow” load “required him to have a Ph.D. in wind reading for every shot, while a faster, but less accurate load netted him more points.”
Note — this was not mere speculation; his score book data backed up his claims, due to less wind effects. Remember, however, this fellow has a consistent, National Championship-level hold, and other Champions on the same team would have opted differently.
Viewpoint THREE: Temperature Stability Is Key
Still another approach is to place heavy emphasis on fine accuracy with absolute stability in changing temperatures. When this writer was actively earning his Distinguished Rifleman badge, that was his goal. The reason? Sighting shots are not allowed in EIC (“Leg”) matches. The first shot out of the barrel was for score. It had to be 100% consistent, with very reliable, predictable elevation and wind deflection regardless of the ambient temperature — even if it wasn’t the lowest wind deflection possible.
Naturally, selecting a powder that is insensitive to temperature changes is a key element here. Elevation zeros and wind effects HAD to be consistent every time. Hunters and military snipers might be among those who fall into this camp, as well as those in pursuit of their Distinguished Rifleman badges.
Contrast that with a traditional High Power shooter who gets two sighter shots before each event (offhand, sitting rapid, prone rapid, prone slow fire.) If there is a zero change on any given day, he/she can correct during sighters. This writer well remembers talking with another very high-level Service Rifle competitor who was happy to have high temperatures boost the velocities of his ammunition above their usual level… As far as this SR competitor was concerned, 60-80 fps more velocity -– even if only due to high ambient temperatures -– meant less wind deflection, and he was mighty happy to have it.
Particularly in the summer, with hot daily conditions, you need to be concerned about temperature stability. Loads worked up in winter may be over-pressue in the summer time. FYI summer officially begins this year on June 21, 2026, Summer Solstice, just 10 days away.
This article has been confined to NRA High Power Rifle competition, which has relatively generous 10-ring dimensions in relation to the accuracy of well-built competition rifles. Hopefully, it will provide food for thought. For some, this might be an opportunity to ensure that one’s load development approach helps them attain their desired results.
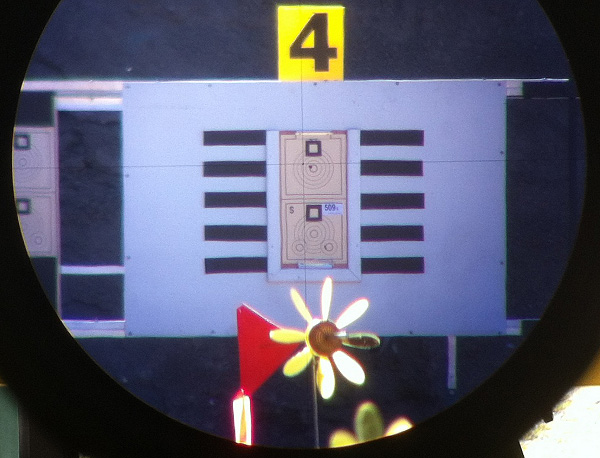
Coalinga Range in California. At dawn we could clearly see 7mm and .30 Cal bullet holes at 1000 yards.
While attending the CA Long Range Championship a few seasons back, we had the opportunity to test the performance of a high-magnification (63X) spotting scope in near-ideal conditions (maybe the best I’ve ever witnessed). On the event’s last day we arrived at 5:45 am, literally as the sun was cresting the horizon. I quickly deployed our Pentax PF-100ED spotting scope, fitted with a Pentax SMC-XW 10mm fixed-power eyepiece. When used with the 100mm Pentax scope, this 10mm eyepiece yields 63X magnification. Befitting its $319.00 price, this eyepiece is extremely clear and sharp.
At the crack of dawn, viewing conditions were ideal. No mist, no mirage, no wind. The first thing this Editor noticed was that I could see metal nail heads on the target boards. That was astonishing. As soon as the first practice targets went up, to my surprise, I could see 6.5mm, 7mm, and 30-caliber bullet holes in the white at 1000 yards. No lie…
That’s right, I could see bullet holes at 1000. I know many of you folks may not believe that, but there was no mistaking when I saw a 7mm bullet cut the white line separating the Nine Ring and Eight Ring on the target in view. (I was watching that target as the shot was fired and saw the shot-hole form). And when I looked at the 30-cal targets, the bullet holes in the white were quite visible. In these perfect conditions I could also make out 3/8″ bolt heads on the target frames.
The Human Factor — Good Vision Required
When viewing the bullet holes, I was using my left naked eye (no safety glasses or magnification). I also had a contact lens in my right eye (needed for distance vision). To my surprise, while I could see the bullet holes without much difficulty with my left eye, things were fuzzier and slightly more blurry with the right eye, even when I re-focused the scope. That contact lens was degrading the fine resolution.
Then I invited 3 or 4 shooters to look through the scope. One younger guy, with good eyes, said immediately: “Yeah, I can see the holes — right there at 4 o’clock and seven o’clock. Wow.” Some older guys, who were wearing glasses, could not see the holes at all, no matter what we did to the scope’s main focus and diopter adjustment.
The lesson here — if you have to wear glasses or corrective contact lenses, just that extra bit of optical interference may make a difference in what you can see through the scope. Basically anything that goes between the scope eyepiece and your eyeball can degrade the image somewhat. So… you may be better off removing your glasses if you can still obtain good focus sharpness using the diopter adjustment and focus ring. I did the left vs. right eye test a half dozen times, and I could definitely see small features at 1000 yards with my naked eye that I could not see with my right eye fitted with a contact lens. (I did have to re-focus the scope for each eye, since one had a corrective lens while the other did not.)
Mirage Degrades Image Sharpness and Resolution
The “magic light” prevailed for only an hour or so, and then we started to get some mirage. As soon as the mirage appeared I was no longer able to see raw bullet holes, though I could still easily see black pasters on the black bulls. When the mirage started, the sharpness of the visible image degraded a huge amount. Where I could see bullet holes at dawn, by mid-morning I could barely read the numbers on the scoring rings. Lesson: If you want to test the ultimate resolution of your optics, you need perfect conditions.
Chromatic Aberration Revealed
As the light got brighter and the mirage increased I started to see blue and red fringing at the edges of the spotting disk and the large numerals. This was quite noticeable. On one side of the bright, white spotting disc you could see a dark red edge, while on the other side there was a blue edge (harder to see but still present).
The photo below was taken through the Pentax spotter lens using a point and shoot camera held up to the eyepiece. The sharpness of the Pentax was actually much better than this photo shows, but the through-the-lens image does clearly reveal the red and blue fringing. This fringing is caused by chromatic aberration — the failure of a lens to focus all colors to the same point. Chromatic aberration, most visible at high magnification, causes different wavelengths of light to have differing focal lengths (see diagram). Chromatic aberration manifests itself as “fringes” of color along boundaries that separate dark and bright parts of the image, because each color in the optical spectrum cannot be focused at a single common point on the optical axis. Keep in mind that the Pentax does have “ED” or low-dispersion glass, so the effect would be even more dramatic with a cheaper spotting scope.
If you wonder why top-of-the-line spotting scopes (such as the $3558.00 Swarovski ATS-80 ) cost so much, the answer is that they will deliver even LESS chromatic aberration at long range and high magnification. With their exotic apochromatic (APO), ultra-low-dispersion glass, a few ultra-high-end spotting scopes can deliver an image without the color edging you see in the photo above.
The Pentax PF-100ED is a heck of a spotting scope. Any scope that can resolve bullet holes at 1000 yards is impressive. But if you want the ultimate in optical performance, with minimal chromatic aberration, you may need to step up to something like the 88mm Kowa Prominar TSN-88A with Flourite Crystal lenses ($3999.00 with eyepiece), or the 82mm Leica APO-Televid ($3649.95 with 25-50X eyepiece).
EDITOR’s NOTE: The purpose of this report is to show what is possible… in IDEAL conditions. With this Pentax 100mm, as well as a Swarovski 80mm, we can often resolve 6mm bullet holes at 600 yards. But again, that performance requires really good viewing conditions. By 10:00 am at my range, even with the 100mm Pentax at 75 power, seeing 6mm bullet holes is “iffy” at best. So don’t go out and mortgage the house to buy a $4000 optic with the hope that you’ll be able to spot your shots at 1000 yards. If conditions are anything less than perfect, you’ll be lucky to see bullet holes at 500 yards.
The real solution for very long-range spotting is to set up a remote target cam that broadcasts a video picture to a screen at your shooting station. Among the target cams on the market, we recommend the LongShot LR-3 2-mile UHD. This modern target cam system boasts excellent resolution and incredible range. The LongShot LR-3 target cam is used in major ELR competitions. The Longshot LR-3 currently sells for $999.00 on Amazon.
The U.S. Supreme Court has granted Second Amendment Foundation (SAF) petitions for a writ of certiorari, in legal actions challenging state/local laws restricting “assault weapons”. In two notable cases — Viramontes v. Cook County and Grant v. Higgins — the Supreme Court has determined to consider SAF’s challenges to the bans on so-called “assault weapons” in Illinois and Connecticut.
Originally filed in 2021, Viramontes challenges the Cook County (Illinois) ban on many popular, commonly-owned modern guns, which was the precursor for the nearly identical statewide ban passed by the Illinois legislature.
In Grant v. Higgins, SAF challenges Connecticut’s broad ban on common, mag-fed, semi-automatic rifles — both by name and by feature set. After a troubling and misguided preliminary injunction decision from the Second Circuit Court of Appeals, SAF presented the case to the Supreme Court for consideration.
“The Supreme Court’s decision to hear these pivotal cases will finally provide the courts the necessary guidance as it relates to the types of arms protected by the Second Amendment,” said SAF Executive Director Adam Kraut. “The modern semi-automatic rifles banned in Cook County, Connecticut and elsewhere are among the most commonly owned firearms in the country, placing them well within the scope of the Second Amendment. The Second Amendment protects arms in common use for lawful purposes, and it’s hard to argue that a type of rifle that potentially outnumbers Ford F-150 trucks in America doesn’t meet that standard.”
SAF is joined in Viramontes v. Cook County by the Firearms Policy Coalition and two private citizens, and is joined in Grant v. Higgins by the Connecticut Citizens Defense League and three private citizens.
The SAF correctly argues that AR-15 type rifles are protected by the Second Amendment and are commonly used for home defense.
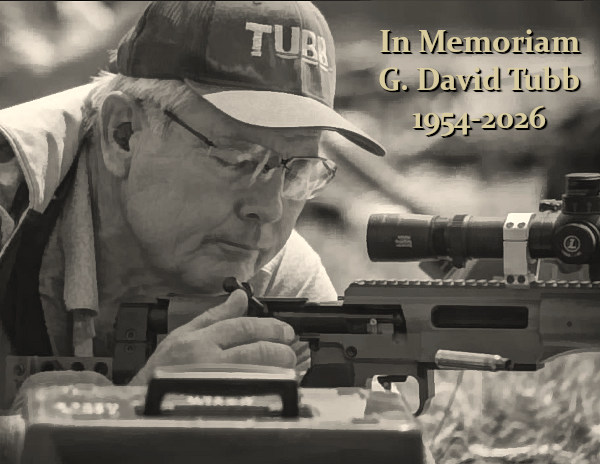
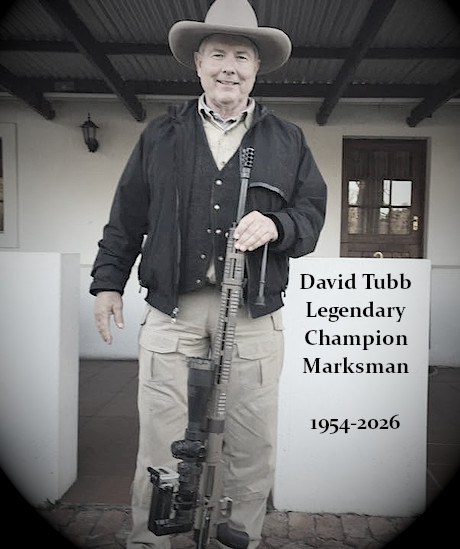
G. David Tubb, America’s greatest competitive marksman, sadly passed away on July 2, 2026 from serious heart and blood oxygen complications following a lower leg amputation surgery. America’s shooting world has lost one of its true superstars, a man whose records at the range will likely never be surpassed.
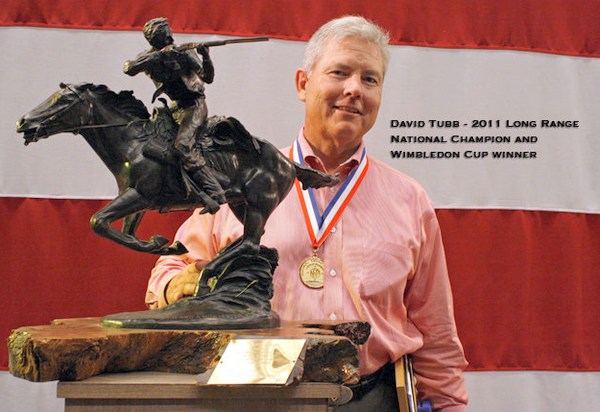
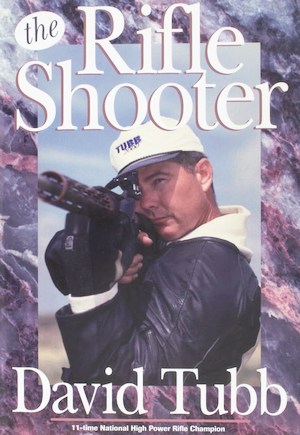
If you have ever competed in NRA High Power, Silhouette, or Long Range disciplines, you know the name David Tubb. Arguably the greatest rifle marksman in American history, David has recorded 11 High Power Rifle Championships, 6 Long Range National Championships, and 7 High Power Silhouette National Championships. Over his career David has won 130 NRA trophies for various competitions. No one has even come close to that number of Championships and honors in rifle competition.
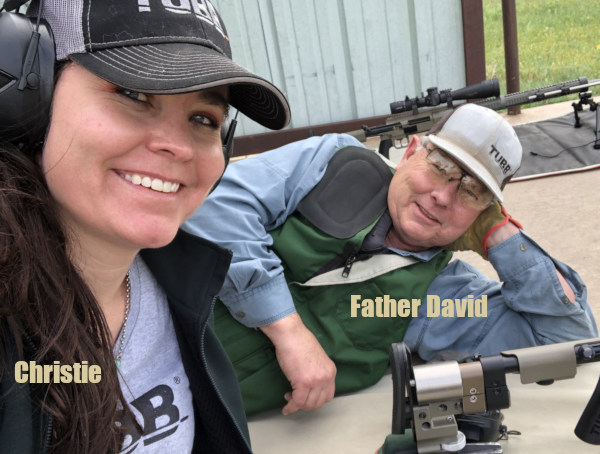
After David passed we communicated with his daughter, Christie Tubb Stallter. She was deeply saddened but wanted to help us understand David’s skills and achievements both as a marksman and a father.
G. David Tubb — Great Marksman and Great Father
by Christie Tubb Stallter
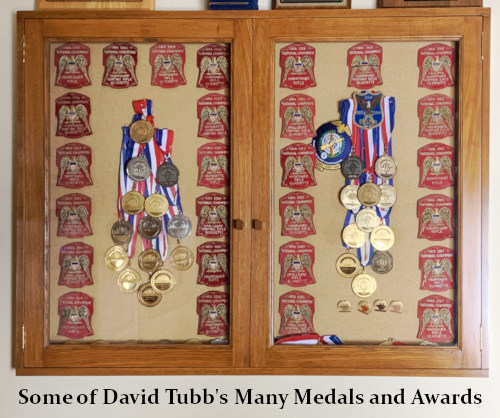
Editor: Over his many decades of shooting, David Tubb amassed more major medals, trophies, and awards than any other American marksman in history. Here his daughter lists some of the most important awards. Then Christie explains the qualities David had that made him a great marksman and a great father.
Summary of David Tubb’s Awards
Dad had so many individual match awards that we did not keep records of them all. There are trophies and plaques in stacks up high in storage in a few places at my parents’ house and business office. He had over 130 NRA national trophies over his shooting career.
Dad was most proud of the perfect score he shot to win the 2004 NRA Long-Range Highpower Rifle National Championship in Camp Perry, Ohio. He did not drop a single point over the course of the match, making this his proudest accomplishment.
David Tubb Major Marksmanship Awards
11-time National Highpower Rifle Champion
6 National Highpower Long Range Championships
Several Highpower National Records
7 National Highpower Rifle Silhouette Championships
8 National Highpower Hunting Rifle Silhouette Championships
2-time Wimbleton Cup winner
National Smallbore Rifle Silhouette Champion
4 National Smallbore Hunting Rifle Silhouette Championships
7 Sportsmen Team Challenge Championships
Rifle Masters tournament champion
1998 NSSF Shooter of the year
Int’l Confed. of Fullbore Rifle Assoc. (ICFRA) Palma Individual World Champion
ELR 3-shot cold bore World Record Holder recognized by 50 Cal. Shooters Association
2019 NRA ELR Heavy Gun National Champion
Over 130 NRA Championship Event Trophies (Individual Match Winner)
Memories of Time Spent Together At the Range
Some of my fondest memories with my dad were spent traveling to rifle matches and competing together. We took many road trips to places such as Arcadia OK, Raton NM, and Camp Perry Ohio to compete. I fell off my shooting stool in Arcadia while spotting and he thought that was quite funny. I can remember shooting at Camp Perry and qualifying for a shoot off in one of the 1000-yard matches with iron sights. Dad had not shot well on the same relay and literally came running when he found out I had shot a 200 with 10Xs about 40 targets away from him on the firing line. He was my score keeper for the shoot off which was one of my fondest memories. He was so proud of me.
Dad was constantly testing shooting components. I can remember opening the refrigerator in the garage at home and seeing a rifle sitting in there along with ammo in the refrigerator and freezer. He was testing to see how the rifle and ammo were going to react in colder temps. He was constantly trying to improve shooting products and loved the challenge. Sometimes it drove me crazy because he wouldn’t settle on a load until the very last minute before a match. I guess that is what made him David Tubb. He never accepted “good” and always strived for “excellence”.
Lessons My Father Taught Me about Family, Life, and Achieving Goals
My dad taught us to listen to each other even if we did not agree with one another. My husband always found it fascinating that we could argue at the dinner table with one another and be totally fine with each-other five minutes later. My dad taught me how to have a very strong work ethic which is now something I realize many young adults and teenagers are missing these days. I grew up constantly working outdoors on our ranch doing activities such as farming, building corrals, cleaning out stock tanks, working cattle, building fences. He would always say, don’t do a half-way job or you’re going to have to redo it and boy did I have to redo some projects over the years.
By the time I was 18, I realized I had stronger work ethic that most kids my age. He taught me to work harder, think smarter, and never quit. Why accept a 10 when you can shoot an X on the firing line. This mentality carried into adulthood and is one of the reasons why I have a doctorate. I couldn’t just settle. I had to get to the top in my field.
He taught me to never quit. There is always a way to reach your goals and overcoming the mental aspect is usually more than half of the battle. He will be greatly missed but his lessons instilled in me are being passed on to my children. Dad was not only a world-class shooter, but he was a very generous person. He always answered phone calls and was willing to help, discuss, and problem solve whatever the issue was. This was a very rare attribute for such a successful person. He was always willing to share his knowledge and experience to grow the shooting sports.
David Tubb Biography Video
Click the video above to view an excellent documentary which covers David Tubb’s career in competitive shooting. Called America’s Rifleman, this fine documentary by filmmaker Sheldon Charron takes you inside the life and mind of legendary shooting champion David Tubb.
Learn how David evolved into the most successful rifleman in the history of competitive shooting, the challenges he faced, and how he overcame them on his road to success, both at the range and in his business, Superior Shooting Systems.
David Tubb with the ELR Adaptive Target Rifle (ATR) he designed which has set ELR records. You can see David shoot this rig in the video below:
David Tubb Shoots ELR Adaptive Target Rifle at KO2M
For the Extreme Long Range discipline, David Tubb developed a .375-caliber, long-barreled ELR version of his famous Tubb rifle, called the Adaptive Target Rifle (ATR). A version of this rifle, piloted by David’s son-in-law Nate Stallter, set the current ELR World Record in January 2018.
The TUBB 2000 — Innovative Modular Bolt Gun
David Tubb is arguably the greatest High-Power Across-the-Course rifle competitor in American history. He won many of his championships shooting a modular rifle of his own design — the Tubb 2000, aka T2K. In this video, David shows the features of the Tubb 2000 rifle which makes it adaptable to multiple shooting positions — prone, sitting/kneeling, and standing.
David Tubb Talks about KO2M and Extreme Long Range Shooting
David Tubb’s long-range rifles have performed well in Extreme Long Range shooting. AT the 2019 NRA Extreme Long Range Championship, David Tubb won the Heavy Gun Division. In this video, created during the King of 2 Miles (K02M) competition at the Whittington Center in New Mexico, David talks about the challenges of ELR shooting, and cartridge selection. Big, heavy, large-caliber bullets with ultra-high BCs are favored for the ELR game, but recoil and cost must also be considered.
“America’s Rifleman” Movie Credits:
Production Company: Enter360 Media
Producer/Director/Editor: Sheldon Charron
Production Assistant: Christie Tubb
This site is for and about accurate shooters. So today we feature the short-range group Benchrest game, where it’s all about shooting tiny groups in the ones and even “zeros”. Seeing the tiny groups 6 PPC aces produce, it’s easy to think the precision is all about the equipment. But there is a lot more involved. A talented human still has to watch the flags, run the gun properly, and tune his loads for the conditions. Here are some tips from one of the world’s best benchresters, Charles Huckeba.
Texan Charles Huckeba was the top individual shooter at the 2013 World Benchrest Championships (WBC) held near Sydney Australia in October 2013. In this video, 2013 WBC Two-Gun Overall winner Charles shoots a 1/8th MOA group at 200 yards — “a little bitty dot” as a fellow Team USA shooter observes. That’s impressive. If you can describe Huckeba’s style in a nutshell it would be “smooth, consistent, and rapid but not hurried”.
Charles also employed some unusual hardware. In the video, take a close look at the joystick on the Farley Coaxial front rest. There’s no knob at the end. In its place is a small, wood ammo caddy. Charles removed the standard knob from the handle of his Farley rest and replaced it with a home-made wood block that holds cartridges for the record target. The 10.5-lb Light Varmint rifle is chambered in 6PPC with a BAT Machine Action and a composite wood and carbon-fiber stock.
Watch Charles Huckeba Shoot 1/8 MOA, 200-yard group at World Benchrest Championships
Here is the actual 200-yard, 5-shot group Charles shot in the video. Photo (by Stuart Elliot) taken through the lens of Huckeba’s 50X March scope (reticle has 1/16th MOA Dot).
Analyzing the Fine Points — What Makes Huckeba So Good
Short-range benchrest shooter Boyd Allen saw some interesting things in Huckeba’s WBC performance, as captured on video. Boyd noticed Huckeba’s smooth gun-handling and efficient loading. But Boyd also spied some interesting equipment, including an innovative joystick “handle-caddy”.
1. Low Friction Bags — When Huckeba slid his rifle, there was very little apparent friction. The front bag features the new 3M material (ScotchLite) on the sliding surfaces. The rear Protektor bag has ears of the same low-friction material.
2. Pause Before Chambering — While he was watching the flags and deciding when to start firing, Charles kept his first round in the action, but out of the barrel’s chamber, probably so as not to heat the cartridge and change the round’s point of impact.
3. Ammo Caddy on Joystick Arm – Charles shoots a Right Bolt/Left Port action, so he pulls his rounds with his left hand. Note that Huckeba’s record rounds rest in a small, wood ammo caddy attached to the end of the joystick shaft. Look carefully, you’ll see the wood ammo block in place of the normal black ball at the end of the joystick. That allows Charles to pull shots with the absolute minimum of hand movement. Ingenious! Huckeba is very fast, with a great economy of motion. I believe that because his ammo was literally at hand, Charles was better able to keep his focus on aiming and the flags.
4. Smooth-Cycling BAT Action — Note how smoothly Huckeba’s action operates. When Charles lifts the bolt handle (to extract a round and cock the firing pin), this does not disturb the rifle. Likewise, as he closes the bolt, the gun doesn’t wobble. The smooth action allows Charles to hold point of aim even when shooting relatively quickly. Huckeba’s BAT action is chrome-moly steel. Some shooters believe this metal makes for a smoother action than stainless steel or aluminum.
5. Long-Wheelbase Stock — The wood and carbon fiber stock is light, long, and stiff. Yet, importantly, the stock is also well-damped. The longer-than-average stock length (with extended forearm) seems to help the gun track well without jumping or rocking. The longer forearm allows a longer “wheelbase”, effectively shifting the weight distribution rearward (less weight on the front, more weight on the rear). This places a greater share of the gun’s weight on the rear bag, as compared to a more conventional benchrest stock. Huckeba’s stock, built by Bob Scoville, is at the cutting edge of short-range benchrest design. Its light-weight balsa wood and carbon fiber construction provides a combination of stiffness and vibration damping that allows its relatively long fore-end to be fully utilized to increase the weight on the rear bag (always an issue with 10.5-pound rifles).
To learn more about this benchrest stock design, read the comments by stock-builder Bob Scoville in our PPC with Pedigree story in our Gun of the Week Archives. Bob observed:
“There is a lot more to the structure of the stocks than meets the eye. The carbon fiber skin with which I cover the stocks creates a light, tough exterior surface. However, this contributes very little to the overall performance of the stocks. The real strength and stiffness is the result of an internal beam utilizing balsa core/carbon fiber technology.
This type construction can be found in aircraft, race cars, powerboats, and sailboats. It is interesting to note, balsa has the highest strength to weight ratio of all woods and carbon fiber is one of the lowest stretch (modulus of elasticity) relative to weight of all materials. The marriage of these two materials is common in the high-performance world. Additionally, balsa is used commercially for vibration dampening and sound reduction.”
Video find by Boyd Allen. Video by Stuart Elliot of BRT Shooters Supply, Brisbane, Australia.
We are very sad to report that G. David Tubb, one of the greatest marksmen who ever lived, passed away on Thursday, July 2, 2026 in the afternoon. David, who was 71, died from heart and blood oxygen issues following surgery to remove one leg at the knee. The amputation procedure followed serious major problems from multiple knee replacements in the past.
David was, without question, one of the most talented and successful marksmen in history. David recorded 11 High Power Rifle Championships, 6 Long Range National Championships, and 7 High Power Silhouette National Championships. Over his career David won 130 NRA trophies for various competitions. No one has even come close to that number of Championships and honors in rifle competition.
A close friend of David, James Schmidt, recently posted: “Legendary firearms shooter David Tubb has left the range. David was an incredible innovator in the firearms industry and was credited in every way with many many excellent creations for shooters all over the world. His love for the industry and extreme accuracy shooting is unsurpassed at any level. His personal shooting skills will remain in history as amazing, remarkable and at times unbelievable! Perhaps his shooting accomplishments will never ever be achieved again.”
David Tubb Competition Shooting Accomplishments:
11 Time – NRA National High Power Rifle Champion – Camp Perry
6 Time – NRA Long Range Rifle (600-1000 yard) National Champion
7 Time (Consecutive) – NRA National High Power Rifle Silhouette Champion
6 Time – NRA National High Power Hunting Rifle Silhouette Champion
4 Time – NRA National Smallbore Hunting Rifle Silhouette
7 Sportsmen’s Team Challenge Championships
2 Time – Wimbledon Cup Winner
2019 ELR World Record Holder recognized by 50 Cal. Shooters Association
2019 NRA ELR Heavy Gun Winner
Over 130 NRA Championship Event Trophies (Individual Match Winner)
David Tubb Interview Podcast with Erik Cortina
In this 2024 Podcast, David Tubb was interviewed by ace F-Class shooter Erik Cortina. This 66-minute video is worth watching start to finish. David covers a wide range of topics include match strategies, marksmanship training, ELR competition, and cartridges he has developed including the 6mm XC (6XC), 338 XC, and 375 XC.
Sierra Bullets Post Honoring David Tubb
All of us at Sierra Bullets are deeply saddened to learn of the passing of David Tubb. Our hearts go out to his family, friends, and everyone whose life he touched. David’’s passion for precision shooting, relentless pursuit of excellence, and willingness to share his knowledge left a lasting mark on the shooting sports. His influence reached far beyond the firing line, inspiring generations of competitors and marksmen to strive for continuous improvement.
We extend our sincere condolences to the Tubb family during this difficult time. May they find comfort in knowing that David’s legacy will continue to live on through the countless shooters he inspired and the enduring impact he made on our community.
Rest easy, David. Thank you for everything you gave to the shooting sports.


F-TR Team USA member Matt Schwartzkopf is a double amputee below the knee, having had his lower legs removed due to a birth defect. That hasn’t held him back. Matt is an inspiration to us all. He told us: “This condition has not held me back from anything.” Jokingly, he added, “I may not have ‘a leg to stand on’, but that doesn’t mean I can’t still shoot 10s and Xs at 1000.” Matt is living proof that competitive shooting is a sport for all individuals — young and old, able-bodied and physically challenged.


 In the archives of

 Gary Anderson served as the Director of the Civilian Marksmanship Program (CMP) from 1999-2009, and is now DCM Emeritus. In 1959, he joined the elite U.S. Army Marksmanship Unit. Just two years later, he won his first national championship. Over his competitive career, Anderson won two Olympic Gold Medals, seven World Championships, and sixteen National Championships. He is unquestionably one of the greatest American marksmen ever.


 While attending the CA Long Range Championship a few seasons back, we had the opportunity to test the performance of a high-magnification (63X) spotting scope in near-ideal conditions (maybe the best I’ve ever witnessed). On the event’s last day we arrived at 5:45 am, literally as the sun was cresting the horizon. I quickly deployed our
  Then I invited 3 or 4 shooters to look through the scope. One younger guy, with good eyes, said immediately: “Yeah, I can see the holes — right there at 4 o’clock and seven o’clock. Wow.” Some older guys, who were wearing glasses, could not see the holes at all, no matter what we did to the scope’s main focus and diopter adjustment.
 Chromatic Aberration Revealed
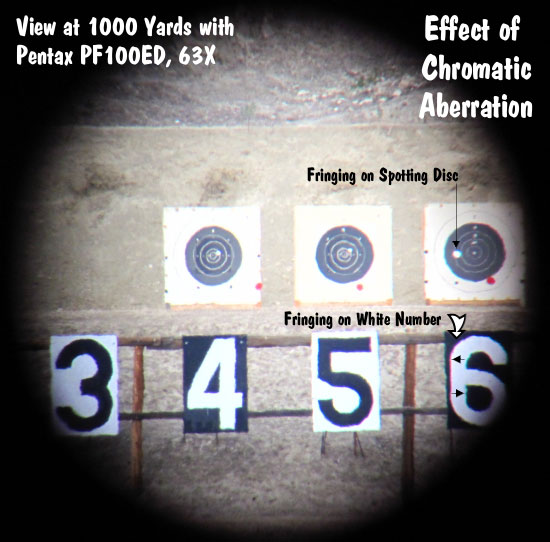


 David Tubb Biography Video


 3. Ammo Caddy on Joystick Arm – Charles shoots a Right Bolt/Left Port action, so he pulls his rounds with his left hand. Note that Huckeba’s record rounds rest in a small, wood ammo caddy attached to the end of the joystick shaft. Look carefully, you’ll see the wood ammo block in place of the normal black ball at the end of the joystick. That allows Charles to pull shots with the absolute minimum of hand movement. Ingenious! Huckeba is very fast, with a great economy of motion. I believe that because his ammo was literally at hand, Charles was better able to keep his focus on aiming and the flags.
 David was, without question, one of the most talented and successful marksmen in history. David recorded 11 High Power Rifle Championships, 6 Long Range National Championships, and 7 High Power Silhouette National Championships. Over his career David won 130 NRA trophies for various competitions. No one has even come close to that number of Championships and honors in rifle competition.


