The following article by Tom Alves describes a very practical approach to physical training for those of us who are not as young and spry as we once were. Tom shows us how to give our bodies at least some of the maintenance we give our rifles. While we all realize that our rifles will outlive us, let’s see if we can’t narrow the margin a bit with some personal maintenance that just might help the shooting too!
This article originally appeared in German Salazar’s Rifleman’s Journal, and appears with permission. Sadly, German passed away in 2022. This was a very sad loss of a distinguished-class marksman and a great shooting sports writer. This Editor counted German as a close friend, who helped this site in many ways.
A Suggested Training Approach for Older Shooters
By Tom Alves Most articles and discussions regarding competitive shooting center around equipment. Now and then one will come across an article about physical training such as the USAMU piece on Physical Conditioning for Highpower Shooting. If you break the articles down they often discuss “core strength” and durability. The purpose of this paper is to elaborate on those points with a bit different perspective. Many of the articles you will read in books about position shooting and the one mentioned before are directed more toward the younger generation of shooters in their 20s. If you look down the line at a typical high power match these days you are likely to see quite a few folks who are in their middle 30’s and up. Many people in that age range have had broken bones and wear and tear on their joints so a training program needs to take that into account. For instance, while jogging for an extended period for heart and lung conditioning — often called cardio exercises — may be the recommended approach for younger folks, it may be totally inappropriate for older people. The procedure to repair meniscus tears in knees is one of the most frequently performed operations in this country. Another approach one often sees in training to improve core strength is the use of weight machines which isolate certain muscle groups in their operation. I would like to suggest an alternative approach that not only does not require special equipment but uses the body’s muscles in a coordinated fashion in the same way they are used in our natural movements. So, let’s set down some criteria:
1. The approach has to be low impact to conserve joints.
2. One goal is to improve the strength of the core muscles which are the muscles of our trunk that keep us erect and from where all movements initiate.
3. Along with core strength we need flexibility and full range of motion.
4. We want to improve our lung and heart function so we can have a good flow of oxygen going to our organs and muscles to reduce the rate at which we become fatigued during a competitive event.
Before I continue I believe it is appropriate for the reader to understand that I am a fellow shooter and this is a program I have designed for myself based on considerable reading and experience over a number of years. I am not a medical doctor, a formally trained exercise professional or any other type of specialist in the field. Consequently, this information is offered with the advice that you consult your medical advisor or similar authority before you embark on this or any similar regimen.
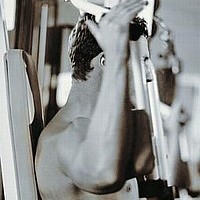
I will start with core strength and flexibility. Pilates exercises are resistance exercises that can incorporate the use of resistance bands, light weights and the weight of your body parts in order to strengthen the muscles in the abdomen, back, hips, chest and shoulders. The exercises can be performed alone but I recommend attending classes put on by a certified instructor who will ensure that you perform a balanced routine meaning you work on the front and back and both sides of your trunk. As to flexibility, yoga complements Pilates exercises and they are often taught together. In practical terms yoga strengthens through resistance using the weight of the body and increases flexibility by stretching the various muscle groups in a coordinated fashion. Some yoga exercises also work on balance which is helpful in position shooting and life in general. Again, I suggest attending formal yoga classes since an instructor can help you address such things as a joint misalignment. As an example, my right leg healed improperly after the femur was broken and my right foot splays out putting undue load on my left knee. There are a number of books available on Pilates and yoga and some of them get pretty involved; I leave that to the reader to explore. I will list some reference material at the end of the article that I have found useful.
Finally, heart and lung improvement. In order to exercise the heart and lungs while not abusing the joints, particularly the knees and hips, one has to resort to something other than jogging. Walking, bicycling, elliptical machines and swimming may be alternative methods you’d like to consider. Based on my reading, in order to get the most benefit it is important to exercise so that the pulse rate becomes elevated for periods of time rather than kept at a constant rate. The process I use, called PACE, is promoted by Al Sears, MD, http://www.alsearsmd.com/. It is interval training for the non-athlete. In simple terms one exercises, using whatever equipment one desires, to achieve a heart rate in which you are slightly above your ability to bring enough oxygen into your body to sustain the activity for an extended period. This is similar to wind sprints for a sprinter or a football player. After each episode you must rest until you have achieved recovery, meaning you can catch your breath easily. A series of three sets is recommended which covers a total time of about 20 minutes.
Report from the Author — Yes, Training Helps
As a result of this training program I have experienced increased strength in my legs and trunk, less joint stiffness, lower blood pressure, and lower resting pulse rate. The Pilates/yoga classes are usually attended 2 to 3 times a week and the interval training performed twice a week. [The author was 64 when this was first published. He is now 75, and still shooting Palma and Smallbore prone.]
Before I close I would like to touch briefly on two other related subjects: hydration and visual training. When one is exerting oneself, the body produces perspiration to keep the body’s temperature at an acceptable level. As one perspires the blood gets thicker and the ocular fluid in one’s eyes thickens as well. The heart has to work harder to supply oxygen and nutrients to the body so visual and cognitive functions degrade and fatigue sets in rapidly. Essential chemicals called electrolytes are also carried out of the body with the perspiration. As a result, it is necessary to replace moisture and electrolytes to maintain basic health and a competitive level of performance. If one goes on the Internet there is a multitude of articles on hydration. Due to the kindness of my lead Pilates/yoga instructor, Ms. Annette Garrison, I have a pretty comprehensive article on various aspects of hydration that I have included, http://www.ideafit.com/fitness-library/hyponatremia-other-side-hydration-story , for your information.
Last I want to mention visual performance training. The New Position Rifle Shooting, A How-To Guide for Shooters and Coaches by Bill Pullum and Frank Hanenkrat mentions sports vision training amongst other aspects of vision in competitive shooting. [Used book under $40.00 on Amazon]. If one goes on the Internet you will find training programs directed at golfers, baseball and football players. There is one site that has a demo which, if one looks at it for long, it is obviously very similar to a shooting gallery video game. The training involves rapid recognition and hand-eye coordination. Another source of visual training exercises, along with a wealth of other information, is the book Prone And Long Range Rifle Shooting by Nancy Tompkins.
Hopefully, I have provided some information which will be helpful in improving shooting performance and extending the time you can participate at a competitive level. It is important that you proceed at your own pace. I have pushed myself too hard in the interval training and now have to back off a bit. In closing I would like to thank Annette Garrison and German Salazar for their help, patience and encouragement.
Additional Reference Material
1. Framework by Nicholas A. DiNubile, MD This is required reading for anybody who has suffered an injury like a torn meniscus or has muscular skeletal issues. This is the book that led me to Pilates/yoga
2 P.A.C.E., The Twelve Minute Fitness Revolution by Al Sears, MD The approach I use to interval training. I am sure there are other sources.
This USAMU article explores three different “Philosophies” of precision reloading. Some handloaders seek to produce ammo that yields the very tightest groups (without factoring in the wind). Other shooters load their ammo to deliver the highest safe velocity. That’s because a projectile launched at higher velocity will drift less in the wind. The theory is that even if fast ammo doesn’t produce the tightest groups in zero wind conditions, it will yield higher scores in a the real world (where the wind blows). Lastly, some handloaders favor ammo that is ultra-consistent across a wide temperature range. This last philosophy dictates selection of a powder that is temp-insensitive, even if it may not produce the very best raw accuracy (or speed).
What’s Your Handloading Philosophy?
Objectives of Reloading — Accuracy, Velocity, Temp Stability What do you, the reader, primarily value in your handloads?
Viewpoint ONE: Accuracy Trumps Everything
Some shooters prize consistent, excellent medium/long range accuracy enough that they’re willing to give up some extra velocity (and reduced wind deflection) to obtain that. Their underlying philosophy could be stated: “Superior accuracy is present for every shot, but the wind isn’t”. One’s ability to hold well, aim well and read the wind are all factors in making this type decision. The photo below shows stellar raw accuracy. This is an 0.67″, 10-shot group at 300-yards fired from a text fixture. The group measures just 0.67″. (This shows the USAMU’s 600-yard load with 75gr bullets).
Viewpoint TWO: Load to Highest Safe Velocity for Less Wind Drift
Some shooters value obtaining the highest safe velocity, even if one’s pure, consistent mechanical accuracy at medium/long range isn’t quite as brilliant. The theory here seems to be that a really good hold extracts as much mechanical accuracy from the rifle/ammo as possible, and faster bullets equal occasional “bonus” points snatched from the jaws of wind.
[For example] one of the USAMU’s many Service Rifle National Champions revealed his philosophy. It can be stated thus: a super-accurate, but [relatively] “slow” load “required him to have a Ph.D. in wind reading for every shot, while a faster, but less accurate load netted him more points.”
Note — this was not mere speculation; his score book data backed up his claims, due to less wind effects. Remember, however, this fellow has a consistent, National Championship-level hold, and other Champions on the same team would have opted differently.
Viewpoint THREE: Temperature Stability Is Key
Still another approach is to place heavy emphasis on fine accuracy with absolute stability in changing temperatures. When this writer was actively earning his Distinguished Rifleman badge, that was his goal. The reason? Sighting shots are not allowed in EIC (“Leg”) matches. The first shot out of the barrel was for score. It had to be 100% consistent, with very reliable, predictable elevation and wind deflection regardless of the ambient temperature — even if it wasn’t the lowest wind deflection possible.
Naturally, selecting a powder that is insensitive to temperature changes is a key element here. Elevation zeros and wind effects HAD to be consistent every time. Hunters and military snipers might be among those who fall into this camp, as well as those in pursuit of their Distinguished Rifleman badges.
Contrast that with a traditional High Power shooter who gets two sighter shots before each event (offhand, sitting rapid, prone rapid, prone slow fire.) If there is a zero change on any given day, he/she can correct during sighters. This writer well remembers talking with another very high-level Service Rifle competitor who was happy to have high temperatures boost the velocities of his ammunition above their usual level… As far as this SR competitor was concerned, 60-80 fps more velocity -– even if only due to high ambient temperatures -– meant less wind deflection, and he was mighty happy to have it.
Particularly in the summer, with hot daily conditions, you need to be concerned about temperature stability. Loads worked up in winter may be over-pressue in the summer time. FYI summer officially begins this year on June 21, 2026, Summer Solstice, just 10 days away.
This article has been confined to NRA High Power Rifle competition, which has relatively generous 10-ring dimensions in relation to the accuracy of well-built competition rifles. Hopefully, it will provide food for thought. For some, this might be an opportunity to ensure that one’s load development approach helps them attain their desired results.
SSG Greg Markowski of the USAMU at Camp Perry, Ohio.*
The U.S. Army Marksmanship Unit (USAMU) fields pistol teams as well as rifle and shotgun competition squads. Consequently the USAMU’s Reloading Shop loads tens of thousands of pistol rounds every year. In this article, the USAMU’s handgun experts talk about reloading for handguns — with smart tips on how to achieve superior accuracy with 100% reliability. This article, which offers important insights on COAL, primers, crimps and more.
This video shows .45 ACP centerfire pistol competitors at Camp Perry
Precision Pistol Reloading — Recommended Methods
Optimize the Taper Crimp
One often-overlooked aspect of handloading highly-accurate pistol ammunition is the amount of crimp and its effect on accuracy. Different amounts of taper crimp are used with various handloads to obtain best accuracy. The amount is based on bullet weight, powder burn rate and charge, plus other factors. It is not unusual for our Shop to vary a load’s crimp in degrees of 0.001″ and re-test for finest accuracy.
Use Consistent Brass
Brass is also important to pistol accuracy. While accurate ammunition can be loaded using brass of mixed parentage, that is not conducive to finest results, particularly at 50 yards. It is important for the serious competitor/handloader to use brass of the same headstamp and ideally one lot number, to maximize uniformity. Given the volumes of ammunition consumed by active pistol competitors, using inexpensive, mixed surplus brass for practice, particularly at the “short line” (25 yards), is understandable. However [at 50 yards], purchasing and segregating a lot of high-quality brass to be used strictly for slow-fire is a wise idea.
Importance of Uniform COAL
Uniformity of the Case Overall Length (COAL) as it comes from the factory is also important to achieving utmost accuracy. More uniform case lengths (best measured after sizing) contribute to greater consistency of crimp, neck tension, ignition/burn of powder charge, and so on. Cartridge case-length consistency varies from lot to lot, as well as by maker. Some manufacturers are more consistent in this dimension than others. [Editor’s note: It is easy to trim pistol brass to uniform length. Doing this will make your taper crimps much more consistent.]
Primers and Powders — Comparison Test for Accuracy
Pay attention to primer brands, powder types and charges. Evaluating accuracy with a Ransom or other machine rest at 50 yards can quickly reveal the effect of changes made to handload recipes.
Bullet Selection — FMJ vs. JHP
Bullets are another vital issue. First, there is the question of FMJ vs. JHP. A friend of this writer spent decades making and accuracy-testing rifle and pistol bullets during QC for a major bullet manufacturer. In his experience, making highly-accurate FMJ bullets is much more difficult than making highly-accurate JHPs, in large part due to the way the jackets are formed. Small die changes could affect accuracy of FMJ lots dramatically. The CMP now allows “safe, jacketed ammunition” in Excellence-in-Competition (EIC) Service Pistol matches, although wadcutter ammunition is prohibited. Thus, the option to use very accurate JHP designs simplifies the life of CMP Service Pistol shooters in pursuit of the prestigious Distinguished Pistol Shot badge.
Hopefully, these tips will be helpful to any pistol shooters interested in accurate handloads, not just “Bullseye” shooters. Small tweaks to one’s normal routine can pay big dividends in improved accuracy and make practice and competition more rewarding. Stay safe, and good shooting!
TOP IMAGE: SSG Greg Markowski, a shooter/instructor with the USAMU, fires his pistol during the 2018 Civilian Marksmanship Program’s National Pistol Matches at Camp Perry, Ohio. At that event, Markowski claimed the General Mellon Trophy, General Patton Trophy and the General Custer Trophy. U.S. Army photo by Maj. Michelle Lunato/released by Defense Visual Information Distribution Service.
Photo by SFC Brandon Green, 2018 National High Power Champion.
The prestigious CMP National Matches will be held at Camp Perry, Ohio this summer, July 12 through August 9, 2026. The President’s 100 Match runs Monday, July 27th, followed by Individual and Team Trophy Matches. And the Garand and Modern Military events kick off on August 1st, while 600-yard Mid-Range rifle matches run August 3-4, with Long Range following, concluding with the Palma Team match on August 9.
For those competing at Camp Perry this summer, we offer some insights from Tyrel Cooper, a multi-time National Champion. A past member of the USAMU, Cooper’s shooting resume includes five national championships (one each in 2008, 2011, 2012, and two in 2013). He won the 2013 NRA National Long Range Championship, as well as the 2013 NRA National Service Rifle Championship. In this article, written in 2014, Cooper explains the mental preparation that helped him win National Titles in 2013.
Below is a 2012 file photo of Ty Cooper shooting a service rifle. Cooper won the 2013 Long Range Championship using a Nesika-actioned bolt gun chambered in 7mm SAUM.
Mental Preparation by Tyrel Cooper Getting focused mentally is an important part of preparation for Perry. In 2011 I was chasing Sherri Gallagher, since then I have been chasing Brandon Green[.] If I get beat by a Service Rifle I am going to make him or her work for it. So there is your peak into my mental process. I go for the top and if I am hanging with them then the Service Rifle National Championship will come, Kind of like how I shoot for X’s and Tens will come.
Now I understand everyone is at different levels. You have to figure out what your goals are and then lie to yourself that you’ve already achieved them. Here is a trick that I used back in 2008: When I was a kid just starting out, my Dad made me read several books on shooting. One of them being With Winning In Mind by Lanny Bassham. One of the things I remember from his book is that he would make notes and place them where he would see them often. They contained his goals or stated he was already a world champion. I took a page from his book and did the same thing.
I made 3×5 cards and wrote my personal best 500 and 800 aggregate scores and taped on the horn of my truck, above the radio in my truck, on my laptop and a few other places I would see them often. Every time I saw those I would tell myself that I average those scores and I would get used to seeing them. By doing this you are lying to yourself to overcome the mental blocks the subconscious mind lays out for you.
I went from my worst year in 2007 to winning my first National Championship in 2008. I kind of slacked off in 2009 because I had reached my goals and didn’t set new ones and it showed, so I had to find new goals and motivation which I did and that pushed me back to the top.
Long story short, this is a mental sport and you have to figure out what you need to do to perform at your highest levels and breaking through those mental road blocks. You have to figure out how to get yourself to relax and control your mind keeping calm when you are shooting a personal best, either standing or on the day.
Here is a tip from my mental process from shooting. First I shoot for Xs, I took the line from the movie The Patriot and applied it to my shooting, “Aim small, miss small” and it is true. If you accept wide shots then you will keep shooting wide shots.
Winning Techniques for Rifle Competition
Slow, Solid, Smooth, Center
Always focus on the positive and good shots, and what you did physically and mentally, when you shot them. When I am nervous and need to calm myself down I tell myself: slow, solid, smooth, center.
Slow
I want my movement to be slow…
I can shoot Tens and Xs all day with slow movement.
Solid
Solid like a rock, a rock doesn’t move and that’s how I want my positions. By saying solid it reminds me to go through my little checks to make sure I am doing what I need to do make that happen.
Smooth
Smooth — that is my trigger word for smooth movement. You don’t want fast choppy movement but slow and smooth. This also reminds me to be smooth on the trigger. You can be smooth-fast or you can be smooth-slow but you have to be smooth and most people aren’t when they think they are. Just before leaving the USAMU, I walked up and down the line of five shooters during a rapid fire string and only one of them was smooth with their trigger control. It’s the second most important thing when it comes to shooting.
Center
This reminds me that I want my shots in the middle. It is just a positive reinforcement of where I want my shots to go. I shoot a reverse flat tire so it also kind of reminds me as to what I am looking for.
Countdown to CMP National Matches:
Story Tip from ELR Researcher. We welcome reader submissions.
SSG Amanda Elsenboss, now with the Pennsylvania National Guard, wass the 2021 NRA National High Power Champion and 2019 NRA Long Range National Champion. These two major titles place Amanda among the greatest American shooters and one of only three women in U.S. history to win the High Power title. Amanda combines a superb “mental game” with great gun-handling and wind-reading skills.
In the archives of On The Mark magazine, DCM Emeritus Gary Anderson, an Olympic Gold medal-winning shooter in his younger years, offers sage advice for competitive shooters.
In his article Ten Lessons I Wished I Had Learned as a Young Shooter, Anderson provides ten important guidelines for everyone involved in competitive shooting. Here are the Ten Lessons, but you should read the full article. Anderson provides detailed explanations of each topic with examples from his shooting career.
LESSON 1 – NATURAL ABILITY WILL NOT MAKE YOU A SHOOTING CHAMPION.
(You also need hard work, training effort and perseverance.)
LESSON 2 – ANGER IS THE ENEMY OF GOOD SHOOTING.
(The key to recovering from a bad shot is to stay cool, no matter what happens.)
LESSON 3 – BAD SHOTS CAN TEACH YOU MORE THAN GOOD SHOTS.
(Today, error analysis is one of the most powerful tools for improving scores.)
LESSON 4 – NEVER GO WITHOUT A SHOT PLAN.
(A shot plan is a detailed breakdown of each of the steps involved in firing a shot.)
LESSON 5 – PRACTICE IN BAD CONDITIONS AS WELL AS GOOD CONDITIONS.
(Most competitions are fired in windy conditions or where there are plenty of distractions.)
LESSON 6 – CHAMPIONS ARE POSITIVE, OPTIMISTIC PEOPLE.
(Negative shooters expect bad results; positive shooters expect to train hard to change bad results.)
LESSON 7 – IT’S NOT ABOUT WHETHER YOU WIN OR LOSE.
(It’s about how hard you try to win.)
LESSON 8 – YOUR DOG WON’T BITE YOU AFTER SHOOTING A BAD SCORE.
(Hopefully your coach, parents and friends won’t bite you either.)
LESSON 9 – YOUR PRESS CLIPPINGS CAN HURT YOU OR HELP YOU.
(Winning can go to our heads. We start thinking we are so good we don’t have to work hard any more.)
LESSON 10 — YOU NEVER SHOT YOUR BEST SCORE.
(Great champions are always looking for ways to improve.)
USAMU shooters on the firing line at the Wa-Ke’-De outdoor range in Bristol, IN. Photo courtesy USAMU.
About Gary Anderson Gary Anderson served as the Director of the Civilian Marksmanship Program (CMP) from 1999-2009, and is now DCM Emeritus. As a Nebraska farmboy, Gary grew up hunting and shooting. Dreams of winning an Olympic Gold Medal in shooting led Gary to the U.S. Army. In 1959, he joined the elite U.S. Army Marksmanship Unit. Just two years later, he won his first national championship.
At the 1962 World Shooting Championships in Egypt, Anderson stunned the shooting world by winning four individual titles and setting three new world records. At the 1964 Tokyo Olympics, Gary won the 300m free-rifle Gold Medal, setting a new world record in the process. At the 1966 World Shooting Championships in Germany, Anderson won three additional world titles. At the 1968 Olympics, Gary won a second gold medal in the 300m free-rifle event.
After his “retirement” from international competition, Gary competed in the National High Power Championships, winning the President’s National Trophy in 1973, 1975 and 1976. Over his competitive career, Anderson won two Olympic Gold Medals, seven World Championships, and sixteen National Championships. He is unquestionably one of the greatest American marksmen ever.
In the archives of The First Shot (the CMP’s Online Magazine), SGT Walter E. Craig of the USAMU discusses physical conditioning for competitive shooters, particularly High Power competitors. Fitness training is an important subject that, curiously, is rarely featured in the shooting sports media. We seem to focus on hardware, or esoteric details of cartridge reloading. Yet physical fitness also matters, particularly for High Power shooters. In his article, Craig advocates: 1) weight training to strengthen the Skeletal Muscle System; 2) exercises to build endurance and stamina; and 3) cardiovascular conditioning programs to allow the shooter to remain relaxed with a controlled heart beat.
SGT Craig explains: “An individual would not enter a long distance race without first spending many hours conditioning his/her body. One should apply the same conditioning philosophy to [shooting]. Physical conditioning to improve shooting skills will result in better shooting performance[.] The objective of an individual physical training program is to condition the muscles, heart, and lungs thereby increasing the shooter’s capability of controlling the body and rifle for sustained periods.”
In addition to weight training and cardio workouts (which can be done in a gym), SGT Craig advocates “some kind of holding drill… to develop the muscles necessary for holding a rifle for extended periods.”
For those with range access, Craig recommends a blind standing exercise: “This exercise consists of dry-firing one round, then live-firing one round, at a 200-yard standard SR target. For those who have access only to a 100-yard range, reduced targets will work as well. Begin the exercise with a timer set for 50 minutes. Dry-fire one round, then fire one live round and without looking at the actual impact, plot a call in a data book. Continue the dry fire/live fire sequence for 20 rounds, plotting after each round. After firing is complete, compare the data book to the target. If your zero and position are solid, the plots should resemble the target. As the training days add up and your zero is refined, the groups will shrink and move to the center.”
Fitness training and holding drills help position shooters reach their full potential. Here is 6-Time U.S. National Long Range Champion John Whidden.
Training for Older Shooters
Tom Alves has written an excellent article A Suggested Training Approach for Older Shooters. This article discusses appropriate low-impact training methods for older shooters. Tom explains: “Many of the articles you will read in books about position shooting and the one mentioned above are directed more toward the younger generation of shooters in their 20s. If you look down the line at a typical high power match these days you are likely to see quite a few folks who are in their middle 30s and up. Many people in that age range have had broken bones and wear and tear on their joints so a training program needs to take that into account. For instance, while jogging for an extended period for heart and lung conditioning may be the recommended approach for younger folks, it may be totally inappropriate for older people.”
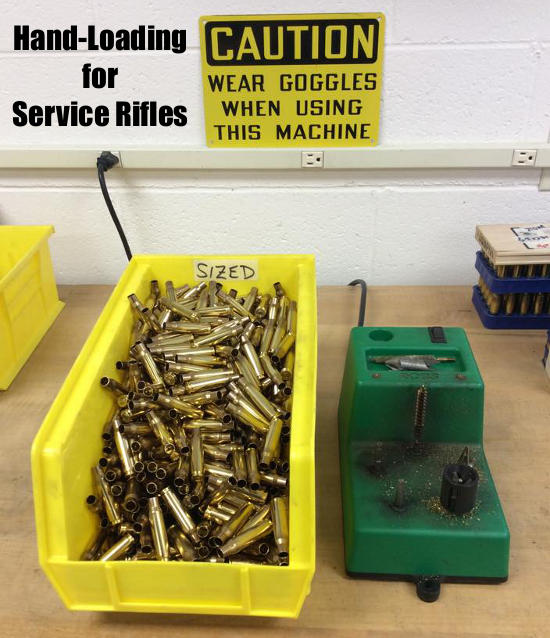
The U.S. Army Marksmanship Unit (USAMU) has published a great series of reloading “how-to” articles on its Facebook Page. This post covers key factors to consider when loading ammunition for Match Rifles and Service Rifles, with a particular focus on self-loading “gas guns”. Visit the USAMU Facebook Page regularly for other, helpful reloading and marksmanship tips.
We offer some “cardinal rules” to help new gas-gun handloaders with safety and efficiency. These address both Match Rifle and Service Rifle versions of the AR15, M1 Garand, M1A, and M110. However, they can also improve safe reloading for many other auto-loaders such as M1 Carbines, FALs, SIGs, etc. The author distilled these principles many years ago to help focus on the essential aspects of these rifles.
RULE ONE: Service Rifles Are Not Benchrest Rifles
Gas-guns require a relatively loose fit between ammunition and chamber (vs. bolt actions) for safe, smooth operation. Many techniques, such as neck sizing and keeping cartridge headspace quite tight, are popular in the extreme bolt gun accuracy realm. However, they are of little value with Service Rifles, and some could even be hazardous. Before adopting a specialized technique, seriously consider whether it is appropriate and beneficial in a gas-gun.
RULE TWO: Never Compromise Safety to Obtain Accuracy
Example: If choosing a brand of great, but ultra-sensitive match primers offers possibly better accuracy at the risk of slam-fires in your design of rifle, don’t do it! You are issued exactly two eyes and ten fingers (best-case scenario). Risking them trying to squeeze 0.25 MOA better accuracy out of an M1A, etc. simply isn’t worth it.
RULE THREE: Tailor the Precision to Your Individual Skill and Your Rifle’s Potential
This has been addressed here before, but bears repeating for newcomers. If you are struggling to break out of the Marksman Class, or using a CMP M1 “As-Issued,” then laboriously turning the necks of your 600-yard brass is a waste of time. Your scores will improve much faster by practicing or dry-firing. On the other hand, if the reigning champions anxiously check your scores each time you fire an event, a little neck-turning might not be so far-fetched.
Verifying Load Improvements — Accuracy hand-loading involves a wide variety of techniques, ranging from basic to rather precise. Carefully select those which offer a good return on investment for your time and labor. In doubt? Do a classic pilot study. Prepare ammo for at least three or four ten-shot groups with your new technique, vs. the same with your standard ammo. Then, pick a calm day and test the ammo as carefully as possible at its full distance (e.g. 200, 300, or 600 yards) to verify a significant improvement. A little testing can save much labor!
This video explains the procedure for ordering an M1 Garand from the CMP.
RULE FOUR: Be Your Own Efficiency Expert
Serious Service Rifle shooters generally think of ammunition in terms of thousands of rounds, not “boxes”, or even “hundreds”. Analyze, and WRITE DOWN each step in your reloading process. Count the number of times each case is handled. Then, see if any operations can be dropped or changed without reducing safety or accuracy. Eliminating just two operations saves 2000 steps per 1000 rounds loaded. Conversely, carefully consider any measurable benefits before adding a step to your routine.
RULE FIVE: In Searching for Greater Accuracy with Efficiency, Look for System Changes
For example, instead of marking your 300-yard rounds individually to differentiate them from your 200-yard ammo, would a simple change in primers work? If accuracy is maintained, using brass-colored primers for 200 and silver for 300 provides an indelible indicator and eliminates a step! Similarly, rather than spending hours selecting GI surplus brass for weight and neck uniformity, consider splurging on some known, high-quality imported match brass for your 600-yard loads. Results should be excellent, time is saved, and given limited shooting at 600 yards, brass life should be long.
RULE SIX: Check All Your Primers Before Packaging Your Loaded Ammo
This seems simple and even intuitive. However, many slam-fires (which were much more common when M1s and M1As were the standard) are due, at least in part, to “high” primers. Primers should be seated below flush with the case head. The USAMU has addressed this at length in a previous column, but each round should be checked for properly-seated primers before they are packaged for use.
Efficient cartridges make excellent use of their available powder and case/bore capacity. They yield good ballistic performance with relatively little recoil and throat erosion.
Cartridge Efficiency: A Primer (pun intended!)by USAMU Staff
The U.S. Army Marksmanship Unit (USAMU) published a series of reloading articles on its Facebook Page. In this article, the USAMU discusses cartridge case efficiency and its benefits. While this is oriented primarily toward NRA High Power Rifle and Long Range (1000-yard) competition, these factors also apply to medium/big game hunters. Assuming one’s rifle and ammunition are accurate, key considerations include ballistic performance (i.e., resistance to wind effects, plus trajectory), recoil, and throat erosion/barrel life.
Efficient cartridges make excellent use of their available powder and case/bore capacity. They yield good ballistic performance with relatively little recoil and throat erosion. A classic example in the author’s experience involved a featherweight 7x57mm hunting/silhouette rifle. When loaded to modern-rifle pressures, just 43-44 grains of powder pushed a 139gr bullet at 2900 fps from its 22″ barrel. Recoil in this light rifle was mild; it was very easy to shoot well, and its performance was superb.
An acquaintance chose a “do everything” 7mm Remington Magnum for use on medium game at short ranges. A larger, heavier rifle, it used ~65 grains of powder to achieve ~3200 fps with similar bullets — from its 26″ barrel. Recoil was higher, and he was sensitive to it, which hampered his shooting ability.
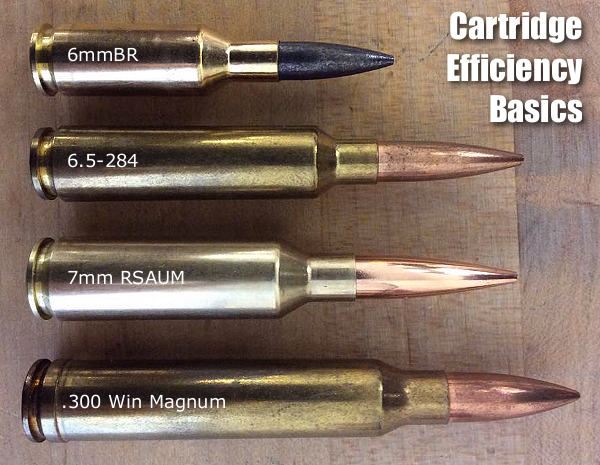
Similarly efficient calibers include the 6mm BR [Norma], and others. Today’s highly-efficient calibers, such as 6mm BR and a host of newer developments might use 28-30 grains of powder to launch a 105-107gr match bullet at speeds approaching the .243 Winchester. The .243 Win needs 40-45 grain charges at the same velocity.
Champion-level Long Range shooters need every ballistic edge feasible. They compete at a level where 1″ more or less drift in a wind change could make the difference between winning and losing. Shooters recognized this early on — the then-new .300 H&H Magnum quickly supplanted the .30-06 at the Wimbledon winner’s circle in the early days.
The .300 Winchester Magnum became popular, but its 190-220gr bullets had their work cut out for them once the 6.5-284 and its streamlined 140-142gr bullets arrived on the scene. The 6.5-284 gives superb accuracy and wind performance with about half the recoil of the big .30 magnums – albeit it is a known barrel-burner.
Currently, the 7mm Remington Short Action Ultra-Magnum (aka 7mm RSAUM), is giving stellar accuracy with cutting-edge, ~180 grain bullets, powder charges in the mid-50 grain range and velocities about 2800+ fps in long barrels. Beyond pure efficiency, the RSAUM’s modern, “short and fat” design helps ensure fine accuracy relative to older, longer cartridge designs of similar performance.
Recent design advances are yielding bullets with here-to-fore unheard-of ballistic efficiency; depending on the cartridge, they can make or break ones decision. Ballistic coefficients (“BC” — a numerical expression of a bullet’s ballistic efficiency) are soaring to new heights, and there are many exciting new avenues to explore.
The ideal choice [involves a] balancing act between bullet BCs, case capacity, velocity, barrel life, and recoil. But, as with new-car decisions, choosing can be half the fun!
Factors to Consider When Evaluating Cartridges
For competitive shooters… pristine accuracy and ballistic performance in the wind are critical. Flat trajectory benefits the hunter who may shoot at long, unknown distances (nowadays, range-finders help). However, this is of much less importance to competitors firing at known distances.
Recoil is an issue, particularly when one fires long strings during competition, and/or multiple strings in a day. Its effects are cumulative; cartridges with medium/heavy recoil can lead to shooter fatigue, disturbance of the shooting position and lower scores.
For hunters, who may only fire a few shots a year, recoil that does not induce flinching during sight-in, practice and hunting is a deciding factor. Depending on their game and ranges, etc., they may accept more recoil than the high-volume High Power or Long Range competitor.
Likewise, throat erosion/barrel life is important to competitive shooters, who fire thousands of rounds in practice and matches, vs. the medium/big game hunter. A cartridge that performs well ballistically with great accuracy, has long barrel life and low recoil is the competitive shooter’s ideal. For the hunter, other factors may weigh more heavily.
Cartridge Efficiency and Energy — Another Perspective
Former Lapua staffer Kevin Thomas explains that efficiency can be evaluated in terms of energy:
“Cartridge efficiency is pretty straight forward — energy in vs. energy out. Most modern single-based propellants run around 178-215 ft/lbs of energy per grain. These figures give the energy potential that you’re loading into the rifle. The resulting kinetic energy transferred to the bullet will give you the efficiency of the round. Most cases operate at around 20-25% efficiency. This is just another way to evaluate the potential of a given cartridge. There’s a big difference between this and simply looking at max velocities produced by various cartridges.”
In the archives of The First Shot (the CMP’s Online Magazine), SGT Walter E. Craig of the USAMU discusses physical conditioning for competitive shooters, particularly High Power competitors. Fitness training is an important subject that, curiously, is rarely featured in the shooting sports media. We seem to focus on hardware, or esoteric details of cartridge reloading. Yet physical fitness also matters, particularly for High Power shooters. In his article, Craig advocates: 1) weight training to strengthen the Skeletal Muscle System; 2) exercises to build endurance and stamina; and 3) cardiovascular conditioning programs to allow the shooter to remain relaxed with a controlled heart beat.
SGT Craig explains: “An individual would not enter a long distance race without first spending many hours conditioning his/her body. One should apply the same conditioning philosophy to [shooting]. Physical conditioning to improve shooting skills will result in better shooting performance[.] The objective of an individual physical training program is to condition the muscles, heart, and lungs thereby increasing the shooter’s capability of controlling the body and rifle for sustained periods.”
In addition to weight training and cardio workouts (which can be done in a gym), SGT Craig advocates “some kind of holding drill… to develop the muscles necessary for holding a rifle for extended periods.”
For those with range access, Craig recommends a blind standing exercise: “This exercise consists of dry-firing one round, then live-firing one round, at a 200-yard standard SR target. For those who have access only to a 100-yard range, reduced targets will work as well. Begin the exercise with a timer set for 50 minutes. Dry-fire one round, then fire one live round and without looking at the actual impact, plot a call in a data book. Continue the dry fire/live fire sequence for 20 rounds, plotting after each round. After firing is complete, compare the data book to the target. If your zero and position are solid, the plots should resemble the target. As the training days add up and your zero is refined, the groups will shrink and move to the center.”
Fitness training and holding drills help position shooters reach their full potential. Here is 6-Time U.S. National Long Range Champion John Whidden.
Training for Older Shooters
Tom Alves has written an excellent article A Suggested Training Approach for Older Shooters. This article discusses appropriate low-impact training methods for older shooters. Tom explains: “Many of the articles you will read in books about position shooting and the one mentioned above are directed more toward the younger generation of shooters in their 20s. If you look down the line at a typical high power match these days you are likely to see quite a few folks who are in their middle 30s and up. Many people in that age range have had broken bones and wear and tear on their joints so a training program needs to take that into account. For instance, while jogging for an extended period for heart and lung conditioning may be the recommended approach for younger folks, it may be totally inappropriate for older people.”
Emil Praslick III is widely recognized as one of the greatest wind wizards on the planet — a master at identifying wind value and direction, and predicting wind cycles. As coach of the USAMU and top civilian teams, Emil has helped win many high-level championships. In the three videos we feature today, Emil, who works with Capstone Precision Group (Berger, Lapua, SK, Vihtavuori) and Team Applied Ballistics, explains how to determine wind direction and velocity using a variety of indicators. Praslick, now retired from the U.S. Army, was an 18-time National and 2-time World Champion coach with the USAMU.
Video ONE: Wind Theory Basics — Understanding “Wind Values”
In this video from UltimateReloader.com, Emil explains the basics of modern wind theory. To properly understand the effect of the wind you need to know both the velocity of the wind and its angle. The combination of those variables translates to the wind value. Emil also explains that the wind value may not be constant — it can cycle both in speed and velocity. Emil also explains some of the environmental conditions such as mirage that can reveal wind conditions.
Video TWO: Determining the Direction of the Wind
Key Point in Video — Find the Boil
Emil explains how to determine wind direction using optic. The method is to use spotting scope, riflescope, or binoculars to look for the “Boil” — the condition in mirage when the light waves rising straight up. The wind will generate that straight-up, vertical boil in your optics when it is blowing directly at you, or directly from your rear. To identify this, traverse your scope or optics until you see the boil running straight up. When you see that vertical boil, the direction your optic is pointing is aligned with the wind flow (either blowing towards you or from directly behind you).
Video THREE: The No Wind Zero Setting
In this second video, Emil defines the “No-Wind Zero”, and explains why competitive shooters must understand the no-wind zero and have their sights or optics set for a no-wind zero starting point before heading to a match. In order to hit your target, after determining wind speed and direction, says Emil, “you have to have your scope setting dialed to ‘no wind zero’ first.”
Coach of Champions — Emil Praslick III
SFC Emil Praslick III, (U.S. Army, retired) works with Berger Bullets and Applied Ballistics. Emil served as the Head Coach of the U.S. National Long Range Rifle Team and Head Coach of the USAMU for several years. Teams coached by Emil have won 33 Inter-Service Rifle Championships. On top of that, teams he coached set 18 National records and 2 World Records. Overall, in the role of coach, Praslick can be credited with the most team wins of any coach in U.S. Military history.


 Most articles and discussions regarding competitive shooting center around equipment. Now and then one will come across an article about physical training such as the USAMU piece on Physical Conditioning for Highpower Shooting. If you break the articles down they often discuss “core strength” and durability. The purpose of this paper is to elaborate on those points with a bit different perspective. Many of the articles you will read in books about position shooting and the one mentioned before are directed more toward the younger generation of shooters in their 20s. If you look down the line at a typical high power match these days you are likely to see quite a few folks who are in their middle 30’s and up. Many people in that age range have had broken bones and wear and tear on their joints so a training program needs to take that into account. For instance, while jogging for an extended period for heart and lung conditioning — often called cardio exercises — may be the recommended approach for younger folks, it may be totally inappropriate for older people. The procedure to repair meniscus tears in knees is one of the most frequently performed operations in this country. Another approach one often sees in training to improve core strength is the use of weight machines which isolate certain muscle groups in their operation. I would like to suggest an alternative approach that not only does not require special equipment but uses the body’s muscles in a coordinated fashion in the same way they are used in our natural movements. So, let’s set down some criteria:
 Last I want to mention visual performance training. The New Position Rifle Shooting, A How-To Guide for Shooters and Coaches by Bill Pullum and Frank Hanenkrat mentions sports vision training amongst other aspects of vision in competitive shooting. [Used book under $40.00 on Amazon]. If one goes on the Internet you will find training programs directed at golfers, baseball and football players. There is one site that has a demo which, if one looks at it for long, it is obviously very similar to a shooting gallery video game. The training involves rapid recognition and hand-eye coordination. Another source of visual training exercises, along with a wealth of other information, is the book Prone And Long Range Rifle Shooting by Nancy Tompkins.


 Use Consistent Brass

 Getting focused mentally is an important part of preparation for Perry. In 2011 I was chasing Sherri Gallagher, since then I have been chasing Brandon Green[.] If I get beat by a Service Rifle I am going to make him or her work for it. So there is your peak into my mental process. I go for the top and if I am hanging with them then the Service Rifle National Championship will come, Kind of like how I shoot for X’s and Tens will come.

 In the archives of
 Gary Anderson served as the Director of the Civilian Marksmanship Program (CMP) from 1999-2009, and is now DCM Emeritus. As a Nebraska farmboy, Gary grew up hunting and shooting. Dreams of winning an Olympic Gold Medal in shooting led Gary to the U.S. Army. In 1959, he joined the elite U.S. Army Marksmanship Unit. Just two years later, he won his first national championship.
 In the archives of


 In the archives of


