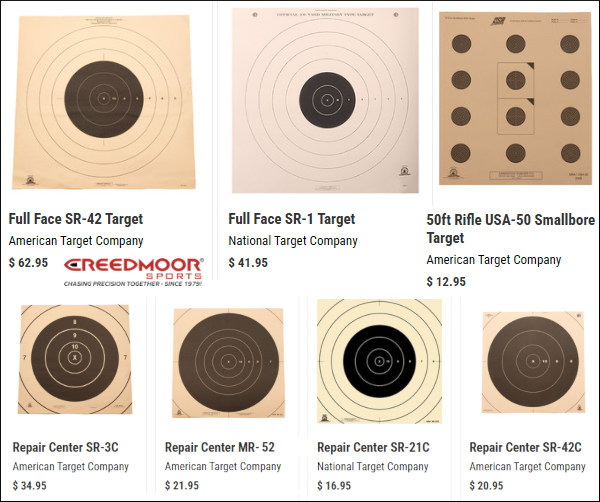
Are you a High Power or Smallbore marksman looking for bullseye paper targets? Here are bulk sets of 25, 50 and 100 targets from Creedmoor Sports. All these can can be used for general practice, fun matches, or official sanctioned events. Choose the 200-yard SR-1 target with seven scoring rings (X,10,9,8,7,6,5), priced at $41.95 for 100. For smallbore, you can get the USA-50 Smallbore Target $12.95 for 100. Creedmoor also offers a variety of Repair Centers, including the 300-Yard SR-3C Target Repair Center ($34.95), or the SR-21C Target Repair Center ($16.95). These target centers can be used on top of full targets, or by themselves for practice on smaller target frames.
Creedmoor Sports also offers match-grade shot spotter discs. These are used to mark shot locations. They are offered in three diameters: 1.5″, 3.0″, and 5.0″. In addition, you can purchase the spindles used with spotter discs along with range Golf Tees also employed to mark shots. These are placed in the shot holes by pit workers.
Frankly for practice, we recommend a target cam, or ShotMarker system.
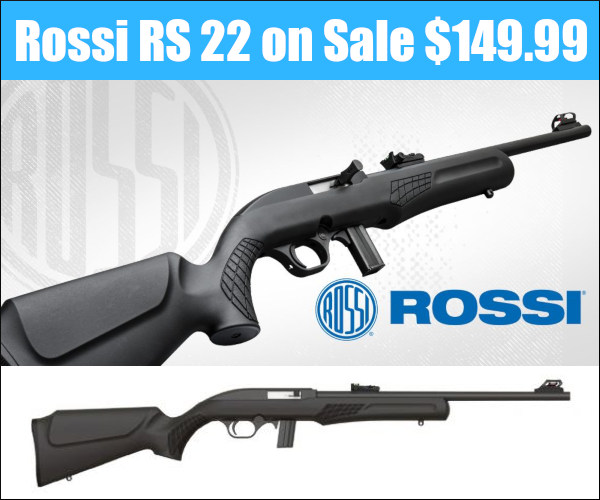
Looking for a very affordable first rifle for a young family member? Here’s one of the best low-cost options you can find among .22 LR rimfire rigs. The Rossi RS22 is a reliable, semi-auto rifle that comes equipped with barrel-mounted iron/fiber optic sights. There are also dovetails on the receiver for mounting scope rings. The RS22 also takes most Mossberg 702 magazines.
The Rossi RS22 features an 18″ free-floating barrel, adjustable fiber optic sights and a synthetic Monte Carlo stock. For added accuracy, 3/8″ dovetail mounts allow the mounting of a scope or other optic (and there is a model with a Picatinny rail).
There are multiple RS22 models. The basic RS22 with black stock and iron sights is $149.99 at Sportsman’s Warehouse. If you prefer a different stock color, Sportsman’s Warehouse also has the iron sights RS22 with Green stock for $149.99 or Brown Stock for $189.99. If you will always be using a scope, consider the RS22 model with Picatinny scope rail and threaded barrel (but no iron sights) — it is on sale now for just $127.47 at Sportsman’s Warehouse.
Rossi RS22 Specifications:
Model: RS22 Semi-Auto, .22 LR
Barrel: 18″ Free-floating
Stock: Black Monte Carlo Synthetic Stock
Overall Length: 36.25″
Weight: 4.1 lbs.
NOTE: The Rossi RS22 on sale has a matte black stock.
Two Video Reviews of Rossi RS22
The above video review of the Rossi RS22 confirms its reliability and build quality. The reviewer praised the fiber-optic iron sights and liked the magazines. After fitting a scope to the rifle’s built-in dove-tail, the tester got excellent accuracy with CCI ammo at 25 yards. Ten shots basically formed one half-inch hole. (See video 8:24 – 8:50 and target at right.) That’s good enough for an NRL22 match. Pretty impressive for a $150 rifle!
Gunblast.com also tested the Rossi RS22. This “dandy little rifle” performed great, with flawless semi-auto feeding and cycling for hundreds of rounds. Accuracy was quite good. The tester praised the fit and feel of the stock and noted it has sling swivel studs and well-protected sights. The RS22 can also use 25-round Mossberg magazines.
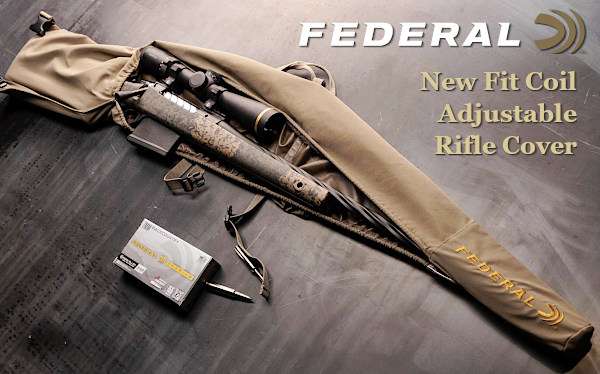
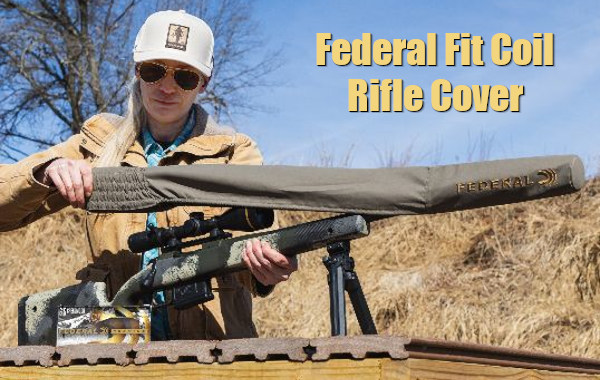
Federal Ammunition has introduced a new type of firearm cover, the Federal Fit Coil Rifle Cover. The Federal Fit Coil Rifle Cover features a roll-up design that lets shooters adjust cover length to the firearm. A key feature is an internal retracting elastic band that allows easy insertion but also adapts the cover to the actual rifle length from muzzle to buttpad.
Federal’s new rifle cover is “suppressor-ready”, meaning the muzzle area inside the cover has heat-resistant lining. Sizes include medium for firearms of 34 to 44 inches in length, large for 39 to 49 inches, and XL for 44 to 54 inches. All sizes are equipped with a quick-grab handle.
“With a roll-up design that lets shooters adjust case length to the firearm, our Federal Fit Coil Rifle Cover is a suppressor-ready rifle case that is ready for anything,” explains Jake Jacobs, Federal’s Accessories Product Director. “It has a heat-resistant lining in the muzzle area and a quick-grab handle. With suppressors being so wildly popular these days, having the gear needed to protect them properly and conveniently is an absolute necessity.”
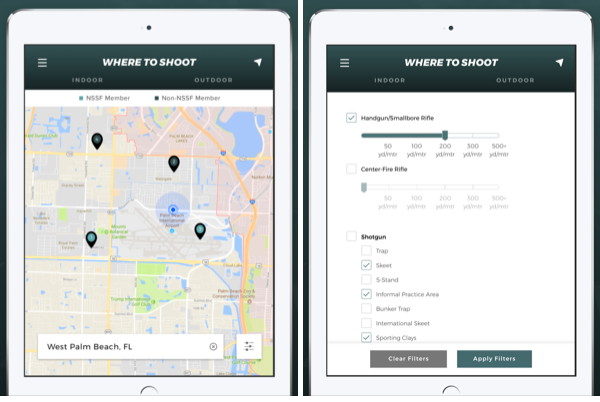
The Where To Shoot Mobile App quickly locates shooting ranges near you, drawing on North America’s most comprehensive directory of shooting ranges. Users can search by current location, state, or zip code. Once you locate a range, you can view activities offered along with a summary of range facilities. You can even get driving directions.
The app is modeled after NSSF’s popular WhereToShoot.org® website and is updated frequently with range information for every U.S. state and Canadian province. Once you’ve located a place to shoot, the App can provide directions to the range. The App also includes video tips for shooters, news, and firearm-safety information.
On this 4th of July, 2026, the 250th Anniversary of American Independence Day, we thought it would be good to feature lever-action rifles. Lever-action rifles have been an important element of American history. These were truly the rifles that “Won the West”. Today, lever-action rifles remain popular with hunters and cowboy-action shooters. And rimfire lever guns are fun for short-range shooting at reactive targets. Easy to carry, lever guns can also be very effective on varmints.
For this Saturday-at-the-Movies installment, we feature seven videos about lever-action rifles. These videos review modern lever guns as well as historic 19th-century lever-action rifles. Two of these videos features sophisticated 3D computer animation so you can look inside the rifles to see how the internal mechanisms function to feed, fire, and eject cartridges.
How a Lever-Action Rifle Functions
This video shows the inner mechanisms of a classic lever-action rifle. It shows how the lever actuates case-feeding from the under-barrel tube, then how the hammer is cocked/fired, and finally how the ejection works after the shot is fired. This video also covers lever-action rifle history, looking at the Winchester 1873 as well as popular modern lever-action firearms.
Classic American Lever-Action Rifles — Hickok45’s Insights
Hickok45 is one of the more knowledgeable YouTube gun reviewers, and he personally owns a number of lever guns. In this video, which has over 2.5 million views, Hickok45 first showcases the original Henry Rifle, and the brass-receiver model 1866 (aka “Yellowboy”). Then he reviews Winchester’s model 1873 and model 1876 (Centennial). Next comes Winchester designs by J.M. Browning — the model 1886, model 1892, model 1894, and lastly the distinctive model 1895 with vertical magazine. The Model 1895 was a favorite of President Theodore Roosevelt.
This insightful Hickok45 video has garnered 2.5 million YouTube views. If you can take the time to watch the entire 37-minute video, this is a great history lesson for 19th-century lever guns. In the video, Hickok45 also shows cartridges used in the various rifles.
Top Five Lever-Action Rifle for Hunting and Home Defense
This video combines reviews from multiple YouTube hosts, including .22 Plinkster. It is a good starting point if you are considering purchase of a modern, lever-action rifle for hunting or home defense. We recommend, prior to purchase, that you go to a gun store to inspect the rifles and work the actions. Some lever guns are significantly smoother in operation than others. You’ll also want to check the triggers, and see the options for mounting optics. This video provides a quick look at a variety of lever guns including: Henry Side Gate Lever Rifle; Winchester Model 1866 Short Rifle (replica); Browning BLR Lever Rifle; Marlin Dark Model 336; and Marlin 1895 Custom Shop 45-70.
Seven Reasons to Own a Lever-Action Rifle
We own a variety of lever-action rifles, including Marlins well as handsome replica Uberti 1866 and 1873 rifles. There is much to be said about the lever gun design. Compared to typical modern bolt-actions, lever guns are narrower and lighter. With a little tuning, the replica 19th-century lever-action rifles cycle very quickly and smoothly. And the modern lever guns are good choices for hunters, with their ability to mount scopes and fire modern high-velocity cartridges. This video reveals the reasons every serious shooter should have at least one lever-action rifle in his or her collection.
How a Winchester 1873 Works
This video has over 15 million views on YouTube. The Model 1873 was one of the most successful Winchester rifles of its day, with Winchester marketing it as “The Gun that Won the West”. The original Model 1873 was manufactured between 1873 and 1923, and it is still available today in replica versions. The 1873 was originally chambered for the .44-40 cartridge, the first significant centerfire cartridge. The 1873 was later produced in .38-40 and .32-20, all of which later became popular handgun cartridges of the day. The Model 1873 was produced in four variations: a 24-inch barrel rifle, a 20-inch barrel carbine, and a “musket”—which was aimed at military contracts and only made up less than 5% of production. The standard rifle-length version was most popular in the 19th century, although Winchester would make rifles to order in any configuration the customer wished, including longer barrels or baby carbines with barrels as short as 12 inches, octagonal-shaped barrels, color case-hardened receivers and fancy engraving.
The Henry Big Boy Lever-Action .44 Magnum
Here’s good, thorough 16-minute review of a modern Henry Big Boy side-gate lever-action rifle chambered for the potent .44 Magnum round. This rifle shows the benefits of modern manufacturing methods, and shows good fit and finish. The review puts the rifle through its paces, show how quickly a modern lever gun can be cycled. We think this would be a good choice for a home defense rifle that could share ammunition with a defensive revolver.
Marlin 336 XLR Tactical-Style Lever-Action Rifle
And now for something a bit different… Here a Marlin 336 XLR lever-action rifle has been updated with a tactical-style forearm, rail-mounted optic, and suppressor. The reviewer noted how well the rifle functioned: “Recently I got my hands on this 336 XLR from Marlin and all of my preconceptions of tactical lever action rifles has now changed. What I found was a very modern and capable twist to an old school platform.”
More Information on Lever-Action Rifles
Want to learn more about lever-action rifles? RifleShooter magazine has published an interesting article, the 10 Greatest Lever-Action Rifles of All Time. Writing for RifleShooter, Brad Fitzpatrick examined a wide selection of lever guns produced in the past 150 years, and came up with this list of ten “all-star” lever-action rifles:
Savage Model 99
Winchester Model 1873/73
Winchester Model 1888/88
Winchester Model 1892/92
Winchester Model 1894/94
As with all “Top 10″ lists, this will be controversial. Where is the Winchester model 1866 “Yellowboy”, the favorite of Native Americans? Where is the iconic Winchester model 1895, the beloved gun Teddy Roosevelt called “Big Medicine”? But other choices are hard to fault. The classic 1860 Henry Rifle surely belongs on the list. And, believe it or not, the Winchester Model 94 is the best-selling sporting rifle of all time in the USA, according to RifleShooter.
The 250th Anniversary of the founding of the United States is just two days away. There will be fireworks and Stars and Stripes decorations around the nation on this special Fourth of July holiday.
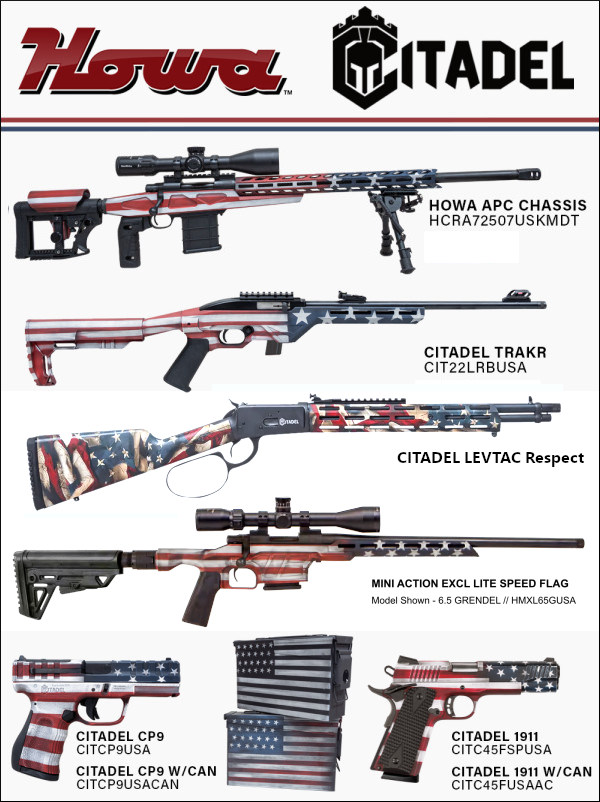
Would you like to show your patriotism and honor America with the color scheme of your firearms? Well gun-makers Howa and Citadel now offer bold, patriotic colors for rifles, shotguns, and pistols. A variety of Howa rifles and Citadel guns are offered with handsome red, white, and blue USA Flag patterns. You can choose rimfire or centerfire rifles, shotguns, or handguns — all with a patriotic Stars and Stripes finish.
Howa’s USA Flag pattern firearms line-up includes the APC Steel and Carbon Fiber Flag Chassis rifle, the Mini Action Excl Lite, and the TSP X Chassis rifle. On the Howas and the Citadel Trakr rifles, the flag patterns are a rugged, protective Cerakote finish. Citadel Trakr .22 LR rimfire rifles are also available with USA Flag and Grayscale options for both semi-auto and bolt-action models. And Citadel now offers a very handsome LEVTAC Respect lever-action rifle with Stars and Stripes buttstock and handguard.
The Citadel handgun collection offers the USA Flag pattern in the Citadel .45 ACP full size 1911 pistol, the Citadel CP9 9mm series, and the Citadel 1911-style compact .380 ACP series.
Howa TSP X Chassis Rifle
The Howa TSP X Chassis rifle has a Cerakoted T-6 Aluminum Chassis and excellent adjustable, 2-stage HACT trigger. This rifle comes with a sub-MOA guarantee and Lifetime Warranty. The patriotic TSP X rifle is offered in four chamberings: 6.5 Creedmoor, 6.5 PRC, .308 Win, and 300 PRC.
CITADEL Stars and Stripes Shotguns
Legacy International offers three different 12ga shotguns with handsome Stars and Stripes stock coverings. The Citadel Boss 25 is a modern mag-fed shotgun with AR-type ergonomics. The Citadel Pup Scout also feeds from a detachable magazine, but located in a rear position behind the hand grip. This allows a more compact OAL even with a proper barrel length. Citadel’s smallest shotgun offering is the 12ga short-barrel pump-gun with 14.75″ barrel and 5+1 capacity.
CITADEL American Flag Pistol Collection
• 1911 .45 ACP (large photo) | • Centurian CP9 9mm Series | • 1911 .380 AUTO
PDF Product Catalog Available CLICK HERE to view full Howa/Citadel Product Catalog with all patriotic color options. The Citadel Trakr .22 LR Rimfires and Boss 25 shotgun are also available in the USA Flag and Grayscale options. Cerakoted ammo cans in the USA Flag and Grayscale Flag are available with the Citadel handguns.
More and more folks are using Burris Signature Rings these days. These unique rings feature polymer inserts. That allows you to pre-load some elevation in your scope set-up, or you can center-up the windage. Additionally, the polymer inserts hold your scope securely without leaving marks on the tube. Lastly, some folks believe that Signature rings may offer advantages for benchrest competition. Rodney Wagner shot a world-record 600-yard group using Burris Signature Zee Rings (“Zee” denotes the Weaver-rail model). James O’Hara set multiple IBS 1000-yard records using Burris Signature Zee Rings. James will tell you he thinks “all his guns seem to shoot best with these rings”.
IBS World Record Set with Signature Zee Rings
Are Signature Zees good enough for competition? Absolutely. Some folks scoff at these Burris rings, given their modest price. A set of 1″-diameter Sig Zees cost $43.10 at Midsouth. But consider this, in 2013 Rodney Wagner shot the then-smallest 600-yard group in history, a 0.336″ 5-shot stunner, using Signature Zee Rings on his IBS Light Gun. It took five years for a smaller 600-yard group to be shot, a 0.311″ by bullet-maker Bart Sauter, using his IBS Heavy Gun. (See IBS 600-yard Records.) Here’s Rodney with his record-setting rifle, fitted with affordable Signature Zee 30mm rings.
Vendors Have Burris Signature Rings in Stock Now
Various models of Burris Signature Rings are available from many online vendors. NOTE: You may have to check with more than one seller to get the exact size, height, and model you prefer. But right now these vendors have pretty good selections of Signature Zees in stock now, including the popular 30mm High and 30mm Extra High models (each currently $59.37 at Midsouth). If you check all three sellers, you’ll probably find what you need.
Serious riflemen know that Krieger makes outstanding centerfire barrels that hold world records and have won many National Championships. But did you know that Krieger makes great rimfire barrels too? Well, Krieger does make outstanding .22 LR rimfire match barrels that can deliver impressive accuracy.
Sniper’s Hide moderator “Padom” recently tested a variety of rimfire ammo types, employing five different barrels: Krieger, Bartlein, Benchmark, Lilja, and Green Mountain. He tested at both 50 yards and 100 yards. FULL Rimfire TEST REPORT HERE.
Reporting on the 50-yard test, Padom posted: “Had a virtually dead calm day today for 50-yard RimX testing (Keystone Accuracy RimX barreled action with 1:16″ Krieger 20″ barrel). A few infrequent 3 mph gusts but pretty dead [calm] and the target showed. This Krieger just barely edged out the Bartlein by 0.003″ with a 0.177″ 6×5 with SK Rifle Match. The 10×5 was 0.198″. The best lots of Center-X weren’t far behind either. This is the first Krieger rimfire [barrel] I’ve shot and it didn’t disappoint.”
Padom noted: “Winds were much calmer tonight than this morning so the 100-yard Krieger test was a success. Winds were pretty consistent [at] 3-5 mph.”
Test Results at 100 Yards
Padom then tested ammo at 100 yards, again using his Krieger rimfire barrel: “To recap, the Krieger shot the best 50-yard results of the barrels tested so far, just barely beating the Bartlein but it was so close you can call the 50-yard results equal (.005). Well the Krieger beat all the barrels tested to date at 100 yards by a pretty good margin with Center-X. The 10×5 was incredible as well at just barely over 0.6″ showing the results were very consistent. A second lot of Center-X was right there with the previous 100-yard 6×5 best results just barely over 0.6. The third lot of Center-X shot a respectable 0.75″ 6×5. This Krieger sure is shooting very nicely. I’m really looking forward to shooting it at 300 and 400 yards[.]”
Components Tested: 20″ Krieger M24 barrel, .22 LR Match Eachus chamber 0.046 headspace, Zermatt RimX Action, Bix’N Andy TacSport Pro 2-Stage Trigger, RimX 10rd magazine, XLR Envy Pro Folding Chassis, Athlon Cronus BTR 4.5-29x56mm MIL scope.
Shooting Set-up: 100 Yards Prone with Bipod and Rear Bag.
On some internet shooting forums, self-declared “experts” advise new rifle shooters to stick to low-end factory rifles. These “experts” (many of whom don’t own a single really accurate rifle), claim that it will take years for a new shooter to learn how to shoot a rifle accurately. So, the argument goes, the accuracy offered by a precision-chambered rifle, with a custom barrel, is “wasted” on a new shooter.
We disagree with that viewpoint, at least when it comes to rifles shot from a rest. We’ve seen relatively new shooters, with help from a skilled mentor, do remarkably well with precision rifles right from the start. With a good bench gun, many new shooters can shoot well under 1 MOA on the first day. Certainly it takes time for a complete novice to learn how to handle the gun and to work the trigger smoothly. However, this editor has personally seen some inexperienced shooters try their hand at benchrest shooting, and within few month they are doing very well indeed at club shoots.
Accurate Rifles Reward Progress As Novices Build Skills
For bench shooting, we think a highly accurate rifle is a much better training device for a new shooter than a typical, cheap factory sporter. With a gun capable of 1.5-2.0 MOA at best, you can never really determine if a “flyer” is you or the gun. Conversely, when a novice shoots a gun that can put 5 shots through one ragged hole, if a shot goes way high or low, the shooter knows his aim, trigger control, or gun-handling is to blame. He (or she) can then correct the problem. And when the shooter does everything right, he or she will see a nice tight group on the target. The accurate rifle provides more meaningful feedback and it rewards progress. That helps the novice become a better shooter in a shorter period of time.
A while back, Forum Member Preacher and his “bunny hugger” niece from California proved this point. The young lady, with almost no shooting experience, took Preacher’s 6-6.5×47 and shot a sub-quarter-MOA, 3-shot group at 350 yards. Don’t tell her she needs to stick to a cheap factory rifle. Preacher reports: “My niece flew in from the west coast and came up to visit. When she saw a few of my full-blown varmint rifles, she wanted to shoot one. She did a super job even if she IS a ‘bunny hugger’. She pulled the 1.5 ounce Jewell on a few fired cases to check out the trigger pull and then got in behind the gun and put three shots into a 350-yard target with a one-inch circle.” We measured her group at 0.822″ (0.224 MOA). Don’t tell Preacher that accuracy is “wasted” on novices. He joked: “I sure don’t want her shooting at me ….”
Rifle Features BAT Action, Krieger Barrel, and Russo Laminated Stock:
For those who are interested, Preacher’s rifle features a BAT 3-lug action, 30″ Krieger 7.5-twist heavy contour barrel, and Russo stock (with clear coat by Preacher). Chambered in 6-6.5×47 Lapua, this gun “shoots the 108gr Bergers very well” according to Preacher. Yep, we agree with that — even when a novice “bunny-hugger” does the trigger-pulling.
At the request of our readers, we provide select “Deals of the Week”. Every Sunday afternoon or Monday morning we offer our Best Bargain selections. Here are some of the best deals on firearms, hardware, reloading components, optics, and shooting accessories. Be aware that sale prices are subject to change, and once clearance inventory is sold, it’s gone for good. You snooze you lose.
NOTE: All listed products are for sale to persons 18 years of age or older. No products are intended for use by minors.
Brownells – Freedom Sale + 12% Savings with Code FREEDOM12
⏺️ » Major savings on products plus 12% OFF with CODE FREEDOM12
Brownells is running a major Freedom to Boom Sale this week in preparation for July 4 and the nation’s 250th anniversary. A wide variety of products are on sale, including Howa barreled actions, Athlon chronographs, and AccuTac bipods. PLUS you can save 12% on most products with code FREEDOM12.
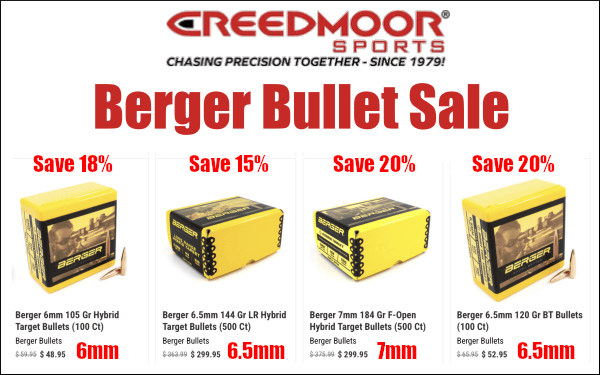
Creedmoor Sports — Berger Bullet Sale
⏺️ » Great Berger bullets for all popular calibers, 15-20% OFF
Need great match bullets? Check out the current Berger Bullets Bargain Bunker Sale at Creedmoor Sports. If you compete in PRS/NRL, Silhouette, or F-Class you probably shoot Berger Bullets and if you don’t you should probably try them. They rank among the highest quality, most consistent bullets available and have won more titles than just about any bullet out there.
As an Amazon affiliate, this site can earn revenues through sales commissions.


 More and more folks are using Burris Signature Rings these days. These unique rings feature polymer inserts. That allows you to pre-load some elevation in your scope set-up, or you can center-up the windage. Additionally, the polymer inserts hold your scope securely without leaving marks on the tube. Lastly, some folks believe that Signature rings may offer advantages for benchrest competition. Rodney Wagner shot a world-record 600-yard group using Burris Signature Zee Rings (“Zee” denotes the Weaver-rail model). James O’Hara set multiple IBS 1000-yard records using Burris Signature Zee Rings. James will tell you he thinks “all his guns seem to shoot best with these rings”.


 Test Results at 100 Yards