It is estimated that nearly 21.5 million Americans are currently licensed/permitted to carry concealed weapons. And with the 2022 U.S. Supreme Court decision in NYSRPA v. Bruen, we can expect that number to increase significantly. That landmark case stated that the Second Amendment guarantees citizens the right to bear arms outside their homes.
According to the Crime Prevention Research Center (CPRC), in 2024 8.2% of American adults had permits. That means nearly 21.5 million Americans are licensed to carry a firearm in the United States. Outside of the restrictive states of California and New York, about 9.8% of adults have a permit. Four states currently have over one million active permit holders: Florida, Georgia, Pennsylvania, and Texas. And interestingly, about 47% of Americans (over 157.6 million people) reside in “Constitutional Carry” states that allow handgun carry without a specific license.
There are now seven (7) major business entities which provide insurance coverage and legal services for CCW holders. These providers are listed below. We suggest, BEFORE you commit to any particular policy/membership, you comparison shop at least three different options. We also recommend you read the full 3400-word GunDigest Article that examines, in detail, the coverage offered by these seven companies:
Factors to Consider When Choosing a Gun Insurance Program:
Attorney Fees and Expert Fees
The key benefit of any CCW insurance plan is coverage for attorneys fees. If you need a lawyer for a civil case or criminal defense, the fees pile up very fast. Good lawyers can charge $400-$500 per hour, and a trial can go on for many days. GunDigest explains: “If your case goes to trial you might find a bill that runs up to six figures.” You should check to see if a policy covers lawyer retainer, hourly fees, expert fees, AND potential damages.
Bail Bond Coverage
If you are involved in an incident, and an arrest is made, you want to avoid spending time in a jail cell. That’s why it’s important to have a CCW insurance plan that will quickly provide funding for bail bonds. As GunDigest notes: “bail-bond coverage is typically part of a sound concealed carry insurance policy”.
Multi-State Coverage
Gun laws vary among states, and state insurance laws vary as well. This affects the coverage an insurance program can and will provide. When choosing a policy, ask questions to determine how coverage may vary from state to state. With some programs you can purchase additional coverage for trips outside your home state. These can be time-limited for cost savings.
Policy Limits (Dollar Amounts)
When considering a CCW insurance program you need to look at the policy limits — the amount the program might pay to provide legal assistance and potentially settle a claim. You need to read the fine print here, just as you would with an automobile or home policy.
The detailed GunDigest article on CCW Insurance Coverage, notes that there are some additional factors to consider when choosing CCW Insurance:
“You’ll find there are other areas covered by some concealed carry insurance plans worth contemplating. Many of them fall within the policies themselves, however, some cost extra. In many cases, CCW policies go well beyond legal expenses and cover some other aspects you might not have considered:”
Crime Scene Clean Up
Negligent Discharge
Spouse And Family Self-Defense
Property Damage
Firearms Replacement
Work Loss Coverage
Personal Use Of Firearm (non-defensive)
SSG Greg Markowski of the USAMU at Camp Perry, Ohio.*
The U.S. Army Marksmanship Unit (USAMU) fields pistol teams as well as rifle and shotgun competition squads. Consequently the USAMU’s Reloading Shop loads tens of thousands of pistol rounds every year. In this article, the USAMU’s handgun experts talk about reloading for handguns — with smart tips on how to achieve superior accuracy with 100% reliability. This article, which offers important insights on COAL, primers, crimps and more.
This video shows .45 ACP centerfire pistol competitors at Camp Perry
Precision Pistol Reloading — Recommended Methods
Optimize the Taper Crimp
One often-overlooked aspect of handloading highly-accurate pistol ammunition is the amount of crimp and its effect on accuracy. Different amounts of taper crimp are used with various handloads to obtain best accuracy. The amount is based on bullet weight, powder burn rate and charge, plus other factors. It is not unusual for our Shop to vary a load’s crimp in degrees of 0.001″ and re-test for finest accuracy.
Use Consistent Brass
Brass is also important to pistol accuracy. While accurate ammunition can be loaded using brass of mixed parentage, that is not conducive to finest results, particularly at 50 yards. It is important for the serious competitor/handloader to use brass of the same headstamp and ideally one lot number, to maximize uniformity. Given the volumes of ammunition consumed by active pistol competitors, using inexpensive, mixed surplus brass for practice, particularly at the “short line” (25 yards), is understandable. However [at 50 yards], purchasing and segregating a lot of high-quality brass to be used strictly for slow-fire is a wise idea.
Importance of Uniform COAL
Uniformity of the Case Overall Length (COAL) as it comes from the factory is also important to achieving utmost accuracy. More uniform case lengths (best measured after sizing) contribute to greater consistency of crimp, neck tension, ignition/burn of powder charge, and so on. Cartridge case-length consistency varies from lot to lot, as well as by maker. Some manufacturers are more consistent in this dimension than others. [Editor’s note: It is easy to trim pistol brass to uniform length. Doing this will make your taper crimps much more consistent.]
Primers and Powders — Comparison Test for Accuracy
Pay attention to primer brands, powder types and charges. Evaluating accuracy with a Ransom or other machine rest at 50 yards can quickly reveal the effect of changes made to handload recipes.
Bullet Selection — FMJ vs. JHP
Bullets are another vital issue. First, there is the question of FMJ vs. JHP. A friend of this writer spent decades making and accuracy-testing rifle and pistol bullets during QC for a major bullet manufacturer. In his experience, making highly-accurate FMJ bullets is much more difficult than making highly-accurate JHPs, in large part due to the way the jackets are formed. Small die changes could affect accuracy of FMJ lots dramatically. The CMP now allows “safe, jacketed ammunition” in Excellence-in-Competition (EIC) Service Pistol matches, although wadcutter ammunition is prohibited. Thus, the option to use very accurate JHP designs simplifies the life of CMP Service Pistol shooters in pursuit of the prestigious Distinguished Pistol Shot badge.
Hopefully, these tips will be helpful to any pistol shooters interested in accurate handloads, not just “Bullseye” shooters. Small tweaks to one’s normal routine can pay big dividends in improved accuracy and make practice and competition more rewarding. Stay safe, and good shooting!
TOP IMAGE: SSG Greg Markowski, a shooter/instructor with the USAMU, fires his pistol during the 2018 Civilian Marksmanship Program’s National Pistol Matches at Camp Perry, Ohio. At that event, Markowski claimed the General Mellon Trophy, General Patton Trophy and the General Custer Trophy. U.S. Army photo by Maj. Michelle Lunato/released by Defense Visual Information Distribution Service.
To understand the heart and mind of a champion, watch this video profiling Jessie Harrison. This talented lady is arguably the best female action pistol shooter in history. No other woman has amassed as many championships or set so many speed-shooting records. Over the past two decades Jessie Harrison (who has also competed with with married names Jessie Duff and Jessie Abbate) has earned dozens of major titles including twenty-two U.S. Practical Shooting Association (USPSA) Ladies Championships. Jessie won her 22nd USPSA title at the 2021 USPSA Race Gun Nationals in Alabama.
Jessie is one of the hardest-working athletes in the shooting game. Jessie is America’s “leading lady” — perhaps the winningest female pistol shooter in the game today. The drive and dedication that has made Jessie a success are revealed in this video from Weatherby.
Jessie Harrison’s Will to Win
Jessie explains how hard work brings titles: “To prepare for a championship, I’m on the range constantly.
My office is the gun range — that’s where I do my work.
I travel the country pullin’ the trigger, makin’ brass, smelling gunsmoke. I have to make sure that I’m in control because… there is no other person on the line with me, helping pull the trigger.
I have to pay attention to my foot placements, my set-ups, my positions, gettin’ the gun clean out of the holster, my reloads. I can’t think about it when I’m shooting. I can’t think about these small things. I have to focus on the sights and pulling the trigger. It’s just me and the gun.
[When] I step out on to the range, I simply have to be perfect — I have to be the best… I won’t settle for anything less.”
First-Ever Female Grand Master
Jessie Duff is the first woman in history to earn the title of USPSA Grand Master (GM), the highest rating conferred by the U.S. Practical Shooting Association (USPSA). To earn this prestigious ranking, Duff had to maintain an average above 95% in shooting classification courses, something never before achieved by a lady shooter. Jessie finished 2013 with a 95.39% average.
A new statute passed in California will bar state employees (as well as teachers, police personnel, and health care workers) from using a variety of firearms terms in official communications. California Assembly Bill 22408, authored by Assemblyman Tony Fulenzo (D. Los Angeles), defines over 30 gun-related words as “hate speech”. Under existing California law, any words/phrases defined as “hate speech” are proscribed (forbidden) in official publications, school textbooks, and all public-sector communications (including email). By effect of AB 22408 then, dozens of gun-related nouns, verbs, and adjectives will be banned, and “shall no longer be uttered or used in the State of California by any public agent or employee”.
Assemblyman Fulenzo said his intent in sponsoring AB 22408 was to alter public attitudes toward firearms, and in particular, to convince school children that firearms are bad. “We want to prevent young kids from perceiving firearms as ‘cool’ or ‘exciting’. The best way to do that is to bury the subject altogether. We need to dismantle the ‘gun culture’. That begins with banning the words themselves.”
Fulenzo said AB 22408 was inspired by existing bans on racist “hate speech”: “We don’t want children to read about guns or talk about guns. The first step, therefore, is to remove firearms-related words from textbooks, classroom presentations, and state documents. This is not something new. California has done the same thing with hateful words directed at minority groups. In California, by law, we have banned the use of the ‘N’ word (and other racist terms) in official state publications and school textbooks. Now we are just following that practice and banning the ‘G’ word (i.e. ‘gun’) and similar firearms-related hate speech”.
Ban on Gun Words in Oregon Next?
Meanwhile, in neighboring Oregon, anti-gun groups have called for the passage of similar legislation banning the use of firearms-related terminology. And there have been protests in Arizona also.
Permitted Word Equivalencies for Banned Firearm Terms
When enacted into law, AB 22408 will ban more than 30 firearm-related words, including “gun”, “pistol”, “rifle”, “bullet” and other commonly-used words. Where it is necessary to reference a firearm, as in a police report, AB 22308 provides for substitute words or phrases. AB 22408 recognizes that, in some instances, it will be necessary to mention firearms-related facts in official documents. By using these officially-designated substitute words, firearms-related facts can be logged without resort to banned “hate speech”.
Gun = “Gunk”
Pistol = “Piddle”
Rifle = “Ripple”
Shoot = “Suit”
Bullet = “Mullet”
Ammo = “Venmo”
Cartridge = “Partridge”
How to Use California-Approved Substitute Gun-Related Words:
Under AB 22408, if an official report requires description of a hate speech item, then the approved replacement words shall be used instead of the prohibited terms. For example, if a hospital treats a pistol wound, this shall be listed as a “piddle wound” in the official medical report. Likewise the recovery of cartridges at a crime scene by police shall be recorded as a “partridge recovery” in the incident report.
New Law Does Not Restrict Speech by Non-Governmental Entities
This new law only applies to “public sector” entities (schools, police/sheriff agencies, hospitals/health clinics, state and municipal agencies). Private businesses, including newspapers and web sites, will still be allowed to use firearms-related words without the threat of prosecution. Likewise, private citizens will still be allowed to say “gun”, “pistol”, or “rifle” etc. in their own private communications. However internet posting of hate speech involving forbidden firearm words will be monitored by a new California State Agency. This new Agency, the California Office of Firearms Hate Speech (COFHS) will be funded by a new 5% sales tax on firearms ammunition and components.
Here is Ernie Bishop’s pride and joy, a specialty pistol nicknamed “Batman” because the black carbon-fiber stock looks like the Batmobile. This is one sophisticated handgun. Complete with scope, the Batman pistol weighs under 7.5 pounds, thanks to the ultra-light stock. The carbon stock is 6 inches wide at the fore-end, yet weighs just one pound. Ernie tells us: “This gun shoots amazing and is easy to shoot especially with my SEB MAX Rest.” After these photos were taken, Ernie added a “field-usable rear-grip stock so [he could] shoot it prone from a bipod as well.”
The Batman pistol is chambered for the 6mm “Long Dasher”, a 6mm 40°-shouldered variant of the 6.5×47 Lapua. Ernie loads Berger 105gr Hybrid bullets pushed by Hodgdon H4350 powder.
Gun Specifications The gun, crafted by Eric Wallance of Nawaka Firearms, features an XP-100 action, Jewell trigger, and 15″-long, Brux 1:8″-twist barrel with aluminum muzzle brake. Interestingly, this gun does not have a traditional recoil lug. Instead, gunsmith Wallace milled out a lug from the bottom of the XP-100 action to save weight. On top of the action, the rig carries a Sightron Inc S-III 6-24X56mm scope in Kelbly rings on a custom +20 MOA rail.
Long Dasher Wildcat
Shown at right is a “Long Dasher” 40° wildcat created by Forum member Sunbuilder. This is very similar to Ernie Bishop’s chambering, though there may be small variations related to reamer design (such as freebore). Sunbuilder’s 6-6.5×47 Improved (aka “Long Dasher”) reamer was made by Dave Kiff of Pacific, Tool & Gauge. This wildcat cartridge adds about 2.0 grains capacity to the 6.5×47 necked down to 6mm. The case certainly is impressive with that 40° shoulder. We’re just waiting for the tactical guys to starting run this improved cartridge with its original 6.5mm bore.
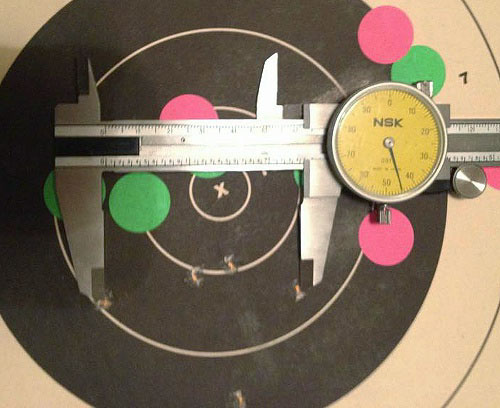
Here are three FIVE-shot groups at 500 yards, shot by Ernie’s Batman pistol. The first 5-shot group is marked with pink dots, the second with green dots, and the third is measured with the calipers:
When shooting pistols do your shots normally land smack dab in the middle of the target? If not, you may have some technique problems that are causing your shots to move off center. Top Shot Champion Chris Cheng has produced a good video for the National Shooting Sports Foundation (NSSF) that helps handgunners diagnose accuracy issues. By shooting 3-shot groups and looking at the pattern and location of the shots, you can see what you’re doing wrong (or right). Here are some examples. Note, this process works best for shooters whose shots fall typically in one target zone. If your shots are all over the target, your form is inconsistent and problems will be harder to diagnose.
1. Low Left — Jerking Trigger: Here we see three (3) shots at the 7 O’clock position. This shows that the shooter is jerking the trigger, meaning that the shooter is pulling the trigger too quickly and therefore forcing the barrel to drop when breaking the shot. This is a very common problem, particularly with novices who are reacting to the noise/recoil of the pistol.
2. 9 O’Clock — Too Little Trigger Finger: If we see three (3) shots at the 9 O’clock position, what this can be indicative of too little trigger finger on the trigger. And therefore with every shot, the shots are getting pushed to the left. Try moving your trigger finger on to the pad of your index finger. Also try dry firing drills.
3. High Left — Anticipating Recoil: In this next example, we see three shots around the 11 O’clock position. What could be happening here is that the shooter is anticipating the recoil, and is actually lifting the gun up when he shoots. We recommend slowing down, working on your breathing, and, again, do dry-firing drills.
4. 3 O’Clock — Too Much Trigger Finger: Finally, if you see three (3) shots at the 3 O’clock position, this can indicate that there is too much trigger finger on the trigger. Therefore when the shot breaks the shooter is pulling each shot to the right. Note: Each of these descriptions is for a RIGHT-handed shooter. If you are a left-handed shooter you’ll want to reverse those descriptions.
The Tactical Hyve YouTube channel currently hosts over 1,100 videos! Here are three of our favorite Tactical Hyve videos focusing on pistol marksmanship. These videos cover basic essential techniques as well as advanced handgun skills used in competition. These videos feature highly-skilled handgun experts.
1. How to Aim a Pistol with Iron Sights or Red Dot
We recommend this video for persons training for a CCW permit, or who are getting started in pistol shooting competition. The video shows proper technique for using iron sights. In addition, it offers some important advice for shooting with Red Dots. Shooting with Red Dot sights can be easier than with iron sights because you only have to put the dot on the target, rather than align front blade with rear notch. But it does take some familiarization to get things right. And persons with astigmatism can have challenges with Red Dot sights.
2. Get Your Sights Back On Target Fast
This popular video covers a very important skill for both pistol competition and defensive handgun use — getting your sights back on target quickly. This informative video covers grip, sight picture, trigger control, and how to handle recoil and muzzle rise. If you’re considering action pistol or 3-gun matches, definitely watch this video.
3. Five Most Common Pistol Shooting Mistakes
In this video, Myles, the founder of Tactical Hyve, talks about the five most common pistol shooting mistakes he sees in classes and how to correct them. Many folks begin pistol shooting without a qualified instructor. Or they try to imitate what they see on TV. This can lead to new pistol shooters forming bad habits. This video helps handgunners correct those bad habits. This popular video has 1.9 million views.
Do you enjoy shooting pistols for sport, or perhaps you carry a handgun for self-defense? If you’re like most of us, you might benefit from a “refresher course” on the fundamentals of handgun shooting. The NRA has created a useful Infographic that covers important basics of handgun marksmanship — key things such as Sight Alignment, Trigger Control, and Handgun Hold.
Here are the first two (2) lessons. Click the link below to see all SIX (6) training topics: Sight Alignment, Sight Focus, Trigger Control, Breath Control, Hold Control, and Follow-Through.
Video Shows Sight Alignment, Grip, Stance, Trigger Control and More
In this USAMU video, SGT Shane Coley talks about the basics of sight alignment and trigger control. But then SGT Coley talks about other important control factors such as grip, arm position, and body stance. For rapid-fire shooting, you need to have a good arm and body positioning to control recoil and get back on target quickly. This video is a valuable complement to the NRA Infographic because it demonstrates all the important pistol fundamentals during live fire, at the range.
Here’s a helpful, time-saving tool for handgun owners. MidwayUSA’s online Holster Finder lets you quickly find the right holsters for virtually all popular makes and models of pistols and revolvers. The wide variety of carry styles, materials, and features can make finding the right holster difficult or confusing. Drawing on a database of over 125,000 gun/holster combinations, the MidwayUSA Holster Finder turns that complex task into an easy three-step process.
The selection process is simple: 1. Choose Pistol or Revolver; 2. Select Make and Model of Handgun (and barrel type/length); 3. Click to view results. Just choose your gun type, select your make, model and barrel, then view the results. All major holster types are included: Ankle, Belly Band, Belt (outside waistband), Chest, Competition, Drop Leg, Inside Waistband (IWB), Paddle, Pocket, and Shoulder. Check out the MidwayUSA Holster Finder at MidwayUSA.com/holster-finder.
If you are evaluating a firearm for self-defense use, you should consider three main factors: Reliability, Functionality (sights, trigger, ergonomics), and Effectiveness (ability to halt/neutralize threats). Regarding effectiveness, you need to consider what happens when the projectiles from your firearm reach the target. That involves penetration and terminal ballistics.
A 12ga shotgun is very effective inside 20 yards, with less risk of over-penetration* vs. a centerfire rifle.
You’ve probably heard the term “Terminal Ballistics”. But do you really know what this refers to? Fundamentally, “Terminal Ballistics” describes the behavior of a projectile as it strikes, enters, and penetrates a target. Terminal Ballistics, then, can be said to describe projectile behavior in a target including the transfer of kinetic energy. Contrast this with “External Ballistics” which, generally speaking, describes and predicts how projectiles travel in flight. One way to look at this is that External Ballistics covers bullet behavior before impact, while terminal ballistics covers bullet behavior after impact.
The study of Terminal Ballistics is important for hunters, because it can predict how pellets, bullets, and slugs can perform on game. This NRA Firearm Science video illustrates Terminal Ballistics basics, defining key terms such as Impact Crater, Temporary Cavity, and Primary Cavity.
External Ballistics, also called “exterior ballistics”, is the part of ballistics that deals with the behavior of a non-powered projectile in flight.
Terminal Ballistics, a sub-field of ballistics, is the study of the behavior and effects of a projectile when it hits its target.
*This Shooting Illustrated article discusses over-penetration risks with a variety of cartridge types. “A bullet passing through a threat and continuing with the potential to cause unintentional damage to a bystander or object is a situation commonly described as over-penetration.”


 Use Consistent Brass
 Jessie Harrison’s Will to Win

 Fulenzo said AB 22408 was inspired by existing bans on racist “hate speech”: “We don’t want children to read about guns or talk about guns. The first step, therefore, is to remove firearms-related words from textbooks, classroom presentations, and state documents. This is not something new. California has done the same thing with hateful words directed at minority groups. In California, by law, we have banned the use of the ‘N’ word (and other racist terms) in official state publications and school textbooks. Now we are just following that practice and banning the ‘G’ word (i.e. ‘gun’) and similar firearms-related hate speech”.

 The gun, crafted by Eric Wallance of Nawaka Firearms, features an XP-100 action, Jewell trigger, and 15″-long, Brux 1:8″-twist barrel with aluminum muzzle brake. Interestingly, this gun does not have a traditional recoil lug. Instead, gunsmith Wallace milled out a lug from the bottom of the XP-100 action to save weight. On top of the action, the rig carries a Sightron Inc S-III 6-24X56mm scope in Kelbly rings on a custom +20 MOA rail.