In the video below, Shiraz Balolia takes you through the essentials of fire-forming brass with his custom-made, water-cooled benchrest railgun. Shiraz is a former Team Captain (and member) of the U.S. F-Class Open Rifle Team. Shiraz has competed on the National and World level for more than two decades, and has won multiple major International championships in 1000-yard shooting. In this video he will walk you through fire-forming cartridges in .284 Shiraz, a wildcat based on the .284 Winchester.
Fire-forming properly is a pre-requisite for accuracy in a match rifle. Done right, fire-forming can improve cartridge consistency shot to shot. Creating a fire-forming fixture like this, or even a more basic design, can save you time and potential frustration on the range, Shiraz explains. The key is getting the initial case expansion to match your competition chamber quickly but without generating excessive heat. Follow along as Shiraz takes you through the methodology of fire-forming both in his work shop and on the range.
Here Shiraz Balolia takes you through the essentials of fire-forming brass with his custom-made, water-cooled benchrest railgun.
Along with running the successful Grizzly Industrial enterprise, Shiraz is a top competitor and member of the U.S. F-Open team. He has competed in three world championships. In recent years he captured three straight Canadian National F-Class Championships (READ 3-Peat STORY). So, this guy knows his stuff.
Shiraz shows fellow shooters how to fire-form cases efficiently without burning precious match barrel life. In the video above he uses a custom-designed railgun that employs water cooling for the barrel. This is done with hoses running from a sink, so that cool water is constantly flowing through the barrel jacket.
Shiraz says the fired cartridge are actually cool to the touch because the water-jacketed barrel keeps everything at a moderate temperature. (See video at 8:00)
Jonathan Ocab, a High Power shooter from California, had gunsmith Doan Trevor install a Sako-style extractor in the Rem 700 bolt in Ocab’s 6mmBR Eliseo R5 tubegun. Jonathan produced an excellent video showing how the Sako extractor improves the ejection of the short, fat 6mmBR cartridges in his rifle. Jonathan’s video demonstrates 6mmBR case ejection with an unmodified Rem 700 factory bolt versus a factory bolt fitted with a Sako-style extractor.
Johnathan explains: “Note how even when slowly operating the bolt, the bolt with the Sako extractor easily ‘kicks’ out the brass on ejection with minimal chance of operator error resulting in a failure to extract. While the unmodified bolt has issues ejecting brass on slow operation, it will eject if the operator pulls the bolt back quickly (fast and with some force).
While a Sako-style extractor isn’t an absolute necessity, this video shows the definite improvement this modification provides. For short cartridges like the 6mmBR, this is very useful. This modification is highly recommended for competition shooters, especially High Power competitors who seek improved function in rapid-fire stages. This modification is fairly inexpensive and any competent gunsmith should be able to perform the work (usually under $100 with parts and labor).”
EDITOR’s NOTE: In his video, Jonathan deliberately worked the unmodified Remington bolt slowly to show how the standard Rem extractor can struggle with short fat cases like the 6mmBR. In fact, when you work a standard, unmodified bolt more quickly, the extraction can be much more positive. Cycling the bolt with more “snap” provides more energy to eject the cases. We have run an R5 Tubegun chambered in 6mmBR with an unmodified Rem 700 bolt (no SAKO extractor), and the extraction was reliable, provided the bolt was worked quickly.
We have used NO-LEAD Cleaner in rimfire benchrest rifles similar to this modified Suhl 150-1. It helped restore accuracy with minimal brushing.
Made by the same smart folks that created Wipe-Out™, and Carb-Out™, NO-LEAD Brushless Lead Remover™ really works. Honest. If you are an active rimfire shooter, or if you shoot cast lead-alloy bullets in centerfire rifles and pistols, you should try this product. We now use NO-LEAD in our rimfire benchrest rifles, and in some centerfire guns that receive a steady diet of soft-alloy cast bullets (90%+ lead). (With rimfire guns, you don’t need to use NO-LEAD very often — maybe every 300-400 rounds unless you have a real fouler of a barrel.)
If you’ve got stubborn lead fouling in a rimfire barrel, or on a pistol’s muzzle brake/compensator, you should definitely give this stuff a try. We don’t know how but it does soften lead deposits. The manufacturer says you don’t need brushes, but we found that a bit of brushing (after NO-LEAD application) can help remove more serious lead build-up.
Yes we were surprised to find a lead remover that really works. We tried a half-dozen other lead “cleaners” that promised to dissolve lead and most of them, we discovered, are nearly useless. There’s a reason for that, as the lead alloys used in bullets don’t react to typical petrochemical-based solvents. It took the Wipe-Out chemists over five years to perfect this water-based solution that really does dissolve lead.
NO-LEAD Cleaning Procedure — Read Carefully NO-LEAD Lead Remover is a clear, red gel that is easy to apply. Just swab it in your bore (or on muzzle brakes) with wet patches or bore mop and let it sit for a few minutes. (The manufacturer says you can leave the NO-LEAD for up to 20 minutes, but that long of a dwell time does not seem necessary with our rimfire barrels.) When it contacts lead it will start to foam and you’ll see that the NO-LEAD solvent turns a pastel pink when it dissolves lead. The pink comes from the formation of lead oxide. After the recommended dwell time, simply patch out the dissolved lead deposits (you can also use a nylon brush for stubborn lead build-up).
NOTE: After cleaning, it is very important that you get all the NO-LEAD out of your barrel, and neutralize it. We recommend following the application of NO-Lead with Wipe-out or Patch-Out to neutralize the NO-LEAD, clear the bore, and remove residual carbon and copper fouling. If you don’t have Wipe-Out or Patch-out, flush the barrel thoroughly with Rubbing Alcohol or even a solution of Dawn dish detergent — then re-oil the bore.
Be Sure to Neutralize NO-LEAD After Use
Remember that N0-LEAD is a strong, slightly acidic chemical that needs to be neutralized after use. If you leave it on a nice, blued barrel for too long, it can harm the bluing. NO-LEAD will remove all the surface oils from the barrel bore. For this reason it is recommended that you neutralize NO-LEAD with Wipe-Out, or Patch-Out, which both contain effective corrosion inhibitors. If you don’t have those products, once you’ve flushed the NO-LEAD with something like rubbing alcohol, then follow with a gun oil. Caution: A petroleum-based gun oil will NOT, by itself, neutralize NO-LEAD. You need to neutralize first, then apply the corrosion inhibitor (or do it all in one step with Wipe-Out or Patch-Out).
Where to Buy NO-LEAD Lead Remover
NO-LEAD Lead Remover costs $19.50 for an 8 oz. squeeze bottle with a flip-top spout. This product is sold directly by Sharp Shoot-R Precision Products through Sharpshootr.com, or you can purchase NO-LEAD through many other online vendors. For more information, send an email via the Sharp Shoot-R Contact Form or or contact SharpShoot-R at (785) 883-4444. You can ask for Terry Paul, Sharp Shoot-R’s owner and the master chemist who developed the NO-LEAD formula.
Do you use factory ammo for your hunting rifles? Or perhaps you buy bulk centerfire ammo for your AR15 or varmint rifle. Or do you shoot a variety of rimfire ammo? Then this book can definitely benefit you.
If you ever shoot factory ammo, you should consider getting Ammo & Ballistics 6. This resource lists over 2,600 different loads for 200+ cartridge types from .17 Mach 2 up to .700 Nitro Express, including the most popular centerfire and rimfire cartridges (both rifle and handgun). In this updated-for-2020 Sixth Edition, there are over 3,000 tables covering virtually every caliber and every load for all commercially-loaded hunting ammunition sold in the USA. Tables include velocity, energy, wind drift, bullet drop, and ballistic coefficients up to 1,000 yards.
Ammo & Ballistics 6 contains data and illustrations on the vast majority of sporting cartridge types sold in the USA: 200-plus cartridge types from .17 Mach 2 up to .700 Nitro Express.
Extensive Cartridge Coverage: Contains data for over 200 cartridge types. Load Database: Includes over 2,600 different loads and 3,000 ballistic tables. Detailed Metrics: Provides information on bullet weight, type, velocity, energy, wind drift, bullet drop, and ballistic coefficients up to 1,000 yards. Choose Hunting Ammo:Ammo & Ballistics 6 helps you select ammo for a hunt — quickly compare the velocity and knock-down power of various commercial ammo.
Verified Book Purchaser Reviews
“Outstanding reference guide for shooters and ballistic enthusiasts alike. Has data on velocity, energy delivered, Taylor KO index, windage and elevation on numerous loadings for hundreds of [cartridge types]. Each cartridge has all dimensions labeled (i.e rim, case length, neck, etc.), and has an informative description of the cartridges history/relevance.” — S. Step, 2017
“Great heaps of data! This volume has pages and pages of new data for .22LR like the hot Velocitor, and also on the .22 WMR from 30 grains up into the 50s. Most importantly there is lots of range data, drop, windage, kinetic energy, etc. — Terrific reference guide….” — E. Svanoe
Flattest-Shooting Cartridges by Caliber (Ron Spomer)
In this 15-minute video, hunting expert Ron Spomer examines a variety of standard and wildcat cartridges from .17 caliber all the way to .338 caliber. For each caliber, Ron picks a flat-shooting “winner” and provides some ballistics comparison tables. This video is quite popular, with over 550,000 views on YouTube.
Ever wondered how factory ammunition is produced, from start to finish? How are brass cases made, how are bullets created, and how are finished cartridges produced on automated assembly lines? Today’s video showcase features six major factories that, collectively, produce bullets, powder, and finished ammo. We start with the Berger Bullet plant, follow by Vihtavuori powder production in Europe. Then we show the Remington (now Vista Outdoor) ammo plant in Utah, along with a Federal plant that produces rimfire ammunition. Last but not least, there’s an excellent, very informative video from the Norma ammo factory, plus a Hornady ammo plant video.
Bullets being seating at Hornady ammo factory.
Berger Bullets Factory Tour — Made in USA
In this video, Recoil TV takes a behind-the-scenes look at Berger Bullets, and how the outstanding, match-winning Berger bullets are created. The video covers the entire process — from raw materials, to the placement of bullet cores inside jackets, to the final ultra-consistent and uniform projectiles. To see the complete line of Berger Bullets, with full Ballistic data, visit BergerBullets.com
Vihtavuori Powder Production in Europe
Vihtavuori produces some of the most consistent, high-quality powder on the planet. Vihtavuori powders have been used to set world records and win countless championships in multiple disciplines. This excellent video goes inside Vihtavuori’s European production centers. It is really fascinating — you see how extruded powder starts with long spaghetti-like strings, before being finalized into the tiny sticks that we load.
Along with the powder production process, this video includes the entire VV production line, so you see how powder bottles are filled with powder and the tops of the bottles are secured by automated machines.
Remington Ammo Factory (Now Operated by Vista Outdoor)
This SHWATteam video visits the Remington ammunition plant in Arkansas. Vista Outdoor, the company that produces Federal, Speer and CCI ammo, purchased Remington’s ammunition business in Lonoke, Arkansas. Including the new high-tech plant in the back, this facility has the equivalent of 13+ football fields (1200 acres) under roof at its ammo plant, with over 1100 employees. Production capacity is impressive. When running at maximum output, this Remington ammo plant can crank out a staggering 7,000,000+ rounds every day. To produce that volume of ammunition, the facility needs a huge amount of resources: one million pounds of copper per month and 124,000 pounds of lead per day. Remington started manufacturing ammunition at this Lonoke facility in 1970, but some of the machines have been churning out ammo since long before.
Norma Factory Tour
Guys — honestly, if you do anything today on this site, watch this video. You won’t be disappointed. Guaranteed. This is a very informative (and surprisingly entertaining) video. Every serious hand-loader should watch this video to see how cartridge cases are made. The camera work and editing are excellent — there are many close-ups revealing key processes such as annealing and head-stamping.
VERY Informative Video Show Cartridge Brass and Ammunition Production:
Norma has released a fascinating video showing how bullets, brass, and ammunition are produced at the Norma Precision AB factory which opened in 1902. You can see how cartridges are made starting with brass disks, then formed into shape through a series of processes, including “hitting [the cup] with a 30-ton hammer”. After annealing (shown at 0:08″), samples from every batch of brass are analyzed to check metal grain structure and hardness. Before packing, each case is visually inspected by a human being (3:27″ time-mark).
Federal Rimfire Ammunition Production
Field & Stream Tours Federal Ammo Plant in Minnesota
A reporter for Field & Stream recently got a chance to tour the Federal ammunition production facility in Anoka, Minnesota. This large plant produces both rimfire and centerfire ammunition. While touring the plant, the reporter was allowed to capture video showing the creation of .22 LR rounds from start to finish. This is a fascinating video, well worth watching. Watch and learn how rimfire ammo is made.
Note to Viewers — After Starting Video, Click Speaker Icon to HEAR audio!
This revealing video shows all phases of .22 LR ammo production including cupping, drawing, annealing, washing, drying, head-stamping, priming, powder charging, bullet seating, crimping, waxing, inspection, and final packaging. We recommend you watch the video from start to finish. You’ll definitely learn some new things about rimfire ammo.
Hornady Ammunition Factory
If you wonder how ammo is made, starting with raw metal, check out this video from Hornady. It shows how bullet jackets are formed from copper, followed by insertion of a lead core. The jacket is then closed up over the core with the bullet taking its final shape in a die (a cannelure is applied on some bullet types). Next the video shows how cartridge brass is formed, starting with small cups of brass. The last part of the video shows how cases are primed and filled with powder, and how bullets are seated into the cases, using an automated process on a giant assembly-line.
Do you occasionally get completely unexplained flyers, or have a shot land straight down at 6 O’Clock, right below your point of aim? That could be caused by poor or inconsistent trigger technique. How you pull the trigger can and does affect your accuracy.
Many gun enthusiasts start with pistols. When they later start shooting rifles they may carry over some not-so-good practices acquired from shooting handguns with heavy 4 to 6-pound trigger pulls. You may want to “re-learn” your trigger techniques to get better rifle results.
Shooting Sports USA has a good article on trigger technique that offers many useful tips. That article also has many helpful illustrations, including the one shown above. Another illustration shows different types of trigger shoes (straight vs. curved) and explains how each makes a difference: “With a lightly curved trigger, the shooter’s finger can contact the trigger either high or low according to preference. Higher contact will increase the resistance.” READ ARTICLE HERE.
The article analyzes common errors, such as pulling the trigger with the very tip of the finger rather than the pad of the index finger: “Using the tip of the finger can lead to lateral pressure on the trigger, which throws off the shot.”
The article also explains that you should check your trigger regularly to make sure it is functioning properly and is not out of adjustment: “Just like any other moving part, the trigger can suffer from wear. In such a precise mechanism, tiny amounts of wear can cause major problems.”
The ergonomics of the Eliseo Tubegun allow a nice, straight trigger pull.
Trigger Tips
Six Suggestions for Making your Trigger Control More Consistent.
1. If your triggers are adjustable, set the pull weight appropriate to the discipline. For a hunting rifle, you don’t want an ultra-light trigger pull. For High Power, you may want a two-stage pull, while on a Benchrest rifle you may prefer a very light trigger.
2. If you have a two-stage trigger, experiment with different combinations of First Stage and Second Stage.
3. Have a friend watch you as you pull the trigger, and maybe even take a close-up video as you pull the trigger. This can reveal a variety of flaws.
4. Practice dry-firing to see if flaws in trigger technique are causing gun movement.
5. As an experiment, try pulling the trigger with your middle finger. Ergonomically, the middle finger has a more straight alignment with the tendons in your hand. This exercise can help you identify alignment issues with your index finger.
6. For stocks with adjustable Length of Pull you may want to set the LOP differently for bench shooting vs. prone or F-Class shooting.
When Only the Best Will Do…
German-made Bix’N Andy triggers, available from BulletCentral.com, are among the very best you can buy. Available in both single-stage and two-stage, Bix’N Andy triggers are extremely precise, repeatable and smooth. The unique internal, friction-reducing roller ball system allows for extremely low reset force, yielding an ultra-crisp let-off. Bix’N Andy triggers can be fitted with a variety of trigger shoes according to shooter preference.
To get the best accuracy out of any benchrest rifle, you need to find the optimal position of front rest and rear bag. The important point to remember is that each rig is different. One gun may perform best with the front rest right at the tip of the forearm (Position ‘D’ in photo), while another gun will work best with the rest positioned much further back. This Editor’s own 6mmBR rifle has a laminated stock that is pretty flexy in the front. It shoots best with the front rest’s sandbag located a good 6″ back from the forearm tip (position ‘A’).
Here’s some benchrest advice that can help you reduce vertical and shoot tighter groups… without spending another penny. Many benchrest shooters spend a fortune on equipment and devote countless hours to meticulous handloading, but they never experiment with their rifle’s position/balance on the bags. This article explains why you should test your rifle in various positions. What you learn may surprise you (and improve your scores).
Next time you go to the range, experiment with the position of your rifle on the front rest, and try a couple different positions for the rear bag. You may find that the rifle handles much better after you’ve made a small change in the placement of your gun on the bags. Recoil can be tamed a bit, and tracking can improve significantly, if you optimize the front rest and rear bag positioning.
This competitor has the front rest positioned fairly far forward but not all the way out. Note the stop on the front rest — this limits forward stock travel.
A small change in the position of the forearm on the front rest, or in the placement of the rear bag, can make a big difference in how your gun performs.
Balance Your Gun BEFORE You Spend Hours Tuning Loads
In the pursuit of ultimate accuracy, shooters may spend countless hours on brass prep, bullet selection, and load tuning. Yet the same shooters may pay little attention to how their gun is set-up on their front rest and rear bag. When you have acquired a new rifle, you should do some basic experimentation to find the optimal position for the forearm on the front rest, and the best position for the rear bag. Small changes can make a big difference.
Joel Kendrick, past IBS 600-yard Shooter of the Year, has observed that by adjusting forearm position on the front rest, he can tune out vertical. He has one carbon-fiber-reinforced stock that is extremely rigid. When it was placed with the front rest right under the very tip of the forearm, the gun tended to hop, creating vertical. By sliding the whole gun forward (with more forearm overhang ahead of the front sandbag), he was able to get the whole rig to settle down. That resulted in less vertical dispersion, and the gun tracked much better.
Fore/aft stock position is important even with very wide fore-ends.
Likewise, the placement of the rear bag is very important. Many shooters, by default, will simply place the rear bag the same distance from the front rest with all their guns. In fact, different stocks and different calibers will NOT behave the same. By moving the rear bag forward and aft, you can adjust the rifle’s overall balance and this can improve the tracking significantly. One of our shooters had a Savage 6BR F-Class rifle. By default he had his rear bag set almost all the way at the end of the buttstock. When he slid the rear bag a couple inches forward the gun tracked much better. He immediately noticed that the gun returned to point of aim better (crosshairs would stay on target from shot to shot), AND the gun torqued (twisted) less. The difference was quite noticeable.
A small change in the position of the forearm on the front rest, or in the placement of the rear bag, can make a big difference in how your gun performs. You should experiment with the forearm placement, trying different positions on the front rest. Likewise, you can move the rear bag back and forth a few inches. Once you establish the optimal positions of front rest and rear bag, you should find that your gun tracks better and returns to battery more reliably. You may then discover that the gun shoots smaller groups, with less vertical dispersion. And all these benefits are possible without purchasing any expensive new gear.
If you want smoother bullet seating, inside neck lube can help. Forum member Ackleyman II likes to add a little Mica powder inside his case necks before seating bullets. This is easily done with the Forster three-brush neck lube kit. Ackleyman tells us: “Many loads that I have will not shoot well with a dry neck compared to a neck that is cleaned and lubed with this [Forster Dry Lubricator] — the best $15 you have ever spent.”
The Forster Case Neck Lubricator features three brushes attached to a tough, impact-resistant case with holes for bench mounting. The brushes accommodate all calibers from 22 to 35 caliber. The kit includes enough “motor mica” to process 2000 to 3000 cases and has a cover to keep dust and grit from contaminating the mica. By moving the case neck up and down on the correct mica-covered brush, the neck can be cleaned and lubricated at the same time.
Function: Lubricate case necks for easier resizing
Contents: Kit with base, lid, and three nylon brushes
Lubricant: Includes 1/10 oz. of Motor Mica, enough to process 2000-3000 cases
Neck Lubrication After Ultrasonic Cleaning or Wet Tumbling with Pins
If you wet-tumble your cases with stainless media and solvents or ultrasonically clean your brass, you may find that the inside of the case necks get too “squeaky clean”. The inside surface of the neck looses lubricity. In this situation, applying a dry lube can definitely be beneficial. CLICK HERE to see story about ultrasonic cleaning.
Gun Storage Check Week is the time to ensure your firearms are stored safely and securely. NSSF, the Firearm Industry Trade Association, is promoting Gun Storage Check Week, June 1-7, 2025, to remind gun owners to review their storage practices to prevent accidents, suicides and thefts. During this week, check your gun safe(s), and ensure your firearms are stored correctly and locked down properly. Also use secure gun cases when transporting firearms to the range. When traveling by air, use proper TSA-approved gun cases and comply with transport rules.
“Securely storing guns when they’re not in use can save lives. It’s really that simple,” said Joe Bartozzi, President and CEO of NSSF. “No one wants their gun in the hands of an unsupervised child, a person in crisis, someone who does not understand how to safely operate firearms, or a thief. If something bad happens because your gun isn’t stored securely, you’ll regret it, probably forever.”
This video covers gun safety rules and secure storage of firearms.
Gun Storage Check Week’s safety resources highlight many options to store firearms securely so that guns are off limits to unauthorized persons. Secure gun storage devices include:
Cable Locks — Available free of charge through NSSF’s Project ChildSafe® program Lock Boxes — Secure storage solution for guns kept for home security and in vehicles Lockable Gun Cases — for security, portability, and travel Full-size Gun Safes — For owners with multiple firearms to protect against fire and theft.
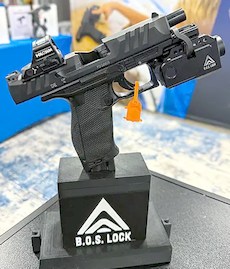
Enter to Win a Biometric Pistol Lock
Visitors to GunStorageCheck.org can enter the Gun Storage Check Week Sweepstakes to win a B.O.S. Lock Fusion. This innovative firearm safety device mounts to a handgun’s accessory rail, combining a biometric slide lock with an integrated tactical light and green laser.
The B.O.S. Lock Fusion is the world’s first biometric slide lock that integrates a tactical light and laser into a single, high-performance locking device. Go to GunStorageCheck.org to register. One winner will be chosen.
NOTE: Gain 5 extra entries by watching any of the firearm safety or suicide prevention videos after you complete the entry form.
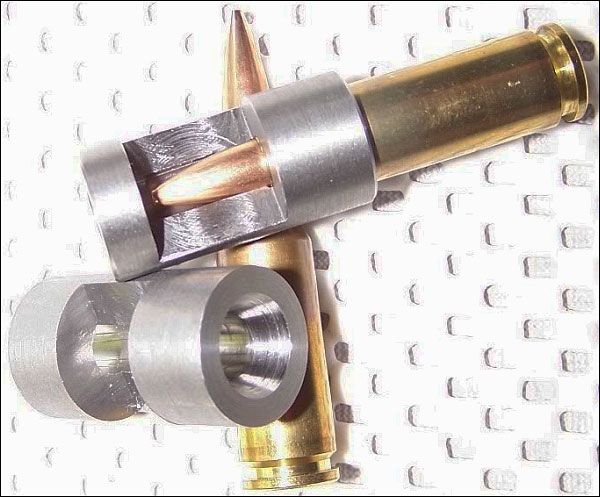
How and Why to Create a Dummy Round
When you have a new custom rifle built, or a new barrel fitted to an existing rifle, it makes sense to create a dummy round. This should have your preferred brass and bullet types, with the bullet positioned at optimal seating depth. A proper dummy round helps the gunsmith set the freebore correctly for your cartridge, and also ensure the proper chamber dimensions.
Respected machinist, tool-maker, and gunsmith Greg Tannel of Gre-Tan Rifles explains: “I use the dummy round as a gauge to finish cut the neck diameter and throat length and diameter so you have [optimal] clearance on the loaded neck and the ogive of the bullet just touches the rifling.” He recommends setting bullet so the full diameter is just forward of the case’s neck-shoulder junction. “From there”, Greg says, “I can build you the chamber you want… with all the proper clearances”.
Greg Tannel has created a very helpful video showing how to create a dummy round. Greg explains how to measure and assemble the dummy and how it will be used during the barrel chambering process. Greg notes — the dummy round should have NO Primer and No powder. We strongly recommend that every rifle shooter watch this video. Even if you won’t need a new barrel any time soon, you can learn important things about freebore, leade, and chamber geometry.
Must Watch Video — This has been viewed over 810,000 times on YouTube:
This has been a very popular video, with over 810,000 views! Here are actual YouTube comments:
That is the best explanation I’ve ever seen. Thank you sir. — P. Pablo
Nice video. You do a very good job of making this easy for new reloaders to understand. I sure wish things like this were available when I started reloading and having custom rifles built. Once again, great job, and your work speaks for itself. — Brandon K.
Beautiful job explaining chambering clearances. — D. Giorgi
Another Cool Tool — The Stub Gauge
When you have your gunsmith chamber your barrel, you can also have him create a Stub Gauge, i.e. a cast-off barrel section chambered like your actual barrel. The stub gauge lets you measure the original length to lands and freebore when your barrel was new. This gives you a baseline to accurately assess how far your throat erodes with use. Of course, as the throat wears, to get true length-to-lands dimension, you need take your measurement using your actual barrel. The barrel stub gauge helps you set the initial bullet seating depth. Seating depth is then adjusted accordingly, based on observed throat erosion, or your preferred seating depth.


 Made by the same smart folks that created Wipe-Out™, and Carb-Out™,
  Where to Buy NO-LEAD Lead Remover


 Norma has released a fascinating video showing how bullets, brass, and ammunition are produced at the
  If you wonder how ammo is made, starting with raw metal, check out this video from