Can you hit an egg at 600+ yards? We mean hit it reliably — not just by luck. To do that you’ll need good shooting skills and a very accurate rifle. How accurate? Well, a chicken egg is, on average, 2 1/4 inches (57 mm) long and 1 3/4 inches (44.5 mm) in diameter. That means to hit an egg (on demand) at 600 yards, you’ll need a rifle capable of 1/3-MOA accuracy (or better). Forum member DukeDuke has such a gun, and he demonstrated its egg-busting prowess in this short video. DukeDuke’s rifle is chambered in 6BRX (a 30° 6BR Improved) and it’s loaded with DTAC 115gr bullets pushed by Alliant Reloder 17. In the video, the eggs are placed on top of poles set 616 yards from the firing line.
See Egg Hit at 38 second mark…
As you can see in the video, that’s a heck of a nice shooting range where DukeDuke scrambled those eggs at 616 yards. The range is situated just outside of Lake Jackson, Texas. As for the gun… the action is a Rem 700 SA BDL, blueprinted and bedded in a Rem/HS Precision PSS stock. The 31″ barrel is 1:8″-twist Broughton. The “P3″ on the barrel stands for Porter’s Precision Products, Lake Jackson, TX. The rifle was built by Kenneth Porter. The load was 33.5 grains of RL-17 at 2950 fps, with 115gr DTAC bullets touching the lands. Cartridge OAL is 2.400″.
The 6mm BRX was developed by Bob Crone. Retaining the 30° shoulder of the parent 6mmBR case, the BRX has a little less capacity than a 6mm Dasher. Bob told us that his original design for the 6mm BRX always had a .100″ longer head space than a 6mmBR Norma and that he never deviated from that. But after Bob developed the first 6mm BRX, Bill Shehane made a 6mm BRX version that had a .120″ longer head space, and thus some confusion started. In truth, the original 6mm BRX always was (and still is) a chambering with a head space .100″ longer than a 6mm BR Norma.
For load development, some guys shoot 3-shot groups. Other guys shoot 5-shot groups, or even 10-shot strings. But for testing its projectiles, Sierra Bullets takes it to another level entirely. A while back Sierra was testing its .30-Caliber 175gr HPBT MatchKing in the Sierra underground tunnel. The results appear above — a FIVE HUNDRED Round group!
500 Shots Form 0.82 MOA Group at 300m (328 yards)
Sierra’s trigger-pullers sent five full boxes of bullets down-range at a single target. The photo above shows the result of 500 shots taken in a 300 meter test tunnel. The raw group size, edge to edge of the farthest shots, is about 3.13 inches, as shown on the calipers’ metal linear scale. Subtract a .308″ nominal bullet diameter* to get the 2.823″ on the digital readout. So you’re seeing a 2.823″ group at 300 meters (328 yards). One MOA at this distance is 3.435″ so this 500-round group is 2.823 divided by 3.435 or 0.82 MOA (0.8218 MOA to be precise).
This 500-round group was shoot as part of a pressure/velocity test for a commercial customer. The cartridge was .308 Winchester, loaded at 2.800″. The powder was Reloder 15. A 26″ barrel was shot from a return to battery rest. The gun was cleaned every 125 rounds and two foulers shot.
What do you think — could you beat this group from a bench for 500 rounds?
One Facebook poster joked: “500-round group? Everyone knows anything less than 1000-round groups are a waste of time and statistically irrelevant.”
Sierra’s 300 Meter Testing Tunnel
Ever wonder how (and where) Sierra tests its bullets? The answer is underground, in a 300-meter test tunnel located under Sierra’s factory in Sedalia, Missouri. The photo above shows the construction of the tunnel back in May, 1990. Like most bullet manufacturers, Sierra does live-fire bullet testing of its projectiles. Sierra’s 300-meter test range is the longest, manufacturer-owned underground bullet test facility in the world. In years past, Sierra offered free visits to the test tunnel as part of a factory tour.
* Normally, to get an exact group size, you should subtract the TRUE bullet hole size, which is usually smaller than the nominal bullet diameter. E.g. a .308 bullet hole may show on paper as .298 or so. But here, for simplicity, we are subtracting .308″ because we do not have the original target to measure.
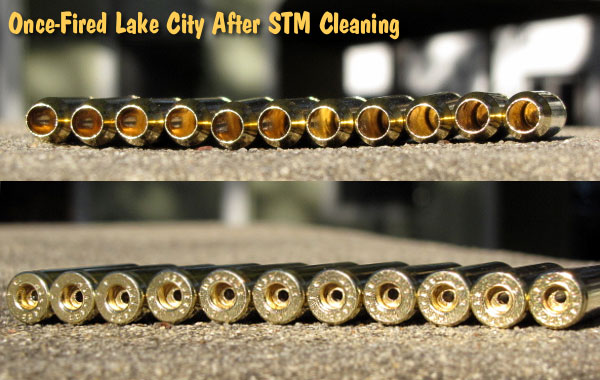
The U.S. Army Marksmanship Unit (USAMU) regularly published reloading “how-to” articles on the USAMU Facebook page. One excellent “Handloading Hump Day” post covered preparation of once-fired 5.56x45mm brass. This article, the first in a 3-part series, has many useful tips. If you shoot a rifle chambered in .223 Rem or 5.56x45mm, this article is worth reading. You can obtain once-fired Lake City 5.56x45mm brass for less than half the cost of premium .223 Rem brass.
This week, Handloading Hump-Day will answer a special request from several competitive shooters who asked about procedures for morphing once-fired GI 5.56mm brass into accurate match brass for NRA High Power Rifle use. The USAMU has used virgin Lake City (LC) 5.56 brass to win National Championships and set National Records for many years. In this 3-part series, we’ll share techniques proven to wring match-winning accuracy from combat-grade brass.
GI brass has an excellent attribute, worth noting — it is virtually indestructible. Due to its NATO-spec hardness, the primer pockets last much longer than most commercial brass when using loads at appropriate pressures.
Preparing Once-Fired GI 5.56 Brass for Reloading (Part 1 of 3)
Assuming our readers will be getting brass once-fired as received from surplus dealers, the following steps can help process the low-cost raw material into reliably accurate components.
1. Clean the Brass
First, clean the brass of any dirt/mud/debris, if applicable. Depending on the brass’s condition, washing it in a soap solution followed by a thorough rinsing may help. [This step also extends the life of the tumbling media.] Approaches range from low-tech, using gallon jugs 1/2 full of water/dish soap plus brass and shaking vigorously, to more high-tech, expensive and time-consuming methods.
2. Wet-Tumbling Options (Be Sure to Dry the Brass)
When applying the final cleaning/polish, some use tumblers with liquid cleaning media and stainless steel pins for a brilliant shine inside and out, while others take the traditional vibratory tumbler/ground media approach. Degree of case shine is purely personal preference, but the key issue is simple cleanliness to avoid scratching ones’ dies.
If a liquid cleaner is used, be SURE to dry the cases thoroughly to preclude corrosion inside. One method is to dump the wet brass into an old pillow case, then tilt it left/right so the cases re-orient themselves while shifting from corner to corner. Several repetitions, pausing at each corner until water stops draining, will remove most water. They can then be left to air-dry on a towel, or can be dried in a warm (150° F-200° F max) oven for a few minutes to speed evaporation.
Shown below are Lake City cases after cleaning with Stainless Media (STM). Note: STM Case cleaning was done by a third party, not the USAMU, which does not endorse any particular cleaning method.
NOTE: The USAMU Handloading (HL) Shop does not RE-load fired 5.56 brass. We use virgin LC brass with our chosen primer already staked in place. However, our staff has extensive personal experience reloading GI brass for competition, which will supplement the Shop’s customary steps. In handloading, as in life, there are many ways to accomplish any given task. Our suggestions are note presented as the “only way,” by any means. Time for loading/practicing is always at a premium. Readers who have more efficient, alternative methods that maintain top accuracy are invited to share them here.
3. Inspect Every Case
Once dry, inspect each case for significant deformation (i.e., someone stepped on it), damaged mouths/necks and case head/rim damage. Some rifles’ ejectors actually dig small chunks of brass out of the case head — obviously, not ideal for precision shooting. Similarly, some extractors can bend the case rims so badly that distortion is visible when spinning them in one’s fingers. These can be used for plinking, but our match brass should have straight, undamaged rims.
Dented case mouths are common, and these can easily be rounded using a conical, tapered tool, [such as a .223 expander mandrel. A dummy 7.62 or .30-06 cartridge with a FMJ spitzer can also work.] If most of your brass is of one headstamp, this is a good time to cull out any odd cases.
4. Check the Primers Before Decapping
Your clean, dry and inspected brass is now ready for full-length sizing, decapping and re-priming. Historically, primer crimps on GI brass have caused some head-scratching (and vile language) among handloaders. Our next installment will detail efficient, easy and practical methods to remove primer crimp, plus other useful handloading tips. Until next week, Good Shooting!
Accuracy Potential of Mil-Surp 5.56×45 Brass
So, how accurate can previously-fired GI surplus brass be in a good National Match AR-15? Well, here’s a data point from many years ago that might be of interest. A High Power shooter who wrote for the late Precision Shooting magazine took a Bill Wylde-built AR match rifle to a registered Benchrest match. He had no difficulty obtaining consistent 0.5-0.6 MOA accuracy at 200 yards using LC brass and a generic “practice” load that was not tuned to his rifle.
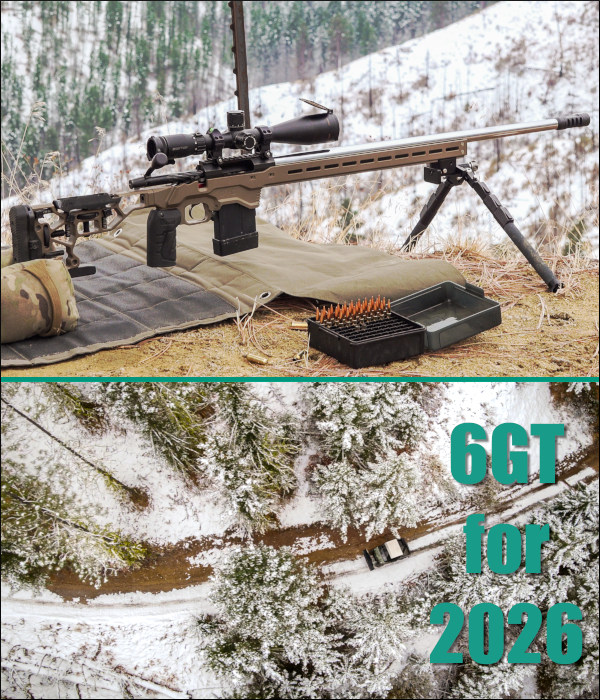
For the very first day of 2026 we present a precision rifle built with a modern 6mm cartridge — the 6GT. Developed by George Gardner of G.A. Precision and Tom Jacobs of Vapor Trail Bullets, the 6GT was designed to have the efficiency of a 6mm Dasher without the need for case forming. It was also designed with a longer case body so it feeds better from magazines. Even with the added capacity, the 6GT is still very efficient, and can achieve good velocities with less powder than a 6mm Creedmoor.
Today’s feature rifle was smithed and tested by Gavin Gear of UltimateReloader.com. Gavin did all the gunsmithing — chambering the barrel, fitting the muzzle brake, and even laser engraving the barrel. In building this 6GT rifle, Gavin used top-tier components: BAT TR action, Krieger 28″ 1:7.5″-twist 4-groove 6mm barrel, TriggerTech Diamond Rem 700-compatible trigger, and Area 419 Hellfire Muzzle Brake. The barreled action was then fitted in a handsome and rugged MDT ACC Chassis. On top is a Zero Tech 4.5-27×50mm FFP Trace Advanced scope in 30mm Hawkins Precision high rings.
We recommend you watch the video above — it covers the rifle build, load development, and then features some remarkable shooting sequences across snowy hills in the Pacific Northwest. Gavin’s team actually used a drone to capture overhead footage of the location.
After developing a promising load with Berger 109gr LRHT bullets, Varget powder, and Alpha brass, Gavin literally headed for the hills to test his new rifle at longer ranges, shooting from bipod. His load had shot well under half-MOA at 100 yards in testing so he was hoping he could hit multiple steel targets positioned at 340 yards, 760 yards, and 1000 yards. Indeed he did, proving the rifle’s great accuracy and Gavin’s fine trigger-pulling skills. You can see the hits at these time points in the above video:
340 Yards — 18:15 time | 760 Yards — 19:00 time | 1000 Yards — 19:54 Time
Gavin’s 6GT Hit Highlights on Steel out to 1000 Yards
Building Gavin’s 6GT Precision Rifle
Gavin Gear did all the gunsmithing on this project, using his own Precision Matthews TL-1660 lathe for the chambering with an Alpha carbide 6GT reamer. The barrel work took about four hours total. Shown below is the reamer cutting the chamber, which was finished with a 0.170″ freebore and 0.270″ neck diameter. For other brands of brass you might want the chamber to have a larger 0.272″ neck diameter.
Chambering the Krieger barrel with Alpha carbide 6GT reamer, 0.170” freebore, .270″ neck diameter.
This project when smoothly, with Gavin able to install the barreled action in the MDT Chassis and fit the buttstock in an hour or so. So total build time was about five hours. One nice “finishing touch” on the project was laser engraving the 28″ Krieger barrel — a process you can see in the video below.
Laser engraving of Krieger 28″ barrel.
About the 6GT — Sort of a 6 Dasher on Steroids
6GT Cartridge Design Features
The 6GT was designed to have an optimal length and capacity for mag-fed PRS/NRL tactical rifles. The 6GT is longer than a 6mmBR and 6 Dasher, but shorter than a 6mm Creedmoor and 6.5×47 Lapua. That gives the 6GT ample case body length to feed reliably from a magazine, while the case capacity is sufficient to run popular powders at reasonable pressures. It has a 35-degree shoulder angle.
On paper the 6GT seemed like the perfect cartridge for PRS- and NRL-style centerfire competition. It has the low recoil of a 6 Dasher, with good feeding and mag compatibility. With the 6GT, a competitor can push 6mm 105gr bullets at 3000+ FPS or run heavier bullets at ~2950 FPS. With this 28″ Krieger barrel, Gavin actually achieved 3004 FPS running 109gr Bergers.
Gavin started with quality Alpha Munitions brass. The cases were then annealed with an AMP Annealer and trimmed to length with a Henderson powered trimmer (see video below). After sizing with a Forster Co-Ax press, Federal SR Primers were seated using a Primal Rights competition seater. Next the powder was measured with an A&D FX120i force restoration scale. Finally, the Berger 109gr LR Hybrid Target bullets were seated with a Forster Micrometer die, again using the smooth Forster Co-Ax press.
Initial Load Testing with Berger and Hornady Projectiles
Before it got cold and snowy, Gavin did load development, shooting from a bench with a Sinclair front rest. The Krieger cut-rifled barrel was accurate right from the start and Hodgdon Varget powder proved to be a very good choice for the 6GT.
Gavin’s 6GT boasts a MDT ACC short action chassis with SRS-X Elite buttstock, vertical grip, and MDT CKYE-POD Bipod.
Gavin did initial load testing with both Hornady 110gr A-Tip Match and Berger 109gr Long Range Hybrid Target bullets. The Berger 109gr LRHT bullets were the most promising. A variety of charge weights were tested, with Gavin settling on 34.6 grains of Varget. This delivered fine accuracy with a 3004 FPS muzzle velocity. Group size measurements with this load are shown in the chart. At 100 yards, four three-shot groups averaged 0.361 MOA, and the rifle produced a nice 0.387 MOA (0.405″) five-shot group.
———————————————— Winter Wonderland for Shooters ———————————————–
For many years, the U.S. Army Marksmanship Unit (USAMU) regularly published reloading “how-to” articles on the USAMU Facebook page. In this article, the USAMU’s reloading gurus address a question frequently asked by prospective handloaders: “Should I buy a single-stage press, or a progressive?” The USAMU says the best answer is Solomon-esque in both its wisdom and simplicity: “Get BOTH!” However, there is definitely more to the issue, as the USAMU explains below.
Progressive Press Safety Considerations
by USAMU Staff
Many are the beginning handloaders who have asked a friend about their “setting up” a progressive press for them. The idea is that the newbie could then just feed in components and crank out buckets of practice ammo without needing to really learn much about handloading. Tempting though this might be, that’s simply not how it works. Such an approach might be ok if there were never a malfunction with either press or operator, but that’s unrealistic. Our hypothetical newbie would then lack the knowledge to problem-solve most situations.
Worse yet, several different handloading operations would be occurring at different stations on the progressive press at the same time. It takes an experienced operator to keep track of, and truly understand the significance of, all those potential mini-problems. Loading without this experience is a recipe for potential disaster – such as a double powder charge (especially with pistol cartridges) dropped while the loader was attending to some other function, etc. Progressives are an animal unto themselves, and while they offer many benefits, they do take some getting used to – even by experienced handloaders!
ILLUSTRATIVE HORROR STORY
Here, enter a 40-year veteran handloader who decided to jump onto the progressive bandwagon late in his career, having used only single-stage presses all his life. A High Master NRA High Power Rifle competitor, he had no background in competitive pistol shooting, where historically most progressive presses are found.
Experienced Action Pistol shooters have typically encountered multiple episodes in which shooters “skipped” a powder charge for some reason, leading to a squib round and a bullet possibly lodged in the bore. Thus, at matches, it’s reflexive for them to yell “STOP!” in unison if they see a shooter get a “click” vs. a “bang”, and rack the slide to keep firing. This writer has personally seen several pistols saved in just such scenarios over the years.
Click No Bang — What NOT to Do
Our High Master set up a popular progressive press and began turning out .223 Rem 100-yard practice ammo with abandon. He was using a moly-coated 52gr match bullet and an economical, fast-burning surplus powder that gave great accuracy. Once on the range, he began practicing strings of rapid-fire. All was well, until he heard “Click!” rather than “Boom”.
Lacking the above experience or onlookers to halt him, he reflexively operated the charging handle on his expensive, custom NM AR15 Service Rifle, and the next trigger squeeze reportedly registered on seismographs over at least a three-state radius. He sat, uninjured but bewildered, until the hail of expensive bits and pieces quit raining down around him.
When the smoke cleared, he immediately cursed the horrid, evil, demonically-possessed progressive press for this, his first-ever reloading mishap. His $1400 NM upper was ruined, but thankfully, his $800 pre-ban lower… and he had escaped injury.
This tale is told not to discourage the use of progressive presses, but to emphasize the need to EASILY and IMMEDIATELY KNOW what is happening with the press at each station, every time the handle is cranked. Not to do so is, as they say, “bad ju-ju.”
It illustrates why we at the USAMU Handloading Shop agree in recommending that new handloaders should begin with a single-stage press. Once one thoroughly learns the steps in each phase of handloading by repeated experience, then one will be qualified to move on to a progressive press.
The single-stage press will REMAIN virtually indispensable for one’s entire handloading career, even after having purchased a progressive press (or two). There are endless small projects that are best handled on a single-stage press, and a poll of USAMU’s Handloading staff reveals that not one would willingly be without his single-stage press, despite owning at least one progressive.
When you make a reloading mistake, you may need to “pull down” assembled ammo. The embedded UltimateReloader.com video demonstrates how to use the Hornady Cam-Lock bullet pulling system.
When Reloading Goes Bad — The Danger of Over-Charging
Our friend Gavin Gear of UltimateReloader.com was recently reloading some 9mm pistol ammo with his Hornady progressive press. As part of his reloading procedure, he visually checks the cases — and he noticed that the charges seemed high. Sure enough, his most recently-produced rounds were about two grains over spec. He diagnosed the issue: “I was using a powder measure without a baffle. What happened was, over the course of the loading session, things settled in, and the charge level increased.”
Not knowing just when his powder measure started delivering too much powder, Gavin decided, for safety’s sake, to pull down all the ammo he had just reloaded. Yes that’s time-consuming, but it’s better than the alternative — having a dangerous Kaboom while shooting. With fast-burning pistol powders, a two-grain over-charge could cause a blown case, damaged firearm, and/or serious injury.
Watch Cam-Lock Bullet Puller Used to Remove Bullets from Loaded Ammo:
Use of Bullet Puller starts 4:00 minutes into video.
Gavin says it is vitally important to perform safety checks during the reloading process: “You’ve got to do it — check every single round to make sure there IS powder, and that there’s not too MUCH powder. Double, Triple, Quadruple check your components… and your powder charges. You can’t be too careful.”
To pull down a loaded round, first place the cartridge in the shellholder on your press ram. Then raise the round up into the bullet puller device installed where a die would go. The Hornady Cam-lock bullet puller works by clamping the bullet in a collet when you flip down the red-coated lever. Then, with the case held by the rim in the shell-holder, the bullet exits the cartridge as the press ram is lowered. It takes time, but it’s pretty fool-proof once you get the hang of it. This entire process is illustrated in Gavin’s video, starting near the four-minute mark.
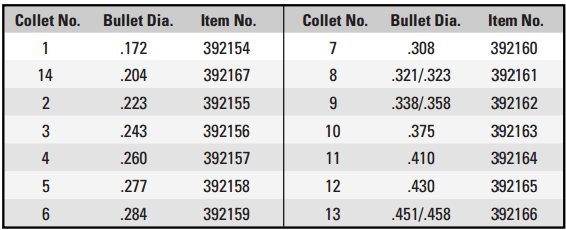
The Hornady Cam Lock Bullet Puller has four (4) key components: 1. Cam-Lock die body; 2. Cam-Lock lever; 3. Stem; and 4. Collet (Caliber-specific).
NOTE: In order to use this tool, you’ll need the appropriate collet for each diameter range of bullets you intend to pull. For example use collet #3 for 6mm, collect #6 for 7mm, and collet #7 for .308 Caliber.
RCBS Lock-Out Die
A good safety option for users with progressive presses is the RCBS Lock-Out Die. This has a charge detection rod that dips into each case after powder has dropped. You adjust the die to the proper charge height for your desired load. If the actual dispensed charge is too high or too low, the Lock-Out Die senses the problem and stops the press from advancing to the next case (it does this by preventing the ram/shellplate from fully elevating). We’ve used the Lock-out die with success for both pistol and rifle cartridges. It’s sensitive to about one-half grain with pistol powders.
This Lock-Out Die works with Hornady and Dillon progressives as well as with RCBS progressives. It does take up one die station on the press.
At the request of our readers, we provide select “Deals of the Week”. Every Sunday afternoon or Monday morning we offer our Best Bargain selections. Here are some of the best deals on firearms, hardware, reloading components, optics, and shooting accessories. Be aware that sale prices are subject to change, and once clearance inventory is sold, it’s gone for good. You snooze you lose.
NOTE: All listed products are for sale to persons 18 years of age or older. No products are intended for use by minors.
Natchez — End of Year Clearance Sale
⏺️ » Great savings on ammo, outdoor gear, optics and more
Right now Natchez in running a massive End of Year Clearance Sale with significant discounts on over 1000 products. On sale are optics, ammunition, reloading components (brass, bullets, powder, primers), gun accessories, hunting gear, and much more. With these end-of-year discounts, this is a great opportunity to save big bucks in the final week of 2025.
EuroOptic — End of Year Vortex Sale with 15% Off Code
⏺️ » Save 15% on Vortex scopes, binoculars, spotters, red dots
EuroOptic is running a major Vortex 15% Off Sale this week. You can save 15% on competition scopes, hunting optics, tactical optics, spotting scopes, binoculars, laser rangefinders, and red dot optics. NOTE: This sale may expire very soon so you should grab these bargains while you can. During check-out use Code VTX15 to save 15% (some exclusions).
As an Amazon affiliate, this site can earn revenues through sales commissions.
Our friend Dennis Santiago is a talented Service Rifle shooter, who regularly competes with an AR shooting the .223 Rem cartridge. A few seasons back, he decided to go over to the “dark side”, putting together a Palma (fullbore) rifle chambered for the .308 Winchester. Dennis selected a Competition Machine (Gary Eliseo) R1 Chassis for the project. Here’s Santiago’s account of his “true blue” Palma build.
Palma Rifle Report by Dennis Santiago
“This project was a .308 Win Palma rifle with an Eliseo R1 chassis, Rem 700 action (blue-printed with PT&G upgrades), Jewell trigger, Boots Obermeyer 1:11″-twist barrel, and Phoenix sights holding Gehmann apertures. Next comes chassis and sling set-up, initial mechanical zeroing, and load development. Yup, I have a bunch of Peterson small primer .308 brass, Sierra #2156 155gr MKs, and Varget to get started with. I’m told I can drive 155gr pills to stay supersonic to 1K. Should make for an interesting 2020. My goal was to be cozy with this blue beast by the time the Berger Southwest Nationals kicked off in February 2020.”
CLICK Imagefor full-screen photo with more detail.
Pinning the Picatinny — For a Super-Solid Mount
One of the key parts of the build, Dennis explains, is mounting the top rail with pins: “Once the rail is aligned using a spin-centered optic, it locks down with three 3/16″ roll pins. That way there is no reliance on screws that can come loose. Above is a photo of the top of the Eliseo tube chassis showing the three, 3/16″ roll pins that unitize the Picatinny rail. You can also see the four brass screws that just kiss the action to fully stabilize it in the tube. The recoil ring buttresses completely around the action with metal to metal contact. There are a million details hidden inside a Gary gun.”
Phoenix Sights Front and Rear
Rise of the Phoenix — Here are the sights for the Eliseo R1. There are very few manufacturers left making these kinds of ultra-precise and repeatable iron sights.
These Ray-Vin tools help set mechanical zero on the sights. Dennis notes: “Finally a reason to pull out the Ray-Vin calibration paraphernalia to set up a mechanical zero. This photo is for all of you who still remember that those barrel flats and screws in our sight towers actually had a purpose once upon a time.”
Sling ‘N Irons — Classic Palma Configuration Dennis plans to use an Eric Hollis sling with his new blue Palma rifle.
Peterson Small Primer .308 Win Brass for Santiago’s Rig
Dennis has used Peterson Cartridge Small Rifle primer .308 Win brass. Peterson offers a “Select” version weight-sorted and length-sorted at the factory. All Select casings (in a 50ct box) are guaranteed to be within 1 grain in weight and .001″ in OAL. Peterson Select brass is available for 20 different cartridge types, including .308 Win both small primer/small flash hole and large primer/large flash hole.
Now Adapted with a Scope
Currently (in 2025) Dennis has this rifle fitted with a high-magnification Nightforce zoom scope, and he competes with his blue prone rifle in the “Any-Any” division. He usually runs the scope at about 22X power. For an older guy with aging eyes, being able to run high-magnification optics is a big plus.
With the optics Dennis has found the rifle to be exceptionally accurate. Shooting 168gr bullets it has produced 5-round groups around 1/3-MOA during testing. And it can easily hold the X-Ring at 300 yards.
Getting the Blue Rifle Ready for the Berger SW Nationals
Dennis has campaigned his rifle at recent Berger Southwest Nationals (SWN) events. At the SWN a Palma shooter can shoot iron sights, or also fit a scope and shoot in the “Any Sights” category. The week-long Berger SWN is the biggest rifle match in the Western United States. Hundreds of shooters compete in both individual and team events. The SWN begins with the Mid-Range Nationals at 600 yards. Then the Long-Range matches are held, with targets out to 1000 yards. Watch the video to see the Ben Avery facility, home of the Berger SWN:
Chassis-maker Gary Elesio at the 2017 Berger SW Nationals. Gary shoots what he sells:
At long range, small bullet holes are much easier to see “in the white” than in the black center of the normal High Power target. When you’re practicing at long range using a scoped rifle, one way to enhance your ability to see your bullet holes is to print a “negative” version of the regulation bullseye target so that your black center is now white.
How do you create a “negative” of a target image? Many image programs, including the FREE Irfanview software, have a “Negative” function in the pull-down menu. If you don’t see a “Negative” menu option in your program, look for a “substitute colors” option. Many printers also have a “reverse colors” function. If you can’t find a solution with your computer or printer, just take a normal bullseye target to a copy shop, and the staff can easily print you a set of targets with white centers in black fields.
Forum member Watercam has a Pentax PF-80ED spotting scope that allows him to see 6mm bullet holes in the white at 600 yards. However, 6mm holes in the black are only visible out to 400 yards or so. Accordingly, Watercam uses a modified “reversed” black-to-white target for 600-yard practice. Watercam explains: “[Using the Pentax] With my 6mm and limited mirage I see defined, 6mm holes in the white out to 600. In the black, however, I can see bullets holes at about 400. I now use reverse-color targets for training without a pit partner at the 600-yard line.”
The Hi-Viz Solution — Day-Glo Pasters
If you’re not concerned with official scoring rings, you can use an all-white target with a bright, fluorescent target dot in the middle. A 2″- or 3″-diameter stick-on target dot is highly visible at 600 yards. Birchwood Casey Target Spots® assortment #33928 offers neon orange target dots in 1″, 2″, and 3″ diameters.
TARGET TIP — Use Chart Paper
For practice backers for the Day-GLo pasters at long distance, use Flip Chart Paper (aka Easel Pads) marked with graph lines at 1″ intervals. Available either regular or self-stick, one sheet can hold 4-8 pasters and the white paper allows for easy spotting of the holes and quick estimation of group size. Get Flip Chart Paper at Amazon.com, Staples, or Office Depot.
Brits Use White-Field Target for F-Class
In the UK, some ranges are now using a “reverse-style” target with a mostly white area. Laurie Holland says this allows shooters to see shots much more easily. Laurie reports: “Here’s a photo of the 500/600 yard F-Class match target we use in PSSA comps at Diggle Ranges with club members Chris Hull (L) and Terry Mann (R). We now use this target form at all ranges up to 1K for F-Class, and, yes you can often see your hits at 600 yards on the target before the markers pull it. Regards from England — Laurie”.
Well 2025 is almost over. It’s time to take stock of your gun-related spending for the year. Did you spend a lot or a little? Were you conservative with gun spending this year or did you bust your budget in 2025?
Here’s a survey that will help you access your gun spending compared to other gun guys. Heads up fellows — you probably want to keep this page confidential. Your spouse probably doesn’t want to be reminded about all the times you ignored the “Honey Do” list and headed off to the range instead. And she certainly doesn’t want to know how much you spend every year on your gun hobby.
Answer these two polls to see how dedicated (or should we say “obsessed”) a gun guy you really are. Once you vote you can see how your shooting (and spending) habits compare to other readers. Full results display after you select an answer and click the “Vote” button.
Click to vote in our current Readers’ polls.
Click “View Results” to see what other readers have selected.
The rifle cartridge money clip was a real product from ReleaseMeCreations.com (now sold out). You can, of course, make your own cartridge money clip with a Dremel tool for free.


 Can you hit an egg at 600+ yards? We mean hit it reliably — not just by luck. To do that you’ll need good shooting skills and a very accurate rifle. How accurate? Well, a chicken egg is, on average, 2 1/4 inches (57 mm) long and 1 3/4 inches (44.5 mm) in diameter. That means to hit an egg (on demand) at 600 yards, you’ll need a rifle capable of 1/3-MOA accuracy (or better). Forum member DukeDuke has such a gun, and he demonstrated its egg-busting prowess in this short video. DukeDuke’s rifle is chambered in 6BRX (a 30° 6BR Improved) and it’s loaded with DTAC 115gr bullets pushed by Alliant Reloder 17. In the video, the eggs are placed on top of poles set 616 yards from the firing line.
As you can see in the video, that’s a heck of a nice shooting range where DukeDuke scrambled those eggs at 616 yards. The range is situated just outside of Lake Jackson, Texas. As for the gun… the action is a Rem 700 SA BDL, blueprinted and bedded in a Rem/HS Precision PSS stock. The 31″ barrel is 1:8″-twist Broughton. The “P3″ on the barrel stands for Porter’s Precision Products, Lake Jackson, TX. The rifle was built by Kenneth Porter. The load was 33.5 grains of RL-17 at 2950 fps, with 115gr DTAC bullets touching the lands. Cartridge OAL is 2.400″.


 RCBS Lock-Out Die


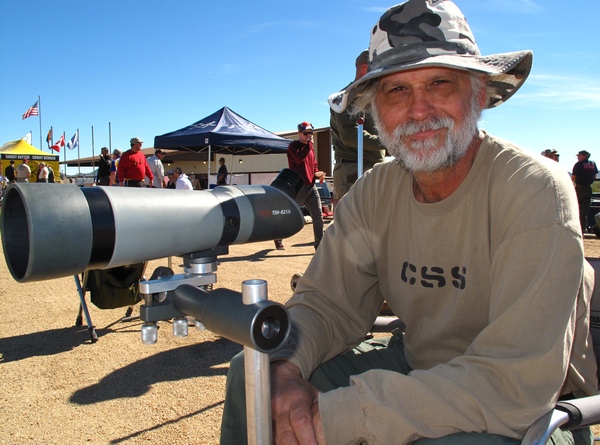

 Forum member Watercam has a Pentax PF-80ED spotting scope that allows him to see 6mm bullet holes in the white at 600 yards. However, 6mm holes in the black are only visible out to 400 yards or so. Accordingly, Watercam uses a modified “reversed” black-to-white target for 600-yard practice. Watercam explains: “[Using the Pentax] With my 6mm and limited mirage I see defined, 6mm holes in the white out to 600. In the black, however, I can see bullets holes at about 400. I now use reverse-color targets for training without a pit partner at the 600-yard line.”


