On the 6.5 Creedmoor Facebook page we found an eye-catching Savage Model 10 BA Stealth. Rifle owner Derek P. has done some important upgrades, starting with a wicked, spiral-fluted McGowen barrel with red-painted flutes. The red theme was carried over to the chassis which combines fire-engine red with matte black in the middle. The scope rings and even the magazine were painted red to match as well. The whole effect is very striking, as you can see.
The barrel is a 29-inch 1:8″-twist McGowen. The optic is a 4.5-27x56mm Vortex Razor HD GenII with sunshade. That supper-stable rear sandbag is a Protektor DR Bag, one of our favorites. The front sandbag is also a Protektor. The front Rest is the new Protektor Aluminum Rest with Mariners Wheel. Look carefully and you’ll see a flat 2.5″-wide block on the underside of the forearm. That improves stability and tracking.
What we really like is the upgraded rear buttstock section. This is NOT standard by any means. Rifle owner Derek has fitted an aftermarket XLR Tactical Lite Buttstock that sits properly in that Protektor DR rear bag. This unit combines an adjustable buttpad with a nice cheek-rest (with upgraded pad from Tactical Works). And, very importantly, the XLR can be fitted with a “tactical bag rider” or you can easily make your own bag rider.
As the Savage 10 BA Stealth Comes from the Factory
This video shows a box-stock Savage 10BA Stealth. Note how different the stock buttstock/cheekpiece assembly is compared to Derek’s Red Hot Savage.
Smith & Wesson has issued a CONSUMER SAFETY ALERT for the M&P 15-22, a semi-auto .22LR rimfire rifle with ergonomics like the centerfire AR15. If you own an M&P 15-22, you need to inspect the bolt. A manufacturing problem with the bolt could allow the gun to fire when the bolt closes, even without pulling the trigger. This inspection process is described in this video.
Smith & Wesson states: “The bolt from your M&P 15-22 must be inspected to determine whether it exhibits the condition identified in this notice. To determine whether your firearm is affected by this condition, please inspect your firearm by following the inspection instructions provided here. We are asking consumers of all M&P 15-22 firearms manufactured before February 1, 2019 to inspect their bolt for this condition.”
Smith & Wesson Notice:
M&P 15-22 CONSUMER SAFETY ALERT
AND INSPECTION PROCEDURE
PRODUCT AFFECTED: ALL models of M&P15-22 rifles and pistols manufactured before February 1, 2019.
STOP USING YOUR M&P 15-22 UNTIL IT HAS BEEN INSPECTED AND YOUR BOLT REPLACED (IF NECESSARY).
Smith & Wesson has identified two M&P 15-22 firearms from recent production on which the breech face counter bore depth was not within manufacturing specification. In those firearms, the lack of depth may allow the bolt, upon closing, to crush the rim of the case, causing the round to fire, cycling the bolt, and potentially resulting in multiple discharges without depressing the trigger. This issue can occur in the following two scenarios:
1) With a loaded magazine in the firearm and the bolt locked to the rear, depressing the bolt release to allow the bolt to drop freely may ignite the round as the bolt closes without engaging the trigger and with the safety selector in either the safe or the fire position, and may also result in multiple discharges.
2) With a loaded magazine in the firearm, bolt in the closed position and a round in the chamber and the safety selector in the fire position, depressing the trigger will cause the round to fire normally, however as the bolt cycles, the next round may be ignited by the bolt crushing the rim of the case as it closes, causing multiple discharges.
We believe that these are isolated incidents, however, any unintended discharge of a firearm has the potential to cause injury. Therefore, we have developed this inspection procedure to ensure that all products in the field are safe to use. We are asking customers to perform the following procedure and to refrain from using their M&P15-22 until the bolt has been inspected and replaced as necessary.
REMEDY/ACTION TO BE TAKEN: The bolt from your M&P15-22 must be inspected to determine whether it exhibits the condition identified in this notice. To determine whether your firearm is affected by this condition, please inspect your firearm by following the inspection instructions provided here.
Safety Alert Tip from EdLongrange. We welcome reader submissions.
This is good news for gun-owners. Sportsman’s Warehouse (SW), which operates 92 retail stores in 23 states, now offers gunsmithing. Gun enthusiasts can get complete firearms gunsmithing services at the new Sportsman’s Warehouse Gunsmith Center in Utah. You can ship your rifles, pistols, or shotguns to the SW Gunsmith Center, or simply drop off your firearm at ANY Sportsman’s Warehouse store. The SW Gunsmith Center, equipped with mills and lathes, offers complete repair, refinishing, threading, metal, and stock work. For more info, visit: www.Sportsmans.com/gunsmith.
“Customers can quickly and easily drop off their firearms directly at our new Gunsmith Service Center in Utah, take them to any Sportsman’s Warehouse store, or ship them in for service,” states Jon Barker, Sportsman’s Warehouse President/CEO. “Expanding from the Utah market, we now offer this unique service to customers nationwide, including our 92 store locations.” SW has a loyalty program — each dollar spent at the Gunsmith Center gives members a point towards earning SW gift cards.
Fees Are Reasonable — $200 for Barrel Chambering
There is a $45 minimum charge for guns left overnight, and a $68/hour labor rate. A barrel chambering/fitting job costs $200. Threading a muzzle costs $100.00. Fitting an aftermarket AR trigger is $45. Blue-printing a bolt-action receiver costs $175.00. Glass-bedding an action costs $90-$175. CLICK HERE for Gunsmithing Fee Schedule.
The new Sportsman’s Warehouse gunsmith shop is located in SW’s Salt Lake City Distribution Center. The workspace features four stations for gunsmiths to work on rifles, shotguns, pistols, and muzzleloaders. They also have added a full production lathe that is designed for 24-hour-a-day operation, as well as a large end mill for a variety of metal working operations.
Finish tanks, a spray booth and oven for Cerakote, along with other pieces of equipment that will allow them to perform almost any gun service or customization are being installed.
“The only thing we won’t offer is custom wood stock building,” said Bill Sturtevant, Head Gunsmith. “The time necessary for that service takes too much time and pulls our gunsmiths off of other projects for too long. But just about anything else, including refinishing stocks, is on the table.”
Sportsman’s Warehouse will offer 1-year and 3-Year Firearm Service Plans supported by the company’s gunsmiths. Plans include: mounting and bore sighting, field cleaning, factory-service augmentation, free shipping to the factory for repair, and discounts on Gunsmith Service Center work.
Story Tip from EdLongrange. We welcome reader submissions.
At the request of our readers, we provide select “Deals of the Week”. Every Monday morning we offer our Best Bargain selections. Here are some of the best deals on firearms, hardware, reloading components, optics, and shooting accessories. Be aware that sale prices are subject to change, and once clearance inventory is sold, it’s gone for good. You snooze you lose.
1. Graf’s and Creedmoor Sports — Peterson Brass
Peterson Brass is quickly becoming a leading cartridge brass producer for good reason. Peterson offers good quality, long-lasting, American-made brass at very competitive prices. For PRS and other disciplines not requiring one-hole accuracy, Peterson brass may be up to the task. Plus some Peterson brass varieties come pre-sorted by weight and length — that saves time! Along with popular cartridge types, such as 6.5 Creedmoor, 6mmBR, and .308 Win, Peterson offers brass for cartridges with fewer brass options — such as 6XC, .300 Norma Magnum, .375 CheyTac, .408 CheyTac, and others. Peterson’s CheyTac brass has found favor with the ELR crowd. Purchase Peterson Brass from Graf and Sons or Creedmoor Sports. Both vendors offer competitive pricing and great customer service.
2. Amazon — Digital Flex-Cord WiFi BoreScope, $32.99
Have you wanted a high-end optical borescope but couldn’t bear the price (as much as a complete rifle)? Here’s an incredibly affordable alternative. For under forty bucks you can get a high-tech, digital endoscope that sends video, via WiFi, to your Android or iOS smartphone, or other mobile device.
This is a great value. Pick up one of these digital borescopes for only $32.99. These digital endoscopes feature a 5.5mm-diameter camera head so you can scope just about any barrel from .22 caliber up to .50 caliber. NOTE: A buyer reports the mirror extension increases the end diameter to 6.5mm so that limits 90deg views with smaller diameter barrels. The unit sends the image wirelessly to your phone, and charges with a USB connection. Watch in real time or record for future viewing. Along with bore-inspection chores, you can use this versatile gadget to find parts you drop behind the bench or even inspect your vehicles.
3. Bruno’s — Berger 7mm 184gr Hybrids, $45.70/100
If you’re a competitive shooter, you know how important it is to get all the components you need for the entire match season or risk running short at the worst time. Topping the “must have” list of many F-Class competitors are the record-setting Berger 7mm/.284 184gr Hybrid Target bullets. Brunos Shooters Supply now has these Berger 7mm 184gr Hybrid Target Bullets in stock. These will, no doubt, become very hard-to-find later this year. So don’t miss out while they’re available or you’ll be sorry later. Bruno’s HERE: Berger 7mm Hybrids $47.30/100.
4. March Optics — All Scopes on Sale
Every time we head to a match we see more and more March Optics on the line and there’s a good reason why. March offers some amazing scopes, offering incredible clarity, sharpness, and magnification ranges you won’t find on other scope series. If you’re looking to upgrade to a serious, competition-grade optic, here is your chance to grab a March scope at up to 30% off.
5. Amazon — Howard Leight Impact Electronic Muffs, $35.99
All firearms enthusiasts need to protect their hearing. Even a single shot can damage your hearing. We like to use double coverage, with plugs under electronic muffs. This provides outstanding hearing protection, AND you can still hear range commands. The very popular Howard Leight Impact Sport ear muffs are now on sale for just $35.99. With that attractive price, there’s no excuse for not having ear protection in your range bag. These Impact Sport muffs are without question the most commonly-used electronic muffs because they offer great performance for the price.
Target cameras and electronic targets are cool but of course that all comes with high prices and technical hassles. Now there’s a smart, affordable solution that lets you quickly change your targets without moving from your firing position. The Lyman Auto Advance Target System holds multiple targets on a motor-advanced roll. With the push of a button, you can command new targets to roll up into view. The wireless controller lets you place the target frame up to 200 yards away. Lyman sells a variety of target rolls. Each has enough targets to keep you shooting all weekend without changing. We really like this unit for rimfire shooting. The unit is easy to set-up and adjust for different heights.
7. Midsouth — Assorted Hornady Gauge and Comparator Tools
Bullet seating depth is a key variable in precision reloading. For best accuracy you really need to know LENGTH to LANDS, i.e. the point at which your bullet will first touch the rifling in the barrel. Adjustment of cartridge base-to-ogive length (from “jam” to “jump”) is a critical method of optimizing rifle accuracy. With some barrels, cartridge types, and bullets it may be best to seat into the lands. With other barrels and bullets you’ll want to “jump” the bullets 20, 30, or even 40 thousandths (or more). To determine your length to lands with repeatable precision, we recommend the Hornady Comparator tools. Grab the straight OAL gauge and either the basic set with 6 inserts or the full set with 14 inserts and start collecting real data about your chambers. You can also grab an extra comparator body on sale.
8. Amazon — Pop Packs Color Burst Targets, $28.91
Do you love reactive targets but don’t live in an area that allows exploding targets? These colorful Pop Packs liquid-filled splash targets offer a safe, cost-effective and fun alternative to exploding targets. Now you can grab 48 Pop Packs bursting targets for just $28.91. There are also 12-packs, 24-packs, and even 96-packs of these bursting Pop Packs targets. The more you buy the lower the cost per sack. Keep in mind these make a messy splatter and should not be used without permission of your range owner or managers.
9. Palmetto State Armory — Multi-Brand Scope Savings
If you’ve been looking for a feature-laden riflescope for your next gun, check out Palmetto State Armory (PSA). This vendor has some lesser-known brands, such as Eotech, at great savings. And PSA has the new Trijicon zooms. Trijicon, famed for its reflex optics, now makes very high quality zoom optics. This week’s PSA Scope Sale saves you money on brands such as Trijicon and EOtech that rarely go on sale. In addition, there are big discounts on Burris and other big names.
This week’s Deal Selections sourced by F-Class John.
Looking 1000 yards downrange at the Deep Creek Range outside Missoula, Montana.
On Facebook recently, we saw an eye-catching rifle. Owned by top 1000-yard competitor (and past IBS Champ) Tom Mousel, this rifle was smithed by Alex Wheeler of Wheeler Accuracy. This rig features the McMillan-crafted Wheeler LRB stock with adjustable keel. It also has BAT Machine’s very impressive new Neuvo LR (aka “Neuvo M”) action, serial number LR0001. The Neuvo LR has some important design features — horizontal lug orientation, full-diameter bolt body, and advanced fire control system. More about those features below.
This gun is a shooter. Tom has already shot a 1.5″ four-shot group at 1000 yards. How does he do that? First you need a great barrel, great bullets, and superior hand-loading skills. But then it comes down to great gun-handling. You can see that in the video below. NOTE to ALL Long-Range Benchrest shooters — Watch this video! You’ll definitely learn from watching Tom shoot — he’s one of the best in the business.
Tom Mousel shoots 1000-yard ladder test with first-released Neuvo LR action, SN LR0001.
Rifle chambering is 6BR Ackley (6BRA) in 28″ Krieger barrel.
Rifle Components and Build INFO:
This rifle has a BAT Neuvo LR (aka Neuvo “M”) action glued and screwed into the LRB stock using a special bedding block, a Boyd Allen concept that Tom has requested to use on every future build. The 28″ Krieger 1:8″-twist HV barrel was indexed using a little different method than most use. It is “panning out well” says Alex, who adds: “So far it has shot [multiple low ones] with two barrels and three different bullet types. This rifle is definitely one of the better shooters I have seen.” We’d agree — owner Tom Mousel has had a 1.5″ 4-shot group at 1000 yards in testing, plus some “zero” 3-shot groups at 100 yards.
Chambering is the 6mmBR Ackley (6BRA). The stock is a Wheeler/McMillan LRB stock with vivid orange and black paint job. It features an adjustable keel in the rear. Trigger is a Bix N Andy unit from Bullets.com.
This BAT Neuvo LR action is a Left-loading Drop Port. Cartridges eject out the bottom of the action.
BAT Machine Neuvo Long Range “M” Action
This is the “Long Range” version of the BAT Neuvo. Dwight Scott and Chris Harris were the original inspiration. I worked with Chris to come up with a version for long range. The main differences for the LR Neuvo (compared to the shorter Neuvo) are this has integral lug and rail, with flat bottom and sides for better bedding. The BAT Neuvo LR is available in drop port, dual port, and single port as well as magnum.
Take a look at the bolt. Notice the lug orientation and full diameter bolt body. There are no bolt raceways in the action and the two lugs sit HORIZONTALLY when the bolt is closed — that’s different than the vast majority of other two-lug actions.
Alex Wheeler says the Neuvo is a winner. He thinks some of the action’s design features really do contribute to enhanced accuracy: “The … fire control (firing pin assembly) carries a lot of energy and has a very “clean” release. This is an excellent design with many small details that combine to deliver superior function. In addition, the full-diameter bolt can be fitted tighter than one with lugways. Also the horizontal lugs may be why we see less vertical stringing in the groups. They are timed perfectly as well.”
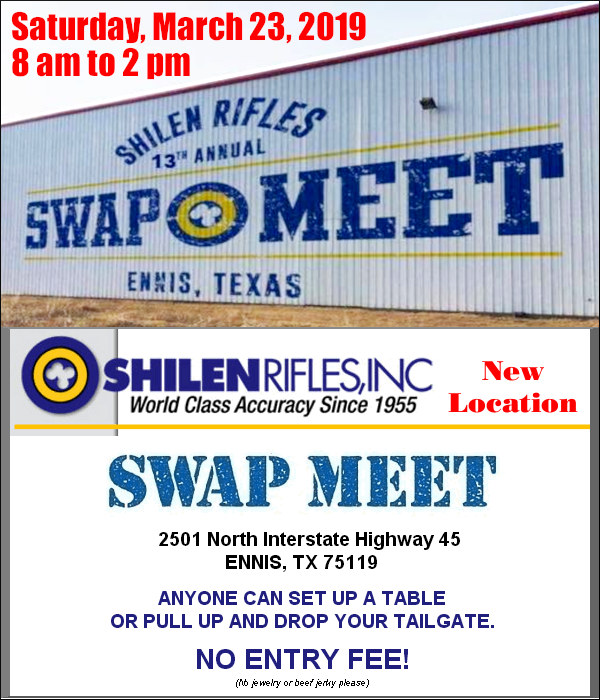
The much-loved Shilen SWAP MEET will take place in Ennis, Texas on Saturday, March 23, 2019 from 8:00 am through 2:00 pm CDT. This will be at Shilen’s new, bigger and better production facility. If you are looking for some great bargains on gun gear, and are near the Dallas-Fort Worth area, definitely mark this date on your calendar. The Shilen Swap Meet is one of the best events of its kind, and Team Shilen will even deliver a complimentary lunch to attendees.
No Vendor Fees, No Entry Fees, and FREE Lunch!
Team Shilen says: “Shilen is excited to host this year’s Swap Meet in our new location. We hope that you will come and see the new building and bring lots of stuff to sell or trade with others.” ANYONE can come and ANYONE can be a vendor. There are NO entry or vendor fees and we will persevere rain or shine. There will be gun stuff everywhere –buy and sell as much as you like. There will be free lunch, as always.
SHILEN SWAP MEET HIGHLIGHTS
Watch Barrel-Making. A Shilen crew will run barrel-making machines from 8:00 am to 11:00 am. Watch precision barrels being made. The techs will answer all your questions about the process.
Sign up for Door Prizes — Shilen Merchandise. There will be multiple drawings for free or discounted Shilen apparel or merchandise. Go to the sign-up table to be entered in the drawings, which will be held at 9 am, 10 am, 10:30 am, 11 am, and 1 pm.
Get Shilen Barrels and Actions at Huge Discounts. Shilen Barrels, Actions, and Barreled Actions will be sold at huge discounts on Saturday. “Swap Meet Barrels” were originally ordered by Shilen customers throughout the year, but orders were canceled or customers changed their mind on contour, chamber, etc. These barrels were placed back in stock for resale. When Swap Meet Time arrives any such barrels still remaining in stock are sold at huge discounts. NOTE: These barrels are in NO WAY factory “seconds” or any lower quality. The warranty on these barrels is the same as any other Shilen barrels.
Sell Your Own Gear. At the Shilen Swap Meet, you can Bring Your Own Table (BYOT). Register to sell anything gun-related: presses, reloading gear, stocks, triggers, scope rings — you name it. Vendor Space is available on a first come-first served basis, starting Saturday morning at 7:00 am. Email or call Shilen for more information. Email: comments@shilen.com. Call: 972-875-5318.
TIPS for Visitors: The SWAP MEET wraps up at 2:00 pm. The best stuff sells fast, so if you are looking for something particular get here early! Keep an eye on the Shilen’s Swap Meet page for a preview of Vendors and the products they’ll be selling.
This is one amazing .50-caliber rifle. Along with the lever-actuated falling block, it has a massive swing-out breech block like you’d find on a field artillery piece. The action is so wide that the sights and scope are offset. You’ve heard of the “Beauty and the Beast”? Well here the Beast IS a Beauty….
View looking down at the action from above. Note the hinged Breech-Block.
This extraordinary example of gunsmithing art was crafted by the late J.T. (Jack) Smith of Sudbury, Massachusetts. This unique .50-caliber rifle features an aircraft machine gun barrel cut down to 38-1/4″, and turned octagon to round (in the style of Schuetzen rifles). The round portion of the barrel is tapered with a heavy boss at the muzzle. The barrel is inlaid in gold on both left and right side top flats. Custom scope bases are fitted to the receiver and to the top of the barrel. These hold an externally adjusting Unertl 15X target scope in offset scope mounts.
Huge Falling Block Receiver
The massive receiver (8″ long x 2-3/4″ wide x 3″ deep) is remarkable in design and construction. Machined from solid steel, the action incorporates several unique features. Note the hinged Howitzer-style breech block which swings to the right and mortises into the back of the receiver in the loading slot, providing a back-up for the falling block. We’ve never seen anything like that on any rifle. The one-piece floorplate/lever incorporates a Ruger No. 1-style latch which locks into the bottom of the trigger guard. The entire floorplate and lever retract downward. Firing is accomplished by means of a striker mounted in the hinged (swing-out) breech block. This is manually cocked with another lever on top of the breech block. Dropping the falling block activates the extractor which removes the spent case.
Offset Sights
This rifle features a custom-built, windage-adjustable offset front sight plus a custom-built vernier tang sight with aperture offset to the left side. The sights are offset to the left for a right-handed shooter, to correct for the extreme width of the receiver, allowing a more comfortable head position.
This rifle started life as a factory Remington VSSF in .204 Ruger. With new stock, new barrel, and other upgrades it is now an ultra-accurate .223 Rem competition rifle.
Flames in the Snow…
Forum Member Brandon Schlund (aka “Bois Blanc Boy”), photographed this handsome flame-themed F-TR rifle against the snowy background of Michigan’s Bois Blanc Island. Brandon posted this to our long-running Pride and Joy Rifle Forum thread. He notes: “This is my first F-TR build, which started out as a stock Remington .204 Ruger. I had the action blue-printed, firing pin was bushed by Speedy, and I had a new bolt handle and knob installed by John Pierce.” This rifle is now fitted with a 3-groove Pac-Nor 1:6.5″-twist barrel chambered in .223 Remington to shoot the 90gr Bergers. Other components are: Kelbly KTS stock, Phoenix bipod, and Sightron 8-32x56mm SIII scope. Brandon says: “It took a long time to get this gun where it is now but I’m truly happy with it!” Here’s the “before” photo:
The Transformation — F-TR Comp Rig Made from Rem .204 Ruger Varminter
This rifle started out as a “plain Jane”, factory Remington VSSF II. I shot it on varmint hunts in factory configuration. Then I decided to transform the rifle into a .223 Rem F-TR gun. As the .204 has the same bolt face as a .223 made sense to go in that direction since I would be able to use the gun for varmint hunting as well as F-TR.
While I had shot some F-Class matches with my dad (Joe Schlund aka Bench on AccurateShooter) it wasnt much. When we did a PD hunt in Wyoming I primarily shot my .204 but I decided I wanted a cartridge that could reach out a little further and also do double duty — competition and varminting.
The first step in transforming this rifle was selecting a barrel. We ordered a Pac-Nor, 1:6.5″-twist, 3 groove, 30.5″ heavy Palma contour. This was then chambered with a PTG .223 ISSF reamer with 0.169″ freebore to run the .224 caliber heavies. I went with Pac-Nor because both my father and my brother Mark (aka Labrador2 on AccurateShooter) owned Kelbly-built F-TR rifles with the same barrels. Mark and my father couldn’t be happier with the results. Pac-Nor has great customer service along with a short wait time.
I sent the barrel and the factory Remington 700 action down to Kelbly’s where they did the chambering and cut the threads. While Kelbly’s had my action I had them blueprint it. A Kelbly KTS stock with the three-way buttplate and adjustable cheek piece came next. After getting behind Dad’s rifle and Mark’s gun there was no reason to look any further. With all its adjustments, the KTS stock fits very comfortably.
Loading for the .223 Rem with H4895 and 90gr Bergers
As a .223 Rem, this rifle has proven very accurate — it’s a bullet-hole cutter at 100 yards (low twos easy). Our best load is with Hodgdon H4895, 90gr Berger VLDs, CCI BR4 primers. This load is running at about 2835 FPS but YMMV (remember this is a LONG 30.5″ barrel). The Bergers are loaded .008″ into the lands with base-to-ogive of 2.035″.
Our loading technique may be tedious — with lots of sorting and measuring. But brother Mark, father Joe, and I all enjoy the steps. Our three .223 Rem match guns all love the same load which makes loading much easier. Believe it or not we use a Hornady Lock-N-Load progressive ammo plant, which is great when loading for three guns. Our consistency is fantastic with run-out a mere .001-.0015.
We also turn necks and weigh our primers. Does neck-turning and primer weighing really make a difference? Who knows but we try to eliminate more variables since we have to the time to do it, and we actually enjoy the procedures.
Pierce Engineering Installed Action and Modified Bolt
Being from Michigan, Pierce Engineering has done a lot of work for my family’s guns. For this project the Pierce team bedded the action and glued in a single-shot follower. The stock bolt handle/knob was too short for comfort in the KTS stock. Pierce added a longer handle and tactical knob to the bolt. I then installed a .223 Rem Lapua case base into the knob.
The complete .223 Rem rifle ready to shoot F-TR, as fitted with 8-32X56mm Sightron and Phoenix Bipod, weighs 17 pounds, 15 ounces.
Flame Graphics by Camo Creek Hydrographics
After the action was bedded by Pierce, the stock was sent to Camo Creek Hydrographics in Fenton, Michigan. I selected a flame-style design which Camo Creek applied through hydro-dipping. The stock went back to Pierce’s shop, which applied three coats of clear over the entire stock. The clear-coating really enhanced the flame graphics.
Firing Pin Bushed by Speedy
I sent the bolt to Thomas “Speedy” Gonzalez to have the firing pin hole bushed as otherwise the load could crater the primers pretty bad. Knowing I’d be shooting heavy-weight .22-Cal bullets with a stout load this was a good idea. Speedy also cut his trademark grooves into the bolt shroud which looks amazing. His work is top notch! There is zero cratering now, even with the hottest of loads.
Competition Components — 8-32x56mm Sightron and Phoenix Bipod
For an F-TR rig you need a quality high-magnification optic and a premium, wide-base bipod. I installed a 8-32x56mm SIII Sightron. This was another easy choice because of the attractive price and because my family has four other Sightrons that work great.
I installed a fore-end Picatinny rail to attach a Phoenix Bipod. I extended the Mariners wheel handles by adding short sections from an aluminum arrow shaft. This lets me adjust elevation without stretching forward. I also installed a Calvin Elite Timney Trigger set at 6 ounces.
How much did this all cost? Brandon tells us “I have roughly $2500 into the rebuild of the gun from a .204 Ruger to the .223 Rem.”
Bois Blanc Island in Michigan
Here on Bois Blanc Island we don’t have many amenities, but we do have the ability to shoot 550 yards at our local gravel pit on state land. It’s snow-bound right now as you can see. But later in the year this will be our close-to-home training center.
Winter at Bois Blanc Island, Michigan — Here’s the gravel pit where we can load test during warmer weather. When I took this photo, it was a “balmy” 10-degree day.
Rifle-maker Weatherby Inc. is finalizing its move to Wyoming, after leaving the politically hostile, high-taxation state of California. Weatherby’s directors are pleased with the move, which has many advantages for the company — not the least of which is getting away from the anti-gun policies of California’s corrupt, one-party-controlled state government.
Weatherby is nearing the final steps in the move to Sheridan, WY from Paso Robles, CA. Weatherby manufacturing has established residency in its new Sheridan, Wyoming facility effective March 1, 2019.
“When you see the words ‘Sheridan, WY’ stamped in the side of a Mark V action, it just looks right. We are excited to see the beginning of our manufacturing in Sheridan, Wyoming.”, says Adam Weatherby.
Weatherby Leaves Hostile Political Environment
Is Weatherby’s Wyoming move all about dollars and cents? Not entirely. California has become increasingly hostile to firearms manufacturers. TheFireamRack.com’s Dan Zimmerman observes: “[Weatherby] wanted to do business in a state that isn’t at war with the very products they make. A state that respects the Second Amendment and won’t try to claw back every single cent it can wring out of businesses located there. So Weatherby made the entirely rational choice to take their company to a place that values what they do.”
Gold and Silver Weatherby Commemorative Rifles
The first firearms built in the new facility in Sheridan will be two Wyoming Commemorative rifles, the Gold and the Silver (see photo at top). Both versions will be chambered in .300 Weatherby Mag and will feature the “Bucking Horse and Rider” engraved on the floor plate. The Gold version will feature highly-figured, exhibition-grade walnut while the Silver version will feature AAA walnut. Both Gold and Silver stocks will feature a mountain scene integrated into the fine line checkering. The receivers are highly decorated with beautiful engravings. The Gold version will also have gold and silver barrel bands and will include a custom leather case. The Gold Commemorative cost $10,000.00 MSRP with serial numbers starting at WY000001. The Silver Commemorative costs $6,500.00 MSRP with serial numbers starting at WY000501.
SEE Weatherby videos at Wby-TV.com. Here’s a video featuring Weatherby’s new home state of Wyoming.
Our friend Dennis Santiago was recently conducting training for a Southern California Police Department. During a training session one of the unit’s AR15s stopped functioning. The problem — the bolt in the AR rifle broke in half. Dennis states: “They ran the gun dry, broke for lunch, shot it again. They don’t like that. I personally like to flood the bolt wet with lube on training days. It prevents stuff like this. Given that, it’s a simple remove-and-replace fix.”
Here are some of the more interesting comments about this parts failure — an AR bolt that literally sheared in half:
“If I was a betting man [the steel] wasn’t made by Carpenter Steel. They are one of the few companies that use the correct [milspec-steel, C-158] called out on the drawing which they coincidentally developed. Most of the other companies that make [AR Bolts] use different steel with the same heat treat specification as what is called out which gives them the potential of being a little on the brittle side at the upper end of the tolerance. When it comes to the AR platform, bolts are probably the only part of the entire gun where I must admit to being a little bit of a brand snob.” David O’N.
[Editor’s Note: Actually Carpenter Steel does not make AR bolts. They are a steel supplier, and yes Carpenter did develop the original C-158 steel for AR bolts. Here is a contrary view, claiming that AISI 9310 Steel is actually stronger than milspec Carpenter C-158: 9310 Steel for AR Bolts.]
“Dry bolt and carrier shouldn’t cause that. Looks like a big pressure spike. What kind of ammo…?” Guy G.
Reply from Dennis: “55gr factory ammo.Piles of it.”
“Is that the new two-piece bolt everyone’s been talking about LOL?” — Darren R.
“Let me guess…the PD called you in cause they didn’t know why it stopped going ‘pew pew’?” — Jim O.
Reply from Dennis: “I was there today for qualifications. It broke during the rifle phase. Simple enough to fish the bolt parts out of the action. The training didn’t miss a beat. I have an armory full of the things.”


 The new Sportsman’s Warehouse gunsmith shop is located in SW’s Salt Lake City Distribution Center. The workspace features four stations for gunsmiths to work on rifles, shotguns, pistols, and muzzleloaders. They also have added a full production lathe that is designed for 24-hour-a-day operation, as well as a large end mill for a variety of metal working operations.


 Have you wanted a high-end optical borescope but couldn’t bear the price (as much as a complete rifle)? Here’s an incredibly affordable alternative. For under forty bucks you can get a high-tech, digital endoscope that sends video, via WiFi, to your Android or iOS smartphone, or other mobile device.


 Flame Graphics by Camo Creek Hydrographics


