On our main AccurateShooter.com site, you’ll find a good article by GS Arizona on the Basics of Neck Turning. If you’re new to the neck-turning game, or are just looking for good tips on improving your neck-turning procedures, you should read that article. Below we offer some highlights and photos from the article, but you’ll need to read the whole story to view all the illustrations and follow all the procedures step by step.
Why Should You Consider Neck Turning?
Let’s assume that your rifle doesn’t have a tight neck chamber that requires neck turning; if you have a tight neck chamber, of course, the answer to the question is “because you have to”. For the rest of us, and that includes the vast majority of Highpower shooters, neck turning isn’t a requirement, but it can be a useful way to bring your ammunition a small but meaningful step closer to that pot of gold at the end of the rainbow: perfection. I’m not talking about a theoretical improvement, but a real one, an improvement that lies in equalizing and optimizing the neck tension of your loaded rounds. Inconsistent neck tension is a real contributor to increased muzzle velocity variance which itself is a significant factor in increased elevation dispersion at long range. So there’s our basic reason for neck turning: to equalize and optimize neck tension in order to reduce elevation dispersion.
The Tools of the Trade
Here you see everything I use and a bit more. The press, a cordless screwdriver (always plugged in, turning is tough on the old battery), a couple of K&M neck turners (one set up for 6mm, the other for .30 caliber) an expander for each size, some Imperial lube, an old toothbrush or two to keep the cutter clean, a handle with a caseholder (for those emergencies when the screwdriver dies and there’s just one more case to go!), steel wool and a tubing micrometer finish the list of tools. Hey, I left the dial calipers out of the picture! They’re always handy, keep them around, but they are useless for measuring neck thickness, so don’t try. I usually use an Optivisor magnifier while I turn necks, very handy for a clear view of what’s happening on the neck.
Expanding the Neck
Put some lube on the inside of the case neck and run it into the expander. Really, this isn’t hard. I prefer to expand each case immediately before turning it as opposed to expanding all the cases and then turning them. Brass is somewhat springy and will tend to go back toward its original size; therefore, by expanding and turning immediately, you are more likely to have all cases fit the mandrel with the same degree of tightness and to get a more consistent depth of cut.
Cutter Adjustment for Cut Depth and Length
All the tools I’ve seen have pretty good adjustment instructions. The only thing they don’t tell you is that you should have five to ten spare cases to get it right initially. Anything of the right diameter will do while you learn, for instance, just use that cheap surplus .308 brass to do initial setup and save the precious .30-06 for when you know what you’re doing. Be patient and make your adjustments slowly; you’ll need to set the cutter for thickness as well as length of cut (just into the shoulder). The depth of cut (brass thickness) takes a bit of fiddling, the length of the cut is generally easy to set.
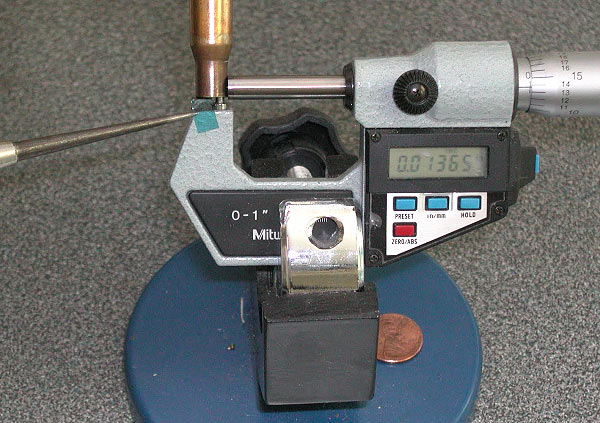
The Finished Product — A Perfectly Uniform Neck
If you read the whole article, and follow the procedures using quality tools, you should get very good results — with a little practice. To demonstrate, here’s an example of my finished, neck-turned brass. You’ll see there is a perfect, 0.0125″ thick neck. It’s very uniform around the circumference, usually I only see 1 or 2 ten-thousandths variance. Now, with the necks uniformed like this, we can select the bushing size that will give us our preferred neck tension and experiment with various levels of tension, secure in the knowledge that all of the cases will actually have the desired neck tension.
About the author — “GS Arizona” was the writing handle for German Salazar, a top-tier rifleman and gun writer. Sadly, German passed from a medical condition in 2022. German was instrumental in helping this website and our Forum get started, and we remember him as a very dear, valued friend.
German was a great individual, and a great asset to the sport. An attorney by trade, with an engineering background, German was one of the very best gun writers, who had high master shooting skills to match his writing abilities.
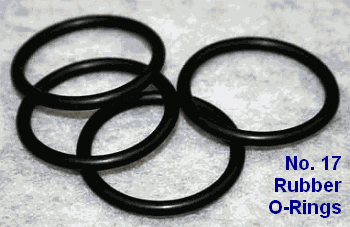
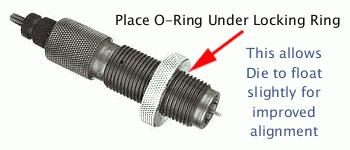
Here’s an inexpensive procedure that can help you load straighter ammo, with slightly better measured concentricity (i.e. less run-out) on the case necks and bullets. Simply use a Rubber O-Ring on the underside of the die locking ring. This allows the die to self-align itself (slightly) to the case that is being sized. Without the O-Ring, if the flat surface on the top of your press is not perfectly square with the thread axis, your die can end up slightly off-angle. This happens when the bottom of the locking ring butts up tight against the top of the press. The O-Ring allows the die to float slightly, and that may, in turn, reduce the amount of run-out induced during case sizing.
Top prone shooter GSArizona, who sadly passed last year, tried this trick and said it works: “Go to your local hardware store and get a #17 O-Ring (that’s the designation at Ace Hardware, don’t know if its universal). Slip the O-Ring on the die and re-adjust the lock ring so that the O-Ring is slightly compressed when the die is at the correct height. Size and measure a few more cases. You will probably see a slight improvement in neck concentricity as the die can now float a bit as the case enters and leaves it. This isn’t going to be a dramatic improvement, but it’s a positive one.”
We want to stress that adding O-Rings to sizing dies may help some reloaders, but we don’t offer this as a panacea. Try it — if using the O-Ring reduces measured runout that’s great. If it doesn’t, you’ve only spent a few pennies to experiment.
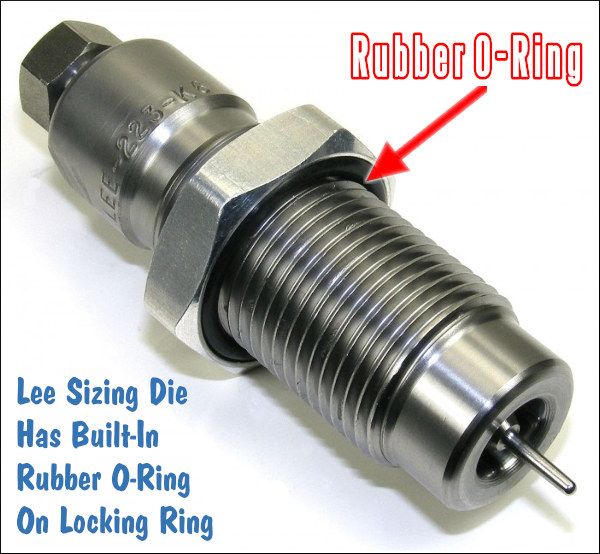
Lee Precision makes die lock rings with built-in O-Rings. Lee’s distinctive lock ring design allows the same kind of self-alignment, which is good. However, Lee lock rings don’t clamp in place on the die threads, so they can move when you insert or remove the dies — and that can throw off your die setting slightly. By using an O-Ring under a conventional die lock ring (that can be locked in place), you get the advantages of the Lee design, without the risk of the lock ring moving.
Do you own an older RCBS electronic powder dispenser? If you do, take the time to watch this ChargeMaster Tuning video from 8541 Tactical. This nine-minute video demonstrates how to re-program your older ChargeMaster to “tune” the dispensing process. The video shows the exact programming procedures to follow, step-by-step. Some folks want a faster powder flow — others tune their machines for a more reliable drop (with fewer over-runs). One cheap and popular modification is to insert a 1″-long section of a McDonald’s plastic straw in the ChargeMaster’s silver dispensing tube. This works surprisingly well to smooth kernel drop and prevent “clumping” that can cause an over-charge. The McDonald’s straw MOD is demonstrated in this video, starting at the 6:22 mark.
Large-Diameter Dispensing Tube Mod
Many folks have had success with the McDonald’s straw modification demonstrated in the above video. However, some folks would like to get even better flow performance (with virtually no clumping). Forum Member Frank B. has come up with a new option using a brass hose fitting with a large outside diameter. The hose fitting (with tape wrapped around the barbed nose section) is placed inside the RCBS dispensing tube (have some kind of wrap — you don’t want metal-on-metal). Here’s how the unit looks installed:
Frank tells us: “I have found a cure for the over-throw problem. It is a simple 1/4″ barbed hose nipple. I wrapped a couple layers of tape around the barbed end for a snug fit. With this in place, I have thrown 100+ charges of Varget without a single overthrow. The ID of the barbed end needs to be approximately 3/16″ to feed a steady flow. This works because of the larger ID at the drop.”
Frank adds: “You can see in the photo that the powder is not stacking up. You can watch it drop one grain at a time. Hope this will take the aggravation out of your case charging.” For best performance with this brass fitting MOD, we recommend de-burring and smoothing out the front edge of the brass fitting over which the kernels drop.
Brass fitting mod suggested by Boyd Allen. We welcome reader submissions.
This article is part of Sinclair Int’l Step-By-Step Reloading Series. Most of the products mentioned in this article are sold through Brownells.com.
by Roy Hill, Brownells/Sinclair Copywriter
Making your own precision handloads is a meticulous journey with many steps, many important matters to consider, and many sets of measurements to calculate. For those who pursue the perfect group, the highest score, the really long accurate shot, the rewards more than outweigh the effort. Choosing the right cases, deburring the flash holes, making the primer pockets uniform, trimming the cases, and lubricating them are all familiar – and critical – steps along the journey. And now that your brass preparation is complete, you are at last ready to start running the cases through your press and fill them with primers, powder, and bullets. The very first die the brass encounters is the sizing die. You insert the case, work the press’s lever to return the case to its correct pre-fired dimensions – and the journey continues.
There are three types of sizing dies to think about: neck, full-length, and small base. All three have specific benefits and potential drawbacks, and you should choose the type of die you use by thinking very carefully about what kind of shooting you plan to do with your handloads. No matter which type you select, most sizing dies will also punch out the old spent primer with some sort of decapper assembly that uses a hardened steel rod. Many types of sizing dies use an expander ball inside the die to make sure the neck of the case will accommodate a bullet after being sized. With some size dies, the expanders are easily removable and interchangeable, letting you get exactly the neck tension you want. When sizing cases (neck of full-length), rifle cases always need lube.
Neck-Sizing Dies Neck-sizing dies resize only the neck of the case. The benefit of sizing only the neck is that the brass is “worked” very little, reducing the amount of changes to the brss. [We recommend full-length sizing for all applications after the first couple of firings, and semi-auto brass should be full-length sized every time!] Sinclair recommends that neck-sized-only cartridges should not be used any in other rifle besides the one they were originally fired from [unless they are also FL-sized], or in any action other than a bolt-action.
Full-Length Sizing Dies
Full-length sizing dies resize the full length of the case, not just the neck. Full-length sizing helps create handloads that will function in any rifle, not just the one from which the cases were originally fired. The potential downside of full-length sizing is that it may shorten case life because it works the brass more than neck sizing. But it’s possible to “tune” today’s full-length sizing dies so they barely work the brass at all, as this article by Sinclair Reloading Tech Ron Dague shows.
Illustration Shows How a Full-Length Sizing Die Works
Another way to reap the benefits of full-length sizing is to use Redding’s full-length bushing dies, which size the full length of the case but use a system of interchangeable bushings that enable you give the case neck the bare minimum of resizing needed. To see how finely adjustable bushing dies are, and how they resize the case while fully supported, CLICK HERE for Video. The neck bushing helps you precisely control the neck tension to help increase the consistency and accuracy of your handloads.
Small Base Dies
A Small Base Die is another type of full-length sizing die, but one that is typically used when reloading for semi-automatic rifles, like the AR-15, M14, or AR-style .308 rifles. (It may also work well for bolt guns that need extra sizing on the lower section of the case.) A small base die works exactly like a full-length sizing die, only it compresses the brass just a bit more, usually about .001″ more, and may even push the case shoulder back just a hair. Small base dies give that extra bit of compression to the brass to help make sure the case will properly extract from a semi-automatic firearm. The upside is that you get handloads that should work flawlessly in your semi-automatic. The downside is case life may be shortened as compared to brass used only in one bolt-action rifle, because the brass is worked more.
Shoulder Bump Gauges
A handy tool for setting up your full-length sizing dies as close as possible to your rifle’s chamber is a shoulder bump gauge. The bump gauge lets you resize the case as little as possible, to extend case life and help your handloads fit your rifle almost like a neck-sized only die. You use deprimed cases fired in your rifle and bump gauge inserts to help you set up the die so it resizes the case only about .001″ to .004″, depending on what type of rifle you’re shooting.
Video shows how to use a shoulder bump gauge to set up your full-length dies
Article Find by EdLongrange. We welcome reader submissions
There are many products used successfully for case lubrication for case sizing. And for neck-turning a variety of lubricants are favored. The video above explains the basics of case lubrication with die wax, and spray lubricants. Below we mention three products that have proven very effective. For cases that have a close fit to your chamber via custom FL dies, Ballistol works well and is easy to apply and remove. For neck-turning, some of our Forum members have had great success with some automotive lubricants.
Three Good Lubricants You May Not Have Tried Before If you’re using a body die or a full-length sizing die, try using Ballistol (in the aerosol can) as a lube. It works GREAT without the tacky or gooey residue left by most case lubes. It will also clean off carbon residues on the neck as you lube the case. Just spray a little on a cotton patch (or your fingertips) and wipe each case before you run it up into the die. If you are using a steel neck bushing, be sure to wipe the neck as well. You can usually do a half-dozen BR-sized cases before you need to re-apply Ballistol on the patch. Ballistol is non-toxic, bio-degradeable, and will not harm your skin. It is very slippery, but can easily be removed with a rag or paper towel. Try it–you may retire your One-Shot. Ballistol can also be used to protect wood stocks.
Note, for heavy case-forming or necking up case necks, we still recommend a thicker lubricant, such as Imperial Die Wax. But for normal case sizing, after your neck has been expanded, Ballistol will do the job, and you won’t need to tumble the brass afterwards. All you need is a very thin layer of Ballistol, and this easily wipes off with a paper towel.
For Neck-Turning, Try STP Blend or Assembly Lube
For lubing the neck-turning tool mandrel while turning case necks, many folks use a blend of STP® Oil Treatment and Mobil 1 lube. Chuckw2 reports: “Try STP and Mobile 1 Synthetic oil in a 50/50 mixture. Very slick, you will need to tumble your cases after turning.” STP is a very thick lubricant, that flows and clings almost like honey. Jason reports the STP blend comes off easily in an ultra-sound bath, using a bit of detergent. At many retailers, STP is also available in a convenient 7-ounce tube, so you don’t have to buy a large bottle.
Another even cheaper option is assembly lubricant. For turning his case necks, RStreich uses assembly lube from an auto parts store. He notes: “The brand I have is reddish in color and kind of sticky like honey. It’s far better than the Imperial die wax I was using before.” There are a variety of types, both with and without moly additive, and you can select the viscosity you prefer if you sample a few brands. Be sure to clean out any lube residue from the inside of your necks when you have completed your neck-turning.
We are finally seeing prices drop on loaded ammo, and there are some notable inventories of ammunition right now at Midsouth, Palmetto State Armory, Powder Valley and Precision Reloading. We are even starting to see ample supplies of large-caliber hunting rifle ammunition — something hard to find a year ago.
Thankfully, if you shop around aggressively, you can now find many types of ammunition at reasonable prices. By using AmmoSeek.com you can instantly compare ammo prices from dozens of sellers. AmmoSeek monitors more than a 180 online vendors — checking current pricing and available inventory, for pistol, rifle, and shotgun ammunition. Looking for .22 LR ammo for your rimfire trainer or .45 acp ammo for your 1911? Just select the cartridge type from the “Quick Seek” list on the right. Likewise you can find .223 Rem and .308 Win Rifle ammo with one click.
If you haven’t sourced ammo online before, note that, for nearly all jurisdictions, it IS legal to order ammunition online and have it delivered to you at home in most states. But check your state and local laws! California, for example, has prohibited direct ammo shipments to ordinary customers.
Got Ammo? Here’s just part of the vast inventory at Skagit Arms in Washington State.
Use Ammoseek.com to Find Reloading Components Too
Ammoseek.com also lets you search for reloading components, including powder, primers, brass, and bullets. This is a huge time-saver. You can instantly check a dozen or more vendors to see if a particular type of powder is in stock. Likewise, you can quickly check for primer availability. If you have a big match coming up and are short on primers — this could solve the problem. To search for components, from the AmmoSeek home page, click the gray “Reloading” Tab (see below), then select Bullets, Brass, Primers, or Powder from the pull-down menu.
AmmoSeek.com FAQ Page
If you have questions about using AmmoSeek.com, visit the AmmoSeek FAQ Page. You’ll find details on how the search engine works. Here’s one FAQ:
How often does the AmmoSeek engine process its ammunition data?
Every minute or two! AmmoSeek is constantly updating ammunition data 24 hours a day, 7 days a week, automatically. Individual retailers are updated at least hourly, most most are updated much more often. Still, however, there’s always the possibility that items can go out of stock the moment after our site is updated, so it’s not always possible to be 100% accurate.
The RCBS Lock-Out Die can also be used with some Dillon and Hornady progressive presses.
If you load pistol or rifle ammo with a progressive press, we strongly recommend you get a Lock-Out Die from RCBS. This unique reloading die will prevent your progressive press from advancing if the dispensed powder charge is more or less than about 0.3 grains too high or too low. The Lock-Out Die really works. Your Editor uses it on his RCBS 2000 progressive press. I can affirm that a Lock-Out Die has “saved my bacon” a half-dozen times over the years when there was an over-charge (which could cause a Kaboom) or a low charge (which could cause a squib load).
The Lock-Out Die works by using a central die detection rod that sets its vertical position based on the height of the powder column in the case. Through an ingenious design, if the powder column height is too low or too high, the rod locks in place as you start to pull the press handle. This halts the press before the ram can lift and the cartridge plate can advance. Unlike a beeping alarm system (which can be ignored or defeated), the Lock-Out Die physically stops the movement of the press ram and prevents a bullet being seated in the “problem” case.
It takes a bit of tweaking to get the Lock-Out Die detection rod setting just right, but once it is correctly positioned, the Lock-Out Die works smoothly in the background. The Lock-Out Die won’t interfere with the loading process unless it detects a high or low charge — and then it positively stops the progressive loading cycle.
While crafted for use in RCBS progressive presses, the RCBS Lock-Out Die can also be used on a Dillon XL Progressive (see video below) or Hornady Lock-N-Load progressive — though it does take up one station which could otherwise be used for a final crimp die (after the seating die). The RCBS 2000 has one more station than a Dillon 550/650, so it’s an ideal platform for using the Lock-Out Die.
Learn More at UltimateReloader.com
On the UltimateReloader.com website, run by our friend Gavin Gear, you’ll find an excellent two-part series on the function and set-up of the RCBS Lock-Out Die. Part One explains how the Lock-Out Die functions, using cut-away illustrations. Part Two shows how to install and adjust the Lock-Out Die on various progressive presses. The Ultimate Reloader video at the top of this article shows setup of the RCBS Lock-Out Die on the Dillon XL-650 progressive press, while the Reloading Bench video below shows the Lock-Out Die on a Hornady LnL progressive.
Thousands of new products will be on display at SHOT Show 2024, the major gun industry trade show held each January in Las Vegas. The official SHOT Show Product Planner offers a “sneak peak” at 294 new-for-2024 products for hunters and shooters. More will come in the weeks ahead. Here are nine interesting new products for gun owners and reloaders. Since these are all recently-released items, we haven’t been able to test them yet. Product profiles are based on descriptions provided by the manufacturers. We will run a separate feature on new pistols and rifles that will debut in 2024.
The Leapers UTG Big Bore Bipod is a heavy-duty bipod designed for very large caliber ELR rifles. This bipod is available with either a MIL-STD Picatinny or ARCA mount. The Big Bore Bipod is 40° pannable and 22° tiltable with tension adjustment levers. The throw levers are user serviceable. The bipod’s hub sits within minimal offset in relation to its mount. This provides improved stability with a lower center of gravity, and better weight distribution. That, plus the bipod’s 60° wide open angle, makes the bipod very stable. The extendable legs offer a wide range in center-height adjustment and retract at the push of a button. Note: This is not yet on Leaper’s website. Price: $299.97
GunStixx allow efficient use of gunsafes. GunStiXX from Winchester are designed and sized to work universally with rifles and shotguns down to .20 caliber. This new firearm storage system consists of an MDF gun rack with holes, aluminum caps, and plastic rods. Each rod is made of sturdy, damage-free plastic material to prevent scratching your gun’s surface or barrel and can be trimmed to your preferred length. This works as a modular racking system securing guns in an upright position, creating more storage capacity within the same available footprint. Note, like other barrel rods, this system works best with rifles/shotguns with relatively narrow forearms. And for long-term storage we recommend that you remove the scope. That creates more room inside the safe.
Many tactical shooters are now mounting red dot optics to a conventional zoom optic. This allows very rapid target acquisition at short range. This dual optic option can can be done easily with the Delta RDS Ring Cap. The ring caps for the Delta Series Mounts feature direct mount footprints for popular red dot sights to accommodate the use of backup red dot sights on scoped carbines. Available footprints include the RMR, Micro Red Dot, EFLX, MRO, Fast Fire, 509-T, and ACRO Red Dot Sights.
This clever Presma AR15 buttstock includes a secure carrier/holder for a spare magazine. This will attach to any regular mil-spec buffer tube and will fit all standard 5.56×45 (.223 Rem) AR15/M16/M4 magazines. This would be a handy accessory for Action Shooting competitions requiring rapid mag changes. The buttstock is adjustable and includes a recoil pad. The magazine-holder has a handy quick release, similar to a standard AR mag release. The buttstock has strap hole features for multiple sling/strap positions. Dimensions are: 7.24″ x 5.47″ x 2.23″. Price: $35.00.
Some states now limit the use of lead bullets and lead shotshell media. That can be problematic for trap/skeet shooters and bird hunters. Thankfully, there are some good options that can replace lead shot. Agescan International has introduced new, non-toxic High-tensile Superb Bismuth Shot. The maker states: “We invented a revolutionary formula and production technique. The new Superb Bismuth Shot (“SBS”) exhibits extremely high quality in terms of uniformity, perfect roundness, mirror-finished surface, and zero fragmentation rate. By saying zero fragmentation rate, the ballistic test showed SBS performs like lead shot and entirely solved the shattering issue with traditional Bismuth shot.” This can be loaded into shotshells for use in areas that ban ammo containing lead projectiles.
We like this versatile multi-gun case from SKB. It can hold THREE rifles and THREE pistols, making this one of the biggest-capacity cases on the market. This waterproof, virtually indestructible MIL-SPEC case features custom-cut foam to accommodate three ARs and three handguns, with plenty of room for magazines, ear protection, and other accessories. This big wheeled transports case is made in the USA and comes with an unconditional lifetime warranty. MSRP is $499.99 — a substantial investment.
The Bore-Max Cleaning Kit & Mobile Workstation has a great selection of tools — jags, brushes, bore mops and more. The workstation has two innovative features that make cleaning easier. The first is the Gun Gripper technology built into the yokes, which firmly grip barrels, handguards and stocks. The second is four Smart-Assist ports located on the corners of the case. These allow plugging in the included hands-free flexible flashlight or other accessories. Tools include: Smart-Fit Bore Guide, Bore-Max 3-Pc Smart Rod, Gun Gripper Form-Fitting Grips, Gun Detailing Tools (Steel Picks, Cleaning Brushes), Micro Cleaning Mat, Travel Case.
With collectors and enthusiast in mind, Custom & Collectable Firearms has proudly introduced the Colt Python Black Stag 3″. This special revolver includes hand and laser engraving on the frame, wheel, and barrel with almost 1/4″ in depth on the engraving. The firearm also showcases exceptional handsome black Stag antler grips that give it that beautiful, yet rugged look. The Colt Black Stag ships with a 1 of 200 challenge coin and hand signed certificate.
Breakthrough Clean Technologies, an Allen Company enterprise, has released an innovative Suppressor Cleaning Kit to address the challenging task of keeping suppressors, muzzle brakes, and compensators clean and in proper working condition. Based on the effectiveness of BCT’s cleaning solution, a suppressor cleaning kit has been developed to make the entire process easier and more effective. This new Suppressor Clean Kit and other new-for-2024 items will be shown at Allen SHOT Show booth #13021. Cleaning Kit includes: 16 oz. Suppressor Cleaner Fluid, Soaking Tube, Two Specialized Brushes, Retrieval Tool, and Organized Tool Tray.
Think you need a relatively long case-neck for good accuracy? Think again. Stan Ware broke all the rules with his radical Wolfpup cartridge, proving that a near-no-neck design can deliver match-winning accuracy. Read on to learn how the Wolfpup works…
Retired gunsmith Stan Ware is a talented shooter who’s not afraid to think “outside the box”. Stan competes in both Hunter Benchrest (HBR) and Varmint for Score (VFS) disciplines. In his quest to build the ultimate Hunter Benchrest cartridge, Stan created the radical “Wolfpup” wildcat, based on a 6mmBR parent case. Noting the dominance of 30 BRs in VFS matches, Stan wondered if a stretched 30 BR could work in HBR competition. The challenge was case capacity. Under HBR rules the cartridge must hold at least 45.0 grains of water, equal to the capacity of the classic 30/30 case.
To get the requisite HBR case capacity, Stan figured he needed to boost the volume of a 30 BR case significantly, so he would have to move the shoulder forward — a lot. He did this by running a 30 BR reamer deeper and deeper, test-firing brass along the way. After three reamer passes, he ended up with the capacity he needed (the Wolfpup holds 45.3 grains of water). But then he looked at the finished product — a case with almost no neck, and he wondered “how could this possibly work?”.
From Trashbin to Winner’s Circle
Ware’s prototype Wolfpup ended up so short-necked, so unlike any “normal” cartridge, that Stan figured it was “dead on arrival”. Stan told us: “I said ‘this ain’t going to work’ and I threw the brass in the trash can. Honest. But later I thought I better shoot it and see what it does.” There was one problem — Stan didn’t have a seating die. He noticed the short neck provided a bit of tension after fire-forming, so he literally seated some bullets, BIB 118s and 125s, with his fingers. For powder he used H4198 and started with 35 grains, one grain more than a 30 BR load. Stan then did a pressure work-up: “I actually went up to 41.0 grains and didn’t have a sticky bolt. I ended up at 37.9 grains of Hodgdon 4198 — that gave 3150 fps, where the sweet spot is.” (Later testing revealed a second accuracy node at about 3020 fps, using 36.4 grains of H4198).
Stan’s radical short-necked Wolfpup shot great from the get-go. Once he found the right velocity node, the gun shot in the ones and zeros with both 7-ogive and 10-ogive bullets, both 118s and 125s. The Wolfpup proved easy to tune — it’s not finicky at all. And it’s a winner. Stan began shooting the Wolfpup in 2006 in both VFS and HBR matches and the ‘Pup’ started winning matches right away. In 2007, Stan won the Wisconsin State VFS Championship shooting the Wolfpup. In June 2010 at a Webster City, Iowa VFS match, Stan won the Grand Agg and posted high X-Count for the match, while placing first at 100 yards and second at 200 yards. How’s that for a cartridge that almost ended up in the trash bin?
Does Stan deserve an award for “most innovative benchrest cartridge design”? Stan chuckles at that notion: “I’m not a hero, not a genius. I really didn’t do anything. The fun part is thinking outside the box — for me anyway. Shooting is an age-old process of experimentation. You never learn it all.”
Why Does It Work?
How can such a radical case design perform so well? “That’s a good question,” Stan admitted. He then explained: “The 30 BR is inherently accurate, so I figured something based on the 30 BR should be accurate too. My personal belief is that the short neck doesn’t hurt you. Plus if the throat in the barrel is straight, the bullet can self-align. If the chamber is good, the bullet will self-center in the throat. In a regular case there’s not much room to do that, so a bullet can start off-center, and you don’t get the same results every time. A bullet in a conventional case is stopped from self-centering by the stiffer neck, particularly in a tight-clearance BR gun.”
Reloading the .30 Wolfpup
Stan’s Wolfpup chamber has a neck dimension of 0.330″. He turns his necks for a 0.327″ loaded round. Bullets are jammed .020″ forward of first contact with the lands. When he closes the bolt it pushes the bullet back in the case — almost a soft seat. Stan notes: “To start with I normally bump the shoulder .0005-.001″ so they go in easy. Just by doing that I get a little neck tension. I also use a bushing. Right now I’m running a .322, but it’s not particularly sensitive. I’ve tried one-thousandths increments up to a .325 bushing and couldn’t tell a lot of difference.” For bullet seating, Stan uses a Wilson 30 BR seater die into which he ran the chamber reamer. This gives perfect case fit during seating operations.
About the Illustrated Gunstock
You’ll notice Stan’s stock contains scenes from Vietnam and a quotation. Here’s the story. A Vietnam combat veteran, Stan served “in-country” with the Army’s 509th Non-Divisional Combat Unit (out of Fort Riley) from 1965-1966. Shortly before he left Vietnam, Stan went to a shop to have a souvenir lighter engraved. He asked the vendor for an appropriate inscription. The shop’s metal-worker engraved: “War is a tragedy. It takes mans’ best to do mans’ worst.” That message, along with the combat scenes, were hand-painted on Stan’s rifle by his wife Susan, a talented artist. She spent more than 20 hours painting the rifle stock.
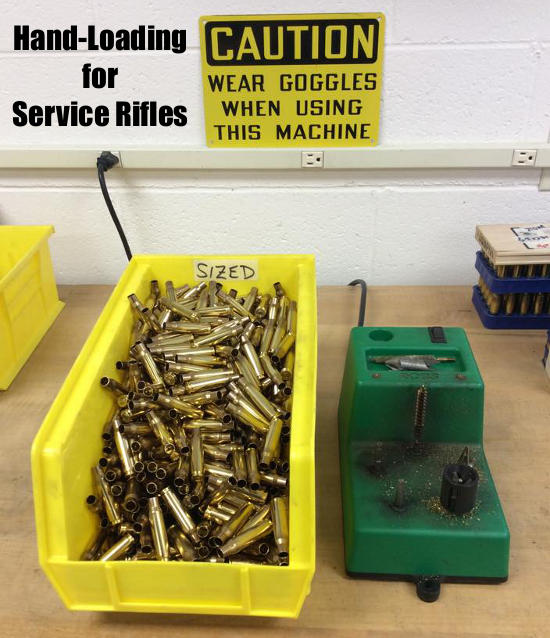
The U.S. Army Marksmanship Unit (USAMU) has published a great series of reloading “how-to” articles on its Facebook Page. This post covers key factors to consider when loading ammunition for Match Rifles and Service Rifles, with a particular focus on self-loading “gas guns”. Visit the USAMU Facebook Page regularly for other, helpful reloading and marksmanship tips.
We offer some “cardinal rules” to help new gas-gun handloaders with safety and efficiency. These address both Match Rifle and Service Rifle versions of the AR15, M1 Garand, M1A, and M110. However, they can also improve safe reloading for many other auto-loaders such as M1 Carbines, FALs, SIGs, etc. The author distilled these principles many years ago to help focus on the essential aspects of these rifles.
RULE ONE: Service Rifles Are Not Benchrest Rifles
Gas-guns require a relatively loose fit between ammunition and chamber (vs. bolt actions) for safe, smooth operation. Many techniques, such as neck sizing and keeping cartridge headspace quite tight, are popular in the extreme bolt gun accuracy realm. However, they are of little value with Service Rifles, and some could even be hazardous. Before adopting a specialized technique, seriously consider whether it is appropriate and beneficial in a gas-gun.
RULE TWO: Never Compromise Safety to Obtain Accuracy
Example: If choosing a brand of great, but ultra-sensitive match primers offers possibly better accuracy at the risk of slam-fires in your design of rifle, don’t do it! You are issued exactly two eyes and ten fingers (best-case scenario). Risking them trying to squeeze 0.25 MOA better accuracy out of an M1A, etc. simply isn’t worth it.
RULE THREE: Tailor the Precision to Your Individual Skill and Your Rifle’s Potential
This has been addressed here before, but bears repeating for newcomers. If you are struggling to break out of the Marksman Class, or using a CMP M1 “As-Issued,” then laboriously turning the necks of your 600-yard brass is a waste of time. Your scores will improve much faster by practicing or dry-firing. On the other hand, if the reigning champions anxiously check your scores each time you fire an event, a little neck-turning might not be so far-fetched.
Verifying Load Improvements — Accuracy hand-loading involves a wide variety of techniques, ranging from basic to rather precise. Carefully select those which offer a good return on investment for your time and labor. In doubt? Do a classic pilot study. Prepare ammo for at least three or four ten-shot groups with your new technique, vs. the same with your standard ammo. Then, pick a calm day and test the ammo as carefully as possible at its full distance (e.g. 200, 300, or 600 yards) to verify a significant improvement. A little testing can save much labor!
This video explains the procedure for ordering an M1 Garand from the CMP.
RULE FOUR: Be Your Own Efficiency Expert
Serious Service Rifle shooters generally think of ammunition in terms of thousands of rounds, not “boxes”, or even “hundreds”. Analyze, and WRITE DOWN each step in your reloading process. Count the number of times each case is handled. Then, see if any operations can be dropped or changed without reducing safety or accuracy. Eliminating just two operations saves 2000 steps per 1000 rounds loaded. Conversely, carefully consider any measurable benefits before adding a step to your routine.
RULE FIVE: In Searching for Greater Accuracy with Efficiency, Look for System Changes
For example, instead of marking your 300-yard rounds individually to differentiate them from your 200-yard ammo, would a simple change in primers work? If accuracy is maintained, using brass-colored primers for 200 and silver for 300 provides an indelible indicator and eliminates a step! Similarly, rather than spending hours selecting GI surplus brass for weight and neck uniformity, consider splurging on some known, high-quality imported match brass for your 600-yard loads. Results should be excellent, time is saved, and given limited shooting at 600 yards, brass life should be long.
RULE SIX: Check All Your Primers Before Packaging Your Loaded Ammo
This seems simple and even intuitive. However, many slam-fires (which were much more common when M1s and M1As were the standard) are due, at least in part, to “high” primers. Primers should be seated below flush with the case head. The USAMU has addressed this at length in a previous column, but each round should be checked for properly-seated primers before they are packaged for use.


 On our main AccurateShooter.com site, you’ll find a good article by GS Arizona on the Basics of Neck Turning. If you’re new to the neck-turning game, or are just looking for good tips on improving your neck-turning procedures, you should read that article. Below we offer some highlights and photos from the article, but you’ll need to read the whole story to view all the illustrations and follow all the procedures step by step.
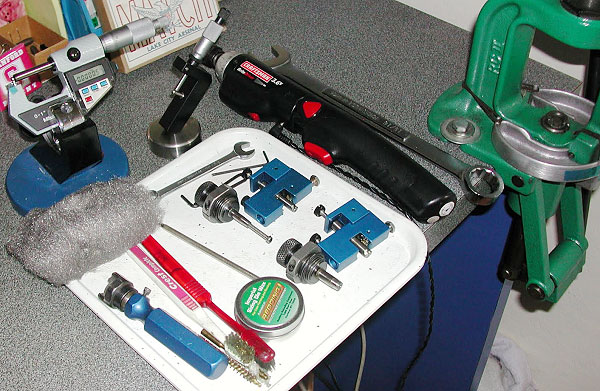


 Neck-sizing dies resize only the neck of the case. The benefit of sizing only the neck is that the brass is “worked” very little, reducing the amount of changes to the brss. [We recommend full-length sizing for all applications after the first couple of firings, and semi-auto brass should be full-length sized every time!] Sinclair recommends that neck-sized-only cartridges should not be used any in other rifle besides the one they were originally fired from [unless they are also FL-sized], or in any action other than a bolt-action.


 If you’re using a body die or a full-length sizing die, try using Ballistol (in the aerosol can) as a lube. It works GREAT without the tacky or gooey residue left by most case lubes. It will also clean off carbon residues on the neck as you lube the case. Just spray a little on a cotton patch (or your fingertips) and wipe each case before you run it up into the die. If you are using a steel neck bushing, be sure to wipe the neck as well. You can usually do a half-dozen BR-sized cases before you need to re-apply Ballistol on the patch. Ballistol is non-toxic, bio-degradeable, and will not harm your skin. It is very slippery, but can easily be removed with a rag or paper towel. Try it–you may retire your One-Shot. Ballistol can also be used to protect wood stocks.
 For Neck-Turning, Try STP Blend or Assembly Lube
 Another even cheaper option is assembly lubricant. For turning his case necks, RStreich uses assembly lube from an auto parts store. He notes: “The brand I have is reddish in color and kind of sticky like honey. It’s far better than the Imperial die wax I was using before.” There are a variety of types, both with and without moly additive, and you can select the viscosity you prefer if you sample a few brands. Be sure to clean out any lube residue from the inside of your necks when you have completed your neck-turning.


 If you load pistol or rifle ammo with a progressive press, we strongly recommend you get a Lock-Out Die from RCBS. This unique reloading die will prevent your progressive press from advancing if the dispensed powder charge is more or less than about 0.3 grains too high or too low. The Lock-Out Die really works. Your Editor uses it on his RCBS 2000 progressive press. I can affirm that a Lock-Out Die has “saved my bacon” a half-dozen times over the years when there was an over-charge (which could cause a Kaboom) or a low charge (which could cause a squib load).


 Retired gunsmith Stan Ware is a talented shooter who’s not afraid to think “outside the box”. Stan competes in both Hunter Benchrest (HBR) and Varmint for Score (VFS) disciplines. In his quest to build the ultimate Hunter Benchrest cartridge, Stan created the radical “Wolfpup” wildcat, based on a 6mmBR parent case. Noting the dominance of 30 BRs in VFS matches, Stan wondered if a stretched 30 BR could work in HBR competition. The challenge was case capacity. Under HBR rules the cartridge must hold at least 45.0 grains of water, equal to the capacity of the classic 30/30 case.
 From Trashbin to Winner’s Circle
 Why Does It Work?