The type of targets you use can make a difference during load development and training — helping you align your crosshairs, estimate group size visually, and also record load data/gun type. Here we provide selection of FREE printable precision and training targets. This selection includes popular load development targets AccurateShooter created as well as other useful grid targets. You can download ALL these targets as PDF files and then print them out on 8.5×11″ heavy paper.
AccurateShooter.com offers a cool page with over 50 FREE downloadable targets. You’ll find all types or FREE targets — sight-in targets, varmint targets, rimfire targets, bullseye targets, tactical targets, load development targets and more. CLICK HERE for all our free targets, including our LOAD DEV target.
We created the above target a decade ago. Since then it has been used by tens of thousands of shooters. It has proven very popular as a load development target, since all your load data fits neatly in the boxes under each target. In fact this target is being employed by both rifle-makers and barrel-makers (including Criterion) to test their products. The target was designed for aiming efficiency. The diamonds have 1/2″ sides and you can align your cross-hairs on the horizontal and vertical lines. It is a clean design that is easy to see even at 200 yards with a 20X scope. When we test, we usually crank in a little elevation, setting the point-of-impact higher, so that our shots fall in the gray circles. That way you leave the squares intact for precise aiming.
Versatile Targets with Multiple Aiming Points
We use the two targets below for load development and precision practice. For the left target, use the corners of the diamonds to align your cross-hairs precisely. The circle dot target (on the right) can also be used for informal rimfire competition at 50 yards. Right-Click Each Target to Download Printable PDFs.
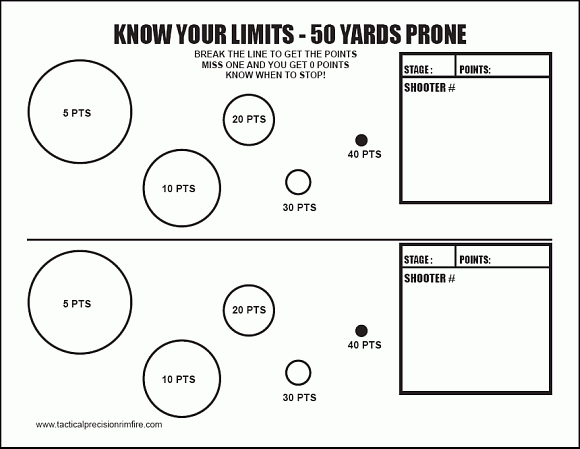
Know-Your-Limits Target for Rimfire Training & Fun Matches
Here’s a rimfire training target with “big to small” target circles. Start with the largest circles, then move to the smaller ones in sequence. This systematic drill provides increasing challenge shot-by-shot. Novices often are quite surprised to see their accuracy improve as they move from bigger to smaller aiming points. That provides positive feedback — always a good thing.
Right Click and “Save as” to download printable PDF versions of target.
Five Diamond Grid Targets
Here’s a popular grid target with multiple red diamond aiming points. The background includes a grid pattern with 1″ squares — that helps to quickly estimate group size through your scope. We recommend using a color printer for this target so the diamonds and grid lines are bright red.
Here’s a NRA-type target for pistol shooting. The bright red center helps when shooting indoors because well-placed bullet holes are much more visible. This target includes data entry boxes to record gun type, score, and load data. This is one of many good free targets available at Targets4free.com.
Image Courtesy NSSF. This story is based on an NSSF Article.
‘Tis the season of gift-giving (Christmas Day is just a week away). Perhaps you’re considering giving a a first rifle to your grandson or perhaps a carry pistol to a spouse. When making a gun gift to a friend or family member, however, there are some very important legal considerations. Also the rules on firearms gift transfers vary from state to state. Bottom line here — you need to know the law BEFORE you deliver that shiny new firearm to a family member, close friend, or relative.
The first thing to remember if you’re thinking about giving someone a gun is that … it’s a gun! You already know that ownership of a firearm brings with it some serious legal and ethical obligations that other consumer products don’t. So let’s look at some questions you may have about giving a firearm as a gift.
Image Courtesy NSSF
The first question you have to ask is whether the intended recipient can legally own the firearm where he or she lives. With more than 20,000 different gun laws on the books, even the kinds of firearms that law-abiding citizens can own vary from place to place. For example, juveniles (under age 18) generally speaking are precluded by law from possessing a handgun. Check out the Bureau of Alcohol, Tobacco, Firearms and Explosives (ATF) website for an overview of local laws and, whatever you do, don’t forget that you can never under any circumstances transfer a firearm to someone you know — or have reasonable cause to believe — legally can’t own one. That’s a federal felony, so be careful.
There’s no federal law that prohibits a gift of a firearm to a relative or friend who lives in your home state. Many states — including California, Colorado, Connecticut, Delaware, New York, Oregon, Rhode Island, Washington State and the District of Columbia — require you to transfer a firearm through a local FFL-holder so an instant background check will be performed to make sure the recipient is not legally prohibited from owning the gun. Maryland and Pennsylvania require a background check for private party transfer of a handgun. There are exceptions, so it’s important to check the law of your state or ask your local firearms retailer.
Consider a Gift Card Instead of Direct Gift
The ATF recommends that if you want to give someone a new firearm, rather than going to a gun store and buying the gun on your own, consider instead purchasing a gift certificate/card from your favorite gun retailer. Then give that gift card as the present. That way the recipient can choose the exact gun he or she wants, and there’s no question about who is “the actual buyer of the firearm”, which is a question any purchaser must certify on the Federal Form 4473 at the time of purchase. The Gift Card option avoids any “straw purchaser” issues. Many reputable vendors offer gift cards, including Brownells and MidwayUSA.
Intra-Family Transfers and Antique Arms
What if you want to give “Old Betsy,” your favorite old deer rifle, to your son or daughter as a college graduation gift? Again, in some states, there’s no law that says you can’t, but many states require even intra-family transfers to go through a licensed dealer. Remember, you can never transfer a firearm directly to another person who is a resident of a different state. In that case, you must transfer the firearm through a licensed dealer in the state where the person receiving the gift resides.
Using a gift certificate from a firearms retailer near where the recipient lives might be a good solution. Be safe and check with an in-state FFL dealer before you give any firearm to a friend or family member.
This 50 Cal Days of Christmas video features some fantastic slow-motion footage of a Barrett .50 Caliber M82. This bad boy pumps out some serious muzzle flash. Watch carefully at the 1:05 mark and you can see the .50-caliber projectile exit the muzzle brake and spin through the ball of smoke and flame. For best viewing, you may want to change your video settings to 720p or 1080p High Definition and view full-screen (using the video controls).
The video carries “overkill” to the max, as the shooter uses his big Barrett to blast Christmas ornaments and a snow-globe. To top things off, at the 2:50 mark, the shooter fires the .50 cal at a pyro-equipped gingerbread house. (The gingerbread shot is taken from a standing hold no less!) The results (at 3:22) are impressive — gingerbread house becomes flaming gingerbread pudding.
Christmas is just 8 days away, so today we’re featuring a hand-picked collection of sixteen “stocking stuffers” for precision shooters. Some of these are recent inventions. All are handy items that you’ll use over and over again at the range, on your vehicle, and/or at your loading bench (so you’re allowed to buy them for yourself, even after Christmas).
B&T Industries BT62 Determinator — $7.95 ✔
The acrylic BT62 Determinator measures groups with laser-cut concentric measuring rings. Check group size quick and easy — simply place the Determinator over shot group. Adjust until one of the circles crosses the center of the two outer-most holes. That gives you the center to center group measurement (1.5″ maximum). Alternatively, you can measure edge to edge (of the farthest shots) and then subtract the bullet diameter. Cool tool for gun guys. The supplied lanyard also glows in the dark.
MAXUS Reloading Scale Kit — $17.99 ✔
Here is a VERY affordable compact scale for use at home or at the range (with battery power). Though it costs under $20, the MAXUS Digital Milligram Scale (#ad) has earned good reviews and should be precise and repeatable. This high-precision digital milligram scale set comes with calibration weight and other reloading accessories. And numbers are easy to read with its large backlit LCD display. NOTE: This MAXUS Scale has dual power functionality — it can run with batteries or USB cable. It can read grains, ounces, grams, and other weight types.
Wheeler Manual Trigger Pull Scale — $21.58 ✔
While we prefer a sensitive digital trigger pull gauge, it’s nice to have a manual back-up. And the Wheeler gauge is plenty accurate for pistols and most hunting rifles. The Wheeler trigger pull scale accurately measures trigger pull weight from 8 ounces to 8 pounds. It features an ergonomic handle for consistent direction of pull. The sliding indicator stays reliably on the maximum weight registered and high contrast pull weight increment marks are very easy to read. This spring-type trigger scale measures in 2-ounce increments and is accurate to +/- 2 ounces — plenty good for pistols and hunting rifles. Priced at just $21.58 on Amazon, this gauge has earned 91% four- or five-star owner reviews.
Lyman Powder Scale Pan and Case Funnel — $6.99 ✔
The Lyman Powder Pan/Funnel saves reloaders time by combining the powder-receiving pan and funnel into one unit. With this combo tool reloaders can pour powder directly into the case without having to fumble with a separate funnel. That’s smart and efficient and just $6.99 on Amazon (#ad). RCBS makes a similar powder pan/funnel ($8.99 at Precision Reloading) with a slightly different case-neck section. You may want to try both to determine which works best for your cartridge brass.
Surveyor’s Flagging Tape (for Wind Indicators) — $1.99 per Roll ✔
Allen Camouflage/Black Neoprene Scope Cover — $12.07 ✔
Here’s a great gift item for a hunter. This reversible Camo-pattern Neoprene Scope Cover fits scopes up to 15″ long and 56mm lens diameter. The cover cushions your scope and protects against moisture and scratches. Along with the $12.07 large version, Allen makes a 12″ medium camo scope cover, and a 10″ small version. NOTE: These covers are reversible with Mossy Oak Break-Up Country camo on one side (as show), and black on the other side.
MagnetoSpeed RifleKuhl Barrel Cooling Fan — $69.00 ✔
Cooling your barrel with a compact fan can extend barrel life. This bright red RifleKuhl from Magnetospeed (#ad) is quite effective. The battery-powered impeller pushes cooling air down the barrel. It has a chamber seal for increased cooling efficiency while a neodymium magnet helps secure the device to your action. The RifleKuhl includes a belt/pocket clip and there is a Replaceable built-in 50 Micron air filter. The RifleKuhl costs $69.00 on Amazon.
Ludex Case Prep Multi-Tool with Internal Storage — $15.99 ✔
This handy Ludex Case Prep Multi-Tool can perform multiple tasks. On one end is an inside neck chamferer, with the outside chamferer/deburrer on the opposite end. Stored inside the tool are four (4) uniforming attachments for large and small primer pockets. This tool with all the attachments is $15.99 on Amazon.
Digital Display Timer with Big Buttons — $16.95 ✔
If you shoot in a discipline with time limits, or you time your firing strings during practice, having a reliable and easy-to-read timer is critical. We like this very affordable Digital Display Timer with both count-up and count-down functions. Just $16.95 on Amazon, this unit boasts an easy-to-read display and LARGE buttons making it perfect for F-Class, Palma, and other matches. This timer comes with both a built-in stand AND a strong magnet so you can position the timer conveniently.
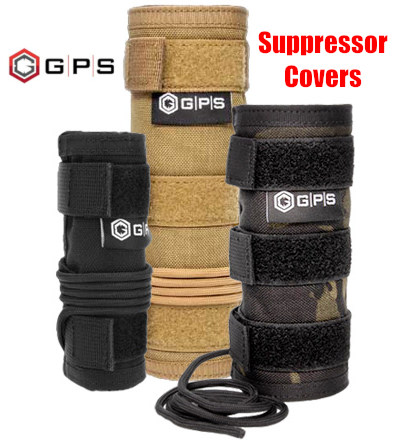
GPS Tactical Suppressor Cover — $34.99 ✔
With the growing popularity of PRS/NRL competition and hunting with suppressors, it’s great to see a product that can protect your pricey “can” AND reduce heat coming off the suppressor. Crafted by GPS Bags, these Tactical Suppressor Covers ($34.99 at Midsouth) help reduce visual “mirage” caused by heat radiating off a rifle’s suppressor. These feature 1000D Nylon with a heat-resistant fiberglass/silicon lining. The Tether Line prevents the suppressor cover from sliding forward during strings of fire.
Hoppes Pistol Cleaning Kit — $9.97 ✔
Right now, for just $9.97, you can get a nice Hoppes Pistol Cleaning Kit complete with solvents, cleaning rod with swivel handle, jags, patch holder, bore brush, and 50 patches. The fluids include 2 oz. of Hoppe’s No. 9 Cleaning Solvent, plus 2.25 ounces of Hoppe’s Lubricating Oil.
Peregrine MAGnet Gun Caddy — $5.50 ✔
Here’s a handy item that can hold your rifle vertically alongside any steel surface. This works great on gun safes (outside or inside), and the MAGnet Gun Caddy can be used on vehicles too (see photo). The patented design makes it possible to secure and remove your gun from the holder with just one hand. The MAGnet Gun Caddy, just $5.50 at Grafs.com is modular so you can arrange multiple units at whatever height works best.
Sack-Ups 13.5″ Pistol Storage Sock — $8.49 ✔
Here’s an actual fabric sock that you can roll up and put in your Christmas stocking. Sack-Up knitted storage sacks are made from silicone-treated 100% natural cotton. The cotton’s wicking ability draws moisture off the gun, inhibiting corrosion. This $8.49 13.5″ Sack-Ups sock is a great choice for revolvers and metal-framed pistols. Midsouth also carries larger 36″, 42″, and 52″ Sack-Ups for shotguns and rifles.
Rimfire disciplines are getting more popular, with the increasing cost of centerfire brass, bullets, and powder. While .22 LR rimfire rifles require less cleaning compared to centerfire rifles, you still need to maintain those rimfire barrels. We like Bore Tech’s Rimfire Blend Bore Cleaner, now $17.95 at Creedmoor Sports. This specially-formulated, ammonia-free bore cleaner can simultaneously cut through the layers of lead, wax, and carbon fouling. NOTE: After use you may have to shoot quite a few rounds before best accuracy returns.
Is the temp and humidity OK inside your gunsafe? With Hornady’s Govee Bluetooth Wireless Hygrometer Thermometer, you can check that easily. The unit measures temperature and humidity inside your safe, and then displays temp/humidity readings on your smartphone via a Bluetooth App. The unit has a good range in open rooms but you may have to get close to the safe to get a signal with the safe door closed. The sophisticated Govee Wireless Hygrometer Thermometer is now just $14.99 on Amazon (#ad).
BONUS — TACTICAL XMAS STOCKINGS, $14.99-$16.99 ✔
Don’t have a stocking to hold your small gift items? Then check out these cool, heavy-duty stockings. These Willbond Tactical Stockings are sold as a two-pack for just $14.99 – $16.99 on Amazon (#ad). Choose a pair in three different types: Classic Style (Camo and Black, $14.99); Dark Style (Bronze and Black, $15.99), and Bright Style (Bronze and Green, $16.99). These Willbond Tactical Stockings feature Hanging hook, MOLLE straps, carry handle, outside draw pocket, side zipper, and Velcro USA Flag Patch. These stockings are sure to bring smiles to your tacticool family members and friends.
As an Amazon affiliate, this site can earn revenues through sales commissions.
He who dies with the most toys wins — right? Well Sinclair has another interesting gadget you can add to your reloading bench. The Sinclair Case Neck Sorting Tool lets you quickly sort brass by neck-wall thickness. For those who shoot “no-turn” brass, this can improve neck-tension consistency. Large variances in neck-wall thickness can cause inconsistent neck “grip” on the bullet. Generally, we’ve found that more consistent neck tension will lower ES and (usually) improve accuracy. We know some guys who shoot no-turn 6mmBR brass in competition with considerable success — but their secret is pre-sorting their brass by neck-wall thickness. Cases that are out-of-spec are set aside for sighters (or are later skim-turned).
Watch Case Neck Sorting Tool Operation in Video
How the Case Neck Sorting Tool Works
Here’s how the Sinclair tool works. Cases are rotated under an indicator tip while they are supported on a case-neck pilot and a support pin through the flash hole. The unit has a nice, wide base and low profile so it is stable in use. The tool works for .22 through .45 caliber cases and can be used on .17- and .20-caliber cases with the optional carbide alignment rod. The MIC-4 pin fits both .060 (PPC size) and .080 (standard size) flash holes. Sinclair’s Case Neck Sorting Tool can be ordered with or without a dial indicator. The basic unit without dial indicator (item item 749006612) is priced at $59.99. With this standard tool you can use your own dial indicator with standard specifications. You can also buy the tool complete with dial indicator (item 749007129) for $89.99. IMPORTANT: This sorting tool requires caliber-specific Case Neck Pilots which must be ordered separately.
Editor’s Comment: The purpose of this Sinclair tool is rapid, high-quantity sorting of cartridge brass to ascertain significant case-neck-wall thickness variations. Consider this a rapid culling/sorting tool. If you are turning your necks, you will still need a quality ball micrometer tool to measure neck-wall thickness (to .0005) before and after neck-turning operations.
Here’s an stunning highlight reel created by Bullet Theory Films, a Los Angeles-based production company that specializes in capturing action that is too quick for the human eye to see. Using ultra-high-speed cameras, these talented film-makers have captured blindingly fast phenomena — things that happen in micro-seconds. The resulting video imagery can be used for R&D, scientific analysis, product marketing, or (of course) entertainment.
We recommend you watch this video full-screen in High-Definition:
This impressive slo-mo “sizzle reel” features many notable sequences, including:
00:18: .45 ACP leaving m1911 muzzle
00:27: Rifle bullet penetrating barrier with explosive ejecta
00:33: M1A cycling 7.62×51 cartridges
00:38: Pistol bullet disintegrating on steel
00:40: Huge muzzle flame from 12ga shotgun and lead shot on steel
00:45: 5.56 bullet in ballistics gelatin with secondary explosion
01:07: Handgun flame ring from muzzle
01:11: Massive shotgun blast with slug in midair
About the Film-Makers
Bullet Theory Films Co-Founders Matt Novello and Matt Drake first met on the set of History Channel’s highly successful competition reality show TOP SHOT. Throughout five seasons, the show set a benchmark in the art of capturing firearms and live ammunition in action, which has yet to be surpassed.
Utilizing the latest digital high speed technology, Bullet Theory Films offers a full range of production services; from concept development, to the final delivery of your vision. To see more cool videos, visit the Bullet Theory Films YouTube PAGE.
Sinclair International has created a series of instructional videos illustrating the basics of metallic cartridge reloading. The 8-Part series starts with reloading basics and provides step-by-step, how-to instructions that will help new reloaders get started. Detailed, animated illustrations show you what happens inside the chamber when shooting, and inside the dies during each step of reloading. The videos can be viewed on Sinclair International’s YouTube channel. Shown below is the first video in the series:
Each of the Sinclair videos is hosted by then Sinclair Int’l President Bill Gravatt (now with Creedmoor Sports). Bill doesn’t just show you “how”, he tells you “why”. The how-to segments cover case inspection, proper die set up, case sizing, primer installation, powder measuring, bullet seating, crimping, and even goes into the record keeping needed for the handloader. “We wanted to give shooters who haven’t reloaded a look at all the advantages of creating your own ammo and how easy it is to get started,” said Gravatt, “without telling them they had to have any certain brand or type of equipment to do the job.”
The Eight Video Topics Are:
Part 1 — Intro to Video Series
Part 2 — Intro to Reloading Safety
Part 3 — Metallic Cartridge Components
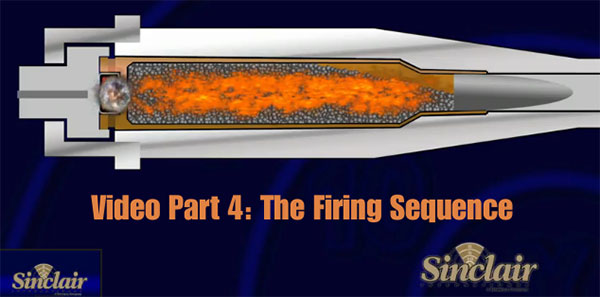
Part 4 — The Firing Sequence
Part 5 — Tools for Reloading
Part 6 — Loading Bottle-Neck Cartridges (2 videos)
Part 7 — Loading Straight Wall Cartridges
Part 8 — Reloading Series Conclusion
Reloading Tools
Shown below is Part 5 of the video series, covering the tools used for precision reloading.
We also strongly recommend the Part 4 Video to readers who are getting started in reloading. This “How Things Work” segment covers the sequence of events inside the chamber (and barrel) when the cartridge is fired. The video includes helpful graphics that show what happens to the primer, powder, cartridge, and bullet when the round is fired. The video also illustrates “headspace” and explains how this can change after firing. We think this video answers many common questions and will help reloaders understand the forces at work on their brass during the firing process.
Photo shows Bryan Litz (on right) and tester Mitchell Fitzpatrick. Bryan said: “Only 2,445 rounds to go! We’re testing over 50 ammo types in five different twist barrels… science can be exhausting!”
Do you know the actual BC (Ballistic Coefficient) of your rimfire ammunition? Well Applied Ballistics has the data, thanks to a comprehensive, marathon ammo testing session. Some years back, in an effort to determine the “real world” BCs of various rimfire ammo types, Bryan Litz and his team at Applied Ballistics did an extraordinary, in-depth shooting test. Litz and company tested over fifty types of .22 LR ammo, using five different twist-rate barrels. This was one of the most comprehensive and through rimfire ammo tests ever done.
Bryan tolds us: “We tested many types of .22 rimfire ammo for the 2nd Edition of the Ballistic Performance of Rifle Bullets book. We used a pair of Oehler chronographs to measure velocity at the muzzle (MV) and velocity at 100 yards.” With these numbers (average and SD) Bryan can calculate G1 BCs for all the 50+ types of rimfire ammo. What’s more, because every sample is shot through five different barrels (each with a different twist rate) Bryan can also determine how velocity is affected by twist rate.
The tests are primarily to determine velocities for BC calculations — this was not an accuracy test. Bryan explains: “Our tests are not really looking at accuracy, mainly because that’s so subjective to different rifles. Our testing is primarily focused on measuring the BC of rimfire rounds from different twist-rate barrels. The MVs and BCs from the different twist test barrels was then published by Applied Ballistics in print books. Bryan Litz told us: “The .22 LR Rimfire data was originally published in Ballistic Performance of Rifle Bullets, 2nd Edition, which is now out of print. The 3rd Edition of that book doesn’t have rimfire data. The rimfire testing results and data were re-published in Modern Advancements in Long Range Shooting – Volume II (along with many other topics).
Bringing Science to the Rimfire World
Bryan’s goal with this project was to increase the rimfire knowledge base: “We hope to give the world of .22 LR rimfire a good dose of science. How is the BC of .22 rimfire ammo affected by barrel twist? Do subsonic rounds have more consistent BCs than supersonic or transonic rounds? What brands have the highest BCs? What brands have the most consistent MVs?”
Data from two Oehler chronographs is recorded in a computer. Ammo samples were tested in five (5) different barrels (of varying twist rates). Give credit to Dane Hobbs who supplied a test rifle, multiple barrels, and most of the ammo types for the test.
.22 LR at 300 Yards?
Bryan also conducted some longer range rimfire tests. His interesting findings have appeared in the Modern Advancements in Long Range Shooting book series. Bryan notes: “While .22 rimfire isn’t typically considered ‘long range’, we were able to consistently hit a two-MOA steel target at 300 yards with the trajectory predicted by AB software and the measured BC of some standard .22 LR rimfire ammo. The info we’’re generating may make it possible to push the range of target engagement for a round that’s not seen much advancement in many decades.”
Product innovation is all about “building a better mousetrap”, or in this case, building a better bore-cleaning patch. A real smart guy, Shane Smith, has invented a triangular patch that earned a patent. The U.S. Patent Office has awarded a utility patent for BoreSmith’s Triangle Patch™. This unique cleaning patch was designed by Shane Smith, a mathematician/physicist who employed his scientific and firearms knowledge to create innovative bore-cleaning products.
BoreSmith’s Triangle Patch™ (aka Pyramid Patch) presents more cleaning surface area to the bore wall than does a conventional square or round patch (of equivalent size). At the same time, the unique geometry makes Triangle Patches much less likely to jam in the barrel. This is because the notches in the sides of the triangle allow the patch to sit more uniformly on the jag (without bunching up). Also the Pyramid patch is much less likely to jam due to pleating. One reason conventional patches get stuck is unwanted 5-layer pleating. The special notches in the Pyramid patch remove all or most 5-layer pleating. As a result the patch does not bunch up and this also reduces rod bowing.
Triangle Patch Function and Geometry Explained (See 1:18 time-mark):
NOTE: Despite what you may see in this video, you should ALWAYS insert brushes and patches from the chamber end first, using a fitted cleaning rod bore guide. With bolt-action rifles, NEVER insert a cleaning rod (with brush or jag) in through the muzzle. This may damage the delicate crown of your barrel.
The Triangle Patches work great with Boresmith’s patented dual-diameter bore brushes:
At the request of our readers, we provide select “Deals of the Week”. Every Sunday afternoon or Monday morning we offer our Best Bargain selections. Here are some of the best deals on firearms, hardware, reloading components, optics, and shooting accessories. Be aware that sale prices are subject to change, and once clearance inventory is sold, it’s gone for good. You snooze you lose.
NOTE: All listed products are for sale to persons 18 years of age or older. No products are intended for use by minors.
EuroOptic — 12 Days of Christmas Sale on Guns, Gear & More
⏺️ » Big discounts through 12/19/2025 — Optics, Rifles, Pistols and more
For the first time ever EuroOptic.com presents its big, sitewide 12 Days of Christmas sales event. Special savings are published daily through 12/19/2025. There are major discounts on optics, rifles, pistols, hunting gear and more. Check out the featured Daily Deals through December 19, 2025:
Day 1: Riflescopes
Day 2: Thermals
Day 3: Pistols
Day 4: Glasses
Day 5: Crossbows
Day 6: Boots/Footwear
Day 7: AR-Type Rifles
Day 8: Binoculars
Day 9: TBA
Day 10: TBA
Day 11: TBA
Day 12: TBA
Sportsman’s Warehouse — Major Product Doorbuster Sale
⏺️ » Optics, handguns, ammo, hunting gear, triggers, tools and more
If you need quality guns, hunting gear, reloading tools, optics, rangefinders, and more, then check out the major Doorbuster Sale now at Sportsman’s Warehouse. Among the fantastic deals are 60% off many optics, $275 off Colt pistols, and $250 off Garmin In-reach Satellite GPS devices.
As an Amazon affiliate, this site can earn revenues through sales commissions.


 Right Click and “Save as” to download printable PDF versions of target.


 The first question you have to ask is whether the intended recipient can legally own the firearm where he or she lives. With more than 20,000 different gun laws on the books, even the kinds of firearms that law-abiding citizens can own vary from place to place. For example, juveniles (under age 18) generally speaking are precluded by law from possessing a handgun. Check out the
  Consider a Gift Card Instead of Direct Gift


 He who dies with the most toys wins — right? Well Sinclair has another interesting gadget you can add to your reloading bench. The Sinclair


 Bryan tolds us: “We tested many types of .22 rimfire ammo for the 2nd Edition of the