Jay Christopherson is AccurateShooter.com’s systems administrator — he keeps the servers up and running. Jay is also a very talented rifle shooter who holds a carry permit. Recently, Jay acquired a Walther PPS M2, a compact, defensive carry pistol. Here Jay reviews that pistol, which is now his “go-to” handgun when he chooses to carry a firearm pursuant to his CCW permit.
The Walther PPS M2, Single-stack 9mm is a Comfortable, Reliable Everyday Carry Pistol.
Looking for a new carry pistol in a single-stack, 9mm configuration, I tested out the slim (1″-wide) Walther PPS M2, with three different magazine capacities. For someone who has carried a 5″-barreled, .45 ACP model 1911 for the last few years, the switch to a single-stack 9mm was a big change — but a welcome one in terms of weight and comfort. I like my big 1911, but the PPS M2 gives me the feeling that if it’s needed, it’ll be a safe, effective, and reliable option. I still love my 1911, but when it comes to carry, the 1911 will stay in the safe while I “pack” the smaller, lighter PPS.
Click Image for Large View of Pistol Specifications Sheet
Like many of AccurateShooter.com’s readers, I have a permit to carry a concealed firearm and I use the privilege regularly. I’m no great shakes with a pistol, having focused most of my efforts on long-range rifle shooting, but I do spend enough time at the pistol range to ensure that I am familiar with my weapon and comfortable shooting it out to ranges where I might encounter a situation requiring its use.
Part of being responsible is selecting a carry weapon that you can be comfortable with, both using and carrying. Now, I’ll admit that I’ve focused a lot on the former, but not as much on the latter. I’m an unabashed fan of John M. Browning’s crowning (in my opinion) achievement, the Colt .45 ACP M1911. My current 1911, with a 5” barrel, is not the easiest pistol in the world to carry comfortably. While I love shooting it, carrying it is another situation altogether. I’ve tried many different configurations, but found myself carrying it less and less.
And so, I decided that I needed to enter the world of the 9mm single stack for a carry weapon. There are a lot of reasons why I chose to go that direction, but it’s a highly subjective and personal subject (some of the arguments out there are pretty heated), so I won’t bore you with mine. Suffice it to say, there’s plenty of available information for you to make an informed decision. To help with testing, Walther Arms was kind enough to provide a new Walther PPS M2, in 9mm, for evaluation.
Three Magazine Options
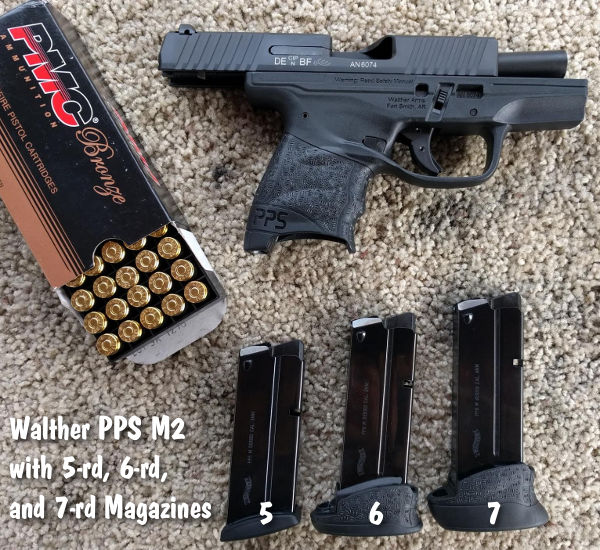
Along with the PPS M2, Walther provided three magazines — the 5-round standard mag plus 6-round and 7-round extended magazines. I tried all three magazines, both for carry/fit, and at the range to see if they would affect my ability to shoot the pistol. For reference my hands are roughly 9.25″ wide — according to the Internet, the average hand size for a male is 7.44″, so I guess I’ve got larger than average hands. The shortest magazine was a bit too short for me to grip comfortably — my pinky finger had zero engagement and my two-hand grip suffered for it. The middle magazine let my pinky engage the grip partially, but was still not ideal. The longest magazine fit perfectly. My guess is that if your hand is in the average range, the middle magazine will work for you. For women, I think the smallest grip will work nicely. My wife has an average hand span for females and thought that the smallest grip felt pretty natural for her.
The trigger is fair — the takeup is smooth, the trigger breaks relatively cleanly and predictably, but a rough spot on the Glock-style trigger safety lever wore against my finger, leaving it feeling a bit raw. It’s fairly minor and something that can easily be resolved. And even with my larger fingers, I still had no problem with trigger guard clearance. Disassembly is fairly easy, though the take-down lever takes some effort to work. [Editor — on the PPS M2 I tried at SHOT Show, the small slide-stop lever was hard to manipulate.]
After having carried my 1911 around quite a bit, I found the Walther PPS M2 to be much lighter and easier to carry (I use a Clinger holster). I rarely notice it, even when getting into and out of a car. With the PPS M2 it’s easy to carry without “printing”, at least with the appendix carry method I prefer.
General Function and Accuracy Testing
I took the pistol down to the range to test it out and get a feel for it. I bought a variety of 115 grain FMJ ammunition to test including PMC and Blazer brass-cased 9mm. I ran about 400 rounds through the little Walther. None of the ammo experienced any sort of issue and the pistol never failed to perform flawlessly. With 400 rounds through the PPS M2 cleanly, I am confident to carry the PPS M2 when I feel the need to carry.
I set up targets at 15 feet and 30 feet — remembering that I’m looking for a personal defense/carry pistol and that I don’t practice for competition! At both ranges, shooting all three magazines, I had no problems putting together groups that are more than accurate enough for “center mass”.
During a second testing session, I shot the pistol for accuracy with my forearms rested on sandbags. The results were impressive. Above is a seven-shot (7-shot) group at 10 yards (30 feet) with the CCI Blazer Brass ammo. At right is a group shot at 5 yards (15 feet), forearms rested, with the PMC ammo. The one shot that went up outside the group was probably me, the shooter. Remember this is a very small, light-weight pistol that does have some muzzle flip. I’ve seen other tests done with the Walther PPS M2, at longer ranges in the hands of skilled shooters and producing much cleaner groups.
Summary — Walther PPS M2 is a Keeper
Overall, I really like the 9mm single stack Walther PPS M2. It’s a very handy, manageable pistol. After testing the gun for AccurateShooter.com I decided to purchase the pistol and keep it. That’s the ultimate vote of confidence. This gun shoots comfortably, accurately and reliably, and most of all, the PPS M2 is comfortable to carry. When I choose to carry, should I ever need a firearm, I have every confidence in the Walther PPS M2.
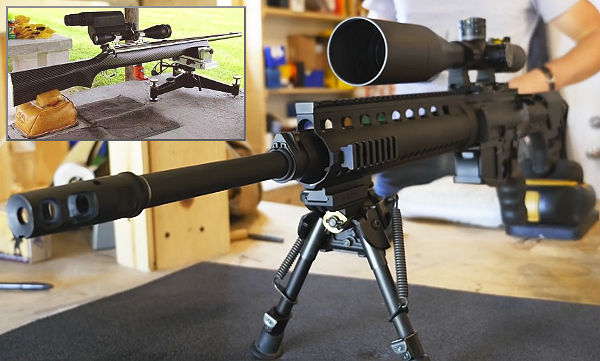
Last summer we published our comprehensive 6.5×47 Lapua Cartridge Guide, researched by the 6.5 Guys. In case you’ve been wondering what kind of accuracy is possible for a tactical-type rifle chambered for this mid-sized cartridge, check out this tack-driver built by gunsmith Ryan Pierce. That’s a mighty impressive 0.206″ five-shot group fired with Berger 140gr Hybrids using a Brux cut-rifled barrel. The powder was Hodgdon H4350, a very good choice for this cartridge.
Ryan reports: “Here is a 6.5×47 I built for a customer. It features a trued Rem 700 action, Brux 1:8″ Rem varmint-contour barrel, Mcmillan thumbhole stock, Surgeon bottom metal, and 3-port muzzle brake. The customer’s preferred load is the same that has worked in the last couple dozen 6.5x47s I’ve built: 41.1-41.3 grains of H4350 with 140 hybrids .050″ off the lands. This should run about 2810-2815 fps from a 26″ barrel. The 3.128″ refers to length of a loaded round from the base to ogive including the Hornady ogive comparator tool.”
Improve Your Hit Ratio by Using Wing Flags
It’s not unusual for varmint hunters to invest $3,000.00 in a custom rifle, pay thousands more for spotting scope and laser rangefinder, and spend countless hours loading ultra-precise ammo. Yet, when they head off to the prairie dog fields, they’ll omit an essential piece of gear that can make the difference between a hit and a miss.
We’re talking about windflags. Many casual shooters, varmint hunters, and even some “tactical” shooters disdain windflags as gadgets suited only for the accuracy-obsessed benchrest crowd. In fact, windflags are just as important for the varminter as for the benchrest competitor. You may think that you can easily notice a major wind shift. But consider this, a change from a light 2.5 mph left breeze to a 2.5 mph right is a 5 mile per hour switch. That is enough to make you miss a prairie dog even at just 200 yards.
Here’s a chart that shows the effect of a 5 mph full-value (i.e. 90-degree) wind change at various distances. The values assume a typical .250 G1 BC varmint bullet launched at 3500 fps at a 3″-wide critter (center hold).
You don’t need to spend a lot of money on windflags. Even a bit of surveyors’ tape on a post is better than nothing. A simple windflag, placed at your shooting station, helps minimize the effect of cross-winds. If you align your shooting position so the breeze is at your back you can shoot with greater confidence even in high winds. Watch the way the windflag blows, and shoot at the dog mounds that are directly downwind.
Our friend Boyd Allen offers another tip: “When you go varminting, be sure to bring some kind of portable target stand. Accuracy or zero problems are much easier to diagnose and remedy if you can set up a target at 100 yards. A simple wood, A-Frame design, hinged at the top, works well, stores flat, and is easy to build.”
The Lyman Borecam is an electro-optical borescope with a digital display. You can record “stills” on a SD card. This is one of the hottest products on the market right now — so hot that it has been sold out for weeks. But Grafs.com just got a shipment of Borecams (item LY04055), and the price is more than competitive. Right now Grafs has the Borecam in stock for $259.99 with free shipping (after a single $7.95 handling fee). That price is $40.00 less than some other online vendors are charging.
This is a good product. Guys who purchased the Lyman Borecam are very happy. If you don’t have one yet, now may be the time to “pull the trigger”. After this article goes live, we expect Grafs.com to sell out quickly. Graf’s inventory may be gone by end-of-day today.
Our British friend Vince Bottomley did an extensive review, giving the Lyman Borecam high praise. Vince says serious shooters should definitely acquire one of these tools: “In my opinion, this product is one of the very best to come along in recent years and I predict that the demand for these [Lyman Borecams] will be very heavy. I would advise you to place an order as quickly as possible if you want one.” Vince adds: “If I were to replace my [Hawkeye optical borescope] today with another Hawkeye, it would cost me well over £700 [$1015 USD]. Stick on a video adapter and we are looking at four figures. That’s what makes the new Lyman digital borescope so attractive — at around [$260.00 USD] including a monitor — it’s an absolute steal!”
The system really works. Many of our Forum members have the system and they say it functions very well and is “very easy to set up and use”. Here’s what an Optics Planet Borecam buyer wrote: “I have used Hawkeye borescopes and know their quality. The Lyman worked as advertised and is a great tool for checking for leading, cleanliness of bore, and bore wear. The compact size, ability to take pictures, and store them are a big plus.”
Lee Precision has an all-new bench-mounted priming device that looks promising. Called the Lee Auto Bench Prime, this device has a hopper-style primer feeder set at an angle. This seems like a clever design. Initial reports confirm that the primers feed reliably and switching from large to small primer size (or vice-versa) is quick and easy. Available at Grafs.com for just $28.59, this new bench priming tool is very affordable. NOTE: this tool does require dedicated Auto Prime shell holders (sold separately), but that’s a relatively small added expense.
The Lee Auto Bench Prime (product #90700) includes a folding primer tray that allows you to load primers quickly and easily. The tray has a built-in primer-flipping feature that allows direct filling from most common 100-count primer boxes. This Lee bench primer tool is also easy to mount. You can bolt the tool directly to your bench or any horizontal surface, or Alternately, you can mount it to special plate. The tool mounting holes are spaced for the Lee Bench Plate system (#90251).
The easiest, most convenient bench mounted priming tool ever. Symmetrical design allows effortless right or left hand operation. Comfortable lever with just the right amount of mechanical advantage effortlessly seats even the most difficult primers with just finger pressure. The perfect mechanical advantage to feel the primer seating completely home into the primer pocket. Includes priming assemblies for large and small primers. Change primer size or shell holder in seconds. Accepts Auto Prime shellholders, sold separately.
Are you looking to improve your long-range shooting? Doubtless you’ve been thinking about upgrading your rifle or optics, but wonder what to buy (and how to get the best “bang for your buck”). In this video, Bryan Litz of Applied Ballistics offers “solid gold” advice on equipment selection for mid-level shooters (i.e. those who are somewhere between “newbie” and “Master of the Universe”). Bryan explains the logical first step is a barrel upgrade — a new tube from a top-barrel maker can make a huge difference. Then you should research the best factory ammo for your rifle, or get started in precision hand-loading. Bryan also offers advice on choosing a scope and optics accessories.
Equipment Upgrades: Barrel, Optics, Ammoby Bryan Litz
Every equipment element can be upgraded. You can run that factory rifle for a period of time, but the barrel eventually is going to be what holds you back. The twist rate probably won’t be fast enough to stabilize the high-BC bullets that you want to shoot at long range. So, the first thing you want to upgrade on your factory rifle is probably going to be the barrel. [With a new custom barrel] you’re going to get a fast twist rate, you’re going to get a chamber that’s optimized with a throat for your … bullet. And a good quality custom barrel is going to be easier to clean, won’t foul out as much, and it’s going to improve to overall accuracy and precision of your shooting. Barrel swaps are very common and routine thing for gunsmiths to do.
The next thing is improving your scope. If you don’t have a quality optic it’s going to hold you back. The job of the scope is to precisely and perfectly delineate [the target] within a half a degree (from 100 to 1000 yards is only a half a degree). The scope has got to put you on the money within that half a degree. So, it’s not a piece of equipment you want to go cheap on.
The other big factor is your ammunition. Getting into hand-loading is meticulous and it takes a long time to learn, but ultimately you’ll be making ammunition that is tailored for your rifle, and there simply won’t be anything better for your rifle than what you can develop through individual handloads.
So that’s typically the upgrade path: Get your factory rifle re-barreled, don’t skimp on a scope (or anything that attaches to it), improve your ammunition (whether by upgrading to better factory ammo or hand-loading on your own). All through this process is continuous learning… Once you have the best equipment (and it doesn’t get any better), the process of learning and education never ends. That is something you build on every single time you go to the range, and it’s what going to allow you to continually improve your skills.”
No matter what kind of rifle you shoot, whether it be an AR or a brenchrest rig, the principles are the same — develop a good load, learn the gun, hone your wind-reading skills, and practice in all conditions. Making a video of a practice session can help you identify and correct bad habits.
Bryan Litz says “don’t skimp on your scope”. Purchase a quality scope, rings, and scope level. Successful long-range shooting all begins with your view of the target.
Even with a top-of-the-line F-TR rig like this, you still have to practice diligently, putting in the “trigger time” needed to improve your game.
Looking for a very high-quality hunting scope that won’t break the bank? The German-crafted Zeiss Conquest DL has won many awards, yet it’s half the cost of super-premium European brands. For general performance, durability, and glass quality, many experts say the Conquest DL sets the “benchmark” for the “upper middle” end of riflescopes. Here is a very revealing review of the Conquest DL by British lady hunter Ginny Langton.
Ginny explains: “Even when the visibility has been bad, early in the morning, very cloudy and a bit foggy, the image is really clear and really bright… which has made for a much easier and clearer shot for me. I have found that using the [ASV bullet drop compensator] even when it’s bitterly cold is really straight-forward. Even when you’re fumbling around with gloves on, it’s very easy to find the buttons and the functionality of the scope is very, very good. The great thing about the DL scope is its versatility — I could use this scope all over the world.”
In a recent comparison review, gunwriter L.P. Brezny rated the 3-12x50mm Zeiss Conquest DL one of the best hunting scopes under $1000. Brezny states: “As a second option on my list of five top hunting scopes for big game that are under a grand stands the Zeiss Conquest DL Hunting Scope in 3x12x50mm. Here you have an illuminated reticle [extra cost], ultra-refined German glass, and a side focus knob with the Z-Plex reticle. In most cases what is in this optic, in terms of quality, is often found at a much higher price.” This German-made Conquest DL retails for $999.99 on Amazon.com (non-illuminated) or $1299.95 with illuminated reticle.
The entire Zeiss riflescope line is available from Europtic.com. Call (570) 368-3920 and ask for Jason Baney and request the best price. Tell Jason that AccurateShooter.com sent you.
Inspect your cases — every time you reload. A tiny flaw could lead to a split neck, case-head separation or worse. The Sierra Blog has a good article this week on case inspection, with many eye-catching examples. Sierra Bullets Ballistic Technician Duane Siercks shows a variety of problem cases and explains the issues he found. Duane states: “Careful case examination is one of the most important safety aspects of the reloading process.”
We recommend that you read the full article. Here are three examples…
Incipient Case-Head Separation
This is a Winchester .308 Win case that has a real issue. This case has a very obvious incipient case head separation in the process of becoming a complete failure.
This is most commonly caused by over-sizing the case causing there to be excess headspace on the case. After a few firings and subsequent re-sizing, this case is just about ready to come completely apart. Proper die adjustment is certainly a requirement here. Of course this case is not safe to reuse.
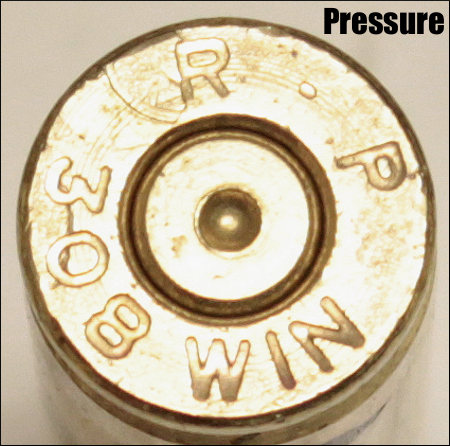
Excessive Pressure (Load Too Hot)
If you will notice in the picture of the case rim, there are two pressure signs to notice. First, look at the primer. It is basically flattened to about the max of what could be considered safe. If this was the only pressure sign noted, I would probably be fine with this load, but would constantly keep an eye on it especially if I was going to use this load in warmer temperatures. This load could easily cross into the “excess pressure” realm very quickly.
There is another sign of pressure that we cannot ignore. If you’ll notice, there is an ejector mark apparent that is located over the “R” of the R-P headstamp. This absolutely tells us that this load would not have been in the safe pressure range. If there were any of these rounds loaded, they should not be fired and should be dis-assembled. This case should not be reloaded.
Split Case-Neck
Here we have an R-P .22-250 case that has died the death. Everything looks fine with this case except the neck is split. This case must be tossed.
A split neck is a normal occurrence that you must watch for. It is caused by work-hardening of the brass. Brass cases get harder with age and use. Brand new cases that are stored for a period of time can become hard enough that they will split like this case within one to two firings. I have had new factory loads do the same thing. Then as we resize and fire these cases repeatedly, they tend to get harder and harder. Eventually they will split. The life of the case can be extended by careful annealing practices. This is an issue that would need to be addressed in an article by itself. Of course this case is no longer usable.
In the classes that I teach, I try to use examples like this to let the students see what they should be looking for. As always, if we can assist you, whether you are new to reloading or very experienced, contact us here at Sierra Bullets by phone at 1-800-223-8799 or by email at sierra [at] sierrabullets.com.
Brownells recently reviewed some interesting new products including Howa Barreled Actions and a low-profile titanium gas block for AR-platform rifles. We really like the Howa Barreled Actions as the basis of a varmint or hunting rifle build. The actions are smooth and the Howa-supplied, adjustable HACT 2-stage trigger is excellent. Brownells will stock these barreled actions in a wide range of calibers and barrel profiles (including some with threaded muzzles for brakes or suppressors).
Watch Brownells NEW PRODUCT Review 3/11/2016:
Starting at $407.00, Howa Barreled Actions include hammer-forged barrel, bottom metal, magazine (internal or DBM), and the HACT 2-stage trigger. The three-position safety allows you to manipulate the bolt with the trigger blocked. These Howa barreled actions, which are drilled and tapped for scope mounts, come in Blue or Cerakote Gray finish in Short, Long, and Mini-Action sizes. The Howa Mini-Action is a great basis for a light, compact small-caliber varminter.
Low-Profile Titanium Gas Block for AR-Platform Rifles
The Battle Arms AR-15 Titanium Gas Block (#100-800-003) provides a very trick, low-profile set-up for an AR “space gun” or 3-Gun rig. Light and strong, the Battle Arms Ti gas block fits underneath almost any handguard. This slim, ultra-lightweight Titanium block helps keep an AR-15 rifle/carbine fast and maneuverable by reducing front-end mass. Brownells price is $99.95.
Sometimes simpler is better when it comes to targets for fun shooting and load testing. While we normally use test targets from our Downloadable Target Page, it’s sometimes easier to just use brightly-colored “Hi-Viz” adhesive target dots.
Hi-Viz Stick-On Dots in Assorted Colors and Diameters
You can order 1″ target dots in bulk from Labeloutfitters.com. Many colors are available including fluorescent (hi-viz) Red, Green, Orange, and Yellow. These are bright and easy to see even in fading afternoon light. A pack of twenty (20) sheets (1260 dots total) costs just $5.97 (that works out to $4.74 per thousand). For the 1″-diameter stick-on dots you get 63 dots per sheet. Larger, 1.5″-diameter fluorescent dots are also available in 20-sheet packs for $5.97, with 24 large dots per sheet (480 dots total). If you want even bigger, 2″-diameter dots, sheets with 20 Hi-Viz dots per sheet are on sale for $5.97 per 20-pack (400 dots total).
Our friend Danny Reever really likes the bright dots from Label-Outfitters: “Ordered some of the 1″ dots from LabelOutfitters.com and recieved them in two days Priority Mail! Bought the flourescent red,green, and yellow and they are really nice — especially for the price.”
If you prefer smaller, 3/4″-diameter circles, Amazon.com sells Avery packs with 1008 adhesive dots for just $2.99 or $3.99 per pack. Colors include Neon Red/Orange (item 5467), Neon Yellow (item 5470), Neon Green (item 5468), and Bright Blue (item 5461). We recommend the Neon Red/Orange for most uses, or the Neon Yellow dots for use on a black background. There is even a dispenser-box option with 1000 3/4″ dots on a roll in a box. Amazon.com also offers 1″, 1.25″, and 2″-diameter target pasters in 1000-dot rolls for $13.99 per roll.
Half-Inch Fluorescent Dots for 100-200 Yards
For close-range work, you may prefer 1/2″-diameter dots. Forum member Steve found a source for very small 1/2″ dots: Uline.com. The 1/2″ dots are available in a wide variety of colors including fluorescent Red, Pink, Yellow, and Green. Price is $12 for a roll of 1000 dots (item S-2063). Steve notes: “A 1/2″ circle at 300 yards is not quite entirely covered by Nightforce crosshairs at 42-power (I’d say 70% coverage). I.e., it seems easier to line up repeatedly than with the bigger (3/4″) circles, which I used to use. Note that, for me, neon green and neon orange work best on brown cardboard targets. Neon orange works well on white paper.”


 During a second testing session, I shot the pistol for accuracy with my forearms rested on sandbags. The results were impressive. Above is a seven-shot (7-shot) group at 10 yards (30 feet) with the CCI Blazer Brass ammo. At right is a group shot at 5 yards (15 feet), forearms rested, with the PMC ammo. The one shot that went up outside the group was probably me, the shooter. Remember this is a very small, light-weight pistol that does have some muzzle flip. I’ve seen other tests done with the Walther PPS M2, at longer ranges in the hands of skilled shooters and producing much cleaner groups.


 Improve Your Hit Ratio by Using Wing Flags