We are re-publishing this article at the request of Forum members who found the information very valuable. If you haven’t read this Safety Tip before, take a moment to learn how you can inspect your fired brass to determine if there may be a potential for case separation. A case separation can be dangerous, potentially causing serious injury.
On the respected Riflemans’ Journal blog there was an excellent article about Cartridge Case-Head Separation. In this important article, Journal Editor GS Arizona examined the causes of this serious problem and explained the ways you can inspect your brass to minimize the risk of a case-head separation. As cases get fired multiple times and then resized during reloading, the cases can stretch. Typically, there is a point in the lower section of the case where the case-walls thin out. This is your “danger zone” and you need to watch for tell-tale signs of weakening.
The photo below shows a case sectioned so that you can see where the case wall becomes thinner near the web. You can see a little arrow into the soot inside the case pointing to the thinned area. This case hadn’t split yet, but it most likely would do so after one or two more firings.
Paper Clip Hack for Detecting Problems
The article provided a great, easy tip for detecting potential problems. You can use a bent paper clip to detect potential case wall problems. Slide the paper clip inside your case to check for thin spots. GS Arizona explains: “This simple little tool (bent paper clip) will let you check the inside of cases before you reload them. The thin spot will be immediately apparent as you run the clip up the inside of the case. If you’re seeing a shiny line on the outside and the clip is really hitting a thin spot inside, it’s time to retire the case. If you do this every time you reload, on at least 15% of your cases, you’ll develop a good feel for what the thin spot feels like and how it gets worse as the case is reloaded more times. And if you’re loading the night before a match and feel pressured for time — don’t skip this step!”
Ever wondered what caused a particular bulge or marking on a case? And more importantly, does the issue make the case unsafe for further use? Sierra Bullets Ballistic Technician Duane Siercks offers some insight into various issues and their causes in two Case Diagnostic articles from the Sierra Blog.
Incipient Case-Head Separation
This is a Winchester .308 Win case that has a real issue. This case has a very obvious incipient case head separation in the process of becoming a complete failure.
This is most commonly caused by over-sizing the case causing there to be excess headspace on the case. After a few firings and subsequent re-sizing, this case is just about ready to come completely apart. Proper die adjustment is certainly a requirement here. Of course this case is not safe to reuse.
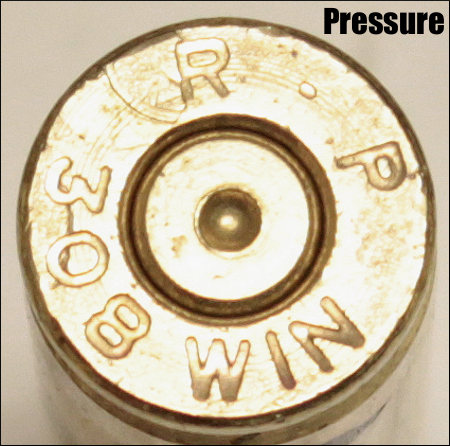
Excessive Pressure (Load Too Hot)
If you will notice in the picture of the case rim, there are two pressure signs to notice. First, look at the primer. It is basically flattened to about the max of what could be considered safe. If this was the only pressure sign noted, I would probably be fine with this load, but would constantly keep an eye on it especially if I was going to use this load in warmer temperatures. This load could easily cross into the “excess pressure” realm very quickly.
There is another sign of pressure that we cannot ignore. If you’ll notice, there is an ejector mark apparent that is located over the “R” of the R-P headstamp. This absolutely tells us that this load would not have been in the safe pressure range. If there were any of these rounds loaded, they should not be fired and should be dis-assembled. This case should not be reloaded.
Split Case-Neck
Here we have an R-P .22-250 case that has died the death. Everything looks fine with this case except the neck is split. This case must be tossed.
A split neck is a normal occurrence that you must watch for. It is caused by work-hardening of the brass. Brass cases get harder with age and use. Brand new cases that are stored for a period of time can become hard enough that they will split like this case within one to two firings. I have had new factory loads do the same thing. Then as we resize and fire these cases repeatedly, they tend to get harder and harder. Eventually they will split. The life of the case can be extended by careful annealing practices. This is an issue that would need to be addressed in an article by itself. Of course this case is no longer usable.
In the classes that I teach, I try to use examples like this to let the students see what they should be looking for. As always, if we can assist you, whether you are new to reloading or very experienced, contact us here at Sierra Bullets by phone at 1-800-223-8799 or by email at sierra@sierrabullets.com.
Dented Case Body
Here we have a Lake City 7.62×51 (.308 Win.) case with two heavy marks/dents in the case body.
This one may be a bit of a mystery. It appears as if this case may have been caught in the action of a semi-auto rifle when the firearm jammed or the case failed to clear during the cycling process. I probably would not reload this case just to prevent any feeding problems. This also appeared to be a factory loaded round and I don’t really see any pressure issues or damage to the case.
Multiple Problems — Lake City 5.56×45 unknown year.
This case has suffered multiple failures and cannot be re-used. First its has have a very rounded shoulder that is split. Upon first look it was obvious that this round had been a victim of excess pressure. The firearm (perhaps an AR?) was apparently not in full battery, or there was possibly a headspace issue also. While taking a closer look, the primer was very flat and the outside radius of the primer cup had been lost. High pressure! Then I also noticed that there was an ejector mark on the case rim. This is most certainly an incident of excessive pressure. This case is ruined and should be discarded.
It is very important to observe and inspect your cases before each reloading. After awhile it becomes second nature to notice the little things. Never get complacent as you become more familiar with the reloading process. If ever in doubt, call Sierra’s Techs at 1-800-223-8799.
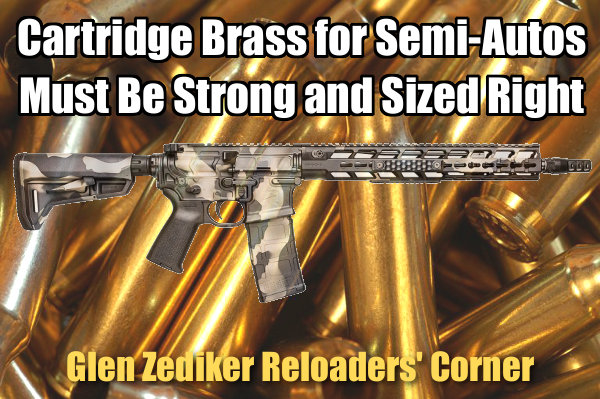
Here are highlights from an article Glen Zediker wrote for the Midsouth Blog. In this article Glen focuses on cartridge brass for semi-auto rifles, AR-platform guns in particular. Glen notes that semi-autos are tougher on brass than bolt-action rifles, so you need strong, durable brass, that has been full-length sized. And you need to be careful about neck tension, and primers. The article starts with Glen’s recommendations for tough, hard brass, and then includes the points outlined below.
ONE: Full Length-Size Cases with Adequate Shoulder Set-Back
This is a huge source of debate… amongst my readers, but, since now I’m strictly speaking of semi-auto needs I doubt there will be much dissent: full-length resize all cases! Most cases from most semi-autos will emerge with a pretty well-blown case shoulder [taming down an excessively functioning gas system can reduce this]. Make double-sure you’re sizing the cases down to at least 0.003 clearance. If you don’t there are safety and function problems ahead.
TWO: USE Sufficient Neck Tension
The case neck [must be] reduced an adequate amount to retain the bullet. There should be a minimum net difference of 0.003 inches (three-thousandths) between sized outside case neck diameter and loaded round outside case neck diameter. [Editor — that means at least three thou of “grip”.] Reason: don’t take a chance of inadvertent bullet movement during the recoil and feeding cycles. That movement can be back or forward! It’s easily possible for a bullet to jump ahead when the inertia from the bolt carrier assembly chambers the next round.
THREE: Use Tough Primers
Choose a tough primer! There’s a floating firing pin on an AR15 (M1A also) that is supposed to be held in check but that system doesn’t always work! If you load and extract a round and see a little dimple in the primer, that’s from the firing pin tapping off of it (again, created by inertia of bolt closing). A combination of a high primer and a sensitive primer cup assembly can create a “slam-fire”. Brands? CCI has some mil-spec primers that work well, and I’ve had great success with Remington 7-1/2. Some of the well-respected “match” primers are a little thin. The CCI and Remington also hold up well to the (sometimes) greater firing forces working on the primer (again, from the quick unlocking).
And, finally, make double-sure that each and every primer is seated to below flush with the case head! That’s true for any firearm (because it also means that the primer is fully seated) but imperative for safety in a semi-auto. This is especially an issue for those who use a progressive-type loading press.
Butch Lambert of ShadeTree Engineering provided this tip. Butch notes that many 6 PPC benchrest group shooters also enjoy shooting in score matches. But to be really competitive in the BR for score game, that means shooting a 30 BR, which has a wider, .308-class rim (0.4728″ diameter). Likewise, if you want to compete in 600-yard registered BR events or in varmint matches, you probably want to run a bigger case, such as the 6BR, 6BRA, 6mm Dasher, or 6-6.5×47. Those cartridges also have the larger 0.4728″ rims.
To convert a PPC-boltface action to shoot the bigger cases you can spend a ton of money and buy a new bolt. That can cost hundreds of dollars. The simpler solution is to turn down the diameter of the larger cases on a lathe. This is a relatively simple procedure with the right cutting tool.
Butch explains: “We’ve seen plenty of interest in rebating case rims. This lets you shoot a 30 BR in score matches using your PPC action. All you need is a new barrel. This saves buying another bolt, receiver, or rifle if you have a PPC boltface. Anyone who has access to a lathe can do this job pretty easily. Yesterday I turned 150 case in about an hour.” At right is the lathe form tool Butch uses to rebate the case rims.
Here’s an interesting offering from one of the USA’s leading brass-makers. We all know that having consistent brass is an important factor in repeatable accuracy. That’s why some hand-loaders weight-sort their brass and why any serious shooter trims his brass to consistent case overall length (OAL).
Well those time-consuming tasks may be a thing of the past for Peterson brass buyers. Peterson is now offering Peterson Select Brass in nine popular cartridge type. According to Peterson:
“Peterson Select casings are weight sorted at the factory. All casings in a 50-count box are guaranteed to be within one grain of each other. They are also sorted by overall length (OAL) and guaranteed to be consistent to within .001 inch.”
Derek Peterson further explained: “If you weighed and measured all of the casings in the box, the highest weight and the lowest weight, and the longest casing and the shortest casing would be no more than one grain and .001″ apart from each other.”
Think about that — brass consistent to ONE GRAIN, right out of the box. And having OAL standardized to .001″ is remarkable. NOTE: After firing, case length may vary. AccurateShooter recommends you re-measure your brass after first firing and trim to length as needed before normal case neck prep (chamfering and deburring).
Peterson Select Brass is offered in FIFTY (50) Count Boxes for These Cartridge Types:
“+SRP” Indicates Small Rifle Primer Option. Note that this brass is shipped in 50-count boxes, not 100 count boxes. Pricing is still attractive. For example Fifty Peterson Select 6.5 Creedmoor casings cost $49.50, about one dollar each.
Since 2010, Lapua has shipped its quality cartridge brass in sturdy blue plastic boxes. Here’s a handy tip for you — don’t toss the plastic boxes when you load up your brass! These are double-duty containers. If you’re not familiar with “Blue Box” Lapua brass, you may not realize that the boxes are designed to serve as 50-round carriers for your loaded ammo and fired cases. (Yes we know some folks who’ve been tossing out their blue boxes without knowing how the boxes work as caddies.)
Snapped in place under the box lid is a rectangular plastic grid that fits in the bottom of the box. Pop the grid loose and slide it into the box with the smooth side facing up. Side supports molded into the lower section hold the grid in place.
Voilà, instant Ammo Box! Each grid contains holes for fifty (50) loaded rounds or empty cases. The convertible plastic container/ammo box is a great idea that Lapua executed very nicely. Now you have even more motivation to purchase your cartridge brass from Lapua.
USER TIPS: When transporting ammo you may want to put some foam over the loaded rounds. That will protect the bullet tips. Also, with shorter cartridges, this will help keep your loaded ammo and fired cases from moving around. You can also tape the FREE Redding Ammo Box Labels on the underside of the lids to list your load information.
In the PRS game, the 6.5 Creedmoor has ruled the roost. However more and more serious competitors are moving to the 6mm Creedmoor cartridge because it offers lower recoil and a flatter trajectory (with some bullets). If you are a fan of the 6mm Creedmoor — take heart. Lapua has started production of 6mm Creedmoor cartridge brass, which should hit American shores later in the year. Yes this 6mm Creedmoor brass has small primer pocket and small flash hole — allowing it to stand up to repeated loading cycles with stout pressures.
Here is the official announcement…
Lapua 6mm Creedmoor Cartridge Brass
Lapua is pleased to announce the new 6mm Creedmoor case, a necked down version of the extremely popular 6.5mm Creedmoor designed to produce higher velocities, flatter trajectories, and reduced recoil.
Customer demand for a 6mm version followed almost immediately after the release of the original Creedmoor case. Aside from the neck dimensions, our new 6mm Creedmoor cases shares the same features and characteristics that make Lapua the standard for 6.5 Creedmoor brass. It is a beautifully-drawn case, properly annealed at the neck and shoulder, with head metallurgy specifically chosen for durability, and the same small rifle primer, small flash-hole design that delivers the ultimate accuracy edge. The smaller 6mm bore diameter offers an excellent selection of proven low-drag match bullets that offer outstanding long range performance with even less recoil.
While the original 6.5 Creedmoor was designed with NRA High Power competition in mind, other disciplines, including the Precision Rifle Series (PRS), were quick to see the positive attributes of this cartridge. We know Lapua’s latest offering will find a niche with discerning shooters in demanding competitive disciplines.
We expect Lapua’s new 6mm Creedmoor cartridge brass to be favored by High Power shooters and serious varminters as well as tactical competitors. The Lapua 6mm Creedmoor cases will be available in the USA later in 2018.
The new Lapua 6mm Creedmoor Brass will definitely be a hit with PRS Competitors…
Photo from Ramia Whitecotton’s GAP GRIND 2016 photo album.
New product tip from Boyd Allen. We welcome reader submissions.
Many shooters these days clean their cartridge brass ultrasonically, or wet-tumble their cases with stainless media (above). Both methods get brass clean and shiny, inside and out. However, when those wet-cleaning processes are completed, you’re left with a pile of soaking wet brass. How do you dry your brass quickly and efficiently, without unsightly water spots? Read on for some great answers…
In our Shooters’ Forum, Forum Gold Member Terry asked: “How do you dry your brass after Ultrasonic cleaning?” In an interesting Reloading Forum Thread, many smart suggestions were posted. A dozen fellow members outlined a variety of effective case-drying procedures, which work equally well for both wet-tumbled brass and ultrasonically-cleaned cases. Here are the Top 10 brass-drying suggestions from our Forum members.
TOP TEN Ways to Dry Cartridge Brass After Wet Cleaning
1. Food Dehydrator — Shake the brass in towel to get the bulk of water off. Next leave in the food dehydrator for 45 minutes or until there are no signs of moisture inside the cases. — Lawrence97
2. Lyman 5-Level Case Dryer — Rinse off cleaning solution(s), then load brass by type into racks in Lyman Cyclone Case Dryer. This is easier to load/unload than food dehydrators and holds more cases.
3. Hot Water + Compressed Air — Rinse all your cases as a batch using scalding hot water from the kitchen sink. Hot water evaporates off of brass very very quickly. Then hit them with compressed air. Takes 10 minutes. Simple. — SG4247
4. Oven Dry in Pre-Heated Oven — After pre-heating to 200° or so, turn off oven and put brass inside on a tray. Most important! Tell your wife what you are doing so she doesn’t crank it up to 425 to heat pizza! — MClark
NOTE: Many other members suggested oven drying at 150-200°. We recommend turning OFF the oven so you don’t cook your brass if you forget to remove the cases.
5. Towel Dry then Warm with Heat Gun — Roll brass in a towel until no more water shakes out. Lay out on cardboard box top and blow off with Harbor Freight heat gun. $9.99 on coupon. Two minutes of heated air and about half hour of wait and they are good to go. This is with primers removed. — Shaggy357
6. Compressed Air, then Sun Dry Outside – I rinse the brass, then blow them out with compressed air. Then, dependent on the time of year, lay them on a towel in the sun. — HogPatrol
7. Dishwasher on Dry Cycle – In the winter, I drop my wet brass cases neck-down on the rack pegs in the dishwasher, then turn on the dry cycle. In the summer…well, I’m in Texas. They go to the porch for a bit. — Toolbreaker
8. Alcohol Rinse then Air or Oven Dry — Rinse in 90% Isopropyl alcohol and either let air dry or stick in 175° oven for half an hour. Alternatively, use a dehydrator. — Zipollini
9. Slow Air-Dry in Loading Blocks — I have a reloading block with holes drilled in it. I simply load the block up and let it air-dry in the cupboard for a couple of days. — JCS
10. Wipe with Towel Then Anneal Normally — This thread is stirring my OCD side. Seems complicated for just drying — my brass dries just fine when I anneal it. This entire process can’t take an hour per batch. When finished, the brass is cleaned, annealed, and ready to size. — CHLuke
Deprime, then tumble brass with stainless media, water, Lemishine, and dish detergent.
Shake them easily in a strainer to knock out most media then grab 4-5 pieces, shake them over the bucket for the last of the media then inside a towel.
Finally blow out the primer pockets and wipe with a towel, load in the Annealeez.
Here’s a new product that should please shooters who wet-tumble their brass with stainless media, or use ultrasonic cleaning machines to clean cartridge brass (and gun parts). Employing forced hot air circulation, the new Lyman Cyclone Case Dryer will dry a large quantity of brass in under two hours. Internal racks provide five drying levels. With “street price” under $60.00, the Cyclone Case Dryer is a very affordable and effective addition to an ultrasonic or rotary-tumbler cleaning system.
The Lyman Cyclone Case Dryer works fast. No need to wait overnight (or longer) to air-dry your brass. Lyman states that “The forced heated air circulation of the Cyclone will dry your brass inside and out within an hour or two, with no unsightly water spots.” The handy individual trays keep different types of brass separate. The dryer can also be used for gun parts that have been ultrasonically cleaned.
Lyman Cyclone Case Dryer Features:
• Holds up to 1000 .223 Rem cases or 2000 9x19mm Luger cases
• Works with cartridge brass cases or gun parts
• Fast drying time — Typically 1 to 2 hours
• Timer control can be set up to 3 hours
• Durable ABS trays with recessed handles
Watch How Cyclone Case Dryer Functions with both Cartridge Brass and Gun Parts
Cyclone Case Dryer 115V (Part #7631560) MSRP: $69.95
Cyclone Case Dryer 230V (Part #7631561) MSRP: $69.95
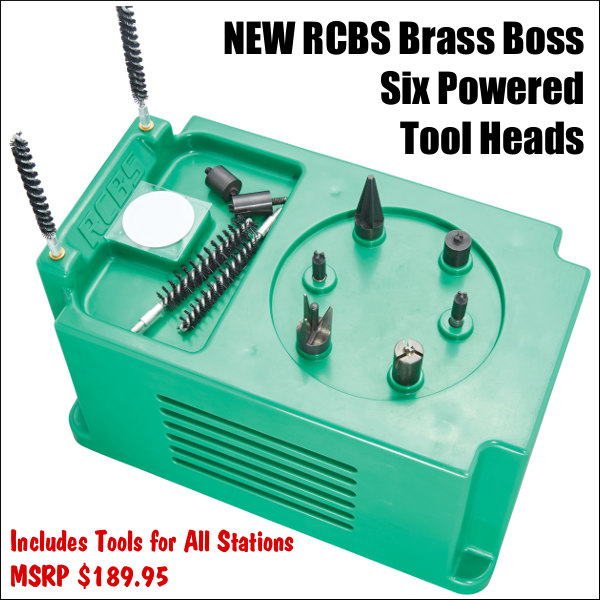
RCBS has announced the successor to the venerable RCBS Trim Mate. The New-for-2018 RCBS Brass Boss features six rotating stations that handle all your brass neck-brushing, chamfering, deburring, and pocket uniforming chores. The new Brass Boss includes tools for all six stations: inside VLD chamfering tool, outside deburring tool, primer pocket cleaners (small/large), military crimp removers (small/large), primer pocket uniformers (small/large), case neck brushes (four diameters), and a tub of dry case neck lubricant. MSRP for the Brass Boss, RCBS SKU 90390, is $189.95. We expect “street price” to be around $155.00.
This machine has two different rotation speeds for the toolheads. Four stations run at 350 rpm, while the two other stations run 57% faster, at 550 rpm. That give you a choice of spin speeds. You can work fast for tougher chores like military crimp removal, and slow down for inside-neck chamfering, which should be done carefully.
Larger and taller than the older RCBS Trim Mate, the new Brass Boss has one more station (six vs. five), plus a more powerful motor. This should make the Brass Boxx more competitive with the popular Lyman Case Prep Express.


 On the respected Riflemans’ Journal blog there was an excellent article about Cartridge Case-Head Separation. In this important article, Journal Editor GS Arizona examined the causes of this serious problem and explained the ways you can inspect your brass to minimize the risk of a case-head separation. As cases get fired multiple times and then resized during reloading, the cases can stretch. Typically, there is a point in the lower section of the case where the case-walls thin out. This is your “danger zone” and you need to watch for tell-tale signs of weakening.


 Customer demand for a 6mm version followed almost immediately after the release of the original Creedmoor case. Aside from the neck dimensions, our new 6mm Creedmoor cases shares the same features and characteristics that make Lapua the standard for 6.5 Creedmoor brass. It is a beautifully-drawn case, properly annealed at the neck and shoulder, with head metallurgy specifically chosen for durability, and the same small rifle primer, small flash-hole design that delivers the ultimate accuracy edge. The smaller 6mm bore diameter offers an excellent selection of proven low-drag match bullets that offer outstanding long range performance with even less recoil.


 5. Towel Dry then Warm with Heat Gun — Roll brass in a towel until no more water shakes out. Lay out on cardboard box top and blow off with Harbor Freight heat gun. $9.99 on coupon. Two minutes of heated air and about half hour of wait and they are good to go. This is with primers removed. — Shaggy357

 This machine has two different rotation speeds for the toolheads. Four stations run at 350 rpm, while the two other stations run 57% faster, at 550 rpm. That give you a choice of spin speeds. You can work fast for tougher chores like military crimp removal, and slow down for inside-neck chamfering, which should be done carefully.


