Social Media fans take note — Lapua is now on Facebook. Lapua recently launched its official Facebook page focusing on Lapua sport shooting components and ammunition. The page will feature shooting news, match results, product info, shooter profiles, videos, tech tips, and other Lapua-related material. You can follow Lapua on Facebook by visiting www.facebook.com/LapuaAmmunition.
Lapua Products and Company History
Lapua (officially Nammo Lapua Oy), is part of the large Nordic Nammo Group. Lapua’s main products include premium cartridge brass, bullets, small caliber cartridges, rimfire cartridges, and reloading components for civilian and professional use. The Lapua cartridge factory was established in 1923. From a modest and practical beginning, Lapua has grown into one of the most respected brands in the industry. The best shooters in the world choose Lapua cartridges and components. In 2014, Nammo acquired the Vihtavuori smokeless powder factory.
Close-up of the Tri Way cutter with clear plastic chip guard removed.
Tired of trimming and chamfering your cartridge brass by hand? Giraud Tool may have a solution. Giraud, makers of rugged bench-mounted case prep machines, now offers a new case trimmer/chamferer that works with a power drill (or other power source). Giraud’s patent-pending Tri Way Case Trimmer is a self-contained unit powered by your drill or motor. Using a sharp carbide blade it will trim your cases to length, deburr, and cut both inside and outside chamfers — all in one pass. That’s pretty impressive for a $98.00 tool that fits in the palm of your hand.
Product Features
1. Fully adjustable for cartridge length (and depth of chamfer).
2. Tool includes carbide blade that cuts a 15° inside case mouth chamfer and 45° outside chamfer.
3. Case holder supported by sealed ball bearing raceway.
4. Tool includes removable, transparent plastic chip guard.
5. Tool can work in any orientation (vertical, horizontal, or any angle).
The Giraud Tri Way Trimmer is designed to be powered by a portable hand drill, drill press, or other dedicated rotating power source. The tool indexes off the shoulder of your cases, but the blade adjusts so that cartridge overall length (COAL) can be controlled with precision. Constructed out of 6061-T6 aluminum and 303 stainless steel, the Tri Way is rugged. Note: This tool is not universal. The Tri Way is dedicated to a single cartridge and “related” cartridges with similar body dimensions. Thus you need a specific tool for each cartridge family. For example, the .308 Win tool will also trim .243 Win, .260 Rem, and 7mm-08.
Cartridge Sizes Available for Giraud Tri Way Trimmer:
.223 Remington (Also trims .17 Rem, .204 Ruger, .222 Rem, .222 Rem Magnum)
7.62 x 39mm (Russian)
.300 Blackout (Also trims .17 Rem Fireball, .221 Fireball)
.308 Winchester (Also trims .243 Winchester, .260 Remington, 7mm-08)
.30-06 Springfield (Also trims .25-06, .270 Winchester, .280 Remington)
.300 Winchester Mag (Also trims .264 Winchester Magnum, 7mm Remington Magnum)
Product Tip from EdLongrange. We welcome reader submissions.
Norma has released a fascinating video showing how bullet, brass, and ammunition are produced at the Norma Precision AB factory which first opened in 1902. You can see how cartridges are made starting with brass disks, then formed into shape through a series of processes, including “hitting [the cup] with a 30-ton hammer”. After annealing (shown at 0:08″), samples from every batch of brass are analyzed (at multiple points along the case length) to check metal grain structure and hardness. Before packing, each case is visually inspected by a human being (3:27″ time-mark).
The video also shows how bullets are made from jackets and lead cores. Finally, you can watch the loading machines that fill cases with powder, seat the bullets, and then transport the loaded rounds to the packing system. In his enthusiasm, the reporter/narrator does sometimes confuse the term “bullets” and “rounds” (5:00″), but you can figure out what he means. We definitely recommend watching this video. It’s fascinating to see 110-year-old sorting devices on the assembly line right next to state-of-the art, digitally-controlled production machinery.
Video tip by EdLongrange. We welcome reader submissions.
Here’s something you don’t see every day — pistol-caliber Lapua brass. We shoot superior Lapua brass in our rifles, and now you can get the “good stuff” for your 9mm pistols too. It’s nice to know that Lapua 9mm brass is available for those guys who accept “nothing but the best”. Grafs.com received a special order of 9mm Luger (aka 9x19mm or 9mm NATO) pistol brass made by Lapua. It is available right now for $19.99 per 100-count bag or $179.99 per 1000-count box. That’s 38% off the regular 1K box price.
When It Pays to Shoot Premium Pistol Brass
Is this Lapua 9mm brass worth the price compared to the cheaper alternatives (such as once-fired police range pickups)? We think the answer depends on your application. If you shoot a 9mm pistol in Bullseye competition, yes it makes sense to get the Lapua. Or, if you have a 9mm revolver that carries the shells in a moon clip, the Lapua brass may be worth getting. With a 9mm revolver, your brass is not marred by an extractor claw and then ejected on to the ground. If we had the impressive new 8-shot, Miculek Edition Smith & Wesson model 929 9mm revolver (below), we’d definitely shoot Lapua brass.
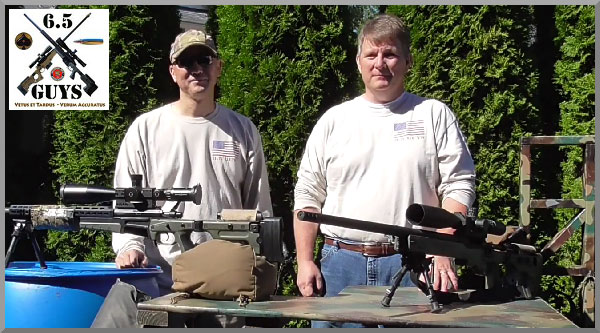
The 6.5 Guys, a dedicated duo of Pacific NW rifle shooters, have created an interesting series of shooting-related videos on their 6.5 Guys YouTube Channel. In this video, The 6.5 Guys set up and demonstrate the Bench-Source cartridge brass annealing machine. The video explains how to set up the machine, how to attach and adjust the torches, and how to “fine tune” the flame and dwell time to achieve best results.
To complement this video, the 6.5 Guys (aka Ed and Steve) have published an Annealing Tech Talk article on 65guys.com. If you own an annealing machine, or are getting started with cartridge annealing, you should read that article. It covers basic annealing principles, and gives useful tips on temp control, dwell time, and frequency of annealing. After the video, we feature highlights from this article.
Temperature Control
We use 750° Tempilaq applied inside the case neck to indicate that the proper temperature has been achieved. If you turn off the lights, you will notice that the brass just barely starts to turn color. As you go beyond the 750° mark we observed that the case mouth will start to flare orange — you can see this with the lights on. From our research, we understand that this is the result of zinc burning off. We adjust the time on our machine between the point that the Tempilaq turns liquid and the flame starts to turn orange. In other words, if the flame is starting to turn orange reduce the time. We let the cases air cool — we don’t quench them in water.
The case starts to flare orange here, during a set-up test. Dwell time was then reduced slightly.
Flame Orientation
We aim the flame at the neck-shoulder junction. Some folks like to aim it at the neck and others the shoulder. When you see how the two flames meet and spread out vertically, it probably doesn’t make that much of a difference.
Here you can see the flame points aimed at the neck-shoulder junction.
Case Coloration
Cases will turn color after annealing, but the degree of color change is not a reliable indicator. We have noticed that the appearance of cases will vary depending on brass manufacturer, brass lot, light source, and how long ago the case was annealed.
How Often Should You Anneal?
Some shooters anneal every time while others choose a specific interval. We noticed work hardening around five firings that resulted in inconsistency in shoulder setback and neck tension, so we choose to anneal every three firings. Your mileage will vary depending on how hot your loads are and how aggressively you resize.
Who are the 6.5 Guys? They are Ed (right) and Steve (left), a pair of avid shooters based in the Pacific Northwest. They have released 22 Videos on the 6.5 Guys YouTube Channel.
Powder Valley Inc. (PVI), a leading vendor of ammo and reloading components, warned us to be prepared for price hikes on Lapua-brand cartridge brass, bullets, and loaded ammunition:
“Lapua has announced a 4-8% price increase for 2015. Anyone who would like to order at 2014 prices please do so now. We will accept backorders on all Lapua from now until December 12 and these items will be filled at 2014 prices as soon as the items become available.”
Cutting to the chase, Powder Valley is saying it will honor current Lapua prices for back-orders, so long as you place your order by December 12th, 2014. So, if you need brass (or those ultra-consistent Lapua Scenar-L bullets), order now before the price goes up. Of course, you can also buy in-stock Lapua brass/bullets inventory from PVI and other major vendors including Bullets.com, Bruno Shooters Supply, Grafs.com, and Midsouth Shooters Supply.
Many shooters prefer to deprime their fired cartridge cases before other operations (such as neck-sizing and full-length sizing). In addition, when cleaning brass with an ultrasonic system, it’s not a bad idea to remove primers first. That way the primer pockets get cleaned during the ultrasonic process.
To deprime cases before sizing or cleaning you can use a Depriming Die (aka “decapping die”). This pushes out the spent primer without changing the neck or body of a case. Such decapping dies work fine, but they do require the use of a press.
New Handheld Primer Removal Tool From Frankford Arsenal
Here’s a new tool that allows you to deprime cartridge cases without a press. This new hand-tool from Frankford Arsenal will deprime (and capture primers) conveniently. You can deprime your cases while watching TV or relaxing in your favorite chair.
This handy depriming tool is very versatile. With a universal, cylinder-style cartridge-holder, the tool can deprime a wide variety of cartridge types from .20 caliber up to .338 caliber. Spent primers are captured in a removable spent primer catch tube. With die-cast metal construction, this tool should last through many thousands of depriming cycles. MSRP is $54.99.
Will This Tool Work with Small Flash Hole Brass?
This new depriming tool will be introduced at SHOT Show in January 2015. We have not been able to measure the decapping shaft diameter, so we do not know whether this hand tool will work with small flash-holes found on Lapua benchrest brass (such as 220 Russian and 6mmBR). We’ll try to answer that question at SHOT Show. This tool is so new the specs are not yet listed on Frankford Arsenal’s website.
Product find by EdLongrange. We welcome reader contributions.
When we first ran this story a while back, it generated great interest among readers. By popular request, we’re reprinting this story, in case you missed it the first time around. — Editor
Precision shooters favor premium brass from Lapua, Norma, or RWS. (Lake City also makes quality brass in military calibers.) Premium brass delivers better accuracy, more consistent velocities, and longer life. Shooters understand the importance of good brass, but many of us have no idea how cartridge cases are actually made. Here’s how it’s done.
The process starts with a brass disk stamped from strips of metal. Then, through a series of stages, the brass is extruded or drawn into a cylindrical shape. In the extrusion process the brass is squeezed through a die under tremendous pressure. This is repeated two or three times typically. In the more traditional “draw” process, the case is progressively stretched longer, in 3 to 5 stages, using a series of high-pressure rams forcing the brass into a form die. While extrusion may be more common today, RWS, which makes some of the most uniform brass in the world, still uses the draw process: “It starts with cup drawing after the bands have been punched out. RWS cases are drawn in three ‘stages’ and after each draw they are annealed, pickled, rinsed and subjected to further quality improvement measures. This achieves specific hardening of the brass cases and increases their resistance to extraordinary stresses.” FYI, Lapua also uses a traditional draw process to manufacture most of its cartridge brass (although Lapua employs some proprietary steps that are different from RWS’s methods).
After the cases are extruded or drawn to max length, the cases are trimmed and the neck/shoulder are formed. Then the extractor groove (on rimless cases) is formed or machined, and the primer pocket is created in the base. One way to form the primer pocket is to use a hardened steel plug called a “bunter”. In the photos below you see the stages for forming a 20mm cannon case (courtesy OldAmmo.com), along with bunters used for Lake City rifle brass. This illustrates the draw process (as opposed to extrusion). The process of draw-forming rifle brass is that same as for this 20mm shell, just on a smaller scale.
River Valley Ordnance explains: “When a case is being made, it is drawn to its final draw length, with the diameter being slightly smaller than needed. At this point in its life, the head of the draw is slightly rounded, and there are no provisions for a primer. So the final drawn cases are trimmed to length, then run into the head bunter. A punch, ground to the intended contours for the inside of the case, pushes the draw into a cylindrical die and holds it in place while another punch rams into the case from the other end, mashing the bottom flat. That secondary ram holds the headstamp bunter punch.
The headstamp bunter punch has a protrusion on the end to make the primer pocket, and has raised lettering around the face to form the headstamp writing. This is, of course, all a mirror image of the finished case head. Small cases, such as 5.56×45, can be headed with a single strike. Larger cases, like 7.62×51 and 50 BMG, need to be struck once to form a dent for the primer pocket, then a second strike to finish the pocket, flatten the head, and imprint the writing. This second strike works the brass to harden it so it will support the pressure of firing.”
Thanks to Guy Hildebrand, of the Cartridge Collectors’ Exchange, OldAmmo.com, for providing this 20mm Draw Set photo. Bunter photo from River Valley Ordnance.
For a few years now, Lyman has offered the Case Prep Xpress, an all-in-one case prep center that chamfers necks (inside and out), cleans and uniforms primer pockets, brushes the inside of case-necks, and uniforms flash holes. The unit can also ream out the crimps on military brass. However, the Lyman Case Prep Xpress does NOT trim cases.
The Lyman Case Press Xpress comes with all the necessary tools and attachments (listed below), so you don’t have to purchase extra accessories. The 5 gear-driven heads on the unit are powered by a high torque, low-speed motor ideal for case prep operations. Lyman’s Case Prep Xpress features handy storage areas for accessories, a removable brass shavings dump pan, and a handy clean-up brush.
Lyman Case Prep Xpress Includes:
Inside Deburr (VLD) Tool
Outside Deburr Tool
Flash Hole Uniformer
Primer Pocket Uniformer (Large & Small)
Primer Pocket Reamer (Large & Small)
Primer Pocket Cleaner (Large & Small)
Case Neck Brushes (25, 30, 38 & 45 Cal)
Case Neck Lube (Mica)
Removable Brass Shavings Dump Pan
Clean-up Brush
In the two years that this product has been on the market it has been a hot seller. We’ve used the Case Prep Xpress. If you’re prepping hundreds of cases, this unit will save considerable time and reduce hand/finger fatigue. While the Case Prep Express is not as sturdy as the metal-bodied Hornady prep center, the Lyman unit offers a lot of functionality for the price ($108-$125 at various vendors).
Video clearly illustrates all case prep functions. Worth watching.
You can find Lyman’s Case Prep Xpress for under $120.00, making it much less expensive than the larger Hornady Case Prep Center, which runs about $400.00. The Hornady unit is beefier, and will trim cases. However, we think the compact Lyman unit makes sense for guys who already have a good case trimmer, such as a Forster or Wilson. The Lyman Case Prep Xpress is hundreds of dollars less than the Hornady prep center. The money you save will buy lots of bullets and brass.
Case Prep Xpress $108.08 at Midsouth
The Lyman Case Prep Xpress is sold by most of the big vendors. The best current price we found was at Midsouth Shooters Supply, which sells the Lyman unit for $108.08.
Hornady plans to start producing .50 BMG ‘Match Grade’ Cartridge Brass. MSRP is $131.99 for twenty (20) cases (Item #8772). Hornady claims the new brass will have very uniform case wall thickness, and very consistent case weight and internal capacity. Hornady has not stated when its .50 BMG brass will start shipping. When the Hornady .50 BMG brass (Item #8772) does hit the market, we expect it will be in high demand. Our friends at the Fifty Caliber Shooters Association (FCSA) tell us that it is “getting harder and harder to get your hands on good .50 Cal brass these days.”
Grafs.com lists the new Hornady .50 BMG brass in its catalog at $101.99 for 20 cases, but inventory (Item HRN8772) is not yet in stock. CLICK HERE to check for updates.
Product tip from EdLongrange. We welcome reader submissions.


 Norma has released a fascinating video showing how bullet, brass, and ammunition are produced at the

 The 6.5 Guys, a dedicated duo of Pacific NW rifle shooters, have created an interesting series of shooting-related videos on their

 “Lapua has announced a 4-8% price increase for 2015. Anyone who would like to order at 2014 prices please do so now. We will accept backorders on all Lapua from now until December 12 and these items will be filled at 2014 prices as soon as the items become available.”

 Precision shooters favor premium brass from


 You can find Lyman’s Case Prep Xpress for under $120.00, making it much less expensive than the larger
  Hornady plans to start producing


