Forum member Mike T. (aka “Watercam”), has cleverly adapted a tubegun cheek piece to conventional fiberglass and wood stocks. The cheek piece hardware comes from Competition Machine and is the same as used on Gary Eliseo’s tubegun stocks. Here is Watercam’s Project Report:
Installing Tubegun Cheek Piece on Conventional Gun Stock
All of my match rifles are equipped with thumb-wheel adjustable cheek pieces for the best of reasons — adjustments can be made while in position, on target. I’ve learned that variations in position, terrain, and vertical angle all demand adjustability to achieve optimal cheek weld.
I wanted a cheek piece for my hunting and tactical type stocks that gave the same adjustability without having to cut a chunk off of my butt stocks. It needed to be affordable and easy to install. I also wanted a unit that would not push my head laterally away from the centerline of the scope or iron sights. Turns out I already had what I needed on my Gary Eliseo B-1 tubegun. I ran the idea past Gary, who said: “If you’ll be the guinea pig I’ll send the hardware”.
Using Gary’s hardware, I mounted Eliseo alloy thumb-wheel adjustable cheek pieces on a Bell & Carlson Medalist hunting stock and a Boyd’s laminate tactical stock. Read Forum Discussion.
Building Version One on Bell & Calson Stock
I had a Bell & Carlson Medalist stock for a Mauser 98 chambered in 9.3×62. This test rifle was enough of a thumper to reveal if the metal cheek piece could handle strong recoil.
I started by drilling three 1/2″ holes into the top of the comb to match the two pillars and one threaded shaft on the cheek piece. I used aluminum tubing to make guides for each and epoxied them in place. Inletting the oval hole for the thumb wheel was reasonably straight forward and the fiber reinforced foam in the buttstock offered enough support. A large flat washer epoxied underneath where the thumbwheel lay gave a smooth bearing surface. Total adjustment (with 2.25″ pillars and shafts) is just about an inch. I chose to trim the bottom of the skirt of Gary’s cheek plate so as to allow better position behind the scope for me and allow maximum adjustment even with the cheek piece of the stock. Set screws could be used instead of the thumb-wheel or in conjunction with it. In the end it was exactly what I envisioned and works great! The only thing left to do is paint the metal to match the stock.
Version Two — Installed on Boyds Laminated Tactical Stock
Watercam’s second metal cheek piece installation was on a laminated tactical stock. This Boyds stock did have a movable comb, but the original adjustable cheek section was too awkward to adjust from position. So I adapted the Eliseo cheek piece to to the Boyds stock, as you can see:
Cheek piece installation for both stocks was straight-forward, and the new cheek pieces work every bit as well the systems on my match rifles. Aluminum tubes epoxied in place guide the rods and threaded shank. A matching-diameter flat washer epoxied under the wheel provides smooth bearing surface. The glass-filled filler of the butt stock is plenty strong enough to support the unit. A set screw and knob can be added to lock in changes if so desired.
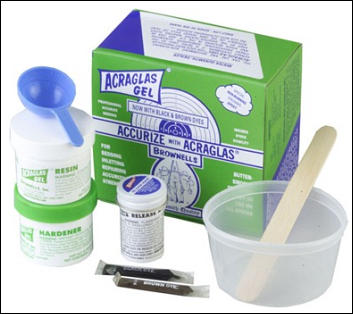
The NRA’s American Rifleman showcased an interesting project this week — an upgraded Ruger American Rifle Predator in 6.5 Creedmoor. The video below shows how a laminated wood stock from Boyd’s Gunstocks was adapted for the Ruger. A Boyds Prairie Hunter model in gray laminate was selected. This was custom-bedded to the Ruger’s action using Brownell’s Acraglas.
All Ruger American Rifle models employ dual aluminum V-Blocks to support the action. These fit slots in the underside of the action. Boyds makes its own version of these V-Blocks which were installed in the Boyds stock to secure the action.
Project leader Joe Kurtenbach says the size, shape, and geometry of the Boyds V-Blocks is very accurate, so they fit the Ruger action well. To further support the action, Acraglas bedding compound was applied to the inside of the stock, after release compound was applied to the barreled action. With this DIY bedding job, the Boyds laminated stock is definitely an improvement over this original “Tupperware” factory stock.
DIY Bargain Hunter Upgrade
American Rifleman states: “The Ruger American has some great features—hammer-forged barrel, reliable action, crisp trigger — but many would not consider the molded, polymer stock to be among them. Luckily, there are aftermarket options to enhance the rifle’s utility and aesthetics. A durable, attractive stock from Boyds Gunstocks and some DIY action bedding, using Brownells Acraglas, is the next step in the precision-driven hunting rifle build.”
Choice of Gun and 6.5 Creedmoor Chambering
For this project, American Rifleman’s Joe Kurtenbach selected one of his favorite cartridges, the 6.5 Creedmoor. Introduced in 2007 by Hornady, the accurate, flat-shooting 6.5 Creedmoor has proven very popular with both hunters and tactical/PRS shooters. The Ruger American Rifle Predator was chosen for its affordable price, reliable action, and Ruger Marksman adjustable trigger.
In this video, Kurtenback explains how and why the 6.5 Creedmoor chambering and Ruger American Rifle were chosen for the Precision Hunter rifle build project.
A while back, we featured a portable reloading bench built on a Black & Decker Workmate. That proved a VERY popular do-it-yourself project so we’re showing it again, in case you missed it the first time.
Texan Robert Lewis made himself a great portable reloading bench from plywood mounted to a Black & Decker Workmate. The bench, roughly 22″ x 19″ on top, folds up to fit easily in your car’s trunk or behind the seats in a pick-up truck cab. Four recessed bolts hold the wood top section to the collapsible B&D Workmate.The sides and back of the unit are attached to the base with small nails. There is a small shelf (also nailed in place) which can be used to clamp a powder measure or hold a scale. Shown in the photo is a Harrell’s Benchrest measure and Harrell’s single-stage “C” press.
The whole unit can be built for about $65.00 with pine, or $80.00 with oak (as shown). Robert explained: “The Workmate was $40. If someone bought a 2’x4′ sheet of 3/4″ oak plywood, I think it is around $30. Using pine plywood would be about half that. Fasteners were $3. Spar Urethane would be $5.”
Robert told us: “I used a couple ideas I found on the web. The Larry Willis website gave me the idea to use the Black and Decker Workmate as a base. I found the Workmate on sale for $40 and the top is made from oak plywood I had in my shop. I sealed the wood with three coats of Spar Urethane. The whole thing folds into a nice package for transportation to and from the range.”
Editor’s NOTE: In the time that’s transpired since we first ran this story, the price of a Black & Decker workmate has gone up. However you can still pick a WM225 Workmate for under $65.00. Target is currently selling WM225 Workmates for $64.99.
You have to admire someone with serious do-it-yourself skills. Not just hammer and nail skills, but formidable design and fabrication skills. Well Forum Member Dave D. (aka “AKShooter”) has a DIY skill set that might put some trained machinists to shame. You see, “DIY Dave” crafted his own pedestal front rest from scratch, using his own design and about $100.00 in materials (not counting the Edgewood front bag). Dave estimates he put 20 hours of labor into the project, but the end result was worth it: “This Do-It-Yourself rest drives like a dream. I’ve played with the Caldwell and a Sinclair, they have nothing on this one.”
Dave tells us: “Here is my Do-It-Yourself front rest. I wanted to show other folks who are handy that a solid front rest is doable with a bit of time — and you don’t need to spend $1000.00. (You could say this is a design for shooters with more time than money.) This is for F-Class. I was originally overwhelmed by the equipment needed, so I decided to make my own rest. I didn’t have the money for a SEB or Farley Coaxial. This is what I’ll run this season (my second as an F-Class competitor).”
Building your own portable shooting bench is a great do-it-yourself project. You can build a sturdy bench for well under $100 in materials. Compare that to some deluxe factory-built benches which may cost $500.00 or more.
FREE Bench Plans on the Web
You’ll find a wide assortment of home-built shooting bench designs (both portable and fixed) on the internet. Renovation Headquarters has links to FREE Plans and building instructions for fourteen (14) different shooting benches. There are all-wood shooting bench designs as well as benches that combine a wood top with a metal sub-frame or legs.
Birchwood-Casey brand Shoot-N-C targets are great for fun shooting. When your bullet passes through the target, a large yellow splash of color surrounds the bullet hole. This is ideal for plinking at short range without optics. Even when using a powerful scope, the color splash on the high-contrast background helps you see your hits at long range. We’ve been able to see Shoot-N-See bullet hits at 800 yards with a 42-power scope.
The only problem with official Shoot-N-See targets is the price. A 30-sheet pack of 8″ Bullseye Shoot-N-C targets costs about $22.00 plus shipping.
Well folks, put your money back in your wallet. In the YouTube Video below, SebalHP shows how to make your own color-splash targets for pennies per target. All you need are sheets of neon (day-glow) poster paper, cheap bulk packing tape, and a can of spray paint. (You can even speed up the process if you can find full size laminating sheets at an office supply store — these replace the tape.)
Making the targets is easy. Simply place the plastic tape over the neon paper. Then spray with matte black paint. Of course do your painting outdoors, in a well-ventilated area! When the paint is dry, cut target to desired size. Watch the video and see how simple it is.
Building your own portable shooting bench is a great do-it-yourself project. You can build a sturdy bench for well under $100 in materials. Compare that to some deluxe factory-built benches which may cost $500.00 or more.
FREE Bench Plans on the Web
You’ll find a wide assortment of home-built shooting bench designs (both portable and fixed) on the internet. Renovation Headquarters has links to FREE Plans and building instructions for fourteen (14) different shooting benches. There are all-wood shooting bench designs as well as benches that combine a wood top with a metal sub-frame or legs.
Reader Jim Jewell has used the eHow bench design shown above. He recommends it highly. Jim reports: “A colleague and I built two of the eHow permanent wood, sturdy benches for our Pt. Phillips Rod and Gun Club in PA, which had outdated benches. I want to tell you that these benches are very stable and a real bargain. The benches cost precisely $100.00 each using the bill of materials and pressure treated wood. The bill of materials, with careful cutting, using a Chop saw, resulted in almost no scrap wood if carefully measured and cut. The plans are terrific and the benches are great platforms for bench-rest shooting. I made only one modification — I left a 6″ wing on both sides of the table to mount a spotting scope. Further we added a base of dry QuickCrete or similar fast setting concrete mix material. Add it dry, make sure the table is level and fill in the 6″ hole. The hole and QuickCrete add maximum stability. The QuickCrete sucks moisture from the ground, hardens in situ, and adds stability to the bench.
I can’t recommend this design highly enough. It is dirt cheap for clubs on a budget, goes together quickly, the table is very stable and there is no waste if you make precise measurements and cuts. A bag of QuickCrete is enough for two tables adding about $2.00 to the cost of each table. We plan on building new tables for the whole club for under $1000. After about a year, with a completely water-free wood in the bench I recommend a coat of Thompson’s Water Seal and these benches should last a long time.”
Heavy Wood Bench That Converts to Three Sections for Transport
In addition to the fourteen benches mentioned above, here is an interesting break-down bench design. Call it a “semi-portable” bench. The legs and frame are made from stout 4×4 post segments so the bench is fairly heavy. However, this bench can break down into three (3) sections for easier transport to and from the range. Dado-cut channels assure proper top alignment. This might be a good choice if you plan a multi-day excursion to a location without fixed benches. This three-leg bench design can be made from easy-to-locate materials. Note: The dimensions of this bench are are larger than typical fixed benches to accommodate 50 BMGs and other big rifles. CLICK HERE for more details.
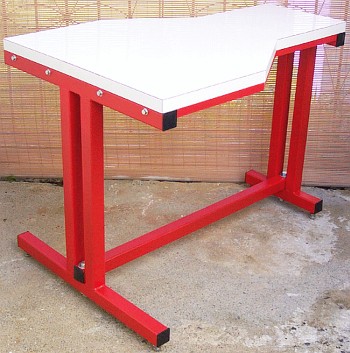
Do you like the bench in the illustration at the beginning of this story (top right)? This is a prototype design by Chris Byrne of the Anarchangel Blog. For more details, CLICK HERE.


 All Ruger American Rifle models employ dual aluminum V-Blocks to support the action. These fit slots in the underside of the action. Boyds makes its own version of these V-Blocks which were installed in the Boyds stock to secure the action.
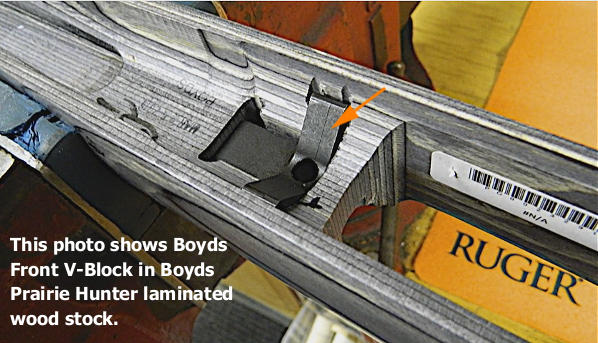
 A while back, we featured a portable reloading bench built on a Black & Decker Workmate. That proved a VERY popular do-it-yourself project so we’re showing it again, in case you missed it the first time.


 You have to admire someone with serious do-it-yourself skills. Not just hammer and nail skills, but formidable design and fabrication skills. Well Forum Member Dave D. (aka “AKShooter”) has a DIY skill set that might put some trained machinists to shame. You see, “DIY Dave” crafted his own pedestal front rest from scratch, using his own design and about $100.00 in materials (not counting the Edgewood front bag). Dave estimates he put 20 hours of labor into the project, but the end result was worth it: “This Do-It-Yourself rest drives like a dream. I’ve played with the Caldwell and a Sinclair, they have nothing on this one.”

 Birchwood-Casey brand Shoot-N-C targets are great for fun shooting. When your bullet passes through the target, a large yellow splash of color surrounds the bullet hole. This is ideal for plinking at short range without optics. Even when using a powerful scope, the color splash on the high-contrast background helps you see your hits at long range. We’ve been able to see Shoot-N-See bullet hits at 800 yards with a 42-power scope.