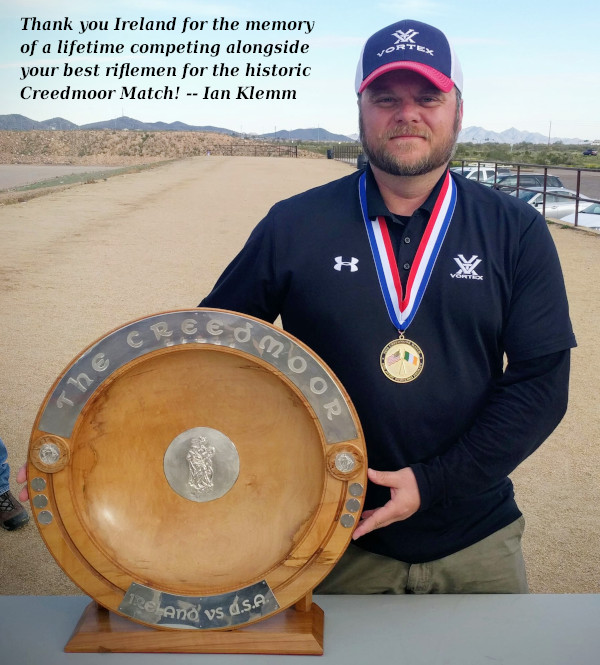
The Creedmoor Cup is an historic challenge match between American and Irish marksmen. The first match was held in in 1874 between American and Irish Teams in Creedmoor, New York. (Read Match History). The Match was revived in 2011 and is now held every four years.
In 2019, the match was held this week at the Ben Avery Range in Arizona, following the Berger Southwest Nationals. It proved to be a great match, with Team USA coming out on top. Erik Cortina stated: “What a great experience this has been. Team USA won the 2019 Creedmoor cup vs Ireland. It had been over 100 years since match was shot in the United States. Glad to see this tradition continue.”
Congrats to the Members of Winning Team USA:
F-TR Riflemen
Alan Barnhart
Ellis Berry
David Conrath
Tracy Hogg
Ian Klemm
Matthew Schwartzkopf
Ed Shelley
Keith Trapp
F-Open Riflemen
Larry Bartholome
Erik Cortina
Ken Dickerman
David Gosnell
Rick Jensen
Jim Murphy
Pat Scully
Keith Weil
Coaches
Kent Reeve (Head Coach)
James Crofts
Scott Fulmer
Bob Seabold
Nancy Tompkins
Team Staff
Captain Phil Kelley
Vice-Captain Dan Bramley
Adjutant Stephen Ireland
Team USA Captain Phil Kelly told us this was a great match: “USA wins the Creedmoor Cup in a great competition with Team Ireland! Two days of cold and windy conditions challenged both 16-shooter teams. Final ceremonies included Native American dancers and great camaraderie among all the competitors. Thank you to all from Team Ireland who made the trip! The best of competitors and friends.” Phil added: “Special thanks to additional Creedmoor Committee members including Michelle Gallagher, Pete Ricci, and Mark Walker. We look forward to the next gathering in four years. Safe travels all.”
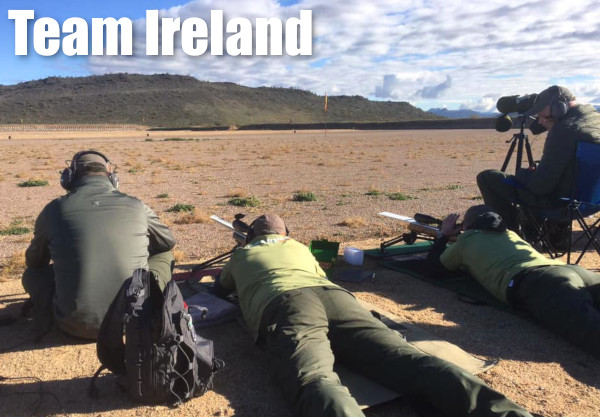
Nancy Tompkins looks down-range. With the wind-chill, competitors and coaches dressed warm.
Not Your Typical Warm Arizona Days at Ben Avery
There were variable conditions at the match — first easy, then tough. USA Captain Phil Kelley reported: “On Day 1 of the 2-day match, things started good then got tougher. The morning and 800-yard line saw 34° and light winds leading to high scores.
That changed as the 16-shooter teams made their way to the 900-yard line as sun, moderate wind and building mirage hit the range providing more challenging conditions.
After an excellent lunch both teams were in for a challenge. Winds of 12-16 mph with constant angle changes and surging mirage made communications and coordination among five coaches critical. The wind chill also dropped as teams stayed on the line for the majority of allotted time.”
The First-Ever Creedmoor Challenge Match in 1874
The Irish International Shooting team arrived in New York on the 16th of September and proceeded to “take in the sights”, which was understandable, before some practice at the Creedmoor range. On September 26th they presented themselves for the match with confidence and in high spirits. The crowds that day were reported to be between 5,000 and 10,000 strong, which showed the huge support already growing for the fledgling sport in America.
The course of fire was 15 shots to each man at 800, 900, and 1000 yards. Unfortunately, the details of each mans scores at the individual distances have been lost to time but we do know that the Americans were well ahead after the 800-yard shoot. The Irish then caught up after the 900-yard and finished the 1000-yard shoot ahead by 1 point. The Americans still had one man left to shoot and it came down to his very last shot with which he scored a 4 giving the American team the win over the Irish by 3 points.
Post-Competition Camaraderie and “Craic” at the Pub
“Craic” is an Irish term referring to positive interaction among people through conversation, stories, and music. The Craic was strong after the 2019 Creedmoor Match.
Desert Sharpshooters posted: “The ‘Craic’ is amazing tonight with the Irish rifle team to finish the Creedmoor. Thank you to the USA team members that came out tonight to show the Irish a good time. This is truely what the Creedmoor Cup is about, Friendship and good times.”
Our friend Erik Cortina is at Raton, NM this week at the F-Class Nationals. When he’s not shooting (or working) Erik produces YouTube videos. One of his most popular videos explained why you should full-length size cartridge brass. In no uncertain terms Erik says: “Quit Neck Sizing!!!” Watch the Video:
Why It’s Smart to Full-Length Size Your Brass
Commentary by Erik Cortina
Should You Full-Length Size Your Cartridge Brass?
Absolutely. Let Me Explain Why…
I have seen it time and time again, shooters on the line wrestling with their rifle trying to get the bolt closed while the wind is switching. They were too focused trying to get their bolt to close and getting their rifle settled back on the bags that they missed the wind switch. Bang… Eight! The straw that broke the camel’s back for me was at the 2017 Canadian Nationals. I was paired up with a young girl and she would try really hard to close the bolt on her rifle. The majority of the time she would get it to close, but often times she could not even get the round to chamber. She was focused on her rifle the entire time rather than on the conditions. When we completed our strings, she had five rounds that did not chamber our of 15! That is way too many!. I told her she needed to think about Full-length sizing with 0.002″ shoulder bump, or Controlled Full-length Sizing like I call it. I told her not to worry about losing accuracy. I told her that I full-length size all my rounds and asked if she noticed how smooth my bolt was and noticed my score. She said yes, they were both great!
Controlled Full-length Sizing Does NOT Harm Accuracy
I have found that Controlled Full-length Sizing does NOT hurt accuracy or shorten brass life. I find that I can focus much more on the conditions when I don’t have to think about chambering a round nor extracting it. It has become second nature. After firing, I keep my head welded to the stock, I open the bolt by placing my thumb on top of stock and rotating hand upwards. I reach in and retrieve spent case, place it back in ammo box, and pick up another loaded round and put in chamber. I verify conditions and when ready, I push the bolt in and close it with my index and middle finger.
With Controlled Full-length Sizing you “bump” the shoulder around .002″ for bolt guns.* Image courtesy Sinclair International which carries a variety of Full-length dies.
Whidden Full-Length Sizing Dies by AccurateShooter.com Editor
For proper Full-length sizing, you want a quality die that’s a very good match to your chamber. For our project rifles we usually turn to Whidden Gunworks which offers both bushing and non-bushing FL dies. And if you want the hot new option, check out Whidden’s patent-pending, click-adjustable FL-sizing die. This gives instant, precise control over shoulder bump. It works great.
*With gas guns, such as the AR10, you may want to increase shoulder bump to .003″ or more. With some benchrest cartridges, .0015″ bump may prove optimal. But .002″ is a good starting point.
In this video, Forum member Erik Cortina shows how to create a custom modified case for use with the Hornady Lock-N-Load Overall Length Gauge (formerly the Stoney Point Tool). While Hornady sells modified cases for many standard cartridges, if you shoot a wildcat such as the 6mm Dasher or .284 Shehane, you’ll need to create a custom modified case*. And even if you shoot a standard cartridge such as the .308 Winchester you can get more consistent measurements if you make a custom modified case from a piece of brass fired in your chamber.
The process is straight-forward. Take a piece of brass fired in your chamber and full-length size it (with about .002″ shoulder bump). Then you need to drill out the primer pocket. Erik uses a mini-lathe for the operation, but this general process can be done with a drill press or other tools. Erik shows how to do this with a 0.290″ HSS (High Speed Steel) drill bit on a mini-lathe. After drilling the hole comes the tricky part — you need to tap the case with the precise 5/16″ x 36 threads per inch (tpi) right-hand thread that matches the male thread on the O.A.L. Gauge. This 5/16″ x 36 tpi tap is pretty uncommon, but you can order it from Amazon.com if you can’t source it locally.
If you use a mini-lathe, Erik suggests loosening the tailstock slightly, so it can float while cutting the threads. Erik also says: “Make sure you get the tap on pretty tight — it’s going to want to spin.” Erik turns the case at about 100 rpm when tapping the threads. Once the case and tap are rigged, the actual tapping process (see video at 6:00) takes only a few seconds. While the mini-lathe makes the tapping process go more quickly, the threading can also be done with other systems.
TIP: Don’t just make one modified case, make three. That gives you one for your range kit, one for your home reloading bench, plus a spare (since you WILL eventually lose or misplace one).
Here’s the Stuff You Need
5/16″-36 TPI Threading Tap
The required thread is somewhat uncommon. You need a 5/16″ – 36 tpi Right Hand Thread Tap. If you can’t find it locally, Amazon.com carries the correct tap. Erik notes: “The 5/16-36 tpi tap is not a common size. I think Hornady did this on purpose to make it more difficult for the average guy to make his own modified cases.”
0.290″ Drill Bit
Erik uses an 0.290″ HSS “L” drill bit. (This “L” Letter Gauge code designates a 0.290″ diameter bit). A close metric equivalent would be 7.3 mm (0.286″). Erik says: “A 9/32″ drill will also work but it will be harder to run the tap in since the hole will be .281″ instead of .290″ with the Letter Gauge L bit.”
Tips for Using O.A.L. Gauge with Modified Case
We’ve noticed that many folks have trouble getting reliable, consistent results when they first start using the Hornady O.A.L. Gauge (formerly the Stoney Point Tool). We’ve found this is usually because they don’t seat the modified case properly and because they don’t use a gentle, consistent method of advancing the bullet until it just kisses the lands.
Here is our suggested procedure for use the O.A.L. Gauge. Following this method we can typically make three of four measurements (with the same bullet), all within .001″ to .0015″. (Yes, we always measure multiple times.)
1. Clean your chamber so there is no build-up of carbon, debris, or lube. Pay particular attention to the shoulder area.
2. Screw the modified case on to the O.A.L. Gauge. Make sure it is seated firmly (and doesn’t spin loose). Note, you may have to re-tighten the modified case after insertion in the chamber.
3. Place your selected bullet so that the ogive (max bullet diameter) is behind the case mouth. This prevents the bullet from “snagging” as you insert the tool in the action.
4. Insert the O.A.L. Gauge into your chamber smoothly. Push a little until you feel resistance. IMPORTANT — You need to ensure that the shoulder of the modified case is seated firmly against the front of your chamber. You may have to wiggle and twist the tool slightly. If you do not have the modified case seated all the way in, you will NOT get a valid measurement.
5. Advance the bullet slowly. (NOTE: This is the most important aspect for consistency!). Push the rod of the O.A.L. tool gently towards the chamber. DON’T shove it hard! Easy does it. Stop when you feel resistance.
6. IMPORTANT. After gently pushing on the rod, give the end of the rod a couple forward taps with your finger. If your bullet was slightly skewed, it may have stopped too far back. Adding a couple extra taps will fix that. If the bullet moves after the taps, then again push gently on the rod. NOT too much! You just want to push the bullet until it just “kisses” the lands and then stops. Do NOT jam the bullet into the rifling. If you do that you will never get consistent results from one measurement to the next.
* For a $15.00 fee, Hornady will make a custom modified case for you if you send two fired pieces of brass. Send two fired cases and $15.00 check to: Hornady Manufacturing, Attn: Modified Cases, 108 S. Apollo St., Alda, NE 68810. More Info HERE.
At the 2018 NRA Show in Dallas last week, Trijicon unveiled a notable new scope that should interest Benchrest shooters and Long-Range competitors. The all-new Trijicon AccuPower 5-50x56mm Long Range Scope offers an impressive ten times zoom range, plus an illuminated reticle. This RS50 Series Second Focal Plane scope with 34mm main tube is offered in both MOA and MIL systems. The MOA version features 1/8 MOA clicks plus a reticle with 1 MOA subtensions at 40X power. The MIL version has 1/20 Milrad click values and a ranging style reticle with wind hold dot system. Both MOA and MIL versions have a full 100 MOA of elevation travel.
New Trijicon 5-50x56mm Scope Revealed at NRA Show in Dallas:
Credit Erik Cortina for providing this video.
With a $2700 MSRP, we expect Trijicon’s new 5-50X scope to have a “street price” of about $2400. That lines up with the NightForce 15-55x52mm Competition, now priced at $2352.00 on Amazon.
The new Trijicon 5-50x56mm (RS50 Series) scope boasts some nice features. Employing extra-low dispersion glass, the scope offers high light transmission with minimal chromatic aberration. The magnification control lever can be moved to two different positions to suit the operator. Both MOA and MIL reticle styles are illuminated with 5 red and 5 green user-selectable brightness settings.
We hope to get our hands on one of these new Trijicon 5-50X scopes soon for testing. We’ll let you know how it stacks up against other high-magnification zoom scopes, such as the Vortex 10-60x52mm Golden Eagle, the Nightforce 15-55x52mm, and the March 5-50x56mm.
Please note, along with this 5-50x56mm scope, Trijicon has also introduced a 4.5-30x56mm RS30 Series scope. This 4.5-30X optic will be offered in both First Focal Plane and Second Focal Plane versions. SEE AccuPower Scope Brochure.
Product Tip from EdLongrange. Video and Trijicon Brochure from Erik Cortina.
Erik Cortina is one of the nation’s top F-Class shooters. A member of Team Lapua-Brux-Borden, Erik has been a top performer at National and World F-Class Championships. Erik is also a very smart guy and a skilled toolsmith who has upgraded his shooting equipment in interesting ways. Today we feature three “How-To” videos from Erik. These show how to upgrade a SEB Coaxial Rest, how to improve the performance of an RCBS Chargemaster, and how to create your own Modified Case for measuring length to lands.
1. How to Upgrade your SEB Co-Axial Joystick Rest
Joystick (coaxial) rests are used by top shooters in benchrest and F-Open disciplines. With coaxial rests, you can adjust both vertical and horizontal aim instantly in one fluid movement — there are no mariner wheels to spin or knobs to turn. Just gently stir the joystick to move up, down, or sideways. Erik Cortina explains: “If you want to get into F-Class (Open) and want to win, you should get a SEB rest. SEB makes an excellent product, but the one thing we upgrade automatically … is adding the F-Class feet. These have a bigger footprint and a spike on the bottom [so you can] dig the feet into the ground and make your rest a lot more stable.” In this video Erik installs a set of Blake Machine Co. F-Class feet. These feature a set-screw, so they are easy to attach and then remove for travel (no Loctite!). “Simple yet effective” declares Erik.
In the second half of the video (starting at 5:30), Erik installs a Dan Bramley Joystick Holder. This features two clamp-on cradles that hold the joystick crosswise below the top (see photo). This handy accessory ensures your handle always remains with the rest (and doesn’t get left at home when you travel to a big match). This joystick holder has been popular with competitors. Erik says, “The Bramley Joystick holder is $60.00 — money well spent.” To order, email Dan at dbramley [at] yahoo.com.
2. How to Make a Modified Case for the Hornady OAL Tool
In this video, Forum member Erik Cortina shows how to create a custom modified case for use with the Hornady Lock-N-Load Overall Length Gauge (formerly the Stoney Point Tool). While Hornady sells modified cases for many standard cartridges, if you shoot a wildcat such as the 6mm Dasher or .284 Shehane, you’ll need to create a custom modified case. And even if you shoot a standard cartridge such as the .308 Win, you can get more consistent measurements if you make a custom modified case from a piece of brass fired in your chamber.
MORE INFORMATION: Want to learn more? We published a much longer story in which Erik explains in greater detail how to made the Modified Case. That article illustrates the 5/16″ – 36 RH HSS Tap required and shows how to set up the lathe to drill and tap your case. If you are serious about making your own Modified Cases, you should Read the Full Article.
3. How to Make the RCBS ChargeMaster 1500 Work Better
Erik Cortina has been fiddling around with his RCBS ChargeMaster and he discovered something interesting. Through a series of tests he determined that the ChargeMaster dispensed slightly more precise charges when he trickled the last few 10ths of a grain on to the RCBS pan. Erik wasn’t expecting this result, but he confirmed there may be a slight benefit to this trickling method (as opposed to allowing the ChargeMaster to dispense the full charge). You can see Erik’s test procedure in this video:
We should note that Erik’s preferred method of weighing powder is to first dispense a slightly lower charge with the RCBS, transfer the pan to a laboratory-class Sartorius magnetic force restoration scale, then trickle up with his Omega (Dandy Products) Powder Trickler. However, if you don’t have a $800+ laboratory-grade scale, you might just try trickling on to the ChargeMaster pan.
MORE INFORMATION: We have published a more lengthy Bulletin Article that covers Erik’s Chargemaster Performance Findings in greater detail. That article has more photos plus a clever, bonus “Beep Defeat Tip”. If you own a Chargemaster, we recommend you READ the Full Article.
NOTE: Audio may auto-start when you click this graphic — turn down speakers at work
You should tune in to Kelly McMillan’s Taking Stock Internet Radio Show today, Friday, December 15, 2017. Two very smart and talented guys are featured on the show. Kelly’s first guest, Erik Cortina, is Captain of Team Lapua-Brux-Borden and one of American’s Top F-Class competitors. The second guest, Dan Dowling, is a respected name in the field of bolt-action rifle work, with his main focus being benchrest rifles and similar high-accuracy rifles. Today’s live show, and recorded archives, are hosted on the VoiceAmerica Sports Channel.
We have followed Erik’s career as he has risen to be one of the best F-Class and long-range shooters in the world. Texas State LR Champion (3 years in a row), Erik has placed Top 10 in the Berger SW Nationals, won a Bronze medal in World Championship with Rutland team (Team USA Red), placed 3rd in F-Class Nationals. Erik also has produced very informative shooting/reloading videos on his YouTube Channel. Erik tells us: “I am honored to be on Taking Stock with Kelly McMillan. As you all know, I enjoy passing on what I know so that other shooters can benefit from my experience. I received a lot of help from others, epecially Mike Downey and Mark Pharr, starting out, so I’m paying it forward. I also believe it’s a good way to grow the shooting sports.”
On today’s radio show, Erik added: “We will also discuss the importance of using quality equipment as it is the most reliable and gives me the best chance at winning. Another topic we will discuss is learning to win. I believe learning how to shoot is fairly easy, especially with all the info out there these days, but learning how to win, is the difference between a great shooter and a Champion.”
Erik Cortina shows one of his handsome F-Open Rifles at Berger SW Nationals.
You can also access previous episodes. Recent guests have included F-TR World Champion and King of 2 Miles Derek Rodgers, Multi-Time National High Power Champion Carl Bernosky, USA F-TR Team Captain Ray Gross, and GA Precision’s George Gardner.
About McMillan Fiberglass Stocks
Kelly McMillan is the president of McMillan Fiberglass Stocks (MFS). This company began in 1973 when Gale McMillan starting crafting benchrest stocks at home in his carport/garage. In 1975 MFS hired its first employee, Kelly McMillan. By 1979 Kelly was made a partner, and by 1984 Kelly was in charge of running the stock shop. Since that time MFS has continued to grow with innovation and design. Today McMillan Fiberglass Stocks has a 15,000 sq/ft facility and 65 employees.
Here’s an interesting project — using a second-hand barrel to upgrade an AR15. Our friend Erik Cortina decided to make his AR15, originally chambered in 6.8 SPC, into a 6.5 Grendel. Erik acquired a “pre-owned” 6.5-06 match barrel through our Shooters’ Forum. Erik inspected the barrel with a bore-scope and confirmed it was in good shape after the first few inches (past the chamber).
The 6.5-06 barrel had more than enough length, so he trimmed off the chamber end, then contoured the barrel to fit his AR15. This is a smart way to upgrade a gun without spending $350 or more on a brand new barrel.
In the first video, Erik explains the process of converting his 6.8 SPC AR15 into a 6.5 Grendel: “I take the upper completely apart and pull barrel off which will be used to take dimensions for new barrel. The new barrel will be turned from an old competition heavy barrel. All the barrel reaming will be done using JGS reamers. I will also use JGS reamers to make a seating and F/L sizing die.”
In the second video, Erik contours the “pre-owned” barrel to fit his AR. He uses an old bolt-action 6.5-06 competition barrel and cuts it to 17″ long and contours it to fit his AR-15. The barrel is turned down on a manual lathe to .750″ outside diameter for the majority of its length in order to fit the gas system barrel block that is made for a .750″ barrel. After contouring, the barrel will be threaded and chambered.
I have seen it time and time again, shooters on the line wrestling with their rifle trying to get the bolt closed while the wind is switching. They were too focused trying to get their bolt to close and getting their rifle settled back on the bags that they missed the wind switch. Bang… Eight! The straw that broke the camel’s back for me was at the 2017 Canadian Nationals. I was paired up with a young girl and she would try really hard to close the bolt on her rifle. The majority of the time she would get it to close, but often times she could not even get the round to chamber. She was focused on her rifle the entire time rather than on the conditions. When we completed our strings, she had five rounds that did not chamber out of 15! That is way too many! I told her she needed to think about full-length sizing with 0.002″ shoulder bump, or Controlled Full-length Sizing like I call it. I told her not to worry about losing accuracy. I told her that I full-length size all my rounds and asked if she noticed how smooth my bolt was and noticed my score. She said yes, they were both great!
Controlled Full-length Sizing Does NOT Harm Accuracy
I have found that Controlled Full-length Sizing does NOT hurt accuracy or shorten brass life. I find that I can focus much more on the conditions when I don’t have to think about chambering a round nor extracting it. It has become second nature. After firing, I keep my head welded to the stock, I open the bolt by placing my thumb on top of stock and rotating hand upwards. I reach in and retrieve spent case, place it back in ammo box, and pick up another loaded round and put in chamber. I verify conditions and when ready, I push the bolt in and close it with my index and middle finger.
With Controlled Full-length Sizing you “bump” the shoulder around .002″ for bolt guns.* Image courtesy Sinclair International which carries a variety of Full-length dies.
Whidden Full-Length Sizing Dies by AccurateShooter.com Editor
For proper Full-length sizing, you want a quality die that’s a very good match to your chamber. For our project rifles we usually turn to Whidden Gunworks which offers both bushing and non-bushing FL dies. And if you want the hot new option, check out Whidden’s patent-pending, click-adjustable FL-sizing die. This gives instant, precise control over shoulder bump. It works great.
*With gas guns, such as the AR10, you may want to increase shoulder bump to .003″ or more. With some benchrest cartridges, .0015″ bump may prove optimal. But .002″ is a good starting point.
“A big congratulations to Bob Mead (1582-68X), who utterly destroyed the competition in tricky wind conditions to take the Gold.” — Jay Christopherson, 2017 F-Open Nationals Second Place.
In this 15-minute video, Team Lapua’s Erik Cortina interviews Robert Mead, the 2017 LR F-Open Champion. Robert (Bob) discusses his wind reading techniques with Erik, and the newly-crowned F-Open Champ explains how to set up a reliable wind zero. Bob also discusses cartridge choices in F-Open. He admits the straight .284 may be the tightest grouping 7mm cartridge, but he has used the 7mm RSAUM for a decade now. He believes the RSAUM may the best cartridge for 1,000 yards in 7mm, all things considered (grouping ability, ballistics): “To me it’s a light magnum, it’s capable of high speed, yet burns less powder than your regular magnums. [But] it’s a finicky cartridge — you’ve got to do a fair amount of load development.”
Every serious F-Class competitor should watch this video start to finish:
Credit Erik Cortina for video and the photo of Robert Mead with trophy above.
“A big congratulations to Bob Mead (1582-68X), who utterly destroyed the competition in tricky wind conditions to take the Gold.” — Jay Christopherson, F-Open Second Place.
The 2017 F-Class National Championships in Lodi, Wisconsin are now history. Hail the new Champions: Robert Mead, F-Open (1582-68X) and Ian Klemm, F-TR (1557-56X). Hosted by the Winnequah Gun Club, the Nationals drew about 75 F-Open shooters and 45 F-TR competitors, down from last year. In F-Open, Robert Mead shot brilliantly in tough conditions to finish 14 points ahead of his closest competitor, AccurateShooter.com’s System Administrator Jay Christopherson. Erik Cortina was just one point behind Jay, but Erik had the high X-Count for the match at 71X.
Photos of Robert Mead and Ian Klemm courtesy Erik Cortina.
In F-TR, Ian Klemm also won by a margin of 14 points. This was an impressive win by Ian, given the challenging winds and weather. F-TR runner-up Todd Sanders also shot remarkably well, considering he is a relative newcomer to F-Class. Forum member KyBountyHunter observed: “Outstanding shooting this week gentlemen, in some of the most challenging conditions that I’ve seen. Congrats to all the winners. Ian — fantastic job taking First Place (well deserved) [and] special congrats to Todd. For this only being his second year in F-TR, he’s going to be force to be reckoned with for a long time!”.
Final Results for F-Open (TOP 10):
1. Robert Mead: 1582-68X HM
2. Jay Christopherson: 1568-59X HM
3. Erik Cortina: 1567-71X HM
4. John Myers: 1558-64X HM
5. Pat Scully: 1558-50X HM
6. Larry Bartholome: 1554-55X HM
7. Robert Sebold: 1554-41X HM
8. Steve Harp: 1553-58X HM
9. Jeff Hopkins: 1551-49X MA
10. Lou Murdica: 1550-46X MA
Final Results for F-T/R (TOP 10):
1. Ian Klemm: 1557-56X HM
2. Todd Sanders: 1543-43X MA
3. Brad Sauve: 1542-44X MA
4. Laura Perry: 1539-46X EX
5. Daniel Pohlabel: 1534-49X MA
6. Josh Moore: 1529-37X EX
7. Ken Klemm: 1528-38X MA
8. Bob Lorenz: 1525-47X EX
9. Raymond Weaver: 1522-36X HM
10. Alan Barnhart: 1521-31X HM
Strong Performances by Members of Team Lapua-Borden-Brux
Jay Christopherson posted: “A big congratulations to Bob Mead (1582-68X), who utterly destroyed the competition in tricky wind conditions to take the Gold. This was a great end to the 2017 competition season for me as I managed to hang on by the skin of my fingertips to win Silver at the 2017 F-Class US National Championships (F-Open).” For the record, Team Lapua-Borden-Brux ended up with all five present members of the team in the Top 8 of the Grand Aggregate.
Jay Christopherson (2nd, 1568-59X, Silver)
Erik Cortina (3rd, 1567-71X, Bronze)
Pat Scully (5th, 1558-50X)
Bob Sebold (7th, 1554-41X)
Steve Harp (8th, 1553-58X)
In team competition, Team Lapua-Borden Brux won the F-0pen Long Range Championship as well as the Mid-Range Championship. Jay told us: “That was some outstanding shooting by great team members. I’m really looking forward to the 2018 season.” Erik Cortina added: “So proud of our team. We conquered the 2017 LR National Championship as well as the Mid-Range National Championship. We could not have done it without our sponsors: Lapua, Borden Actions, and Brux Barrels.”
In the F-TR Team Competition, mighty Team Sinclair triumphed yet again, winning its 10th Long Range National Championship. Team member Paul Phillips offered this interesting factoid: “This year we won with the original four members we had in 2004 plus Dan Pohlabel. It’s pretty awesome to be shooting with the same guys for 13 years! What a great run since 2004.” And those same four also all hail from Midland, Michigan (Midland County Sportsman’s Club). Team Sinclair still holds the 4-man Team 1000-yard National Record. Shown below, L to R, are team members: Daniel J. Pohlabel, Paul Phillips, Raymond Gross (Coach), Brad Sauve, and John Droelle.
All Team Sinclair members use identical hardware: McMillan XiT stock, Kelbly Panda action, Bartlein barrel, Nightforce scope, and Phoenix Precision bipod. All shoot Berger 200-20X bullets in Lapua brass.
The One that Got Away — Almost Matching F-Open 20-Shot Record
Erik Cortina shot a superb 200-16X during the competition (see electronic target scoring screen below). That was just one X shy of the current 200-17X National Record. Erik observed: “So close, yet so far. Almost matched the National Record of 200-17X but shot a ten on my very last shot. Everything felt good but luck was not on my side.”