|
|
February 28th, 2026

We are re-publishing this article at the request of Forum members who found the information very valuable. If you haven’t read this Safety Tip before, take a moment to learn how you can inspect your fired brass to determine if there may be a potential for case separation. A case separation can be dangerous, potentially causing serious injury.
 On the highly-respected Riflemans’ Journal blog, created by our late, dear friend German Salazar*, there was an excellent article about Cartridge Case-Head Separation. In this important article, Salazar (aka GS Arizona) examined the causes of this serious problem and explained the ways you can inspect your brass to minimize the risk of a case-head separation. As cases get fired multiple times and then resized during reloading, the cases can stretch. Typically, there is a point in the lower section of the case where the case-walls thin out. This is your “danger zone” and you need to watch for tell-tale signs of weakening. On the highly-respected Riflemans’ Journal blog, created by our late, dear friend German Salazar*, there was an excellent article about Cartridge Case-Head Separation. In this important article, Salazar (aka GS Arizona) examined the causes of this serious problem and explained the ways you can inspect your brass to minimize the risk of a case-head separation. As cases get fired multiple times and then resized during reloading, the cases can stretch. Typically, there is a point in the lower section of the case where the case-walls thin out. This is your “danger zone” and you need to watch for tell-tale signs of weakening.
The photo below shows a case sectioned so that you can see where the case wall becomes thinner near the web. You can see a little arrow into the soot inside the case pointing to the thinned area. This case hadn’t split yet, but it most likely would do so after one or two more firings.

Paper Clip Hack for Detecting Problems
The article provided a great, easy tip for detecting potential problems. You can use a bent paper clip to detect potential case wall problems. Slide the paper clip inside your case to check for thin spots. GS Arizona explains: “This simple little tool (bent paper clip) will let you check the inside of cases before you reload them. The thin spot will be immediately apparent as you run the clip up the inside of the case. If you’re seeing a shiny line on the outside and the clip is really hitting a thin spot inside, it’s time to retire the case. If you do this every time you reload, on at least 15% of your cases, you’ll develop a good feel for what the thin spot feels like and how it gets worse as the case is reloaded more times. And if you’re loading the night before a match and feel pressured for time — don’t skip this step!”
* Sadly, German Salazar passed away unexpectedly on June 21, 2022 at age 62. German was a great inspiration to this site who helped guide the creation of the AccurateShooter Forum. A brilliant man, expert attorney, and top-tier marksman, German will be sorely missed in the shooting sports world.
January 27th, 2025
We are re-publishing this article at the request of Forum members who found the information very valuable. If you haven’t read this Safety Tip before, take a moment to learn how you can inspect your fired brass to determine if there may be a potential for case separation. A case separation can be dangerous, potentially causing serious injury.
On the highly-respected Riflemans’ Journal blog, created by our late, dear friend German Salazar*, there was an excellent article about Cartridge Case-Head Separation. In this important article, Salazar (aka GS Arizona) examined the causes of this serious problem and explained the ways you can inspect your brass to minimize the risk of a case-head separation. As cases get fired multiple times and then resized during reloading, the cases can stretch. Typically, there is a point in the lower section of the case where the case-walls thin out. This is your “danger zone” and you need to watch for tell-tale signs of weakening.
The photo below shows a case sectioned so that you can see where the case wall becomes thinner near the web. You can see a little arrow into the soot inside the case pointing to the thinned area. This case hadn’t split yet, but it most likely would do so after one or two more firings.
Paper Clip Hack for Detecting Problems
The article provided a great, easy tip for detecting potential problems. You can use a bent paper clip to detect potential case wall problems. Slide the paper clip inside your case to check for thin spots. GS Arizona explains: “This simple little tool (bent paper clip) will let you check the inside of cases before you reload them. The thin spot will be immediately apparent as you run the clip up the inside of the case. If you’re seeing a shiny line on the outside and the clip is really hitting a thin spot inside, it’s time to retire the case. If you do this every time you reload, on at least 15% of your cases, you’ll develop a good feel for what the thin spot feels like and how it gets worse as the case is reloaded more times. And if you’re loading the night before a match and feel pressured for time — don’t skip this step!”
* Sadly, German Salazar passed away unexpectedly on June 21, 2022 at age 62. German was a great inspiration to this site who helped guide the creation of the AccurateShooter Forum. A brilliant man, expert attorney, and top-tier marksman, German will be sorely missed in the shooting sports world.
March 27th, 2023

We are re-publishing this article at the request of Forum members who found the information very valuable. If you haven’t read this Safety Tip before, take a moment to learn how you can inspect your fired brass to determine if there may be a potential for case separation. A case separation can be dangerous, potentially causing serious injury.
 On the highly-respected Riflemans’ Journal blog, created by our late dear friend German Salazar*, there was an excellent article about Cartridge Case-Head Separation. In this important article, Salazar (aka GS Arizona) examined the causes of this serious problem and explained the ways you can inspect your brass to minimize the risk of a case-head separation. As cases get fired multiple times and then resized during reloading, the cases can stretch. Typically, there is a point in the lower section of the case where the case-walls thin out. This is your “danger zone” and you need to watch for tell-tale signs of weakening. On the highly-respected Riflemans’ Journal blog, created by our late dear friend German Salazar*, there was an excellent article about Cartridge Case-Head Separation. In this important article, Salazar (aka GS Arizona) examined the causes of this serious problem and explained the ways you can inspect your brass to minimize the risk of a case-head separation. As cases get fired multiple times and then resized during reloading, the cases can stretch. Typically, there is a point in the lower section of the case where the case-walls thin out. This is your “danger zone” and you need to watch for tell-tale signs of weakening.
The photo below shows a case sectioned so that you can see where the case wall becomes thinner near the web. You can see a little arrow into the soot inside the case pointing to the thinned area. This case hadn’t split yet, but it most likely would do so after one or two more firings.

Paper Clip Hack for Detecting Problems
The article provided a great, easy tip for detecting potential problems. You can use a bent paper clip to detect potential case wall problems. Slide the paper clip inside your case to check for thin spots. GS Arizona explains: “This simple little tool (bent paper clip) will let you check the inside of cases before you reload them. The thin spot will be immediately apparent as you run the clip up the inside of the case. If you’re seeing a shiny line on the outside and the clip is really hitting a thin spot inside, it’s time to retire the case. If you do this every time you reload, on at least 15% of your cases, you’ll develop a good feel for what the thin spot feels like and how it gets worse as the case is reloaded more times. And if you’re loading the night before a match and feel pressured for time — don’t skip this step!”
* Sadly, German Salazar passed away unexpectedly on June 21, 2022 at age 62. German was a great inspiration to this site and help guide the creation of the AccurateShooter Forum. A brilliant man, expert attorney, and top-tier marksman, German will be sorely missed in the shooting sports world.
March 23rd, 2021
We are re-publishing this article at the request of Forum members who found the information very valuable. If you haven’t read this Safety Tip before, take a moment to learn how you can inspect your fired brass to determine if there may be a potential for case separation. A case separation can be dangerous, potentially causing serious injury.
On the respected Riflemans’ Journal blog there was an excellent article about Cartridge Case-Head Separation. In this important article, Journal Editor GS Arizona examined the causes of this serious problem and explained the ways you can inspect your brass to minimize the risk of a case-head separation. As cases get fired multiple times and then resized during reloading, the cases can stretch. Typically, there is a point in the lower section of the case where the case-walls thin out. This is your “danger zone” and you need to watch for tell-tale signs of weakening.
The photo below shows a case sectioned so that you can see where the case wall becomes thinner near the web. You can see a little arrow into the soot inside the case pointing to the thinned area. This case hadn’t split yet, but it most likely would do so after one or two more firings.
Paper Clip Hack for Detecting Problems
The article provided a great, easy tip for detecting potential problems. You can use a bent paper clip to detect potential case wall problems. Slide the paper clip inside your case to check for thin spots. GS Arizona explains: “This simple little tool (bent paper clip) will let you check the inside of cases before you reload them. The thin spot will be immediately apparent as you run the clip up the inside of the case. If you’re seeing a shiny line on the outside and the clip is really hitting a thin spot inside, it’s time to retire the case. If you do this every time you reload, on at least 15% of your cases, you’ll develop a good feel for what the thin spot feels like and how it gets worse as the case is reloaded more times. And if you’re loading the night before a match and feel pressured for time — don’t skip this step!”
March 15th, 2015
Last month we showcased an Illustrated History of the Second Amendment by attorney Robert J. McWhirter. That fascinating article, published in Arizona Attorney magazine, explained the history and evolution of the Second Amendment in a novel way. McWhirter included dozens of annotations with images from old books, magazines, even stills from movies and television shows. This was certainly the most entertaining discussion of the Second Amendment ever published.

This month, Arizona Attorney released Part Two of McWhirter’s Illustrated History of the Second Amendment. Like Part One, this article is informative and chock full of fascinating historical footnotes. The footnotes are just as interesting as the main article, as they feature dozens of eye-catching graphics — everything from 18th century lithographs to modern movie posters. Click the Links below to read both Part Two and Part One:
Second Amendment History PART TWO | Second Amendment History PART ONE
Part Two of McWhirter’s illustrated history addresses interesting historical subtopics such as: Guns and Colonial Slavery, Militias and Minutemen, and the Founders’ concerns about Government Tyranny. If you have any interest in American history or Constitutional law, check out this article — it’s definitely worth a read. Part Two of McWhiter’s Illustrated History is available FREE online in digital, eZine Format.
 Story Tip from German Salazar. We welcome reader submissions.
February 13th, 2015
Ben Hur

Ben Avery

Was this Ben Hur or Ben Avery? With all the wheels rolling around the place, the Berger SW Nationals looked a bit like the Chariot scene from the 1959 Hollywood blockbuster movie.
Folks attending a big match such as the Berger Southwest Nationals must haul a lot of gear — both to the range and from vehicles to the firing lines (and then back again). This transportational necessity has inspired shooters to develop a wide variety of modern chariots. Here’s a selection of the “wheeled contrivances” we found at Ben Avery This week.
Don’t mess with Texas. That kind of says it all…

Folding carts were the favored mode of transport. Yes there are TWO carts in the back of this SUV.

Grizzly President Shiraz Balolia, appropriately enough, customized his cart with ursine artwork.


This rig had a custom bracket to support a rifle vertically. This clever invention preserves space in the main cargo section.

Felix Solis of the U.S. Veterans’ Rifle Team customized his travel van’s interior. Rifles are secured upright in the left compartment, with shooting coats on the right.

The little red wagon offers four-wheel stability. This one even has its own license plate.


Wait a minute — is that a stroller? Actually these rigs can be easily adapted to hold rifles and rests. Check out Craigslist for low-cost, “previously owned” strollers.

Past F-Class Nat’l Champ Larry Bartholome was seen rolling around with a familiar cart. This cart used to belong to our good friend German Salazar. Hey German, we all miss your presence at Ben Avery…


November 23rd, 2014
The .308 Winchester, a shortened version of the .30-06, has almost completely replaced the .30-06 in NRA competition. The .308 is required for Palma shooting, so it is also used by many Palma competitors in other long-range and mid-range prone matches. However, with the exception of M1 Garand matches, you won’t see many .30-06 rifles on the firing lines. Does that mean the .30-06 is obsolete? Is the .308 Win really much more accurate? Or does it just offer the advantages of reduced recoil and reduced powder consumption?

Cartridge photos courtesy Deuce45s.com, a leading source of specialized military cartridges.
In his Sibling Rivalry: .308 vs. .30-06 article on the Rifleman’s Journal website, German Salazar argues that the .30-06 remains a viable competition cartridge, particularly for the long-range game. This isn’t just a subjective opinion. German has data to back up the argument that the .30-06 can still do the job.
German compares the actual scores produced by his .308 Win rifles with the scores from his .30-06 rifles. German analyzes scores, over a two-year period, shot by “matched pair” rifles (one in each caliber) with similar actions, stocks, sights, and barrels. For comparison purposes, German also includes score data from his 6XC, a modern low-recoil chambering.

RESULTS: .308 Has Small Edge at Middle Distance, But .30-06 Is Better at Long Range
Surprisingly, the .30-06 performed nearly as well as the .308 at middle distances. The .30-06 delivered 99.2% of max possible scores vs. 99.5% for the .308 Win. Notably, at 1000 yards, the .30-06 racked up 97.7% of max scores vs. 97.3% for the .308 Win. So, at 1000 yards, the .30-06 actually proved superior to the .308 Win. German explains: “This isn’t too surprising when one considers [the .308’s] limited case capacity for the bullet weights typically used in Long-Range shooting. They just run out of steam and dip perilously close to the transonic range as they approach 1000 yards of flight. The extra 150 fps or so that can be safely obtained from the .30-06 case really pays off at 1000 yards.”
|
Mid-Range Comparison
In NRA Mid-Range matches (500 and 600 yards), the average score and percentage of possible score for each cartridge was as follows:
.308 – 597-36X (99.5%), 960 rounds fired
6XC – 596-35X (99.3%),1260 rounds fired
.30-06 – 595-31X (99.2%), 2580 rounds fired
If we look at the score averages, the .308 comes out on top at the Mid-Range distances… by 0.3% of the possible score. By the way, notice that the 6XC, as good as it is, simply straddles the .30 caliber cartridges; it is not the winner.
Long-Range Comparison
German rarely shoots the .308 in matches that are only 1000 yards; most of his 1000-yard .308 shooting is done in Palma matches which include 800, 900 and 1000 yards. To make the comparison useful, the Long-Range results are presented only as a percentage of the possible score and the 800- and 900-yard stages of Palma matches were NOT included.
In NRA Long-Range and Palma matches, the average percentage of possible score for each cartridge at 1000 yards was as follows:
6XC – 98.9%, 360 rounds fired
.30-06 – 97.7%, 460 rounds fired
.308 – 97.3%, 490 rounds fired
Editor’s Note: Among the three cartridges German studied, the 6XC actually proved best at 1000 yards, delivering 98.9% of the maximum possible scores. The .30-06 was second-best with 97.7%, slightly better than the .308 Win at 97.3%.
|
You’ll want to read German’s full Sibling Rivalry article, which includes an interesting history of the .30-06 and .308 in High Power shooting, along with tables showing German’s actual scores with his .30-06, .308 Win, and 6XC rifles. German’s story first ran in 2011.
November 6th, 2014
 In response to questions from a fellow F-Class shooter, German Salazar offered some expert advice in an article entitled: Basics: A Few Wind Reading Tips. Here are highlights from that essay. You can read the entire article on German’s Rifleman’s Journal Website. German cautions that: “I certainly am not attempting to make this short item into a comprehensive lesson in wind reading, but there may be a nugget or two in here for the newer shooter. There is, however, no substitute for range time and coaching.” In response to questions from a fellow F-Class shooter, German Salazar offered some expert advice in an article entitled: Basics: A Few Wind Reading Tips. Here are highlights from that essay. You can read the entire article on German’s Rifleman’s Journal Website. German cautions that: “I certainly am not attempting to make this short item into a comprehensive lesson in wind reading, but there may be a nugget or two in here for the newer shooter. There is, however, no substitute for range time and coaching.”
Preliminary Matters — Holding Off vs. Knob-Turning
Let’s begin by eliminating one topic altogether — I realize that the predominant method of wind correction in F-Class is holding-off with the crosshairs of your scope rather than adjusting the windage knob. I am a firm believer in aiming at the center and turning the knob as needed, but we’ll leave that for another time and focus on seeing what the wind is doing.
The Wave — Wind Cycles and Shot Timing
I find that most shooters begin to shoot immediately when the time commences rather than waiting for an appropriate moment in the cycle, this often leads to lost points early on. If you’ve been scoring prior to shooting, hopefully you’ve observing the flags and your shooter’s shot placement. It’s a very useful way of gaining some insight into the day’s wind patterns before shooting.
 My technique is based on the understanding of wind as a cyclical wave motion. That statement alone should give you plenty to think about[.] Imagine for a moment, a surfer. He waits for a gentle swell, gets moving on it and rides it through it’s growth and ultimately its crescendo and hopefully avoids being swallowed in its crash. Wind typically behaves in the same fashion as that wave and a smart shooter behaves as does the surfer — get on early in the wave, ride through the major change and get off at the right moment. Knowing when to stop shooting is every bit as important as shooting quickly through the predictable portion of the wave; getting back on to the next wave is a matter of delicate judgment and timing. My technique is based on the understanding of wind as a cyclical wave motion. That statement alone should give you plenty to think about[.] Imagine for a moment, a surfer. He waits for a gentle swell, gets moving on it and rides it through it’s growth and ultimately its crescendo and hopefully avoids being swallowed in its crash. Wind typically behaves in the same fashion as that wave and a smart shooter behaves as does the surfer — get on early in the wave, ride through the major change and get off at the right moment. Knowing when to stop shooting is every bit as important as shooting quickly through the predictable portion of the wave; getting back on to the next wave is a matter of delicate judgment and timing.
When you are on that rising (or falling) wave, the idea is to shoot very quickly to minimize the amount of change between shots and to make a small adjustment on each shot. Too many shooters waste time trying to analyze the exact amount of the change, by which time it has changed even more! Get on with it, click or hold over a set amount and fire the next shot quickly. This is the foundation of how I shoot and it is very effective as long as you know when to start, when to stop and you have a good man working the target – a slow marker is the death of this method.
Watch Shots from Other Shooters
We all watch the wind flags, of course, and the trees if your range is so blessed (ours are fairly barren), and many other small wind indicators. Watching the shots of your fellow shooter can also be a very useful tool and should be observed whenever possible. When a good shooter next to you comes up with a poor shot, it should signal you to stop and reassess conditions as they may not be what they appear.
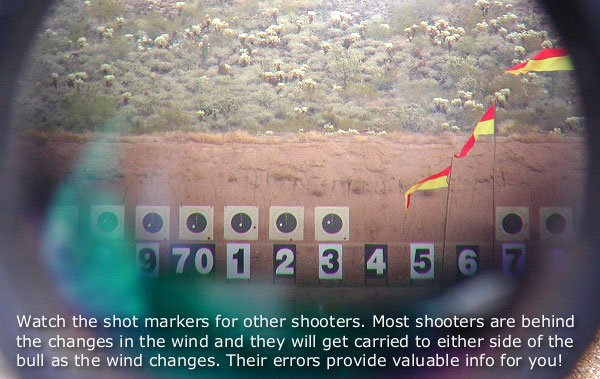
While scoring for another shooter, take a moment to scan the line of targets. You’ll be surprised at how most of the shot markers move in unison to one side and then the other. The sad truth is that most shooters are behind the changes in the wind and they will get carried to either side of the bull as the wind changes. You’ll see this in the targets as they come up, and once learned, you’ll find that the line of targets is as useful as another row of flags.

October 14th, 2014
When we recently ran a story about Dennis Santiago’s new snakeskin Eliseo Tubegun, folks asked us if this kind of rifle can be competitive in F-Class competition. Here’s a detailed answer to that question by G. Salazar, who runs the Riflemans Journal Website.
A while back, G. Salazar published a three-part article on Shooting The Tubegun in F-Class. Links for all three segments are found below. The article covers some of the hardware German engineered to adapt his tubegun for long-range F-Class shooting with scope. If you’re an F-Classer, or just a fan of tubeguns, you should read German’s article, in all its parts.
READ Tubegun in F-Class Part 1
READ Tubegun in F-Class Part 2
READ Tubegun in F-Class Part 3
In the intro to his multi-part F-Class Tubegun article, German explains:
Salazar: The tubegun has truly changed the face of High Power shooting over the past five years or so. Specifically, the CSS (Gary Eliseo) tubeguns, which are made for a broad variety of actions and configurable to single-shot or repeater, have truly helped the sport to grow. That’s not just idle talk, the two principal factors that made the tubegun so important to our growth are the ease of transition for AR15 shooters moving into a bolt-action rifle and the absolutely ridiculous length of time it currently takes to get a stock from the conventional stock makers. My last conventional stock took well over two years from order to delivery (plain fiberglass). One of my friends has now been waiting four years for a simple wood stock for a smallbore rifle. By contrast, tubeguns, which are largely CNC machined, are delivered in a reasonably short time — weeks or a couple of months at most.

Notwithstanding the foregoing, the tubegun would never have attained its present success if it weren’t for one simple fact — they are brutally accurate. I have three CSS tubeguns, one chambered in .308 and two in .30-06 and they are my favorite prone rifles due to their accuracy and great ergonomics. Those factors are just as appealing to an F-Class competitor as to a prone shooter, and indeed, the tubegun is making solid inroads into F-Class. READ MORE…
READ MORE of Part 1, The Tubegun in F-Class
May 7th, 2014
We first ran this story a year ago. Since then, many readers asked us: “Is there a good article that explains how to get started in F-Class?” Indeed there is… Rod Vigstol provides tips for F-Class rookies, plus a checklist of items to bring to the range.
How Easy it is to Have Fun with Rifles and Equipment You Probably Already Have….
Forum member Rod Vigstol (aka Nodak7mm) has written a great Introduction to F-Class for shooters getting started in this rewarding discipline. Rod’s article, which appears in German Salazar’s Rifleman’s Journal website, covers F-Class basics and addresses concerns that “newbies” may have when trying a new shooting sport. Rod stresses that most guys who own a varmint-hunting or tactical rig likely have nearly all the gear they need to give F-Class competition a try.

CLICK HERE to read Rod Vigstol’s ‘Getting Started in F-Class’ article on Rifleman’s Journal.com
Rod explains: “If you’re reading this, you have more than just a general interest in the shooting sports and in the awesome rifles that shoot tiny groups at insane distances. You probably even have friends that enjoy shooting as much as you do. The quandary you may find yourself in is your friends haven’t quite jumped into it head-first like you have and they haven’t spent a lot of money and time obtaining the equipment you have to go shoot these matches. But you know what? Your prairie-dog shooting buddy or coyote-hunter friend can attend these matches and shoot alongside with you. He or she more than likely already has the basic equipment needed to shoot a match.” Most varmint shooters already have a suitable, accurate rifle and the following equipment:
• A variable-power scope in the 4.5-14x range or higher.
• A front bipod like the trusty old Harris 9″-13″, or maybe even a basic pedestal front rest.
• A rear sand-bag or similar sand-sock to rest the butt stock.
• A basic shooting mat from Midway or at least a piece of carpet or canvas to lay on.

Rod also provides a handy checklist of items to bring to the range. These include: Canvas or carpet strip (to set under bipod), Notebook, Kitchen Timer, Cleaning Rod, Camp Chair, Elbow Pads, Shooting Hat, and Open Bolt Indicator (OBI). Along with rifle, bipod (or front rest), rear bag, and ammo, that’s pretty much all you need.

Rod encourages all shooters to give F-Class a try — even novices. Rod explains: “We have all been rookies, newbies, new kids on the block or whatever. So we all have a good idea of what may be going on in your mind, the questions and concerns you may have. I’m telling you this sport is full of fantastic people who deep down find it far more fulfilling to help a new shooter get started than running a clean target. You just have to take the first step to get involved.”
CLICK HERE To read the entire article on Rifleman’s Journal.com. We’ve only provided a small sample of Rod’s article; it is definitely worth reading in its entirety.
|


