|
|
April 29th, 2026

Photo shows the ZEISS LRP S5 318-50 first focal plane (FFP) scope.
“A bullet launched at a higher altitude is able to fly slightly farther (in the thinner air) for every increment of downward movement. Effectively, the bullet behaves as if it has a higher ballistic coefficient.”
A few seasons back a good friend ventured to the high country of Colorado to pursue elk. He recently zeroed his rifle in California, at a range just a few hundred feet Above Mean Sea Level (AMSL). He wondered if the higher altitude in Colorado could alter his ballistics. The answer is a definite yes. However the good news is that free ballistics calculators can help you plot reliable drop charts for various shooting locations, high or low.
 The question has been posed: “What effect does altitude have on the flight of a bullet?” The simplistic answer is that, at higher altitudes, the air is thinner (lower density), so there is less drag on the bullet. This means that the amount of bullet drop is less at any given flight distance from the muzzle. Since the force of gravity is essentially constant on the earth’s surface (for practical purposes), the bullet’s downward acceleration doesn’t change, but a bullet launched at a higher altitude is able to fly slightly farther (in the thinner air) for every increment of downward movement. Effectively, at higher altitudes, the bullet behaves as if it has a higher ballistic coefficient. The question has been posed: “What effect does altitude have on the flight of a bullet?” The simplistic answer is that, at higher altitudes, the air is thinner (lower density), so there is less drag on the bullet. This means that the amount of bullet drop is less at any given flight distance from the muzzle. Since the force of gravity is essentially constant on the earth’s surface (for practical purposes), the bullet’s downward acceleration doesn’t change, but a bullet launched at a higher altitude is able to fly slightly farther (in the thinner air) for every increment of downward movement. Effectively, at higher altitudes, the bullet behaves as if it has a higher ballistic coefficient.
Forum member Milanuk explains that the key factor is not altitude, but rather air pressure. Milanuk writes:
“In basic terms, as your altitude increases, the density of the air the bullet must travel through decreases, thereby reducing the drag on the bullet. Generally, the higher the altitude, the less the bullet will drop. For example, I shoot at a couple ranges here in the Pacific Northwest. Both are at 1000′ AMSL (Above Mean Sea Level) or less. I’ll need about 29-30 MOA to get from 100 yards to 1000 yards with a Berger 155gr VLD at 2960 fps. By contrast, in Raton, NM, located at 6600′ AMSL, I’ll only need about 24-25 MOA to do the same. That’s a significant difference.
Note that it is the barometric pressure that really matters, not simply the nominal altitude. The barometric pressure will indicate the reduced pressure from a higher altitude, but it will also show you the pressure changes as a front moves in, etc. which can play havoc w/ your calculated come-ups. Most altimeters are simply barometers that read in feet instead of inches of mercury.”
As Milanuk states, it is NOT altitude per se, but the LOCAL barometric pressure (sometimes called “station pressure”) that is key. The two atmospheric conditions that most effect bullet flight are air temperature, and barometric pressure. Normally, humidity has a negligible effect. It’s important to remember that the barometric pressure reported on the radio (or internet) may be stated as a sea level equivalency. So in Denver (at 6,000 feet AMSL), if the local pressure is 24″, the radio will report the barometric pressure to be 30″. If you do high altitude shooting at long range, bring along a Kestrel, or remember to mentally correct the radio station’s pressure, by 1″ per 1,000 feet.
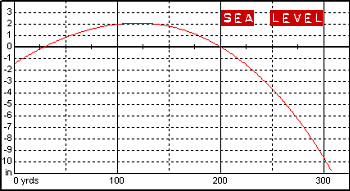
Trajectory of Bullet fired at Sea Level
 Trajectory of Bullet fired at 20,000 feet

You can do your own experimental calculations using JBM Online Ballistics (free to use). Here is an extreme example, with two printouts (generated with Point Blank software), one showing bullet trajectory at sea level (0′ altitude) and one at 20,000 feet. For demonstration sake, we assigned a low 0.2 BC to the bullet, with a velocity of 3000 fps.
To learn more about all aspects of Exterior Ballistics, Hornady has a useful discussion of External Ballistics including the effects of altitude and temperature. To dig deeper, Sierra Bullets has a comprehensive Exterior Ballistics Resource Page with multiple sections from the Sierra Manual (4th and 5th Editions), including:
Section 3.0: Exterior Ballistic Effects on Bullet Flight
Section 3.1: Effects of Altitude and Atmospheric Conditions
Section 3.2: Effects of Wind
Section 3.3: Effects of Shooting Uphill or Downhill
Example from Section 3.0: “When a bullet flies through the air, two types of forces act on the bullet to determine its path (trajectory) through the air. The first is gravitational force; the other is aerodynamics. Several kinds of aerodynamic forces act on a bullet: drag, lift, side forces, Magnus force, spin damping force, pitch damping force, and Magnus cross force. The most important of these aerodynamic forces is drag. All the others are very small in comparison when the bullet is spin-stabilized.”
August 16th, 2024
Photo shows the new ZEISS LRP S5 318-50 first focal plane (FFP) scope.
“A bullet launched at a higher altitude is able to fly slightly farther (in the thinner air) for every increment of downward movement. Effectively, the bullet behaves as if it has a higher ballistic coefficient.”
A few seasons back a good friend ventured to the high country of Colorado to pursue elk. He recently zeroed his rifle in California, at a range just a few hundred feet Above Mean Sea Level (AMSL). He wondered if the higher altitude in Colorado could alter his ballistics. The answer is a definite yes. However the good news is that free ballistics calculators can help you plot reliable drop charts for various shooting locations, high or low.
The question has been posed: “What effect does altitude have on the flight of a bullet?” The simplistic answer is that, at higher altitudes, the air is thinner (lower density), so there is less drag on the bullet. This means that the amount of bullet drop is less at any given flight distance from the muzzle. Since the force of gravity is essentially constant on the earth’s surface (for practical purposes), the bullet’s downward acceleration doesn’t change, but a bullet launched at a higher altitude is able to fly slightly farther (in the thinner air) for every increment of downward movement. Effectively, at higher altitudes, the bullet behaves as if it has a higher ballistic coefficient.
Forum member Milanuk explains that the key factor is not altitude, but rather air pressure. Milanuk writes:
“In basic terms, as your altitude increases, the density of the air the bullet must travel through decreases, thereby reducing the drag on the bullet. Generally, the higher the altitude, the less the bullet will drop. For example, I shoot at a couple ranges here in the Pacific Northwest. Both are at 1000′ AMSL (Above Mean Sea Level) or less. I’ll need about 29-30 MOA to get from 100 yards to 1000 yards with a Berger 155gr VLD at 2960 fps. By contrast, in Raton, NM, located at 6600′ AMSL, I’ll only need about 24-25 MOA to do the same. That’s a significant difference.
Note that it is the barometric pressure that really matters, not simply the nominal altitude. The barometric pressure will indicate the reduced pressure from a higher altitude, but it will also show you the pressure changes as a front moves in, etc. which can play havoc w/ your calculated come-ups. Most altimeters are simply barometers that read in feet instead of inches of mercury.”
As Milanuk states, it is NOT altitude per se, but the LOCAL barometric pressure (sometimes called “station pressure”) that is key. The two atmospheric conditions that most effect bullet flight are air temperature, and barometric pressure. Normally, humidity has a negligible effect. It’s important to remember that the barometric pressure reported on the radio (or internet) may be stated as a sea level equivalency. So in Denver (at 6,000 feet AMSL), if the local pressure is 24″, the radio will report the barometric pressure to be 30″. If you do high altitude shooting at long range, bring along a Kestrel, or remember to mentally correct the radio station’s pressure, by 1″ per 1,000 feet.
Trajectory of Bullet fired at Sea Level
Trajectory of Bullet fired at 20,000 feet
You can do your own experimental calculations using JBM Online Ballistics (free to use). Here is an extreme example, with two printouts (generated with Point Blank software), one showing bullet trajectory at sea level (0′ altitude) and one at 20,000 feet. For demonstration sake, we assigned a low 0.2 BC to the bullet, with a velocity of 3000 fps.
To learn more about all aspects of Exterior Ballistics, Hornady has a useful discussion of External Ballistics including the effects of altitude and temperature. To dig deeper, Sierra Bullets has a comprehensive Exterior Ballistics Resource Page with multiple sections from the Sierra Manual (4th and 5th Editions), including:
Section 3.0: Exterior Ballistic Effects on Bullet Flight
Section 3.1: Effects of Altitude and Atmospheric Conditions
Section 3.2: Effects of Wind
Section 3.3: Effects of Shooting Uphill or Downhill
Example from Section 3.0: “When a bullet flies through the air, two types of forces act on the bullet to determine its path (trajectory) through the air. The first is gravitational force; the other is aerodynamics. Several kinds of aerodynamic forces act on a bullet: drag, lift, side forces, Magnus force, spin damping force, pitch damping force, and Magnus cross force. The most important of these aerodynamic forces is drag. All the others are very small in comparison when the bullet is spin-stabilized.”
August 5th, 2017

The movie “The Patriot” gave us the phrase “Aim small, miss small”. While that’s a good mantra, aiming strategies for long-range competition are a bit more complicated, as this article explains…
The The F-Class World Championships (FCWC) in Canada are just one week away. This August 11-17, the world’s top F-Class shooters will gather at the Connaught Ranges outside Ottawa, Ontario. Here are some tips that can help F-TR and F-Open shooters aim more precisely, and achieve higher scores. F-Class ace Monte Milanuk reviews reticle choices and strategies for holding off.
In our Shooters Forum, one newcomer wanted some advice on selecting a reticle for F-Class optics. He wondered about the advantage of Front (first) Focal Plane (FFP) vs. Second Focal Plane scopes and also wondered if one type of reticle was better for “holding off” than others.
In responding to this question, Forum regular Monte Milanuk provided an excellent summary of aiming methods used in F-Class. For anyone shooting score targets, Monte’s post is worth reading:
Aiming Methods for F-Class (and Long-Range) Shooting — by Monte Milanuk
 F-Class is a known-distance event, with targets of known dimensions that have markings (rings) of known sizes. Any ‘holding off’ can be done using the target face itself. Most ‘benefits’ of Front (first) focal plain (FFP) optics are null and void here — they work great on two-way ranges where ‘minute of man’ is the defining criteria — but how many FFP scopes do you know of in the 30-40X magnification range? Very, very few, because what people who buy high-magnification scopes want is something that allows them to hold finer on the target, and see more detail of the target, not something where the reticle covers the same amount of real estate and appears ‘coarser’ in view against the target, while getting almost too fine to see at lower powers. F-Class is a known-distance event, with targets of known dimensions that have markings (rings) of known sizes. Any ‘holding off’ can be done using the target face itself. Most ‘benefits’ of Front (first) focal plain (FFP) optics are null and void here — they work great on two-way ranges where ‘minute of man’ is the defining criteria — but how many FFP scopes do you know of in the 30-40X magnification range? Very, very few, because what people who buy high-magnification scopes want is something that allows them to hold finer on the target, and see more detail of the target, not something where the reticle covers the same amount of real estate and appears ‘coarser’ in view against the target, while getting almost too fine to see at lower powers.
Whether a person clicks or holds off is largely personal preference. Some people might decline to adjust their scope as long as they can hold off somewhere on the target. Some of that may stem from the unfortunate effect of scopes being mechanical objects which sometimes don’t work entirely as advertised (i.e. one or two clicks being more or less than anticipated). Me personally, if I get outside 1-1.5 MOA from center, I usually correct accordingly. I also shoot on a range where wind corrections are often in revolutions, not clicks or minutes, between shots.
Some shooters do a modified form of ‘chase the spotter’ — i.e. Take a swag at the wind, dial it on, aim center and shoot. Spotter comes up mid-ring 10 at 4 o’clock… so for the next shot aim mid-ring 10 at 10 o’clock and shoot. This should come up a center X (in theory). Adjust process as necessary to take into account for varying wind speeds and direction.

 Others use a plot sheet that is a scaled representation of the target face, complete with a grid overlaid on it that matches the increments of their optics — usually in MOA. Take your Swag at the wind, dial it on, hold center and shoot. Shot comes up a 10 o’clock ‘8’… plot the shot on the sheet, look at the grid and take your corrections from that and dial the scope accordingly. This process should put you in the center (or pretty close), assuming that you didn’t completely ignore the wind in the mean time. Once in the center, hold off and shoot and plot, and if you see a ‘group’ forming (say low right in the 10 ring) either continue to hold high and left or apply the needed corrections to bring your group into the x-ring. Others use a plot sheet that is a scaled representation of the target face, complete with a grid overlaid on it that matches the increments of their optics — usually in MOA. Take your Swag at the wind, dial it on, hold center and shoot. Shot comes up a 10 o’clock ‘8’… plot the shot on the sheet, look at the grid and take your corrections from that and dial the scope accordingly. This process should put you in the center (or pretty close), assuming that you didn’t completely ignore the wind in the mean time. Once in the center, hold off and shoot and plot, and if you see a ‘group’ forming (say low right in the 10 ring) either continue to hold high and left or apply the needed corrections to bring your group into the x-ring.
Just holding is generally faster, and allows the shooter to shoot fast and (hopefully) stay ahead of the wind. Plotting is more methodical and may save your bacon if the wind completely changes on you… plotting provides a good reference for dialing back the other way while staying in the middle of the target. — YMMV, Monte
January 29th, 2017

Our friend Monte Milanuk needed to get in a little practice for the upcoming Berger Southwest Nationals. Monte didn’t let a little white stuff get in the way of his training session at the NCW Gun Club range in East Wenatchee, WA. Monte says: “For all you southerners and snowbirds… this is how the rest of us get ready for the Berger SWN!” Oh man that does look cold…

Monte’s F-TR competition rig features a fully-adjustable McMillan XIT stock resting on a SEB JoyPod up front with an Edgewood bag in the rear. On top is a Nightforce Competition scope. Monte shoots Berger bullets, measuring their velocity with a LabRadar chronograph. The LabRadar sits on a Manfrotto tripod, which can adjust super-low, as you can see. With this set-up, Monte tells us “life is good” — even on a chilly morning in Wenatchee.
We wish Monte (and all competitors) good luck at the Berger SW Nationals. The popular event runs February 6-12, 2017 at the Ben Avery Shooting Facility in Phoenix, AZ. See you on the firing line!
CLICK HERE for Phoenix Travel and Lodging Information.
View Larger Map
December 21st, 2016
The movie “The Patriot” gave us the phrase “Aim small, miss small”. While that’s a good mantra, aiming strategies for long-range competition are a bit more complicated, as this article explains…
In our Shooters Forum, one newcomer wanted some advice on selecting a reticle for F-Class optics. He wondered about the advantage of Front (first) Focal Plane (FFP) vs. Second Focal Plane scopes and also wondered if one type of reticle was better for “holding off” than others.
In responding to this question, Forum regular Monte Milanuk provided an excellent summary of aiming methods used in F-Class. For anyone shooting score targets, Monte’s post is worth reading:
Aiming Methods for F-Class (and Long-Range) Shooting — by Monte Milanuk
F-Class is a known-distance event, with targets of known dimensions that have markings (rings) of known sizes. Any ‘holding off’ can be done using the target face itself. Most ‘benefits’ of Front (first) focal plain (FFP) optics are null and void here — they work great on two-way ranges where ‘minute of man’ is the defining criteria — but how many FFP scopes do you know of in the 30-40X magnification range? Very, very few, because what people who buy high-magnification scopes want is something that allows them to hold finer on the target, and see more detail of the target, not something where the reticle covers the same amount of real estate and appears ‘coarser’ in view against the target, while getting almost too fine to see at lower powers.
Whether a person clicks or holds off is largely personal preference. Some people might decline to adjust their scope as long as they can hold off somewhere on the target. Some of that may stem from the unfortunate effect of scopes being mechanical objects which sometimes don’t work entirely as advertised (i.e. one or two clicks being more or less than anticipated). Me personally, if I get outside 1-1.5 MOA from center, I usually correct accordingly. I also shoot on a range where wind corrections are often in revolutions, not clicks or minutes, between shots.
Some shooters do a modified form of ‘chase the spotter’ — i.e. Take a swag at the wind, dial it on, aim center and shoot. Spotter comes up mid-ring 10 at 4 o’clock… so for the next shot aim mid-ring 10 at 10 o’clock and shoot. This should come up a center X (in theory). Adjust process as necessary to take into account for varying wind speeds and direction.
Others use a plot sheet that is a scaled representation of the target face, complete with a grid overlaid on it that matches the increments of their optics — usually in MOA. Take your Swag at the wind, dial it on, hold center and shoot. Shot comes up a 10 o’clock ‘8’… plot the shot on the sheet, look at the grid and take your corrections from that and dial the scope accordingly. This process should put you in the center (or pretty close), assuming that you didn’t completely ignore the wind in the mean time. Once in the center, hold off and shoot and plot, and if you see a ‘group’ forming (say low right in the 10 ring) either continue to hold high and left or apply the needed corrections to bring your group into the x-ring.
Just holding is generally faster, and allows the shooter to shoot fast and (hopefully) stay ahead of the wind. Plotting is more methodical and may save your bacon if the wind completely changes on you… plotting provides a good reference for dialing back the other way while staying in the middle of the target. — YMMV, Monte
September 22nd, 2016
The movie “The Patriot” gave us the phrase “Aim small, miss small”. While that’s a good mantra, aiming strategies for long-range competition are a bit more complicated, as this article explains…
The U.S. Mid-Range and Long Range Nationals kick off tomorrow, September 23rd, in Lodi, Wisconsin. Here are some tips that can help F-TR and F-Open shooters aim more precisely, and achieve higher scores. F-Class ace Monte Milanuk reviews reticle choices and strategies for holding off.
In our Shooters Forum, one newcomer wanted some advice on selecting a reticle for F-Class optics. He wondered about the advantage of Front (first) Focal Plane (FFP) vs. Second Focal Plane scopes and also wondered if one type of reticle was better for “holding off” than others.
In responding to this question, Forum regular Monte Milanuk provided an excellent summary of aiming methods used in F-Class. For anyone shooting score targets, Monte’s post is worth reading:
Aiming Methods for F-Class (and Long-Range) Shooting — by Monte Milanuk
F-Class is a known-distance event, with targets of known dimensions that have markings (rings) of known sizes. Any ‘holding off’ can be done using the target face itself. Most ‘benefits’ of Front (first) focal plain (FFP) optics are null and void here — they work great on two-way ranges where ‘minute of man’ is the defining criteria — but how many FFP scopes do you know of in the 30-40X magnification range? Very, very few, because what people who buy high-magnification scopes want is something that allows them to hold finer on the target, and see more detail of the target, not something where the reticle covers the same amount of real estate and appears ‘coarser’ in view against the target, while getting almost too fine to see at lower powers.
Whether a person clicks or holds off is largely personal preference. Some people might decline to adjust their scope as long as they can hold off somewhere on the target. Some of that may stem from the unfortunate effect of scopes being mechanical objects which sometimes don’t work entirely as advertised (i.e. one or two clicks being more or less than anticipated). Me personally, if I get outside 1-1.5 MOA from center, I usually correct accordingly. I also shoot on a range where wind corrections are often in revolutions, not clicks or minutes, between shots.
Some shooters do a modified form of ‘chase the spotter’ — i.e. Take a swag at the wind, dial it on, aim center and shoot. Spotter comes up mid-ring 10 at 4 o’clock… so for the next shot aim mid-ring 10 at 10 o’clock and shoot. This should come up a center X (in theory). Adjust process as necessary to take into account for varying wind speeds and direction.
Others use a plot sheet that is a scaled representation of the target face, complete with a grid overlaid on it that matches the increments of their optics — usually in MOA. Take your Swag at the wind, dial it on, hold center and shoot. Shot comes up a 10 o’clock ‘8’… plot the shot on the sheet, look at the grid and take your corrections from that and dial the scope accordingly. This process should put you in the center (or pretty close), assuming that you didn’t completely ignore the wind in the mean time. Once in the center, hold off and shoot and plot, and if you see a ‘group’ forming (say low right in the 10 ring) either continue to hold high and left or apply the needed corrections to bring your group into the x-ring.
Just holding is generally faster, and allows the shooter to shoot fast and (hopefully) stay ahead of the wind. Plotting is more methodical and may save your bacon if the wind completely changes on you… plotting provides a good reference for dialing back the other way while staying in the middle of the target. — YMMV, Monte
November 6th, 2015

Click above image to zoom to larger size.
Here’s a very interesting spotting scope stand, from Forum member (and ace F-Class shooter) Monte Milanuk. You can see this stable rig can be adjusted super-low for prone shooting. The components are from Italian photography accessory maker Manfrotto (but it’s not as expensive as you might think).
Monte tells us about his spotting scope stand, which is really a conventional photography tripod adjusted to a very low position, with a special head:
This stand has a Manfrotto 322RC2 pistol-grip head to make positioning easier. It actually goes even lower, and much, much higher. Both the head and the tripod are about $170-ish each, so it’s a bit more expensive than a Ray-Vin, a little less than a Creedmoor Polecat, and a whole lot more flexible overall.
This Manfrotto 055XPROB Pro Tripod is actually a little on the big side – probably should have gone with a Manfrotto 190 model (couple inches shorter on the legs) so it can be a bit of a hassle to set up when you have to shoot two-to-a-mound a la Fullbore.
It’s probably not as [expensive] as you might think… a Ray-Vin F-Class stand (without head) is about $170 from Creedmoor Sports. A Ray-Vin stand head is $150, plus the outrigger attachment is another $100+. I’ve got two of them downstairs for when I used to shoot conventional prone[.]
Comments from Facebook Fans:
Pretty high end setup, should work well for prone, not sure about other positions. — John T.
An excellent and sturdy Manfrotto stand. I have one that I use not only for a spotting scope but to mount the rifle on when allowed for unknown distance tactical matches.–Dennis Santiago
October 4th, 2013
 Many styles of bipods were used by F-TR shooters at the F-Class U.S. Nationals and World Championships recently held in Raton, NM. Most featured angled arms — either left/right arms or parallel pairs of arms on either side. With such designs, vertical height is controlled by adjusting the angle of the arms (and hence the distance between the feet). Widen the track and the gun goes down; narrow the track and the gun goes up. One bipod design, Dan Pohlabel’s FLEX Bipod, was very different than the norm. On the FLEX, there are no angled arms — the main blade is a solid piece of metal. Each leg has independent control for height via adjustable “feet” on either ends of the main piece. A ratcheting locking lever controls the cant. Many styles of bipods were used by F-TR shooters at the F-Class U.S. Nationals and World Championships recently held in Raton, NM. Most featured angled arms — either left/right arms or parallel pairs of arms on either side. With such designs, vertical height is controlled by adjusting the angle of the arms (and hence the distance between the feet). Widen the track and the gun goes down; narrow the track and the gun goes up. One bipod design, Dan Pohlabel’s FLEX Bipod, was very different than the norm. On the FLEX, there are no angled arms — the main blade is a solid piece of metal. Each leg has independent control for height via adjustable “feet” on either ends of the main piece. A ratcheting locking lever controls the cant.

Click photo below for full-screen version

Monte Milanuk, who tested an early version of the FLEX Bipod, explains: “The FLEX bipod is a very simple design — no Mariner’s wheel for vertical adjustment, no joystick head, no changing width as it goes up and down. And the FLEX bipod is very light (as are most, these days), but also very durable. An added bonus is that it breaks down very flat for airline travel. Once I take the feet off, remove the ratchet lever (with screw), the whole bipod nestles very nicely in the bottom layer of foam in my gun case (with cuts for the head etc. in the foam). If someone bashes the case hard enough to damage what is essentially a plate of spring steel, then I’ve got bigger worries.”

Monte likes the FLEX Bipod, but notes that it works best if you lean into the gun when shooting: “Not everyone wants a bipod that slides around like a hog on ice. Some people manage to get things tracking straight back and forth, almost like it was constrained by a front rest. Personally, I have a hard time doing that in a repeatable fashion. While the FLEX Bipod shoots quite well with a [loose] hold, it was designed for those of us who like to ‘lean’ into the gun a bit. Quite literally, the idea is that you get the feet to dig in slightly, and push against the rifle butt with your shoulder and the bipod will ‘flex’ or bow forward slightly. It is one of those things that sounds wonky until you try it. It may take a few times to get a feel for it, but once you do, it is surprisingly repeatable.”
The FLEX bipod’s designer, Dan Pohlabel, offers these instructions:
The bipod feet are shipped loose. Note there is a left foot and a right foot. Determine the balance point of your rifle and mount the bipod approximately two inches forward of that point. You may want to move it further forward after shooting. Experiment with its placement to minimize movement of the bipod. When setting up, first grab each foot and ‘dig’ them in to the shooting surface, dirt, gravel, grass, carpet — it doesn’t matter. After making sure each foot has a hold, raise or lower the bipod to your target and use the cant adjustment to level your rifle. Loading the bipod with your shoulder is the preferred method of position. For more info, visit Kreativ-Solutions.com or email flex-bipods [at] kreativ-solutions.com .


February 8th, 2013
Report by Monte Milanuk
With the proliferation of wide bipods for competitive F-TR shooting, we’ve seen a lot of cool gear hitting the market. Whatever you can imagine, someone is either building now, or working on prototype plans. One new design that seems to have stayed under the radar thus far is the FLEX bipod by Dan Pohlabel.
The FLEX bipod’s designer, Dan Pohlabel, offers these instructions:
The bipod feet are shipped loose. Note there is a left foot and a right foot. Mount them as shown in the diagram above. Determine the balance point of your rifle and mount the bipod approximately two inches forward of that point. You may want to move it further forward after shooting. Experiment with its placement to minimize movement of the bipod. When setting up, first grab each foot and ‘dig’ them in to the shooting surface, dirt, gravel, grass, carpet — it doesn’t matter. After making sure each foot has a hold, raise or lower the bipod to your target and use the cant adjustment to level your rifle. Loading the bipod with your shoulder is the preferred method of position. Contact me with any FLEX bipod questions you may have: danielp123 [at] earthlink.net.
The FLEX bipod is a very simple design — no Mariner’s wheel for vertical adjustment, no joystick head, no changing width as it goes up and down. And the FLEX bipod is very light (as are most, these days), but also very durable. I haven’t actively tried to destructively test it, but so far it’s held up to being tossed in the back of the truck, hauled around to the range and everywhere else in between. It definitely has not been ‘babied’ in any way, and it’s not noticeably any worse for wear. An added bonus is that it breaks down very flat for airline travel. Once I take the feet off, remove the ratchet lever (with screw), the whole bipod nestles very nicely in the bottom layer of foam in my gun case (with cuts for the head etc. in the foam). I’m definitely not worried about it in there. If someone bashes the case hard enough to damage what is essentially a plate of spring steel, then I’ve got bigger worries.

This view (below) shows a bit of the adjustment controls. Each leg has independent control for height, and there is a ratcheting locking lever that controls the cant. Instead of being directly centered like most other designs I’ve seen, this one is off-set a little, allowing a fair amount of movement without allowing it to completely ‘flop’ over to one side. (By contrast, using other bipod designs, I’ve had guns literally flip over as they tipped over too far.) Also having the tilt control relatively close/tight to the bore of the gun helps with the stability as well.

Inventor Dan Pohlebel developed the FLEX bipod for use in his native Ohio, where apparently grassy firing lines are the norm. Here in the Pacific Northwest, I seem to encounter concrete or gravel more often, which is why I usually place a mat under the bipod to keep it from sinking in too far. On Dan’s newest models, the “feet” have teeth to give better traction on hard surfaces such as the hard-pack clay/dirt (beneath a skim layer of gravel) that you’ll find at Raton, NM.
Why would you want more traction? Well, not everyone wants a bipod that slides around like a hog on ice. Some people manage to get things tracking straight back and forth, almost like it was constrained by a front rest. Personally, I have a hard time doing that in a repeatable fashion. While the FLEX Bipod shoots quite well with a [loose] hold, it was designed for those of us who like to ‘lean’ into the gun a bit. Quite literally, the idea is that you get the feet to dig in slightly, and push against the rifle butt with your shoulder and the bipod will ‘flex’ or bow forward slightly. It is one of those things that sounds wonky until you try it. It may take a few times to get a feel for it, but once you do, it is surprisingly repeatable.

The system does have a few quirks to it. Personally, I wish the rail attachment had a ratchet lever like the pivot control. Currently you need a separate tool to take the bipod on/off the gun. Also, the FLEX bipod seems to work better mounted somewhat further back than other designs. Some experimenting may be necessary to find what works best. Then again, we all need more trigger time….
|


