He who dies with the most toys wins — right? Well Sinclair has another interesting gadget you can add to your reloading bench. The Sinclair Case Neck Sorting Tool lets you quickly sort brass by neck-wall thickness. For those who shoot “no-turn” brass, this can improve neck-tension consistency. Large variances in neck-wall thickness can cause inconsistent neck “grip” on the bullet. Generally, we’ve found that more consistent neck tension will lower ES and (usually) improve accuracy. We know some guys who shoot no-turn 6mmBR brass in competition with considerable success — but their secret is pre-sorting their brass by neck-wall thickness. Cases that are out-of-spec are set aside for sighters (or are later skim-turned).
Watch Case Neck Sorting Tool Operation in Video
How the Case Neck Sorting Tool Works
Here’s how the Sinclair tool works. Cases are rotated under an indicator tip while they are supported on a case-neck pilot and a support pin through the flash hole. The unit has a nice, wide base and low profile so it is stable in use. The tool works for .22 through .45 caliber cases and can be used on .17- and .20-caliber cases with the optional carbide alignment rod. The MIC-4 pin fits both .060 (PPC size) and .080 (standard size) flash holes. Sinclair’s Case Neck Sorting Tool can be ordered with or without a dial indicator. The basic unit without dial indicator (item item 749006612) is priced at $59.99. With this standard tool you can use your own dial indicator with standard specifications. You can also buy the tool complete with dial indicator (item 749007129) for $89.99. IMPORTANT: This sorting tool requires caliber-specific Case Neck Pilots which must be ordered separately.
Editor’s Comment: The purpose of this Sinclair tool is rapid, high-quantity sorting of cartridge brass to ascertain significant case-neck-wall thickness variations. Consider this a rapid culling/sorting tool. If you are turning your necks, you will still need a quality ball micrometer tool to measure neck-wall thickness (to .0005) before and after neck-turning operations.
There are many products used successfully for case lubrication for case sizing. And for neck-turning a variety of lubricants are favored. The video above explains the basics of case lubrication with die wax, and spray lubricants. Below we mention three products that have proven very effective. For cases that have a close fit to your chamber via custom FL dies, Ballistol works well and is easy to apply and remove. For neck-turning, some of our Forum members have had great success with some automotive lubricants.
Three Good Lubricants You May Not Have Tried Before If you’re using a body die or a full-length sizing die, try using Ballistol (in the aerosol can) as a lube. It works GREAT without the tacky or gooey residue left by most case lubes. It will also clean off carbon residues on the neck as you lube the case. Just spray a little on a cotton patch (or your fingertips) and wipe each case before you run it up into the die. If you are using a steel neck bushing, be sure to wipe the neck as well. You can usually do a half-dozen BR-sized cases before you need to re-apply Ballistol on the patch. Ballistol is non-toxic, bio-degradeable, and will not harm your skin. It is very slippery, but can easily be removed with a rag or paper towel. Try it–you may retire your One-Shot. Ballistol can also be used to protect wood stocks.
Note, for heavy case-forming or necking up case necks, we still recommend a thicker lubricant, such as Imperial Die Wax. But for normal case sizing, after your neck has been expanded, Ballistol will do the job, and you won’t need to tumble the brass afterwards. All you need is a very thin layer of Ballistol, and this easily wipes off with a paper towel.
For Neck-Turning, Try STP Blend or Assembly Lube
For lubing the neck-turning tool mandrel while turning case necks, many folks use a blend of STP® Oil Treatment and Mobil 1 lube. Chuckw2 reports: “Try STP and Mobile 1 Synthetic oil in a 50/50 mixture. Very slick, you will need to tumble your cases after turning.” STP is a very thick lubricant, that flows and clings almost like honey. Jason reports the STP blend comes off easily in an ultra-sound bath, using a bit of detergent. At many retailers, STP is also available in a convenient 7-ounce tube, so you don’t have to buy a large bottle.
Another even cheaper option is assembly lubricant. For turning his case necks, RStreich uses assembly lube from an auto parts store. He notes: “The brand I have is reddish in color and kind of sticky like honey. It’s far better than the Imperial die wax I was using before.” There are a variety of types, both with and without moly additive, and you can select the viscosity you prefer if you sample a few brands. Be sure to clean out any lube residue from the inside of your necks when you have completed your neck-turning.
Here’s good news for 30 BR shooters. Paul Parosky, maker of the excellent PRP Custom Bullets, is now offering 30 BR neck-turned brass. This can save you considerable time and effort forming 30 BR cases from Lapua 6mmBR brass. And the neck-turning is superb, again representing time savings (and no tools to buy). You can order this 30 BR brass from PRPbullets.com. If you communicate with the PRP team, Paul may be able to neck-turn to your specific thickness. Paul notes: “Here are necks turned for a 0.330 neck. I’ll try my best to accommodate anyone’s neck dimensions as they wish. Just contact us through our website PRPBullets.com.”
About this Neck-Turning set-up — Paul Parosky notes: “For neck-turning I’m using an old drill press that has been re-worked. The cutter and spindle are all indicated before neck turning to ensure no runout. The RPM is around 520. The lube I use is a mixture of royal and mystery oil.”
Why the 30 BR Dominates 100/200 Benchrest for Score Competition
The 30BR, along with some wildcat variants, remains the dominant cartridge in short-range (100/200) benchrest-for-score competition. The 30BR’s .308″-diameter bullets are larger than the 6mm bullets used by the 6PPC (which rules group BR competition). The bigger 30-Cal diameter has an advantage in touching scoring rings. In addition, the 30 BR is also relatively easy to tune, and barrel life is considerably better than with smaller-caliber benchrest cartridges. For more information, see our AccurateShooter 30 BR Cartridge Guide.
Cases are Expanded, Then Neck-Turned
To produce his 30 BR brass, Parosky first uses a series of expander mandrels. Then he neck-turns with power using a converted drill press. Paul tells us: “This is done the old school way, I use three different tapered expander mandrels, then neck-turn it to the proper neck chamber, then run them up through a FL expander mandrel to ensure necks are straight. Then I clean all the cases.”
Paul Parosky Can Also Neck-Turn 6PPC Brass
Paul Parosky also expands and neck-turns 6PPC cases that are made from parent Lapua .220 Russian cartridge brass. Here, illustrating his 6PPC neck-turning operation, is a Paul Parosky post on the USA Benchrest & Extreme Precision Shooters Facebook page.
When neck-turning cases, it’s a good idea to extend the cut slightly below the neck-shoulder junction. This helps keep neck tension more uniform after repeated firings, by preventing a build-up of brass where the neck meets the shoulder. One of our Forum members, Craig from Ireland, a self-declared “neck-turning novice”, was having some problems turning brass for his 20 Tactical cases. He was correctly attempting to continue the cut slightly past the neck-shoulder junction, but he was concerned that brass was being removed too far down the shoulder.
Craig writes: “Everywhere I have read about neck turning, [it says] you need to cut slightly into the neck/shoulder junction to stop doughnutting. I completely understand this but I cant seem to get my neck-turning tool set-up to just touch the neck/shoulder junction. It either just doesn’t touch [the shoulder] or cuts nearly the whole shoulder and that just looks very messy. No matter how I adjust the mandrel to set how far down the neck it cuts, it either doesn’t touch it or it cuts far too much. I think it may relate to the bevel on the cutter in my neck-turning tool…”
Looking at Craig’s pictures, we’d agree that he didn’t need to cut so far down into the shoulder. There is a simple solution for this situation. Craig is using a neck-turning tool with a rather shallow cutter bevel angle. This 20-degree angle is set up as “universal geometry” that will work with any shoulder angle. Unfortunately, as you work the cutter down the neck, a shallow angled-cutter tip such as this will remove brass fairly far down. You only want to extend the cut about 1/32 of an inch past the neck-shoulder junction. This is enough to eliminate brass build-up at the base of the neck that can cause doughnuts to form.
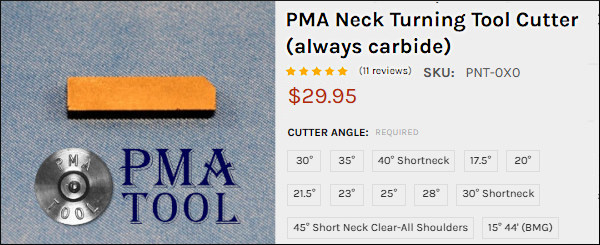
The answer here is simply to use a cutter tip with a wider angle — 30 to 40 degrees. The cutter for the K&M neck-turning tool (above) has a shorter bevel that better matches a 30° shoulder. There is also a 40° tip available. PMA Tool and 21st Century Shooting also offer carbide cutters with a variety of bevel angles to exactly match your case shoulder angle*. WalkerTexasRanger reports: “I went to a 40-degree cutter head just to address this same issue, and I have been much happier with the results. The 40-degree heads are available from Sinclair Int’l for $15 or so.” Forum Member CBonner concurs: “I had the same problem with my 7WSM… The 40-degree cutter was the answer.” Below is Sinclair’s 40° Cutter for its NT-series neck-turning tools. Item NT3140, this 40° Cutter sells for $14.99. For the same price, Sinclair also sells the conventional 30° Cutter, item NT3100.
Al Nyhus has another clever solution: “The best way I’ve found to get around this problem is to get an extra shell holder and face it off .020-.025 and then run the cases into the sizing die. This will push the shoulder back .020-.025. Then you neck turn down to the ‘new’ neck/shoulder junction and simply stop there. Fireforming the cases by seating the bullets hard into the lands will blow the shoulder forward and the extra neck length you turned by having the shoulder set back will now be blended perfectly into the shoulder. The results are a case that perfectly fits the chamber and zero donuts.”
Editor: America’s birthday, the 4th of July, is just five days away. To help mark this historic occasion, today we feature a pair of patriotic rifles — a Light Gun and a big Heavy Gun both used in 1000-yard competition at the famed Williamsport Range in Pennsylvania. These rifles both feature handsome patriotic graphics featuring the U.S. Constitution and the Stars and Stripes.
Report by Andrew Murtagh
I’ve been a long range shooter for over two decades. Like most shooters in this game I’ve built, bought, and sold many rifles during my tenure. Here’s my tale of two special rifles, a Heavy Gun and a Light Gun, both sporting Patriotic stock graphics. I have shot both of these rifles in competition at Reade Range and The Original Pennsylvania 1000-Yard Club, aka “Williamsport”, where I have served as Club Vice-President.
My two Patriots were both acquired second-hand from a fellow shooter, Mike Bonchack. As purchased, they were very different from what they are now. I first decided to rechamber them using my reamers. The Light Gun (LG) is now chambered in 6×47 Lapua with 0.267″ neck, while the Heavy Gun (HG) is a 6mm Dasher with 0.266″ neck. After re-chambering the barrels, next I decided to get both guns up to maximum weight. The LG already had an adjustable weight system so it was easy to get it to 17 pounds. For the HG, I added an additional 25 pounds of lead/epoxy fill which was milled into the barrel channel and butt stock.
The Story Behind the Patriotic Graphics
I was initially going to have the LG painted until a close friend and fellow shooter, Tom Murtiff, suggested hydrographics. I landed on the patriotic theme because I’m a right-wing leaning Constitutionalist who still believes in the principles upon which our Founding Fathers built this nation. I wanted to express my support of our country’s Constitution and its Amendments. The search for the perfect patriot print was on.
This was my first hydrographic print experience and I was overwhelmed with the sheer number and variety of prints available. I spent a few days searching when I found the Amendment print. I then contacted Rick Schuh, owner of Boyzhid Hydrographics. He then prepped, hydro-dipped, and clear-coated the LG. Late in 2017 I purchased the HG and through a lengthy process in 2018 the metal work and stock additions were completed. I was now back in search of the perfect print. This was also lengthy, and I couldn’t find anything that spoke to me except for a suggestion to have “twin” rifles. I liked the idea — a pair of “Patriots!”
Rick was again employed to dip the Heavy Gun. That became a real undertaking because the stock alone (no metal attached) now weighed 35 pounds. He had to manufacture reinforced hangers to apply the graphics without flaw. The stock came out perfect to my eye, but not to his. On the bottom, which is rarely seen on any HG, he airbrushed a small flag to cover an area that stretched the print. Rick also made a jeweled plate for the toe of the butt.
I’m including this image so everyone can see Rick’s extra effort to make the HG perfect. I often joke with him about the added work no one would see. Well now the world can view his workmanship.
1000-Yard Heavy Gun Specifications:
Kelbly Stolle F-Class Panda dual-port, right eject with Kelbly Picatinny rail
Modified Ryan Miller HG stock bedded/pillared/weighted by David Powley
Bartlein 1:8.5-8″ gain-twist 0.236″ bore barrel
— chambered in 6mm Dasher 0.266″ neck by David Powley
Ryan Miller barrel-block fitted with nylon bushing by David Powley
Harrell’s muzzle brake
Jewell trigger
Optic One: NightForce 12-42x56mm NXS in Vortex rings
Optic Two: Leupold 7-35x56mm Mark 5 HD in Leupold rings
1000-Yard Light Gun Specifications:
BAT Machine B Action RB/LP/RE
McMillan MBR stock bedded by David Powley
Bartlein 1:8″-twist 0.237″ bore 30″ barrel
— chambered in 6×47 Lapua 0.267″ neck by David Powley
Harrell’s radial muzzle brake
Jewell trigger
NightForce 15-55x52mm Competition Scope in Harrell’s rings
Stock Graphics: Both rifles share a Patriot Constitution Hydrographic print (and clear-coat) by Rick Schuh of BoyzHid Hygrogaphics.
How to Succeed in the 1K Benchrest Games — Q & A with Andrew
Q: How Do You Choose a Chambering/Cartridge for a particular Match or Relay?
Andrew: Cartridge choice depends on the wind forecast. I always have several rifles with particular cartridge/loads for each depending on the forecast. If it’s a light wind day, say 4 to 8 mph with light gusts, I’ll be shooting either a 6×47 Lapua or a 6mm Dasher. If it’s blowing around 10 to 12 mph, I’ll campaign a 6×47 on its high node to get it down range flat. But if it’s really blowing or constantly changing direction, I shoot a big .300 WSM with either 200gr or 210gr bullet.
Q: What Is Your Load Development Method?
Andrew: Initial load development is always done over the chronograph at 100 yards until I get low ES/SD for 5 shots utilizing the same 10 pieces of absolutely perfect brass. Once I’m satisfied with the raw data I move to 1000 yards with a set of match brass and shoot 5-shot strings to find the best-performing exact powder charge. I have found this is usually within 0.20 grains of what performs well over the chronograph.
Q: What Brass, Primers, Powders, and Bullets Do You Use?
Andrew: I use Lapua brass for all things 6mm and Norma brass for my big .30 Cal stuff. I never change primers and shoot CCI BR2s or BR4s. I’m a Varget and H4350 fan. I’ve tried other powders, but they never were fruitful at 1K. Currently the only bullets I shoot are Sierra Match Kings. In the 6mm Dasher and 6×47 Lapua I use the 6mm 107gr SMK. In my .300 WSM I use .308-cal 200gr and 210gr SMKs.
Q: What Advice Do You Have for Novice 1000-Yard Competitors?
Andrew: Leave your ego at home and be willing to learn each and every time you come to the range. The discipline evolves rapidly and so must the shooter. It won’t take long to get left behind and become extremely frustrated with the game if you are not willing to learn and adapt. Find a tutor who is a great shooter and who is willing to mentor you. John Hoover and Tom Murtiff helped me and are very dear friends and great 1000-yard shooters. Believe me, having a good mentor takes years off the learning curve. Lastly, enroll in the Benchrest Shooting School offered by The Original Pennsylvania 1000 Yard Benchrest Club. I’m an instructor there and I, along with all the cadre, will help new shooters rapidly advance their skills.
Q: What’s the Secret to Judging the Wind? (In this discipline there are no target markers after each shot.)
Andrew: That’s the million-dollar question. What I do is find the condition that seems to hold. Once I’m committed into the record string, I follow it to the end. At Williamsport the wind flags can change at every distance so you simply need to pick one flag and hope it’s the one that remains truthful.
Long Range Competition Advice from a Leading 1K Benchrest Competitor
FIVE Key points to remember when shooting 1000-Yard benchrest
1. Be positive and have a clear state of mind when competing.
2. Bench set-up and shooting mechanics must always be the same — every shot. Then follow the shot through your optic.
3. Shoot two (2) shots before making a scope adjustment unless you’re under a minute of the sighter period.
4. Trust yourself and your equipment. You never want to second guess anything you put on the line.
5. Once you commit to shooting your record string, DO NOT STOP.
Andrew wanted to give credit to the many talented guys who have helped with his rifle builds and his reloading equipment. In alphabetical order, these are Mike Bonchack, John Hoover, Tom Murtiff, David Powley, and Rich Schuh (Boyzhid Hydrographics).
BONUS Topic — Case Prep and Loading for 1000-Yard Benrchest
Accurate loading, in my opinion, all starts with perfect brass. I always use Lapua or Norma brass, and when I buy it I try to purchase no less than 500 of the same lot. Most shooters sort by weight and I do as well, but it’s the last thing I do instead of the first. My reasoning behind this is simple, if I’m going to uniform primer pocket, ream and debur flash holes, turn necks, trim cases to length I’m removing lots of material. Therefore the weights change drastically from where they started. That said weight sort at the end, period. I do the entire lot at one time — a labor of love.
Every Saturday we present interesting, informative videos for our Daily Bulletin readers. Here we feature five YouTube videos that offer a ton of useful information for serious shooters. We start with a great video about setting up rifle, rest, and bag on the bench. Then Hall-of-Fame benchrest shooter Speedy Gonzalez shows smart methods for cleaning barrels. Next F-Class Ace Keith Glasscock explains how to optimize your rifle after travel. In the fourth video, AutoTrickler inventor Adam MacDonald shows how to optimize the AutoTrickler V4. Next the truly outstanding 21st Century Power Neck-Turning lathe is showcased.
How to Set Up Your Rifle, Rest, and Bag on the Bench
To get the best results in benchrest shooting, you need to set up all the gear on your bench properly. That includes front rest placement, rear bag position, spotting scope set-up, and placement of cartridge holder/caddy, and possibly an elbow/forearm rest. When setting up the hardware, you need to align the front rest and rear bag properly to get optimal tracking. In addition you want to make sure the rear bag doesn’t slide or rotate a bit from shot to shot. And you also want to set your seat height/location so the shooter’s position is optimal and comfortable. This helpful video shows how to set up your rifle and gear for a benchrest match or load development/practice at the range. Credit to Boyd Allen for finding video.
Cleaning Barrels with Speedy — Smart Techniques
There are many effective methods to clean barrels. But some are more efficient that others and can help you do the job more quickly, with less effort. Here respected gunsmith and Hall-of-Fame benchrest shooter Speedy Gonzalez shows his procedures for cleaning competition barrels. He uses Sharpshoot-R Liquid Patch-Out and Wipe-Out Accelerator as primary solvents. Watch carefully — Speedy has some clever techniques for starting a patch in the rifling, and he is also careful about exiting the muzzle when brushing. Speedy also explains the importance of keeping your rods clean. And he prefers nylon brushes because, as the barrel starts to get wear in the throat, “the bronze bristles will actually start eating into that and you’ll see little grooves if you have a good borescope.” (See video 00:38-01:35)
Loading for PRS vs. F-Class — Keith Glasscock
Keith Glasscock is one of America’s top F-Class shooters, having finished second at the National Championships multiple times. He also now shoots PRS/NRL Precision Rifle matches. Keith, who has an engineering background, runs the popular Winning in the Wind YouTube channel. There you’ll find great advice on wind reading, load tuning, precision reloading and many other topics. In this video, Keith offers very smart advice on how to optimize a PRS load compared to a F-Class load. Accuracy counts for both disciplines, but the key objectives can be different.
Adjusting AutoTrickler V4 with its Inventor, Adam MacDonald
Adam MacDonald is the brilliant Canadian engineer who created the AutoTrickler series of automated powder dispensing systems. These work with advanced scales to dispense powder rapidly, but with a precise final trickle accurate to a single kernel. In this video, Adam explains how best to adjust and calibrate the AutoTrickler V4 when using powders that flow at different rates.
21st Century Power Neck-Turning Lathe — Great Tool
Turning case-necks can be tedious and tough on older hands if you’re using hand-held tools. Quite a few years ago 21st Century released a great compact, neck-turning lathe that delivers superb, consistent results. This Editor uses that original lathe with hand crank and I can affirm that it works great. It is easy to use, fast, and the turned necks come out smooth with consistent rim thickness. But you still had to turn a crank. Well, in 2018, 21st Century created an upgraded Power Neck-Turning Lathe with an electric motor and lever to advance the cases to the cutter. The power head glides on stainless steel guide rails. Power is controlled with a red button in the feed handle.
This advanced, powered mini-lathe is absolutely superb. It works brilliantly and makes the task of turning case-necks fast and VERY easy. And there is even a 3-Way trimmer upgrade that will trim cases to length at the same time as the necks are turned.
BONUS — How to Spot Fake Online Sellers of Components
With the shortage of premium reloading components, particularly powder and primers, many handloaders are desperate to find components when even big companies such as Midsouth and MidwayUSA are completely sold out. Enter the scammers. There are criminals, many based overseas, who have created entire websites designed to steal your money. You might find such a site when searching for “Varget powder in stock” or “CCI BR4 primers”. These sites look like regular business webstores, with product photos and modern shopping cart systems. But it’s all a scam.
Key giveaways are: 1) The site does NOT take Visa, Mastercard, or Discover but requires payment with Zelle, Venmo, Bitcoin, or AppleCash only; and 2) The site has hard-to-find powders, such as H4895 and H4198, that nobody else has, and you can put thousands of pounds in the shopping cart.
Bottom line here — if the site allows you to order vast amounts of powder and/or primers, and does not take ANY major Credit Card types, it is almost surely a scam. If you see links to pay with Crypto-Currency (such as Bitcoin) run away!
He who dies with the most toys wins — right? Well Sinclair has another interesting gadget you can add to your reloading bench. The Sinclair Case Neck Sorting Tool lets you quickly sort brass by neck-wall thickness. For those who shoot “no-turn” brass, this can improve neck-tension consistency. Large variances in neck-wall thickness can cause inconsistent neck “grip” on the bullet. Generally, we’ve found that more consistent neck tension will lower ES and (usually) improve accuracy. We know some guys who shoot no-turn 6mmBR brass in competition with considerable success — but their secret is pre-sorting their brass by neck-wall thickness. Cases that are out-of-spec are set aside for sighters (or are later skim-turned).
Watch Case Neck Sorting Tool Operation in Video
How the Case Neck Sorting Tool Works
Here’s how the Sinclair tool works. Cases are rotated under an indicator tip while they are supported on a case-neck pilot and a support pin through the flash hole. The unit has a nice, wide base and low profile so it is stable in use. The tool works for .22 through .45 caliber cases and can be used on .17- and .20-caliber cases with the optional carbide alignment rod. The MIC-4 pin fits both .060 (PPC size) and .080 (standard size) flash holes. Sinclair’s Case Neck Sorting Tool can be ordered with or without a dial indicator. The basic unit without dial indicator (item item 749006612) is priced at $59.99. With this standard tool you can use your own dial indicator with standard specifications. You can also buy the tool complete with dial indicator (item 749007129) for $89.99 (but not currently in stock). IMPORTANT: This sorting tool requires caliber-specific Case Neck Pilots which must be ordered separately.
Editor’s Comment: The purpose of this Sinclair tool is rapid, high-quantity sorting of cartridge brass to ascertain significant case-neck-wall thickness variations. Consider this a rapid culling/sorting tool. If you are turning your necks, you will still need a quality ball micrometer tool to measure neck-wall thickness (to .0005) before and after neck-turning operations.
On our main AccurateShooter.com site, you’ll find a good article by GS Arizona on the Basics of Neck Turning. If you’re new to the neck-turning game, or are just looking for good tips on improving your neck-turning procedures, you should read that article. Below we offer some highlights and photos from the article, but you’ll need to read the whole story to view all the illustrations and follow all the procedures step by step.
Why Should You Consider Neck Turning?
Let’s assume that your rifle doesn’t have a tight neck chamber that requires neck turning; if you have a tight neck chamber, of course, the answer to the question is “because you have to”. For the rest of us, and that includes the vast majority of Highpower shooters, neck turning isn’t a requirement, but it can be a useful way to bring your ammunition a small but meaningful step closer to that pot of gold at the end of the rainbow: perfection. I’m not talking about a theoretical improvement, but a real one, an improvement that lies in equalizing and optimizing the neck tension of your loaded rounds. Inconsistent neck tension is a real contributor to increased muzzle velocity variance which itself is a significant factor in increased elevation dispersion at long range. So there’s our basic reason for neck turning: to equalize and optimize neck tension in order to reduce elevation dispersion.
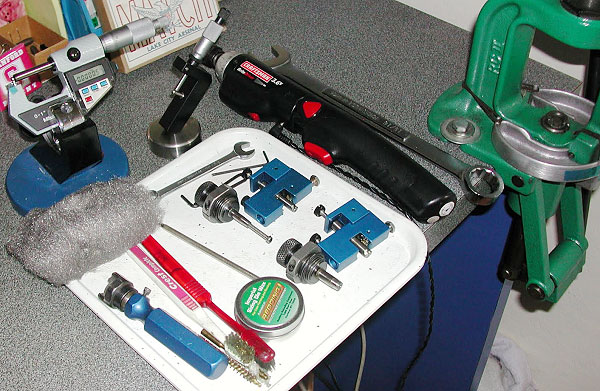
The Tools of the Trade
Here you see everything I use and a bit more. The press, a cordless screwdriver (always plugged in, turning is tough on the old battery), a couple of K&M neck turners (one set up for 6mm, the other for .30 caliber) an expander for each size, some Imperial lube, an old toothbrush or two to keep the cutter clean, a handle with a caseholder (for those emergencies when the screwdriver dies and there’s just one more case to go!), steel wool and a tubing micrometer finish the list of tools. Hey, I left the dial calipers out of the picture! They’re always handy, keep them around, but they are useless for measuring neck thickness, so don’t try. I usually use an Optivisor magnifier while I turn necks, very handy for a clear view of what’s happening on the neck.
Expanding the Neck
Put some lube on the inside of the case neck and run it into the expander. Really, this isn’t hard. I prefer to expand each case immediately before turning it as opposed to expanding all the cases and then turning them. Brass is somewhat springy and will tend to go back toward its original size; therefore, by expanding and turning immediately, you are more likely to have all cases fit the mandrel with the same degree of tightness and to get a more consistent depth of cut.
Cutter Adjustment for Cut Depth and Length
All the tools I’ve seen have pretty good adjustment instructions. The only thing they don’t tell you is that you should have five to ten spare cases to get it right initially. Anything of the right diameter will do while you learn, for instance, just use that cheap surplus .308 brass to do initial setup and save the precious .30-06 for when you know what you’re doing. Be patient and make your adjustments slowly; you’ll need to set the cutter for thickness as well as length of cut (just into the shoulder). The depth of cut (brass thickness) takes a bit of fiddling, the length of the cut is generally easy to set.
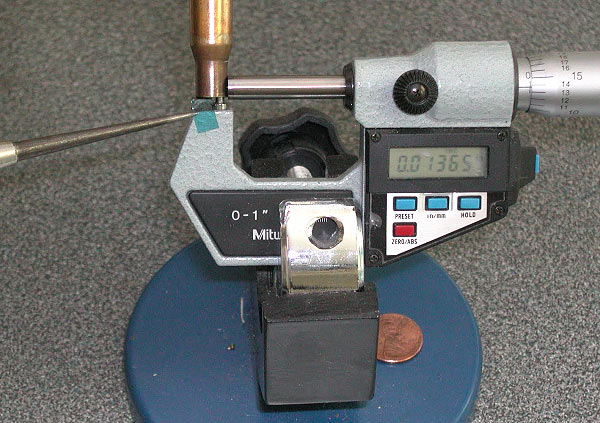
The Finished Product — A Perfectly Uniform Neck
If you read the whole article, and follow the procedures using quality tools, you should get very good results — with a little practice. To demonstrate, here’s an example of my finished, neck-turned brass. You’ll see there is a perfect, 0.0125″ thick neck. It’s very uniform around the circumference, usually I only see 1 or 2 ten-thousandths variance. Now, with the necks uniformed like this, we can select the bushing size that will give us our preferred neck tension and experiment with various levels of tension, secure in the knowledge that all of the cases will actually have the desired neck tension.
About the author — “GS Arizona” was the writing handle for German Salazar, a top-tier rifleman and gun writer. Sadly, German passed from a medical condition in 2022. German was instrumental in helping this website and our Forum get started, and we remember him as a very dear, valued friend.
German was a great individual, and a great asset to the sport. An attorney by trade, with an engineering background, German was one of the very best gun writers, who had high master shooting skills to match his writing abilities.
When neck-turning cases, it’s a good idea to extend the cut slightly below the neck-shoulder junction. This helps keep neck tension more uniform after repeated firings, by preventing a build-up of brass where the neck meets the shoulder. One of our Forum members, Craig from Ireland, a self-declared “neck-turning novice”, was having some problems turning brass for his 20 Tactical cases. He was correctly attempting to continue the cut slightly past the neck-shoulder junction, but he was concerned that brass was being removed too far down the shoulder.
Craig writes: “Everywhere I have read about neck turning, [it says] you need to cut slightly into the neck/shoulder junction to stop doughnutting. I completely understand this but I cant seem to get my neck-turning tool set-up to just touch the neck/shoulder junction. It either just doesn’t touch [the shoulder] or cuts nearly the whole shoulder and that just looks very messy. No matter how I adjust the mandrel to set how far down the neck it cuts, it either doesn’t touch it or it cuts far too much. I think it may relate to the bevel on the cutter in my neck-turning tool…”
Looking at Craig’s pictures, we’d agree that he didn’t need to cut so far down into the shoulder. There is a simple solution for this situation. Craig is using a neck-turning tool with a rather shallow cutter bevel angle. This 20-degree angle is set up as “universal geometry” that will work with any shoulder angle. Unfortunately, as you work the cutter down the neck, a shallow angled-cutter tip such as this will remove brass fairly far down. You only want to extend the cut about 1/32 of an inch past the neck-shoulder junction. This is enough to eliminate brass build-up at the base of the neck that can cause doughnuts to form.
The answer here is simply to use a cutter tip with a wider angle — 30 to 40 degrees. The cutter for the K&M neck-turning tool (above) has a shorter bevel that better matches a 30° shoulder. There is also a 40° tip available. PMA Tool and 21st Century Shooting also offer carbide cutters with a variety of bevel angles to exactly match your case shoulder angle*. WalkerTexasRanger reports: “I went to a 40-degree cutter head just to address this same issue, and I have been much happier with the results. The 40-degree heads are available from Sinclair Int’l for $15 or so.” Forum Member CBonner concurs: “I had the same problem with my 7WSM… The 40-degree cutter was the answer.” Below is Sinclair’s 40° Cutter for its NT-series neck-turning tools. Item NT3140, this 40° Cutter sells for $14.99. For the same price, Sinclair also sells the conventional 30° Cutter, item NT3100.
Al Nyhus has another clever solution: “The best way I’ve found to get around this problem is to get an extra shell holder and face it off .020-.025 and then run the cases into the sizing die. This will push the shoulder back .020-.025. Then you neck turn down to the ‘new’ neck/shoulder junction and simply stop there. Fireforming the cases by seating the bullets hard into the lands will blow the shoulder forward and the extra neck length you turned by having the shoulder set back will now be blended perfectly into the shoulder. The results are a case that perfectly fits the chamber and zero donuts.”
On our main AccurateShooter.com site, you’ll find a good article by GS Arizona on the Basics of Neck Turning. If you’re new to the neck-turning game, or are just looking for good tips on improving your neck-turning procedures, you should read that article. Below we offer some highlights and photos from the article, but you’ll need to read the whole story to view all the illustrations and follow all the procedures step by step.
Why Should You Consider Neck Turning?
Let’s assume that your rifle doesn’t have a tight neck chamber that requires neck turning; if you have a tight neck chamber, of course, the answer to the question is “because you have to”. For the rest of us, and that includes the vast majority of Highpower shooters, neck turning isn’t a requirement, but it can be a useful way to bring your ammunition a small but meaningful step closer to that pot of gold at the end of the rainbow: perfection. I’m not talking about a theoretical improvement, but a real one, an improvement that lies in equalizing and optimizing the neck tension of your loaded rounds. Inconsistent neck tension is a real contributor to increased muzzle velocity variance which itself is a significant factor in increased elevation dispersion at long range. So there’s our basic reason for neck turning: to equalize and optimize neck tension in order to reduce elevation dispersion.
The Tools of the Trade
Here you see everything I use and a bit more. The press, a cordless screwdriver (always plugged in, turning is tough on the old battery), a couple of K&M neck turners (one set up for 6mm, the other for .30 caliber) an expander for each size, some Imperial lube, an old toothbrush or two to keep the cutter clean, a handle with a caseholder (for those emergencies when the screwdriver dies and there’s just one more case to go!), steel wool and a tubing micrometer finish the list of tools. Hey, I left the dial calipers out of the picture! They’re always handy, keep them around, but they are useless for measuring neck thickness, so don’t try. I usually use an Optivisor magnifier while I turn necks, very handy for a clear view of what’s happening on the neck.
Expanding the Neck
Put some lube on the inside of the case neck and run it into the expander. Really, this isn’t hard. I prefer to expand each case immediately before turning it as opposed to expanding all the cases and then turning them. Brass is somewhat springy and will tend to go back toward its original size; therefore, by expanding and turning immediately, you are more likely to have all cases fit the mandrel with the same degree of tightness and to get a more consistent depth of cut.
Cutter Adjustment for Cut Depth and Length
All the tools I’ve seen have pretty good adjustment instructions. The only thing they don’t tell you is that you should have five to ten spare cases to get it right initially. Anything of the right diameter will do while you learn, for instance, just use that cheap surplus .308 brass to do initial setup and save the precious .30-06 for when you know what you’re doing. Be patient and make your adjustments slowly; you’ll need to set the cutter for thickness as well as length of cut (just into the shoulder). The depth of cut (brass thickness) takes a bit of fiddling, the length of the cut is generally easy to set.
The Finished Product — A Perfectly Uniform Neck
If you read the whole article, and follow the procedures using quality tools, you should get very good results — with a little practice. To demonstrate, here’s an example of my finished, neck-turned brass. You’ll see there is a perfect, 0.0125″ thick neck. It’s very uniform around the circumference, usually I only see 1 or 2 ten-thousandths variance. Now, with the necks uniformed like this, we can select the bushing size that will give us our preferred neck tension and experiment with various levels of tension, secure in the knowledge that all of the cases will actually have the desired neck tension.
About the author — “GS Arizona” was the writing handle for German Salazar, a top-tier rifleman and gun writer. Sadly, German passed from a medical condition in 2022. German was instrumental in helping this website and our Forum get started, and we remember him as a very dear, valued friend.
German was a great individual, and a great asset to the sport. An attorney by trade, with an engineering background, German was one of the very best gun writers, who had high master shooting skills to match his writing abilities.


 He who dies with the most toys wins — right? Well Sinclair has another interesting gadget you can add to your reloading bench. The Sinclair Case Neck Sorting Tool lets you quickly sort brass by neck-wall thickness. For those who shoot “no-turn” brass, this can improve neck-tension consistency. Large variances in neck-wall thickness can cause inconsistent neck “grip” on the bullet. Generally, we’ve found that more consistent neck tension will lower ES and (usually) improve accuracy. We know some guys who shoot no-turn 6mmBR brass in competition with considerable success — but their secret is pre-sorting their brass by neck-wall thickness. Cases that are out-of-spec are set aside for sighters (or are later skim-turned).
 If you’re using a body die or a full-length sizing die, try using Ballistol (in the aerosol can) as a lube. It works GREAT without the tacky or gooey residue left by most case lubes. It will also clean off carbon residues on the neck as you lube the case. Just spray a little on a cotton patch (or your fingertips) and wipe each case before you run it up into the die. If you are using a steel neck bushing, be sure to wipe the neck as well. You can usually do a half-dozen BR-sized cases before you need to re-apply Ballistol on the patch. Ballistol is non-toxic, bio-degradeable, and will not harm your skin. It is very slippery, but can easily be removed with a rag or paper towel. Try it–you may retire your One-Shot. Ballistol can also be used to protect wood stocks.
 For Neck-Turning, Try STP Blend or Assembly Lube
 Another even cheaper option is assembly lubricant. For turning his case necks, RStreich uses assembly lube from an auto parts store. He notes: “The brand I have is reddish in color and kind of sticky like honey. It’s far better than the Imperial die wax I was using before.” There are a variety of types, both with and without moly additive, and you can select the viscosity you prefer if you sample a few brands. Be sure to clean out any lube residue from the inside of your necks when you have completed your neck-turning.
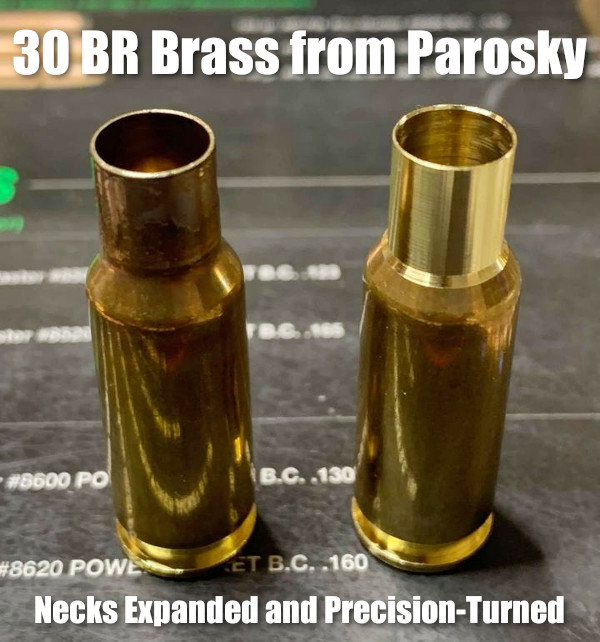


 When neck-turning cases, it’s a good idea to extend the cut slightly below the neck-shoulder junction. This helps keep neck tension more uniform after repeated firings, by preventing a build-up of brass where the neck meets the shoulder. One of our Forum members, Craig from Ireland, a self-declared “neck-turning novice”, was having some problems turning brass for his 20 Tactical cases. He was correctly attempting to continue the cut slightly past the neck-shoulder junction, but he was concerned that brass was being removed too far down the shoulder.